Feedback
Table Of Contents
PEAP/EAP-TLS Configuration Scenario
Summary of Configuration Steps
Step 1: Configure Security Certificates
Obtain Certificates and Copy Them to the ACS Host
Run the Windows Certificate Import Wizard to Install the Certificate
Enable Security Certificates on the ACS Installation
Step 2: Configure Global Authentication Settings
Step 3: Specify EAP-TLS Options
Step 4: (Optional) Configure Authentication Policy
PEAP/EAP-TLS Configuration Scenario
You can now select EAP-TLS as an inner method that is used within the tunnel that ACS establishes for PEAP authentication. If you select EAP-TLS, ACS can use it not only to encrypt the initial data sent through the PEAP protocol; but, once a secure tunnel is established between ACS and the NAD, to encrypt (for a second time) the data that is transmitted within the secure tunnel.
This enhanced encryption method greatly enhances the security of communications between ACS and the NAD.
Most customers who will use this feature are customers who use Microsoft supplicants.
Summary of Configuration Steps
To configure PEAP-TLS:
Step 1
Configure security certificates.
See Step 1: Configure Security Certificates for details.
Step 2
See Step 2: Configure Global Authentication Settings for details.
Step 3
See Step 3: Specify EAP-TLS Options for details.
The following sections provide more details about the previous steps.
Step 1: Configure Security Certificates
This section describes a simplified procedure for the ACS for Windows platform. For detailed information on installing certificates and for information on how to install certificates on the Cisco Secure ACS Solution Engine platform, see Chapter 9 of the User Guide for Cisco Secure ACS 4.1, "Advanced Configuration: Authentication and Certificates."
Obtain Certificates and Copy Them to the ACS Host
To use EAP-TLS, you must obtain and install security certificates.
To copy a certificate to the ACS host:
Step 1
Step 2
a.
b.
mkdir <selected_drive>:\Certs
where selected_drive is the currently selected drive.
Step 3
•
•
•
Run the Windows Certificate Import Wizard to Install the Certificate
To run the Windows Certificate Import wizard to install the certificate on the server:
Step 1
Step 2
where selected_drive is the currently selected drive.
Step 3
The Certificate dialog appears.
Step 4
The Windows Certificate Import wizard starts.
Step 5
Step 6
Note
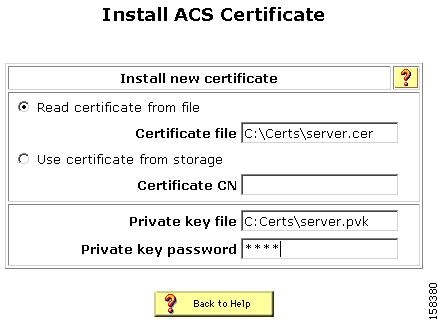
Enable Security Certificates on the ACS Installation
To enable security certificates:
Step 1
The System Configuration page opens.
Step 2
Step 3
Step 4
Figure 5-1 Install ACS Certificate Page
Step 5
Step 6
Step 7
Step 8
Step 9
Step 10
Step 11
Restart the services later, after you have completed the steps for adding a trusted certificate. See Add a Trusted Certificate.
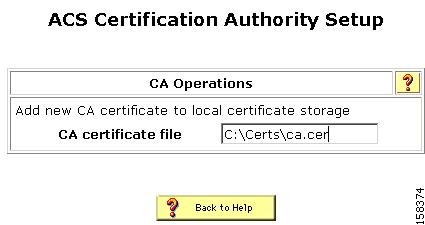
Install the CA Certificate
To install the CA Certificate:
Step 1
Step 2
Figure 5-2 ACS Certification Authority Setup Page
Step 3
Step 4
Add a Trusted Certificate
After you add a server certificate and set up the certificate authority, install a trusted certificate.
To add a trusted certificate:
Step 1
The Edit Certificate Trust List appears.
Step 2
For example, find the Stress certificate and check the check box next to it.
Step 3
Step 4
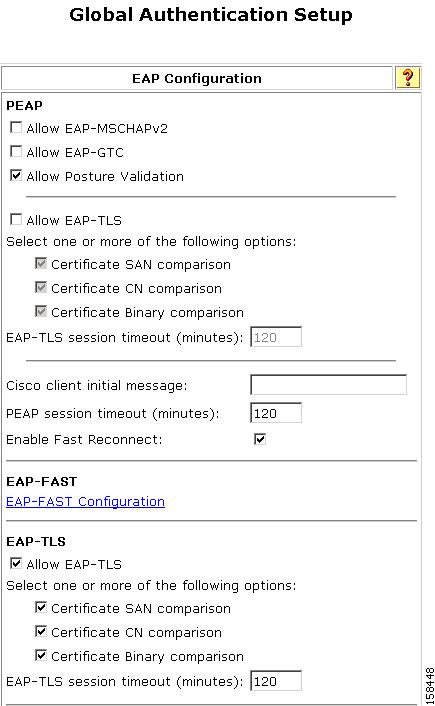
Step 2: Configure Global Authentication Settings
To configure global authentication settings:
Step 1
The System Configuration page opens.
Step 2
The Global Authentication Setup page opens, as shown in Figure 5-3.
Figure 5-3 Global Authentication Setup Page
Step 3
•
•
Step 4
Step 3: Specify EAP-TLS Options
Specify one or more of the certificate comparison options for EAP-TLS:
•
•
•
Step 4: (Optional) Configure Authentication Policy
The authentication policy that is available with PEAP has changed slightly with ACS 4.1.
You can now enable EAP-TLS when you set up an authentication policy in the protocols section of network access profile configuration.
Figure 5-4 shows the modified EAP configuration section on the NAP Protocols page.
Figure 5-4 EAP Configuration Section of NAP Protocols Page