Feedback
Table Of Contents
Step 2: Configure a RADIUS AAA Client
Step 3: Configure the Logging Level
Step 4: Install and Set Up an ACS Security Certificate
Obtain Certificates and Copy Them to the ACS Host
Run the Windows Certificate Import Wizard to Install the Certificate (ACS for Windows)
Enable Security Certificates on the ACS Installation
Step 5: Configure Remote Web Access
Step 6: Enable Downloadable ACLs and Network Access Filters
Step 7: Configure ACS for PEAP
Step 8: Configure ACS for EAP-FAST
Step 9: Configure Network Access Filtering
Step 10: Configure Logs and Reports
Step 11: Set Up Network Access Profiles
Step 12: Configure Profile-Based Policies
Create an Authorization Policy
Step 13: Configure Posture Validation for NAC
Configure Internal Posture Validation Policies
Configure External Posture Validation Policies
Configure an External Posture Validation Audit Server
Add the Posture Attribute to the ACS Dictionary
Configure the External Posture Validation Audit Server
Authorization Policy and NAC Audit
Step 14: Set Up Templates to Create NAPs
Sample NAC Layer 3 Profile Template
Protocols Policy for the NAC Layer 3 Template
Sample Posture Validation Rule
Sample Posture Validation Rule
Sample NAC Layer 2 802.1x Template
Sample Posture Validation Rule
Sample Wireless (NAC L2 802.1x) Template
Sample Posture Validation Rule
Using a Sample Agentless Host Template
Step 15: Map Posture Validation Components to Profiles
Step 16: Map an Audit Server to a Profile
Step 17 (Optional): Configure GAME Group Feedback
Import an Audit Vendor file Using CSUtil
Import a Device-Type Attribute File Using CSUtil
Import NAC Attribute-Value Pairs
Configure Database Support for Agentless Host Processing
Configure an External Audit Server
NAC Configuration Scenario
This chapter describes how to set up Cisco Secure Access Control Server 4.1, hereafter referred to as ACS, to work in a Cisco Network Admission Control (NAC) environment. This chapter contains the following sections:
•
Step 2: Configure a RADIUS AAA Client
•
•
•
•
•
•
•
•
•
•
•
•
•
•
•
Step 1: Install ACS
This section describes the installation process that you perform to run ACS, which runs on a Windows 2000 Server, Windows 2003, or on a Cisco Secure ACS Solution Engine (ACS SE).
For detailed information on ACS installation, refer to the:
•
•
To install ACS:
Step 1
During the installation process, you are prompted to enter a password for encrypting the internal database.
Step 2
The ACS installation process for ACS for Windows automatically creates a shortcut to the ACS administrative GUI on your desktop.
Note
http://www.cisco.com/en/US/products/sw/secursw/ps2086/
products_device_support_tables_list.htmlStep 3
Step 4
•
•
where IP_address is the IP address of the host that is running ACS and hostname is the hostname of the host that is running ACS.
Step 2: Configure a RADIUS AAA Client
Before you can configure agentless host support, you must configure a RADIUS AAA client.
To configure a RADIUS AAA client:
Step 1
The Network Configuration page opens.
Step 2
•
•
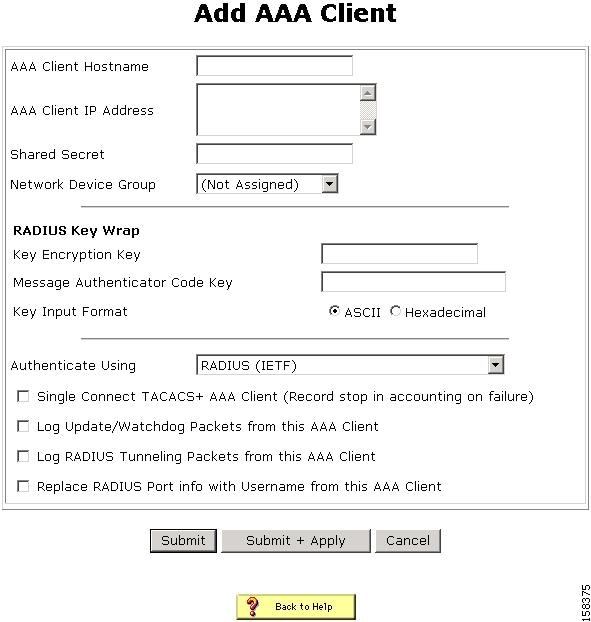
The Add AAA Client page opens, shown in Figure 7-1.
Figure 7-1 Add AAA Client Page
Step 3
Step 4
Step 5
Step 6
Step 7
Each key must be unique, and must also be distinct from the RADIUS shared key. You can configure these shared keys for each AAA Client, as well as for each NDG. The NDG key configuration overrides the AAA Client configuration. If the key entry is null, ACS uses the AAA client key. You must enable the Key Wrap feature in the NAP Authentication Settings page to implement these shared keys in EAP-TLS authentication:
a.
b.
c.
Step 8
Step 9
Step 10
Step 3: Configure the Logging Level
To set ACS to full logging capabilities:
Step 1
The System Configuration page opens.
Step 2
Step 3
Step 4
Step 5
Step 4: Install and Set Up an ACS Security Certificate
This section describes a simplified procedure for the ACS for Windows platform. For detailed information on installing certificates and for information on how to install certificates on the Cisco Secure ACS Solution Engine platform, see Chapter 9 of the User Guide for Cisco Secure ACS 4.1, "Advanced Configuration: Authentication and Certificates."
Obtain Certificates and Copy Them to the ACS Host
To copy a certificate to the ACS host:
Step 1
Step 2
a.
b.
mkdir <selected_drive>:\Certs
where selected_drive is the currently selected drive.
Step 3
•
•
•
Run the Windows Certificate Import Wizard to Install the Certificate (ACS for Windows)
To run the Windows Certificate Import wizard to install the certificate on the server:
Step 1
Step 2
Step 3
The Certificate dialog appears.
Step 4
The Windows Certificate Import wizard starts.
Step 5
Step 6
Note
Enable Security Certificates on the ACS Installation
To enable security certificates on the ACS installation:
Step 1
The System Configuration page opens.
Step 2
Step 3
Step 4
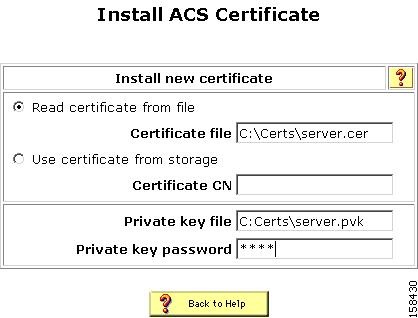
Figure 7-2 Install ACS Certificate Page
Step 5
Step 6
Step 7
Step 8
Step 9
Step 10
Step 11
Restart the services later, after you have completed the steps for adding a trusted certificate. See Add a Trusted Certificate.
Install the CA Certificate
To install the CA Certificate:
Step 1
Step 2
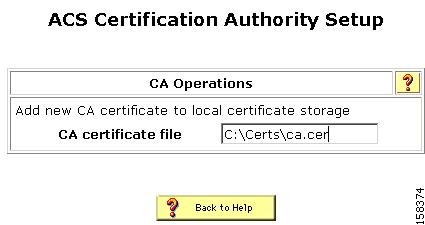
Figure 7-3 ACS Certification Authority Setup Page
Step 3
Step 4
Add a Trusted Certificate
To add a trusted certificate:
Step 1
The Edit Certificate Trust List appears.
Step 2
Step 3
Step 4
Step 5: Configure Remote Web Access
To prepare ACS for remote administration:
Step 1
The System Configuration page opens.
Step 2
The Administration Control page opens, as shown in Figure 7-4.
Figure 7-4 Administration Control Page
Step 3
The Add Administrator page opens.
Step 4
Step 5
This grants all privileges to the new administrator; or, specifies to which groups or actions this administrator is granted access.
Note
Step 6
After performing these steps, from a remote host, you can open a browser in which to administer ACS.
The URLs for remote access are:
•
•
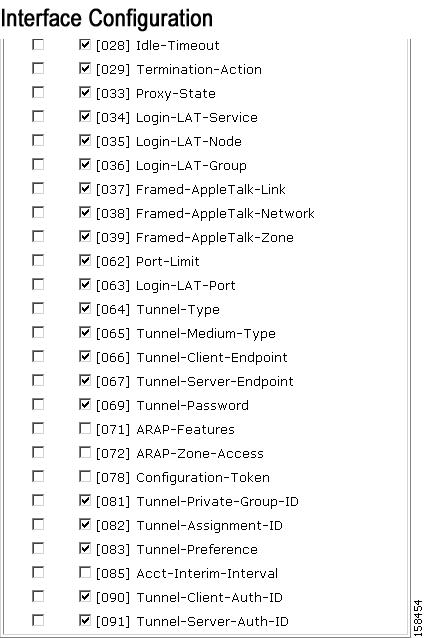
Step 6: Enable Downloadable ACLs and Network Access Filters
To enable downloadable access control lists (dACLs) and Network Access Filters (NAFs), which are required to create Network Access Profiles (NAPs):
Step 1
The Interface Configuration page opens.
Step 2
The Advanced Options page appears, shown in Figure 7-5.
Figure 7-5 Advanced Options Required to Enable Network Access Profiles
Step 3
•
•
Step 4
Step 7: Configure ACS for PEAP
To configure ACS so that PEAP will work properly with NAC posture validation:
Step 1
The System Configuration page opens.
Step 2
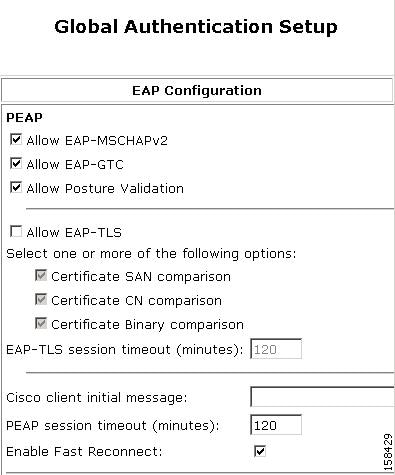
The Global Authentication Setup Page appears, as shown in Figure 7-6.
Figure 7-6 Global Authentication Setup Page
Step 3
Step 4
Step 5
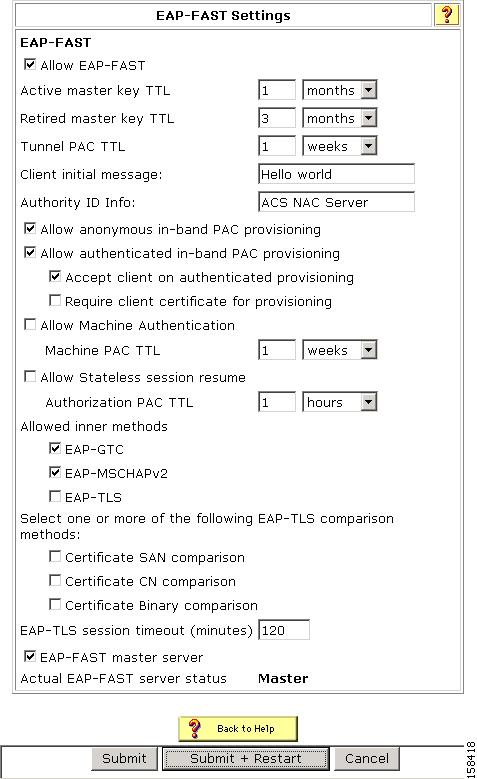
Step 8: Configure ACS for EAP-FAST
To configure ACS to work with NAC and use EAP-FAST will with posture validation:
Step 1
The System Configuration page opens.
Step 2
The Global Authentication Setup Page appears, as shown in Figure 7-6.
Step 3
The EAP FAST Configuration page appears, as shown in Figure 7-7.
Figure 7-7 EAP-FAST Configuration Page
Step 4
Step 5
Step 6
Step 7
Step 8
Step 9
The EAP-FAST Master Server check box is automatically checked (enabled).
Step 10
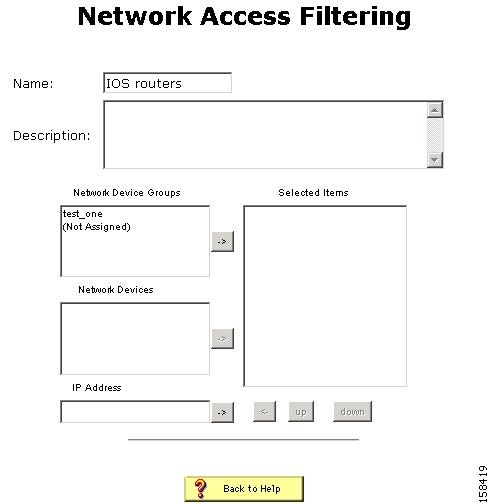
Step 9: Configure Network Access Filtering
To use ACS in a NAC environment, configure network access filtering (NAF).
NAF is an ACS feature that groups several devices into one group. The devices can be ACS clients, ACS servers, ACS network device groups (NDGs), or a specific IP address. NAFs are particularly useful for defining Network Access Profiles (NAPs).
To configure ACS to use NAFs:
Step 1
The Interface Configuration page opens.
Step 2
Step 3
Click Submit.
Step 4
The Shared Profile Components page opens.
Step 5
The Network Access Filtering table appears. Initially, this table does not contain shared profile components.
Step 6
The Edit Network Access Filtering page opens, as shown in Figure 7-8.
Figure 7-8 Edit Network Access Filtering Page
Step 7
Step 8
To move a device or device group, select the item to move and then click the right arrow button to move it to the Selected Items list.
Step 9
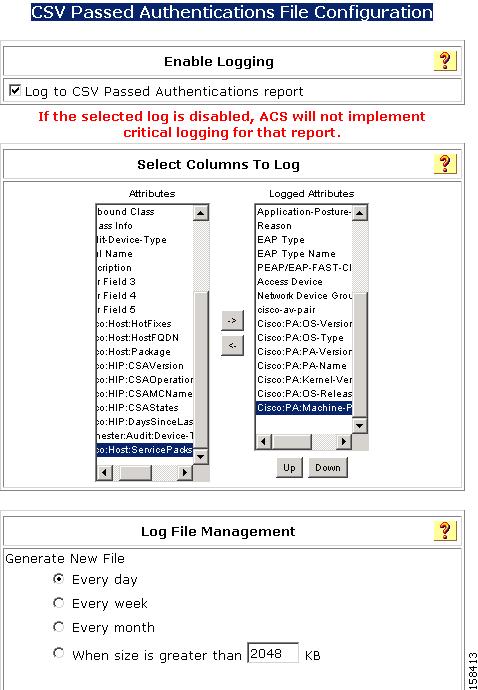
Step 10: Configure Logs and Reports
ACS logs records of users who gain network access or are refused network access. The ACS reports summarize these logs, and provide useful information for debugging and tracking problems.
The Passed Authentications report is particularly useful in NAC-enabled networks; because, it shows the group mapping for each posture validation request. By default, the Passed Authentication report is unchecked (disabled).
To enable the Passed Authentication report:
Step 1
The System Configuration page opens.
Step 2
The Logging Configuration page opens.
Step 3
The CSV Passed Authentications File Configuration page opens, as shown in Figure 7-9.
Figure 7-9 CSV Passed Authentications File Configuration Page
Step 4
Step 5
Some useful attributes to log are:
•
•
•
•
•
Step 6
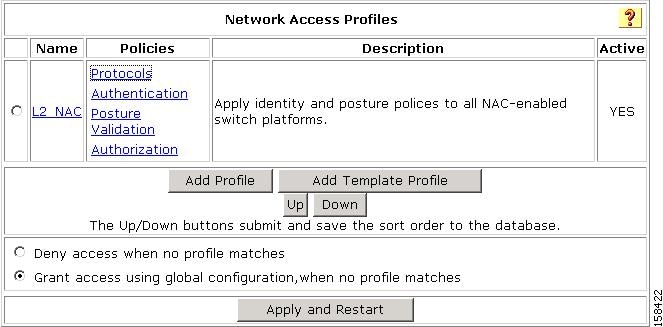
Step 11: Set Up Network Access Profiles
A NAP, also known as a profile, is a way to classify access requests according to the AAA clients' IP addresses, membership in a network device group, protocol types, or other specific RADIUS attribute values sent by the network device through which the user connects.
If you configure NAPs, ACS traverses the ordered list of active profiles, and maps a RADIUS transaction to a profile by using a first-match strategy on the first access-request of the transaction.
After you set up a profile, you associate a set of rules or policies with it, to reflect your organization's security policies. These associations are called profile-based policies. Configuring a profile-based policy includes creating rules for:
•
•
•
•
A profile is a classification of network access requests for applying a common policy.
You can create a profile in two ways:
•
•
When you set up a NAP, you can configure:
•
•
•
•
•
•
ACS uses three conditions to determine how an access request is classified and mapped to a profile. ACS selects the profile when all three conditions match. For each condition, you can substitute the value Any to always match the condition.
You can classify (filter) a user request by choosing a NAF from the list of existing NAFs. You configure NAF objects in the Shared Profile Components pages.
You can use protocol types to choose one or more protocol types as a filter. The protocol types are a subset of the vendor-specific attributes (VSAs) that a network access server supports. ACS 4.1 does not support the TACACS+ protocol for NAPs.
You can use Advanced Filtering to create a specific rule that contains one or more RADIUS attributes and values. The Advanced Filtering rules are based on a Boolean AND expression that uses RADIUS attributes to examine the request packet.
Each NAP contains a name, description, active flag and a set of classifications that you use to rank an access request based on different parameters.
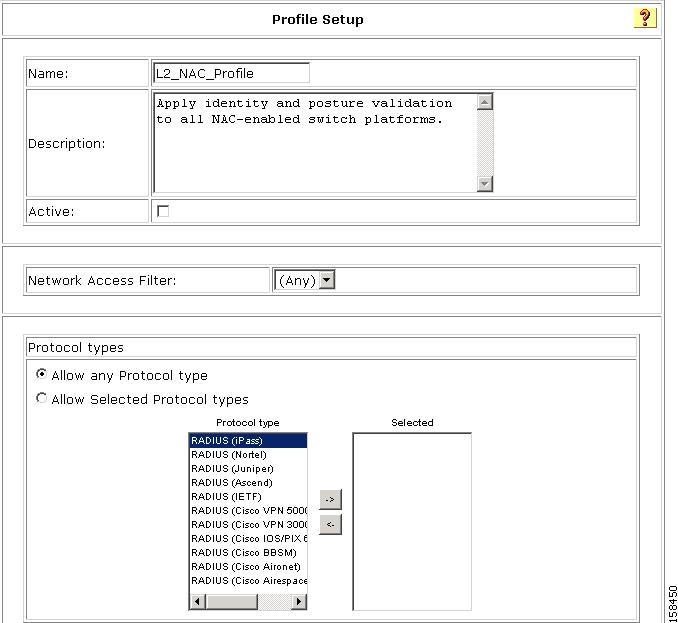
Create a NAP
To create a NAP:
Step 1
The Network Access Profiles page opens. Initially, the list of Network Access Profiles is empty.
Step 2
The Profile Setup page opens, as shown in Figure 7-10.
Figure 7-10 Profile Setup Page
Step 3
Step 4
Step 5
Step 6
Step 12: Configure Profile-Based Policies
After you create a profile, configure the policies to associate with that profile. The available policies are:
•
•
•
•
To configure profile-based policies:
Step 1
The Edit Network Access Profiles page opens, as shown in Figure 7-11.
Figure 7-11 Edit Network Access Profiles Page
Step 2
•
•
•
•
Configure Protocol Settings
To configure protocol settings:
Step 1
The Protocols Settings page for the selected profile opens.
Step 2
Step 3
Step 4
Step 5
Configure Authentication
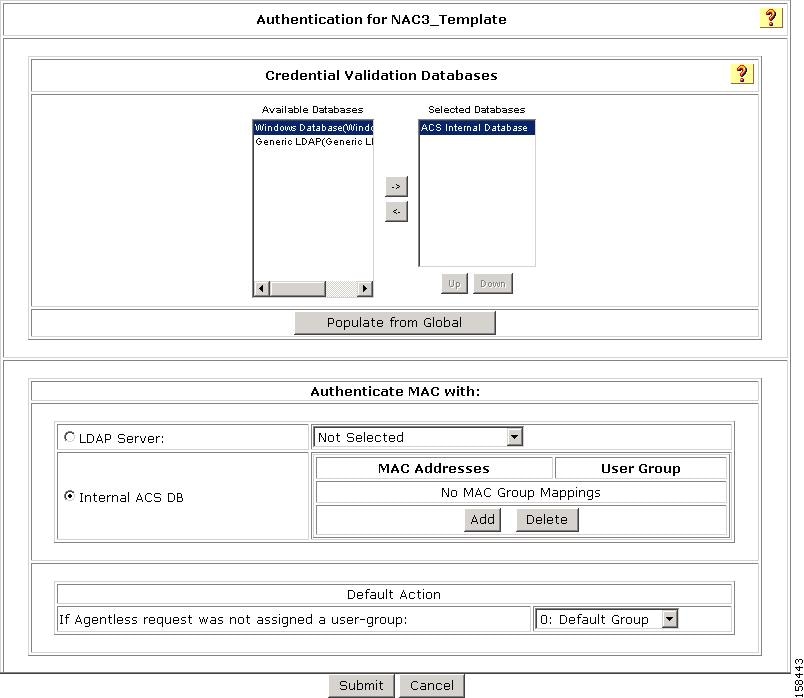
The Authentication page for a specified profile controls how a profile authenticates matched requests and which user-validation databases ACS uses for authentication.
The Authentication page list the databases that were configured in the External User Databases section. These databases are mapped to ACS user groups based on the mapping rules defined in External User Databases > Databases Group Mapping.
To configure profile authentication settings:
Step 1
The Edit Authentication page for the selected profile opens. Figure 7-12 shows an example.
Figure 7-12 Edit Authentication Page for a Selected Profile
Step 2
Step 3
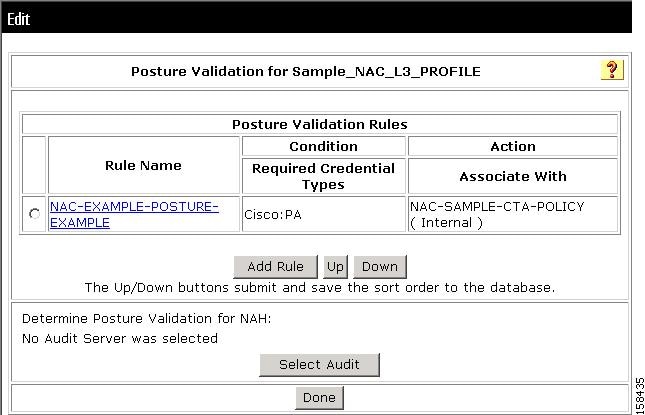
Configure Posture Validation
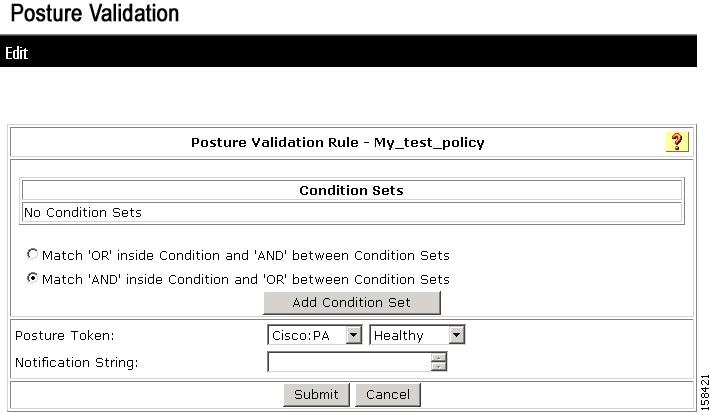
Posture validation rules define how ACS performs posture validation. Each posture validation rule specifies a condition and associated actions. The condition contains a set of required credential types, and the action contains a list of external posture validation servers (optional) and internal posture validation polices.
Posture Validation rules also contain:
•
•
•
•
•
•
ACS evaluates posture rules by using a first-match strategy. ACS calculates the "worst" token that is returned based on the selected internal policies and information that the external posture servers send.
If the client is a nonresponsive host (NRH), ACS uses a specified audit server to audit the client.
Audit Servers are Cisco and third-party servers that determine posture information about a host without relying on the presence of a PA. These types of hosts are also called agentless hosts. The Cisco PA is called the Cisco Trust Agent. ACS uses audit servers to assess posture validation based on an organization's security policy.
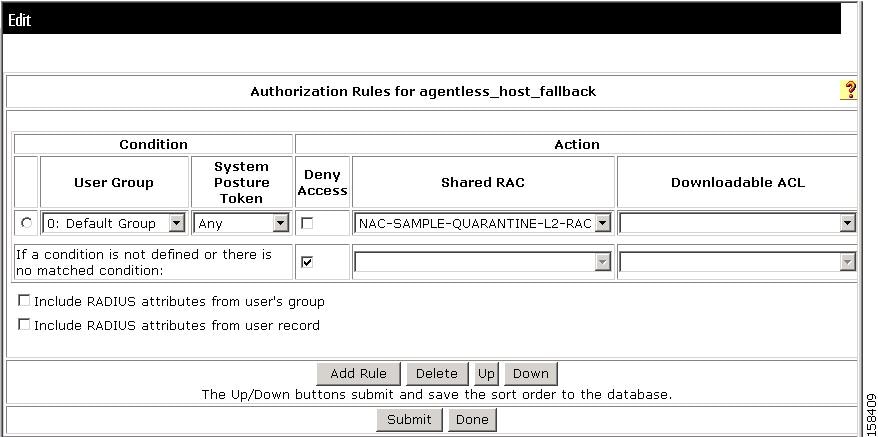
Configure Authorization
A profile-based authorization policy is a set of conditions that ACS uses to authenticate users to the network. ACS associates the conditions that you specify in the authorization policy with actions that determine which RAC and downloadable ACLs are returned to the network device.
When you configure an authorization policy, you can also specify whether access to the network is denied for a specific user group; or, in a NAC network, denied based on a returned posture token. Authorization policies are tied not only to the user identity, but also to the profile type to which a user is mapped and the posture of the machine used to access the network.
Note
An authorization rule has this form:
If (user-group = selected-user-group and posture-token = selected-posture-token),
then provision (selected-RAC and selected-dACL)
You can also use the authorization rules to explicitly deny (send an access-reject) as an action. If you check the Include RADIUS attributes from user-group/user check box, ACS merges the RADIUS attributes defined in the user configuration, user-groups, and RAC. This process is:
1.
2.
a.
b.
c.
Create an Authorization Policy
To create an authorization policy for a profile:
Step 1
The Edit Authorization Rules page for the selected profile opens. Figure 7-13 shows an example.
Figure 7-13 Edit Authorization Policy Page
Step 2
Step 3
Note
Step 4
Step 5
Step 6
Define ACLs
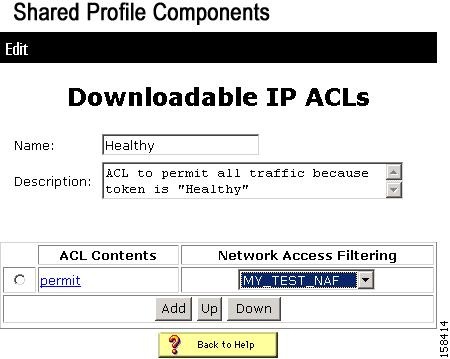
In ACS 4.1, you can download access lists to specific devices or device groups.
You can define an access list that contains one or more ACLs and later download the list to network devices, based on their assignments to user groups. Before you define ACLS, enable downloadable ACLs.
To define an ACL:
Step 1
A list of downloadable IP ACLs appears, as shown in Figure 7-14:
Figure 7-14 Downloadable IP ACL List
Step 2
The Edit Downloadable IP ACLs page opens, as shown in Figure 7-15.
Figure 7-15 Downloadable IP ACLs Page
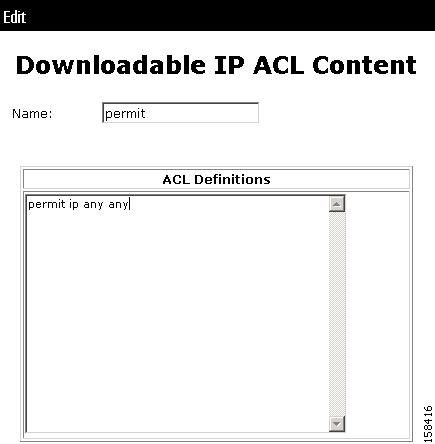
Each Assessment Result (system posture token), according to its definition, should have its own ACL, which contains one or more Access Control Entries (ACEs) that will instruct the NAC network device (router) to block packets from going to a specific destination or allow packets to reach a specific destination.
Step 3
Note
Step 4
The Downloadable IP ACL Content page opens, as shown in Figure 7-16.
Figure 7-16 Downloadable IP ACL Content Page
Step 5
Step 6
ACL definitions consist of a series of permit and deny statements that permit or deny access for specified hosts. For information on the syntax for ACL definitions, see the "Downloadable ACLs" section of Chapter 4 of the User Guide for Cisco Secure Access Control Server 4.1, "Shared Profile Components."
Step 7
Note
The Downloadable ACL page appears with the new ACL in the ACL Contents list, as shown in Figure 7-17.
Figure 7-17 Downloadable ACL Contents List with New Content
Step 8
You perform this action to enable the downloading of different ACEs for different devices or a group of devices. For example, the syntax of an ACE on routers differs from the syntax on a Project Information Exchange (PIX) firewall. By using a NAF, you can assign the same ACL to a PIX and a router, even though the actual ACE that is downloaded is different.
Step 9
The new ACL appears on the list of downloadable ACLs.
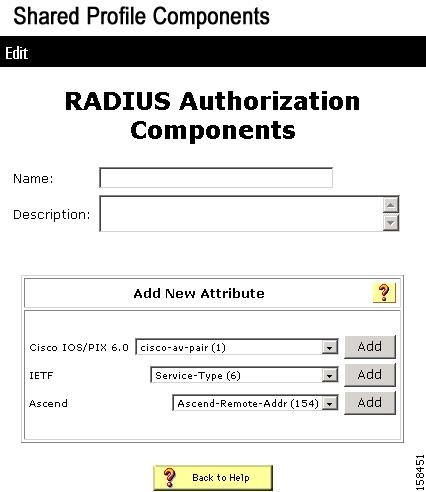
Create a RAC
Shared RADIUS Authorization Components (RACs) contain groups of RADIUS attributes that you can dynamically assign to user sessions based on a policy. For example, you can create a RAC that gathers RADIUS attributes to define a VLAN. By using NAP configuration, you can define a policy that ACS uses to apply conditions specified in Network Access Filters (grouped NDGs), and in posture assessment rules to the shared RAC.
To define RACs:
Step 1
a.
b.
Figure 7-18 Tunnel Attributes for RACs Used in NAC Configuration:
c.
d.
To restart the system, choose System Configuration > Service Control and then click Restart.
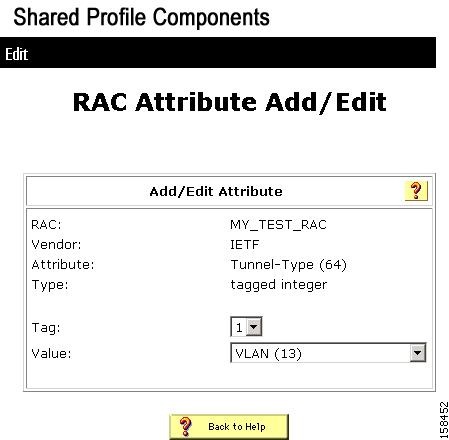
Step 2
a.
The RADIUS Authorization Components page for Tunnel type (64) opens, as shown in Figure 7-19.
Figure 7-19 RADIUS Authorization Components Page
b.
c.
The RAC Attribute Add/Edit page opens, as shown in Figure 7-20.
Figure 7-20 RAC Attribute Add/Edit Page
d.
Step 3
Step 4
Step 13: Configure Posture Validation for NAC
This section describes how to set up simple posture validation for a NAC-enabled network. You can create internal policies that ACS uses to validate the posture data or you can configure ACS to send the posture data to an external posture validation server.
Configure Internal Posture Validation Policies
An internal posture validation policy is an internal attribute policy that you can use in more then one profile. The result of an internal posture validation policy returns a Posture Assessment (token) according to rules that you set.
To create an internal posture validation policy:
Step 1
The Posture Validation Components Setup page opens.
Step 2
The Posture Validation page opens, which lists any existing posture validation policies.
Step 3
The Edit Posture Validation page opens.
Step 4
Step 5
Step 6
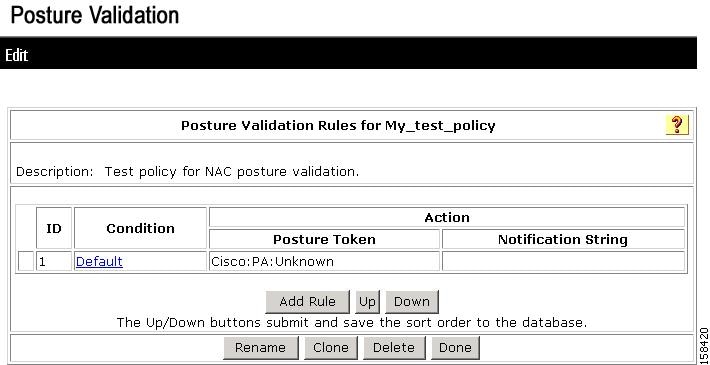
A new internal policy is created with a default rule. Figure 7-21 shows an example policy.
Figure 7-21 Creating a New Posture Validation Policy
Step 7
a.
b.
Step 8
a.
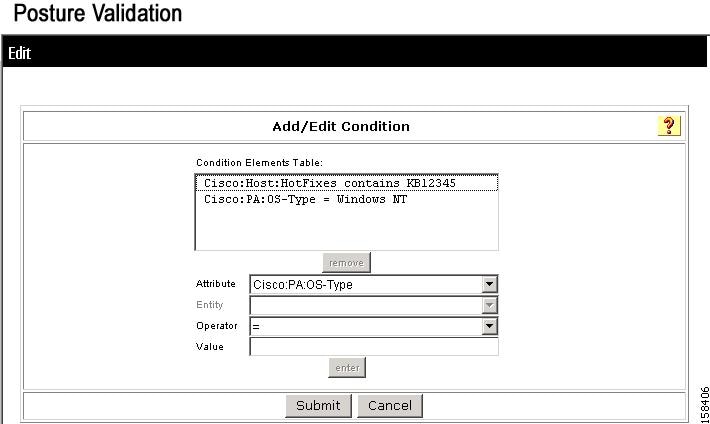
The Edit Posture Rule page appears, as shown in Figure 7-22. Initially no conditions are available for the rule.
Figure 7-22 Edit Posture Validation Rule Page
b.
c.
Figure 7-23 Add/Edit Condition Page
d.
e.
f.
g.
The specified rule appears in Add/Edit Condition page appears, as shown in Figure 7-23.
h.
i.
j.
For information on creating advanced rules, see Configure Posture Validation.
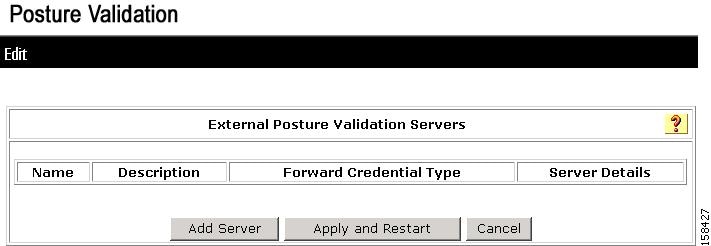
Configure External Posture Validation Policies
An external posture validation policy uses an external server that returns a posture assessment (token) to ACS according to data that the ACS forwards to this server.
To set up an external posture validation server:
Step 1
Step 2
Figure 7-24 Edit External Posture Validation Servers Page
Initially, the list of external posture validation servers is empty.
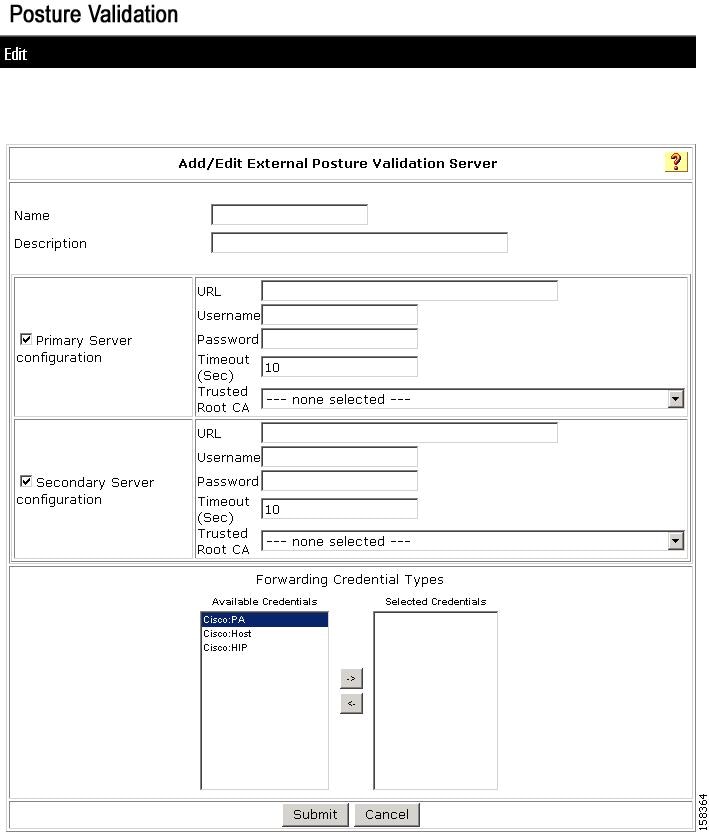
Step 3
The Add/Edit External Posture Validation Server page appears, as shown in Figure 7-25.
Figure 7-25 Add/Edit External Posture Validation Server Page
Step 4
Step 5
Step 6
Configure an External Posture Validation Audit Server
A NAC-enabled network might include agentless hosts that do not have the NAC client software. ACS can defer the posture validation of the agentless hosts to an audit server. The audit server determines the posture credentials of a host without relying on the presence of a PA.
Configuring an external audit server involves two stages:
•
•
Add the Posture Attribute to the ACS Dictionary
Before you can create an external posture validation server, you must add one or more vendor attributes to the ACS internal data dictionary. To do this, you use the bin\CSUtil tool, which is located in the ACS installation directory.
To add the posture attributes:
Step 1
[attr#0]vendor-id=[your vendor id]vendor-name=[The name of you company]application-id=6application-name=Auditattribute-id=00003attribute-name=Dummy-attrattribute-profile=outattribute-type=unsigned integerYour vendor ID should be the Internet Assigned Numbers Authority (IANA)-assigned number that is the first section of the posture token attribute name, [vendor]:6:
Step 2
a.
b.
\<ACS_Install_Dir>\bin\CSUtil -addAVP [file_name]
where ACS_Install_Dir is the name of the ACS installation directory and file_name is the name of the text file that contains vendor attributes.
Step 3
Configure the External Posture Validation Audit Server
You can configure an audit server once, and then use it for other profiles.
To configure an audit server:
Step 1
Step 2
The External Posture Validation Audit Server Setup page appears, as shown in Figure 7-26.
Figure 7-26 External Posture Validation Audit Server Setup Page
Step 3
a.
b.
c.
d.
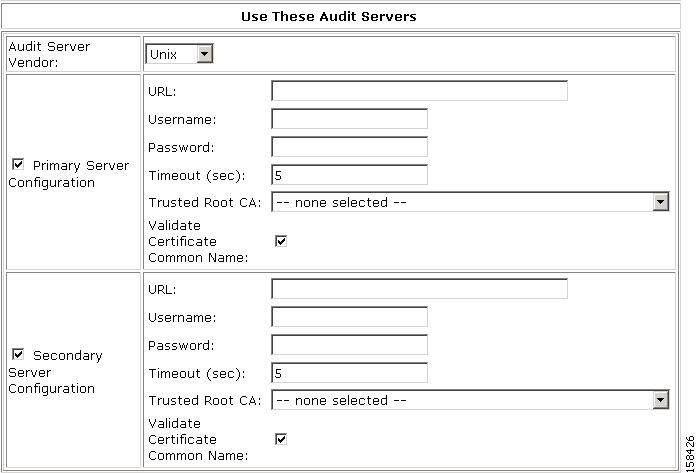
Figure 7-27 shows the Use These Audit Servers section of the External Posture Validation Server Setup page.
Figure 7-27 Use These Audit Servers Section
e.
Figure 7-28 shows the Audit Flow Settings and the GAME Group Feedback section.
Figure 7-28 Audit Flow Settings and GAME Group Feedback Sections
f.
g.
For information on configuring GAME Group Feedback settings, see Enable GAME Group Feedback.
h.
Authorization Policy and NAC Audit
Audit servers define two types of posture assessments (tokens). A:
•
•
Note
Step 14: Set Up Templates to Create NAPs
ACS 4.1 provides several profile templates that you can use to configure common usable profiles. In NAC-enabled networks, you can use these predefined profile templates to configure commonly used profiles. This section describes the templates provided in ACS 4.1.
Sample NAC Profile Templates
ACS 4.1 provides the following sample profile templates for NAC. A:
•
•
•
•
In addition to these templates, ACS 4.1 provides two templates for agentless host processing that you can use in NAC installations:
•
•
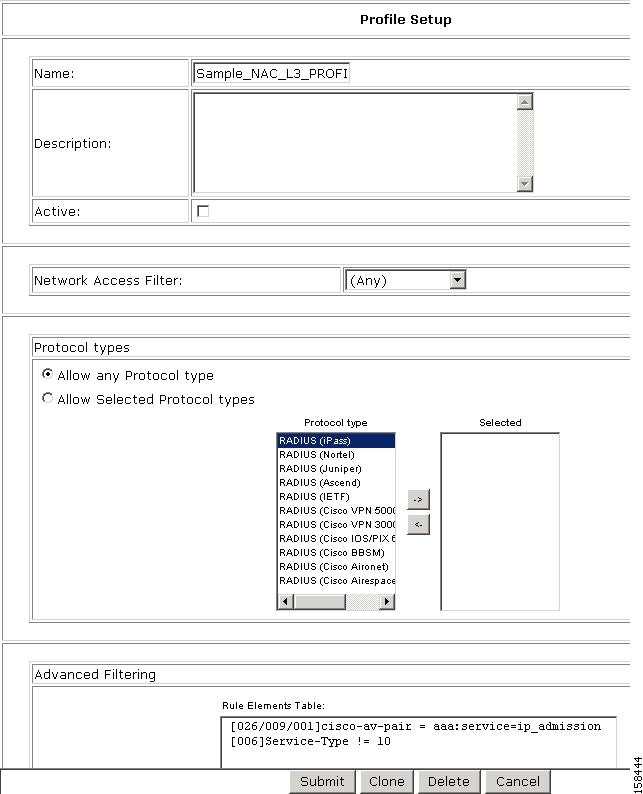
Sample NAC Layer 3 Profile Template
This template creates a profile for Layer 3 NAC requests. Before you use this template, you should choose System Configuration > Global Authentication Setup and check the Enable Posture Validation check box.
To create a Layer 3 NAC profile template:
Step 1
•
•
•
•
Step 2
The Network Access Profiles page opens.
Step 3
The Create Profile from Template page opens, as shown in Figure 7-29.
Figure 7-29 Create Profile From Template Page
Step 4
Step 5
Step 6
Step 7
If no error appears, then you have created a profile that can authenticate Layer 3 NAC hosts.
The Edit Network Access Profile page opens, and the new profile appears in the Name column.
The predefined values for the Layer 3 NAC template include:
•
•
•
•
Step 8
•
•
•
•
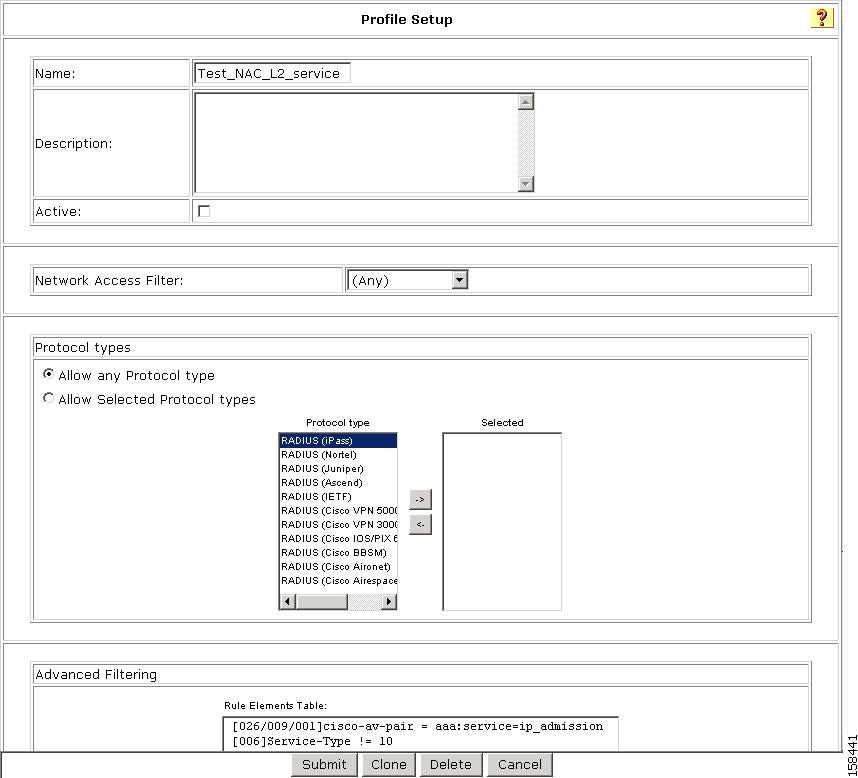
Profile Setup
To use the Profile Setup settings from the template:
Step 1
Step 2
Step 3
Figure 7-30 Profile Setup Page for Layer 3 NAC Template
The default settings for the profile are:
•
You can choose NAFs from the drop-down list, so that only specific host IPs match this profile.
•
•
•
[026/009/001]Cisco-av-pair = aaa:service=ip admission[006]Service-Type != 10These rules specify that the associated profile policies authenticate and authorize each RADIUS request that matches the attribute's rules. You can change the advanced filter, and add, remove, or edit any RADIUS attribute that the RADIUS client sends.
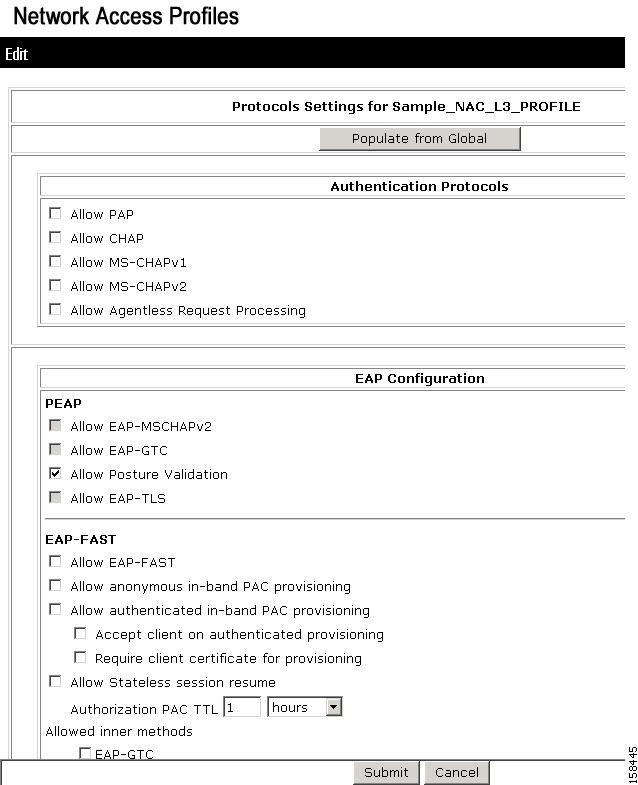
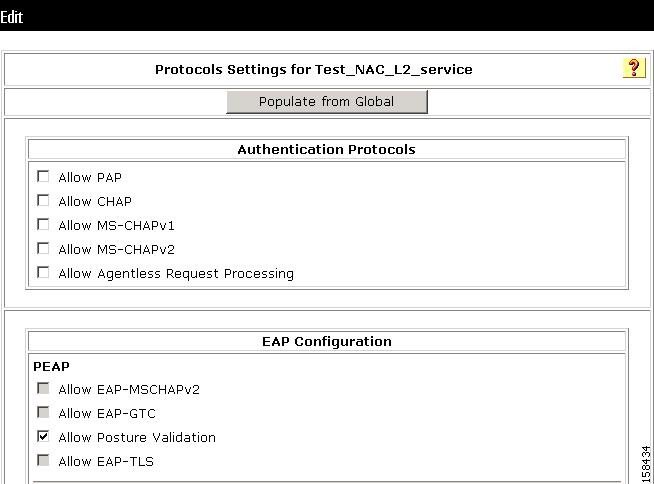
Protocols Policy for the NAC Layer 3 Template
Figure 7-31 shows the Protocols settings for the NAC Layer 3 template.
Figure 7-31 Protocols Setting for NAC Layer 3 Template
In the EAP Configuration section, Posture Validation is enabled.
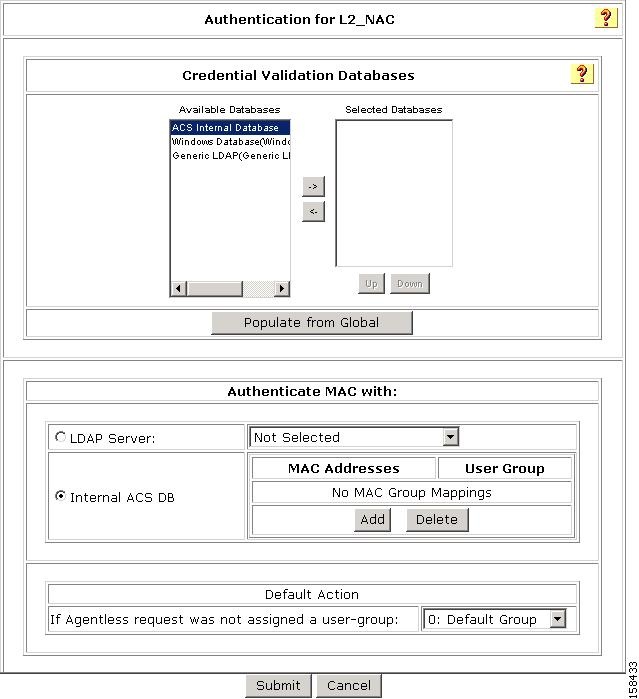
Authentication Policy
To configure authentication policy:
Step 1
Step 2
The Authentication page for the profile opens, as shown in Figure 7-32.
Figure 7-32 Authentication Page for Layer 3 NAC Profile Template
On this page, you can see the Layer 3 NAC template configuration for authentication:
Step 3
a.
b.
c.
Sample Posture Validation Rule
Figure 7-33 shows the sample posture validation policy provided with the NAC Layer 3 template.
Figure 7-33 Sample Posture Validation Policy for NAC Layer 3 Template
Sample NAC Layer 2 Template
This template creates a profile for Layer 2 NAC requests.
Before you use the Layer 2 NAC profile template:
1.
2.
3.
To create a Layer 2 NAC profile template:
Step 1
The Network Access Profiles page opens.
Step 2
Step 3
Step 4
Step 5
Step 6
If no error appears, then you have created a Profile that can authenticate Layer 2 NAC hosts and the Profile Setup page for the NAC Layer 2 template appears.
The predefined values for the Layer 2 NAC template include:
•
•
•
•
The name of this policy is NAC-EXAMPLE-POSTURE-EXAMPLE.
Step 7
Profile Setup
To enable the profile setup:
Step 1
Step 2
The Profile Setup page appears, as shown in Figure 7-34.
Figure 7-34 Profile Setup Page for NAC Layer 2 Template
The default settings for the profile are:
•
You can choose NAFs from the drop-down list, so that only specific host IPs match this profile.
•
•
•
[026/009/001]Cisco-av-pair = aaa:service=ip admission[006]Service-Type != 10These rules specify that the associated profile policies authenticate and authorize each RADIUS request that matches the attribute's rules. You can change the advanced filter, and add, remove, or edit any RADIUS attribute that the RADIUS client sends.
This template automatically sets Advanced Filtering and Authentication properties with NAC Layer 2 IP Configuration.
ACS and Attribute-Value Pairs
When you enable NAC Layer 2 IP validation, ACS provides NAC AAA services by using RADIUS. ACS gets information about the antivirus credentials of the endpoint system and validates the antivirus condition of the endpoint.
You can set these Attribute-Value (AV) pairs on ACS by using the RADIUS cisco-av-pair vendor- specific attributes (VSAs).
•
#ACL#-IP-name-number
where name is the ACL name and number is the version number, such as 3f783768.
ACS uses the Auth-Proxy posture code to check if the switch has downloaded access-control entries (ACEs) for the specified downloadable ACL. If the switch has not downloaded the ACES, ACS sends an AAA request with the downloadable ACL name as the username so that the switch downloads the ACEs. The downloadable ACL is then created as a named ACL on the switch. This ACL has ACEs with a source address of Any and does not have an implicit Deny statement at the end. When the downloadable ACL is applied to an interface after posture validation is complete, the source address is changed from any to the host source IP address. The ACEs are prepended to the downloadable ACL that is applied to the switch interface to which the endpoint device is connected.
If traffic matches the Cisco Secure-Defined-ACL ACEs, ACS takes appropriate actions required by NAC.
•
— url-redirect = <HTTP or HTTPS URL>
— url-redirect-acl = switch ACL name
These AV pairs enable the switch to intercept an HTTP or Secure HTTP (HTTPS) request from the endpoint device and forward the client web browser to the specified redirect address from which the latest antivirus files can be downloaded. The url-redirect AV pair on the ACS contains the URL to which the web browser will be redirected. The url-redirect-acl AV pair contains the name of an ACL which specifies the HTTP or HTTPS traffic to be redirected. The ACL must be defined on the switch. Traffic which matches a permit entry in the redirect ACL will be redirected.
If the host's posture is not healthy, ACS might send these AV pairs.
For more information about AV pairs that Cisco IOS software supports, see the documentation about the software releases that run on the AAA clients.
Default ACLs
If you configure NAC Layer 2 IP validation on a switch port, you must also configure a default port ACL on a switch port. You should also apply the default ACL to IP traffic for hosts that have not completed posture validation.
If you configure the default ACL on the switch and the ACS sends a host access policy to the switch, the switch applies the policy to traffic from the host that is connected to a switch port. If the policy applies to the traffic, the switch forwards the traffic. If the policy does not apply, the switch applies the default ACL. However, if the switch gets a host access policy from the ACS, but the default ACL is not configured, the NAC Layer 2 IP configuration does not take effect.
When ACS sends the switch a downloadable ACL that specifies a redirect URL as a policy-map action, this ACL takes precedence over the default ACL that is already configured on the switch port. The default ACL also takes precedence over the policy that is already configured on the host. If the default port ACL is not configured on the switch, the switch can still apply the downloadable ACL from ACS.
You use this template for access requests from Layer 2 devices that do not have the 802.1x client installed. The Authentication Bypass (802.1x fallback) template is used for access requests to bypass the nonclient authentication process. Users are mapped to a User Group based on their identity.
Note
Protocols Settings
Figure 7-35 shows the Protocols settings for the NAC Layer 2 template.
Figure 7-35 Protocols Setting for NAC Layer 2 Template
On this page, you can see the Layer 2 NAC template configuration for protocols. The default settings are:
•
•
Authentication Policy
To set the authentication policy:
Step 1
Step 2
The Authentication Settings page for the NAC Layer 2 template opens, as shown in Figure 7-36.
Figure 7-36 Authentication Settings for NAC Layer 2 Template
Step 3
a.
b.
c.
Sample Posture Validation Rule
Figure 7-37 shows the sample posture validation rule provided with the NAC Layer 2 template.
Figure 7-37 Sample Posture Validation Policy for NAC Layer 2 Template
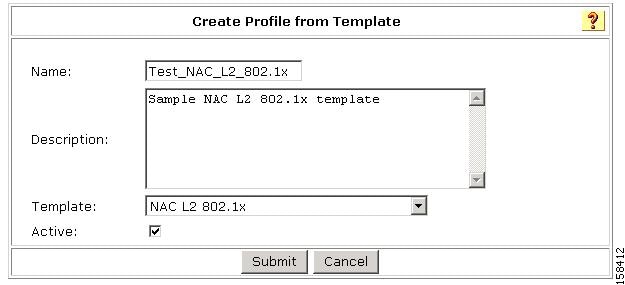
Sample NAC Layer 2 802.1x Template
This template creates a profile for Layer 2 NAC 802.1x requests. Before you use this template, you should choose System Configuration > Global Authentication Setup and check the Enable Posture Validation check box.
To create a Layer 2 NAC 802.1x profile template:
Step 1
The Network Access Profiles page opens.
Step 2
The Create Profile from Template page opens, as shown in Figure 7-38.
Figure 7-38 Create Profile From Template Page
Step 3
Step 4
Step 5
Step 6
If no error appears, then you have created a Profile that can authenticate Layer 2 NAC hosts.
The Edit Network Access Profile page opens, and the new profile appears in the Name column.
The predefined values for the Layer 2 NAC 802.1x template include:
•
•
•
•
Step 7
•
•
•
•
Profile Setup
To use the Profile Setup settings from the template:
Step 1
Step 2
Step 3
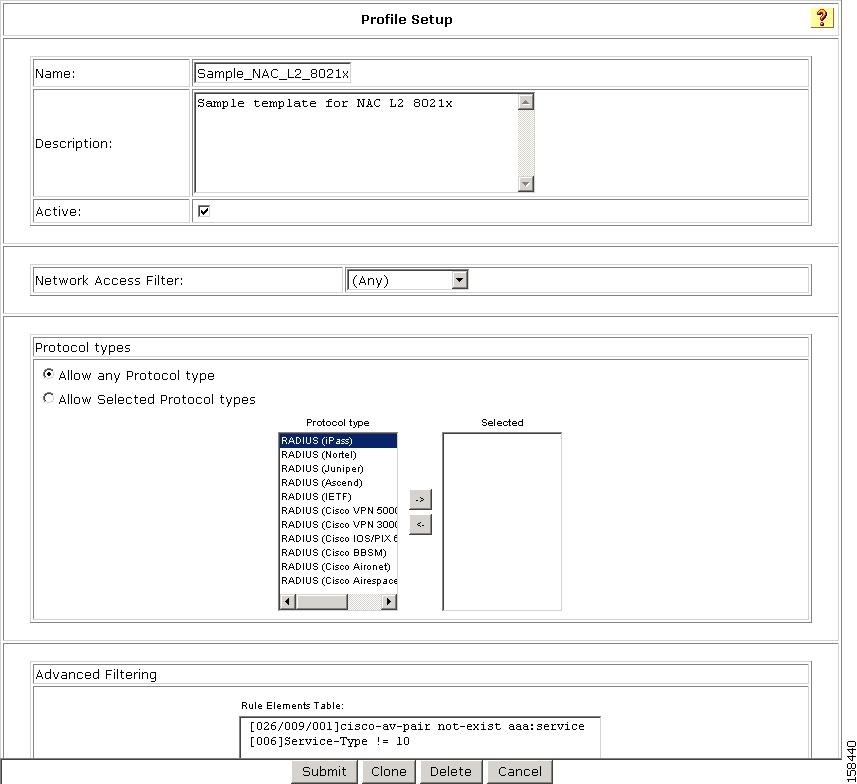
Figure 7-39 Profile Setup Page for NAC Layer 2 802.1x Template
The default settings for the profile are:
•
You can choose NAFs from the drop-down list, so that only specific host IPs match this profile.
•
•
•
[026/009/001]Cisco-av-pair = aaa:service=ip admission[006]Service-Type != 10These rules specify that the associated profile policies authenticate and authorize each RADIUS request that matches the attribute's rules. You can change the advanced filter, and add, remove, or edit any RADIUS attribute that the RADIUS client sends.
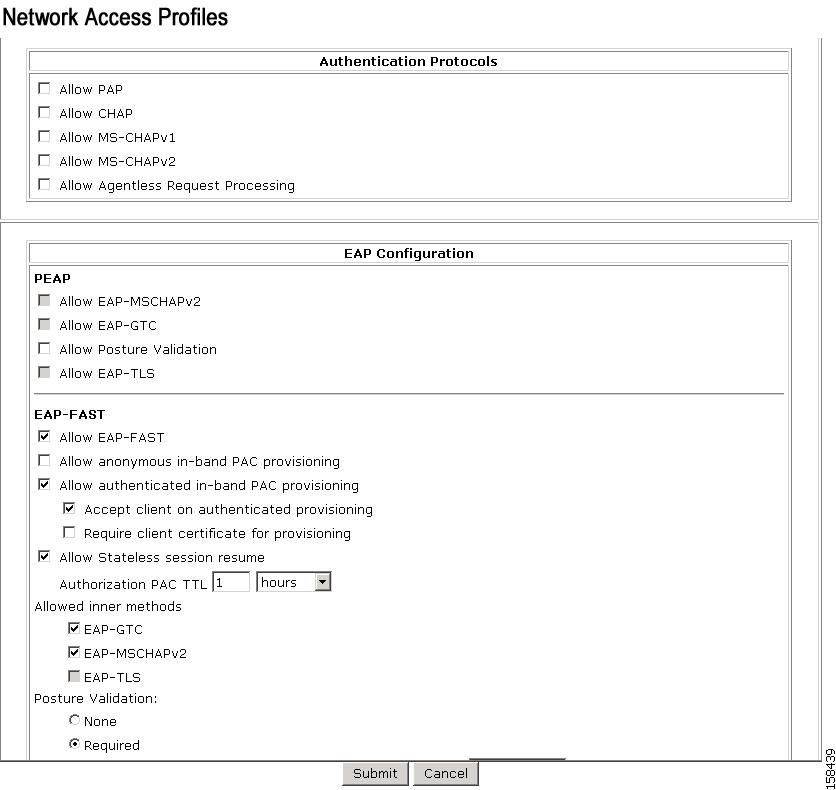
Protocols Policy
Figure 7-40 shows the Protocols settings for the NAC Layer 2 802.1x template.
Figure 7-40 Protocols Setting for NAC Layer 802.1x Template
In the EAP Configuration section, Posture Validation is enabled.
Authorization Policy
To configure an authorization policy for the NAC Layer 2 802.1x template:
Step 1
Step 2
The Authentication page for the NAC Layer 2 802.1x template profile appears, as shown in Figure 7-41.
Figure 7-41 Authentication Page for NAC Layer 2 802.1x Profile Template
On this page, you can see the Layer 2 NAC 802.1x template configuration for authorization.
Step 3
a.
b.
c.
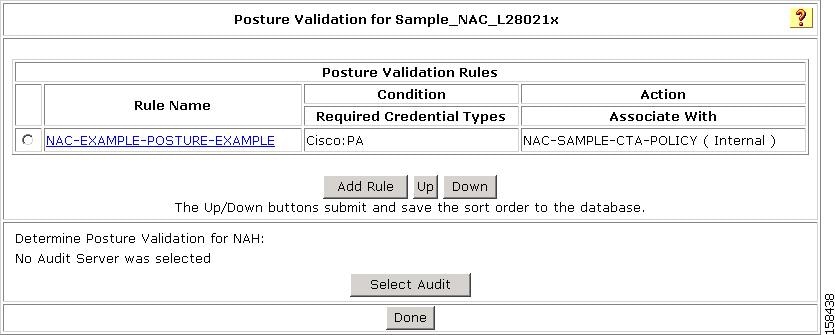
Sample Posture Validation Rule
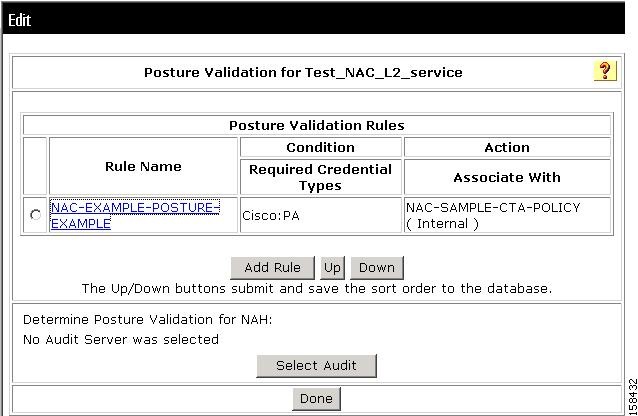
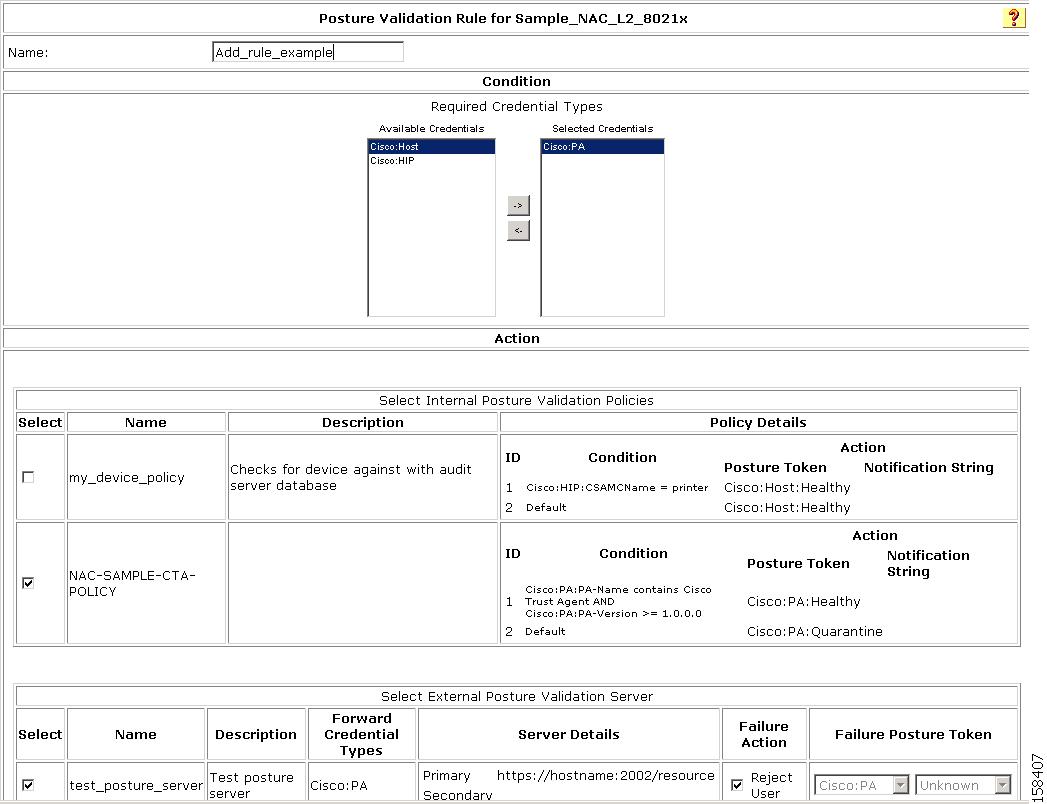
Figure 7-42 shows the sample posture validation policy provided with the NAC Layer 2 802.1x template.
Figure 7-42 Sample Posture Validation Policy for NAC Layer 2 802.1x Template
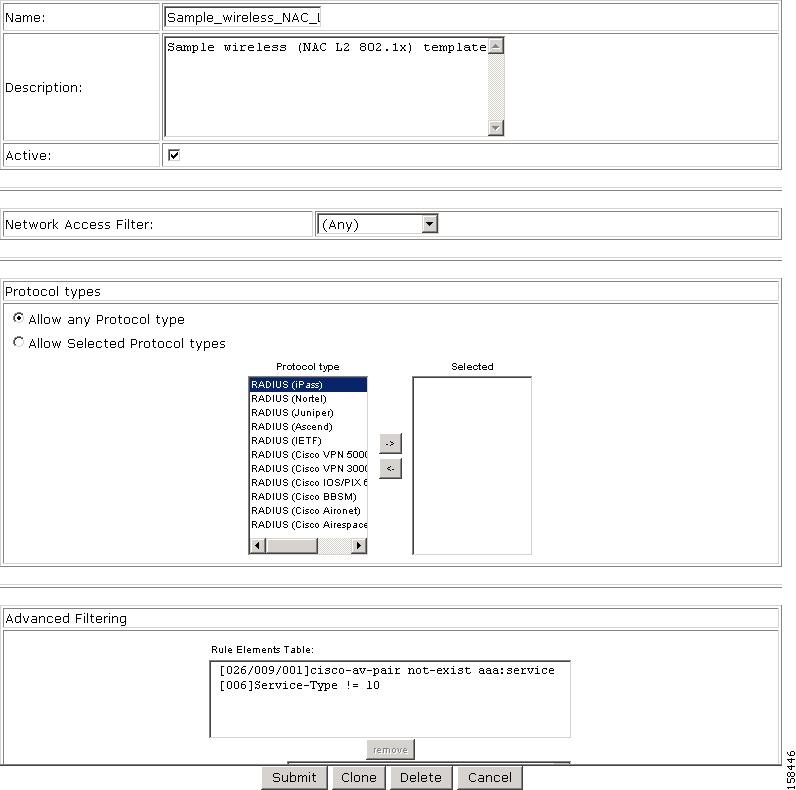
Sample Wireless (NAC L2 802.1x) Template
This template creates a profile for Layer 2 NAC 802.1x requests in wireless networks. Before you use this template, you should choose System Configuration > Global Authentication Setup and check the Enable Posture Validation check box.
To create a wireless (NAC L2 802.1x) NAC profile template:
Step 1
The Network Access Profiles page opens.
Step 2
The Create Profile from Template page opens, as shown in Figure 7-43.
Figure 7-43 Create Profile From Template Page
Step 3
Step 4
Step 5
Step 6
If no error appears, then you have created a Profile that can authenticate wireless NAC Layer 2 802.1x hosts.
The Edit Network Access Profile page opens, and the new profile is listed in the Name column.
The predefined values for the NAC Layer 2 802.1x template include:
•
•
•
•
Step 7
•
•
•
•
Profile Setup
To use the Profile Setup settings from the template:
Step 1
Step 2
Step 3
Figure 7-44 Profile Setup Page for Wireless (NAC L2 802.1x)Template
The default settings for the profile are:
•
You can choose NAFs from the drop-down list, so that only specific host IPs match this profile.
•
•
•
[026/009/001]Cisco-av-pair = aaa:service=ip admission[006]Service-Type != 10These rules specify that the associated profile policies authenticate and authorize each RADIUS request that matches the attribute's rules. You can change the advanced filter, and add, remove, or edit any RADIUS attribute that the RADIUS client sends.
Protocols Policy
Figure 7-45 shows the Protocols settings for the Wireless (NAC L2 802.1x) template.
Figure 7-45 Protocols Setting for Wireless NAC 802.1x Template
In the EAP Configuration section, Posture Validation is enabled.
Authorization Policy
To configure an authorization policy for the Wireless NAC Layer 2 802.1x template:
Step 1
Step 2
The Authentication page for the profile appears, as shown in Figure 7-46.
Figure 7-46 Authorization Page for Wireless (NAC L2 802.1x) Profile Template
On this page, you can see the Wireless (NAC L2 802.1x) template configuration for authentication:
Step 3
a.
b.
c.
Sample Posture Validation Rule
Figure 7-47 shows the sample posture validation policy provided with the Wireless (NAC L2 802.1x) template.
Figure 7-47 Sample Posture Validation Policy for Wireless (NAC L2 802.1x) Template
Note
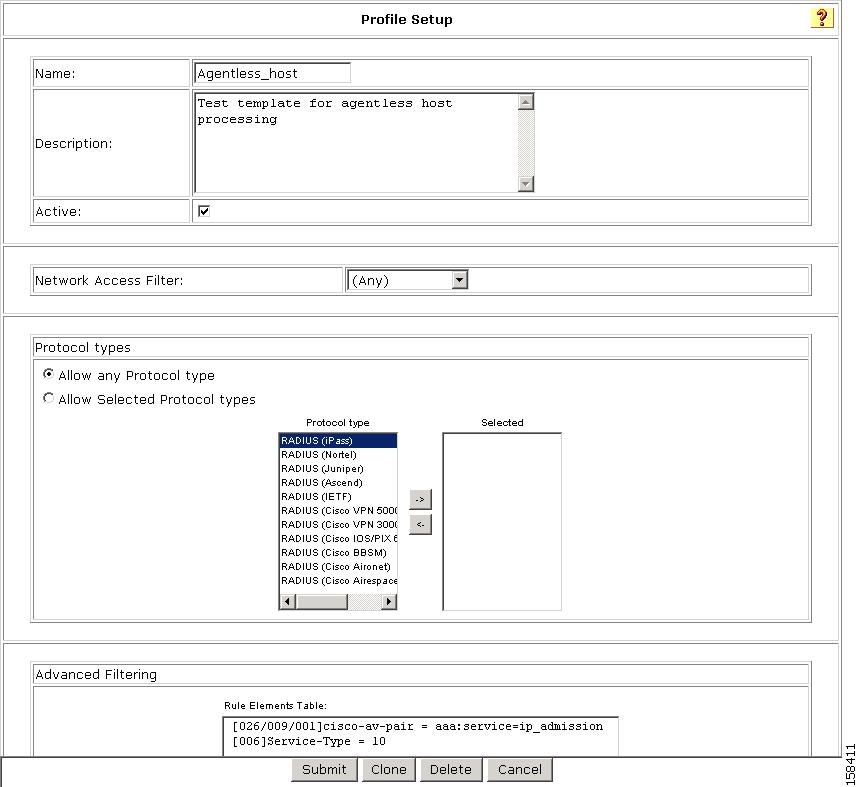
Using a Sample Agentless Host Template
ACS 4.1 provides two sample templates for agentless host processing:
•
•
These two templates are almost identical. This section documents the steps for using the Agentless Host for Layer 3 template.
Note
The Agentless Host for Layer 3 template creates a profile for Layer 3 requests that involve agentless host processing. Before you use this template, you should choose System Configuration > Global Authentication Setup and check the Enable Posture Validation check box.
To create an agentless host for Layer 3 profile template:
Step 1
The Network Access Profiles page opens.
Step 2
The Create Profile from Template page opens, as shown in Figure 7-48.
Figure 7-48 Create Profile From Template Page
Step 3
Step 4
Step 5
Step 6
If no error appears, then you have created a profile that can authenticate Layer 3 NAC hosts.
The Edit Network Access Profile page opens, and the new profile is listed in the Name column.
The predefined values for the Agentless Host for Layer 3 template include:
•
•
•
•
Step 7
•
•
•
•
Profile Setup
To use the Profile Setup settings from the template:
Step 1
Step 2
Step 3
Figure 7-49 Profile Setup Page for Agentless Host for Layer 3 Template
The default settings for the profile are:
•
You can choose NAFs from the drop-down list, so that only specific host IPs match this profile.
•
•
•
[026/009/001]Cisco-av-pair = aaa:service=ip admission[006]Service-Type != 10These rules specify that the associated profile policies authenticate and authorize each RADIUS request that matches the attribute's rules. You can change the advanced filter, and add, remove, or edit any RADIUS attribute that the RADIUS client sends.
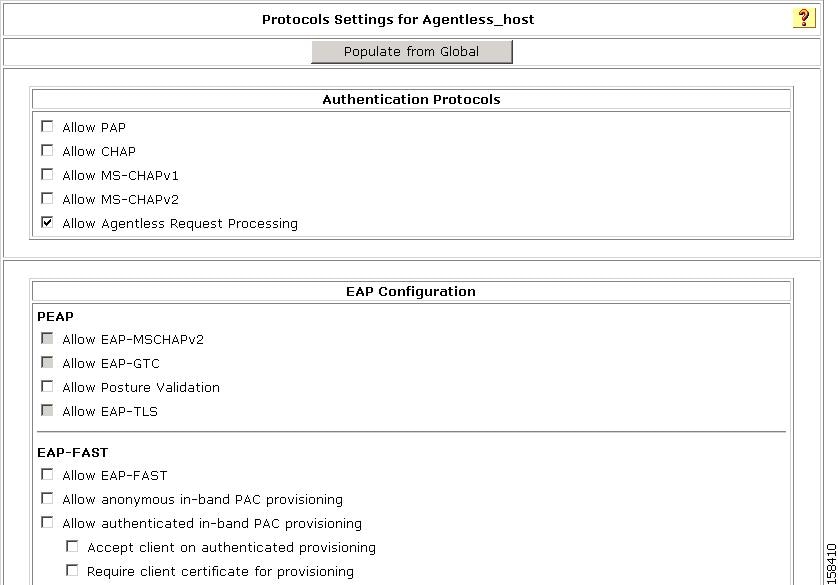
Protocols Policy
Figure 7-50 shows the Protocols settings for the Agentless Host for Layer 3 template.
Figure 7-50 Protocols Setting for Agentless Host for Layer 3 Template
In the Authentication Protocols section, check Agentless Host processing.
Authentication Policy
To configure an authentication policy for the Agentless Host for Layer 3 template:
Step 1
Step 2
The Authentication page for the profile appears, as shown in Figure 7-51.
Figure 7-51 Authentication Page for Agentless Host for Layer 3 Profile Template
On this page, you can see the Agentless Host for Layer 3 template configuration for authentication:
Step 3
a.
b.
c.
Step 15: Map Posture Validation Components to Profiles
To add an internal posture validation policy, external posture validation server, or both, to a profile:
Step 1
Step 2
Step 3
Step 4
The Add/Edit Posture Validation Rule page for the specified rule appears, as shown in Figure 7-52.
Figure 7-52 Add/Edit Posture Validation Rule Page
Step 5
Step 6
•
•
Step 7
Step 8
Step 9
Step 16: Map an Audit Server to a Profile
To add an external posture validation audit server to a profile:
Step 1
Step 2
The Protocols Settings page for the selected policy opens.
Step 3
Step 4
Step 5
Step 6
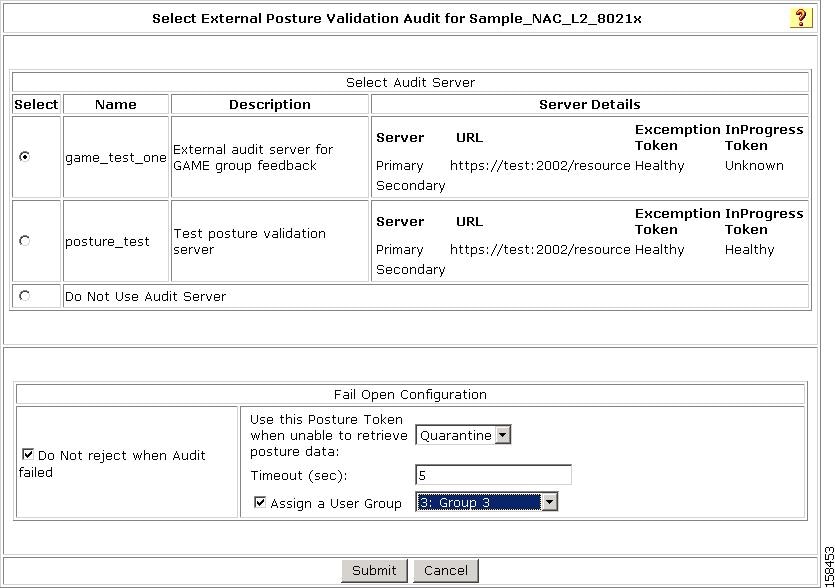
The Select External Posture Validation Audit Server page opens, as shown in Figure 7-53.
Figure 7-53 Select External Validation Audit Server Page
Step 7
Step 8
a.
b.
c.
d.
Step 9
Step 10
Step 11
Step 17 (Optional): Configure GAME Group Feedback
If you are using ACS in a NAC environment with agentless hosts, then you must configure GAME group feedback.
To configure GAME group feedback:
Step 1
See Import an Audit Vendor file Using CSUtil for details.
Step 2
See Import a Device-Type Attribute File Using CSUtil for details.
Step 3
See Import NAC Attribute-Value Pairs for details.
Step 4
The database that you use can be an external LDAP database (preferred) or the ACS internal database. See Configure Database Support for Agentless Host Processing for details.
Step 5
See Enable Posture Validation for details.
Step 6
See Configure an External Audit Server for details.
Step 7
To enable GAME Group feedback, in the external audit server posture validation setup section, configure:
•
•
•
See Enable GAME Group Feedback for details.
Step 8
See Enable GAME Group Feedback for details.
Import an Audit Vendor file Using CSUtil
For information on importing an audit vendor file by using CSUtil.exe, see the "Adding a Custom RADIUS Vendor and VSA Set" section in Appendix D of the User Guide for Cisco Secure Access Control Server 4.1, "CSUtil Database Utility."
Import a Device-Type Attribute File Using CSUtil
Before you can configure GAME group feedback, you must import an attribute file that contains a device-type attribute.
The format of a text file to set up a device-type attributes is:
[attr#0]vendor-id=<the vendor identifier number>vendor-name=<the name of the vendor>application-id=6application-name=Auditattribute-id=00012attribute-name=Device-Typeattribute-profile=in outatribute-type=stringTo import the file:
Step 1
Step 2
Step 3
CSUtil -addAVP <device-type filename>where device-type filename is the name of the text file that contains the device-type attribute.
Step 4
a.
b.
c.
Import NAC Attribute-Value Pairs
To import NAC attribute-value pairs:
Step 1
Step 2
a.
b.
CSUtil -addAVP <NAC AV-pair filename>
where NAC AV-pair filename is the name of the text file that contains the device-type attribute.
Step 3
a.
b.
c.
Configure Database Support for Agentless Host Processing
The database that you use can be an external LDAP database (preferred) or the ACS internal database.
For information on configuring database support for agentless host processing, see Step 4: Configure LDAP Support for MAB, page 4-9 in Chapter 4, "Agentless Host Support Configuration Scenario".
Enable Posture Validation
You must enable posture validation in two places. In the:
•
•
Configure an External Audit Server
For detailed instructions on configuring an external audit server, see Configure an External Posture Validation Audit Server.
Enable GAME Group Feedback
To enable GAME Group feedback:
Step 1
If this check box is not available, define an audit device type attribute for the vendor in the internal ACS dictionary.
ACS for Windows:
With ACS for Windows, you use the CSUtil.exe command. For detailed information, see "Posture Validation Attributes" in Appendix D of the User Guide for Cisco Secure ACS.
ACS Solution Engine:
With ACS Solution Engine, you use the NAC Attributes Management page in the web interface. See "NAC Attribute Management (ACS Solution Engine Only)" in Chapter 8 of the User Guide for Cisco Secure ACS for more information.
Step 2
You should now add entries to the group assignment table. The group assignment table is a list of rules that set conditions that determine the user group to which to assign a particular device type that is returned from the audit server.
Step 3
The group assignment table appears, as shown in Figure 7-54.
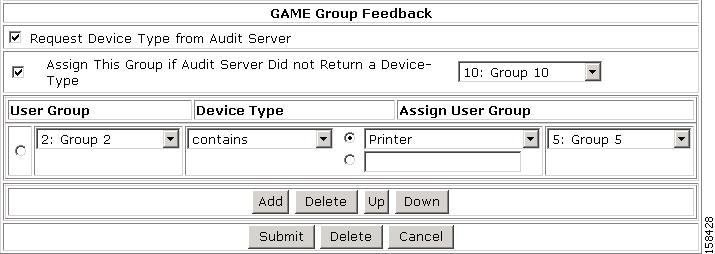
Figure 7-54 GAME Group Feedback Section with Group Assignment Table
Step 4
•
•
–
–
–
–
–
–
•
–
–
–
–
–
–
–
–
–
–
Note
•
Step 5
Step 6
Step 7
Step 8
Step 9