Release 3.1: Cisco StadiumVision Director Server Administration Guide
Bias-Free Language
The documentation set for this product strives to use bias-free language. For the purposes of this documentation set, bias-free is defined as language that does not imply discrimination based on age, disability, gender, racial identity, ethnic identity, sexual orientation, socioeconomic status, and intersectionality. Exceptions may be present in the documentation due to language that is hardcoded in the user interfaces of the product software, language used based on RFP documentation, or language that is used by a referenced third-party product. Learn more about how Cisco is using Inclusive Language.
- Updated:
- June 19, 2013
Chapter: Configuring Cisco StadiumVision Director for Multiple Venue Support
- Contents
- Prerequisites for Configuring Multiple Venue Support
- Restrictions for Configuring Multiple Venue Support
- Information About Configuring Multiple Venue Support
- Prerequisites
- Exporting a Device List for the Original System Configuration
- Creating New Venues
- Removing All Locations From Existing Groups
- Removing Locations From Existing Suites
- Associating Initial Locations to Venues
- Completing Venue-Specific Information and Association of Locations Using BAT
- Populating Group Information in the New Device List
Configuring Cisco StadiumVision Director for Multiple Venue Support
Beginning in Cisco StadiumVision Director Release 3.1, a centralized server site can be deployed with multiple remote sites in a multi-venue architecture. This document is intended for Cisco StadiumVision Director administrators and describes how to enable and manage multiple venue support on Cisco StadiumVision Director Remote servers.
Contents
•![]() Prerequisites for Configuring Multiple Venue Support
Prerequisites for Configuring Multiple Venue Support
•![]() Restrictions for Configuring Multiple Venue Support
Restrictions for Configuring Multiple Venue Support
•![]() Information About Configuring Multiple Venue Support
Information About Configuring Multiple Venue Support
•![]() How to Configure Multiple Venue Support
How to Configure Multiple Venue Support
•![]() How to Modify Multicast Optimization Registry Settings
How to Modify Multicast Optimization Registry Settings
•![]() How to Migrate Deployed Devices From a Single Venue to a Multiple Venue System
How to Migrate Deployed Devices From a Single Venue to a Multiple Venue System
Prerequisites for Configuring Multiple Venue Support
Before you configure Cisco StadiumVision Director remote servers for multiple venue support, be sure that the following requirements are met:
•![]() You have read the "Cisco StadiumVision Director Server Architecture".
You have read the "Cisco StadiumVision Director Server Architecture".
•![]() If deploying Cisco StadiumVision Director Remote servers:
If deploying Cisco StadiumVision Director Remote servers:
–![]() You understand the multicast configuration in place for your network to assess if there are any conflicts in addressing with the multicast optimization feature as described in the "Multicast Optimization for Remote Venues" section on page 25. If there is any need to change the Cisco StadiumVision Director Remote multicast registry keys due to network restrictions, see the "How to Modify Multicast Optimization Registry Settings" section.
You understand the multicast configuration in place for your network to assess if there are any conflicts in addressing with the multicast optimization feature as described in the "Multicast Optimization for Remote Venues" section on page 25. If there is any need to change the Cisco StadiumVision Director Remote multicast registry keys due to network restrictions, see the "How to Modify Multicast Optimization Registry Settings" section.
–![]() You have configured the network to appropriately localize the transmission of the multicast addresses shown in Table 1. For more information, refer to the Cisco Connected Stadium Design Guide from your Cisco Systems representative.
You have configured the network to appropriately localize the transmission of the multicast addresses shown in Table 1. For more information, refer to the Cisco Connected Stadium Design Guide from your Cisco Systems representative.
•![]() You understand the deployment of zones, groups and locations and the use of playlists and scripts in Cisco StadiumVision Director.
You understand the deployment of zones, groups and locations and the use of playlists and scripts in Cisco StadiumVision Director.
•![]() The centralized Cisco StadiumVision Director server is installed with a minimum of Release 3.1.
The centralized Cisco StadiumVision Director server is installed with a minimum of Release 3.1.
•![]() You have the following information for all installed Cisco StadiumVision Director Remote servers:
You have the following information for all installed Cisco StadiumVision Director Remote servers:
–![]() The names that you want to use for the remote sites.
The names that you want to use for the remote sites.
–![]() The IP addresses for all installed Cisco StadiumVision Director Remote servers.
The IP addresses for all installed Cisco StadiumVision Director Remote servers.

Note ![]() If you do not yet have the IP addresses for the remote server sites, you can continue to add the venues to Cisco StadiumVision Director without any IP address, and go back to configure the real IP addresses later.
If you do not yet have the IP addresses for the remote server sites, you can continue to add the venues to Cisco StadiumVision Director without any IP address, and go back to configure the real IP addresses later.
–![]() If you plan to override use of global remote server credentials, then you have the password that you want to use for each remote server. This will also require reconfiguration of these credentials using the Text Utility Interface (TUI) on the Cisco StadiumVision Director remote server. For more information, see the "Configuring Cisco StadiumVision Director Remote Servers".
If you plan to override use of global remote server credentials, then you have the password that you want to use for each remote server. This will also require reconfiguration of these credentials using the Text Utility Interface (TUI) on the Cisco StadiumVision Director remote server. For more information, see the "Configuring Cisco StadiumVision Director Remote Servers".
•![]() You have planned the configuration for any new or changes to existing Locations. For existing Locations be sure that you are aware of current group/zone associations that will be disabled once you reassign an existing Location to a specific venue.
You have planned the configuration for any new or changes to existing Locations. For existing Locations be sure that you are aware of current group/zone associations that will be disabled once you reassign an existing Location to a specific venue.
Restrictions for Configuring Multiple Venue Support
Before you configure Cisco StadiumVision Director remote servers for multiple venue support, be sure that you consider the following restrictions:
•![]() Venue objects (such as locations, playlists, and scripts) are limited to a single-venue association, except for users who are assigned to the role of Venue Operator.
Venue objects (such as locations, playlists, and scripts) are limited to a single-venue association, except for users who are assigned to the role of Venue Operator.

•![]() Only Venue Operators can be associated to one or more venues.
Only Venue Operators can be associated to one or more venues.
•![]() Only certain areas of the Cisco StadiumVision Director software are venue aware, which means that certain roles can apply venue-specific scope of control using the venue selector. These areas include:
Only certain areas of the Cisco StadiumVision Director software are venue aware, which means that certain roles can apply venue-specific scope of control using the venue selector. These areas include:
–![]() Control Panel > Control—Administrator, Event Operator, and Venue Operator
Control Panel > Control—Administrator, Event Operator, and Venue Operator
–![]() Control Panel > Content—Administrator and Content Manager
Control Panel > Content—Administrator and Content Manager
–![]() Control Panel > Schedule—Administrator and Content Manager
Control Panel > Schedule—Administrator and Content Manager
–![]() Management Dashboard—Administrator and Venue Operator
Management Dashboard—Administrator and Venue Operator
Note ![]() The following areas of the Control Panel > Setup are not directly venue-aware using the venue selector, but objects defined there can have a venue-specific relationship:
The following areas of the Control Panel > Setup are not directly venue-aware using the venue selector, but objects defined there can have a venue-specific relationship:
•![]() Users—You can define all Users under Control Panel > Setup, but you can only associate venues to Venue Operators under the Venues tab. Therefore, the Users interface is not venue aware.
Users—You can define all Users under Control Panel > Setup, but you can only associate venues to Venue Operators under the Venues tab. Therefore, the Users interface is not venue aware.
•![]() Zones & Groups—Zones and groups inherit their venue association through the Location. Locations are associated to venues under the Venues tab by the administrator.
Zones & Groups—Zones and groups inherit their venue association through the Location. Locations are associated to venues under the Venues tab by the administrator.
•![]() Triggers—Triggers can be applied to venue-associated scripts, but the Triggers interface itself is not venue aware, and all defined triggers in Cisco StadiumVision Director are global in scope.
Triggers—Triggers can be applied to venue-associated scripts, but the Triggers interface itself is not venue aware, and all defined triggers in Cisco StadiumVision Director are global in scope.
•![]() Playlists imported using the Media Planner Import API need to be manually assigned to venues after import into Cisco StadiumVision Director.
Playlists imported using the Media Planner Import API need to be manually assigned to venues after import into Cisco StadiumVision Director.
•![]() Cisco StadiumVision Director does not support disabling of multiple venue support (set the "Multiple Venue Enabled?" property to false) after you have enabled it and associated objects.
Cisco StadiumVision Director does not support disabling of multiple venue support (set the "Multiple Venue Enabled?" property to false) after you have enabled it and associated objects.
Information About Configuring Multiple Venue Support
This section includes the following topics:
•![]() Cisco StadiumVision Director Remote Servers
Cisco StadiumVision Director Remote Servers
•![]() Multicast Optimization for Remote Venues, page 25
Multicast Optimization for Remote Venues, page 25
•![]() Role-Based Access Control for Hierarchical Management of Multiple Venues
Role-Based Access Control for Hierarchical Management of Multiple Venues
•![]() Understanding Venue Association
Understanding Venue Association
•![]() Understanding Scripts and Staging Behavior in a Multi-Venue Environment
Understanding Scripts and Staging Behavior in a Multi-Venue Environment
Cisco StadiumVision Director Remote Servers
Cisco StadiumVision Director Remote Servers are installed at remote sites to provide a way of transferring venue-specific content in a distributed Cisco StadiumVision Director network environment, where primary management and control is performed on a centralized Cisco StadiumVision Director server.
The benefits of deploying remote servers include faster script staging due to WAN optimization, as well as multicast optimization which reduces the number of messages that remote DMPs receive.
The Cisco StadiumVision Director Remote servers support a limited set of administrative functions using a text utility interface (TUI) similar to the TUI support on Cisco StadiumVision Director. The remote servers are connected by a wide-area network (WAN) to the central Cisco StadiumVision Director server. The remote server connection to the central Cisco StadiumVision Director server is configured using the IP addresses of the servers. The IP address configuration must be completed on both the Cisco StadiumVision Director server, and on the Cisco StadiumVision Director Remote server using the remote server TUI.
The transmission of data is optimized over the WAN because the central Cisco StadiumVision Director server sends content only to the Cisco StadiumVision Director Remote server, rather than sending multiple transmissions to each remote DMP for that server. The remote server sends that content to each of the DMPs that it is configured to support on the local network.
For more information, see the "Cisco StadiumVision Director Server Architecture".
Multicast Optimization for Remote Venues
The Multicast Optimization feature is designed to reduce the number of messages that remote DMPs receive. This benefit can be achieved only when the following guidelines are met:
•![]() Cisco StadiumVision Director Remote servers are deployed at those venues to control the remote DMP traffic.
Cisco StadiumVision Director Remote servers are deployed at those venues to control the remote DMP traffic.
•![]() The Cisco StadiumVision multicast network is configured to properly contain the multicast rebroadcast address (by default, 239.193.1.1:7778) within the LAN/WAN segment of the remote server without being transmitted across the network to other segments where remote servers also are deployed.
The Cisco StadiumVision multicast network is configured to properly contain the multicast rebroadcast address (by default, 239.193.1.1:7778) within the LAN/WAN segment of the remote server without being transmitted across the network to other segments where remote servers also are deployed.
•![]() Remote DMPs are configured to participate in the multicast rebroadcast group (default is 239.193.1.1:7778).
Remote DMPs are configured to participate in the multicast rebroadcast group (default is 239.193.1.1:7778).
•![]() Scripts are set up to control only a single site with exclusion of any non-site DMPs for that script.
Scripts are set up to control only a single site with exclusion of any non-site DMPs for that script.
Scripts that only control DMPs from a single venue will only transmit multicast messages to that venue. Scripts that control DMPs from multiple, non-global venues will only transmit multicast messages to those venues. Any script that controls any global DMPs will transmit multicast messages to all venues and all global DMPs.
Note ![]() For optimal operation, you should avoid running multiple event scripts to the same DMPs at a site. The multicast messages will be seen by all DMPs at a remote site for each event script.
For optimal operation, you should avoid running multiple event scripts to the same DMPs at a site. The multicast messages will be seen by all DMPs at a remote site for each event script.
When configured properly, multicast optimization allows the Cisco StadiumVision Director Remote server to rebroadcast multicast messages associated with scripts for that venue to be seen only by the DMPs associated with that remote site.
Figure 1 shows the multicast behavior from the Cisco StadiumVision Director server to Cisco StadiumVision Director Remote servers at two venues, and the rebroadcast of those multicast messages (using a different multicast group than Cisco StadiumVision Director) by the remote servers to DMP locations that have been associated to that venue.
Figure 1 Multicast Flows for Remote Venues
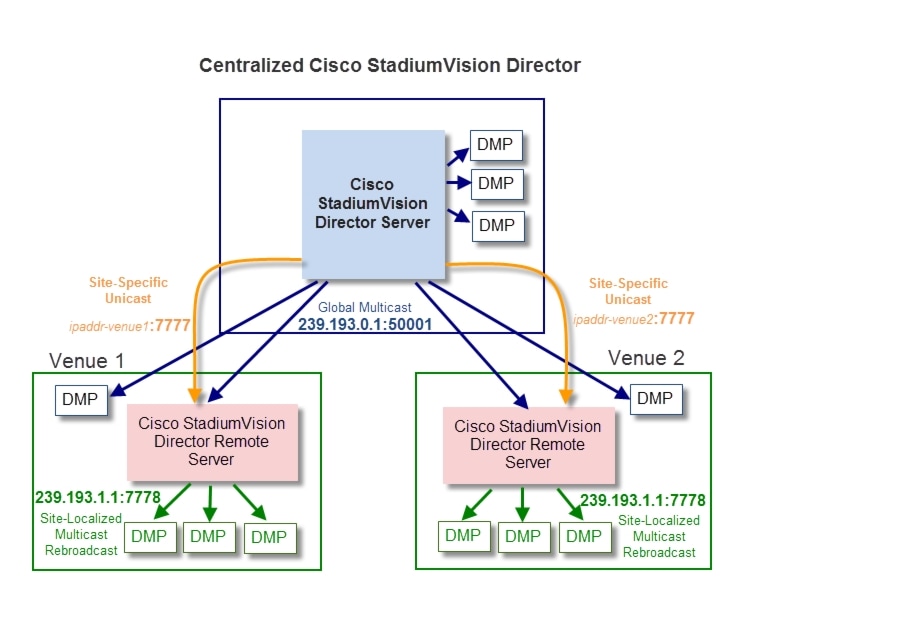
In this example, Cisco StadiumVision Director uses the multicast group 239.193.0.1:50001 to send script messages to global DMPs (DMPs that are not associated to a venue, regardless of their actual physical location). Figure 1 shows the following global multicast flows from the centralized Cisco StadiumVision Director server using group 239.193.0.1:50001 (blue arrows):
•![]() To DMPs located at the central Cisco StadiumVision Director server site.
To DMPs located at the central Cisco StadiumVision Director server site.
•![]() To the Cisco StadiumVision Director Remote servers at all venues.
To the Cisco StadiumVision Director Remote servers at all venues.
•![]() To DMPs at remote sites that are not associated to a remote server.
To DMPs at remote sites that are not associated to a remote server.
When a DMP location has been associated to the venue supported by a Cisco StadiumVision Director Remote server, the central Cisco StadiumVision Director server also sends unicast messages to the remote server for those commands intended only for that server using the IP address of the remote server and port 7777. In Figure 1 (orange arrows), this is identified as "ipaddr-venue1:7777" or "ipaddr-venue2:7777" where ipaddr-venueX is replaced by the dotted decimal IPv4 address of the remote server at that venue.
The remote server rebroadcasts the unicast messages only to those DMPs to which it is associated using the default multicast group 239.193.1.1:7778 (green arrows in the figure).
Note ![]() Although the Cisco StadiumVision Director Remote servers use a different multicast group than the original group used by the Cisco StadiumVision Director server, notice that all remote servers use the same multicast group for rebroadcast at their respective venues (239.193.1.1:7778 by default). Therefore, this multicast group must be site-localized and not rebroadcast externally from the LAN/WAN segment in which that remote server resides. For further guidelines about multicast configuration in the Cisco StadiumVision network, refer to the Cisco Connected Stadium Design Guide from your Cisco Systems representative.
Although the Cisco StadiumVision Director Remote servers use a different multicast group than the original group used by the Cisco StadiumVision Director server, notice that all remote servers use the same multicast group for rebroadcast at their respective venues (239.193.1.1:7778 by default). Therefore, this multicast group must be site-localized and not rebroadcast externally from the LAN/WAN segment in which that remote server resides. For further guidelines about multicast configuration in the Cisco StadiumVision network, refer to the Cisco Connected Stadium Design Guide from your Cisco Systems representative.
If your network configuration requires you to change the default multicast addressing used for Cisco StadiumVision Director Remote server deployment, see the "How to Modify Multicast Optimization Registry Settings" section.
Role-Based Access Control for Hierarchical Management of Multiple Venues
Cisco StadiumVision Director Release 3.1 introduces a new role of Venue Operator and adds new configuration management features to the Administrator role. All other legacy roles in Cisco StadiumVision Director retain their existing functionality.
For more information about user management and Role-Based Access Control (RBAC), see the "User Management in Cisco StadiumVision Director".
Administrator
The Cisco StadiumVision Director administrator can perform all functions related to Cisco StadiumVision Director Remote server configuration and venue management.
Most of the configuration management for multiple venue support resides only with the Cisco StadiumVision Director administrator role, which includes the addition of the following functions:
•![]() Enabling Cisco StadiumVision Director for multiple venue support.
Enabling Cisco StadiumVision Director for multiple venue support.
•![]() Creating venues in Cisco StadiumVision Director.
Creating venues in Cisco StadiumVision Director.
•![]() Creating users with role of Venue Operator.
Creating users with role of Venue Operator.
•![]() Capability for associating any venues to users, locations, content, playlists, and scripts.
Capability for associating any venues to users, locations, content, playlists, and scripts.
Content Manager
In a multi-venue architecture a Content Manager can perform all of the same functions as within a standard Cisco StadiumVision Director environment, with the addition of the following capabilities:
•![]() Selecting the venue scope from the Content and Schedule screens in Control Panel.
Selecting the venue scope from the Content and Schedule screens in Control Panel.
•![]() Importing content to be associated with one or more venues by using venue tags.
Importing content to be associated with one or more venues by using venue tags.
•![]() Creating playlists and scripts to be associated with the currently selected venue scope or all venues.
Creating playlists and scripts to be associated with the currently selected venue scope or all venues.
Note ![]() Content Managers can only create new objects with venue assignment based on the currently selected venue in the venue selector. To reassign an object to a different venue, the Content Manager must remove the object and add again.
Content Managers can only create new objects with venue assignment based on the currently selected venue in the venue selector. To reassign an object to a different venue, the Content Manager must remove the object and add again.
Venue Operator
The Venue Operator is a new role introduced in Cisco StadiumVision Director Release 3.1 that is based on a subset of Event Operator and Help Desk roles, with the added functionality of venue-specific scope of control. The Venue Operator role supports the following capabilities:
•![]() Changing the user password in Control Panel.
Changing the user password in Control Panel.
•![]() Selecting venue scope for the venues for which permissions are granted.
Selecting venue scope for the venues for which permissions are granted.
•![]() Viewing and monitoring information on the Management Dashboard with read-only access to the venues for which permissions are granted.
Viewing and monitoring information on the Management Dashboard with read-only access to the venues for which permissions are granted.
•![]() Executing scripts and related state functions during an event at the venues for which permissions are granted.
Executing scripts and related state functions during an event at the venues for which permissions are granted.
Other Legacy RBAC Roles
Legacy RBAC roles (roles that were available in releases prior to Cisco StadiumVision Director Release 3.1) can perform all of the same functions as within earlier Cisco StadiumVision Director software releases.
Note ![]() In a multi-venue architecture an Event Operator can perform all of the same functions as within a standard Cisco StadiumVision Director environment. The Event Operator role is not venue aware. To support venue-specific scope of control for scripts, use the new Venue Operator role.
In a multi-venue architecture an Event Operator can perform all of the same functions as within a standard Cisco StadiumVision Director environment. The Event Operator role is not venue aware. To support venue-specific scope of control for scripts, use the new Venue Operator role.
Understanding Venue Association
A centralized Cisco StadiumVision Director site with multiple remote sites (venues) supports the following functionality:
•![]() Association of venues to Users, Locations, Playlists, and Scripts (referred to collectively as venue objects).
Association of venues to Users, Locations, Playlists, and Scripts (referred to collectively as venue objects).
•![]() Inheritance of venue association from Locations for Groups, Zones, and Luxury Suites.
Inheritance of venue association from Locations for Groups, Zones, and Luxury Suites.

Tip ![]() You can use the Bulk Administration Tool (BAT) to associate multiple locations to a venue.
You can use the Bulk Administration Tool (BAT) to associate multiple locations to a venue.
Understanding Scripts and Staging Behavior in a Multi-Venue Environment
This section provides information about scripts that you should be aware of when implementing them in a multi-venue environment.
Script Best Practices
When configuring scripts in a multi-venue environment, consider the following best practices:
•![]() Deploy remote servers to achieve faster script staging due to WAN optimization.
Deploy remote servers to achieve faster script staging due to WAN optimization.
•![]() Configure scripts to control only a single venue.
Configure scripts to control only a single venue.
•![]() When creating venue-specific scripts, use the following process:
When creating venue-specific scripts, use the following process:
1. ![]() Create the script first without any actions—Name it and save it.
Create the script first without any actions—Name it and save it.
2. ![]() Assign the script to the venue.
Assign the script to the venue.
3. ![]() Edit the script to assign it to zones/groups.
Edit the script to assign it to zones/groups.
4. ![]() Use playlists that belong to the same venue.
Use playlists that belong to the same venue.
5. ![]() Edit the script to further define states.
Edit the script to further define states.
•![]() Be sure that scripts that are intended to run at a remote site are not also being run on any non-site DMPs.
Be sure that scripts that are intended to run at a remote site are not also being run on any non-site DMPs.
•![]() For optimal operation, avoid running multiple event scripts to the same DMPs at a site. The multicast messages will be seen by all DMPs at a remote site for each event script.
For optimal operation, avoid running multiple event scripts to the same DMPs at a site. The multicast messages will be seen by all DMPs at a remote site for each event script.
Note ![]() If you move a script assignment from one venue to another, be aware that the zones/groups/playlists might still be associated with the old venue until they are manually reassigned. If a script is part of one venue and zones/groups/playlists are part of another venue, then the script will not start.
If you move a script assignment from one venue to another, be aware that the zones/groups/playlists might still be associated with the old venue until they are manually reassigned. If a script is part of one venue and zones/groups/playlists are part of another venue, then the script will not start.
Script Staging Behavior
In Cisco StadiumVision Director, script staging is always serialized. In the case of two venues where each is deployed with a different remote server, then when scripts are staged for each venue, one venue's script will be staged before the other. The sripts will not start at the same time.
In the case of content replacement, content staging happens right away. If current staging is going on, content replacement staging will go into the queue. The DMP will play old content until confirmation of successful staging occurs, so there could be some time delay.
How to Configure Multiple Venue Support
This section includes the following tasks:
•![]() Enabling Multiple Venue Support in Cisco StadiumVision Director (required)
Enabling Multiple Venue Support in Cisco StadiumVision Director (required)
•![]() Adding Venues to Cisco StadiumVision Director (required)
Adding Venues to Cisco StadiumVision Director (required)
•![]() Associating Venues with Cisco StadiumVision Director Objects (required)
Associating Venues with Cisco StadiumVision Director Objects (required)
•![]() Removing Venues From Cisco StadiumVision Director (optional)
Removing Venues From Cisco StadiumVision Director (optional)
•![]() Selecting Venue Scope (optional)
Selecting Venue Scope (optional)
•![]() Monitoring Venues From the Management Dashboard (optional)
Monitoring Venues From the Management Dashboard (optional)
Enabling Multiple Venue Support in Cisco StadiumVision Director
By default, Cisco StadiumVision Director is not configured for multi-venue deployment. To support Cisco StadiumVision Director with a centralized server and remote sites, you must configure the Multiple Venue Configuration property, which will set the corresponding registry key. Once this registry key is set, it will be preserved during an upgrade.
To enable multiple venue support in Cisco StadiumVision Director, complete the following tasks:
Step 1 ![]() Log into Cisco StadiumVision Director as an administrator.
Log into Cisco StadiumVision Director as an administrator.
Step 2 ![]() From the main menu, click Management Dashboard.
From the main menu, click Management Dashboard.
Step 3 ![]() Go to SV Director Configuration > Multiple Venue Configuration.
Go to SV Director Configuration > Multiple Venue Configuration.
Step 4 ![]() Set the Multiple Venue Enabled? property value to "true."
Set the Multiple Venue Enabled? property value to "true."
Step 5 ![]() Click the Refresh icon to update property values.
Click the Refresh icon to update property values.
The multiple venue management functions are enabled in Cisco StadiumVision Director and the registry key named "multiVenueDeployment."
Step 6 ![]() Click Save.
Click Save.
Step 7 ![]() Confirm that the "Choose venue:" control appears in the upper right corner of the Management Dashboard window.
Confirm that the "Choose venue:" control appears in the upper right corner of the Management Dashboard window.

Step 8 ![]() Go to Control Panel > Setup and confirm that the Venues tab is available.
Go to Control Panel > Setup and confirm that the Venues tab is available.
Tip ![]() If you already had the Control Panel open before enabling multiple venue support, refresh the browser to display the Venues tab.
If you already had the Control Panel open before enabling multiple venue support, refresh the browser to display the Venues tab.
Adding Venues to Cisco StadiumVision Director
After you enable multiple venue support in Cisco StadiumVision Director, you can add remote sites as venues in the Control Panel.
To add venues in Cisco StadiumVision Director, complete the following tasks:
Step 1 ![]() Log into Cisco StadiumVision Director as an administrator.
Log into Cisco StadiumVision Director as an administrator.
Step 2 ![]() From the main menu, click Control Panel.
From the main menu, click Control Panel.
Step 3 ![]() Go to Setup > Venues.
Go to Setup > Venues.
Step 4 ![]() Click the plus (+) icon.
Click the plus (+) icon.
The Intro panel displays the remote server configuration options (Figure 2).
Figure 2 New Venue Intro Panel

Step 5 ![]() (Required) In the Name box, type a unique and identifiable name for the venue. "new venue" is the default.
(Required) In the Name box, type a unique and identifiable name for the venue. "new venue" is the default.
Step 6 ![]() (Required) In the Time zone box, click the arrow to open the drop-down box and select the time zone for the remote site.
(Required) In the Time zone box, click the arrow to open the drop-down box and select the time zone for the remote site.
Note ![]() This option is informational only and for proof-of-play reporting. The actual time zone for the venue is configured from the TUI on the remote server. For more information, see the "Restrictions for Configuring Multiple Venue Support" section.
This option is informational only and for proof-of-play reporting. The actual time zone for the venue is configured from the TUI on the remote server. For more information, see the "Restrictions for Configuring Multiple Venue Support" section.
Step 7 ![]() (Required only when remote servers are deployed) In the IP address box, type the IPv4 address of the Cisco StadiumVision Director Remote server.
(Required only when remote servers are deployed) In the IP address box, type the IPv4 address of the Cisco StadiumVision Director Remote server.
Step 8 ![]() (Optional) To specify a unique password for the remote server to enable monitoring from the Management Dashboard, type a Password.
(Optional) To specify a unique password for the remote server to enable monitoring from the Management Dashboard, type a Password.
Tip ![]() When global credentials are configured, this field is automatically populated with the global password that is configured in the Cisco StadiumVision Director Management Dashboard. Before you modify this password, be sure that you understand the use and requirements for this password. For more information, see the "Configuring Connectivity to the Cisco StadiumVision Director Server" section.
When global credentials are configured, this field is automatically populated with the global password that is configured in the Cisco StadiumVision Director Management Dashboard. Before you modify this password, be sure that you understand the use and requirements for this password. For more information, see the "Configuring Connectivity to the Cisco StadiumVision Director Server" section.
Associating Venues with Cisco StadiumVision Director Objects
You can associate venues with Locations, Playlists, Scripts, and Users in Cisco StadiumVision Director. Only the administrator can perform associations for all of these objects for all venues using the Venues tab in the Control Panel Setup screen.
After the initial multiple venue configuration and association is completed by the Cisco StadiumVision Director administrator, other roles (Content Manager and Venue Operator) can use the venue selector in Cisco StadiumVision Director for their authorized functional areas of the interface to select their venue scope of control. Any related tasks will be based on that selected venue scope (All Venues or a specific venue).
This section includes the following topics:
•![]() Guidelines for Associating Venues
Guidelines for Associating Venues
•![]() Troubleshooting Venue Association Conflicts
Troubleshooting Venue Association Conflicts
Guidelines for Associating Venues
Before you associate venues in Cisco StadiumVision Director, be sure that you understand the following guidelines:
•![]() Each object is limited to a single-venue association, except for users.
Each object is limited to a single-venue association, except for users.
•![]() Only users with the assigned role of Venue Operator can be assigned to one or more venues by the administrator.
Only users with the assigned role of Venue Operator can be assigned to one or more venues by the administrator.
•![]() Only the following roles can see the venue selector in the Cisco StadiumVision Director interface and use it to select the venue scope of control for their authorized areas:
Only the following roles can see the venue selector in the Cisco StadiumVision Director interface and use it to select the venue scope of control for their authorized areas:
–![]() Administrator
Administrator
–![]() Content Manager
Content Manager
–![]() Event Operator
Event Operator
–![]() Venue Operator
Venue Operator
Note ![]() SSC users and the SSC portal are not venue aware. There is no venue selector available in SSC.
SSC users and the SSC portal are not venue aware. There is no venue selector available in SSC.
•![]() Refer to the "Script Best Practices" section for guidelines on script creation and association.
Refer to the "Script Best Practices" section for guidelines on script creation and association.
Venue Association Procedure
To associate venues with Cisco StadiumVision Director objects, complete the following steps:
Step 1 ![]() Log into Cisco StadiumVision Director as an administrator.
Log into Cisco StadiumVision Director as an administrator.
Step 2 ![]() From the main menu, click Control Panel.
From the main menu, click Control Panel.
Step 3 ![]() Go to Setup > Venues.
Go to Setup > Venues.
Step 4 ![]() In the Venue list, click the name of the venue that you want to associate.
In the Venue list, click the name of the venue that you want to associate.
Step 5 ![]() Do the following to assign object types to the selected venue:
Do the following to assign object types to the selected venue:
a. ![]() Click Locations, Playlists, Scripts, or Users.
Click Locations, Playlists, Scripts, or Users.
b. ![]() In the "Available" box, select the name of the location, playlist, script, or user that you want to associate.
In the "Available" box, select the name of the location, playlist, script, or user that you want to associate.
Tip ![]() You can multi-select objects. Click the checkbox and Ctrl+Click to select additional objects. In releases prior to Release 3.1 SP1, multi-selection was limited to Locations objects only.
You can multi-select objects. Click the checkbox and Ctrl+Click to select additional objects. In releases prior to Release 3.1 SP1, multi-selection was limited to Locations objects only.
c. ![]() Click the << button.
Click the << button.
The object name is added to the Assigned box.
d. ![]() Repeat from Step a. or Step b. for as many objects as you need to associate.
Repeat from Step a. or Step b. for as many objects as you need to associate.
Figure 3 Associate Scripts to Venue Example

Step 6 ![]() (Optional) To remove an assigned object, select the name of the object in the "Assigned" box and click the >> button.
(Optional) To remove an assigned object, select the name of the object in the "Assigned" box and click the >> button.
Step 7 ![]() When associations are complete, click Save.
When associations are complete, click Save.
Troubleshooting Venue Association Conflicts
When you attempt to associate objects to venues, certain conditions can cause the system to provide you with a warning about objects that are not optimally configured to be associated to the venue, such as a Location already being associated to a group or zone in another venue. The warning message identifies the objects, which allows you to do one of two things:
•![]() Click Close to go back to the Cisco StadiumVision Director configuration to confirm that the object best follows venue association guidelines and note or change the configuration.
Click Close to go back to the Cisco StadiumVision Director configuration to confirm that the object best follows venue association guidelines and note or change the configuration.
•![]() Click Force to permit the system to attempt to make the requested association for the objects in conflict.
Click Force to permit the system to attempt to make the requested association for the objects in conflict.
Note ![]() The Force button might not work for all associations. It is important to understand that an attempt is made by the system to force the specified user action but several factors influence its success. For best results, read the error message and see what objects are identified as being in conflict with the requested action and take corrective steps to avoid the conflict within Cisco StadiumVision Director.
The Force button might not work for all associations. It is important to understand that an attempt is made by the system to force the specified user action but several factors influence its success. For best results, read the error message and see what objects are identified as being in conflict with the requested action and take corrective steps to avoid the conflict within Cisco StadiumVision Director.
Figure 4 shows an example of an error message that can appear when you attempt to associate venue objects and there are conflicts within the Cisco StadiumVision Director configuration. Any other objects not in conflict will be associated to the venue as requested.
Figure 4 Venue Association Conflict Message Example
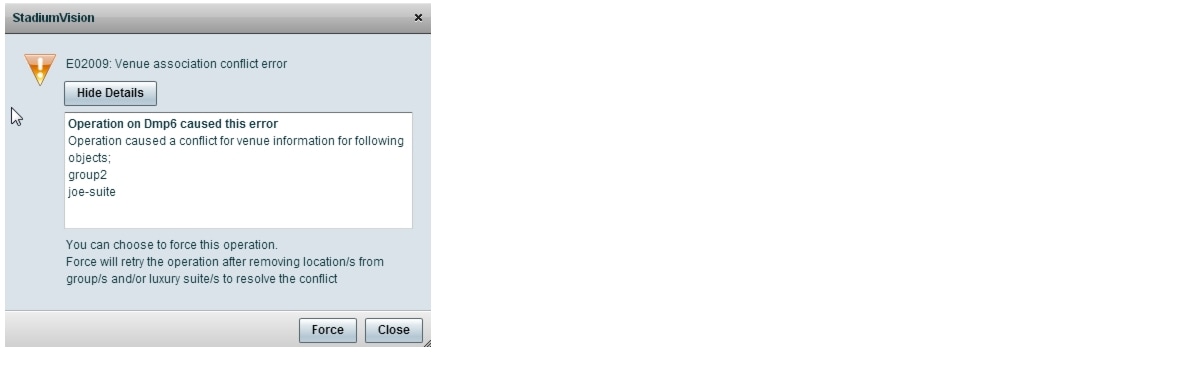
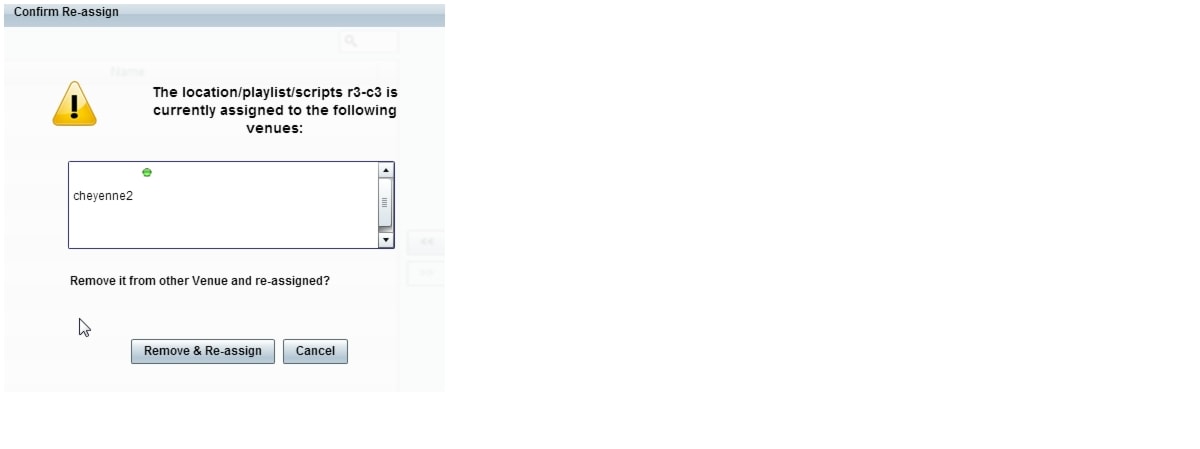
Figure 5 shows an example of a venue assignment conflict message where the location, playlist, or script that you tried to assign to a venue is identified as already assigned to another venue. The original venue assignment is displayed in the message ("Cheyenne2" in this example). You can do one of two things:
•![]() Click Remove & Re-assign to proceed with the new venue assignment and remove the specified object from its current venue assignment.
Click Remove & Re-assign to proceed with the new venue assignment and remove the specified object from its current venue assignment.
•![]() Click Cancel to retain the original venue assignment and return to Cisco StadiumVision Director.
Click Cancel to retain the original venue assignment and return to Cisco StadiumVision Director.
Figure 5 Confirm Object Reassignment Message Example
Removing Venues From Cisco StadiumVision Director
To remove a venue from Cisco StadiumVision Director, complete the following steps:
Step 1 ![]() Log into Cisco StadiumVision Director as an administrator.
Log into Cisco StadiumVision Director as an administrator.
Step 2 ![]() From the main menu, click Control Panel.
From the main menu, click Control Panel.
Step 3 ![]() Go to Setup > Venues.
Go to Setup > Venues.
Step 4 ![]() Dissassociate all objects that are linked to the venue that you want to remove.
Dissassociate all objects that are linked to the venue that you want to remove.
Step 5 ![]() In the Venue List box, select the venue that you want to remove.
In the Venue List box, select the venue that you want to remove.
Step 6 ![]() Click the delete icon (red dash).
Click the delete icon (red dash).
Selecting Venue Scope
You can select venue scope in the Control Panel and in the Management Dashboard. However only certain areas of the Control Panel interface are venue aware. Once you have enabled the software for multiple venue support and added new venues in the Control Panel, you can use the venue selector in those areas that are venue aware.
Venue status is indicated in the venue selector using a radio button that is colored red to indicate that the venue is disabled and green to show that the venue is online.
To select venue scope, complete the following tasks:
Step 1 ![]() Log into Cisco StadiumVision Director as an administrator, content manager, or venue operator.
Log into Cisco StadiumVision Director as an administrator, content manager, or venue operator.
Step 2 ![]() Go to the Control Panel (or Management Dashboard, as allowed by your role).
Go to the Control Panel (or Management Dashboard, as allowed by your role).
Step 3 ![]() At the top of the window, look for the venue selector drop-down box.
At the top of the window, look for the venue selector drop-down box.
Figure 6 shows an example of the venue selector in the Cisco StadiumVision Control Panel.
Figure 6 Venue Selector Drop-Down Box in the Control Panel

Step 4 ![]() Do one of the following:
Do one of the following:
•![]() To apply the scope of operation to a specific venue, select the name of the venue in the drop-down box.
To apply the scope of operation to a specific venue, select the name of the venue in the drop-down box.
•![]() To apply the scope of operation to all venues, select All Venues.
To apply the scope of operation to all venues, select All Venues.
Step 5 ![]() Continue to the Control Panel area that you want to configure.
Continue to the Control Panel area that you want to configure.
Monitoring Venues From the Management Dashboard
You can monitor the status of remote devices for selected venues from the Management Dashboard.
The red, green, or gray LED to the left of venue names in the venue selector represents the status of the Cisco StadiumVision Director remote server, but not whether the DMPs in the venue are accessible.
You also can see if there are connection issues for the Cisco StadiumVision Director remote server Monitor and Status > Services area of the Management Dashboard.
Traffic monitoring of remote DMPs in the Management Dashboard is performed using unicast messaging, so multicast optimization does not apply nor interfere with the multicast optimization for the Cisco StadiumVision Director Remote server processing.
To monitor venues from the Management Dashboard, complete the following steps:
Step 1 ![]() Log into the Cisco StadiumVision Director server as an administrator.
Log into the Cisco StadiumVision Director server as an administrator.
Step 2 ![]() Go to the Management Dashboard.
Go to the Management Dashboard.
Step 3 ![]() At the top of the window, select the venue whose devices you want to monitor.
At the top of the window, select the venue whose devices you want to monitor.
Step 4 ![]() Click Monitor and Status.
Click Monitor and Status.
Step 5 ![]() Select the area that you want to get information about. Go to Services to see the status of the Cisco StadiumVision Director remote server connection.
Select the area that you want to get information about. Go to Services to see the status of the Cisco StadiumVision Director remote server connection.
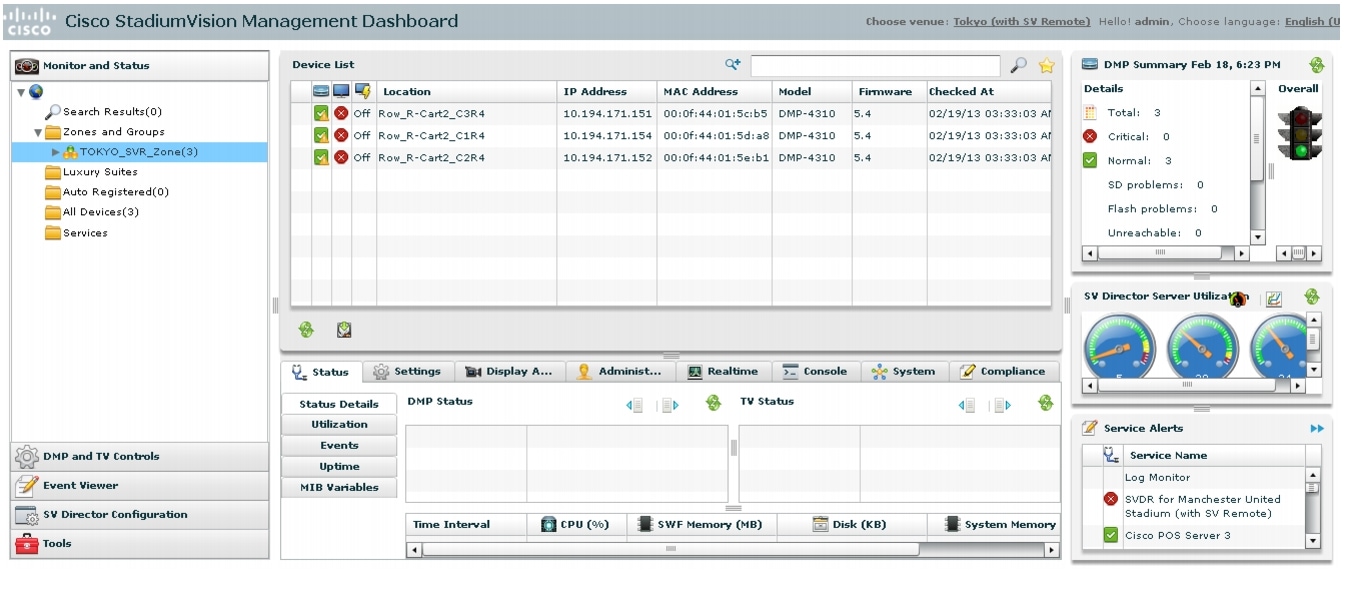
Figure 7 shows information about zones in the Tokyo venue.
Figure 7 Monitoring Devices for a Specific Venue in the Management Dashboard
How to Modify Multicast Optimization Registry Settings
Note ![]() You should not need to modify the multicast optimization registry settings to change the multicast addressing or ports unless your site has some specific network limitations such as firewall restrictions, or otherwise has overlap with the default multicast addressing and ports used by Cisco StadiumVision. For more information about multicast configuration in the Cisco StadiumVision network and for the Cisco StadiumVision Remote environment, refer to the Cisco Connected Stadium Design Guide available from your Cisco Systems representative.
You should not need to modify the multicast optimization registry settings to change the multicast addressing or ports unless your site has some specific network limitations such as firewall restrictions, or otherwise has overlap with the default multicast addressing and ports used by Cisco StadiumVision. For more information about multicast configuration in the Cisco StadiumVision network and for the Cisco StadiumVision Remote environment, refer to the Cisco Connected Stadium Design Guide available from your Cisco Systems representative.
This section describes how to modify some of the default multicast settings that are automatically configured and implemented when you enable multiple venue support on the Cisco StadiumVision Director server. It includes the following topics:
•![]() Multicast Registry Keys in Cisco StadiumVision Director
Multicast Registry Keys in Cisco StadiumVision Director
•![]() Guidelines for Multicast Optimization Registry Settings
Guidelines for Multicast Optimization Registry Settings
•![]() Configuring the Multicast Optimization Registry Settings
Configuring the Multicast Optimization Registry Settings
For information about how the multicast optimization feature works, see the "Multicast Optimization for Remote Venues" section on page 25.
Multicast Registry Keys in Cisco StadiumVision Director
Table 1 describes the registry keys in Cisco StadiumVision Director that control the multicast configuration.
|
|
|
|
|---|---|---|
MulticastHostPort |
239.192.0.254:50001 |
Sets the global multicast address and port for Cisco StadiumVision Director.
|
transport.remote.enableSiteSending1 |
true |
Enables (true) and disables (false) multicast optimization. If set to false, then Cisco StadiumVision Director only multicasts all messages using the global multicast address rather than unicasting some messages to the remote servers. |
transport.remote.multicast_send_address_port1 |
239.193.1.1:7778 |
Specifies the multicast group and port that the Cisco StadiumVision Director Remote server will rebroadcast to the remote DMPs. This is also the address that the DMPs will listen on. |
transport.remote.udp_listen_port1 |
7777 |
Specifies the port that is used for the site-specific unicast messages from Cisco StadiumVision Director to the remote servers, which are ultimately rebroadcast to the DMPs using the localized multicast group. In Figure 1, this is identified as "ipaddr-venue1:7777" or "ipaddr-venue2:7777" where ipaddr-venueX is replaced by the dotted decimal IPv4 address of the remote server at that venue. |
1 The registry keys prefixed by "transport.remote" are not visible in the registry table in the Management Dashboard. If you must modify these keys, you need to add them manually to the table with the proper registry key syntax and value format. |
Guidelines for Multicast Optimization Registry Settings
When modifying the multicast optimization registry keys, consider the following guidelines:
•![]() The multicast send port (port portion of transport.remote.multicast_send_address_port) cannot equal the multicast listen port (port portion of MulticastHostPort).
The multicast send port (port portion of transport.remote.multicast_send_address_port) cannot equal the multicast listen port (port portion of MulticastHostPort).
•![]() The multicast send port (port portion of transport.remote.multicast_send_address_port) cannot equal the unicast listen port (transport.remote.udp_listen_port).
The multicast send port (port portion of transport.remote.multicast_send_address_port) cannot equal the unicast listen port (transport.remote.udp_listen_port).
•![]() The multicast listen port (port portion of MulticastHostPort) cannot equal the unicast listen port (transport.remote.udp_listen_port).
The multicast listen port (port portion of MulticastHostPort) cannot equal the unicast listen port (transport.remote.udp_listen_port).
•![]() The multicast listen group/address (address portion of MulticastHostPort) cannot equal the multicast send group/address (address portion of transport.remote.multicast_send_address_port).
The multicast listen group/address (address portion of MulticastHostPort) cannot equal the multicast send group/address (address portion of transport.remote.multicast_send_address_port).
Configuring the Multicast Optimization Registry Settings
To configure the multicast optimization registry settings, complete the following steps:
Step 1 ![]() From the Management Dashboard, select Tools > Advanced > Registry.
From the Management Dashboard, select Tools > Advanced > Registry.
Step 2 ![]() To modify the global multicast address, scroll to the "MulticastHostPort" registry key in the Parameters list and change the address in that Value cell.
To modify the global multicast address, scroll to the "MulticastHostPort" registry key in the Parameters list and change the address in that Value cell.
Step 3 ![]() To modify any of the "transport.remote" registry key values, do the following:
To modify any of the "transport.remote" registry key values, do the following:
a. ![]() In the Registry Data table, click Add Row.
In the Registry Data table, click Add Row.
b. ![]() In the empty cell under the Key column, type the name of the registry key exactly as it appears in Table 1.
In the empty cell under the Key column, type the name of the registry key exactly as it appears in Table 1.
c. ![]() In the empty cell under the Value column, type the new value following the format of the default value shown in Table 1 for that registry key.
In the empty cell under the Value column, type the new value following the format of the default value shown in Table 1 for that registry key.
Step 4 ![]() Click Apply.
Click Apply.
How to Migrate Deployed Devices From a Single Venue to a Multiple Venue System
This section describes the best practices for migrating a large number of deployed devices and locations from a single venue to a multiple venue system using the Bulk Administration Tool (BAT).
For more information about the tasks referenced here for exporting, editing, and importing TSV files using BAT, see the Cisco StadiumVision Director Bulk Adminstration Tool guide.
This section includes the following tasks:
•![]() Prerequisites (required)
Prerequisites (required)
•![]() Exporting a Device List for the Original System Configuration (required)
Exporting a Device List for the Original System Configuration (required)
•![]() Creating New Venues (required)
Creating New Venues (required)
•![]() Removing All Locations From Existing Groups (required)
Removing All Locations From Existing Groups (required)
•![]() Removing Locations From Existing Suites (only required if DMPs are in suites)
Removing Locations From Existing Suites (only required if DMPs are in suites)
•![]() Associating Initial Locations to Venues (required)
Associating Initial Locations to Venues (required)
•![]() Completing Venue-Specific Information and Association of Locations Using BAT (required)
Completing Venue-Specific Information and Association of Locations Using BAT (required)
•![]() Populating Group Information in the New Device List (required)
Populating Group Information in the New Device List (required)
Prerequisites
Before you migrate deployed devices from Cisco StadiumVision Director, be sure that the following requirements are met:
•![]() You must be sure that the following object types are configured to be unique per venue:
You must be sure that the following object types are configured to be unique per venue:
Groups, zones, locations, scripts, suites, and playlists.
•![]() A recommended best practice is to use a naming convention that easily identifies the venue to which an object is associated by assigning a prefix to the object name. This can make it easier to find and track related objects.
A recommended best practice is to use a naming convention that easily identifies the venue to which an object is associated by assigning a prefix to the object name. This can make it easier to find and track related objects.
For example, to name scripts , playlists , and locations that belong to a venue called "WEST-SIDE-VENUE" you could use the prefex "WE" such as WE-Script1, WE-Script2, WE-Playlist1, WE-Location1, and so on.
•![]() If you have existing DMPs in a group that are targeted to be in multiple venues, they need to be split up so that each group contains DMPs only for a single venue.
If you have existing DMPs in a group that are targeted to be in multiple venues, they need to be split up so that each group contains DMPs only for a single venue.
For example, if there is a group (ALL-DMPs) that consists of all of the DMPs in Cisco StadiumVision Director, then the group needs to be sub-divided into smaller groups of DMPs by venue, such as "ALL-DMPs-Venue1," "All-DMPs-Venue2," "ALL-DMPs-No-Venue" and so on.
This same rule applies to other objects like zones, scripts, suites, and locations. If any of these have objects that are targeted to be in different venues or to be global (that is, objects that are not part of any venues) then they need to be sub-divided on a per-venue basis.
•![]() (For DMPs in suites only) All suites must have a suite controller attached.
(For DMPs in suites only) All suites must have a suite controller attached.
Tip ![]() You can easily verify whether or not a controller is defined for a suite by looking at the original exported device list (See "Exporting a Device List for the Original System Configuration" section.) If Column N (Suite Name) has a value and Column M (Suite Control Type) does not have a corresponding value in the same row, then you know that the Suite named in Column N does not have a device list attached to it.
You can easily verify whether or not a controller is defined for a suite by looking at the original exported device list (See "Exporting a Device List for the Original System Configuration" section.) If Column N (Suite Name) has a value and Column M (Suite Control Type) does not have a corresponding value in the same row, then you know that the Suite named in Column N does not have a device list attached to it.
If a suite controller is not attached, then you must assign a suite controller to it. If there are not any available suite controllers, you can create an artificial one and assign it to the suite. These fake controllers can be deleted after the migration process has completed successfully:
1. ![]() Go to Control Panel > Setup > Devices > IP Phones.
Go to Control Panel > Setup > Devices > IP Phones.
2. ![]() Create artificial IP phone entries with fake, non-pingable IP addresses.
Create artificial IP phone entries with fake, non-pingable IP addresses.
3. ![]() Go to Suites.
Go to Suites.
4. ![]() Select the suite that does not have a suite controller.
Select the suite that does not have a suite controller.
5. ![]() Click the Phone & Remote tab on the right panel that has suite properties.
Click the Phone & Remote tab on the right panel that has suite properties.
6. ![]() Assign the artificial IP phone that you created to the suite by selecting the checkbox.
Assign the artificial IP phone that you created to the suite by selecting the checkbox.
Exporting a Device List for the Original System Configuration
This task should be done to preserve initial single venue system configuration information and to aid re-population of that information to the new multi-venue device list created later.
For more information, see the "Exporting and Downloading a TSV File for Locations and DMPs" topic in the Cisco StadiumVision Director Bulk Adminstration Tool guide.
To export a device list for the original system configuration, complete the following steps:
Step 1 ![]() Go to Control Panel > Setup > Devices > Locations & DMPs.
Go to Control Panel > Setup > Devices > Locations & DMPs.
Step 2 ![]() Click Export.
Click Export.
Step 3 ![]() When the Export box displays, click Download.
When the Export box displays, click Download.
Step 4 ![]() When the "Select location for download" window appears, type the name of the .txt file that you want to save, or accept the default name and click Save.
When the "Select location for download" window appears, type the name of the .txt file that you want to save, or accept the default name and click Save.
Step 5 ![]() Be sure to save a master copy of the originally exported device list.
Be sure to save a master copy of the originally exported device list.
Creating New Venues
This task describes how to create a new venue with basic information, which will be further updated in a later task using BAT.
To create new venues, complete the following steps:
Step 1 ![]() Go to Control Panel > Setup > Venues.
Go to Control Panel > Setup > Venues.
Step 2 ![]() Specify the Name and Timezone for the venue.
Specify the Name and Timezone for the venue.
Step 3 ![]() Click Save.
Click Save.
Removing All Locations From Existing Groups
Note ![]() Before you remove locations from existing groups, be sure that you have completed the requirements in the Prerequisites section to place all objects in unique groups per venue.
Before you remove locations from existing groups, be sure that you have completed the requirements in the Prerequisites section to place all objects in unique groups per venue.
Before associating Locations to the new venues, you need to remove them from existing groups.
To remove all Locations from Groups, complete the following steps:
Step 1 ![]() Go to Control Panel > Setup > Zones & Groups> Location<->Group.
Go to Control Panel > Setup > Zones & Groups> Location<->Group.
Step 2 ![]() Click Groups.
Click Groups.
Step 3 ![]() Select an individual group.
Select an individual group.
Step 4 ![]() In the Locations panel on the right, select all Locations for the selected group.
In the Locations panel on the right, select all Locations for the selected group.
Tip ![]() You can use Ctrl+Click or Shift+Click key sequences to multi-select the Locations.
You can use Ctrl+Click or Shift+Click key sequences to multi-select the Locations.
Step 5 ![]() Click Remove From Groups.
Click Remove From Groups.
Step 6 ![]() Repeat from Step 3 for all groups that need locations removed.
Repeat from Step 3 for all groups that need locations removed.
Step 7 ![]() Refresh the browser to reload the UI so that the changes are updated.
Refresh the browser to reload the UI so that the changes are updated.
Removing Locations From Existing Suites
To associate locations to a venue, they need to be removed from any existing suites. These locations will be added back to the configuration using the BAT tool using the original Device list that was exported.
To remove Locations from existing suites, complete the following steps:
Step 1 ![]() Go to Control Panel > Setup > Suites.
Go to Control Panel > Setup > Suites.
Step 2 ![]() Select any suites that contain locations that are targeted to be moved to venues.
Select any suites that contain locations that are targeted to be moved to venues.
Step 3 ![]() Select each location and click the red '-' button on the top to delete it from the suite.
Select each location and click the red '-' button on the top to delete it from the suite.
Tip ![]() Click the red '-' button rapidly to delete DMPs quickly from the suite.
Click the red '-' button rapidly to delete DMPs quickly from the suite.
Step 4 ![]() After all DMPs are removed from the suite, be sure to click Save.
After all DMPs are removed from the suite, be sure to click Save.
Step 5 ![]() Repeat from Step 2 for each suite from which you need to remove locations.
Repeat from Step 2 for each suite from which you need to remove locations.
Associating Initial Locations to Venues
To establish the venue-specific fields when you export the new multi-venue device list, you need to associate at least one Location to each new venue that you created.
For more information, see the Associating Venues with Cisco StadiumVision Director Objects.
Completing Venue-Specific Information and Association of Locations Using BAT
This task is performed to more easily complete configuration of any remaining venue-specific information and association of locations using BAT.
To complete venue-specific information and association of Locations, complete the following steps:
Step 1 ![]() Export a new device list.
Export a new device list.
After the association of at least one Location per venue, the newly exported device list file now contains the venue-specific field entries that can now be more easily populated with the remaining required configuration information.
The venue-specific field entries in the BAT file are:
•![]() Venue Name
Venue Name
•![]() Venue Timezone
Venue Timezone
•![]() Venue Remote Server IP
Venue Remote Server IP
•![]() Venue JMX Password—The JMX password is saved in the venue information only when the system is disabled for global credentials.
Venue JMX Password—The JMX password is saved in the venue information only when the system is disabled for global credentials.
Note ![]() The Venue JMX Username field is always ignored.
The Venue JMX Username field is always ignored.
Step 2 ![]() To complete association of Locations to venues, edit the TSV file using a spreadsheet application such as Microsoft Excel to:
To complete association of Locations to venues, edit the TSV file using a spreadsheet application such as Microsoft Excel to:
a. ![]() Complete the venue-specific information.
Complete the venue-specific information.
a. ![]() Copy (or auto-fill) to add rows for new Locations that you want to add to the venues.
Copy (or auto-fill) to add rows for new Locations that you want to add to the venues.
Step 3 ![]() Import the device list.
Import the device list.
For more information, see the "Importing a TSV File" topic in the Cisco StadiumVision Director Bulk Adminstration Tool guide.
Step 4 ![]() Go to Control Panel > Setup > Venues and confirm that the Locations are properly associated to their venues.
Go to Control Panel > Setup > Venues and confirm that the Locations are properly associated to their venues.
Populating Group Information in the New Device List
This step allows you to more easily re-populate the original system's Group information to the new multi-venue device list.
To populate Group and other information from the original device list, complete the following steps:
Step 1 ![]() Export a new device list and open the file in your spreadsheet application.
Export a new device list and open the file in your spreadsheet application.
Step 2 ![]() Excluding the first row, select all rows and columns.
Excluding the first row, select all rows and columns.
Step 3 ![]() Sort the spreadsheet by the Name field (column E).
Sort the spreadsheet by the Name field (column E).
Step 4 ![]() Obtain the copy of the master device list that you exported in in Step 1. Also sort the master spreadsheet by the Name field.
Obtain the copy of the master device list that you exported in in Step 1. Also sort the master spreadsheet by the Name field.
Step 5 ![]() From the original master file, copy the columns that have Group information (Z, AA, AB, AC, and so on) and paste them appropriately into your new device list.
From the original master file, copy the columns that have Group information (Z, AA, AB, AC, and so on) and paste them appropriately into your new device list.
Tip ![]() When working with certain rows and columns in Microsoft Excel, the hide/unhide columns or rows feature and freeze/unfreeze feature can be used to efficiently do this job. For information about these features, see the Microsoft support site.
When working with certain rows and columns in Microsoft Excel, the hide/unhide columns or rows feature and freeze/unfreeze feature can be used to efficiently do this job. For information about these features, see the Microsoft support site.
Step 6 ![]() From the original master file, also copy columns that have Suites and Suite Controller information (J-Y).
From the original master file, also copy columns that have Suites and Suite Controller information (J-Y).
Step 7 ![]() Save the new device list.
Save the new device list.
Step 8 ![]() Import the new device list into Cisco StadiumVision Director.
Import the new device list into Cisco StadiumVision Director.
Step 9 ![]() After the import is complete, refresh the browser.
After the import is complete, refresh the browser.
 Feedback