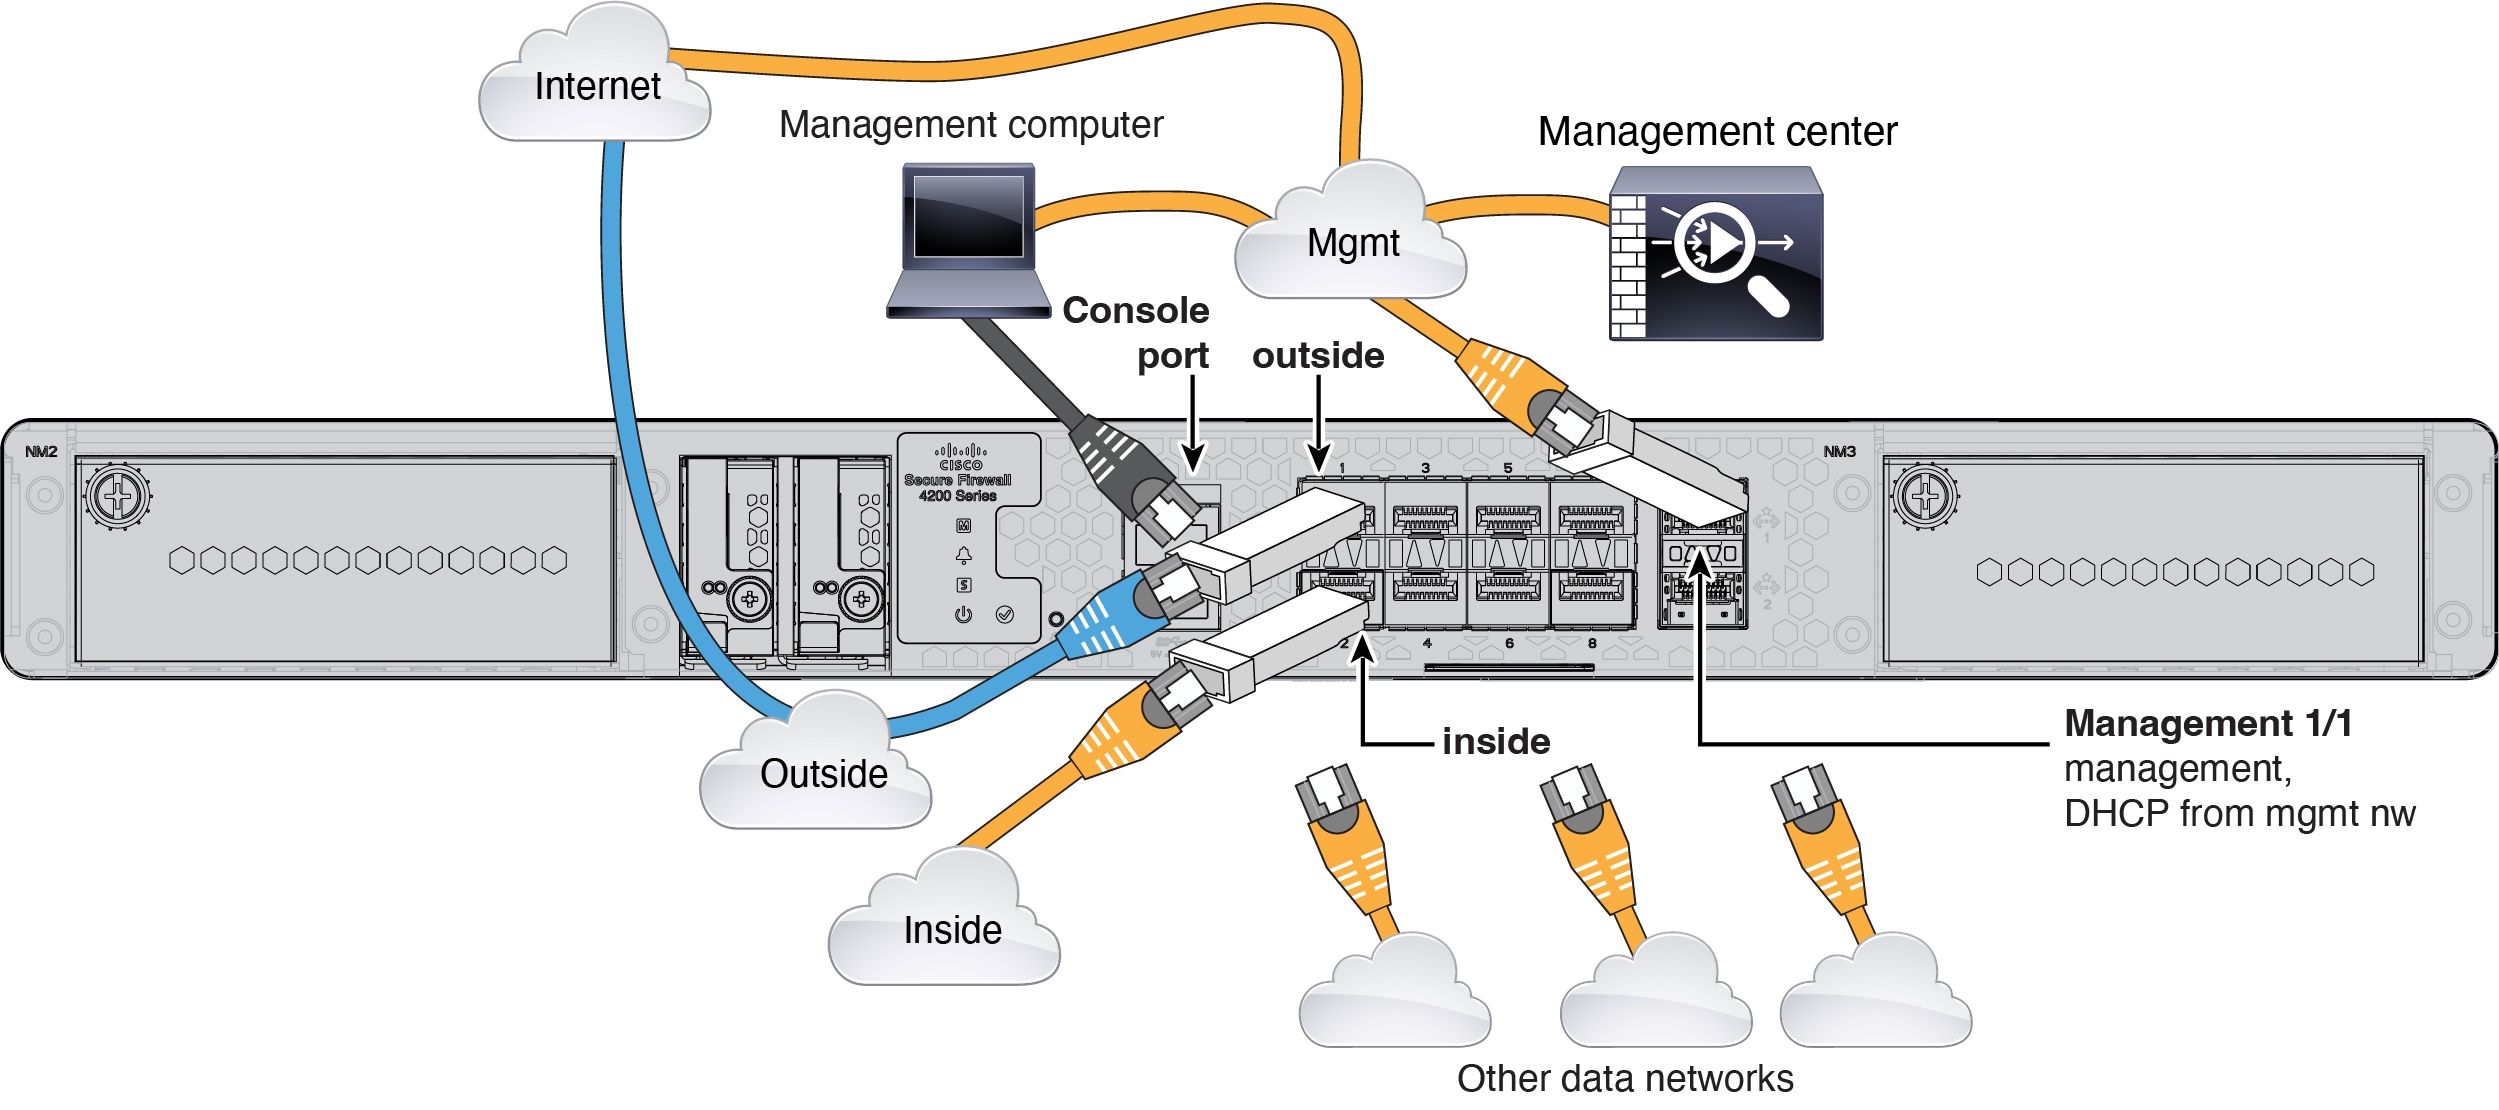
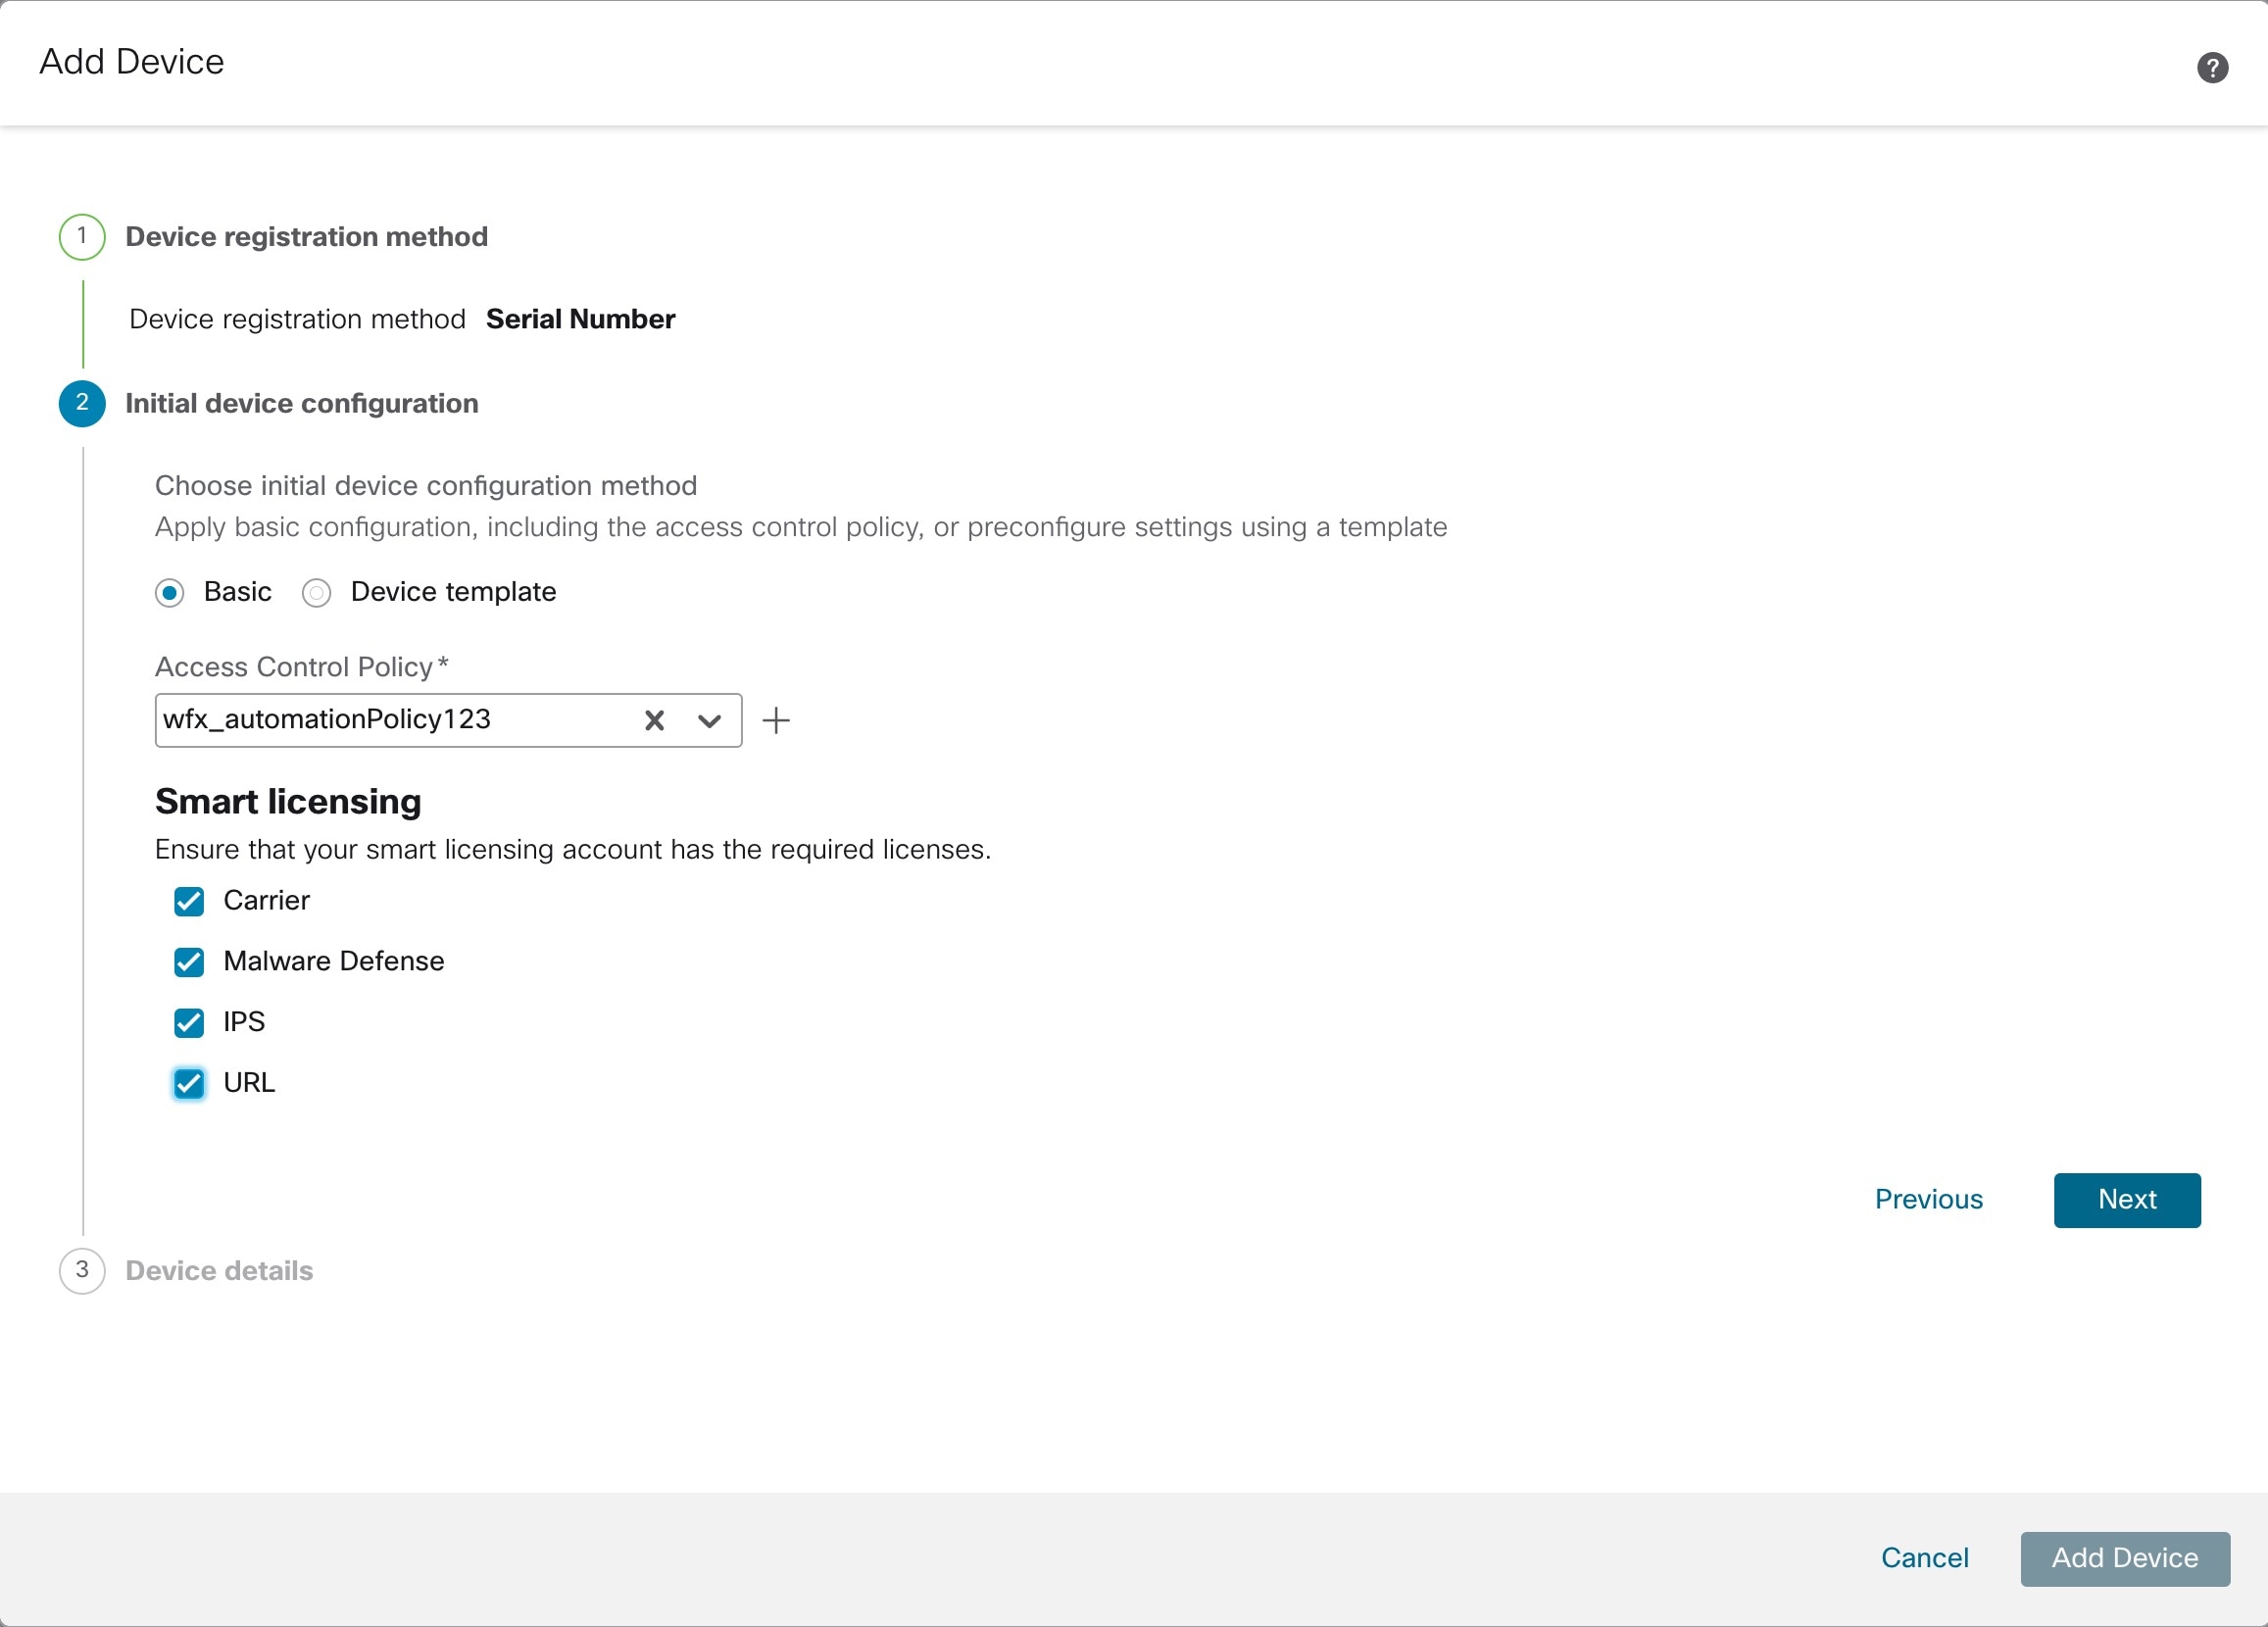
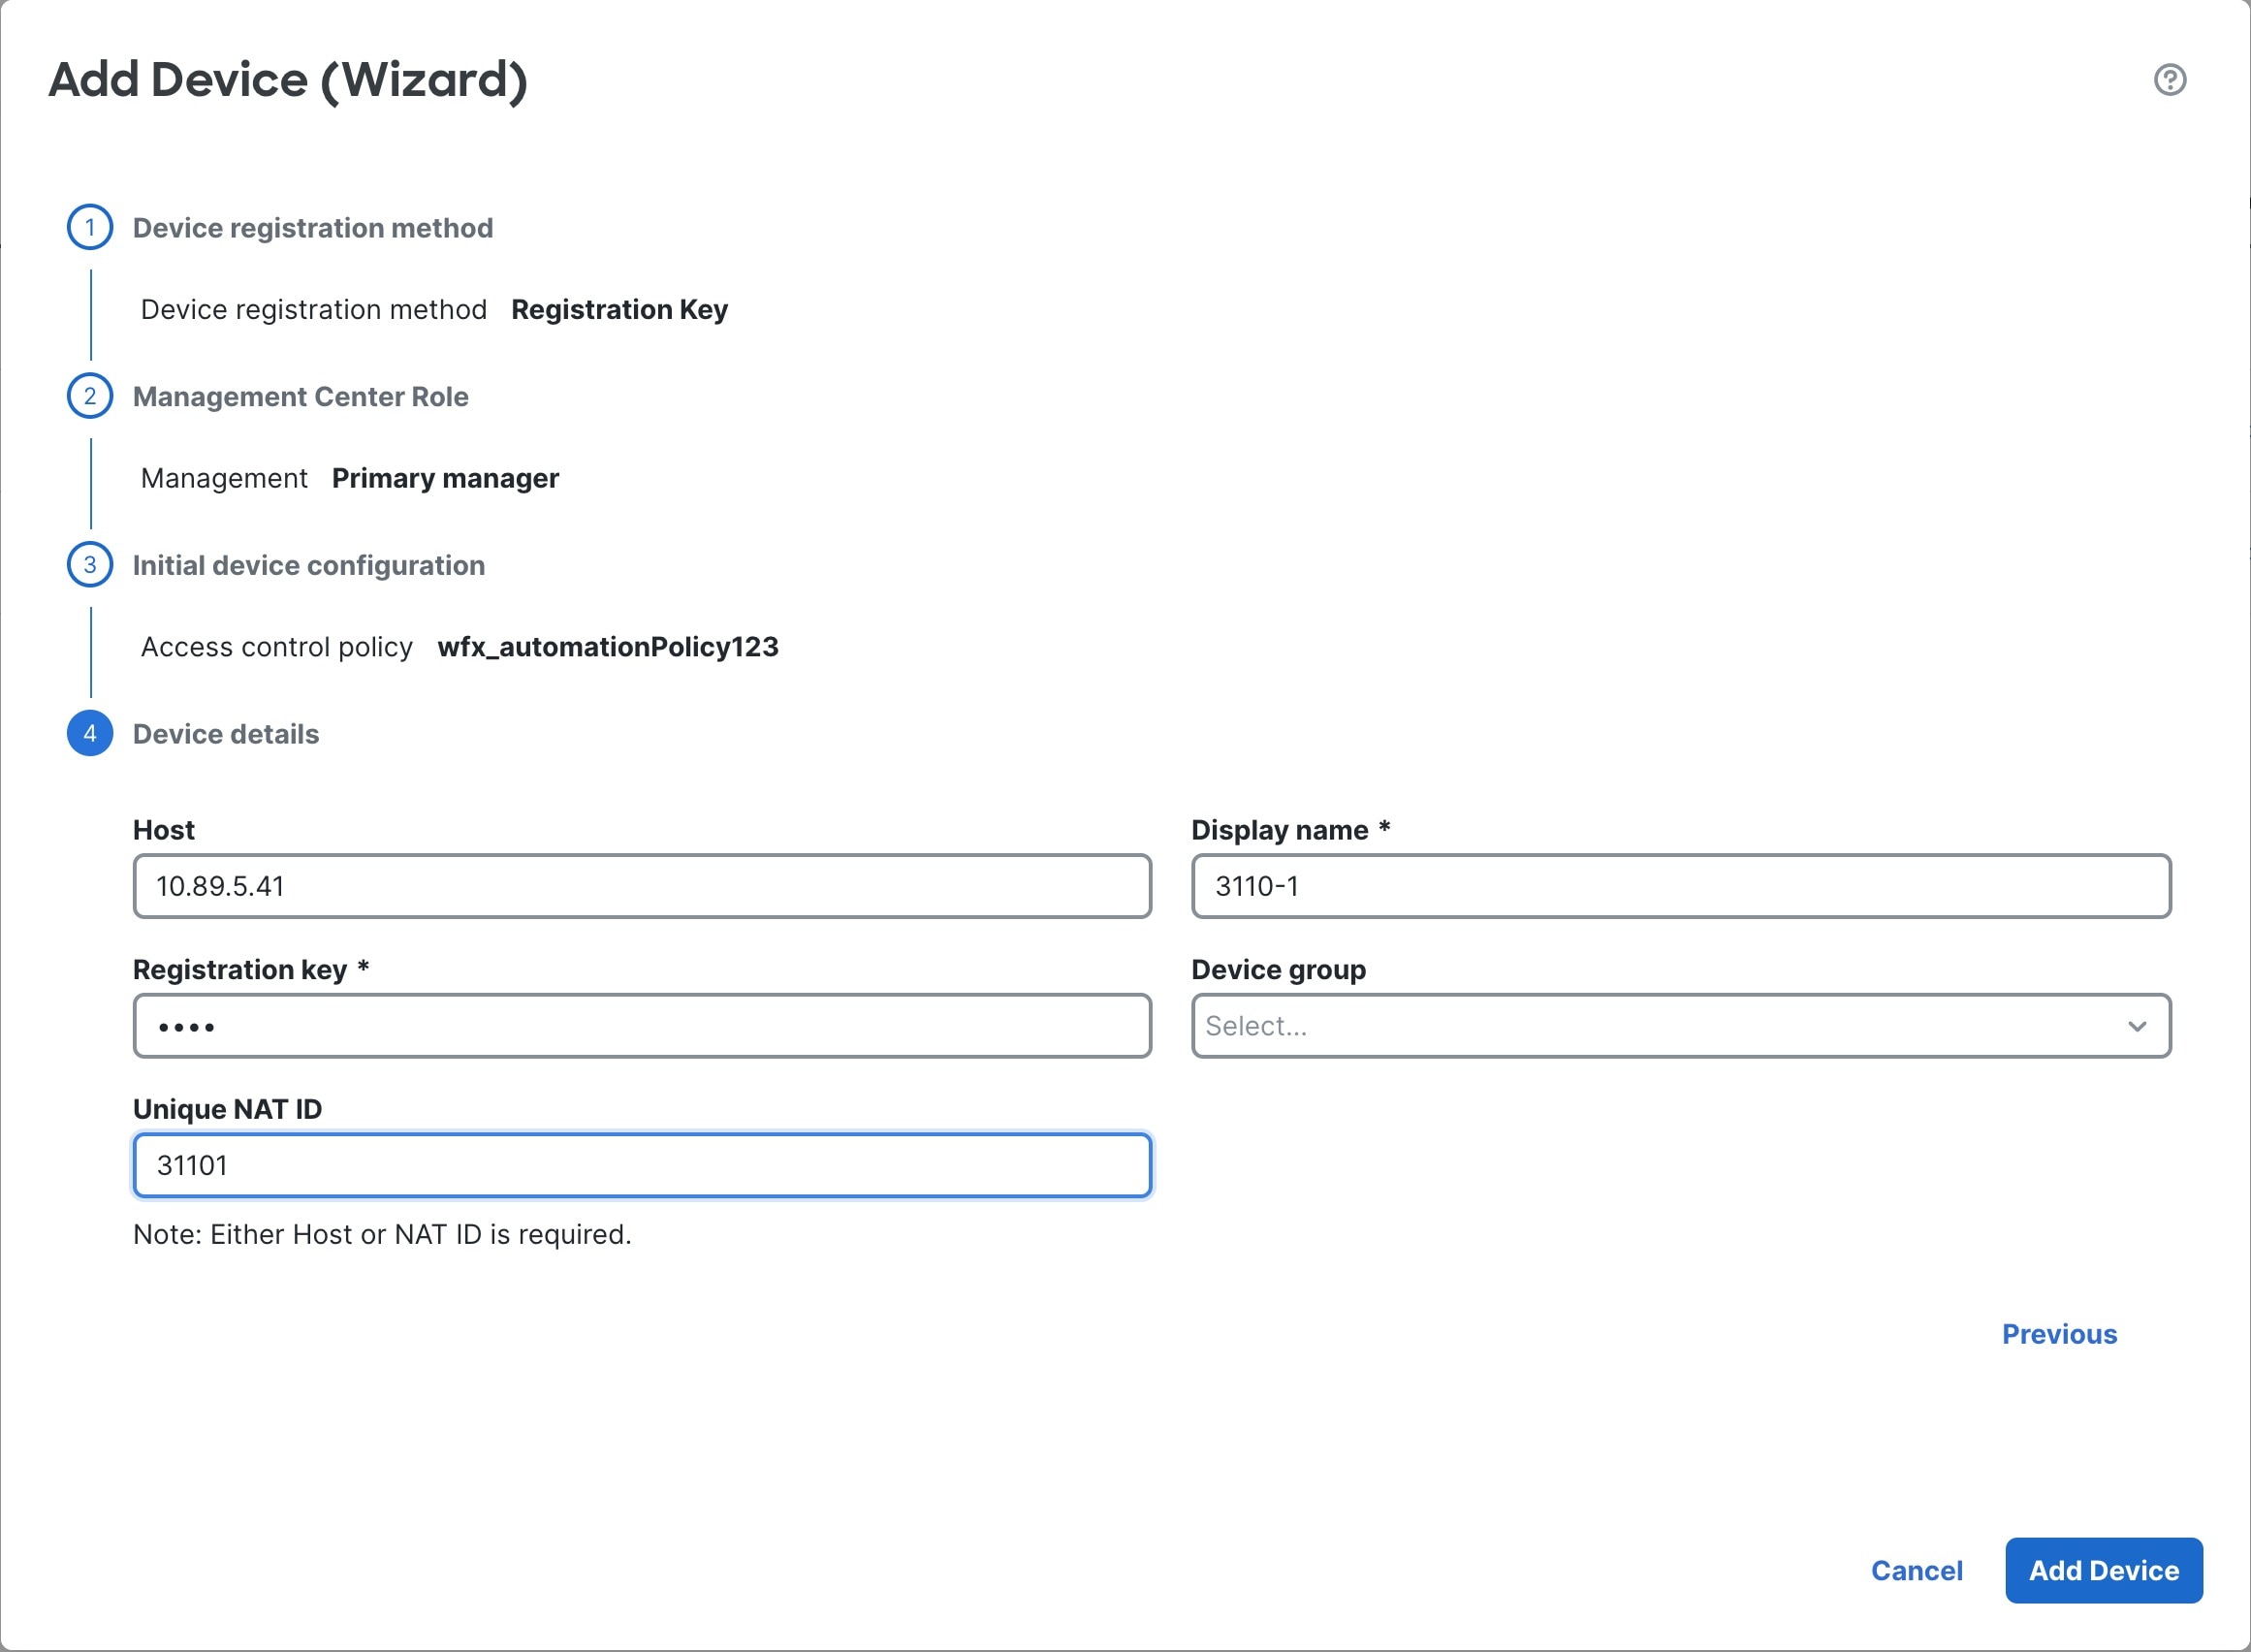
连接并注册防火墙

连接防火墙,然后将防火墙注册到管理中心

连接防火墙的电缆

管理中心 连接到专用管理 1/1 接口。管理网络需要访问互联网以进行更新。例如,您可以通过防火墙本身将管理网络与互联网连接(如连接到内部网络)。

  • 获取控制台电缆 - 默认情况下,防火墙不随附控制台电缆,因此您需要购买第三方 USB 转 RJ-45 串行电缆。

  • 将 SFP 安装到数据接口端口 - 内置端口是需要 1/10/25-Gb SFP28 模块的 1/10/25-Gb SFP28 端口。

  • 有关详细信息,请参阅硬件安装指南

连接管理网络

初始配置:CLI

使用 CLI 设置脚本设置专用管理 IP 地址、网关和其他基本网络设置。

过程


步骤 1

连接控制台端口并访问 威胁防御 CLI。请参阅访问威胁防御 CLI

步骤 2

完成管理界面设置的 CLI 设置脚本。


除非清除配置,否则无法重复 CLI 设置脚本(例如,通过重新建立映像)。但是,可以稍后在 CLI 中使用 configure network 命令更改所有这些设置。请参阅 Cisco Secure Firewall Threat Defense 命令参考


You must accept the EULA to continue.
Press <ENTER> to display the EULA:                 
Cisco General Terms
[...]

Please enter 'YES' or press <ENTER> to AGREE to the EULA:

System initialization in progress.  Please stand by.
You must configure the network to continue.
Configure at least one of IPv4 or IPv6 unless managing via data interfaces.
Do you want to configure IPv4? (y/n) [y]:
Do you want to configure IPv6? (y/n) [y]: n

指南:为至少其中一种地址类型输入 y

Configure IPv4 via DHCP or manually? (dhcp/manual) [manual]:
Enter an IPv4 address for the management interface [192.168.45.61]: 10.89.5.17
Enter an IPv4 netmask for the management interface [255.255.255.0]: 255.255.255.192

Enter the IPv4 default gateway for the management interface [data-interfaces]: 10.10.10.1
Enter a fully qualified hostname for this system [firepower]: 1010-3
Enter a comma-separated list of DNS servers or 'none' [208.67.222.222,208.67.220.220,2620:119:35::35]:
Enter a comma-separated list of search domains or 'none' []: cisco.com
If your networking information has changed, you will need to reconnect.
Disabling IPv6 configuration: management0
Setting DNS servers: 208.67.222.222,208.67.220.220,2620:119:35::35
Setting DNS domains:cisco.com
Setting hostname as 1010-3
Setting static IPv4: 10.89.5.17 netmask: 255.255.255.192 gateway: data on management0
Updating routing tables, please wait...
All configurations applied to the system. Took 3 Seconds.
Saving a copy of running network configuration to local disk.
For HTTP Proxy configuration, run 'configure network http-proxy'
Configuring firewall mode ...


Device is in OffBox mode - disabling/removing port 443 from iptables.
Update policy deployment information
    - add device configuration
    - add network discovery
    - add system policy

You can register the sensor to a Firepower Management Center and use the
Firepower Management Center to manage it. Note that registering the sensor
to a Firepower Management Center disables on-sensor Firepower Services
management capabilities.

When registering the sensor to a Firepower Management Center, a unique
alphanumeric registration key is always required.  In most cases, to register
a sensor to a Firepower Management Center, you must provide the hostname or
the IP address along with the registration key.
'configure manager add [hostname | ip address ] [registration key ]'

However, if the sensor and the Firepower Management Center are separated by a
NAT device, you must enter a unique NAT ID, along with the unique registration
key.
'configure manager add DONTRESOLVE [registration key ] [ NAT ID ]'

Later, using the web interface on the Firepower Management Center, you must
use the same registration key and, if necessary, the same NAT ID when you add
this sensor to the Firepower Management Center.
>

步骤 3

识别 管理中心

configure manager add {主机名 | IPv4_address | IPv6_address | DONTRESOLVE} reg_key nat_id

  • {hostname | IPv4_address | IPv6_address | DONTRESOLVE} - 指定 管理中心 的 FQDN 或 IP 地址。如果 管理中心 无法直接寻址,请使用 DONTRESOLVE,在这种情况下,防火墙必须具有可访问的 IP 地址或主机名。

  • reg_key - 指定您选择的一次性注册密钥,注册威胁防御时也要在管理中心上指定它。注册密钥不得超过 37 个字符。有效字符包括字母数字(A–Z、a–z、0–9)和连字符 (-)。

  • nat_id - 指定了您选择的唯一一次性字符串,您还需要在 管理中心 上指定它。NAT ID 不得超过 37 个字符。有效字符包括字母数字(A–Z、a–z、0–9)和连字符 (-)。此 ID 不能用于将任何其他设备注册到 管理中心

示例:


> configure manager add fmc-1.example.com regk3y78 natid56
Manager successfully configured.

向管理中心注册防火墙

将防火墙手动注册到 管理中心

过程


步骤 1

登录管理中心

  1. 输入以下 URL。

    https://fmc_ip_address

  2. 输入您的用户名和密码。

  3. 点击登录

步骤 2

选择设备 > 设备管理

步骤 3

添加下拉列表中,选择添加设备

图 1. 使用注册密钥添加设备
使用注册密钥添加设备

设置以下参数:

  • 主机 (Host) - 输入要添加的防火墙的 IP 地址或主机名(如果可用)。如果不可用,请将此字段留空。

  • 显示名称 (Display Name) - 输入要在 管理中心 中显示的防火墙名称。之后将无法更改该名称。

  • 注册密钥 (Registration Key) - 输入您在防火墙初始配置中指定的注册密钥。

  • 域 (Domain) - 如果有多域环境,请将设备分配给分叶域。

  • 组 (Group) - 如果在使用组,则将其分配给设备组。

  • 访问控制策略 (Access Control Policy) - 选择初始策略。除非已经拥有您知道自己需要使用的自定义策略,否则选择新建策略 (Create new policy),然后选择阻止所有流量 (Block all traffic)。之后您可以更改此设置以允许流量通过;请参阅配置访问控制规则

    图 2. 新建策略
    新建策略
  • 智能许可—为要部署的功能分配所需的智能许可证。注意: 在添加设备后,您可以从 系统 > 许可证 > 智能许可证 页面应用 Secure Client 远程访问 VPN 许可证。

  • 唯一 NAT ID (Unique NAT ID) - 指定您在防火墙初始配置中指定的 NAT ID。

  • 传输数据包 (Transfer Packets) - 选中传输数据包 (Transfer Packets) 复选框,以便对于每个入侵事件,设备将数据包传输到 管理中心 进行检查。

    默认情况下,此选项已启用。对于每个入侵事件,设备会将事件信息和触发事件的数据包发送到 管理中心 进行检查。如果禁用此选项,则只会向 管理中心 发送事件信息,而不会发送数据包。

步骤 4

点击 Register

如果 威胁防御注册失败,请检查以下项:

  • Ping - 访问 威胁防御 CLI(请参阅访问威胁防御 CLI),然后使用以下命令 ping 管理中心 IP 地址:

    ping system fmc_ip_address

    如果 ping 不成功,使用 show network 命令检查网络设置。如果需要更改防火墙管理 IP 地址,请使用 configure network {ipv4 | ipv6} manual 命令。

  • 注册密钥、NAT ID 和 管理中心 IP 地址 - 确保在两个设备上使用相同的注册密钥和 NAT ID。可以在防火墙上使用 configure manager add 命令设定注册密钥和 NAT ID。

有关更多故障排除信息,请参阅 https://cisco.com/go/fmc-reg-error