在Cisco UCS Manager中配置分离的第2层

简介
本文档介绍如何在Cisco Unified Computing System Manager(UCS Manager)中配置分离的第2层(DL2),以及如何验证VLAN流量是否使用预期的上行链路。
环境
- 每个交换矩阵互联上至少有一个可用链路,上游交换机上有两个可用链路
- 交换矩阵互联和上游交换机之间的链路必须启用并配置为上行链路。如果不是,请参阅Cisco UCS Manager GUI配置指南:使用LAN上行链路管理器。
- 要使用的VLAN必须已存在于UCS Manager中。如果没有,请参阅Cisco UCS Manager GUI配置指南:使用LAN上行链路管理器创建命名VLAN。
- 必须在上游交换机上创建要使用的VLAN。
- 要使用的VLAN不能存在于服务配置文件上的任何其他虚拟网络接口卡(vNIC)上。
要求
了解以下主题很有帮助:
- Cisco Unified Computing System Manager(UCS Manager)。
- 基本了解不连续的第2层网络。
- 网络配置。
- vNIC配置。
使用的组件
| 产品 |
角色 |
版本/型号 |
|---|---|---|
| Cisco UCS Manager |
管理平台 |
4.2(3e) |
| 交换矩阵互联 |
UCS交换矩阵连接 |
6454 |
| Cisco UCS B系列服务器 |
正在测试的服务器 |
B200 M5 |
| Cisco Nexus交换机 |
上游交换机 |
Nexus 5672UP 16G-FC机箱 |
| Cisco Catalyst 交换机 |
接入/上游交换机 |
WS-C3650-12X48UR-E |
问题
分离第2层(DL2)
当两个或多个以太网网络无法相互连接,但必须由同一Cisco UCS域中的服务器或虚拟机访问时,使用分离的第2层(DL2)。
预期结果是每个VLAN保持固定到正确的上行链路,同时为关联的服务器或虚拟机保持所需的第2层连接。
网络图
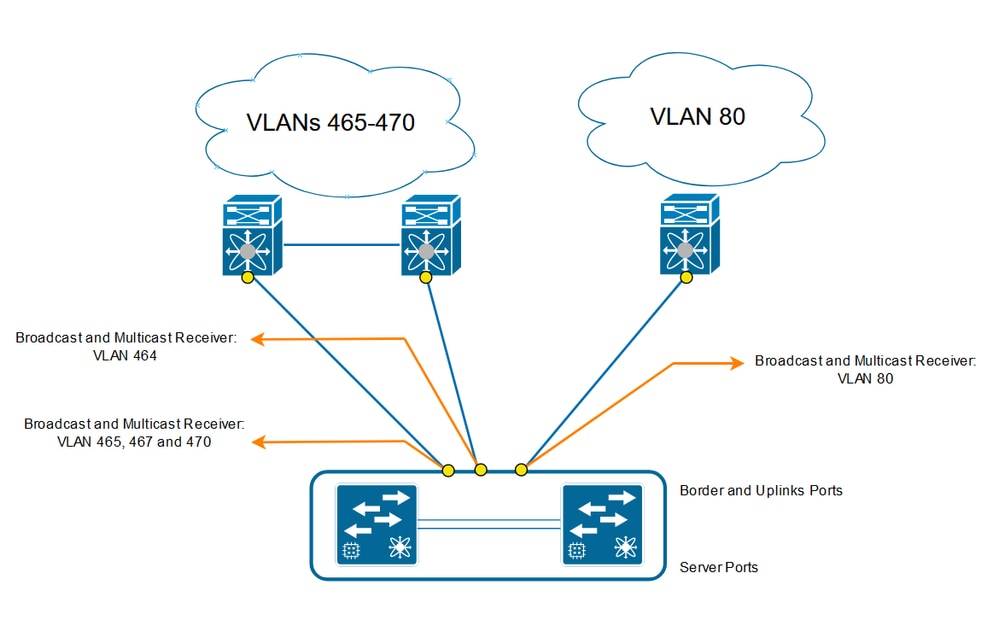
分辨率
以管理用户身份登录到Cisco UCS Manager GUI。
在交换矩阵互联上创建上行链路
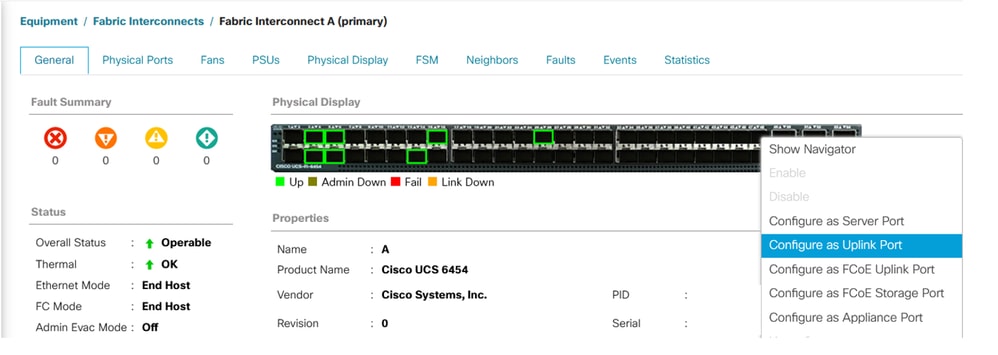
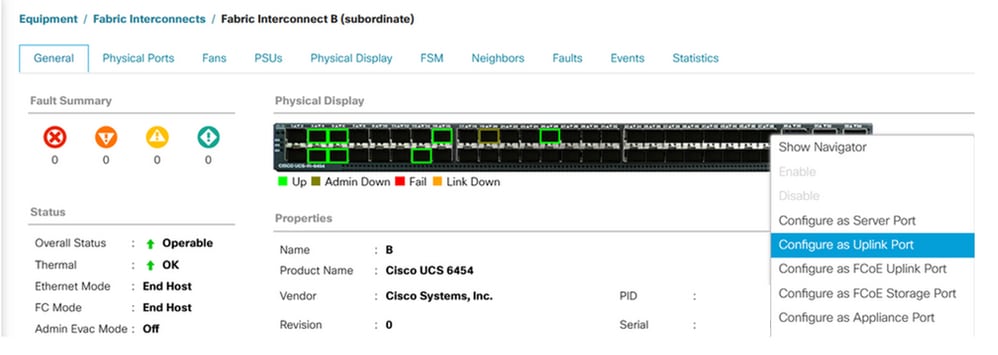
第1步:导航到Equipment > Fabric Interconnects > Fabric Interconnect A或Fabric Interconnect B。
步骤2.右键点击所需的端口,然后点击配置为上行链路端口。此上行链路端口连接到分离的第2层(DL2)网络。在下面的示例中,使用的是 VLAN 80。
分配VLAN
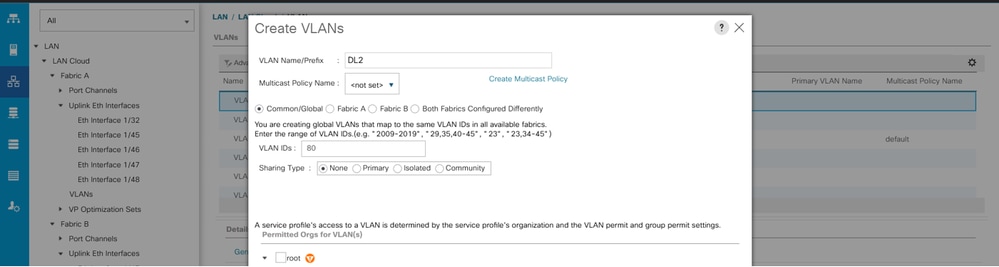
在本例中,创建了VLAN 80。
步骤1.导航到LAN > LAN Cloud > VLANs,点击Add,然后填写字段以创建VLAN 80。
创建vNIC模板
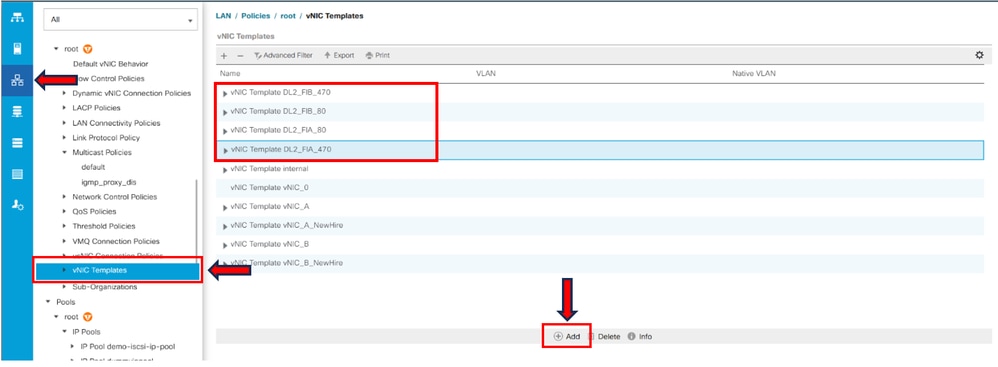
第1步:导航到LAN > Policies > root > vNIC Templates,然后点击Add。
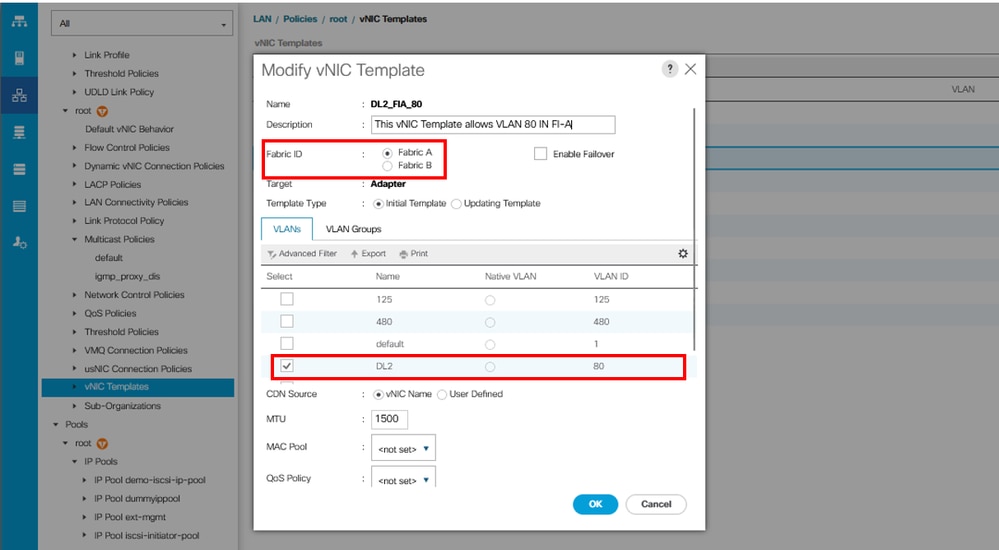
选择vNIC模板,输入名称,然后选择适当的交换矩阵ID。
可以使用冗余vNIC配置。
相应地选择要配置的VLAN。在本例中,基本VLAN是VLAN 470,而分离VLAN是VLAN 80。
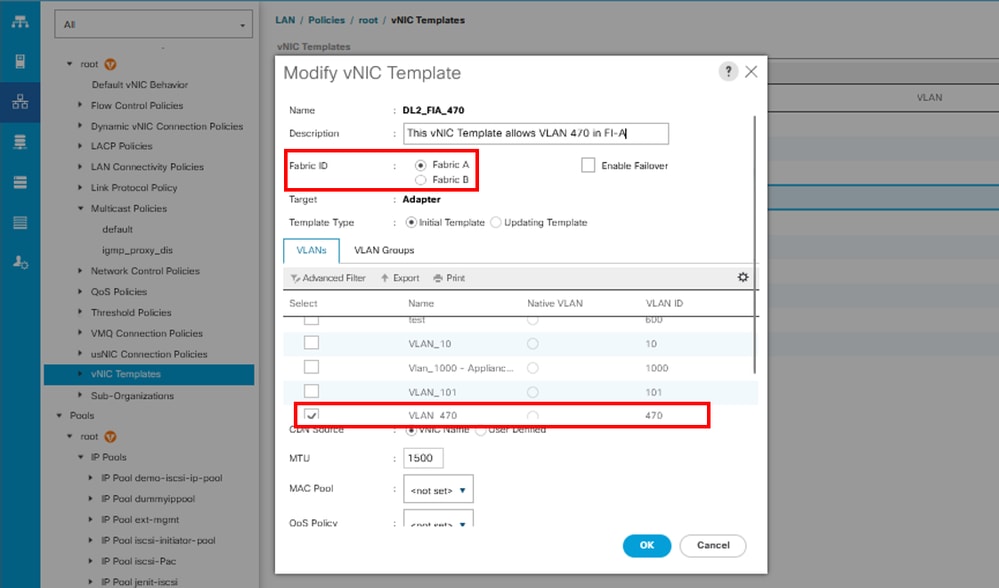
对交换矩阵B重复相同步骤。
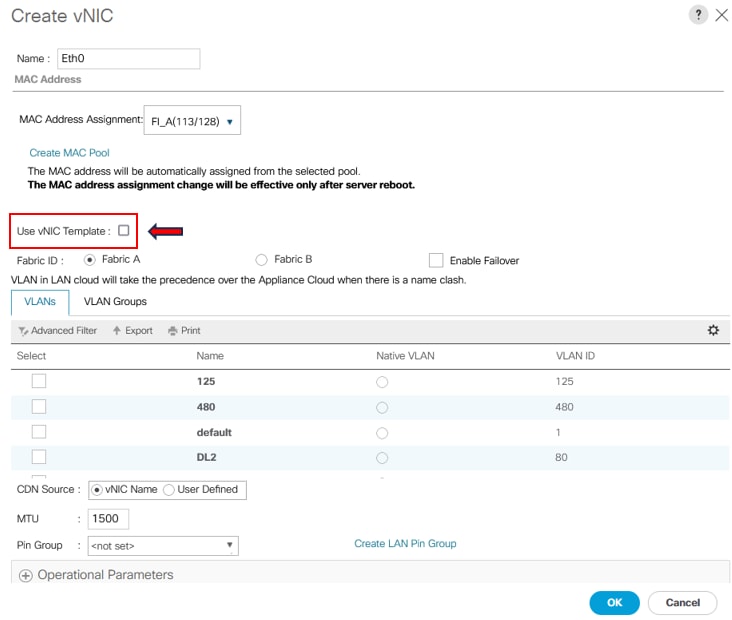
第2步:导航到LAN > Policies > root > LAN Connectivity Policies,创建新策略,点击Add,然后创建vNIC。
输入vNIC的名称,选择MAC池,然后选择使用vNIC模板复选框。
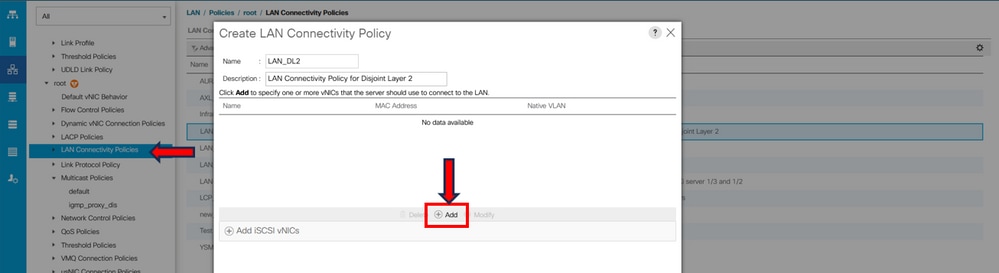
步骤3.使用先前配置的vNIC模板,选择所需的适配器策略,然后点击OK。对交换矩阵互联B重复此过程。
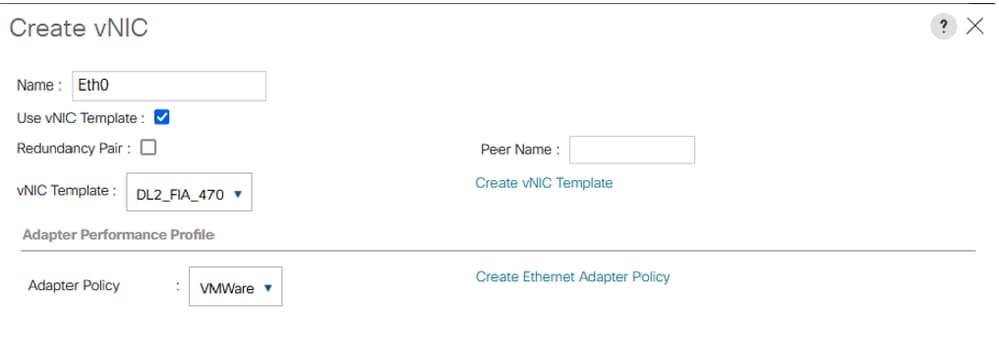
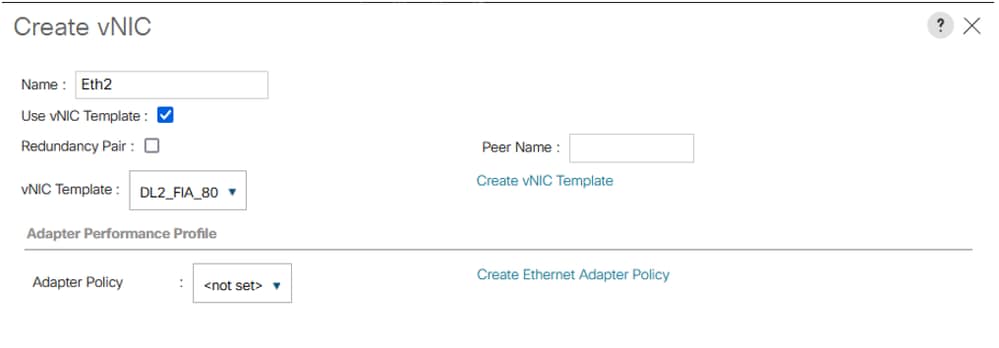
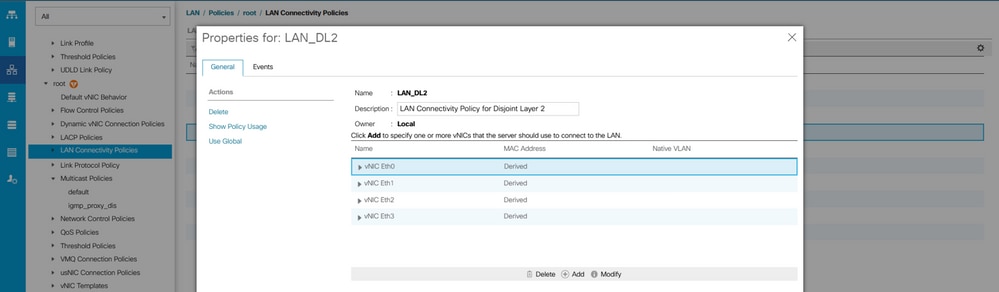
第4步:导航至服务配置文件,并选择LAN连接策略。
重启服务器
步骤1.重新启动服务器以应用配置更改。

注意:在vCenter中,确保节点处于维护模式。
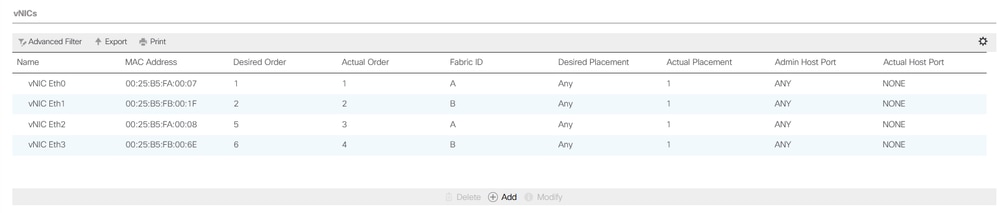
步骤2.服务器完成启动后,验证vNIC是否存在。导航到Servers > Service Profiles > root > service-profile-name > Network。
创建VLAN组
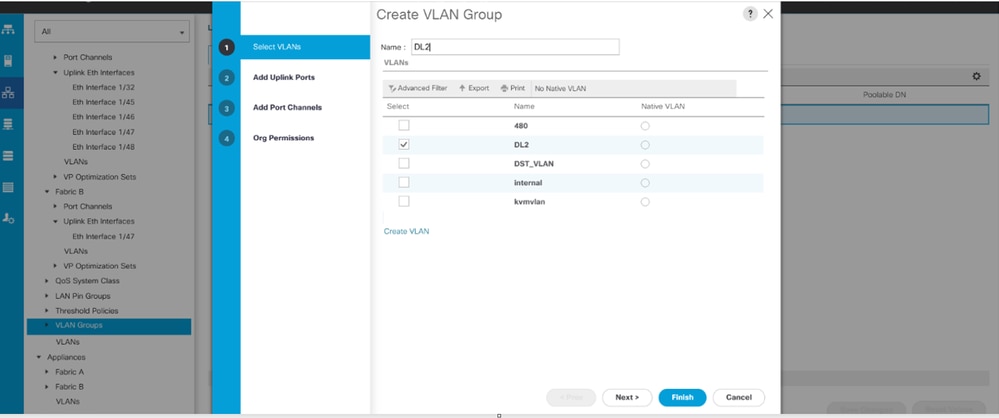
步骤1.导航到LAN > LAN Cloud > VLAN Groups > Create VLAN Groups。
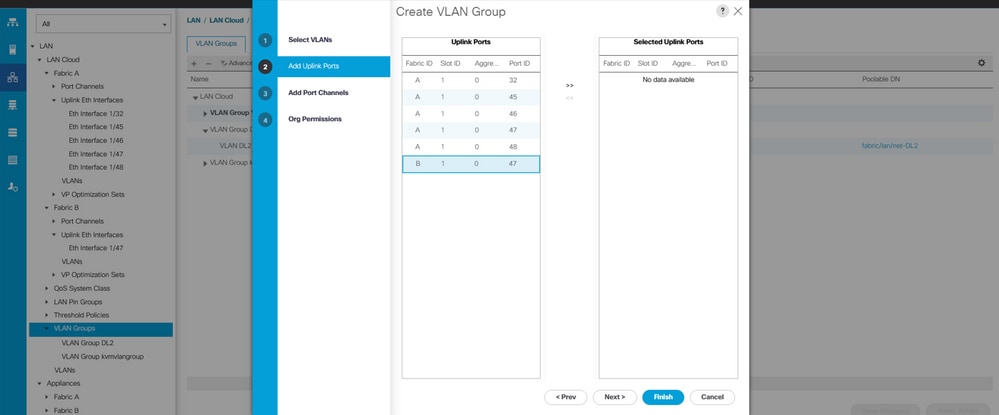
步骤2.输入VLAN Group的名称,选择所需的VLAN,然后在向导的步骤2中添加单个上行链路。
步骤3.或者,移至VLAN Group向导的第3步以添加端口通道。
ESXi配置
第1步:登录ESXi主机,然后导航到Networking选项卡>Virtual Switches,然后点击Add standard virtual Switch,为虚拟交换机命名,并选择上行链路。
步骤2.导航到网络>端口组>添加端口组。为您的端口组命名,选择所需的VLAN,并使用之前配置的虚拟交换机。
第3步:导航到Networking,选择之前配置的vSwitch,然后点击Add Uplink。为了获得冗余,添加一个新的上行链路,该上行链路包括用于分离第2层(DL2)的VLAN。
在本示例中,vNIC Eth2(交换矩阵互联A)和vNIC Eth3(交换矩阵互联B)上允许VLAN 80。
在UCSM中验证
在CLI中验证VLAN
打开到交换矩阵互联的SSH会话并运行show vlan brief。
FI-A(nx-os)# show vlan brief此命令显示已配置的VLAN并确认为分离第2层(DL2)创建的VLAN。
VLAN Name                             Status    Ports
---- -------------------------------- --------- -------------------------------
1    default                          active    Po1, Eth1/5, Eth1/6, Eth1/8
                                                Eth1/9, Eth1/10, Eth1/11
                                                Eth1/12, Eth1/13, Eth1/16
                                                Eth1/17, Eth1/18, Eth1/19
                                                Eth1/20, Eth1/21, Eth1/22
                                                Eth1/23, Eth1/24, Eth1/26
                                                Eth1/27, Eth1/28, Eth1/29
                                                Eth1/30, Eth1/31, Eth1/32
                                                Eth1/33, Eth1/34, Eth1/35
                                                Eth1/36, Eth1/37, Eth1/38
                                                Eth1/39, Eth1/40, Eth1/41
                                                Eth1/42, Eth1/43, Eth1/44
                                                Eth1/45, Eth1/46, Eth1/47
                                                Eth1/48, Eth1/49, Eth1/50
                                                Veth876, Veth877, Veth1084
                                                Veth1119, Veth1120, Veth1122
                                                Eth1/1/10, Eth1/1/12, Eth1/1/13
                                                Eth1/1/15, Eth1/1/18, Eth1/1/20
                                                Eth1/1/22, Eth1/1/24, Eth1/1/26
                                                Eth1/1/28, Eth1/1/29, Eth1/1/30
                                                Eth1/1/31, Eth1/1/32
80   VLAN0080                         active    Eth1/47
470  VLAN0470                         active    Po1, Eth1/5, Eth1/6, Eth1/32
                                                Eth1/45, Eth1/46, Eth1/48
                                                Veth1084, Veth1090, Veth1092
                                                Veth1094, Veth1108, Veth1119
                                                Veth1120, Veth1122, Veth1131
                                                Veth1133
检验虚拟接口(VIF)路径
在SSH会话中,运行show service-profile circuit <server number>:
FI-A# show service-profile circuit
Server: 1/6
    Fabric ID: A
        Path ID: 1
        VIF        vNIC            Link State  Oper State Prot State    Prot Role   Admin Pin  Oper Pin   Transport
        ---------- --------------- ----------- ---------- ------------- ----------- ---------- ---------- ---------
              1131 Eth0            Up          Active     No Protection Unprotected 0/0/0      0/0/1      Ether
              1133 Eth2            Up          Active     No Protection Unprotected 0/0/0      1/0/47     Ether
              1135 fc0             Up          Active     No Protection Unprotected 0/0/0      1/0/3      Fc
              9327                 Up          Active     No Protection Unprotected 0/0/0      0/0/0      Ether
    Fabric ID: B
        Path ID: 1
        VIF        vNIC            Link State  Oper State Prot State    Prot Role   Admin Pin  Oper Pin   Transport
        ---------- --------------- ----------- ---------- ------------- ----------- ---------- ---------- ---------
              1132 Eth1            Up          Active     No Protection Unprotected 0/0/0      0/0/2      Ether
              1134 Eth3            Up          Active     No Protection Unprotected 0/0/0      1/0/47     Ether
              1136 fc1             Up          Active     No Protection Unprotected 0/0/0      1/0/3      Fc
              9328                 Up          Active     No Protection Unprotected 0/0/0      0/0/0      Ether
此命令显示虚拟接口(VIF)路径、固定接口和相应的vNIC。
在此输出中,VIF 1134对应于vNIC Eth3,并且被固定到交换矩阵互联B中的接口1/0/47。
此外,VIF 1133对应于vNIC Eth2,并固定到交换矩阵互联A中的1/0/47。
检验固定边界接口。
运行命令以验证是否固定至上行链路端口。
FI-A(nx-os)# show pinning border-interfaces

--------------------+---------+----------------------------------------
Border Interface     Status    SIFs
--------------------+---------+----------------------------------------
Po1                  Active    Veth1084 Veth1090 Veth1092 Veth1094
                               Veth1108 Veth1119 Veth1120 Veth1131
Eth1/32              Down
Eth1/45              Down
Eth1/46              Down
Eth1/47              Active    sup-eth1 Veth1133
Eth1/48              Down
Eth1/51              Down
Eth1/52              Down
Eth1/53              Down
Eth1/54              Down
检验指定接收方
运行此命令以验证接收VLAN组播流量的端口。
FI-A(nx-os)# show platform software enm internal info vlandb id
vlan_id 80
-------------
Designated receiver: Eth1/47
Membership:
Eth1/47
此输出显示了正确的上行链路。
检验上游交换机
打开与上游交换机的SSH会话,并运行show vlan brief。
NEXUS-01# show vlan brief
VLAN Name                             Status    Ports
---- -------------------------------- --------- -------------------------------
1    default                          active    Po1, Po2, Po4, Po5, Po6, Po7
                                                Po8, Po9, Po50, Po100, Eth1/1
                                                Eth1/2, Eth1/3, Eth1/4, Eth1/5
                                                Eth1/6, Eth1/8, Eth1/9, Eth1/10
                                                Eth1/12, Eth1/13, Eth1/14
                                                Eth1/15, Eth1/18, Eth1/19
                                                Eth1/20, Eth1/21, Eth1/22
                                                Eth1/23, Eth1/24, Eth2/1, Eth2/2
                                                Eth2/3, Eth2/4, Eth2/5, Eth2/6
                                                Eth2/7, Eth2/8, Eth2/10, Eth2/11
                                                Eth2/12, Eth2/13, Eth2/14
                                                Eth2/15, Eth2/16, Eth2/17
                                                Eth2/18, Eth2/19, Eth2/20
                                                Eth2/21, Eth2/22, Eth2/23
                                                Eth3/1, Eth3/2, Eth3/3, Eth3/4
                                                Eth3/5, Eth3/6
                                                Eth2/18
80   DL2                              active    Po1, Po2, Po6, Po7, Po8, Po9
                                                Po50, Po100, Eth1/1, Eth1/3
                                                Eth1/4, Eth1/5, Eth1/6, Eth1/17
                                                Eth1/19, Eth1/20, Eth1/21
                                                Eth1/22, Eth1/23, Eth1/24
                                                Eth2/1, Eth2/2, Eth2/3, Eth2/4
                                                Eth2/5, Eth2/17, Eth2/18
470  VLAN_470                         active    Po1, Po2, Po3, Po4, Po5, Po6
                                                Po7, Po8, Po9, Po50, Po100
                                                Eth1/1, Eth1/3, Eth1/4, Eth1/5
                                                Eth1/6, Eth1/7, Eth1/9, Eth1/10
                                                Eth1/16, Eth1/19, Eth1/20
                                                Eth1/21, Eth1/22, Eth1/23
                                                Eth1/24, Eth2/1, Eth2/2, Eth2/3
                                                Eth2/4, Eth2/5, Eth2/9, Eth2/17
Eth2/18, Eth2/24此输出显示与VLAN 80关联的端口。在本示例中,相关端口是Ethernet 1/17,它与上行链路1/47关联在一起。
也可以验证MAC地址表以确认虚拟机(VM)条目。
NEXUS-01(config)# show mac address-table vlan 80
Legend:
        * - primary entry, G - Gateway MAC, (R) - Routed MAC, O - Overlay MAC
        age - seconds since last seen,+ - primary entry using vPC Peer-Link
   VLAN     MAC Address      Type      age     Secure NTFY   Ports/SWID.SSID.LID
---------+-----------------+--------+---------+------+----+------------------
* 80       000c.2937.2cc7    dynamic   150        F    F  Eth1/17
在ESXi中验证与VLAN网络的连接
打开虚拟机中的终端,对VLAN网络的默认网关执行ping操作。ping操作成功确认连接。
相关内容
Cisco UCS Manager GUI配置指南:使用LAN上行链路管理器
修订历史记录
| 版本 | 发布日期 | 备注 |
|---|---|---|
1.0 |
21-Jul-2023
|
初始版本 |
 反馈
反馈