简介
本文档介绍如何使用Umbrella Module for Kandji RMM(macOS)配置思科安全客户端(CSC)。
先决条件
要求
Cisco 建议您了解以下主题:
- 访问Umbrella Dashboard。
- 访问Kandji门户。
- 安全客户端Umbrella模块配置文件(orginfo.json)
- 用于要部署的版本的安全客户端预部署包。

注意:本指南使用Kandji中的.zip部署方法,以及安装后脚本。
使用的组件
本文档中的信息基于带有Umbrella模块的Cisco安全客户端。
本文档中的信息都是基于特定实验室环境中的设备编写的。本文档中使用的所有设备最初均采用原始(默认)配置。如果您的网络处于活动状态,请确保您了解所有命令的潜在影响。
概述
本文介绍如何使用Umbrella Module for Kandji RMM(macOS)配置Cisco Secure Client(CSC)。

警告:本文自2025年3月3日起提供。Cisco Umbrella支持不保证这些说明在此日期之后有效,并且可能会根据来自Kandji的更新进行更改。
准备.zip安装程序
1.导航到部署>漫游客户端>下载>下载模块配置文件,从而访问您的Umbrella控制面板并下载安全客户端Umbrella模块配置文件(orginfo.json)。
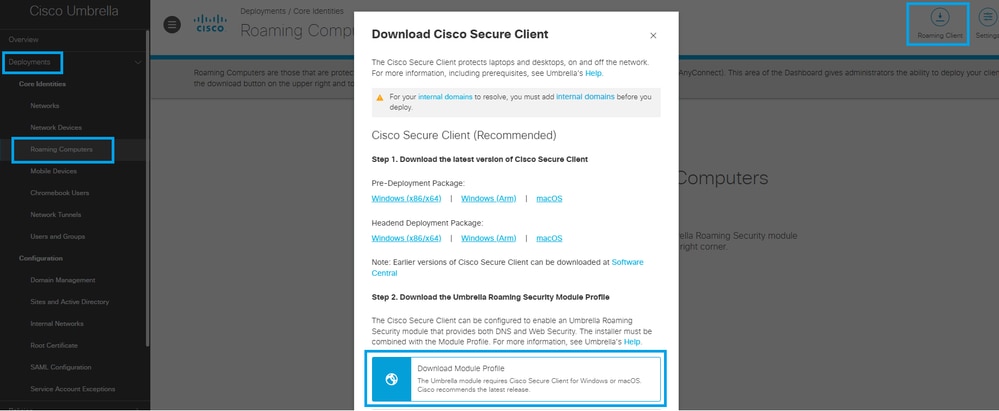 34747396643092
2.您还可以通过选择预部署包下载最新版本的macOS安装程序。
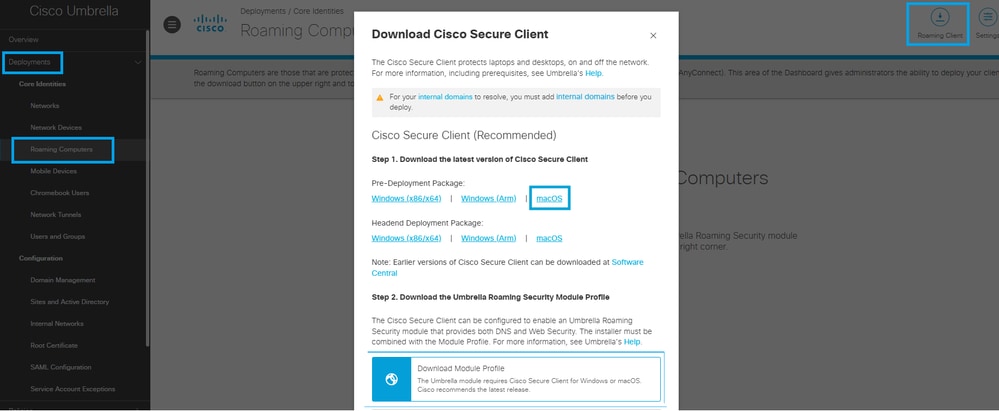 34747396644884
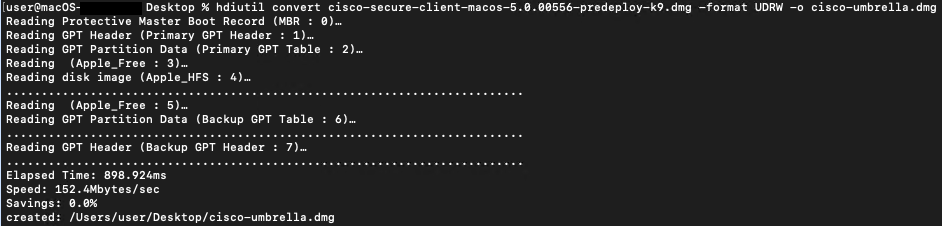
3.现在,通过将安装程序映像更改为可写版本,您可以配置.dmg文件以进行部署。可以使用Disk Utility或Terminal应用程序使用以下命令完成此操作:
hdiutil convert -format UDRW -o
4.打开新转换的.dmg文件,然后导航到“配置文件”文件夹。然后,在Umbrella文件夹中,放置从控制面板下载的OrgInfo.json文件。
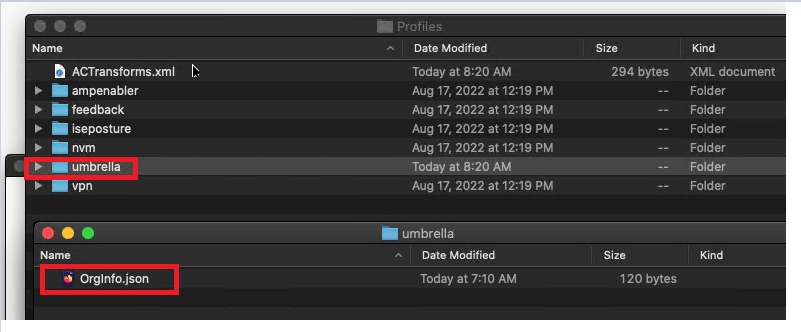 34747396647444
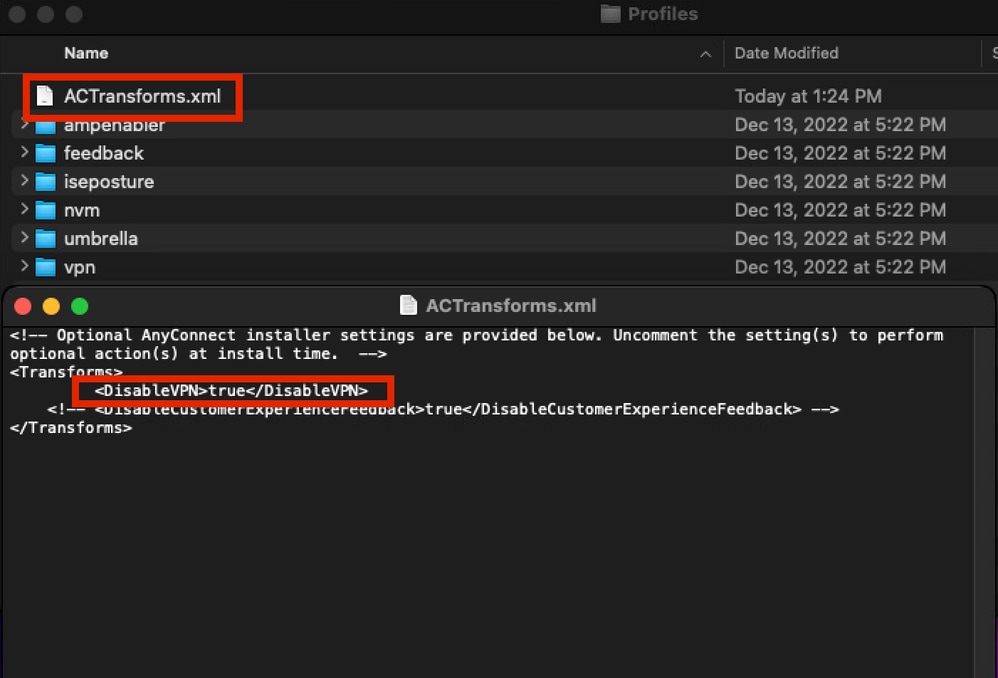
4.1.要选择性地隐藏VPN模块,请编辑ACTransforms.xml文件。将<DisableVPN>元素更新为true,并删除注释标记<!—和—>
 34747372903956
5.接下来,创建一个名为install_choices.xml的新文件。此文件可以指定要安装的模块。
运行以下命令以生成文件:
installer -pkg /volumes/Cisco\ Secure\ Client\ /Cisco\ Secure\ Client.pkg -showChoiceChangesXML > ~/Downloads/install_choices.xml
- 要跳过模块,请使用0定义模块。
- 要安装模块,请使用1定义模块。
此文件需要与修改的.dmg文件位于同一文件夹中。您的文件夹结构可能与此屏幕截图类似:
 34747372904212
在本示例中,install_choices.xml文件包括Core VPN、Umbrella和DART模块,每个模块设置为1,表示它们包含在安全客户端安装中:
attributeSetting

choiceAttribute
visible
choiceIdentifier
choice_anyconnect_vpn


attributeSetting

choiceAttribute
enabled
choiceIdentifier
choice_anyconnect_vpn


attributeSetting
1
choiceAttribute
selected
choiceIdentifier
choice_anyconnect_vpn


attributeSetting

choiceAttribute
visible
choiceIdentifier
choice_fireamp


attributeSetting

choiceAttribute
enabled
choiceIdentifier
choice_fireamp


attributeSetting
0
choiceAttribute
selected
choiceIdentifier
choice_fireamp


attributeSetting

choiceAttribute
visible
choiceIdentifier
choice_dart


attributeSetting

choiceAttribute
enabled
choiceIdentifier
choice_dart


attributeSetting
1
choiceAttribute
selected
choiceIdentifier
choice_dart


attributeSetting

choiceAttribute
visible
choiceIdentifier
choice_secure_firewall_posture


attributeSetting

choiceAttribute
enabled
choiceIdentifier
choice_secure_firewall_posture


attributeSetting
0
choiceAttribute
selected
choiceIdentifier
choice_secure_firewall_posture


attributeSetting

choiceAttribute
visible
choiceIdentifier
choice_iseposture


attributeSetting

choiceAttribute
enabled
choiceIdentifier
choice_iseposture


attributeSetting
0
choiceAttribute
selected
choiceIdentifier
choice_iseposture


attributeSetting

choiceAttribute
visible
choiceIdentifier
choice_nvm


attributeSetting

choiceAttribute
enabled
choiceIdentifier
choice_nvm


attributeSetting
0
choiceAttribute
selected
choiceIdentifier
choice_nvm


attributeSetting

choiceAttribute
visible
choiceIdentifier
choice_secure_umbrella


attributeSetting

choiceAttribute
enabled
choiceIdentifier
choice_secure_umbrella


attributeSetting
1
choiceAttribute
selected
choiceIdentifier
choice_secure_umbrella


attributeSetting

choiceAttribute
visible
choiceIdentifier
choice_thousandeyes


attributeSetting

choiceAttribute
enabled
choiceIdentifier
choice_thousandeyes


attributeSetting
0
choiceAttribute
selected
choiceIdentifier
choice_thousandeyes


attributeSetting

choiceAttribute
visible
choiceIdentifier
choice_duo


attributeSetting

choiceAttribute
enabled
choiceIdentifier
choice_duo


attributeSetting
0
choiceAttribute
selected
choiceIdentifier
choice_duo


attributeSetting

choiceAttribute
visible
choiceIdentifier
choice_zta


attributeSetting

choiceAttribute
enabled
choiceIdentifier
choice_zta


attributeSetting
0
choiceAttribute
selected
choiceIdentifier
choice_zta
6.现在使用Disk Utility或Terminal应用程序将安装程序映像更改为只读版本:
hdiutil convert <source dmg> -format UDRO -o <output dmg>
7.准备Umbrella安装的最后一步是将安装文件夹转换为.zip文件,该文件已准备好上载到Kandji仪表板。
Kanji控制面板更改
1.对于macOS 13(及更高版本)和安全客户端5.1,VPN代理需要用户批准才能由操作系统启动。要自动执行此审批流程或防止用户禁用安全客户端拥有的登录项目,您必须部署一个具有为托管登录项目配置的属性的MDM配置文件。
- 捆绑包标识符前缀:com.cisco.secureclient
- 组标识符:DE8Y96K9QP
可以使用使用捆绑包标识符的Kandji指南配置登录和后台项库项来创建以下项:com.cisco.secureclient。
2. Cisco Secure Client使用macOS 11(及更高版本)上的网络系统扩展,该扩展被捆绑到名为“Cisco Secure Client - Socket Filter”的应用中。 接下来,您需要让Kandji使用此处提供的标识符进行安装:
- 组标识符:DE8Y96K9QP
- 捆绑包标识符:com.cisco.anyconnect.macos.acsockext
- 系统扩展类型:网络扩展
可使用干地指南设置以下标识符:系统扩展 — 概述和指南
3.思科安全客户端必须部署为自定义应用,这可以通过使用Kandji指南完成:部署自定义应用
进入添加和配置阶段后,请对部署进行以下调整:
- 选择包类型:选择ZIP文件
- 上传安装程序:上传之前在步骤7中配置的.zip文件。
- 如果选择.zip文件类型,则可以使用其他字段来定义解压缩位置。(默认位置为/var/tmp/)
- 安装后脚本:提供在运行包后要执行的脚本。
- 将
<Filename.zip>更新为之前步骤7中使用的名称。
- 用于包含.dmg文件和install_choices.xml文件的更新
<Folder Name>
- 将
<Output dmg file.dmg>更新为之前步骤5中声明的名称。
示例脚本
#!/bin/bash

# Optional extract the ZIP file. (Kandji extracts to /var/tmp by default)
#unzip "/var/tmp/Cisco Secure Client 5-1-7-80.zip" -d /var/tmp/

# Mount the DMG.
hdiutil attach "/var/tmp/<Folder Name>/<Output dmg file.dmg>"

# Run the installer with our xml choices file.
installer -pkg "/Volumes/Cisco Secure Client 5.1.7.80/Cisco Secure Client.pkg" -applyChoiceChangesXML "/var/tmp/<Folder Name>/install_choices.xml" -target /

# Check installer exit code.
if [ $? -ne 0 ]; then
echo "Error: Installation failed."
# Add any necessary cleanup or rollback actions here
exit 1
fi

# Unmount the DMG.
hdiutil detach "Cisco Secure Client 5.1.7.80"

# Remove the temp files & folders.
rm -rf /var/tmp/<Folder Name>
rm -f /var/tmp/<Filename.zip>

exit 0
如果您遇到与部署Cisco安全客户端相关的部署问题,可以联系Cisco TAC团队。
有关与Umbrella模块相关的部署问题,请通过Cisco Umbrella Support记录支持票证。
 反馈
反馈