Probleemoplossing voor GuestShell op Catalyst 9K-platforms
Downloadopties
Inclusief taalgebruik
De documentatie van dit product is waar mogelijk geschreven met inclusief taalgebruik. Inclusief taalgebruik wordt in deze documentatie gedefinieerd als taal die geen discriminatie op basis van leeftijd, handicap, gender, etniciteit, seksuele oriëntatie, sociaaleconomische status of combinaties hiervan weerspiegelt. In deze documentatie kunnen uitzonderingen voorkomen vanwege bewoordingen die in de gebruikersinterfaces van de productsoftware zijn gecodeerd, die op het taalgebruik in de RFP-documentatie zijn gebaseerd of die worden gebruikt in een product van een externe partij waarnaar wordt verwezen. Lees meer over hoe Cisco gebruikmaakt van inclusief taalgebruik.
Over deze vertaling
Cisco heeft dit document vertaald via een combinatie van machine- en menselijke technologie om onze gebruikers wereldwijd ondersteuningscontent te bieden in hun eigen taal. Houd er rekening mee dat zelfs de beste machinevertaling niet net zo nauwkeurig is als die van een professionele vertaler. Cisco Systems, Inc. is niet aansprakelijk voor de nauwkeurigheid van deze vertalingen en raadt aan altijd het oorspronkelijke Engelstalige document (link) te raadplegen.
Inhoud
Inleiding
Dit document beschrijft hoe problemen met de Guest Shell op Cat9K switches kunnen worden opgelost.
Voorwaarden
Vereisten
- Basiskennis van Cisco IOS® XE-software
- Linux-bestandssystemen
- Linux-opdrachten
Gebruikte componenten
De informatie in dit document is gebaseerd op de volgende software- en hardware-versies:
- Catalyst 9200
- Catalyst 9300
- Catalyst 9400
- Catalyst 9500
- Catalyst 9600
- Cisco IOS XE 17.9.1 en latere versies
De informatie in dit document is gebaseerd op de apparaten in een specifieke laboratoriumomgeving. Alle apparaten die in dit document worden beschreven, hadden een opgeschoonde (standaard)configuratie. Als uw netwerk live is, moet u zorgen dat u de potentiële impact van elke opdracht begrijpt.
Achtergrondinformatie
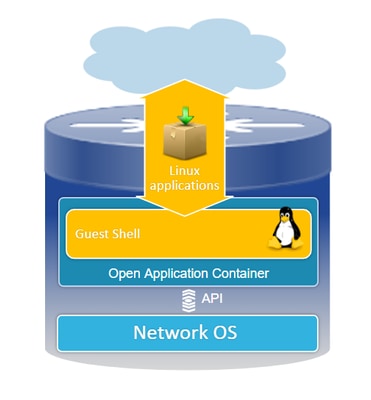
Guest Shell - Overzicht
- De Guest Shell biedt een geïsoleerde executie-omgeving die werkt binnen een Linux Container (LXC).
- Netwerktoegang: Beheerders kunnen verbinding maken met het netwerk via Linux-netwerkinterfaces, waardoor robuuste connectiviteit en beheer mogelijk worden.
- Bootflash-toegang: Directe toegang tot bootflash-opslag is beschikbaar, wat efficiënt bestandsbeheer en systeembewerkingen vergemakkelijkt.
- Cisco IOS CLI-toegang: Beheerders hebben de mogelijkheid om direct te communiceren met de Cisco IOS opdrachtregel interface, waardoor naadloze integratie en controle mogelijk is.
- Scriptuitvoering: De omgeving ondersteunt de installatie en uitvoering van Python scripts, waardoor automatisering en aanpassing mogelijk wordt.
- Toepassingsondersteuning: Zowel 32-bits als 64-bits Linux-toepassingen kunnen worden geïnstalleerd en uitgevoerd, wat flexibiliteit en een breed scala aan functionele mogelijkheden biedt.
Probleemoplossing
.
Configuratie
1. Schakel IOX in.
Switch#conf terminal
Switch(config)#iox
Switch(config)#
Wacht 1-5 minuten voordat IOX wordt geïnitialiseerd. Zorg ervoor dat IOX operationeel is. U kunt de berichten controleren die tijdens de CLI-sessie worden weergegeven of door de uitvoer van de showopdracht te bekijken.
*Mar 10 15:35:40.206: %UICFGEXP-6-SERVER_NOTIFIED_START: Switch 1 R0/0: psd: Server iox has been notified to start
*Mar 10 15:35:51.186: %IOX-3-PD_PARTITION_CREATE: Switch 1 R0/0: run_ioxn_caf: IOX may take upto 5 mins to be ready. Wait for iox to be ready before installing the apps
*Mar 10 15:37:56.643: %IOX-3-IOX_RESTARTABITLITY: Switch 1 R0/0: run_ioxn_caf: Stack is in N+1 mode, disabling sync for IOx restartability
*Mar 10 15:38:05.835: %IM-6-IOX_ENABLEMENT: Switch 1 R0/0: ioxman: IOX is ready.
Switch#show iox-service

IOx Infrastructure Summary:
---------------------------
IOx service (CAF)              : Running
IOx service (HA)               : Running
IOx service (IOxman)           : Running
IOx service (Sec storage)      : Running
Libvirtd 5.5.0                 : Running
Dockerd v19.03.13-ce           : Running
Sync Status                    : Disabled
2. Netwerkconfiguratie.
In dit voorbeeld wordt de AppGigabit Ethernet-interface gebruikt om netwerktoegang te bieden.
!
interface AppGigabitEthernet1/0/1
 switchport trunk allowed vlan 50
 switchport mode trunk
!
app-hosting appid guestshell
 app-vnic AppGigabitEthernet trunk
  vlan 50 guest-interface 0
   guest-ipaddress 192.168.10.10 netmask 255.255.255.0
 name-server0 192.168.10.254
end
!

Opmerking: GuestShell gebruikt een statisch IP-adres omdat het de DHCP-clientservice niet standaard omvat. U kunt de DHCP-clientservice installeren om dynamisch een IP-adres te verkrijgen.
In dit voorbeeld wordt de beheerinterface (Gi0/0) gebruikt om netwerktoegang te bieden. In de beheermodus gebruikt guestshell beheerpoort voor netwerken en Cisco IOS geconfigureerde beheerpoort voor IP-adres als gateway.
!
app-hosting appid guestshell
 app-vnic management guest-interface 0
 name-server0 8.8.8.8
!
Opmerking: Wanneer u de Management interface gebruikt, is de standaardconfiguratie voor de Guestshell eth0 interface hardcoded naar het IP-adres 192.168.30.2.
U kunt de interface voor de virtuele poortgroep configureren:
- Configuratie virtuele poortgroep: Maak een virtuele poortgroep met een statisch IP-adres.
- Internetconnectiviteit: Zorg ervoor dat de voorpoortinterface is aangesloten op het internet om externe toegang mogelijk te maken.
- NAT-configuratie: Stel NAT in tussen de virtuele poortgroep en de voorpoort om de netwerkadresomzetting te vergemakkelijken.
- GuestShell IP-toewijzing: Wijs een IP-adres toe aan de GuestShell binnen dezelfde subnetverbinding als de Virtual Port Group-interface.
!
interface VirtualPortGroup0
 ip address 192.168.35.1 255.255.255.0
 ip nat inside
!
interface GigabitEthernet1/0/3
 no switchport
 ip address 192.168.100.10 255.255.255.0
 ip nat outside
!
ip route 0.0.0.0 0.0.0.0 192.168.100.254
ip route vrf Mgmt-vrf 0.0.0.0 0.0.0.0 192.168.10.254
ip nat inside source static tcp 192.168.35.2 7023 192.168.100.10 7023 extendable
!
!
ip access-list standard NAT_ACL
 10 permit 192.168.0.0 0.0.255.255
!
app-hosting appid guestshell
 app-vnic gateway1 virtualportgroup 0 guest-interface 0
  guest-ipaddress 192.168.35.2 netmask 255.255.255.0
 app-default-gateway 192.168.35.1 guest-interface 0
 name-server0 8.8.8.8
end
3. Schakel guestshell in.
Switch#guestshell enable
Interface will be selected if configured in app-hosting
Please wait for completion
guestshell installed successfully
Current state is: DEPLOYED
guestshell activated successfully
Current state is: ACTIVATED
guestshell started successfully
Current state is: RUNNING
Guestshell enabled successfully
Opmerking: De guestshell-opdracht is de enige manier om guestshell te installeren. Het gebruik van app-hosting CLI activeren/verbinden/deactiveren kan worden gebruikt om guestshell te besturen. Aanbevolen wordt om guestshell exec CLI te gebruiken.
Guestshell levenscyclus
Guestshell uitgeschakeld: Schakel guesthell uit verwijdert toegang tot guestshell en doodt huidige sessies. Bestanden/gegevens worden bewaard, u kunt guestshell inschakelen om toegang te herstellen.
Switch#guestshell disable
Guestshell disabled successfully
Guestshell te vernietigen: Dit verwijdert het guest shell bestandssysteem irreversibel. Alle bestanden/gegevens/scripts/setinguestshell/ geïnstalleerde pakketten en modules.
Switch#guestshell destroy
Guestshell destroyed successfully
Opmerking: wanneer u deze opdracht uitvoert, gaan alle gegevens onomkeerbaar verloren.
Draaischaal: Guestshell voert de opdracht guestshell run bash om een shell te maken binnen de Guest Shell, zodat u elke Linux binaire onder /bin en /sbin.
Switch#guestshell run bash
[guestshell@guestshell ~]$ ping 192.168.10.1
PING 192.168.10.1 (192.168.10.1) 56(84) bytes of data.
64 bytes from 192.168.10.1: icmp_seq=2 ttl=254 time=0.517 ms
64 bytes from 192.168.10.1: icmp_seq=3 ttl=254 time=0.552 ms
64 bytes from 192.168.10.1: icmp_seq=4 ttl=254 time=0.447 ms
64 bytes from 192.168.10.1: icmp_seq=5 ttl=254 time=0.549 ms
Guestshell run python: Gebruik deze opdracht om een interactieve python-tolk te starten.
Switch#guestshell run python3
Python 3.6.8 (default, Dec 22 2020, 19:04:08)
[GCC 8.4.1 20200928 (Red Hat 8.4.1-1)] on linux
Type "help", "copyright", "credits" or "license" for more information.
>>>
Valideringen
U kunt deze opdrachten gebruiken om de Guestshell te valideren:
Switch#show app-hosting detail appid guestshell
App id                 : guestshell
Owner                  : iox
State                  : RUNNING
Application
  Type                 : lxc
  Name                 : GuestShell
  Version              : 3.3.0
  Description          : Cisco Systems Guest Shell XE for x86_64
  Author               : Cisco Systems
  Path                 : /guestshell/:guestshell.tar
  URL Path             :
  Multicast            : yes
Activated profile name : custom

Resource reservation
  Memory               : 256 MB
  Disk                 : 1 MB
  CPU                  : 800 units
  CPU-percent          : 11 %
  VCPU                 : 1

Platform resource profiles
  Profile Name                  CPU(unit)  Memory(MB)  Disk(MB)
  --------------------------------------------------------------

Attached devices
  Type              Name               Alias
  ---------------------------------------------
  serial/shell     iox_console_shell   serial0
  serial/aux       iox_console_aux     serial1
  serial/syslog    iox_syslog          serial2
  serial/trace     iox_trace           serial3

Network interfaces
   ---------------------------------------
eth0:
   MAC address         : 52:54:dd:5b:c4:b8
   IPv4 address        : 192.168.30.2
   IPv6 address        : ::
   Network name        : mgmt-bridge200

Port forwarding
  Table-entry  Service  Source-port  Destination-port
  ---------------------------------------------------
  Switch#show app-hosting list
App id                                   State
---------------------------------------------------------
guestshell                               RUNNING
Switch#guestshell run sudo ifconfig
eth0: flaguestshell=4163<UP,BROADCAST,RUNNING,MULTICAST>  mtu 1500
        inet 192.168.10.10  netmask 255.255.255.0  broadcast 192.168.10.255
        inet6 fe80::5054:ddff:fece:a7c9  prefixlen 64  scopeid 0x20
        ether 52:54:dd:ce:a7:c9  txqueuelen 1000  (Ethernet)
        RX packets 3  bytes 266 (266.0 B)
        RX errors 0  dropped 0  overruns 0  frame 0
        TX packets 9  bytes 726 (726.0 B)
        TX errors 0  dropped 0 overruns 0  carrier 0  collisions 0

lo: flaguestshell=73<UP,LOOPBACK,RUNNING>  mtu 65536
        inet 127.0.0.1  netmask 255.0.0.0
        inet6 ::1  prefixlen 128  scopeid 0x10
        loop  txqueuelen 1000  (Local Loopback)
        RX packets 338  bytes 74910 (73.1 KiB)
        RX errors 0  dropped 0  overruns 0  frame 0
        TX packets 338  bytes 74910 (73.1 KiB)
        TX errors 0  dropped 0 overruns 0  carrier 0  collisions 0
Resourcegrootte
!
app-hosting appid guestshell
 app-vnic management guest-interface 0
 app-resource profile custom
  cpu 1000
  memory 512
  persist-disk 200
!
U moet de Guest Shell uitschakelen en vervolgens inschakelen om de wijzigingen van kracht te laten worden.
Switch#guestshell disable
Guestshell disabled successfully
Switch#guestshell enable
*Mar 11 01:17:46.841: %SYS-5-CONFIG_I: Configured from console by coguestshell enable
Interface will be selected if configured in app-hosting
Please wait for completion
guestshell activated successfully
Current state is: ACTIVATED
guestshell started successfully
Current state is: RUNNING
Guestshell enabled successfully
Switch#show app-hosting detail appid guestshell | sec Resource reservation
Resource reservation
  Memory               : 512 MB
  Disk                 : 200 MB
  CPU                  : 1110 units
  CPU-percent          : 15 %
  VCPU                 : 1
Opmerking: Op switches is het aanpassen van de grootte van de bronnen toegestaan tot de maximale limieten van het platform. Raadpleeg Cisco Catalyst 9000 Platform Hardware Resources voor toepassingen.
Gemeenschappelijke scenario’s
DHCP-configuratie
Probleem: DHCP-client binair getal (DHCP CLIENT) is niet aanwezig.
Oplossing
U kunt de DHCP-client installeren met behulp van het hulpprogramma Yum met de opdracht sudo yum installeert dhcp-client. Houd er echter rekening mee dat de opslagplaatsen voor CentOS Stream 8 niet langer beschikbaar zijn.
1. U moet vermijden het IP-adres in de app-hosting in te stellen om DHCP te laten functioneren.
!
interface AppGigabitEthernet1/0/1
 switchport trunk allowed vlan 50
 switchport mode trunk
!
app-hosting appid guestshell
 app-vnic AppGigabitEthernet trunk
  vlan 50 guest-interface 0
name-server0 8.8.8.8
!
2. Verander mirrorlist naar baseurl kluis in yum repo.
Switch#guestshell run bash
[guestshell@guestshell ~]$ sudo find /etc/yum.repos.d/ -type f -exec sed -i 's/mirrorlist=/#mirrorlist=/g' {} +
[guestshell@guestshell ~]$ sudo find /etc/yum.repos.d/ -type f -exec sed -i 's/#baseurl=/baseurl=/g' {} +
[guestshell@guestshell ~]$ sudo find /etc/yum.repos.d/ -type f -exec sed -i 's/mirror.centos.org//g' {} +
[guestshell@guestshell ~]$ cat /etc/yum.repos.d/CentOS-Stream-RealTime.reporepo
# CentOS-Stream-RealTime.repo
# The mirrorlist system uses the connecting IP address of the client and the
# update status of each mirror to pick current mirrors that are geographically
# close to the client.  You should use this for CentOS updates unless you are
# manually picking other mirrors.
#
# If the mirrorlist does not work for you, you can try the commented out
# baseurl line instead.

[rt]
name=CentOS Stream $releasever - RealTime
#mirrorlist=http://mirrorlist.centos.org/?release=$stream&arch=$basearch&repo=RT&infra=$infra
baseurl=http:///$contentdir/$stream/RT/$basearch/os/
gpgcheck=1
enabled=0
gpgkey=file:///etc/pki/rpm-gpg/RPM-GPG-KEY-centosofficial
3. Installeer de pakketten.
guestshell@guestshell ~]$ sudo yum install dhcp-client
ast metadata expiration check: 0:50:34 ago on Wed Mar 12 17:44:46 2025.
Dependencies resolved.
================================================================================
 Package                Architecture Version                 Repository    Size
================================================================================
Installing:
 dhcp-client            x86_64       12:4.3.6-50.el8         baseos       319 k
Installing dependencies:
 bind-export-libs       x86_64       32:9.11.36-13.el8       baseos       1.1 M
 dhcp-common            noarch       12:4.3.6-50.el8         baseos       208 k
 dhcp-libs              x86_64       12:4.3.6-50.el8         baseos       148 k

Transaction Summary
================================================================================
Install  4 Packages

Total download size: 1.8 M
Installed size: 3.9 M
Is this ok [y/N]: y
Downloading Packages:
(1/4): dhcp-client-4.3.6-50.el8.x86_64.rpm      284 kB/s | 319 kB     00:01
(2/4): dhcp-common-4.3.6-50.el8.noarch.rpm      171 kB/s | 208 kB     00:01
(3/4): dhcp-libs-4.3.6-50.el8.x86_64.rpm        572 kB/s | 148 kB     00:00
(4/4): bind-export-libs-9.11.36-13.el8.x86_64.r 577 kB/s | 1.1 MB     00:02
--------------------------------------------------------------------------------
Total                                           908 kB/s | 1.8 MB     00:02
CentOS Stream 8 - BaseOS                        1.6 MB/s | 1.6 kB     00:00
Importing GPG key 0x8483C65D:
 Userid     : "CentOS (CentOS Official Signing Key) <CentOS Official Signing Key>"
 Fingerprint: 99DB 70FA E1D7 CE22 7FB6 4882 05B5 55B3 8483 C65D
 From       : /etc/pki/rpm-gpg/RPM-GPG-KEY-centosofficial
Is this ok [y/N]: y
Key imported successfully
Running transaction check
Transaction check succeeded.
Running transaction test
Transaction test succeeded.
Running transaction
  Preparing        :                                                        1/1
  Installing       : dhcp-libs-12:4.3.6-50.el8.x86_64                       1/4
  Installing       : dhcp-common-12:4.3.6-50.el8.noarch                     2/4
  Installing       : bind-export-libs-32:9.11.36-13.el8.x86_64              3/4
  Running scriptlet: bind-export-libs-32:9.11.36-13.el8.x86_64              3/4
  Installing       : dhcp-client-12:4.3.6-50.el8.x86_64                     4/4
  Running scriptlet: dhcp-client-12:4.3.6-50.el8.x86_64                     4/4
  Verifying        : bind-export-libs-32:9.11.36-13.el8.x86_64              1/4
  Verifying        : dhcp-client-12:4.3.6-50.el8.x86_64                     2/4
  Verifying        : dhcp-common-12:4.3.6-50.el8.noarch                     3/4
  Verifying        : dhcp-libs-12:4.3.6-50.el8.x86_64                       4/4

Installed:
  bind-export-libs-32:9.11.36-13.el8.x86_64  dhcp-client-12:4.3.6-50.el8.x86_64
  dhcp-common-12:4.3.6-50.el8.noarch         dhcp-libs-12:4.3.6-50.el8.x86_64

Complete!
Opmerking: (VOOR CALO) Het is mogelijk om een proxy voor Yum te configureren. Hierdoor kan Yum verbinding maken via een proxyserver voor pakketdownloads:
[guestshell@guestshell ~]$ echo "proxy=http://<IP_adres:port>/" | sudo tee -a /etc/yum.conf > /dev/null
4. .Vraag een DHCP IP adres aan voor eth0.
[guestshell@guestshell ~]$ sudo dhclient eth0
5. Controleer of de DHCP-client werkt door de IP-adrestoewijzing te controleren.
Switch#guestshell run ifconfig
eth0: flags=4163<UP,BROADCAST,RUNNING,MULTICAST>  mtu 1500
        inet 192.168.10.2  netmask 255.255.255.0  broadcast 192.168.10.255
        inet6 fe80::5054:ddff:fea0:4aef  prefixlen 64  scopeid 0x20
        ether 52:54:dd:a0:4a:ef  txqueuelen 1000  (Ethernet)
        RX packets 1516  bytes 2009470 (1.9 MiB)
        RX errors 0  dropped 0  overruns 0  frame 0
        TX packets 687  bytes 54603 (53.3 KiB)
        TX errors 0  dropped 0 overruns 0  carrier 0  collisions 0

lo: flags=73<UP,LOOPBACK,RUNNING>  mtu 65536
        inet 127.0.0.1  netmask 255.0.0.0
        inet6 ::1  prefixlen 128  scopeid 0x10
        loop  txqueuelen 1000  (Local Loopback)
        RX packets 773  bytes 90658 (88.5 KiB)
        RX errors 0  dropped 0  overruns 0  frame 0
        TX packets 773  bytes 90658 (88.5 KiB)
        TX errors 0  dropped 0 overruns 0  carrier 0  collisions 0
Update voor DNF Packet Manager mislukt
Probleem: Kan update sudo dnf -y on Guestshell niet voltooien vanwege een fout:
[guestshell@guestshell ~]$ sudo dnf upgrade --refresh
Warning: failed loading '/etc/yum.repos.d/CentOS-Base.repo', skipping.
Oplossing
1. RPM-pakketten opnieuw installeren en upgraden.
! Clean packages

[guestshell@guestshell ~]$ sudo dnf clean all

! Reinstall and update the tpm2-tss package:

[guestshell@guestshell ~]$ sudo dnf install tpm2-tss-2.3.2-3.el8
[guestshell@guestshell ~]$ sudo dnf upgrade rpm
2. Installeer het git-pakket apart.
[guestshell@guestshell ~]$ sudo dnf install git -y
Guestshell-toegang verloren na de upgrade
Probleem: Na de upgrade naar versie 17.08.01 of hoger wordt de Guest Shell ontoegankelijk, wat resulteert in de onmogelijkheid om scripts uit te voeren.
Switch#guestshell run bash
Switch#
Oplossing
Het probleem is gerelateerd aan Cisco bug-id CSCwi63075  , die wordt geactiveerd tijdens een upgrade wanneer FIPS is ingeschakeld op de switch.
1. Schakel FIPS uit.
Switch#configure terminal
Switch(config)#no fips authorization-key
FIPS: Authorization-key erased ONLY from the  Flash.
But the authorization-key is still operational. Use "reload" command for complete removal of key and to enter into non fips-mode.
Make sure to remove fips key from all the members of the stack individually
2. U kunt upgraden naar een van de versies die de fix, versie 17.12.04 of een latere release bevatten.
IPv6-adressering beperken
Probleem: Het probleem betreft onbedoelde IPv6-adressen die op interfaces binnen de Cisco Guestshell-omgeving verschijnen. Hoewel, niet opzettelijk geconfigureerd.
De configuratie die op de Switch met IPV4 wordt waargenomen is:
!
app-hosting appid guestshell
 app-vnic AppGigabitEthernet trunk
  vlan 50 guest-interface 0
   guest-ipaddress 192.168.20.10 netmask 255.255.255.0  <-- IPv4 address configured
 app-default-gateway 192.168.20.1 guest-interface 0
 app-resource profile custom
 name-server1 192.168.20.1
 !
Wanneer het ifconfig commando binnen de Guestshell omgeving wordt uitgevoerd, worden zowel IPv4- als IPv6-adressen zichtbaar.
lat1-2-ssw01.gts#guestshell run bash
[guestshell@guestshell ~]$ sudo ifconfig
eth0: flags=4163  mtu 1500
        inet 192.168.20.10  netmask 255.255.255.0 broadcast 192.168.20.255
        inet6 2620:119:5022:515:5054:ddff:fe41:c643  prefixlen 64  scopeid 0x0
        inet6 fe80::5054:ddff:fe41:c643  prefixlen 64  scopeid 0x20
        ether 52:54:dd:41:c6:43  txqueuelen 1000  (Ethernet)
        RX packets 7829  bytes 1750981 (1.6 MiB)
        RX errors 0  dropped 0  overruns 0  frame 0
        TX packets 5551  bytes 744320 (726.8 KiB)
        TX errors 0  dropped 0 overruns 0  carrier 0  collisions 0

lo: flags=73  mtu 65536
        inet 127.0.0.1  netmask 255.0.0.0
        inet6 ::1  prefixlen 128  scopeid 0x10
        loop  txqueuelen 1000  (Local Loopback)
        RX packets 292  bytes 63812 (62.3 KiB)
        RX errors 0  dropped 0  overruns 0  frame 0
        TX packets 292  bytes 63812 (62.3 KiB)
        TX errors 0  dropped 0 overruns 0  carrier 0  collisions 0
Oplossing
Stap 1: Schakel IPv6-routing en -adressering in Gastshell uit.
lat1-2-ssw01.gts#guestshell run bash
[guestshell@guestshell ~]$ sudo sysctl -w net.ipv6.conf.all.disable_ipv6=1
[guestshell@guestshell ~]$ sudo sysctl -w net.ipv6.conf.default.disable_ipv6=1
[guestshell@guestshell ~]$ sudo sysctl -w net.ipv6.conf.lo.disable_ipv6=1
Stap 2: Controleer of IPv6 is uitgeschakeld.
[guestshell@guestshell ~]$ /sbin/ifconfig
eth0: flags=4163  mtu 1500
        inet 192.168.20.10  netmask 255.255.255.0 broadcast 192.168.20.255
        ether 52:54:dd:41:c6:43  txqueuelen 1000  (Ethernet)
        RX packets 7829  bytes 1750981 (1.6 MiB)
        RX errors 0  dropped 0  overruns 0  frame 0
        TX packets 5551  bytes 744320 (726.8 KiB)
        TX errors 0  dropped 0 overruns 0  carrier 0  collisions 0

lo: flags=73  mtu 65536
        inet 127.0.0.1  netmask 255.0.0.0
        loop  txqueuelen 1000  (Local Loopback)
        RX packets 292  bytes 63812 (62.3 KiB)
        RX errors 0  dropped 0  overruns 0  frame 0
        TX packets 292  bytes 63812 (62.3 KiB)
        TX errors 0  dropped 0 overruns 0  carrier 0  collisions 0
Fouten in schijfruimte bij het uitvoeren van Python-scripts
Probleem: De kwestie betreft een Python script dat draait op een Embedded Event Manager (EEM) binnen de Guestshell. Het scripts mislukt vanwege onvoldoende schijfruimte met de fout:
guestshell run python3 /flash/guest-share/monitoring.py -rt True -bgp True
---- pushing bgp status ----
OSError: [Errno 28] No space left on device

During handling of the above exception, another exception occurred:

Traceback (most recent call last):
  File "/flash/guest-share/monitoring_periodic_tasks.py", line 18, in
    print(bgp_status())
  File "/bootflash/guest-share/monitoring_bgp_status.py", line 15, in bgp_status
    vrf = cli.cli('show vrf')
  File "/usr/lib/python3.6/site-packages/cli/__init__.py", line 311, in cli
    _log_to_file("CLI execution invoked for '" + command + "'")
  File "/usr/lib/python3.6/site-packages/cli/__init__.py", line 87, in _log_to_file
    logfile.close()
OSError: [Errno 28] No space left on device
! This error indicates that the disk space allocated for logging command executions within the Guestshell environment has been exhausted.
Oplossing
Om het probleem op te lossen dat er onvoldoende schijfruimte is, moet u de grootte van de aanhoudende schijf voor de Guestshell-omgeving verhogen:
1. Wijzig het profiel van de toepassingsbron om de grootte van de permanent-schijfschijf te verhogen.
Switch(config-app-hosting)# app-resource profile custom
Switch(config-app-hosting-profile)# persist-disk 100
Switch(config-app-hosting-profile)# cpu 800
Switch(config-app-hosting-profile)# memory 256
Switch(config-app-hosting-profile)# end
2. Sla de configuratie op en schakel de guestshell in/uit.
Switch# write memory
Switch#guestshell disable
Guestshell disabled successfully
Switch#guestshell enable
Interface will be selected if configured in app-hosting
Please wait for completion
guestshell installed successfully
Current state is: DEPLOYED
guestshell activated successfully
Current state is: ACTIVATED
guestshell started successfully
Current state is: RUNNING
Guestshell enabled successfully
Logboekregistratie-systeem
U kunt deze opdrachten in guestshell uitvoeren om de syslog-berichten weer te geven:
[guestshell@guestshell ~]$ sudo logger -p 1 "Priority 1"
[guestshell@guestshell ~]$ sudo cat /var/log/messages
Mar 11 02:05:24 localhost systemd[248]: user@0.service: Failed at step PAM spawning /usr/lib/systemd/systemd: Operation not permitted
Mar 11 02:05:24 localhost systemd[1]: user@0.service: Failed with result 'protocol'.
Mar 11 02:05:24 localhost systemd[1]: Failed to start User Manager for UID 0.
Mar 11 02:05:24 localhost systemd[1]: Stopping /run/user/0 mount wrapper...
Mar 11 02:05:24 localhost systemd[1]: run-user-0.mount: Succeeded.
Mar 11 02:05:24 localhost systemd[1]: user-runtime-dir@0.service: Succeeded.
Mar 11 02:05:24 localhost systemd[1]: Stopped /run/user/0 mount wrapper.
Mar 11 02:05:24 localhost root[250]: Priority 1
[guestshell@guestshell ~]$ sudo cat /var/log/secure
Mar 11 02:05:24 localhost systemd[248]: pam_unix(systemd-user:account): expired password for user root (root enforced)
Mar 11 02:05:24 localhost sudo[246]: pam_systemd(sudo:session): Failed to create session: Start job for unit user@0.service failed with 'failed'
Mar 11 02:05:24 localhost sudo[246]: pam_unix(sudo:session): session opened for user root by (uid=0)
Traceloog
U kunt app-hosting verplaatsen appid guestshell log naar bootflash:folder_name gebruiken om het bestand te roteren. Dit kan worden gebruikt om te roteren naar een doelmap, maar dit roteert ook naar traceloguestshell directory.
Switch#app-hosting move appid guestshell log to bootflash:
Successfully moved tracelog to flash:/ioxapploguestshell/iox_R0-0_R0-0.14195_0.20250311023831.bin.gz
Opmerking: IOX guestshell.log is altijd het actieve tracelog bestand onder /tmp/rp/trace · Wanneer dit bestand 1 MB bereikt, wordt het automatisch geroteerd naar bootflash:traceloguestshell/ met een tijdstempel, en een nieuw is gestart.
Gerelateerde informatie
- Application Hosting op Cisco Catalyst 9000 Series Switches - witboek
- Cisco Catalyst 9300 Series Switches hardwaregids
- Configuratiehandleiding voor programmeerbaarheid, Cisco IOS XE 17.9.x
- Catalyst 9300 stapelbare systeemarchitectuur - witboek
- Cisco bug-id CSCwi63075 - Guestshell is niet toegankelijk via CLI na een upgrade naar 17.08.01 of hoger als FIPS-modus is ingeschakeld
- Technische ondersteuning en documentatie – Cisco Systems
Revisiegeschiedenis
| Revisie | Publicatiedatum | Opmerkingen |
|---|---|---|
1.0 |
17-Mar-2025
|
Eerste vrijgave |
Bijgedragen door Cisco-engineers
- Christopher Martinez BarriosTechnisch adviseur-engineer
 Feedback
Contact Cisco
- Een ondersteuningscase openen

- (Vereist een Cisco-servicecontract)