Nginx Reverse Proxy configureren voor VPN-loze toegang tot Cisco Finesse (12.6 ES03)
Downloadopties
Inclusief taalgebruik
De documentatie van dit product is waar mogelijk geschreven met inclusief taalgebruik. Inclusief taalgebruik wordt in deze documentatie gedefinieerd als taal die geen discriminatie op basis van leeftijd, handicap, gender, etniciteit, seksuele oriëntatie, sociaaleconomische status of combinaties hiervan weerspiegelt. In deze documentatie kunnen uitzonderingen voorkomen vanwege bewoordingen die in de gebruikersinterfaces van de productsoftware zijn gecodeerd, die op het taalgebruik in de RFP-documentatie zijn gebaseerd of die worden gebruikt in een product van een externe partij waarnaar wordt verwezen. Lees meer over hoe Cisco gebruikmaakt van inclusief taalgebruik.
Over deze vertaling
Cisco heeft dit document vertaald via een combinatie van machine- en menselijke technologie om onze gebruikers wereldwijd ondersteuningscontent te bieden in hun eigen taal. Houd er rekening mee dat zelfs de beste machinevertaling niet net zo nauwkeurig is als die van een professionele vertaler. Cisco Systems, Inc. is niet aansprakelijk voor de nauwkeurigheid van deze vertalingen en raadt aan altijd het oorspronkelijke Engelstalige document (link) te raadplegen.
Inhoud
Inleiding
In dit document wordt beschreven hoe u een reverse proxy kunt gebruiken om toegang te krijgen tot de Cisco Finesse-desktop zonder verbinding te maken met een VPN op basis van 12,6 ES03-versies van Cisco Finesse, Cisco Unified Intelligence Center (CUIC) en Cisco Identity Service (IdS).
Opmerking: Nginx-installatie en -configuratie wordt niet ondersteund door Cisco. Vragen met betrekking tot dit onderwerp kunnen worden besproken op de Cisco-communityforums.
Opmerking: Voor ES03-implementaties van VPN-Less raadpleegt u de leeslijst van de afzonderlijke componenten om de upgrades te plannen en compatibiliteitsbeperkingen te controleren. Cisco Finesse 12.6 ES03 Readme, CUIC / IdS 12.6 ES03 Readme
Voorwaarden
Vereisten
Cisco raadt kennis van de volgende onderwerpen aan:
- Cisco Unified Contact Center Enterprise (UCCE) release
- Cisco Finesse
- Linux-beheer
- Netwerkbeheer en Linux-netwerkbeheer
Gebruikte componenten
De informatie in dit document is gebaseerd op de volgende software- en hardware-versies:
- Finesse - 12,6 ES03
- CUIC - 12,6 ES03
- IdS - 12.6 ES03
- UCCE/Hosted Collaboration Solution (HCS) voor Contact Center (CC) - 11.6 of hoger
- Packaged Contact Center Enterprise (PCCE) - 12,5 of later
Opmerking: PCCE/UCCE 2k-implementaties moeten op 12.6-versie van CCE worden uitgevoerd als gevolg van de implementatie van LD/CUIC-coresident
De informatie in dit document is gebaseerd op de apparaten in een specifieke laboratoriumomgeving. Alle apparaten die in dit document worden beschreven, hadden een opgeschoonde (standaard)configuratie. Als uw netwerk live is, moet u zorgen dat u de potentiële impact van elke opdracht begrijpt.
Opmerking: de configuratie die in dit document wordt geleverd, is geconfigureerd, gehard en getest met Nginx reverse proxy (OpenResty) die op CentOS 8.0 is geïmplementeerd, tegen een voorbeeld van 2000 gebruikers UCCE-implementatie. Informatie over het prestatieprofiel is beschikbaar in dit document.
Achtergrondinformatie
Dit implementatiemodel wordt ondersteund voor de oplossingen UCCE/PCCE en HCS voor UCCE.
De implementatie van een reverse proxy wordt ondersteund (beschikbaar vanaf 12.6 ES01) als een optie om toegang te krijgen tot de Cisco Finesse-desktop zonder verbinding te maken met een VPN. Deze functie biedt agenten de flexibiliteit om vanaf elke locatie via internet toegang te krijgen tot de Finesse-desktop.
Om deze functie in te schakelen, moet een omgekeerd proxypaar worden ingezet in de gedemilitariseerde zone (DMZ).
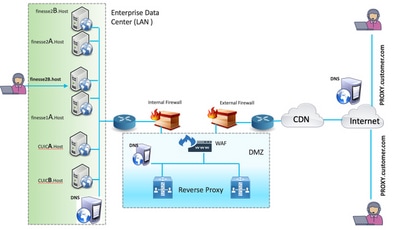
Mediatoegang blijft ongewijzigd in omgekeerde proxy-implementaties. Om verbinding te maken met de media kunnen agenten gebruikmaken van Cisco Jabber over Mobile and Remote Access Solution (MRA) of de Mobile Agent-mogelijkheid van UCCE met een Public Switched Telephone Network (PSTN) of mobiel eindpunt. Dit diagram laat zien hoe de netwerkimplementatie eruit zal zien wanneer u twee Finesse-clusters en twee CUIC-knooppunten opent via een enkel paar reverse proxy-knooppunten met hoge beschikbaarheid (HA).
Gelijktijdige toegang van agents op het internet en agents die verbinding maken vanaf het LAN wordt ondersteund, zoals in deze afbeelding wordt getoond.
Opmerking: Zie de handleiding voor de selectiecriteria voor proxy's van derden in plaats van Nginx om deze implementatie te ondersteunen.
- UCCE 12.6 Feature Guide - Biedt een overzicht van functies, een ontwerp en configuratiedetails voor de VPN-Less Feature.
- UCCE 12.6 Security Guide - Biedt richtlijnen voor de configuratie van de beveiliging voor de omgekeerde proxy-implementatie.
Het wordt aanbevolen om het gedeelte VPN-minder van de handleiding met functies en de beveiligingsgids te bekijken voordat u dit document leest.
Wijzigingen in ES03
- Nieuwe functies
- Finesse supervisor-mogelijkheden worden nu ondersteund via reverse proxy.
- CUIC RealTime- en Historische rapporten worden nu ondersteund via Finesse-gadgets in een geproxed-omgeving.
- Authenticatie voor alle verzoeken / communicatie - vereist Lua-ondersteuning
- Alle Finesse / CUIC / IM & Presence (IM&P) verzoeken worden geverifieerd bij de proxy voordat ze het datacenter mogen betreden.
- Websocket en Live data socketIO-verbindingen zijn ook beperkt en alleen toegestaan van klanten die met succes een beveiligd verzoek hebben ingediend bij Finesse.
- Brute force attack sensing en logging bij de proxy, die kan worden gebruikt met Fail2Ban om kwaadaardige IP-adressen te blokkeren.
- Beveiligingsverbeteringen voor omgekeerde proxyconfiguratie - vereist Lua-ondersteuning
- TLS-verificatie (Mutual Transport Layer Security) tussen reverse proxy- en upstream-componenten (Finesse/IdS/CUIC/Livedata).
- SeLinux-instellingen.
- Schakel wederzijdse Secure Sockets Layer (SSL)-vertrouwensverificatie in voor proxy- en componentserververzoeken.
- Verbeterde beveiliging voor de proxyconfiguratie om Denial-of-Service (DoS) / Distributed Denial-of-Service (DDoS)-aanvallen te voorkomen - vereist Lua-ondersteuning
- Verbeterde Nginx-verzoeksnelheidslimieten voor verschillende delen van het systeem.
- Tarievenlimieten voor IPtables.
- Verificatie van verzoeken om statische bronnen voordat de upstream-componentserver wordt aangevraagd.
- Lichtere en niet-geauthentiseerde pagina's in cache die niet op de upstream-componentserver terechtkomen.
- Diverse andere functies - vereist Lua-ondersteuning
- Auto sensing Cross-Origin Resource Sharing (CORS)-antwoorden die worden geleverd vanaf de proxy om automatische configuratie te ondersteunen en de prestaties te verbeteren
- Auto sensing Cross-Origin Resource Sharing (CORS)-antwoorden die worden geleverd vanaf de proxy om automatische configuratie te ondersteunen en de prestaties te verbeteren
- Defect Fixes met betrekking tot VPN-Less
- CSCwa26057
 CSCwa26057 " />- Meerdere certificaten aangeboden aan agent tijdens aanmelding finesse desktop
 - CSCwa24471 - Aanmeldingspagina van Finesse toont geen FQDN-naam van SSO Agent
- CSCwa24519 : Webproxy-service kan niet opnieuw worden gestart als reverse proxy-hostnaam niet kan worden opgelost vanuit component
- CSCwa23252 Proxy: vertrouwen in finesse wordt verbroken wanneer diepte meer dan één is voor CA certs-keten
- CSCwa46459 Log4J Zero Day-kwetsbaarheid blootgesteld in Webservice
- CSCwa26057
Upgrade-opmerkingen voor op ES01 gebaseerde VPN-loze configuraties
- De ES03-configuratie vereist Nginx-installatie met Lua-ondersteuning.
- Certificaatvereisten
- Cisco Finesse, CUIC en IdS vereisen dat het Nginx / OpenResty-hostcertificaat wordt toegevoegd aan de Tomcat-vertrouwenswinkel en opnieuw wordt opgestart voordat de Nginx ES02-configuratie met succes verbinding kan maken met de upstream-server.
- Cisco Finesse-, CUIC- en IdS-upstreamservercertificaten moeten in de Nginx-server worden geconfigureerd om de op ES03 gebaseerde configuratie te gebruiken.
Opmerking: het wordt aanbevolen om de bestaande Nginx-configuratie met ES01 te verwijderen voordat u de ES03 Nginx-configuraties installeert.
Opmerking: ES03-configuratiescripts vereisen ook de bijbehorende ES03 COP-installatie in Cisco Finesse, CUIC en IdS.
Verificatie
Finesse 12.6 ES03 introduceert authenticatie bij de proxy. Authenticatie wordt ondersteund voor Single Sign On (SSO)- en niet-SSO-implementaties.
Authenticatie wordt afgedwongen voor alle verzoeken en protocollen die bij de proxy worden geaccepteerd voordat ze worden doorgestuurd naar de upstream-componentservers, waar de authenticatie die door de componentservers wordt afgedwongen ook lokaal plaatsvindt. Bij alle verificatie worden de algemene aanmeldingsreferenties van Finesse gebruikt om de verzoeken te verifiëren.
Permanente verbindingen, zoals websockets die gebruikmaken van toepassingsprotocollen zoals Extensible Messaging en Presence Protocol (XMPP) voor verificatie en postverbinding, worden bij de proxy geverifieerd door het IP-adres te valideren van waaruit een succesvolle toepassingsverificatie is gemaakt voordat de socketverbinding tot stand wordt gebracht.
Niet-SSO-verificatie
Niet-SSO-verificatie vereist geen extra configuraties en werkt met out-of-the-box Nginx-configuratiescripts zodra de vereiste scriptvervangingen zijn gemaakt. Authenticatie is gebaseerd op de gebruikersnaam en het wachtwoord dat wordt gebruikt om in te loggen bij Finesse. Toegang tot alle eindpunten wordt gevalideerd met Finesse-verificatieservices.
De lijst met geldige gebruikers wordt lokaal in de cache opgeslagen (de cache wordt elke 15 minuten bijgewerkt), die wordt gebruikt om de gebruiker in een verzoek te valideren. Gebruikersreferenties worden gevalideerd door het verzoek door te sturen naar de geconfigureerde Finesse URI en daarna wordt de hash met referenties lokaal in de cache opgeslagen (15 minuten in de cache) om nieuwe verzoeken lokaal te verifiëren. Als er een wijziging is in de gebruikersnaam of het wachtwoord, wordt deze pas na 15 minuten van kracht.
SSO-verificatie
Voor SSO-verificatie moet de beheerder de IdS-tokencoderingssleutel configureren op de Nginx-server in het configuratiebestand. De IdS token encryptiesleutel kan worden verkregen van de IdS server met de show ids geheime CLI opdracht. De sleutel moet worden geconfigureerd als onderdeel van een van de #Must-change-vervangingen die de beheerder in de scripts moet uitvoeren voordat de SSO-auteur kan werken.
Raadpleeg de gebruikershandleiding van de SSO voor de IdS SAML-configuraties die moeten worden uitgevoerd om de proxyresolutie te laten werken voor IdS.
Zodra SSO-verificatie is geconfigureerd, kan een geldig paar tokens worden gebruikt om toegang te krijgen tot een van de eindpunten in het systeem. De proxyconfiguratie valideert de referenties door het onderscheppen van de token-retrieval-verzoeken die aan IdS zijn gedaan of door geldige tokens te decoderen en ze vervolgens lokaal te cachen voor verdere validaties.
Authenticatie voor websocketverbindingen
Websocketverbindingen kunnen niet worden geverifieerd met de standaard autorisatieheader, omdat aangepaste headers niet worden ondersteund door native websocketimplementaties in de browser. Authenticatieprotocollen op toepassingsniveau, waarbij de authenticatiegegevens in de payload de oprichting van een websocketverbinding niet verhinderen, en daarom kunnen kwaadwillende entiteiten DOS- of DDOS-aanvallen uitvoeren door ontelbare verbindingen te maken om het systeem te overweldigen.
Om deze mogelijkheid te beperken, hebben de verstrekte nginx reverse proxy-configuraties specifieke controles om websocketverbindingen ALLEEN te accepteren van die IP-adressen die met succes een geverifieerd REST-verzoek hebben ingediend voordat de websocketverbinding tot stand is gebracht. Dit betekent dat clients die proberen om websocketverbindingen te maken voordat een REST-verzoek wordt uitgegeven, nu een mislukte autorisatiefout krijgen en geen ondersteund gebruiksscenario is.
Brute Force Attack Prevention
Finesse 12.6 ES02-verificatiescripts voorkomen actief brute force-aanvallen die kunnen worden gebruikt om het gebruikerswachtwoord te raden. Dit gebeurt door het IP-adres te blokkeren dat wordt gebruikt om toegang te krijgen tot de service, na een bepaald aantal mislukte pogingen in een korte tijd. Deze verzoeken worden afgewezen door 418 client error. De details van de geblokkeerde IP-adressen zijn toegankelijk via de bestanden <nginx-install-directory>/logs/blocking.log en <nginx-install-directory>/logs/error.log.
Het aantal mislukte aanvragen, het tijdsinterval en de blokkeringsduur kunnen worden geconfigureerd. Configuraties zijn aanwezig in het bestand <nginx-install-directory>/conf/conf.d/maps.conf.
## These two constants indicate five auth failures from a client can be allowed in thirty seconds.
## if  the threshold is crossed,client ip will be blocked.
map $host $auth_failure_threshold_for_lock {
    ## Must-change Replace below two parameters as per requirement
    default 5 ;
}

map $host $auth_failure_counting_window_secs {
    ## Must-change Replace below two parameters as per requirement
    default 30;
}

## This indicates duration of blocking a client to avoid brute force attack
map $host $ip_blocking_duration {
    ## Must-change Replace below parameter as per requirement
    default 1800;
}
Logboekregistratie
Voer de volgende opdrachten uit in de directory <nginx-install-directory>/logs om de IP-adressen te vinden die zijn geblokkeerd.
grep "will be blocked for" blocking.log
grep "IP is already blocked." error.log
2021/10/29 17:30:59 [emerg] 1181750#1181750: *19 [lua] block_unauthorized_users.lua:153:
_redirectAndSendError(): 10.68.218.190 will be blocked for 30 minutes for exceeding retry limit.,
client: 10.68.218.190, server: saproxy.cisco.com, request:
"GET /finesse/api/SystemInfo?nocache=1636456574482 HTTP/2.0", host: "saproxy.cisco.com:8445",
referrer: "https://saproxy.cisco.com:8445/desktop/container/?locale=en_US&"

2021/10/29 19:21:00 [error] 943068#943068: *43 [lua] block_unauthorized_users.lua:53: 10.70.235.30 ::
IP is already blocked..., client: 10.70.235.30, server: saproxy.cisco.com, request:
"GET /finesse/api/SystemInfo?nocache=1635591686497 HTTP/2.0", host: "saproxy.cisco.com:8445",
referrer: "https://saproxy.cisco.com:8445/desktop/container/?locale=en_US"
Het wordt aanbevolen dat klanten integreren met Fail2ban of vergelijkbaar om het verbod toe te voegen aan de IPtable / firewall-regels.
Fail2ban installeren en configureren
Fail2ban scant logbestanden en verbiedt IP's die de kwaadaardige tekens tonen - te veel wachtwoordfouten, op zoek naar exploits, enz. Over het algemeen wordt Fail2Ban vervolgens gebruikt om firewallregels bij te werken om de IP-adressen voor een bepaalde tijd te weigeren, hoewel andere willekeurige acties (bijvoorbeeld het verzenden van een e-mail) ook kunnen worden geconfigureerd. Ga voor meer informatie naar https://www.fail2ban.org/.
Fail2ban kan worden geconfigureerd om het blocking.log te controleren om de IP-adressen te identificeren die door Nginx worden geblokkeerd bij het detecteren van bruteforce-aanvallen en ze voor een configureerbare duur te verbieden. Stappen voor het installeren en configureren van fail2ban op een CentOS reverse proxy zijn als volgt:
1. Installeer Fail2ban met yum.
yum update && yum install epel-release
yum install fail2ban
2. Creëer een lokale gevangenis.
Met gevangenisconfiguraties kan de beheerder verschillende eigenschappen configureren, zoals de poorten die niet toegankelijk zijn via een geblokkeerd IP-adres, de duur van de blokkering van het IP-adres, de filterconfiguratie die wordt gebruikt voor het identificeren van het geblokkeerde IP-adres uit het gecontroleerde logbestand, enz. De stappen voor het toevoegen van een aangepaste configuratie voor het verbieden van IP-adressen die geen toegang hebben tot de upstream-servers zijn als volgt:
2.1. Ga naar de installatiemap van Fail2ban (in dit voorbeeld /etc/fail2ban)
cd /etc/fail2ban
2.2. Maak een kopie van jail.conf in jail.local om de lokale veranderingen geïsoleerd te houden.
cp jail.conf jail.local
2.3. Voeg deze gevangenisconfiguraties toe aan het einde van het bestand jail.local, en vervang de poorten in de sjabloon door de daadwerkelijke poorten. De configuratie van de ban-tijd bijwerken zoals vereist.
# Jail configurations for HTTP connections.
[finesse-http-auth]
enabled = true
# The ports to be blocked. Add any additional ports.
port = http,https,<finesse-ports>,<cuic-ports>,<any-other-ports-to-be-blocked>
# Path to nginx blocking logs.
logpath = /usr/local/openresty/nginx/logs/blocking.log
# The filter configuration.
filter = finesseban
# Block the IP from accessing the port, once the IP is blocked by lua.
maxretry= 1
# Duration for retry set to 3 mins. Doesn't count as the maxretry is 1
findtime= 180
# Lock time is set to 3 mins. Change as per requirements.
bantime = 180
3. Configureer een filter.
Een filter vertelt Fail2ban waar u op moet letten in de logs om te bepalen welke host moet worden geblokkeerd. De stappen voor het maken van een filter zijn als volgt:
3.1. Maak filter.d/finesseban.conf.
touch filter.d/finesseban.conf
3.2. Voeg deze regels toe aan het bestand filter.d/finesseban.conf.
[Definition]
# The regex match that would cause blocking of the host.
failregex = <HOST> will be blocked for
4. Start Fail2ban.
Voer deze opdracht uit om fail2ban te starten.
fail2ban-client start
Open fail2ban-logbestanden en controleer of er geen fouten zijn. Logboeken voor fail2ban gaan standaard in het bestand /var/log/fail2ban.log.
Statische bron-URL's valideren
Alle geldige eindpunten die op een niet-geverifieerde manier toegankelijk zijn, worden actief bijgehouden in de ES03-scripts.
Aanvragen voor deze niet-geverifieerde paden worden actief afgewezen als een ongeldige URI wordt aangevraagd, zonder deze verzoeken naar de upstream-server te sturen.
Caching CORS-koppen
Wanneer het eerste optieverzoek succesvol is, worden de antwoordkoppen access-control-allow-headers, access-control-allow-origin, access-control-allow-methods, access-control-expose-headers, en access-control-allow-credentials gedurende vijf minuten in de cache van de proxy opgeslagen. Deze headers worden in de cache opgeslagen voor elke respectieve upstream-server.
Configureren
In dit document wordt de configuratie van Nginx beschreven als de reverse proxy die moet worden gebruikt om Finesse VPN-less toegang mogelijk te maken. De UCCE-oplossingscomponent, proxy- en OS-versies die worden gebruikt om de verstrekte instructies te controleren, worden meegeleverd. De relevante instructies moeten worden aangepast aan het besturingssysteem/de proxy van uw keuze.
- Nginx versie gebruikt - OpenResty 1.19.9.1
- Besturingssysteem gebruikt voor configuratie - CentOS 8.0
Opmerking: De beschreven Nginx-configuratie kan worden gedownload van de downloadpagina voor Finesse Release 12.6(1)ES3-software.
Oplossingscomponenten configureren voor minder VPN-toegang
Nadat u de proxy hebt geconfigureerd, configureert u de oplossingscomponenten (Finesse / CUIC / IdS) voor VPN Less-toegang met de geplande hostnaam en IP van de proxy / services die worden gebruikt om toegang te krijgen tot de oplossing met deze opdrachten.
utils system reverse-proxy allowed-hosts add
utils system reverse-proxy config-uri <uri> add
De details van deze opdrachten zijn te vinden in de UCCE 12.6 Feature Guide en moeten worden doorverwezen voordat u dit document gebruikt.
OpenResty installeren als een omgekeerde proxy in DMZ
In dit gedeelte worden de stappen voor de installatie van de op OpenResty gebaseerde proxy beschreven. De reverse proxy wordt meestal geconfigureerd als een speciaal apparaat in de netwerk gedemilitariseerde zone (DMZ), zoals weergegeven in het implementatiediagram dat eerder werd genoemd.
- Installeer het besturingssysteem van uw keuze met de vereiste hardwarespecificaties. Kernel- en IPv4-parameteraanpassingen kunnen verschillen afhankelijk van het geselecteerde besturingssysteem en gebruikers wordt geadviseerd deze aspecten opnieuw te controleren als de gekozen OS-versie anders is.
- Twee netwerkinterfaces configureren. Eén interface is vereist voor openbare toegang van de internetclients en een andere voor communicatie met de servers in het interne netwerk.
- Installeer OpenResty.
Alle smaken van Nginx kunnen voor dit doel worden gebruikt, zolang ze gebaseerd zijn op Nginx 1.19+ en Lua ondersteunen:
- Nginx Plus
- Nginx Open Source (Nginx open source moet worden gecompileerd samen met OpenResty-gebaseerde Lua-modules om te worden gebruikt)
- OpenResty
- GetPageSpeed Extra's
Opmerking: De geleverde configuratie is getest met OpenResty 1.19 en zal naar verwachting werken met andere distributies met slechts kleine updates, indien aanwezig.
OpenResty-installatie
- OpenResty installeren. Zie OpenResty Linux-pakketten. Als onderdeel van de OpenResty-installatie wordt Nginx op deze locatie geïnstalleerd en wordt het OpenResty-pad toegevoegd aan de variabele PATH door het bestand ~/.bashrc toe te voegen.
export PATH=/usr/local/openresty/bin:$PATH
- Start/stop Nginx.
- Om Nginx te starten,
openrestyvoert u in. - Om Nginx te stoppen, ga
openresty -s stopnaar binnen.
- Om Nginx te starten,
Nginx configureren
De configuratie wordt uitgelegd voor een op OpenResty gebaseerde Nginx-installatie. De standaarddirectory's voor OpenResty zijn:
- <nginx-install-directory> = /usr/local/openresty/nginx
- <Openresty-install-directory> = /usr/local/openresty
- Download en pak het bestand uit de Finesse Release 12.6(1)ES03 software download pagina (12.6-ES03-reverse-proxy-config.zip) die de reverse proxy configuratie voor Nginx bevat.
- Kopieer nginx.conf, nginx/conf.d/ en nginx/html/ uit de uitgepakte reverse proxy configuratie directory naar <nginx-install-directory>/conf, <nginx-install-directory>/conf/conf.d/, en <nginx-install-directory>/html/ respectievelijk.
- Kopieer de directory nginx/lua uit de geëxtraheerde reverse proxy configuratie directory in de <nginx-install-directory>.
- Kopieer de inhoud van lualib naar <Openresty-install-directory>/lualib/resty.
- Configureer de rotatie van het nginx-log door het nginx/logrotate/saproxy-bestand te kopiëren naar de <nginx-install-directory>/logrotate/map. Wijzig de bestandsinhoud om naar de juiste logmappen te verwijzen als Nginx-standaardwaarden niet worden gebruikt.
- Nginx moet worden uitgevoerd met een speciale niet-geprivilegieerde serviceaccount, die moet worden vergrendeld en een ongeldige shell moet hebben (of zoals van toepassing voor het gekozen besturingssysteem).
- Zoek de "Must-change" string in de bestanden onder de geëxtraheerde mappen met de naam html en conf.d en vervang de aangegeven waarden door de juiste items.
- Zorg ervoor dat alle verplichte vervangingen worden uitgevoerd, die worden beschreven met de Must-change-opmerkingen in de configuratiebestanden.
- Zorg ervoor dat de cachemappen die zijn geconfigureerd voor CUIC en Finesse, worden gemaakt onder <nginx-install-directory>/cache samen met deze tijdelijke mappen.
- <nginx-install-directory>/cache/client_temp
- <nginx-install-directory>/cache/proxy_temp
Opmerking: de configuratie die wordt geleverd, is bedoeld voor een voorbeeld van een implementatie in 2000 en moet op de juiste manier worden uitgebreid voor een grotere implementatie.
De Nginx-cache configureren
De proxy-cachepaden worden standaard opgeslagen in het bestandssysteem. We raden aan deze te wijzigen in in-memory drives door een cachelocatie in tmpfs te maken, zoals hier wordt weergegeven.
- Mappen maken voor de verschillende proxy-cachepaden onder /home.
Deze mappen moeten bijvoorbeeld worden gemaakt voor de primaire finesse. Dezelfde stappen moeten worden gevolgd voor de secundaire Finesse- en CUIC-servers.
mkdir -p /home/primaryFinesse/rest
mkdir -p /home/primaryFinesse/desktop
mkdir -p /home/primaryFinesse/shindig
mkdir -p /home/primaryFinesse/openfire
mkdir -p /home/primaryCUIC/cuic
mkdir -p /home/primaryCUIC/cuicdoc
mkdir -p /home/client_temp
mkdir -p /home/proxy_temp
echo "tmpfs /home/primaryFinesse/rest tmpfs size=1510M,rw,auto,noexec,nodev,nosuid,gid=root,uid=root,mode=1700 0 0" >>
/etc/fstab echo "tmpfs /home/primaryFinesse/desktop tmpfs size=20M,rw,auto,noexec,nodev,nosuid,gid=root,uid=root,mode=1700 0 0" >>
/etc/fstab echo "tmpfs /home/primaryFinesse/shindig tmpfs size=500M,rw,auto,noexec,nodev,nosuid,gid=root,uid=root,mode=1700 0 0" >>
/etc/fstab echo "tmpfs /home/primaryFinesse/openfire tmpfs size=10M,rw,auto,noexec,nodev,nosuid,gid=root,uid=root,mode=1700 0 0" >>
/etc/fstab echo "tmpfs /home/primaryCUIC/cuic tmpfs size=100M,rw,auto,noexec,nodev,nosuid,gid=root,uid=root,mode=1700 0 0" >>
/etc/fstab echo "tmpfs /home/primaryCUIC/cuicdoc tmpfs size=100M,rw,auto,noexec,nodev,nosuid,gid=root,uid=root,mode=1700 0 0" >>
/etc/fstab echo "tmpfs /home/client_temp tmpfs size=2048M,rw,auto,noexec,nodev,nosuid,gid=root,uid=root,mode=1700 0 0" >>
/etc/fstab echo "tmpfs /home/proxy_temp tmpfs size=2048M,rw,auto,noexec,nodev,nosuid,gid=root,uid=root,mode=1700 0 0" >> /etc/fstabOpmerking: Verhoog de client- en proxy_temp-caches met 1 GB voor elk nieuw Finesse-cluster dat aan de configuratie is toegevoegd.
- Monteer de nieuwe koppelpunten met de
mount -avopdracht. - Valideren dat het bestandssysteem de nieuwe koppelpunten heeft gekoppeld met de
df -hopdracht. - Wijzig de proxy_cache_path locaties in de Finesse en CUIC cache configuratiebestanden.
Ga bijvoorbeeld naar <nginx-install-directory>conf/conf.d/finesse/caches en wijzig de bestaande cachelocatie /usr/local/openresty/nginx/cache/finesse25/ naar de nieuw gemaakte bestandssysteemlocatie om de paden voor de primaire Finesse te wijzigen /home/primaryFinesse.
##Must-change /usr/local/openresty/nginx/cache/finesse25 location would change depending on folder extraction proxy_cache_path /home/primaryFinesse/desktop levels=1:2 use_temp_path=on keys_zone=desktop_cache_fin25:10m max_size=15m inactive=3y use_temp_path=off; proxy_cache_path /home/primaryFinesse/shindig levels=1:2 use_temp_path=on keys_zone=shindig_cache_fin25:10m max_size=500m inactive=3y use_temp_path=off; proxy_cache_path /home/primaryFinesse/openfire levels=1:2 use_temp_path=on keys_zone=openfire_cache_fin25:10m max_size=10m inactive=3y use_temp_path=off; proxy_cache_path /home/primaryFinesse/rest levels=1:2 use_temp_path=on keys_zone=rest_cache_fin25:10m max_size=1500m inactive=40m use_temp_path=off; - Volg dezelfde stappen voor de secundaire Finesse- en CUIC-servers.
Opmerking: zorg ervoor dat de som van alle tmpfs-schijfgroottes die in alle voorgaande stappen zijn gemaakt, wordt toegevoegd aan de uiteindelijke geheugengrootte voor de implementatie, omdat deze schijven geheugenblokken zijn die zijn geconfigureerd om eruit te zien als schijven voor de toepassing en zoveel mogelijk geheugenruimte in beslag nemen.
SSL-certificaten configureren
Zelf ondertekende certificaten gebruiken - Testimplementaties
Zelf ondertekende certificaten mogen alleen worden gebruikt totdat de reverse proxy klaar is om in productie te worden uitgerold. Gebruik bij een productie-implementatie alleen een certificaat dat door de certificeringsinstantie (CA) is ondertekend.
- Nginx-certificaten genereren voor SSL-mapinhoud. Voordat u certificaten genereert, moet u een map maken met de naam ssl onder /usr/local/openresty/nginx. U moet twee certificaten genereren met behulp van deze opdrachten (één voor <reverseproxy_primary_fqdn> en een andere voor <reverseproxy_secondary_fqdn>).
sudo openssl req -x509 -nodes -days 365 -newkey rsa:2048 -keyout /usr/local/openresty/nginx/ssl/nginx.key -out /usr/local/openresty/nginx/ssl/nginx.crt(hostnaam doorgeven als: <reverseproxy_primary_fqdn>)sudo openssl req -x509 -nodes -days 365 -newkey rsa:2048 -keyout /usr/local/openresty/nginx/ssl/nginxnode2.key -out /usr/local/openresty/nginx/ssl/nginxnode2.crt(hostnaam doorgeven als:<reverseproxy_secondary_fqdn>)- Zorg ervoor dat het certificaatpad /usr/local/openresty/nginx/ssl/nginx.crt en /usr/local/openresty/nginx/ssl/nginxnode2.crt is, aangezien deze al zijn geconfigureerd in Finesse Nginx-configuratiebestanden.
- Wijzig de machtiging van de privésleutel 400 (r---------).
- Configureer de firewall/iptables op de reverse proxy om communicatie vanuit de firewall mogelijk te maken die overeenkomt met de poorten waarop de Nginx-server is geconfigureerd om te luisteren.
- Voeg het IP-adres en de hostnaam van Finesse, IdS en CUIC toe onder het /etc/hosts-item op de omgekeerde proxyserver.
- Raadpleeg de handleiding met oplossingsfuncties voor de configuraties die op de componentservers moeten worden uitgevoerd om de Nginx-host als een reverse proxy te configureren.
Opmerking: de configuratie die wordt geleverd, is bedoeld voor een voorbeeld van een implementatie in 2000 en moet op de juiste manier worden uitgebreid voor een grotere implementatie.
CA-ondertekend certificaat gebruiken - Productie-implementaties
Een CA-ondertekend certificaat kan op de reverse proxy worden geïnstalleerd met de volgende stappen:
- Genereer het certificaatondertekeningsverzoek (CSR).
Om de CSR en private key te genereren,
openssl req -new -newkey rsa:4096 -keyout nginx.key -out nginx.csrvoer je in nadat je bent ingelogd op de proxy. Volg de prompt en geef de details op. Dit genereert de CSR (nginx.csr in het voorbeeld) en de RSA private key (nginx.key in het voorbeeld) van sterkte 4096 bits.Voorbeeld:
[root@reverseproxyhost.companyname.com ssl]# openssl req -new -newkey rsa:4096 -keyout nginx.key -out nginx.csr
Generating a RSA private key
.....+++++
...................................................................................................................................................+++++
writing new private key to 'nginx.key'
Enter PEM pass phrase:passphrase
Verifying - Enter PEM pass phrase:passphrase
-----
You are about to be asked to enter information that will be incorporated
into your certificate request.
What you are about to enter is what is called a Distinguished Name or a DN.
There are quite a few fields but you can leave some blank
For some fields there will be a default value,
If you enter '.', the field will be left blank.
-----
Country Name (2 letter code) [XX]:US
State or Province Name (full name) []:CA
Locality Name (eg, city) [Default City]:Orange County
Organization Name (eg, company) [Default Company Ltd]:CompanyName
Organizational Unit Name (eg, section) []:BusinessUnit
Common Name (eg, your name or your server's hostname) []:reverseproxyhostname.companydomain.com
Email Address []:john.doe@comapnydomain.com
Please enter the following 'extra' attributes
to be sent with your certificate request
A challenge password []:challengePWD
An optional company name []:CompanyName
Noteer de PEM-wachtwoordzin, omdat deze wordt gebruikt om de privésleutel te decoderen tijdens de implementatie. - Verkrijg het ondertekende certificaat van de CA.
Stuur de CSR naar de certificeringsinstantie en verkrijg het ondertekende certificaat.
Opmerking: Als het van de certificeringsinstantie ontvangen certificaat geen certificaatketen is die alle respectieve certificaten bevat, stelt u alle relevante certificaten samen in één certificaatketenbestand.
- Implementeer het certificaat en de sleutel.
Decodeer de sleutel die eerder is gegenereerd als onderdeel van de eerste stap met
openssl rsa -in nginx.key -out nginx_decrypted.keyhet commando. Plaats het CA-ondertekende certificaat en de gedecodeerde sleutel in de map /usr/local/openresty/nginx/ssl in de omgekeerde proxy-machine. Bijwerken/toevoegen van SSL-configuraties met betrekking tot het certificaat in de Nginx-configuraties in het configuratiebestand /usr/local/openresty/nginx/conf/conf.d/ssl/ssl.conf.ssl_certificate /usr/local/openresty/nginx/ssl/ca_signed_cert.crt; ssl_certificate_key /usr/local/openresty/nginx/ssl/nginx_decrypted.key; - Configureer machtigingen voor de certificaten.
chmod 400 /usr/local/openresty/nginx/ssl/ca_signed_cert.crtInvoerenchmod 400 /usr/local/openresty/nginx/ssl/nginx_decrypted.key, zodat het certificaat alleen-lezen toestemming heeft en beperkt is tot de eigenaar. - Nginx opnieuw laden.
Aangepaste Diffie-Hellman-parameter gebruiken
Maak een aangepaste Diffie-Hellman-parameter met de volgende opdrachten:
    openssl dhparam -out /usr/local/openresty/nginx/ssl/dhparam.pem 2048

    chmod 400 /usr/local/openresty/nginx/ssl/dhparam.pem
Wijzig de serverconfiguratie om de nieuwe parameters in het bestand /usr/local/openresty/nginx/conf/conf.d/ssl/ssl.conf te gebruiken:ssl_dhparam /usr/local/openresty/nginx/ssl/dhparam.pem;
Zorg ervoor dat OCSP-nieten is ingeschakeld - Controle op intrekking van certificaat
Opmerking: hiervoor moet de server een CA-ondertekend certificaat gebruiken en moet de server toegang hebben tot de CA die het certificaat heeft ondertekend.
Voeg deze configuratie toe/werk deze bij in de file/usr/local/openresty/nginx/conf/conf.d/ssl/ssl.conf:ssl_stapling on;
ssl_stapling_verify on;
Nginx-configuratie
Het standaard Nginx-configuratiebestand (/usr/local/openresty/nginx/conf/nginx.conf) moet worden gewijzigd om deze vermeldingen te bevatten om de beveiliging af te dwingen en prestaties te bieden. Deze inhoud moet worden gebruikt om het standaardconfiguratiebestand te wijzigen dat is gemaakt door de Nginx-installatie.
# Increasing number of worker processes will not increase the processing the request. The number of worker process will be same as number of cores
# in system CPU. Nginx provides "auto" option to automate this, which will spawn one worker for each CPU core.
worker_processes  auto;

# Process id file location
pid /usr/local/openresty/nginx/logs/nginx.pid;

# Binds each worker process to a separate CPU
worker_cpu_affinity auto;

#Defines the scheduling priority for worker processes. This should be calculated by "nice" command. In our proxy set up the value is 0
worker_priority 0;


error_log  /usr/local/openresty/nginx/logs/error.log info;

#user root root;

# current limit on the maximum number of open files by worker processes, keeping 10 times of worker_connections

worker_rlimit_nofile 102400;

events {
    multi_accept on;


    # Sets the maximum number of simultaneous connections that can be opened by a worker process.
    # This should not be more the current limit on the maximum number of open files i.e. hard limit of the maximum number of open files for the user (ulimit -Hn)
    # The appropriate setting depends on the size of the server and the nature of the traffic, and can be discovered through testing.
    worker_connections  10240;
    #debug_connection 10.78.95.21
}


http {

    include       mime.types;


    default_type  text/plain;


    ## Must-change Change with DNS resolver ip in deployment
    resolver 192.168.1.3;


    ## Must-change change lua package path to load lua libraries
    lua_package_path  "/usr/local/openresty/lualib/resty/?.lua;/usr/local/openresty/nginx/lua/?.lua;;"


    ## Must-change change proxy_temp folder as per cache directory configurations
    proxy_temp_path /usr/local/openresty/nginx/cache/proxy_temp 1 2 ;
    ## Must-change change client_temp folder as per cache directory configurations
    client_body_temp_path /usr/local/openresty/nginx/cache/client_temp 1 2 ;


    lua_shared_dict userlist 50m;
    lua_shared_dict credentialsstore 100m;
    lua_shared_dict userscount 100k;
    lua_shared_dict clientstorage 100m;
    lua_shared_dict blockingresources 100m;
    lua_shared_dict tokencache_saproxy 10M;
    lua_shared_dict tokencache_saproxy125 10M;
    lua_shared_dict ipstore 10m;
    lua_shared_dict desktopurllist 10m;
    lua_shared_dict desktopurlcount 100k;
    lua_shared_dict thirdpartygadgeturllist 10m;
    lua_shared_dict thirdpartygadgeturlcount 100k;
    lua_shared_dict corsheadersstore 100k;


    init_worker_by_lua_block {
        local UsersListManager = require('users_list_manager')
        local UnauthenticatedDesktopResourcesManager = require("unauthenticated_desktopresources_manager")
        local UnauthenticatedResourcesManager = require("unauthenticated_thirdpartyresources_manager")
        --  Must-change Replace saproxy.cisco.com with reverseproxy fqdn

        if  ngx.worker.id() == 0 then
            UsersListManager.getUserList("saproxy.cisco.com", "https://saproxy.cisco.com:8445/finesse/api/Users")
            UnauthenticatedDesktopResourcesManager.getDesktopResources("saproxy.cisco.com", "https://saproxy.cisco.com:8445/desktop/api/urls?type=desktop")
            UnauthenticatedResourcesManager.getThirdPartyGadgetResources("saproxy.cisco.com", "https://saproxy.cisco.com:8445/desktop/api/urls?type=3rdParty")
        end
    }

    include conf.d/*.conf;

    sendfile        on;

    tcp_nopush     on;

    server_names_hash_bucket_size 512;
Omgekeerde proxypoort configureren
Standaard luistert de Nginx-configuratie op poort 8445 voor Finesse-verzoeken. Tegelijkertijd kan slechts één poort worden ingeschakeld vanaf een reverse proxy om Finesse-verzoeken te ondersteunen, bijvoorbeeld 8445. Als poort 443 moet worden ondersteund, bewerkt u het bestand <nginx-install-directory>conf/conf.d/finesse.conf om luisteren op 443 mogelijk te maken en luisteren op 8445 uit te schakelen.
Wederzijdse TLS-verificatie configureren tussen omgekeerde proxy- en upstreamcomponenten
Client SSL-certificaatverificatie voor verbindingen van reverse proxy-hosts kan worden ingeschakeld op CCBU-upstreamcomponenten CUIC/Finesse/IdS/Livedata via de nieuwe CLI-optie voor CVOS die
Utils System reverse-proxy client-auth Enable/Disable/Status.
Dit is standaard uitgeschakeld en moet expliciet door de beheerder worden ingeschakeld door CLI op elke upstream-server afzonderlijk uit te voeren. Zodra deze optie is ingeschakeld, begint Cisco Web Proxyservice op de upstream-host met de verificatie van clientcertificaten in TLS-handshake voor verbindingen die afkomstig zijn van vertrouwde reverse proxy-hosts die zijn toegevoegd als onderdeel van CLI-hulpprogramma's Systeem reverse-proxy-toegestane hosts <proxy-host> toevoegen.
Hieronder ziet u het configuratieblok voor hetzelfde in proxyconfiguratiebestanden, namelijk ssl.conf en ssl2.conf
#Must-change /usr/local/openresty/nginx/ssl/nginx.crt change this location accordingly
proxy_ssl_certificate /usr/local/openresty/nginx/ssl/nginx.crt;
#Must-change /usr/local/openresty/nginx/ssl/nginx.key change this location accordingly
proxy_ssl_certificate_key /usr/local/openresty/nginx/ssl/nginx.key;
SSL-certificaat dat wordt gebruikt voor uitgaande verkeer (proxy naar upstream) kan hetzelfde zijn als SSL-certificaat dat is geconfigureerd voor inkomende verkeer (SSL-connector voor componentserverblokken). Als een zelf ondertekend certificaat als proxy_ssl_certificate wordt gebruikt, moet het worden geüpload naar upstream-componenten (Finesse/IdS/CUIC/Livedata) om het te kunnen gebruiken in de vertrouwensopslag.
Upstream-servercertificaatvalidatie met behulp van reverse proxy is optioneel en standaard uitgeschakeld. Als u volledige TLS-wederzijdse authenticiteit wilt bereiken tussen reverse proxy- en upstream-hosts, moet de onderstaande configuratie worden verwijderd uit ssl.conf- en ssl2.conf-bestanden.#Enforce upstream server certificate validation at proxy ->
#this is not mandated as per CIS buit definitely adds to security.
#It requires the administrator to upload all upstream server certificates to the proxy certificate store
#Must-Change Uncomment below lines IF need to enforce upstream server certificate validation at proxy
#proxy_ssl_verify on;
#proxy_ssl_trusted_certificate /usr/local/openresty/nginx/ssl/finesse25.crt;
proxy_ssl_trusted_certificate: This file should contain the all upstream certificate enteries concatenated together
Voorbehouden voor het configureren van wederzijdse TLS-auth:
- Zodra deze functie is ingeschakeld op CCBU-componenten, wordt het clientcertificaat ook tijdens de TLS-handshake gevraagd van LAN-clients. In het geval dat client-/persoonlijke certificaten op de clientcomputer zijn geïnstalleerd, kunnen browsers ervoor kiezen een pop-upvenster voor de eindgebruiker weer te geven waarin wordt gevraagd om het juiste certificaat voor clientverificatie te kiezen. Hoewel het niet uitmaakt welk certificaat de eindgebruiker kiest of op Annuleren drukt, zullen de pop-upverzoeken slagen omdat de clientzekerheid niet wordt afgedwongen voor LAN-clients, maar er zal een verandering in ervaring zijn. Verwijs CDET CSCwa26057 voor meer informatie.
- De webproxyservice van Upstream Components komt niet naar voren als een proxyhost wordt toegevoegd aan de lijst met toegestane proxyservers die niet kan worden opgelost door de webproxyservice. Zorg ervoor dat reverse proxy-hosts die aan de lijst zijn toegevoegd, via DNS-lookup kunnen worden opgelost vanaf een upstream-component.
Cache wissen
De reverse proxy cache kan worden gewist met de opdracht.
Standaardrichtlijnen
In dit gedeelte worden de standaardrichtlijnen beschreven die moeten worden gevolgd wanneer u Nginx als proxyserver instelt.
Deze richtlijnen zijn afgeleid van het Center for Internet Security. Voor meer informatie over elke richtlijn, verwijzen naar dezelfde.
- Het wordt altijd aanbevolen om de nieuwste stabiele OpenResty- en OpenSSL-versie te gebruiken.
- Het is raadzaam om Nginx te installeren in een aparte schijfmount.
- De Nginx-proces-id moet eigendom zijn van de root-gebruiker (of zoals van toepassing voor het gekozen OS) en moet toestemming hebben 644 (rw-------) of strenger.
- Nginx moet verzoeken voor onbekende hosts blokkeren. Zorg ervoor dat elk serverblok de server_name-richtlijn bevat die expliciet is gedefinieerd. Om dit te verifiëren, zoekt u alle serverblokken in de directory nginx.conf en nginx/conf.d en controleert u of alle serverblokken de server_name bevatten.
- Nginx moet alleen luisteren op de geautoriseerde poorten. Zoek alle serverblokken in de directory nginx.conf en nginx/conf.d en controleer of u naar richtlijnen luistert om te controleren of alleen de geautoriseerde poorten open zijn voor beluisteren.
- Omdat Cisco Finesse geen HTTP ondersteunt, wordt het aanbevolen om ook de HTTP-poort van de proxyserver te blokkeren.
- Het Nginx SSL-protocol moet TLS 1.2 zijn. Ondersteuning voor oudere SSL-protocollen moet worden verwijderd. Het moet ook zwakke SSL-coderingen uitschakelen.
- Het is raadzaam dat Nginx-fout- en toegangslogboeken naar de externe syslog-server worden verzonden.
- Het is raadzaam om de mod_security module te installeren die werkt als een webapplicatie firewall. Zie de ModSecurity handleiding voor meer informatie. Merk op dat de Nginx-belasting niet is geverifieerd in de module mod_security.
Het toewijzingsbestand configureren
De omgekeerde proxy-implementatie van het Finesse-bureaublad vereist een toewijzingsbestand om de lijst met extern zichtbare hostnaam-/poortcombinaties en de toewijzing daarvan aan de werkelijke servernamen en poorten te configureren die worden gebruikt door de Finesse-, IdS- en CUIC-servers. Dit toewijzingsbestand dat op interne servers is geconfigureerd, is de belangrijkste configuratie waarmee de clients die via internet zijn verbonden, kunnen worden omgeleid naar de vereiste hosts en poorten die op internet worden gebruikt.
Het toewijzingsbestand moet worden geïmplementeerd op een webserver die toegankelijk is voor de componentservers en de URI moet worden geconfigureerd om de implementatie te laten werken. Het wordt aanbevolen het toewijzingsbestand te configureren met een speciale webserver die beschikbaar is in het netwerk. Als een dergelijke server niet beschikbaar is, kan in plaats daarvan de omgekeerde proxy worden gebruikt, wat vereist dat de proxy toegankelijk is vanuit het netwerk en ook een risico vormt om de informatie bloot te stellen aan externe clients die ongeautoriseerde toegang tot de DMZ kunnen maken. In het volgende deel wordt uitgelegd hoe dit kan worden bereikt.
Raadpleeg de handleiding met functies voor de exacte stappen voor het configureren van de URI van het toewijzingsbestand op alle componentservers en voor meer informatie over het maken van toewijzingsbestandsgegevens.
Reverse Proxy gebruiken als toewijzingsbestandsserver
Deze stappen zijn alleen vereist als de reverse-proxy ook wordt gebruikt als de host voor het toewijzingsbestand van de proxy.
- Configureer de reverse proxy-hostnaam in de domeincontroller die wordt gebruikt door de Finesse/CUIC- en IdS-hosts, zodat het IP-adres kan worden opgelost.
- Upload de gegenereerde Nginx-ondertekende certificaten op beide knooppunten onder tomcat-trust van cmplatform en start de server opnieuw op.
- Werk de waarden voor Must-change bij in <NGINX_HOME>/html/proxymap.txt.
- Laad Nginx-configuraties opnieuw met de
nginx -s reloadopdracht. - Valideer dat het configuratiebestand toegankelijk is vanaf een andere netwerkhost met behulp van de
curlopdracht.
CentOS 8 Kernel Hardening
Als het gekozen besturingssysteem CentOS 8 is, wordt aanbevolen om kernel hardening / tuning uit te voeren met behulp van deze sysctl-configuraties voor installaties die een speciale server gebruiken voor het hosten van de proxy.
## Configurations for kernel hardening - CentOS8. The file path is /etc/sysctl.conf
## Note that the commented configurations denote that CentOS 8's default value matches
## the recommended/tested value, and are not security related configurations.

# Avoid a smurf attack
net.ipv4.icmp_echo_ignore_broadcasts = 1

# Turn on protection for bad icmp error messages
net.ipv4.icmp_ignore_bogus_error_responses = 1

# Turn on syncookies for SYN flood attack protection
net.ipv4.tcp_syncookies = 1

# Turn on and log spoofed, source routed, and redirect packets
net.ipv4.conf.all.log_martians = 1
net.ipv4.conf.default.log_martians = 1

# Turn off routing
net.ipv4.ip_forward = 0
net.ipv4.conf.all.forwarding = 0
net.ipv6.conf.all.forwarding = 0

net.ipv4.conf.all.mc_forwarding = 0
net.ipv6.conf.all.mc_forwarding = 0

# Block routed packets
net.ipv4.conf.all.accept_source_route = 0
net.ipv4.conf.default.accept_source_route = 0
net.ipv6.conf.all.accept_source_route = 0
net.ipv6.conf.default.accept_source_route = 0

# Block ICMP redirects
net.ipv4.conf.all.accept_redirects = 0
net.ipv4.conf.default.accept_redirects = 0
net.ipv6.conf.all.accept_redirects = 0
net.ipv6.conf.default.accept_redirects = 0
net.ipv4.conf.all.secure_redirects = 0
net.ipv4.conf.default.secure_redirects = 0
net.ipv4.conf.all.send_redirects = 0
net.ipv4.conf.default.send_redirects = 0

# Filter routing packets with inward-outward path mismatch(reverse path filtering)
net.ipv4.conf.all.rp_filter = 1
net.ipv4.conf.default.rp_filter = 1

# Router solicitations & advertisements related.
net.ipv6.conf.default.router_solicitations = 0
net.ipv6.conf.default.accept_ra_rtr_pref = 0
net.ipv6.conf.default.accept_ra_pinfo = 0
net.ipv6.conf.default.accept_ra_defrtr = 0
net.ipv6.conf.default.autoconf = 0
net.ipv6.conf.default.dad_transmits = 0
net.ipv6.conf.default.max_addresses = 1
net.ipv6.conf.all.accept_ra = 0
net.ipv6.conf.default.accept_ra = 0

# Backlog - increased from default 1000 to 5000.
net.core.netdev_max_backlog = 5000

# Setting syn/syn-ack retries to zero, so that they don't stay in the queue.
net.ipv4.tcp_syn_retries = 0
net.ipv4.tcp_synack_retries = 0

# Max tcp listen backlog. Setting it to 511 to match nginx config
net.core.somaxconn = 511

# Reduce the duration of connections held in TIME_WAIT(seconds)
net.ipv4.tcp_fin_timeout = 6

# Maximum resources allotted
# fs.file-max = 2019273
# kernel.pid_max = 4194304
# net.ipv4.ip_local_port_range = 32768 60999

# TCP window size tuning
# net.ipv4.tcp_window_scaling = 1
# net.core.rmem_default = 212992
# net.core.rmem_max = 212992
# net.ipv4.tcp_rmem = 4096 87380 6291456
# net.ipv4.udp_rmem_min = 4096
# net.core.wmem_default = 212992
# net.core.wmem_max = 212992
# net.ipv4.tcp_wmem = 4096 16384 4194304
# net.ipv4.udp_wmem_min = 4096
# vm.lowmem_reserve_ratio = 256 256 32 0 0
# net.ipv4.tcp_mem = 236373 315167 472746

# Randomize virtual address space
kernel.randomize_va_space = 2

# Congestion control
# net.core.default_qdisc = fq_codel
# net.ipv4.tcp_congestion_control = cubic

# Disable SysReq
kernel.sysrq = 0

# Controls the maximum size of a message, in bytes
kernel.msgmnb = 65536

# Controls the default maximum size of a message queue
kernel.msgmax = 65536

# Controls the eagerness of the kernel to swap.
vm.swappiness = 1
Een reboot wordt aanbevolen nadat u de aanbevolen wijzigingen hebt aangebracht.
IPtables verharden
IPtables is een applicatie waarmee een systeembeheerder de IPv4- en IPv6-tabellen, -ketens en -regels kan configureren die door de Linux-kernelfirewall worden geleverd.
Deze IPtables-regels zijn geconfigureerd om de proxytoepassing te beveiligen tegen brute force-aanvallen door de toegang in de Linux-kernelfirewall te beperken.
De opmerkingen in de configuratie geven aan welke service volgens de regels wordt beperkt.
Opmerking: als beheerders een andere poort gebruiken of de toegang tot meerdere servers uitbreiden met dezelfde poorten, moet de juiste grootte voor deze poorten worden bepaald op basis van deze nummers.
## Configuration for iptables service
## The file path is /etc/sysconfig/iptables
## Make a note for must-change values to be replaced.
## Restart of the iptable service is required after applying following rules

*filter
:INPUT ACCEPT [0:0]
:FORWARD ACCEPT [0:0]
:OUTPUT ACCEPT [0:0]

# Ensure loopback traffic is configured
-A INPUT -i lo -j ACCEPT
-A OUTPUT -o lo -j ACCEPT
-A INPUT -s 127.0.0.0/8 -j DROP

# Ensure ping openeded only for the particular source and blocked for rest
# Must-Change: Replace the x.x.x.x with valid ip address
-A INPUT -p ICMP --icmp-type 8 -s x.x.x.x -j ACCEPT

# Ensure outbound and established connections are configured
-A INPUT -p tcp -m state --state RELATED,ESTABLISHED -j ACCEPT
-A OUTPUT -p tcp -m state --state NEW,RELATED,ESTABLISHED -j ACCEPT

# Block ssh for external interface
# Must-Change: Replace the ens224 with valid ethernet interface
-A INPUT -p tcp -i ens224 --dport 22 -j DROP
# Open inbound ssh(tcp port 22) connections
-A INPUT -p tcp -m state --state NEW -m tcp --dport 22 -j ACCEPT


# Configuration for finesse 8445 port
-A INPUT -p tcp -m tcp --dport 8445 --tcp-flags SYN SYN -m connlimit --connlimit-above 10 --connlimit-mask 32 --connlimit-saddr -m limit --limit 1/min --limit-burst 1 -j LOG --log-prefix " Connections to 8445 exceeded connlimit "
-A INPUT -p tcp -m tcp --dport 8445 --tcp-flags SYN SYN -m connlimit --connlimit-above 10 --connlimit-mask 32 --connlimit-saddr -j DROP
 -A INPUT -p tcp -m tcp --dport 8445 --tcp-flags SYN SYN -m hashlimit --hashlimit-upto 6/sec --hashlimit-burst 8 --hashlimit-mode srcip,dstport --hashlimit-name TCP_8445_DOS -j ACCEPT
-A INPUT -p tcp -m tcp --dport 8445 --tcp-flags SYN SYN -m limit --limit 1/min --limit-burst 1 -j LOG --log-prefix " Exceeded 8445 hashlimit "
-A INPUT -p tcp -m tcp --dport 8445 --tcp-flags SYN SYN -j DROP

# Configuration for IdS 8553 port
-A INPUT -p tcp -m tcp --dport 8553 --tcp-flags SYN SYN -m connlimit --connlimit-above 6 --connlimit-mask 32 --connlimit-saddr -m limit --limit 1/min --limit-burst 1 -j LOG --log-prefix " IdS connection limit exceeded"
-A INPUT -p tcp -m tcp --dport 8553 --tcp-flags SYN SYN -m connlimit --connlimit-above 6 --connlimit-mask 32 --connlimit-saddr -j DROP
-A INPUT -p tcp -m tcp --dport 8553 --tcp-flags SYN SYN -m hashlimit --hashlimit-upto 2/sec --hashlimit-burst 4 --hashlimit-mode srcip,dstport --hashlimit-name TCP_8553_DOS -j ACCEPT
-A INPUT -p tcp -m tcp --dport 8553 --tcp-flags SYN SYN -m limit --limit 1/min --limit-burst 1 -j LOG --log-prefix " Exceeded 8553 hashlimit "
-A INPUT -p tcp -m tcp --dport 8553 --tcp-flags SYN SYN -j DROP

# Configuration for IdP 443 port
-A INPUT -p tcp -m tcp --dport 443 --tcp-flags SYN SYN -m connlimit --connlimit-above 8 --connlimit-mask 32 --connlimit-saddr -m limit --limit 1/min --limit-burst 1 -j LOG --log-prefix " IdP connection limit exceeded"
-A INPUT -p tcp -m tcp --dport 443 --tcp-flags SYN SYN -m connlimit --connlimit-above 8 --connlimit-mask 32 --connlimit-saddr -j DROP
-A INPUT -p tcp -m tcp --dport 443 --tcp-flags SYN SYN -m hashlimit --hashlimit-upto 4/sec --hashlimit-burst 6 --hashlimit-mode srcip,dstport --hashlimit-name TCP_443_DOS -j ACCEPT
-A INPUT -p tcp -m tcp --dport 443 --tcp-flags SYN SYN -m limit --limit 1/min --limit-burst 1 -j LOG --log-prefix " Exceeded 443 hashlimit "
-A INPUT -p tcp -m tcp --dport 443 --tcp-flags SYN SYN -j DROP


# Must-Change: A2A file transfer has not been considered for below IMNP configuration.
# For A2A for support, these configuration must be recalculated to cater different file transfer scenarios.

# Configuration for IMNP 5280 port
-A INPUT -p tcp -m tcp --dport 5280 --tcp-flags SYN SYN -m connlimit --connlimit-above 30 --connlimit-mask 32 --connlimit-saddr -m limit --limit 1/min --limit-burst 1 -j LOG --log-prefix " IMNP connection limit exceeded"
-A INPUT -p tcp -m tcp --dport 5280 --tcp-flags SYN SYN -m connlimit --connlimit-above 30 --connlimit-mask 32 --connlimit-saddr -j DROP
-A INPUT -p tcp -m tcp --dport 5280 --tcp-flags SYN SYN -m hashlimit --hashlimit-upto 20/sec --hashlimit-burst 25 --hashlimit-mode srcip,dstport --hashlimit-name TCP_5280_DOS -j ACCEPT
-A INPUT -p tcp -m tcp --dport 5280 --tcp-flags SYN SYN -m limit --limit 1/min --limit-burst 1 -j LOG --log-prefix " Exceeded 5280 hashlimit "
-A INPUT -p tcp -m tcp --dport 5280 --tcp-flags SYN SYN -j DROP

# Configuration for IMNP 15280 port
-A INPUT -p tcp -m tcp --dport 15280 --tcp-flags SYN SYN -m connlimit --connlimit-above 30 --connlimit-mask 32 --connlimit-saddr -m limit --limit 1/min --limit-burst 1 -j LOG --log-prefix " IMNP connection limit exceeded"
-A INPUT -p tcp -m tcp --dport 15280 --tcp-flags SYN SYN -m connlimit --connlimit-above 30 --connlimit-mask 32 --connlimit-saddr -j DROP
-A INPUT -p tcp -m tcp --dport 15280 --tcp-flags SYN SYN -m hashlimit --hashlimit-upto 20/sec --hashlimit-burst 25 --hashlimit-mode srcip,dstport --hashlimit-name TCP_15280_DOS -j ACCEPT
-A INPUT -p tcp -m tcp --dport 15280 --tcp-flags SYN SYN -m limit --limit 1/min --limit-burst 1 -j LOG --log-prefix " Exceeded 15280 hashlimit "
-A INPUT -p tcp -m tcp --dport 15280 --tcp-flags SYN SYN -j DROP


# Configuration for IMNP 25280 port
-A INPUT -p tcp -m tcp --dport 25280 --tcp-flags SYN SYN -m connlimit --connlimit-above 30 --connlimit-mask 32 --connlimit-saddr -m limit --limit 1/min --limit-burst 1 -j LOG --log-prefix " IMNP connection limit exceeded"
-A INPUT -p tcp -m tcp --dport 25280 --tcp-flags SYN SYN -m connlimit --connlimit-above 30 --connlimit-mask 32 --connlimit-saddr -j DROP
-A INPUT -p tcp -m tcp --dport 25280 --tcp-flags SYN SYN -m hashlimit --hashlimit-upto 20/sec --hashlimit-burst 25 --hashlimit-mode srcip,dstport --hashlimit-name TCP_25280_DOS -j ACCEPT
-A INPUT -p tcp -m tcp --dport 25280 --tcp-flags SYN SYN -m limit --limit 1/min --limit-burst 1 -j LOG --log-prefix " Exceeded 25280 hashlimit "
-A INPUT -p tcp -m tcp --dport 25280 --tcp-flags SYN SYN -j DROP


# Configuration for CUIC 8444 port
-A INPUT -p tcp -m tcp --dport 8444 --tcp-flags SYN SYN -m connlimit --connlimit-above 6 --connlimit-mask 32 --connlimit-saddr -m limit --limit 1/min --limit-burst 1 -j LOG --log-prefix " CUIC connection limit exceeded"
-A INPUT -p tcp -m tcp --dport 8444 --tcp-flags SYN SYN -m connlimit --connlimit-above 6 --connlimit-mask 32 --connlimit-saddr -j DROP
-A INPUT -p tcp -m tcp --dport 8444 --tcp-flags SYN SYN -m hashlimit --hashlimit-upto 2/sec --hashlimit-burst 4 --hashlimit-mode srcip,dstport --hashlimit-name TCP_8444_DOS -j ACCEPT
-A INPUT -p tcp -m tcp --dport 8444 --tcp-flags SYN SYN -m limit --limit 1/min --limit-burst 1 -j LOG --log-prefix " Exceeded 8444 hashlimit "
-A INPUT -p tcp -m tcp --dport 8444 --tcp-flags SYN SYN -j DROP

# Configuration for CUIC 8447 port
-A INPUT -p tcp -m tcp --dport 8447 --tcp-flags SYN SYN -m connlimit --connlimit-above 6 --connlimit-mask 32 --connlimit-saddr -m limit --limit 1/min --limit-burst 1 -j LOG --log-prefix " CUIC connection limit exceeded"
-A INPUT -p tcp -m tcp --dport 8447 --tcp-flags SYN SYN -m connlimit --connlimit-above 6 --connlimit-mask 32 --connlimit-saddr -j DROP
-A INPUT -p tcp -m tcp --dport 8447 --tcp-flags SYN SYN -m hashlimit --hashlimit-upto 2/sec --hashlimit-burst 4 --hashlimit-mode srcip,dstport --hashlimit-name  TCP_8447_DOS -j ACCEPT
-A INPUT -p tcp -m tcp --dport 8447 --tcp-flags SYN SYN -m limit --limit 1/min --limit-burst 1 -j LOG --log-prefix " Exceeded 8447 hashlimit "
-A INPUT -p tcp -m tcp --dport 8447 --tcp-flags SYN SYN -j DROP

# Configuration for LiveData 12005  port
-A INPUT -p tcp -m tcp --dport 12005 --tcp-flags SYN SYN -m connlimit --connlimit-above 10 --connlimit-mask 32 --connlimit-saddr -m limit --limit 1/min --limit-burst 1 -j LOG --log-prefix " LD connection limit exceeded"
-A INPUT -p tcp -m tcp --dport 12005 --tcp-flags SYN SYN -m connlimit --connlimit-above 10 --connlimit-mask 32 --connlimit-saddr -j DROP
-A INPUT -p tcp -m tcp --dport 12005 --tcp-flags SYN SYN -m hashlimit --hashlimit-upto 6/sec --hashlimit-burst 8 --hashlimit-mode srcip,dstport --hashlimit-name TCP_12005_DOS -j ACCEPT
-A INPUT -p tcp -m tcp --dport 12005 --tcp-flags SYN SYN -m limit --limit 1/min --limit-burst 1 -j LOG --log-prefix " Exceeded 12005 hashlimit "
-A INPUT -p tcp -m tcp --dport 12005 --tcp-flags SYN SYN -j DROP

# Configuration for LiveData 12008  port
-A INPUT -p tcp -m tcp --dport 12008 --tcp-flags SYN SYN -m connlimit --connlimit-above 10 --connlimit-mask 32 --connlimit-saddr -m limit --limit 1/min --limit-burst 1 -j LOG --log-prefix " LD connection limit exceeded"
-A INPUT -p tcp -m tcp --dport 12008 --tcp-flags SYN SYN -m connlimit --connlimit-above 10 --connlimit-mask 32 --connlimit-saddr -j DROP
-A INPUT -p tcp -m tcp --dport 12008 --tcp-flags SYN SYN -m hashlimit --hashlimit-upto 6/sec --hashlimit-burst 8 --hashlimit-mode srcip,dstport --hashlimit-name  TCP_12008_DOS -j ACCEPT
-A INPUT -p tcp -m tcp --dport 12008 --tcp-flags SYN SYN -m limit --limit 1/min --limit-burst 1 -j LOG --log-prefix " Exceeded 12008 hashlimit "
-A INPUT -p tcp -m tcp --dport 12008 --tcp-flags SYN SYN -j DROP

# Block all other ports
-A INPUT -j REJECT --reject-with icmp-host-prohibited
-A FORWARD -j REJECT --reject-with icmp-host-prohibited

COMMIT
Deze regels kunnen rechtstreeks worden toegepast door de tabellen /etc/sysconfig/iptables handmatig te bewerken of als alternatief de configuratie op te slaan in een bestand zoals iptables.conf en cat iptables.conf >>/etc/sysconfig/iptables uit te voeren om de regels toe te passen.
Een herstart van de IPtables-service is vereist nadat u de regels hebt toegepast. Voer systemctl restart iptables dit in om de IPtables-service opnieuw te starten.
Clientverbindingen beperken
Naast de vorige IPtables-configuratie wordt aanbevolen dat installaties die het adresbereik kennen voor clients die de proxy gebruiken, deze kennis gebruiken om de toegangsregels voor proxy's te beveiligen. Dit kan enorme terugbetalingen opleveren als het gaat om het beveiligen van de proxy van botnets van kwaadaardige netwerken die vaak worden gemaakt in het IP-adresbereik van landen die meer lakse regels hebben met betrekking tot online beveiliging. Het wordt daarom sterk aanbevolen om de IP-adresbereiken te beperken tot land / staat of ISP-gebaseerde IP-bereiken als u zeker bent van de toegangspatronen.
Clientverbindingen blokkeren
Het is ook nuttig om te weten hoe u een specifiek bereik van adressen kunt blokkeren wanneer een aanval wordt geïdentificeerd die wordt uitgevoerd vanaf een IP-adres of een reeks IP-adressen. In dergelijke gevallen kunnen de verzoeken van die IP-adressen worden geblokkeerd met iptable regels.
Verschillende IP-adressen blokkeren
Als u meerdere afzonderlijke IP-adressen wilt blokkeren, voegt u voor elk IP-adres een regel toe aan het configuratiebestand IPTables.
Als u bijvoorbeeld adressen 192.0.2.3 en 192.0.2.4 wilt blokkeren, voert u het volgende in:
iptables -A INPUT -s 192.0.2.3 -j DROP iptables -A INPUT -s 192.0.2.4 - j DROP.
Een reeks IP-adressen blokkeren
Blokkeer meerdere IP-adressen in een bereik en voeg één regel toe aan het configuratiebestand IPTables met het IP-bereik.
Als u bijvoorbeeld adressen van 192.0.2.3 tot 192.0.2.35 wilt blokkeren, voert u het volgende in:
iptables -A INPUT -m iprange --src-range 192.0.2.3-192.0.2.35 -j DROP.
Alle IP-adressen in een subnet blokkeren
Blokkeer alle IP-adressen in een volledig subnet door een enkele regel toe te voegen aan het configuratiebestand van IPTables met behulp van de klasseloze routeringsnotatie voor het IP-adresbereik. Als u bijvoorbeeld alle klasse C-adressen wilt blokkeren, voert u het volgende in:
iptables -A INPUT -s 192.0.0.0/16 -j DROP.
SELinux
SELinux is een platform security framework geïntegreerd als een verbetering in het Linux OS. De procedure voor het installeren en toevoegen van SELinux-beleid om OpenResty uit te voeren als de omgekeerde proxy wordt hierna verstrekt.
- Stop het proces met het
openresty -s stopcommando. - Configureer en start /stop nginx server met de
systemctlopdracht zodat tijdens het opstarten het OpenResty proces automatisch wordt gestart. Voer deze opdrachten in als hoofdgebruiker.- Ga naar /usr/lib/systemd/system.
- Open het bestand openresty.service.
- Werk de inhoud van het bestand bij volgens de locatie van het PIDF-bestand.
[Unit]
Description=The OpenResty Application Platform
After=syslog.target network-online.target remote-fs.target nss-lookup.target
Wants=network-online.target

[Service]
Type=forking
PIDFile=/usr/local/openresty/nginx/logs/nginx.pid
ExecStartPre=/usr/local/openresty/nginx/sbin/nginx -t
ExecStart=/usr/local/openresty/nginx/sbin/nginx
ExecReload=/bin/kill -s HUP $MAINPID
ExecStop=/bin/kill -s QUIT $MAINPID
PrivateTmp=true

[Install]
WantedBy=multi-user.target
- Als rootgebruiker voert u
sudo systemctl enable openrestyin. - Start / Stop de OpenResty-service met de
systemctl start openresty / systemctl stop openrestyopdracht en zorg ervoor dat het proces wordt gestart / gestopt als rootgebruiker.
- Selinux installeren
- Standaard worden slechts enkele SELinux-pakketten geïnstalleerd in CentOs.
-
Het policy coreutils-development pakket en de afhankelijkheden ervan moeten worden geïnstalleerd om het SELinux beleid te genereren.
-
Voer deze opdracht in om policy coreutils-devel te installeren
yum install policycoreutils-devel
- Zorg ervoor dat nadat u het pakket hebt geïnstalleerd, de
sepolicyopdracht werkt.usage: sepolicy [-h] [-P POLICY] {booleans,communicate,generate,gui,interface,manpage,network,transition} ... SELinux Policy Inspection Tool
-
Een nieuwe Linux-gebruiker maken en toewijzen met SElinux-gebruiker
-
Voer
semanage login -lin om de toewijzing tussen Linux-gebruikers en SELinux-gebruikers te bekijken.[root@loadproxy-cisco-com ~]# semanage login -l Login Name SELinux User MLS/MCS Range Service __default__ unconfined_u s0-s0:c0.c1023 * * root unconfined_u s0-s0:c0.c1023 *
-
Maak als root een nieuwe Linux-gebruiker (nginx-gebruiker) die is toegewezen aan de SELinux user_u-gebruiker.
useradd -Z user_u nginxuser
[root@loadproxy-cisco-com ~]# passwd nginxuser
Changing password for user nginxuser.
New password:
Retype new password:
passwd: all authentication tokens updated successfully.
-
Om de toewijzing tussen nginxuser en user_u te bekijken, voert u deze opdracht in als root:
[root@loadproxy-cisco-com ~]# semanage login -l

Login Name           SELinux User         MLS/MCS Range        Service

__default__          unconfined_u         s0-s0:c0.c1023       *
nginxuser            user_u               s0                   *
root                 unconfined_u         s0-s0:c0.c1023       *
-
SELinux __default_login is standaard toegewezen aan de SELinux unconfined_u gebruiker. Het is vereist om user_u standaard te laten beperken met deze opdracht:
semanage login -m -s user_u -r s0 __default__
Om te controleren of de opdracht goed werkte, voert u
semanage login -lde opdracht in. Het moet deze output produceren:
-
Wijzig nginx.conf en voer eigendomswijziging uit voor nginxuser.
- Voer
chown -R nginxuser:nginxuser* in de <Openresty-install-directory> directory in. -
Wijzig het bestand nginx.conf om nginxuser op te nemen als de gebruiker voor het uitvoeren van werknemersprocessen.
........

user nginxuser nginxuser;

..........
- Voer
-
Schrijf het SELinux-beleid voor Nginx
- In plaats van een nieuw standaard aangepast beleid voor Nginx te genereren met de
sepolicy generate --init /usr/bin/nginxopdracht, wordt er de voorkeur aan gegeven om te beginnen met een bestaand beleid. - Het bestand nginx.fc (File Contexts file) en de bestanden nginx.te (Type Enforcement file) die van de opgegeven URL worden gedownload, zijn aangepast aan het omgekeerde proxygebruik.
- Deze gewijzigde versie kan als referentie worden gebruikt omdat deze is vastgesteld voor het specifieke gebruiksgeval.
- Download het bestand selinux-nginx-rhel-master-modified.tar van de downloadpagina voor bestandssoftware.
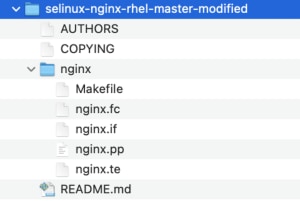
- Pak het .tar bestand uit en navigeer naar de nginx directory erin.
- Open het .fc-bestand en controleer de vereiste bestandspaden van het nginx-installatieprogramma, de cache en het pid-bestand.
- Configureer de configuratie met de
makeopdracht. - Het bestand nginx.pp wordt gegenereerd.
- Laad het beleid met de
semoduleopdracht.semodule -i nginx.pp
- Ga naar / root en maak een leeg bestand met de naam touch /.autorelabel.
- Start het systeem opnieuw op.
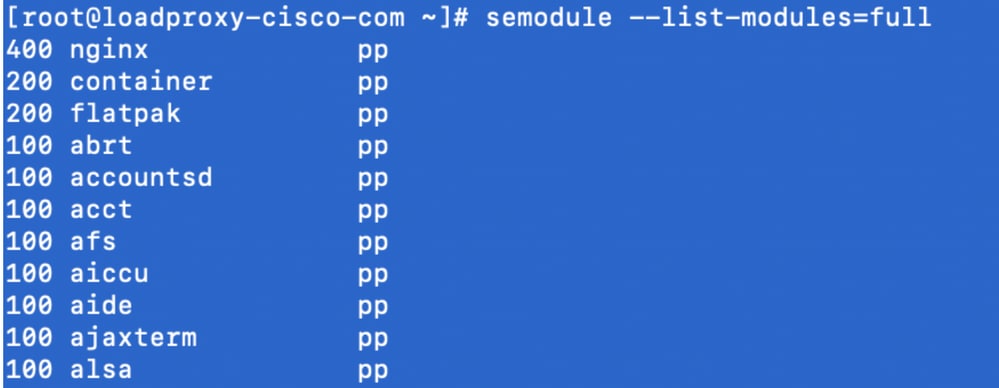
- Voer deze opdracht in om te controleren of het beleid met succes is geladen.
semodule --list-modules=full
- Nginx moet zonder enige overtreding worden uitgevoerd. (Overtredingen zijn beschikbaar in / var / log / berichten en /var/log/audit/audit.log).
- Voer deze opdracht in om de status van Nginx te controleren.
ps -aefZ | grep nginx

- Nu moet de Finesse agent / supervisor desktop toegankelijk zijn.
Verifiëren
Gebruik deze sectie om te controleren of uw configuratie goed werkt.
Finesse
- Vraag https://<reverseproxy:port>/finesse/api/SystemInfo. aan bij de DMZ en controleer of ze bereikbaar zijn.
- Controleer of <host> waarden in zowel <primaryNode> als <secondaryNode> geldige reverse proxy-hostnamen zijn. Het mogen geen Finesse-hostnamen zijn.
CUIC en Live Data
- Als Finesse-hostnamen in het antwoord worden weergegeven in plaats van reverse proxy-hostnamen, worden proxy-mappingconfiguraties en toegestane hosts correct toegevoegd in Finesse-servers, zoals beschreven in de sectie "Vertaalgegevens van het netwerk bevolken" van "VPN-minder toegang tot Finesse Desktop" in de Finesse 12.6 UCCE Feature Guide.
- Als LiveData-gadgets correct worden geladen in Finesse Desktop, zijn de proxyconfiguraties CUIC en LiveData correct.
- Om de CUIC- en LiveData-configuratie te valideren, kunt u HTTP-verzoeken indienen bij deze URL's vanuit de DMZ en kijken of ze bereikbaar zijn.
- https://<reverseProxy:cuic_port>/cuic/rest/about
- https://<reverseProxy:ldweb_port>/LiveData/Security
- https://<reverseProxy:ldsocketio_port>/beveiliging
IDS
Voer de volgende stappen uit om de IdS-configuratie te valideren:
- Meld u aan bij de IdSAdmin-interface op https://<ids_LAN_host:ids_port>:8553/idsadmin vanaf het LAN, aangezien de beheerdersinterface niet via reverse proxy wordt weergegeven.
- Kies Instellingen > IdS-vertrouwen.
- Controleer of het knooppunt van de proxy-clusteruitgever wordt vermeld op de pagina Download SP-metagegevens en klik op Volgende.
- Controleer of de IDP-proxy correct wordt weergegeven als deze is geconfigureerd op de pagina IDP-metagegevens uploaden en klik op Volgende.
- Start de SSO-test via alle proxyclusternodes op de pagina SSO testen en valideer of alle tests succesvol zijn. Dit vereist connectiviteit van clientmachines om proxynodes om te keren.
Prestaties
De data-analyse van top-equivalente performance capture, gemaakt met de nmon tool, is beschikbaar op de Finesse Release 12.6(1) ES03 software download pagina (load_result.zip). De gegevens vertegenwoordigen de status van de proxy voor desktop- en supervisor-bewerkingen, op een voorbeeld van 2000 UCCE-implementatie met behulp van SSO-aanmeldingen en CUIC LD-rapporten zoals geconfigureerd in de standaardlay-out voor 2000 gebruikers gedurende een periode van acht uur. Het kan worden gebruikt om de computer-, schijf- en netwerkvereisten af te leiden voor een installatie met Nginx op vergelijkbare hardware.
Problemen oplossen
SSO
- Desktop redirects gaan niet via proxy
- Controleer of hostnamen in de juiste gevallen zijn geconfigureerd volgens de werkelijke VM-hostnamen in verschillende configuraties zoals proxymap.txt, server_filter-bestand, enz.
- Zorg ervoor dat IdS wordt toegevoegd met de juiste hostnaam in CCE-inventaris, omdat dezelfde informatie naar componenten wordt gepusht wanneer deze voor SSO is geregistreerd bij CCE-webbeheerder.
- SSO-aanmeldingen worden niet uitgevoerd
- Zorg ervoor dat het IdS-IDP-vertrouwen is ingesteld voor de proxyhost.
- Zorg ervoor dat het IdS-IDP-vertrouwen is ingesteld voor de proxyhost.
SELinux
- Als Nginx niet standaard is gestart of het bureaublad van de Finesse-agent niet toegankelijk is, stelt u SELinux in op de rechtmatige modus met deze opdracht:
setenforce 0
- Probeer de Nginx opnieuw op te starten met het
systemctl restart nginxcommando. - Overtredingen zullen beschikbaar zijn in /var/log/messages en /var/log/audit/audit.log.
- Het is vereist om het .te-bestand te regenereren met allow-regels voor het aanpakken van die schendingen door een van deze opdrachten:
cat /var/log/audit/audit.log | audit2allow -m nginx1 > nginx1.te. # this will create nginx1.te file
                or
ausearch -c 'nginx' --raw | audit2allow -M  my-nginx  # this will create my-nginx.te file
- Werk het oorspronkelijke bestand nginx.te in de directory selinux-nginx-rhel-master-modified/nginx bij met nieuw gegenereerde machtigingsregels.
- Compileer hetzelfde met het
makecommando. - Het bestand nginx.pp wordt opnieuw gegenereerd.
- Laad het beleid op basis van de module.
semodule -i nginx.pp
- Maak SELinux om de modus af te dwingen met deze opdracht:
setenforce
- Start het systeem opnieuw op.
- Herhaal deze procedure totdat de vereiste overtredingen zijn vastgesteld.
Revisiegeschiedenis
| Revisie | Publicatiedatum | Opmerkingen |
|---|---|---|
5.0 |
24-Dec-2021 |
Correctie stappen voor OpenResty. De stappen voor het genereren en toepassen van het SSL-certificaat zijn gewijzigd. Het document is bijgewerkt met ES03-links. |
4.0 |
10-Dec-2021 |
ES03-updates. |
3.0 |
10-Nov-2021 |
De oplossingsgidsen en de beschrijving van de verificatie bijgewerkt. |
2.0 |
09-Nov-2021 |
Eerste vrijgave |
1.0 |
09-Nov-2021 |
Eerste vrijgave |
Bijgedragen door Cisco-engineers
- Dhinakaran ArumugamCisco TAC Engineer
- Sahil NarwalCisco TAC Engineer
- Arunkumar SrambikkalCisco TAC Engineer
 Feedback
Contact Cisco
- Een ondersteuningscase openen

- (Vereist een Cisco-servicecontract)