방화벽 케이블 연결 및 온보딩

Security Cloud Control에 방화벽을 케이블로 연결하고 온보딩합니다.

방화벽 케이블 연결

  • 콘솔 케이블 준비 - 방화벽은 기본적으로 콘솔 케이블과 함께 제공되지 않으므로 예를 들어 타사 USB-RJ-45 직렬 케이블을 구매해야 합니다.

  • 데이터 인터페이스 포트에 SFP 설치 - 기본 제공 포트는 SFP 모듈이 필요한 1/10/25-Gbps SFP 포트입니다.

  • 자세한 내용은 하드웨어 설치 가이드를 참조하십시오.

Security Cloud Control 케이블 연결

방화벽 온보딩

CLI 등록 키를 사용하여 방화벽을 본보딩합니다.

프로시저


단계 1

Security Cloud Control 탐색 메뉴에서 보안 디바이스를 클릭한 다음 파란색 더하기 버튼(더하기 기호)을 클릭하여 디바이스를 온보딩합니다.

단계 2

FTD tile(타일)을 클릭합니다.

단계 3

Management Mode(관리 모드)에서 FTD가 선택되어 있는지 확인합니다.

단계 4

온보딩 방법으로 Use CLI Registration Key(CLI 등록 키 사용)를 선택합니다.

그림 1. CLI 등록 키 사용
CLI 등록 키 사용

단계 5

Device Name(디바이스 이름)을 입력하고 Next(다음)를 클릭합니다.

그림 2. Device Name(디바이스 이름)
Device Name(디바이스 이름)

단계 6

Policy Assignment(정책 할당)에서 드롭다운 메뉴를 사용하여 디바이스에 대한 액세스 제어 정책을 선택합니다. 구성된 정책이 없는 경우 Default Access Control Policy(기본 액세스 제어 정책)를 선택합니다.

그림 3. 액세스 제어 정책
액세스 제어 정책

단계 7

구독 라이선스의 경우, Physical FTD Device(물리적 FTD 디바이스) 라디오 버튼을 클릭한 다음 활성화하려는 각 기능 라이선스를 선택합니다. Next(다음)를 클릭합니다.

그림 4. 구독 라이선스
구독 라이선스

단계 8

CLI 등록 키의 경우 Security Cloud Control는 등록 키 및 기타 매개 변수를 사용하여 명령을 생성합니다. 이 명령을 복사하여 Firewall Threat Defense의 초기 구성에서 사용해야 합니다.

그림 5. CLI 등록 키
CLI 등록 키

configure manager add Security Cloud Control_hostname registration_key nat_id display_name

시작 스크립트를 완료한 후 Firewall Threat Defense CLI에서 이 명령을 복사합니다. 초기 구성 수행의 내용을 참조하십시오.

예:

CLI 설정을 위한 샘플 명령:


configure manager add account1.app.us.scc.cisco.com KPOOP0rgWzaHrnj1V5ha2q5Rf8pKFX9E
Lzm1HOynhVUWhXYWz2swmkj2ZWsN3Lb account1.app.us.scc.cisco.com

단계 9

온보딩 마법사에서 Next(다음)를 클릭하여 디바이스 등록을 시작합니다.

단계 10

(선택 사항) Security Devices(보안 디바이스) 페이지를 정렬하고 필터링하는 데 도움이 되도록 디바이스에 레이블을 추가합니다. 레이블을 입력하고 파란색 더하기 버튼(더하기 기호)을 선택합니다. 레이블은 Security Cloud Control에 온보딩된 후 디바이스에 적용됩니다.

그림 6. 완료
완료

초기 구성 수행

CLI 설정 스크립트를 사용하여 전용 관리 IP 주소, 게이트웨이 및 기타 기본 네트워킹 설정을 설정합니다.

프로시저


단계 1

Firewall Threat Defense 및 ASA CLI에 액세스하기 위해 콘솔 포트에 연결 Firewall Threat Defense CLI에 액세스을 참조하십시오.

단계 2

그러면 관리 인터페이스 설정을 위한 CLI 설정 스크립트가 표시됩니다.

참고


이미지 재설치 등을 통해 구성을 지우지 않으면 CLI 설정 스크립트를 반복할 수 없습니다. 그러나 이러한 모든 설정은 configure network(네트워크 구성) 명령을 사용하여 CLI에서 나중에 변경할 수 있습니다. Cisco Secure Firewall Threat Defense 명령 참조의 내용을 참조하십시오.


You must accept the EULA to continue.
Press <ENTER> to display the EULA:                 
Cisco General Terms
[...]

Please enter 'YES' or press <ENTER> to AGREE to the EULA:

System initialization in progress.  Please stand by.
You must configure the network to continue.
Configure at least one of IPv4 or IPv6 unless managing via data interfaces.
Do you want to configure IPv4? (y/n) [y]:
Do you want to configure IPv6? (y/n) [y]: n

지침: 다음 주소 유형 중 하나 이상에 대해 y를 입력합니다.관리 인터페이스를 사용할 계획은 없지만 IP 주소(예: 개인 주소)를 설정해야 합니다.

Configure IPv4 via DHCP or manually? (dhcp/manual) [manual]:

지침: manual(수동)을 선택합니다. 관리자 액세스용 외부 인터페이스를 사용할 때는 DHCP가 지원되지 않습니다. 라우팅 문제를 방지하기 위해 이 인터페이스가 관리자 액세스 인터페이스와 다른 서브넷에 있는지 확인하십시오.

Enter an IPv4 address for the management interface [192.168.45.61]: 10.89.5.17
Enter an IPv4 netmask for the management interface [255.255.255.0]: 255.255.255.192
Enter the IPv4 default gateway for the management interface [data-interfaces]:

지침: 게이트웨이를 data-interfaces로 설정합니다. 이 설정은 관리 트래픽을 백플레인을 통해 포워딩하므로 외부 인터페이스를 통해 라우팅될 수 있습니다.

Enter a fully qualified hostname for this system [firepower]: 1010-3
Enter a comma-separated list of DNS servers or 'none' [208.67.222.222,208.67.220.220,2620:119:35::35]:
Enter a comma-separated list of search domains or 'none' []: cisco.com
If your networking information has changed, you will need to reconnect.
Disabling IPv6 configuration: management0
Setting DNS servers: 208.67.222.222,208.67.220.220,2620:119:35::35
Setting DNS domains:cisco.com

지침: 관리 인터페이스 DNS 서버를 설정합니다. 외부 인터페이스에서 액세스하므로 나중에 설정하는 외부 인터페이스 DNS 서버와 일치할 수 있습니다.

Setting hostname as 1010-3
Setting static IPv4: 10.89.5.17 netmask: 255.255.255.192 gateway: data on management0
Updating routing tables, please wait...
All configurations applied to the system. Took 3 Seconds.
Saving a copy of running network configuration to local disk.
For HTTP Proxy configuration, run 'configure network http-proxy'

지침: routed를 입력합니다. 외부 관리자 액세스는 라우팅 방화벽 모드에서만 지원됩니다.

Configuring firewall mode ...


Device is in OffBox mode - disabling/removing port 443 from iptables.
Update policy deployment information
    - add device configuration
    - add network discovery
    - add system policy

You can register the sensor to a Firepower Management Center and use the
Firepower Management Center to manage it. Note that registering the sensor
to a Firepower Management Center disables on-sensor Firepower Services
management capabilities.

When registering the sensor to a Firepower Management Center, a unique
alphanumeric registration key is always required.  In most cases, to register
a sensor to a Firepower Management Center, you must provide the hostname or
the IP address along with the registration key.
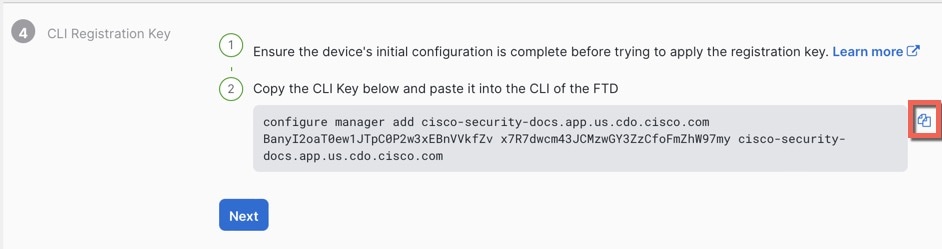
'configure manager add [hostname | ip address ] [registration key ]'

However, if the sensor and the Firepower Management Center are separated by a
NAT device, you must enter a unique NAT ID, along with the unique registration
key.
'configure manager add DONTRESOLVE [registration key ] [ NAT ID ]'

Later, using the web interface on the Firepower Management Center, you must
use the same registration key and, if necessary, the same NAT ID when you add
this sensor to the Firepower Management Center.
>

단계 3

관리자 액세스를 위한 외부 인터페이스를 구성합니다.

configure network management-data-interface

Enter를 누르면 외부 인터페이스에 대한 기본 네트워크 설정을 구성하라는 메시지가 표시됩니다.

수동 IP 주소


> configure network management-data-interface
Data interface to use for management: ethernet1/1
Specify a name for the interface [outside]: internet
IP address (manual / dhcp) [dhcp]: manual
IPv4/IPv6 address: 10.10.6.7
Netmask/IPv6 Prefix: 255.255.255.0
Default Gateway: 10.10.6.1
Comma-separated list of DNS servers [none]: 208.67.222.222,208.67.220.220

지침: 등록 후 외부 DNS 서버를 유지하려면 Firewall Management Center에서 DNS 플랫폼 설정을 다시 구성해야 합니다.


DDNS server update URL [none]:
Do you wish to clear all the device configuration before applying ? (y/n) [n]:

Configuration done with option to allow manager access from any network, if you wish to change the manager access network
use the 'client' option in the command 'configure network management-data-interface'.

Setting IPv4 network configuration.
Network settings changed.

>

DHCP로부터 할당된 IP 주소


> configure network management-data-interface
Data interface to use for management: ethernet1/1
Specify a name for the interface [outside]:
IP address (manual / dhcp) [dhcp]:  
DDNS server update URL [none]: https://dwinchester:pa$$w0rd17@domains.example.com/nic/update?hostname=<h>&myip=<a>
Do you wish to clear all the device configuration before applying ? (y/n) [n]:

Configuration done with option to allow manager access from any network, if you wish to change the manager access network 
use the 'client' option in the command 'configure network management-data-interface'.

Setting IPv4 network configuration.
Network settings changed.

> 

단계 4

Security Cloud Control에서 생성한 configure manager add 명령을 사용하여 이 Firewall Threat Defense를 관리할 Security Cloud Control를 식별합니다. 명령을 생성하려면 방화벽 온보딩의 내용을 참조하십시오.

예:


> configure manager add account1.app.us.cdo.cisco.com KPOOP0rgWzaHrnj1V5ha2q5Rf8pKFX9E
Lzm1HOynhVUWhXYWz2swmkj2ZWsN3Lb account1.app.us.cdo.cisco.com
Manager successfully configured.

단계 5

원격 지사로 디바이스를 전송할 수 있도록 Firewall Threat Defense를 종료합니다.

시스템을 올바르게 종료하는 것이 중요합니다. 단순히 전원을 분리하거나 전원 스위치를 누르는 경우 파일 시스템이 심각하게 손상될 수 있습니다. 항상 백그라운드에서 많은 프로세스가 실행되므로 전원을 분리하거나 종료하면 Firepower 시스템이 정상적으로 종료되지 않는다는 점에 유의하십시오.

  1. shutdown 명령을 입력합니다.

  2. 전원 LED 및 상태 LED를 관찰하여 섀시의 전원이 꺼져 있는지 확인합니다(LED 꺼짐).

  3. 섀시가 성공적으로 꺼진 후에 필요한 경우 섀시에서 전원을 분리하여 물리적으로 제거할 수 있습니다.