Cisco Unified Communications Manager リリース 10.5(1)の IM and Presence サービスのパーティション イントラドメイン フェデレーション
偏向のない言語
この製品のマニュアルセットは、偏向のない言語を使用するように配慮されています。このマニュアルセットでの偏向のない言語とは、年齢、障害、性別、人種的アイデンティティ、民族的アイデンティティ、性的指向、社会経済的地位、およびインターセクショナリティに基づく差別を意味しない言語として定義されています。製品ソフトウェアのユーザーインターフェイスにハードコードされている言語、RFP のドキュメントに基づいて使用されている言語、または参照されているサードパーティ製品で使用されている言語によりドキュメントに例外が存在する場合があります。シスコのインクルーシブランゲージに対する取り組みの詳細は、こちらをご覧ください。
翻訳について
このドキュメントは、米国シスコ発行ドキュメントの参考和訳です。リンク情報につきましては、日本語版掲載時点で、英語版にアップデートがあり、リンク先のページが移動/変更されている場合がありますことをご了承ください。あくまでも参考和訳となりますので、正式な内容については米国サイトのドキュメントを参照ください。
- Updated:
- 2015年3月23日
章のタイトル: パーティション イントラドメイン フェデレーションの IM and Presence サービス ノードの設定
目次
- パーティション イントラドメイン フェデレーションの IM and Presence サービス ノードの設定
- パーティション イントラドメイン フェデレーションのドメイン設定
- IM アドレス ドメインの表示
- パーティション イントラドメイン フェデレーション オプションの設定
- スタティック ルートの設定
- 着信アクセス コントロール リストの設定
- TLS 暗号化の設定
- アプリケーション リスナー ポートを設定
- TLS ピア サブジェクトの設定
- ピア認証 TLS コンテキストの設定
- 認証局のルート証明書のインポート
- IM and Presence Service の証明書署名要求の生成
- 認証局からの署名付き証明書のインポート
- ルーティング IM and Presence サービス ノードでの機能サービスの非アクティブ化
- パーティション イントラドメイン フェデレーションのドメイン設定
- パーティション イントラドメイン フェデレーション オプションの設定
- スタティック ルートの設定
- 着信アクセス コントロール リストの設定
- TLS 暗号化の設定
- ルーティング IM and Presence サービス ノードでの機能サービスの非アクティブ化
パーティション イントラドメイン フェデレーションのドメイン設定
パーティション イントラドメイン フェデレーションの IM and Presence サービスをセット アップする前にすべての必要なドメインが IM and Presence サービス クラスタのすべてのノードで設定されていることを確認し、その Lync/OCS サーバで設定されたドメインに一致していることも確認します。 必要に応じて、Cisco Unified IM and Presence Administration ユーザ インターフェイスを使用して、クラスタ内のノードでローカル ドメインを追加するか更新します。
ディレクトリ URI が IM アドレス スキームとして設定されている場合に複数のドメインが IM and Presence サービス クラスタでサポートされます。 クラスタ内のすべてのノードは IM アドレス スキームとしてディレクトリ URI を使用するディレクトリ URI をサポートする必要があります。
クラスタに対して Directory URI IM アドレス スキームを設定する詳細に関しては、『Configuration and Administration of IM and Presence Service on Cisco Unified Communications Manager(Cisco Unified Communications Manager での IM and Presence サービスの設定および管理)』を参照してください。
ドメイン間フェデレーションの複数のドメインのセット アップについては『Interdomain Federation for IM and Presence Service on Cisco Unified Communications Manger Guide(Cisco Unified Communications Manger 上の IM and Presence のドメイン間フェデレーション ガイド)』を参照してください。
IM アドレス ドメインの表示
|
|
パーティション イントラドメイン フェデレーション オプションの設定
次の手順では、IM and Presence サービスでパーティション イントラドメイン フェデレーションを有効にし、ルーティング モードを選択する方法について説明します。
マルチクラスタを導入している場合は、各クラスタで、この手順を実行する必要があります。 パーティション イントラドメイン フェデレーションを有効にする、またはルーティング モードを選択する場合、これらの設定はクラスタ全体で有効になります。したがって、任意のクラスタ内の IM and Presence サービス パブリッシャ ノードで有効にするだけで設定できます。
 注意 |
フェデレーションの電子メール アドレスは、パーティション イントラドメイン フェデレーションが設定された展開ではサポートされません。 展開が Lync/OCS のドメイン間フェデレーション機能を使用する場合は、フェデレーションの電子メール アドレスはドメイン間フェデレーションでもサポートされません。 フェデレーションの電子メール アドレスがこれらの展開シナリオのどの展開でも有効になっていないこと、[Enable use of Email Address for Inter-domain Federation(ドメイン間フェデレーションのために電子メール アドレスの使用を有効化)] オプションがクラスタに選択されていないことを確認します。 |
スタティック ルートの設定
次の手順では、 IM and Presence サービスと Lync/OCS 間のパーティション イントラドメイン フェデレーションのルーティングをイネーブルにするようにスタティック ルートを設定する方法について説明します。 各 Microsoft サーバのプレゼンス ドメインの個々のスタティック ルートを追加する必要があります。 スタティック ルートには、共通のネクスト ホップ アドレスを設定できます。 Microsoft の Server 要求に経路指定に IM and Presence サービスから Microsoft のサーバ要求ルーティングと、基本および高度なルーティング モードに関連するトピックを参照してください。
 (注) |
パーティション イントラドメイン フェデレーションを Microsoft サーバのイントラドメイン フェデレーション機能と統合している場合、各リモート ドメインの IM and Presence サービスにスタティック ルートを設定しなければなりません。 詳細については、リモート ドメインのスタティック ルートの設定に関するトピックを参照してください。 |
(注) |
各 Microsoft サーバのドメインに対してこの手順を実行します。 |
Microsoft サーバのプレセンス ドメインのスタティック ルートについて、次の点に注意してください。
- Standard Edition Microsoft サーバについて、スタティック ルートは特定の Standard Edition サーバの IP アドレスをポイントする必要があります。
- Enterprise Edition Microsoft サーバ用:
IM and Presence サービスは、Microsoft サーバのフロントエンド ロード バランサとして Cisco Application Control Engine(ACE)を使用してテストされています。 ACE の代わりに他のロード バランサを使用できます。認定されたロード バランサのリストについては次の URL を参照してください。http://technet.microsoft.com/en-us/office/ocs/cc843611 ただし、それらのロード バランサを導入し、正しく管理するのはお客様の責任です。
(注) |
シスコでは、ACE 以外のロード バランサをポイントするスタティック ルートの設定はサポートしていません。 |
ACE が設定されたフロントエンドのロード バランサでないような導入環境では、フロントエンド ロードバランサをバイパスするためのスタティック ルートを設定することをお勧めします。
ハイ アベイラビリティのために、各 Microsoft サーバのプレセンス ドメインの追加のバックアップ スタティック ルートを設定できます。
バックアップ ルートの優先順位は低く、プライマリ スタティック ルートの次のホップ アドレスに到達できない場合にのみ使用されます。
(注) |
マルチクラスタを導入している場合は、各クラスタで、この手順を実行する必要があります。 これらの設定はクラスタ全体で有効になります。したがって、任意のクラスタ内の IM and Presence サービス データベース パブリッシャ ノードでのみ設定する必要があります。 |
| ステップ 1 | [Cisco UnifiedCommunications Manager IM and Presence Administration(Cisco UnifiedCommunications Manager IM and Presence Administration)] ユーザ インターフェイスにログインします。 を選択します。 | ||
| ステップ 2 | [Add New(新規追加)] をクリックします。 | ||
| ステップ 3 | ドメインが元に戻るよう [宛先パターン(Destination Pattern)] 値を入力します。 たとえば、ドメインが "domaina.com" の場合、宛先パターン値は ".com .domaina" である必要があります | ||
| ステップ 4 | [ネクスト ホップ(Next Hop)] フィールドに Microsoft サーバの IP アドレスを入力します。 | ||
| ステップ 5 |
[Route Type(ルート タイプ)] で [domain] を選択します。
|
||
| ステップ 6 | [ネクスト ホップ ポート(Next Hop Port)] および [プロトコル タイプ(Protocol Type)] を次のように設定します。 | ||
| ステップ 7 | [プライオリティ(Priority)] 値を次のように入力します。 | ||
| ステップ 8 | 他のすべてのパラメータにはデフォルト値を選択します。 | ||
| ステップ 9 | [Save(保存)] をクリックします。 |
着信アクセス コントロール リストの設定
(注) |
マルチクラスタを導入している場合は、各クラスタで、この手順を実行する必要があります。 これらの設定はクラスタ全体で有効になります。したがって、任意のクラスタ内の IM and Presence サービス パブリッシャ ノードでのみ設定する必要があります。 |
着信 ACL の設定方法は、どの程度厳格に IM and Presence サービスへのアクセスを制御するかにより異なります。
-
IM and Presence サービスへのオープン アクセスを許可するには、[All(すべて)] のアドレス パターンのエントリを追加します。
-
特定のネットワーク ドメインから IM and Presence サービスへのアクセスを許可する場合は、アドレス パターンが特定のドメインと一致するエントリを追加します。 たとえば、foo.com 内の任意のサーバからアクセスできるようにするには、アドレス パターンに foo.com を入力します。
-
特定のサーバから IM and Presence サービスへのアクセスを許可するには、IP アドレスと一致するアドレス パターンとこれらのサーバの FQDN を持つ ACL エントリを追加します。 各サーバで IP アドレスと FQDN の 2 つの ACL エントリを作成する必要があります。 たとえば、サーバ ocs1.foo.com(10.1.10.100)からのアクセスを許可するには、1 つの ACL エントリとして ocs1.foo.com と入力し、別の ACL エントリの宛先パターンとして 10.1.10.100 と入力します。
パーティション イントラドメイン フェデレーションについて、IM and Presence サービスへのアクセスを特定の Microsoft サーバ FQDN または IP アドレスのみに制限する場合、次のエンティティの ACL エントリを追加する必要があります。
-
各 Microsoft サーバ Enterprise Edition フロントエンドまたは Standard Edition サーバ
-
Microsoft の各サーバ プール FQDN(Enterprise Edition のみ)
サーバの FQDN を使用してアクセスを制限する場合は、フロント エンド サーバまたはプールと同じ IP アドレスに解決する他の DNS レコードの ACL エントリを追加する必要があります。 たとえば、admin.lync.com などのいずれかの Lync のフロント エンド サーバと同じ IP アドレスに解決する Lync コントロール パネルにアクセスする DNS レコードを Lync サーバに作成できます。
注意 |
特定のサーバの FQDN または ACL エントリの IP アドレスを入力する場合、説明通りのすべての必要な ACL エントリの作成に失敗すると、Lync 2013 クライアントの安定性の問題が生じる場合があります。 |
| ステップ 1 | [Cisco Unified CM IM and Presence Administration(Cisco Unified CM IM and Presence Administration)] ユーザ インターフェイスにログインします。 を選択します。 | ||
| ステップ 2 | [Add New(新規追加)] をクリックします。 | ||
| ステップ 3 | [説明(Description)] フィールドに、Lync Server など、エントリの説明を入力します。 | ||
| ステップ 4 |
[アドレス パターン(Address Pattern)] フィールドにアドレス パターンを入力します。 次の選択肢があります。
|
||
| ステップ 5 | [Save(保存)] をクリックします。 |
TLS 暗号化の設定
IM and Presence サービスと Lync/OCS の間で TLS 暗号化を設定するには、この項の手順を完了する必要があります。 TLS 暗号化は、Lync サーバを持つパーティション イントラドメイン フェデレーションに必須です。
(注) |
マルチクラスタ展開をしている場合、クラスタごとにこの手順を実行する必要があります。 これらの設定はクラスタ全体で有効になります。したがって、任意のクラスタ内の IM and Presence サービス パブリッシャ ノードでのみ設定する必要があります。 |
- アプリケーション リスナー ポートを設定
- TLS ピア サブジェクトの設定
- ピア認証 TLS コンテキストの設定
- 認証局のルート証明書のインポート
- IM and Presence Service の証明書署名要求の生成
- 認証局からの署名付き証明書のインポート
アプリケーション リスナー ポートを設定
サーバ認証とピア認証の両方の [デフォルト Cisco SIP Proxy TLS リスナー(Default Cisco SIP Proxy TLS Listener)] 値を変更する必要があります。 IM and Presence サービスは、デフォルトでポート 5062 でピア(相互)TLS 認証を行います。 ポート 5061 でピア TLS 認証が行われるようにするには、このデフォルト設定を変更し、サーバ TLS 認証ポート値を 5062 に設定する必要があります。
| ステップ 1 | [Cisco Unified IM and Presence Administration(Cisco Unified IM and Presence Administration)] ユーザ インターフェイスにログインします。 を選択します。 |
| ステップ 2 | アプリケーション リスナーがまだ表示されていない場合、[Find(検索)] を選択して、すべてのアプリケーション リスナーを表示します。 |
| ステップ 3 | [Default Cisco SIP Proxy TLS Listener – Server Auth(デフォルト Cisco SIP プロキシ TLS リスナー - サーバ認証)] を選択します。 |
| ステップ 4 | [ポート(Port)] 値を 5063 に変更します。 |
| ステップ 5 | 表示されるポップアップ ウィンドウで、[Save(保存)] をクリックし、[OK(OK)] をクリックします。 |
| ステップ 6 | [Related Links(関連リンク)] ドロップダウン リストで、[Back to Find/List(検索/一覧に戻る)] を選択し、[OK(OK)] を選択してアプリケーション リスナー リストに戻ります。 |
| ステップ 7 | [Default Cisco SIP Proxy TLS Listener – Peer Auth(デフォルト Cisco SIP プロキシ TLS リスナー - ピア認証)] を選択します。 |
| ステップ 8 | [ポート(Port)] 値を 5061 に変更します。 |
| ステップ 9 | 表示されるダイアログボックスで [Save(保存)] をクリックし、[OK(OK)] をクリックします。 |
| ステップ 10 | [Related Links(関連リンク)] ドロップダウン リストで、[Back to Find/List(検索/一覧に戻る)] を選択し、[OK(OK)] を選択してアプリケーション リスナー リストに戻ります。 |
| ステップ 11 | [Default Cisco SIP Proxy TLS Listener – Server Auth(デフォルト Cisco SIP プロキシ TLS リスナー - サーバ認証)] を選択します。 |
| ステップ 12 | 5063 ~ 5062 のポート値を変更します。 |
| ステップ 13 | [Save(保存)] をクリックします。 |
| ステップ 14 | クラスタのすべての IM and Presence サービス ノードで SIP Proxy サービスを再起動します。 SIP プロキシ サービスを再起動するには、[Cisco Unified IM and Presence Serviceability(Cisco Unified IM and Presence Serviceability)] ユーザ インターフェイスにログインし、 を選択します。 |
次の作業
TLS ピア サブジェクトの設定
ピア TLS 認証の場合、 IM and Presence サービス では、ピアにより提示されるセキュリティ証明書から件名共通名(CN)が [TLS Peer Subject(TLS ピア件名)] リストに含まれている必要があります。 [Cisco Unified IM and Presence Administration(Cisco Unified IM and Presence Administration)] ユーザ インターフェイスを使用して、件名 CN をこのリストに追加します。
パーティション イントラドメイン フェデレーションについては、次に示すエンティティの TLS ピア サブジェクトを追加する必要があります。
| ステップ 1 | [Cisco Unified IM and Presence Administration(Cisco Unified IM and Presence Administration)] ユーザ インターフェイスにログインします。 を選択します。 |
| ステップ 2 | [Add New(新規追加)] をクリックします。 |
| ステップ 3 | ピア サブジェクト名を入力します。 |
| ステップ 4 | [説明(Description)] フィールドに、OCS Server など、件名の説明を入力します。 |
| ステップ 5 | [Save(保存)] をクリックします。 |
| ステップ 6 | クラスタのすべての IM and Presence サービス ノードで SIP Proxy サービスを再起動します。 SIP プロキシ サービスを再起動するには、[Cisco Unified IM and Presence Serviceability(Cisco Unified IM and Presence Serviceability)] ユーザ インターフェイスにログインし、を選択します。 |
次の作業
ピア認証 TLS コンテキストの設定
IM and Presence サービス および Lync/OCS 間の TLS 暗号化をサポートするには、IM and Presence サービスのピア認証 TLS コンテキスト設定を変更する必要があります。
| ステップ 1 | [Cisco Unified IM and Presence Administration(Cisco Unified IM and Presence Administration)] ユーザ インターフェイスにログインします。 を選択します。 |
| ステップ 2 | [Find(検索)] をクリックします。 |
| ステップ 3 | デフォルト Cisco SIP プロキシ ピア認証 TLS コンテキスト用のリンクをクリックします。 |
| ステップ 4 | [Disable Empty TLS Fragments(空の TLS フラグメントを無効化)] のチェックボックスがオンになっていることを確認します。 |
| ステップ 5 | [TLS Cipher Mapping(TLS 暗号化マッピング)] 領域の [Available TLS Ciphers(利用可能な TLS 暗号化)] リストで、すべての暗号を選択し、[Move Right(右に移動)] 矢印をクリックし、これらの暗号を [Selected TLS Ciphers(選択した TLS 暗号化)] リストに移動します。 |
| ステップ 6 | [TLS peer Subject Mapping(TLS ピア件名マッピング)] 領域の [Available TLS Peer Subjects(利用可能な TLS ピア件名)] リストで、TLS ピア サブジェクトの設定 で設定した TLS ピア サブジェクトを選択し、[Move Right(右に移動)] 矢印をクリックしし、[Selected TLS Peer Subjects(選択された TLS ピア件名)] リストに移動します。 |
| ステップ 7 | [Save(保存)] をクリックします。 |
| ステップ 8 | クラスタのすべての IM and Presence サービス ノードで SIP Proxy サービスを再起動します。 SIP プロキシ サービスを再起動するには、[Cisco Unified IM and Presence Serviceability(Cisco Unified IM and Presence Serviceability)] ユーザ インターフェイスにログインし、 を選択します。 |
次の作業
認証局のルート証明書のインポート
通常、すべての Lync/OCS セキュリティ証明書は認証局(CA)により署名されています。 IM and Presence サービス証明書も、Microsoft サーバと同じ認証局によって署名する必要があります。 IM and Presence サービスが Microsoft サーバ CA で署名された証明書を使用し、その同じ CA で署名された Microsoft サーバ証明書を承認するには、CA のルート証明書を IM and Presence サービス信頼ストアにアップロードする必要があります。
| ステップ 1 | [Cisco Unified IM and Presence Operating System Administration(Cisco Unified IM and Presence Operating System Administration)] ユーザ インターフェイスにログインします。 を選択します。 |
| ステップ 2 | [Upload Certificate(証明書のアップロード)] をクリックします。 |
| ステップ 3 | [Certificate Name(証明書の名前)] ドロップダウン リストで、cup-trust を選択します。 |
| ステップ 4 | [ルート証明書(Root Certificate)] フィールドは空白のままにします。 |
| ステップ 5 | [説明(Description)] フィールドに、「認証局のルート証明書」など、証明書の説明を入力します。 |
| ステップ 6 | [Browse(参照)] を選択して、ローカル コンピュータ上のルート証明書を見つけます。 |
| ステップ 7 | [Upload File(ファイルをアップロード)] を選択し、証明書を IM and Presence サービス ノードにアップロードします。 |
| ステップ 8 | クラスタのすべての IM and Presence サービス ノードで SIP Proxy サービスを再起動します。 SIP プロキシ サービスを再起動するには、[Cisco Unified IM and Presence Serviceability(Cisco Unified IM and Presence Serviceability)] ユーザ インターフェイスにログインし、 を選択します。 |
次の作業
IM and Presence Service の証明書署名要求の生成
IM and Presence Service 証明書がLync/OCSにより使用される同じ認証局(CA)で署名する必要があります。 CA 署名付き証明書を入手するには、次に示す 2 段階のプロセスを実行する必要があります。
次の手順では、IM and Presence Service から CSR を生成して、ダウンロードする方法について説明します。 IM and Presence Service CSR は 2048 ビットです。
| ステップ 1 | [Cisco Unified IM and Presence Operating System Administration(Cisco Unified IM and Presence Operating System Administration)] ユーザ インターフェイスにログインします。 IM and Presence Service で を選択します。 |
| ステップ 2 | [Generate CSR(CSR を生成)] をクリックします。 |
| ステップ 3 | [Certificate Name(証明書名)] ドロップダウン リストで、cup を選択します。 |
| ステップ 4 | [Generate CSR(CSR を生成)] をクリックします。 |
| ステップ 5 | [Status(ステータス)] に"「成功:証明書署名要求が作成されました(Success: Certificate Signing Request Generated)」"と表示されている場合、[Close(閉じる)] を選択します。 |
| ステップ 6 | [Download CSR(CSR をダウンロード)] をクリックします。 |
| ステップ 7 | [Certificate Name(証明書名)] ドロップダウン リストで、cup を選択します。 |
| ステップ 8 | [Download CSR(CSR をダウンロード)] を選択し、証明書をローカル コンピュータにダウンロードします。 |
| ステップ 9 | 証明書がダウンロードされたら、[Close(閉じる)] を選択します。 |
次の作業
CSR をダウンロードしたら、それを使用して選択した CA から署名付き証明書を要求できます。 これは、有名なパブリック CA または内部 CA の場合があります。
認証局からの署名付き証明書のインポート
次の手順では、CA 署名付き証明書を IM and Presence サービス にアップロードする方法について説明します。
IM and Presence サービス から CSR を生成し、ダウンロードします。 IM and Presence Service の証明書署名要求の生成を参照してください。
| ステップ 1 | [Cisco Unified IM and Presence Operating System Administration(Cisco Unified IM and Presence Operating System Administration)] ユーザ インターフェイスにログインします。 を選択します。 |
| ステップ 2 | [Upload Certificate(証明書をアップロード)] をクリックすると [Upload Certificate/Certificate chain(証明書/証明書チェーンをアップロード)] ダイアログボックスが開きます。 |
| ステップ 3 | [Certificate Name(証明書名)] ドロップダウン リストで、cup を選択します。 |
| ステップ 4 | [説明(Description)] フィールドに、「CA 署名付き証明書」など、証明書の説明を入力します。 |
| ステップ 5 | [Browse(参照)] を選択して、ローカル コンピュータ上の証明書ファイルを見つけます。 |
| ステップ 6 | [Upload File(ファイルをアップロード)] を選択し、証明書を IM and Presence サービス ノードにアップロードします。 |
| ステップ 7 | 証明書をアップロードしたら、クラスタのすべての IM and Presence ノードで SIP Proxy サービスを再起動します。 Cisco SIP プロキシ サービスを再起動するには、[Cisco Unified IM and Presence Servicceability(Cisco Unified IM and Presence Servicceability)] ユーザ インターフェイスにログインします。 を選択します。 |
ルーティング IM and Presence サービス ノードでの機能サービスの非アクティブ化
ルーティング IM and Presence サービス ノードが Lync/OCS からの SIP トラフィックを処理できる容量を備えるには、ユーザをルーティング IM and Presence サービス ノードに割り当ててはいけません。 つまり、割り当てユーザをサポートしている多数の IM and Presence サービス 機能サービスをルーティング IM and Presence ノードで非アクティブ化できるということです。 これらのサービスを非アクティブ化すると、ルーティング IM and Presence サービス ノードには、その SIP ルーティングの役割を果たすために処理能力が追加されます。 次の手順では、機能サービスを非アクティブ化する方法について説明します。
| ステップ 1 | [Cisco Unified IM and Presence Serviceability(Cisco Unified IM and Presence Serviceability)] ユーザ インターフェイスにログインします。 を選択します。 |
| ステップ 2 | [Server(サーバ)] ドロップダウン リストから、ルーティング IM and Presence サービス ノードを選択します。 |
| ステップ 3 | 次の機能サービスのチェックボックスをそれぞれオフにします。 |
| ステップ 4 | [Save(保存)] をクリックします。 |
目次
- パーティション イントラドメイン フェデレーションの IM and Presence サービス ノードの設定
- パーティション イントラドメイン フェデレーションのドメイン設定
- IM アドレス ドメインの表示
- パーティション イントラドメイン フェデレーション オプションの設定
- スタティック ルートの設定
- 着信アクセス コントロール リストの設定
- TLS 暗号化の設定
- アプリケーション リスナー ポートを設定
- TLS ピア サブジェクトの設定
- ピア認証 TLS コンテキストの設定
- 認証局のルート証明書のインポート
- IM and Presence Service の証明書署名要求の生成
- 認証局からの署名付き証明書のインポート
- ルーティング IM and Presence サービス ノードでの機能サービスの非アクティブ化
- パーティション イントラドメイン フェデレーションのドメイン設定
- パーティション イントラドメイン フェデレーション オプションの設定
- スタティック ルートの設定
- 着信アクセス コントロール リストの設定
- TLS 暗号化の設定
- ルーティング IM and Presence サービス ノードでの機能サービスの非アクティブ化
パーティション イントラドメイン フェデレーションのドメイン設定
パーティション イントラドメイン フェデレーションの IM and Presence サービスをセット アップする前にすべての必要なドメインが IM and Presence サービス クラスタのすべてのノードで設定されていることを確認し、その Lync/OCS サーバで設定されたドメインに一致していることも確認します。 必要に応じて、Cisco Unified IM and Presence Administration ユーザ インターフェイスを使用して、クラスタ内のノードでローカル ドメインを追加するか更新します。
ディレクトリ URI が IM アドレス スキームとして設定されている場合に複数のドメインが IM and Presence サービス クラスタでサポートされます。 クラスタ内のすべてのノードは IM アドレス スキームとしてディレクトリ URI を使用するディレクトリ URI をサポートする必要があります。
クラスタに対して Directory URI IM アドレス スキームを設定する詳細に関しては、『Configuration and Administration of IM and Presence Service on Cisco Unified Communications Manager(Cisco Unified Communications Manager での IM and Presence サービスの設定および管理)』を参照してください。
ドメイン間フェデレーションの複数のドメインのセット アップについては『Interdomain Federation for IM and Presence Service on Cisco Unified Communications Manger Guide(Cisco Unified Communications Manger 上の IM and Presence のドメイン間フェデレーション ガイド)』を参照してください。
パーティション イントラドメイン フェデレーション オプションの設定
手順次の手順では、IM and Presence サービスでパーティション イントラドメイン フェデレーションを有効にし、ルーティング モードを選択する方法について説明します。
マルチクラスタを導入している場合は、各クラスタで、この手順を実行する必要があります。 パーティション イントラドメイン フェデレーションを有効にする、またはルーティング モードを選択する場合、これらの設定はクラスタ全体で有効になります。したがって、任意のクラスタ内の IM and Presence サービス パブリッシャ ノードで有効にするだけで設定できます。
注意
フェデレーションの電子メール アドレスは、パーティション イントラドメイン フェデレーションが設定された展開ではサポートされません。 展開が Lync/OCS のドメイン間フェデレーション機能を使用する場合は、フェデレーションの電子メール アドレスはドメイン間フェデレーションでもサポートされません。 フェデレーションの電子メール アドレスがこれらの展開シナリオのどの展開でも有効になっていないこと、[Enable use of Email Address for Inter-domain Federation(ドメイン間フェデレーションのために電子メール アドレスの使用を有効化)] オプションがクラスタに選択されていないことを確認します。
ステップ 1 [Cisco UnifiedCommunications Manager IM and Presence Administration(Cisco UnifiedCommunications Manager IM and Presence Administration)] ユーザ インターフェースにログインします。 を選択します。 ステップ 2 [Enable Partitioned Intradomain Federation with LCS/OCS/Lync(LCS/OCS/Lync とのパーティション ドメイン間フェデレーションを有効化)] チェックボックスをオンにします。 ステップ 3 警告メッセージに目を通し、[OK(OK)] をクリックします。 ステップ 4 [Partitioned Intradomain Federation Routing Mode(パーティション ドメイン間フェデレーション ルーティング モード)] ドロップダウン リストから次のいずれかを選択します。
ライセンスのない IM and Presence サービス要求の受信者が IM and Presence サービス ドメイン内に存在する場合、[Basic Routing Mode(基本ルーティング モード)](デフォルト) 基本ルーティング モードでは、IM and Presence サービス は Microsoft サーバにこれらの受信者の要求をルーティングします。
ライセンスされていて、有効な Microsoft Lync または Microsoft Office Communicator SIP アドレスが IM and Presence サービス データベースに保存されている要求の受信者が IM and Presence サービス ドメインにある場合は [Advanced Routing Mode(高度ルーティング モード)] を選択します。 Cisco Unified Communications Manager が Microsoft サーバが使用する Active Directory からのユーザを同期している場合のみ、[Advanced Routing(高度ルーティング)] を選択します。
(注) Active Directory から同期されたユーザのリストには、すべての Microsoft Lync または Microsoft Office Communicator ユーザが記載されている必要があります。
ステップ 5 [Save(保存)] をクリックします。 ステップ 6 パーティション イントラドメイン フェデレーションを有効にするか、ルーティング モードを選択した後、クラスタのすべての IM and Presence サービス ノードの Cisco CP Router を再起動する必要があります。 Cisco XCP ルータを再起動するには、[Cisco Unified IM and Presence Serviceability(Cisco Unified IM and Presence Serviceability)] ユーザ インターフェイスにログインし、を選択します。
(注) パーティション フェデレーションをイネーブルにするときに SIP プロキシを再起動するように促されます。
スタティック ルートの設定
手順次の手順では、 IM and Presence サービスと Lync/OCS 間のパーティション イントラドメイン フェデレーションのルーティングをイネーブルにするようにスタティック ルートを設定する方法について説明します。 各 Microsoft サーバのプレゼンス ドメインの個々のスタティック ルートを追加する必要があります。 スタティック ルートには、共通のネクスト ホップ アドレスを設定できます。 Microsoft の Server 要求に経路指定に IM and Presence サービスから Microsoft のサーバ要求ルーティングと、基本および高度なルーティング モードに関連するトピックを参照してください。
(注)
パーティション イントラドメイン フェデレーションを Microsoft サーバのイントラドメイン フェデレーション機能と統合している場合、各リモート ドメインの IM and Presence サービスにスタティック ルートを設定しなければなりません。 詳細については、リモート ドメインのスタティック ルートの設定に関するトピックを参照してください。
(注)
各 Microsoft サーバのドメインに対してこの手順を実行します。
Microsoft サーバのプレセンス ドメインのスタティック ルートについて、次の点に注意してください。
- Standard Edition Microsoft サーバについて、スタティック ルートは特定の Standard Edition サーバの IP アドレスをポイントする必要があります。
- Enterprise Edition Microsoft サーバ用:
IM and Presence サービスは、Microsoft サーバのフロントエンド ロード バランサとして Cisco Application Control Engine(ACE)を使用してテストされています。 ACE の代わりに他のロード バランサを使用できます。認定されたロード バランサのリストについては次の URL を参照してください。http://technet.microsoft.com/en-us/office/ocs/cc843611 ただし、それらのロード バランサを導入し、正しく管理するのはお客様の責任です。
(注)
シスコでは、ACE 以外のロード バランサをポイントするスタティック ルートの設定はサポートしていません。
ACE が設定されたフロントエンドのロード バランサでないような導入環境では、フロントエンド ロードバランサをバイパスするためのスタティック ルートを設定することをお勧めします。
ハイ アベイラビリティのために、各 Microsoft サーバのプレセンス ドメインの追加のバックアップ スタティック ルートを設定できます。
バックアップ ルートの優先順位は低く、プライマリ スタティック ルートの次のホップ アドレスに到達できない場合にのみ使用されます。
(注)
マルチクラスタを導入している場合は、各クラスタで、この手順を実行する必要があります。 これらの設定はクラスタ全体で有効になります。したがって、任意のクラスタ内の IM and Presence サービス データベース パブリッシャ ノードでのみ設定する必要があります。
ステップ 1 [Cisco UnifiedCommunications Manager IM and Presence Administration(Cisco UnifiedCommunications Manager IM and Presence Administration)] ユーザ インターフェイスにログインします。 を選択します。 ステップ 2 [Add New(新規追加)] をクリックします。 ステップ 3 ドメインが元に戻るよう [宛先パターン(Destination Pattern)] 値を入力します。 たとえば、ドメインが "domaina.com" の場合、宛先パターン値は ".com .domaina" である必要があります ステップ 4 [ネクスト ホップ(Next Hop)] フィールドに Microsoft サーバの IP アドレスを入力します。 ステップ 5 [Route Type(ルート タイプ)] で [domain] を選択します。
(注) ルート タイプのデフォルト設定はユーザです。
ステップ 6 [ネクスト ホップ ポート(Next Hop Port)] および [プロトコル タイプ(Protocol Type)] を次のように設定します。 ステップ 7 [プライオリティ(Priority)] 値を次のように入力します。 ステップ 8 他のすべてのパラメータにはデフォルト値を選択します。 ステップ 9 [Save(保存)] をクリックします。
着信アクセス コントロール リストの設定
手順次の手順では、 Lync/OCS サーバが認証されなくても IM and Presence サービスにアクセスできるよう、着信アクセス コントロール リスト(ACL)のエントリを設定する方法について説明します。
(注)
マルチクラスタを導入している場合は、各クラスタで、この手順を実行する必要があります。 これらの設定はクラスタ全体で有効になります。したがって、任意のクラスタ内の IM and Presence サービス パブリッシャ ノードでのみ設定する必要があります。
着信 ACL の設定方法は、どの程度厳格に IM and Presence サービスへのアクセスを制御するかにより異なります。
IM and Presence サービスへのオープン アクセスを許可するには、[All(すべて)] のアドレス パターンのエントリを追加します。
特定のネットワーク ドメインから IM and Presence サービスへのアクセスを許可する場合は、アドレス パターンが特定のドメインと一致するエントリを追加します。 たとえば、foo.com 内の任意のサーバからアクセスできるようにするには、アドレス パターンに foo.com を入力します。
特定のサーバから IM and Presence サービスへのアクセスを許可するには、IP アドレスと一致するアドレス パターンとこれらのサーバの FQDN を持つ ACL エントリを追加します。 各サーバで IP アドレスと FQDN の 2 つの ACL エントリを作成する必要があります。 たとえば、サーバ ocs1.foo.com(10.1.10.100)からのアクセスを許可するには、1 つの ACL エントリとして ocs1.foo.com と入力し、別の ACL エントリの宛先パターンとして 10.1.10.100 と入力します。
パーティション イントラドメイン フェデレーションについて、IM and Presence サービスへのアクセスを特定の Microsoft サーバ FQDN または IP アドレスのみに制限する場合、次のエンティティの ACL エントリを追加する必要があります。
各 Microsoft サーバ Enterprise Edition フロントエンドまたは Standard Edition サーバ
Microsoft の各サーバ プール FQDN(Enterprise Edition のみ)
サーバの FQDN を使用してアクセスを制限する場合は、フロント エンド サーバまたはプールと同じ IP アドレスに解決する他の DNS レコードの ACL エントリを追加する必要があります。 たとえば、admin.lync.com などのいずれかの Lync のフロント エンド サーバと同じ IP アドレスに解決する Lync コントロール パネルにアクセスする DNS レコードを Lync サーバに作成できます。
注意
特定のサーバの FQDN または ACL エントリの IP アドレスを入力する場合、説明通りのすべての必要な ACL エントリの作成に失敗すると、Lync 2013 クライアントの安定性の問題が生じる場合があります。
ステップ 1 [Cisco Unified CM IM and Presence Administration(Cisco Unified CM IM and Presence Administration)] ユーザ インターフェイスにログインします。 を選択します。 ステップ 2 [Add New(新規追加)] をクリックします。 ステップ 3 [説明(Description)] フィールドに、Lync Server など、エントリの説明を入力します。 ステップ 4 [アドレス パターン(Address Pattern)] フィールドにアドレス パターンを入力します。 次の選択肢があります。
IM and Presence サービスへのオープン アクセスを許可するには、All を入力します。
特定のネットワーク ドメイン名を入力します。
特定の IP アドレスを入力します。
特定の FQDN を入力します。
(注) アドレス パターンと All を入力しない場合、サーバの IP アドレスとサーバの FQDN の少なくとも 2 つの ACL エントリを作成する必要があります。 ドメイン名の入力はオプションです。
ステップ 5 [Save(保存)] をクリックします。
TLS 暗号化の設定
- アプリケーション リスナー ポートを設定
- TLS ピア サブジェクトの設定
- ピア認証 TLS コンテキストの設定
- 認証局のルート証明書のインポート
- IM and Presence Service の証明書署名要求の生成
- 認証局からの署名付き証明書のインポート
アプリケーション リスナー ポートを設定
手順サーバ認証とピア認証の両方の [デフォルト Cisco SIP Proxy TLS リスナー(Default Cisco SIP Proxy TLS Listener)] 値を変更する必要があります。 IM and Presence サービスは、デフォルトでポート 5062 でピア(相互)TLS 認証を行います。 ポート 5061 でピア TLS 認証が行われるようにするには、このデフォルト設定を変更し、サーバ TLS 認証ポート値を 5062 に設定する必要があります。
ステップ 1 [Cisco Unified IM and Presence Administration(Cisco Unified IM and Presence Administration)] ユーザ インターフェイスにログインします。 を選択します。 ステップ 2 アプリケーション リスナーがまだ表示されていない場合、[Find(検索)] を選択して、すべてのアプリケーション リスナーを表示します。 ステップ 3 [Default Cisco SIP Proxy TLS Listener – Server Auth(デフォルト Cisco SIP プロキシ TLS リスナー - サーバ認証)] を選択します。 ステップ 4 [ポート(Port)] 値を 5063 に変更します。 ステップ 5 表示されるポップアップ ウィンドウで、[Save(保存)] をクリックし、[OK(OK)] をクリックします。 ステップ 6 [Related Links(関連リンク)] ドロップダウン リストで、[Back to Find/List(検索/一覧に戻る)] を選択し、[OK(OK)] を選択してアプリケーション リスナー リストに戻ります。 ステップ 7 [Default Cisco SIP Proxy TLS Listener – Peer Auth(デフォルト Cisco SIP プロキシ TLS リスナー - ピア認証)] を選択します。 ステップ 8 [ポート(Port)] 値を 5061 に変更します。 ステップ 9 表示されるダイアログボックスで [Save(保存)] をクリックし、[OK(OK)] をクリックします。 ステップ 10 [Related Links(関連リンク)] ドロップダウン リストで、[Back to Find/List(検索/一覧に戻る)] を選択し、[OK(OK)] を選択してアプリケーション リスナー リストに戻ります。 ステップ 11 [Default Cisco SIP Proxy TLS Listener – Server Auth(デフォルト Cisco SIP プロキシ TLS リスナー - サーバ認証)] を選択します。 ステップ 12 5063 ~ 5062 のポート値を変更します。 ステップ 13 [Save(保存)] をクリックします。 ステップ 14 クラスタのすべての IM and Presence サービス ノードで SIP Proxy サービスを再起動します。 SIP プロキシ サービスを再起動するには、[Cisco Unified IM and Presence Serviceability(Cisco Unified IM and Presence Serviceability)] ユーザ インターフェイスにログインし、 を選択します。
次の作業
関連情報
TLS ピア サブジェクトの設定
手順ピア TLS 認証の場合、 IM and Presence サービス では、ピアにより提示されるセキュリティ証明書から件名共通名(CN)が [TLS Peer Subject(TLS ピア件名)] リストに含まれている必要があります。 [Cisco Unified IM and Presence Administration(Cisco Unified IM and Presence Administration)] ユーザ インターフェイスを使用して、件名 CN をこのリストに追加します。
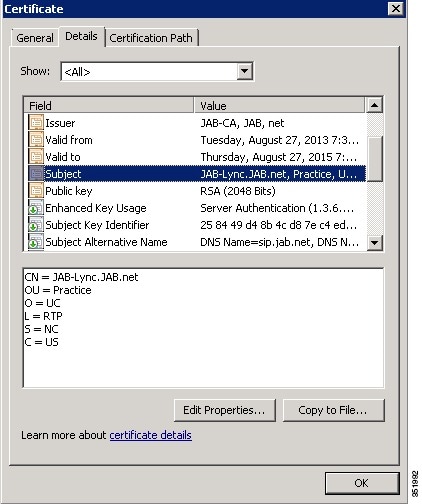
[TLS ピア サブジェクト(TLS Peer Subject)] リストには件名 CN だけを含めます。 [TLS ピア サブジェクト(TLS Peer Subject)] リストに [サブジェクト名の別名(Subject Alternate Name)] エントリを含めないでください。 次の図は、件名 CN が強調表示されている件名 CN 証明書の例を示します。パーティション イントラドメイン フェデレーションについては、次に示すエンティティの TLS ピア サブジェクトを追加する必要があります。
ステップ 1 [Cisco Unified IM and Presence Administration(Cisco Unified IM and Presence Administration)] ユーザ インターフェイスにログインします。 を選択します。 ステップ 2 [Add New(新規追加)] をクリックします。 ステップ 3 ピア サブジェクト名を入力します。 ステップ 4 [説明(Description)] フィールドに、OCS Server など、件名の説明を入力します。 ステップ 5 [Save(保存)] をクリックします。 ステップ 6 クラスタのすべての IM and Presence サービス ノードで SIP Proxy サービスを再起動します。 SIP プロキシ サービスを再起動するには、[Cisco Unified IM and Presence Serviceability(Cisco Unified IM and Presence Serviceability)] ユーザ インターフェイスにログインし、を選択します。
次の作業
関連情報
ピア認証 TLS コンテキストの設定
手順IM and Presence サービス および Lync/OCS 間の TLS 暗号化をサポートするには、IM and Presence サービスのピア認証 TLS コンテキスト設定を変更する必要があります。
ステップ 1 [Cisco Unified IM and Presence Administration(Cisco Unified IM and Presence Administration)] ユーザ インターフェイスにログインします。 を選択します。 ステップ 2 [Find(検索)] をクリックします。 ステップ 3 デフォルト Cisco SIP プロキシ ピア認証 TLS コンテキスト用のリンクをクリックします。 ステップ 4 [Disable Empty TLS Fragments(空の TLS フラグメントを無効化)] のチェックボックスがオンになっていることを確認します。 ステップ 5 [TLS Cipher Mapping(TLS 暗号化マッピング)] 領域の [Available TLS Ciphers(利用可能な TLS 暗号化)] リストで、すべての暗号を選択し、[Move Right(右に移動)] 矢印をクリックし、これらの暗号を [Selected TLS Ciphers(選択した TLS 暗号化)] リストに移動します。 ステップ 6 [TLS peer Subject Mapping(TLS ピア件名マッピング)] 領域の [Available TLS Peer Subjects(利用可能な TLS ピア件名)] リストで、TLS ピア サブジェクトの設定 で設定した TLS ピア サブジェクトを選択し、[Move Right(右に移動)] 矢印をクリックしし、[Selected TLS Peer Subjects(選択された TLS ピア件名)] リストに移動します。 ステップ 7 [Save(保存)] をクリックします。 ステップ 8 クラスタのすべての IM and Presence サービス ノードで SIP Proxy サービスを再起動します。 SIP プロキシ サービスを再起動するには、[Cisco Unified IM and Presence Serviceability(Cisco Unified IM and Presence Serviceability)] ユーザ インターフェイスにログインし、 を選択します。
次の作業
関連情報
認証局のルート証明書のインポート
手順通常、すべての Lync/OCS セキュリティ証明書は認証局(CA)により署名されています。 IM and Presence サービス証明書も、Microsoft サーバと同じ認証局によって署名する必要があります。 IM and Presence サービスが Microsoft サーバ CA で署名された証明書を使用し、その同じ CA で署名された Microsoft サーバ証明書を承認するには、CA のルート証明書を IM and Presence サービス信頼ストアにアップロードする必要があります。
ステップ 1 [Cisco Unified IM and Presence Operating System Administration(Cisco Unified IM and Presence Operating System Administration)] ユーザ インターフェイスにログインします。 を選択します。 ステップ 2 [Upload Certificate(証明書のアップロード)] をクリックします。 ステップ 3 [Certificate Name(証明書の名前)] ドロップダウン リストで、cup-trust を選択します。 ステップ 4 [ルート証明書(Root Certificate)] フィールドは空白のままにします。 ステップ 5 [説明(Description)] フィールドに、「認証局のルート証明書」など、証明書の説明を入力します。 ステップ 6 [Browse(参照)] を選択して、ローカル コンピュータ上のルート証明書を見つけます。 ステップ 7 [Upload File(ファイルをアップロード)] を選択し、証明書を IM and Presence サービス ノードにアップロードします。 ステップ 8 クラスタのすべての IM and Presence サービス ノードで SIP Proxy サービスを再起動します。 SIP プロキシ サービスを再起動するには、[Cisco Unified IM and Presence Serviceability(Cisco Unified IM and Presence Serviceability)] ユーザ インターフェイスにログインし、 を選択します。
次の作業
関連情報
IM and Presence Service の証明書署名要求の生成
手順IM and Presence Service 証明書がLync/OCSにより使用される同じ認証局(CA)で署名する必要があります。 CA 署名付き証明書を入手するには、次に示す 2 段階のプロセスを実行する必要があります。
次の手順では、IM and Presence Service から CSR を生成して、ダウンロードする方法について説明します。 IM and Presence Service CSR は 2048 ビットです。
ステップ 1 [Cisco Unified IM and Presence Operating System Administration(Cisco Unified IM and Presence Operating System Administration)] ユーザ インターフェイスにログインします。 IM and Presence Service で を選択します。 ステップ 2 [Generate CSR(CSR を生成)] をクリックします。 ステップ 3 [Certificate Name(証明書名)] ドロップダウン リストで、cup を選択します。 ステップ 4 [Generate CSR(CSR を生成)] をクリックします。 ステップ 5 [Status(ステータス)] に"「成功:証明書署名要求が作成されました(Success: Certificate Signing Request Generated)」"と表示されている場合、[Close(閉じる)] を選択します。 ステップ 6 [Download CSR(CSR をダウンロード)] をクリックします。 ステップ 7 [Certificate Name(証明書名)] ドロップダウン リストで、cup を選択します。 ステップ 8 [Download CSR(CSR をダウンロード)] を選択し、証明書をローカル コンピュータにダウンロードします。 ステップ 9 証明書がダウンロードされたら、[Close(閉じる)] を選択します。
次の作業
CSR をダウンロードしたら、それを使用して選択した CA から署名付き証明書を要求できます。 これは、有名なパブリック CA または内部 CA の場合があります。
関連情報
認証局からの署名付き証明書のインポート
はじめる前に手順IM and Presence サービス から CSR を生成し、ダウンロードします。 IM and Presence Service の証明書署名要求の生成を参照してください。
ステップ 1 [Cisco Unified IM and Presence Operating System Administration(Cisco Unified IM and Presence Operating System Administration)] ユーザ インターフェイスにログインします。 を選択します。 ステップ 2 [Upload Certificate(証明書をアップロード)] をクリックすると [Upload Certificate/Certificate chain(証明書/証明書チェーンをアップロード)] ダイアログボックスが開きます。 ステップ 3 [Certificate Name(証明書名)] ドロップダウン リストで、cup を選択します。 ステップ 4 [説明(Description)] フィールドに、「CA 署名付き証明書」など、証明書の説明を入力します。 ステップ 5 [Browse(参照)] を選択して、ローカル コンピュータ上の証明書ファイルを見つけます。 ステップ 6 [Upload File(ファイルをアップロード)] を選択し、証明書を IM and Presence サービス ノードにアップロードします。 ステップ 7 証明書をアップロードしたら、クラスタのすべての IM and Presence ノードで SIP Proxy サービスを再起動します。 Cisco SIP プロキシ サービスを再起動するには、[Cisco Unified IM and Presence Servicceability(Cisco Unified IM and Presence Servicceability)] ユーザ インターフェイスにログインします。 を選択します。
関連情報
ルーティング IM and Presence サービス ノードでの機能サービスの非アクティブ化
手順ルーティング IM and Presence サービス ノードが Lync/OCS からの SIP トラフィックを処理できる容量を備えるには、ユーザをルーティング IM and Presence サービス ノードに割り当ててはいけません。 つまり、割り当てユーザをサポートしている多数の IM and Presence サービス 機能サービスをルーティング IM and Presence ノードで非アクティブ化できるということです。 これらのサービスを非アクティブ化すると、ルーティング IM and Presence サービス ノードには、その SIP ルーティングの役割を果たすために処理能力が追加されます。 次の手順では、機能サービスを非アクティブ化する方法について説明します。
ステップ 1 [Cisco Unified IM and Presence Serviceability(Cisco Unified IM and Presence Serviceability)] ユーザ インターフェイスにログインします。 を選択します。 ステップ 2 [Server(サーバ)] ドロップダウン リストから、ルーティング IM and Presence サービス ノードを選択します。 ステップ 3 次の機能サービスのチェックボックスをそれぞれオフにします。 ステップ 4 [Save(保存)] をクリックします。
 フィードバック