DCNM インストール後のネットワーク プロパティ
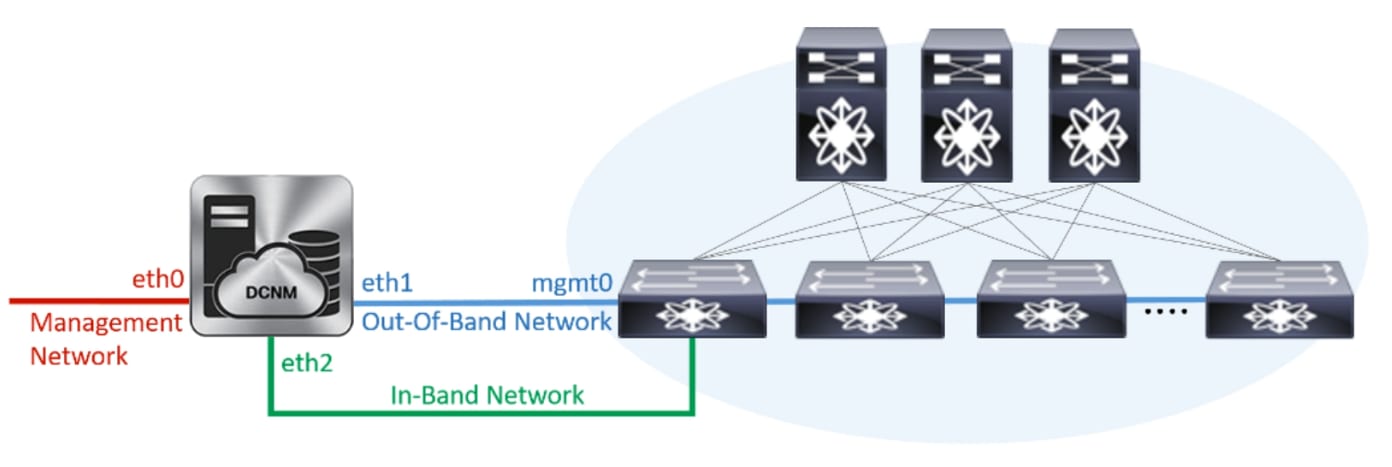
Cisco DCNM OVA または ISO iインストールは、3 つのネットワーク インターフェイスで構成されています。
-
dcnm-mgmt network (eth0) インターフェイス
このネットワークは、Cisco DCNM オープン仮想アプライアンスに接続 (SSH、SCP、HTTP、HTTPS) を提供します。DCNM 管理ネットワークに関連付けられているサブネットに対応するポート グループに、このネットワークを関連付けます。
-
enhanced-fabric-mgmt (eth1) インターフェイス
このネットワークは、Nexus スイッチのファブリック管理を強化します。リーフおよびスパイン スイッチの管理ネットワークに対応するポート グループに、このネットワークを関連付けます。
-
enhanced-fabric-inband (eth2) インターフェイス
このネットワークは、ファブリックへのインバンド接続を提供します。このネットワークを、ファブリック インバンド接続に対応するポートグループに関連付けます。
次の図は、Cisco DCNM 管理インターフェイスのネットワーク図を示しています。
展開タイプの Cisco DCNM のインストール中に、これらのインターフェイスを設定できます。ただし、Cisco DCNM リリース 11.2(1) 以降では、インストール後のネットワーク設定を編集および変更できます。
 (注) |
ネットワーク プロパティを更新するために、appmgr コマンドを使用するようにお勧めします。ネットワーク インターフェイスを手動で再起動しないでください。 |
次の項で説明するように、パラメータを変更できます。
ネットワーク インターフェイス (eth0 および eth1) の DCNM インストール後の変更
Eth0 および eth1 の IP アドレス (IPv4 および IPv6) とともに、appmgr update network-properties コマンドを使用して DNS および NTP サーバの設定を変更することもできます。
appmgr update network-properties コマンドを使用して、ネットワーク パラメータを変更する方法の手順については、次の項を参照してください。
スタンドアロン モードの DCNM 上でネットワーク プロパティの変更
次の例は、Cisco DCNM スタンドアロン アプライアンスに対する appmgr update network-properties コマンドの出力例を示しています。
Note |
DCNM アプライアンス コンソールで次のコマンドを実行し、早期のセッション タイムアウトを防止します。 |
-
次のコマンドを使用して、コンソールのセッションを開始します。
appmgr update network-properties session start
-
次のコマンドを使用して、ネットワーク プロパティを更新します。
appmgr update network-properties set ipv4 {eth0|eth1} <ipv4-address> <network-mask> <gateway>
サブネット マスクおよびゲートウェイ IP アドレスとともに、管理 (eth0) インターフェイスの新しい IPv4 アドレスを入力します。
-
次のコマンドを使用して、変更を表示し確認します。
appmgr update network-properties session show {config | changes | diffs}
-
変更を確認した後、次のコマンドを使用して設定を適用します。
appmgr update network-properties session applyeth0 管理ネットワーク IP アドレスを使用して Cisco DCNM Web UI にログオンする前に、数分待機します。
Cisco DCNM スタンドアロン セットアップでネットワーク パラメータを変更する場合のサンプル コマンド出力
次のサンプル例では、Cisco DCNM スタンドアロン セットアップ用に、インストール後ネットワーク パラメータを変更する方法を示します。
dcnm# appmgr update network-properties session start

dcnm# appmgr update network-properties set ipv4 eth0 172.28.10.244 255.255.255.0 172.28.10.1
dcnm# appmgr update network-properties set ipv4 eth1 100.0.0.244 255.0.0.0
*****************************************************************
 WARNING: fabric/poap configuration may need to be changed
 manually after changes are applied.
*****************************************************************

dcnm# appmgr update network-properties session show changes
eth0 IPv4 addr  172.28.10.246/255.255.255.0  ->  172.28.10.244/255.255.255.0
eth1 IPv4 addr  1.0.0.246/255.0.0.0          ->  100.0.0.244/255.0.0.0

dcnm# appmgr update network-properties session apply
*********************************************************************
                           WARNING

Applications of both nodes of the DCNM HA system need to be stopped
for the changes to be applied properly.

            PLEASE STOP ALL APPLICATIONS MANUALLY
*********************************************************************

Have applications been stopped? [y/n]: y
Applying changes
DELETE 1
Node left the swarm.
Server configuration file loaded: /usr/local/cisco/dcm/fm//conf/server.properties
log4j:WARN No appenders could be found for logger (fms.db).
log4j:WARN Please initialize the log4j system properly.
log4j:WARN See http://logging.apache.org/log4j/1.2/faq.html#noconfig for more info.
UPDATE 1
UPDATE 1
DELETE 1
server signaled
INFO      : [ipv6_wait_tentative] Waiting for interface eth0 IPv6 address(es) to leave the 'tentative' state
INFO      : [ipv6_wait_tentative] Waiting for interface eth0 IPv6 address(es) to leave the 'tentative' state
**********************************************************************
Please run 'appmgr start afw; appmgr start all' to restart your nodes.
**********************************************************************

dcnm# appmgr start afw; appmgr start all
Started AFW Server Processes
Started AFW Agent Processes
Started AFW Server Processes
Started AFW Agent Processes
Started applications managed by heartbeat..
Check the status using 'appmgr status all'
Starting High-Availability services: INFO:  Resource is stopped
Done.

Warning: PID file not written; -detached was passed.
AMQP User Check
Started AFW Server Processes
Started AFW Agent Processes
dcnm#
ネイティブ HA モードの DCNM 上でネットワーク プロパティの変更
次の例は、Cisco DCNM ネイティブ HA アプライアンスに対して、appmgr update network-properties コマンドを使用してネットワーク パラメータを変更するための出力を示しています。
Note |
|
-
次のコマンドを使用して、スタンバイ ノードで DCNM アプリケーションを停止します。
appmgr stop all続行する前に、スタンバイ ノードですべてのアプリケーションが停止するまで待ちます。
-
次のコマンドを使用して、アクティブ ノードで DCNM アプリケーションを停止します。
appmgr stop all
-
次のコマンドを使用して、アクティブおよびスタンバイ ノードの両方の Cisco DCNM コンソールでセッションを開始します。
appmgr update network-properties session start -
アクティブ ノードで、次のコマンドを使用してネットワーク インターフェイス パラメータを変更します。
-
次のコマンドを使用して、eth0 および eth1 アドレスの IP アドレスを設定します。
appmgr update network-properties set ipv4 {eth0|eth1} <ipv4-address> <network-mask> <gateway>
サブネット マスクおよびゲートウェイ IP アドレスとともに、eth1 インターフェイスの新しい IPv4 または IPv6 アドレスを入力します。
-
次のコマンドを使用して、VIP IP アドレスを設定します。
appmgr update network-properties set ipv4 {vip0|vip1} <ipv4-address> <network-mask>
eth0 インターフェイスの vip0 アドレスを入力します。eth1 インターフェイスの vip1 アドレスを入力します。
-
次のコマンドを使用して、ピア IP アドレスを設定します。
appmgr update network-properties set ipv4 {peer0|peer1} <ipv4-address>
アクティブ ノードに peer0 アドレスとして、スタンバイ ノードの eth0 アドレスを入力します。アクティブ ノードに peer1 アドレスとして、スタンバイ ノードに eth1 アドレスを入力します。
-
次のコマンドを使用して、ネットワーク パラメータに行った変更を表示および確認します。
appmgr update network-properties session show {config | changes | diffs}
次のコマンドを使用して、設定した変更を表示します。
-
-
スタンバイ ノードで、手順 4で説明したコマンドを使用して、ネットワーク インターフェイスのパラメータを変更します。
-
変更を確認した後、アクティブ ノードで次のコマンドを使用して設定を適用します。
appmgr update network-properties session applyネットワーク パラメータが更新されていることを確認するため、プロンプトが返されるまで待ちます。
-
変更を確認した後、次のコマンドを使用してスタンバイ ノードで設定を適用します。
appmgr update network-properties session apply -
次のコマンドを使用して、アクティブ ノードですべてのアプリケーションを開始します。
appmgr start allNote
次の手順に進む前に、アクティブ ノードですべてのアプリケーションが正常に稼働するまで待ちます。
-
次のコマンドを使用して、スタンバイ ノードですべてのアプリケーションを開始します。
appmgr start all
-
次のコマンドを使用して、アクティブ ノードでピア信頼キーを確立します。
appmgr update ssh-peer-trust -
次のコマンドを使用して、スタンバイ ノードでピア トラスト キーを確立します。
appmgr update ssh-peer-trust
Cisco DCNM ネイティブ HA セットアップでネットワーク パラメータを変更する場合のサンプル コマンド出力
次のサンプル例では、Cisco DCNM ネイティブ HA セットアップ用に、インストール後ネットワーク パラメータを変更する方法を示します。
Note |
例えば、アクティブおよびスタンバイ アプライアンスを dcnm1 および dcnm2 に個別に示します。 |
[root@dcnm2]# appmgr stop all
Stopping AFW Applications...
Stopping AFW Server Processes
Stopping AFW Agent Processes
Stopped Application Framework...
Stopping High-Availability services: Done.

Stopping and halting node rabbit@dcnm2 ...
Note: Forwarding request to 'systemctl enable rabbitmq-server.service'.
Stopping AFW Applications...
Stopping AFW Server Processes
Stopping AFW Agent Processes
Stopped Application Framework...
[root@dcnm2]#

[root@dcnm1]# appmgr stop all
Stopping AFW Applications...
Stopping AFW Server Processes
Stopping AFW Agent Processes
Stopped Application Framework...
Stopping High-Availability services: Done.

Stopping and halting node rabbit@dcnm1 ...
Note: Forwarding request to 'systemctl enable rabbitmq-server.service'.
Stopping AFW Applications...
Stopping AFW Server Processes
Stopping AFW Agent Processes
Stopped Application Framework...
[root@dcnm1]#

[root@dcnm1]# appmgr update network-properties session start
[root@dcnm2]# appmgr update network-properties session start

[root@dcnm1]# appmgr update network-properties set ipv4 eth0 172.28.10.244 255.255.255.0 172.28.10.1
[root@dcnm1]# appmgr update network-properties set ipv4 eth1 100.0.0.244 255.0.0.0
*****************************************************************
 WARNING: fabric/poap configuration may need to be changed
 manually after changes are applied.
*****************************************************************
[root@dcnm1]# appmgr update network-properties set ipv4 vip0 172.28.10.238 255.255.255.0
[root@dcnm1]# appmgr update network-properties set ipv4 vip1 100.0.0.238 255.0.0.0
[root@dcnm1]# appmgr update network-properties set ipv4 peer0 172.28.10.245
[root@dcnm1]# appmgr update network-properties set ipv4 peer1 100.0.0.245
[root@dcnm1]# appmgr update network-properties session show changes

[root@dcnm2]# appmgr update network-properties set ipv4 eth0 172.28.10.245 255.255.255.0 172.28.10.1
[root@dcnm2]# appmgr update network-properties set ipv4 eth1 100.0.0.245 255.0.0.0
*****************************************************************
 WARNING: fabric/poap configuration may need to be changed
 manually after changes are applied.
*****************************************************************
[root@dcnm2]# appmgr update network-properties set ipv4 vip0 172.28.10.238 255.255.255.0
[root@dcnm2]# appmgr update network-properties set ipv4 vip1 100.0.0.238 255.0.0.0
[root@dcnm2]# appmgr update network-properties set ipv4 peer0 172.28.10.244
[root@dcnm2]# appmgr update network-properties set ipv4 peer1 100.0.0.244
[root@dcnm2]# appmgr update network-properties session show changes

[root@dcnm1]# appmgr update network-properties session show changes
eth0 IPv4 addr  172.28.10.246/255.255.255.0  ->  172.28.10.244/255.255.255.0
eth1 IPv4 addr  1.0.0.246/255.0.0.0          ->  100.0.0.244/255.0.0.0
eth0 VIP        172.28.10.248/24             ->  172.28.10.238/24
eth1 VIP        1.0.0.248/8                  ->  100.0.0.238/8
Peer eth0 IP    172.28.10.247                ->  172.28.10.245
Peer eth1 IP    1.0.0.245                    ->  100.0.0.245

[root@dcnm1]# appmgr update network-properties session show config
======= Current configuration ======
NTP Server      1.ntp.esl.cisco.com
eth0 IPv4 addr  172.28.10.246/255.255.255.0
eth0 IPv4 GW    172.28.10.1
eth0 DNS        171.70.168.183
eth0 IPv6 addr  2001:420:284:2004:4:112:210:20/112
eth0 IPv6 GW    2001:420:284:2004:4:112:210:1
eth1 IPv4 addr  1.0.0.246/255.0.0.0
eth1 IPv4 GW
eth1 DNS        1.0.0.246
eth1 IPv6 addr
eth2 IPv4 addr  /
eth2 IPv4 GW
Peer eth0 IP    172.28.10.247
Peer eth1 IP    1.0.0.247
Peer eth2 IP
eth0 VIP        172.28.10.248/24
eth1 VIP        1.0.0.248/8
eth2 VIP        /
eth0 VIPv6      /
eth1 VIPv6      /

====== Session configuration ======
NTP Server      1.ntp.esl.cisco.com
eth0 IPv4 addr  172.28.10.244/255.255.255.0
eth0 IPv4 GW    172.28.10.1
eth0 DNS        171.70.168.183
eth0 IPv6 addr  2001:420:284:2004:4:112:210:20/112
eth0 IPv6 GW    2001:420:284:2004:4:112:210:1
eth1 IPv4 addr  100.0.0.244/255.0.0.0
eth1 IPv4 GW
eth1 DNS        1.0.0.246
eth1 IPv6 addr
eth2 IPv4 addr  /
eth2 IPv4 GW
Peer eth0 IP    172.28.10.245
Peer eth1 IP    100.0.0.245
Peer eth2 IP
eth0 VIP        172.28.10.238/24
eth1 VIP        100.0.0.238/8
eth2 VIP        /
eth0 VIPv6      /
eth1 VIPv6      /
[root@dcnm1]#

[root@dcnm2]# appmgr update network-properties session show config
======= Current configuration ======
NTP Server      1.ntp.esl.cisco.com
eth0 IPv4 addr  172.28.10.247/255.255.255.0
eth0 IPv4 GW    172.28.10.1
eth0 DNS        171.70.168.183
eth0 IPv6 addr
eth0 IPv6 GW
eth1 IPv4 addr  1.0.0.247/255.0.0.0
eth1 IPv4 GW
eth1 DNS        1.0.0.247
eth1 IPv6 addr
eth2 IPv4 addr  /
eth2 IPv4 GW
Peer eth0 IP    172.28.10.246
Peer eth1 IP    1.0.0.246
Peer eth2 IP
eth0 VIP        172.28.10.248/24
eth1 VIP        1.0.0.248/8
eth2 VIP        /
eth0 VIPv6      /
eth1 VIPv6      /

====== Session configuration ======
NTP Server      1.ntp.esl.cisco.com
eth0 IPv4 addr  172.28.10.245/255.255.255.0
eth0 IPv4 GW    172.28.10.1
eth0 DNS        171.70.168.183
eth0 IPv6 addr
eth0 IPv6 GW
eth1 IPv4 addr  100.0.0.245/255.0.0.0
eth1 IPv4 GW
eth1 DNS        1.0.0.247
eth1 IPv6 addr
eth2 IPv4 addr  /
eth2 IPv4 GW
Peer eth0 IP    172.28.10.244
Peer eth1 IP    100.0.0.244
Peer eth2 IP
eth0 VIP        172.28.10.238/24
eth1 VIP        100.0.0.238/8
eth2 VIP        /
eth0 VIPv6      /
eth1 VIPv6      /
[root@dcnm2]#

[root@dcnm1]# appmgr update network-properties session apply
*********************************************************************
                           WARNING

Applications of both nodes of the DCNM HA system need to be stopped
for the changes to be applied properly.

            PLEASE STOP ALL APPLICATIONS MANUALLY
*********************************************************************

Have applications been stopped? [y/n]: y
Applying changes
DELETE 1
Node left the swarm.
Server configuration file loaded: /usr/local/cisco/dcm/fm//conf/server.properties
log4j:WARN No appenders could be found for logger (fms.db).
log4j:WARN Please initialize the log4j system properly.
log4j:WARN See http://logging.apache.org/log4j/1.2/faq.html#noconfig for more info.
UPDATE 1
UPDATE 1
DELETE 1
server signaled
INFO      : [ipv6_wait_tentative] Waiting for interface eth0 IPv6 address(es) to leave the 'tentative' state
INFO      : [ipv6_wait_tentative] Waiting for interface eth0 IPv6 address(es) to leave the 'tentative' state
**********************************************************************
Please run 'appmgr start afw; appmgr start all' to restart your nodes.
**********************************************************************
*********************************************************************
Please run 'appmgr update ssh-peer-trust' on the peer node.
*********************************************************************
[root@dcnm1]#

[root@dcnm2]# appmgr update network-properties session apply
*********************************************************************
                           WARNING

Applications of both nodes of the DCNM HA system need to be stopped
for the changes to be applied properly.

            PLEASE STOP ALL APPLICATIONS MANUALLY
*********************************************************************

Have applications been stopped? [y/n]: y
Applying changes
DELETE 1
Node left the swarm.
Server configuration file loaded: /usr/local/cisco/dcm/fm//conf/server.properties
log4j:WARN No appenders could be found for logger (fms.db).
log4j:WARN Please initialize the log4j system properly.
log4j:WARN See http://logging.apache.org/log4j/1.2/faq.html#noconfig for more info.
UPDATE 1
UPDATE 1
DELETE 1
afwnetplugin:0.1
server signaled
**********************************************************************
Please run 'appmgr start afw; appmgr start all' to restart your nodes.
**********************************************************************
*********************************************************************
Please run 'appmgr update ssh-peer-trust' on the peer node.
*********************************************************************
[root@dcnm2]#

[root@dcnm1]# appmgr start afw; appmgr start all
Started AFW Server Processes
Started AFW Agent Processes
Started AFW Server Processes
Started AFW Agent Processes
Started applications managed by heartbeat..
Check the status using 'appmgr status all'
Starting High-Availability services: INFO:  Resource is stopped
Done.

Warning: PID file not written; -detached was passed.
AMQP User Check
Started AFW Server Processes
Started AFW Agent Processes
[root@dcnm1]#

Wait until dcnm1 becomes active again.

[root@dcnm2]# appmgr start afw; appmgr start all
Started AFW Server Processes
Started AFW Agent Processes
Started AFW Server Processes
Started AFW Agent Processes
Started applications managed by heartbeat..
Check the status using 'appmgr status all'
Starting High-Availability services: INFO:  Resource is stopped
Done.

Warning: PID file not written; -detached was passed.
AMQP User Check
Started AFW Server Processes
Started AFW Agent Processes
[root@dcnm2]#

[root@dcnm1]# appmgr update ssh-peer-trust
/usr/bin/ssh-copy-id: INFO: Source of key(s) to be installed: "/root/.ssh/id_rsa.pub"
Number of key(s) added: 1

Now try logging into the machine, with:   "ssh -o 'StrictHostKeyChecking=no' '172.28.10.245'"
and check to make sure that only the key(s) you wanted were added.
/usr/bin/ssh-copy-id: INFO: Source of key(s) to be installed: "/root/.ssh/id_rsa.pub"
Number of key(s) added: 1

Now try logging into the machine, with:   "ssh -o 'StrictHostKeyChecking=no' '100.0.0.245'"
and check to make sure that only the key(s) you wanted were added.
/usr/bin/ssh-copy-id: INFO: Source of key(s) to be installed: "/root/.ssh/id_rsa.pub"
Number of key(s) added: 1
Now try logging into the machine, with:   "ssh -o 'StrictHostKeyChecking=no' 'dcnm-247.cisco.com'"
and check to make sure that only the key(s) you wanted were added.
[root@dcnm1]#

[root@dcnm2]# appmgr update ssh-peer-trust
/usr/bin/ssh-copy-id: INFO: Source of key(s) to be installed: "/root/.ssh/id_rsa.pub"
Number of key(s) added: 1

Now try logging into the machine, with:   "ssh -o 'StrictHostKeyChecking=no' '172.28.10.244'"
and check to make sure that only the key(s) you wanted were added.
/usr/bin/ssh-copy-id: INFO: Source of key(s) to be installed: "/root/.ssh/id_rsa.pub"
Number of key(s) added: 1

Now try logging into the machine, with:   "ssh -o 'StrictHostKeyChecking=no' '100.0.0.244'"
and check to make sure that only the key(s) you wanted were added.
/usr/bin/ssh-copy-id: INFO: Source of key(s) to be installed: "/root/.ssh/id_rsa.pub"
Number of key(s) added: 1

Now try logging into the machine, with:   "ssh -o 'StrictHostKeyChecking=no' 'dcnm-246.cisco.com'"
and check to make sure that only the key(s) you wanted were added.
[root@dcnm2]#
スタンドアロン モードの DCNM 上でネットワーク プロパティの変更
Note |
DCNM アプライアンス コンソールで次のコマンドを実行し、早期のセッション タイムアウトを防止します。 |
Cisco DCNM スタンドアロン セットアップでネットワーク プロパティを変更するには、次の手順を実行します。
Procedure
|
Step 1 |
次のコマンドを使用して、コンソールのセッションを開始します。 appmgr update network-properties session start |
|
Step 2 |
次のコマンドを使用して、ネットワーク プロパティを更新します。 appmgr update network-properties set ipv4 {eth0|eth1|eth2} <ipv4-address> <network-mask> <gateway> |
|
Step 3 |
次のコマンドを使用して、変更を表示し確認します。 appmgr update network-properties session show {config | changes | diffs} |
|
Step 4 |
変更を確認した後、次のコマンドを使用して設定を適用します。 appmgr update network-properties session apply eth0 管理ネットワーク IP アドレスを使用して Cisco DCNM Web UI にログオンする前に、数分待機します。 |
Cisco DCNM スタンドアロン セットアップでネットワーク パラメータを変更する場合のサンプル コマンド出力
次のサンプル例では、Cisco DCNM スタンドアロン セットアップ用に、インストール後ネットワーク パラメータを変更する方法を示します。
dcnm# appmgr update network-properties session start

dcnm# appmgr update network-properties set ipv4 eth0 172.28.10.244 255.255.255.0 172.28.10.1
dcnm# appmgr update network-properties set ipv4 eth1 100.0.0.244 255.0.0.0
dcnm# appmgr update network-properties set ipv4 eth2 2.0.0.251 255.0.0.0 2.0.0.1
*****************************************************************
 WARNING: fabric/poap configuration may need to be changed
 manually after changes are applied.
*****************************************************************

dcnm# appmgr update network-properties session show changes
eth0 IPv4 addr  172.28.10.246/255.255.255.0  ->  172.28.10.244/255.255.255.0
eth1 IPv4 addr  1.0.0.246/255.0.0.0          ->  100.0.0.244/255.0.0.0
eth2 IPv4 addr  10.0.0.246/255.0.0.0         ->  2.0.0.251/255.0.0.0 2.0.0.1

dcnm# appmgr update network-properties session apply
*********************************************************************
                           WARNING

Applications of both nodes of the DCNM HA system need to be stopped
for the changes to be applied properly.

            PLEASE STOP ALL APPLICATIONS MANUALLY
*********************************************************************

Have applications been stopped? [y/n]: y
Applying changes
DELETE 1
Node left the swarm.
Server configuration file loaded: /usr/local/cisco/dcm/fm//conf/server.properties
log4j:WARN No appenders could be found for logger (fms.db).
log4j:WARN Please initialize the log4j system properly.
log4j:WARN See http://logging.apache.org/log4j/1.2/faq.html#noconfig for more info.
UPDATE 1
UPDATE 1
DELETE 1
server signaled
INFO      : [ipv6_wait_tentative] Waiting for interface eth0 IPv6 address(es) to leave the 'tentative' state
INFO      : [ipv6_wait_tentative] Waiting for interface eth0 IPv6 address(es) to leave the 'tentative' state
**********************************************************************
Please run 'appmgr start afw; appmgr start all' to restart your nodes.
**********************************************************************

dcnm# appmgr start afw; appmgr start all
Started AFW Server Processes
Started AFW Agent Processes
Started AFW Server Processes
Started AFW Agent Processes
Started applications managed by heartbeat..
Check the status using 'appmgr status all'
Starting High-Availability services: INFO:  Resource is stopped
Done.

Warning: PID file not written; -detached was passed.
AMQP User Check
Started AFW Server Processes
Started AFW Agent Processes
dcnm#
ネイティブ HA モードの DCNM 上でネットワーク プロパティの変更
Note |
DCNM アプライアンス コンソールで次のコマンドを実行し、早期のセッション タイムアウトを防止します。 次の手順で示されているように、同じ順番でコマンドを実行します。 |
Note |
ネイティブ HA ノードは、単一のエンティティと見なす必要があります。アクティブ ノードの eth1 IP アドレスを変更する場合は、スタンバイ ノードの eth1 IP アドレスも変更する必要があります。 任意のノードの eth0 IP アドレスを変更する場合は、そのノードの eth2 IP アドレスを変更する必要があります。 |
Cisco DCNM ネイティブ HA セットアップでネットワーク プロパティを変更するには、次の手順を実行します。
Procedure
|
Step 1 |
次のコマンドを使用して、スタンバイ ノードで DCNM アプリケーションを停止します。 appmgr stop all 続行する前に、スタンバイ ノードですべてのアプリケーションが停止するまで待ちます。 |
||
|
Step 2 |
次のコマンドを使用して、アクティブ ノードで DCNM アプリケーションを停止します。 appmgr stop all |
||
|
Step 3 |
次のコマンドを使用して、アクティブおよびスタンバイ ノードの両方の Cisco DCNM コンソールでセッションを開始します。 appmgr update network-properties session start |
||
|
Step 4 |
アクティブ ノードで、次のコマンドを使用してネットワーク インターフェイス パラメータを変更します。 |
||
|
Step 5 |
スタンバイ ノードで、ステップ Step 4 で説明したコマンドを使用して、ネットワーク インターフェイスのパラメータを変更します。 |
||
|
Step 6 |
変更を確認した後、アクティブ ノードで次のコマンドを使用して設定を適用します。 appmgr update network-properties session apply ネットワーク パラメータが更新されていることを確認するため、プロンプトが返されるまで待ちます。 |
||
|
Step 7 |
変更を確認した後、次のコマンドを使用してスタンバイ ノードで設定を適用します。 appmgr update network-properties session apply |
||
|
Step 8 |
次のコマンドを使用して、アクティブ ノードですべてのアプリケーションを開始します。 appmgr start all
|
||
|
Step 9 |
次のコマンドを使用して、スタンバイ ノードですべてのアプリケーションを開始します。 appmgr start all |
||
|
Step 10 |
次のコマンドを使用して、アクティブ ノードでピア信頼キーを確立します。 appmgr update ssh-peer-trust |
||
|
Step 11 |
次のコマンドを使用して、スタンバイ ノードでピア トラスト キーを確立します。 appmgr update ssh-peer-trust |
Cisco DCNM ネイティブ HA セットアップでネットワーク パラメータを変更する場合のサンプル コマンド出力
次のサンプル例では、Cisco DCNM ネイティブ HA セットアップ用に、インストール後ネットワーク パラメータを変更する方法を示します。
Note |
例えば、アクティブおよびスタンバイ アプライアンスを dcnm1 および dcnm2 に個別に示します。 |
[root@dcnm2 ~]# appmgr stop all
Stopping AFW Applications...
Stopping AFW Server Processes
Stopping AFW Agent Processes
Stopped Application Framework...
Stopping High-Availability services: Done.
Stopping and halting node rabbit@dcnm-dcnm2 ...
Note: Forwarding request to 'systemctl enable rabbitmq-server.service'.
Stopping AFW Applications...
Stopping AFW Server Processes
Stopping AFW Agent Processes
Stopped Application Framework...
[root@dcnm2 ~]#

[root@dcnm1 ~]# appmgr stop all
Stopping AFW Applications...
Stopping AFW Server Processes
Stopping AFW Agent Processes
Stopped Application Framework...
Stopping High-Availability services: Done.
Stopping and halting node rabbit@dcnm1 ...
Note: Forwarding request to 'systemctl enable rabbitmq-server.service'.
Stopping AFW Applications...
Stopping AFW Server Processes
Stopping AFW Agent Processes
Stopped Application Framework...
[root@dcnm-1 ~]#

[root@dcnm1 ~]# appmgr update network-properties session start
[root@dcnm1 ~]#

[root@dcnm2 ~]# appmgr update network-properties session start
[root@dcnm2 ~]#

[root@dcnm1 ~]# appmgr update network-properties set ipv4 eth0 172.28.10.244 255.255.255.0 172.28.10.1
[root@dcnm1 ~]# appmgr update network-properties set ipv4 eth1 1.0.0.244 255.0.0.0 1.0.0.1
*****************************************************************
 WARNING: fabric/poap configuration may need to be changed
 manually after changes are applied.
*****************************************************************
[root@dcnm1 ~]# appmgr update network-properties set ipv4 eth2 2.0.0.244 255.0.0.0 2.0.0.1
[root@dcnm1 ~]# appmgr update network-properties set ipv4 peer0 172.29.10.238
[root@dcnm1 ~]# appmgr update network-properties set ipv4 peer1 1.0.0.238
[root@dcnm1 ~]# appmgr update network-properties set ipv4 peer2 2.0.0.238
[root@dcnm1 ~]# appmgr update network-properties set ipv4 vip0 172.28.10.239 255.255.255.0
[root@dcnm1 ~]# appmgr update network-properties set ipv4 vip1 1.0.0.239 255.0.0.0
[root@dcnm1 ~]# appmgr update network-properties set ipv4 vip2 2.0.0.239 255.0.0.0
[root@dcnm1 ~]# appmgr update network-properties set hostname local dcnm3.cisco.com
[root@dcnm1 ~]# appmgr update network-properties set hostname peer dcnm4.cisco.com
[root@dcnm1 ~]# appmgr update network-properties set hostname vip dcnm5.cisco.com
[root@dcnm1 ~]#

[root@dcnm2 ~]# appmgr update network-properties set ipv4 eth0 172.28.10.238 255.255.255.0 172.28.10.1
[root@dcnm2 ~]# appmgr update network-properties set ipv4 eth1 1.0.0.238 255.0.0.0 1.0.0.1
*****************************************************************
 WARNING: fabric/poap configuration may need to be changed
 manually after changes are applied.
*****************************************************************
[root@dcnm2 ~]# appmgr update network-properties set ipv4 eth2 2.0.0.238 255.0.0.0 2.0.0.1
[root@dcnm2 ~]# appmgr update network-properties set ipv4 peer0 172.29.10.244
[root@dcnm2 ~]# appmgr update network-properties set ipv4 peer1 1.0.0.244
[root@dcnm2 ~]# appmgr update network-properties set ipv4 peer2 2.0.0.244
[root@dcnm2 ~]# appmgr update network-properties set ipv4 vip0 172.28.10.239 255.255.255.0
[root@dcnm2 ~]# appmgr update network-properties set ipv4 vip1 1.0.0.239 255.0.0.0
[root@dcnm2 ~]# appmgr update network-properties set ipv4 vip2 2.0.0.239 255.0.0.0
[root@dcnm2 ~]# appmgr update network-properties set hostname local dcnm3.cisco.com
[root@dcnm2 ~]# appmgr update network-properties set hostname peer dcnm4.cisco.com
[root@dcnm2 ~]# appmgr update network-properties set hostname vip dcnm5.cisco.com
[root@dcnm2 ~]#

[root@dcnm2 ~]#
[root@dcnm1 ~]# appmgr update network-properties session show changes
eth0 IPv4 addr     172.28.10.246/255.255.255.0    ->    172.28.10.244/255.255.255.0
eth1 IPv4 addr     1.0.0.246/255.0.0.0            ->    1.0.0.244/255.0.0.0
eth1 IPv4 GW                                      ->    1.0.0.1
eth2 IPv4 addr     /                              ->    2.0.0.244/255.0.0.0
eth2 IPv4 GW                                      ->    2.0.0.1
Hostname           dcnm1.cisco.com                ->    dcnm3.cisco.com
eth0 VIP           172.28.10.248/24               ->    172.28.10.239/24
eth1 VIP           1.0.0.248/8                    ->    1.0.0.239/8
eth2 VIP           /                              ->    2.0.0.239/8
Peer eth0 IP       172.28.10.247                  ->    172.29.10.238
Peer eth1 IP       1.0.0.247                      ->    1.0.0.238
Peer eth2 IP                                      ->    2.0.0.238
Peer hostname      dcnm2.cisco.com                ->    dcnm4.cisco.com
VIP hostname       dcnm6.cisco.com                ->    dcnm5.cisco.com

[root@dcnm1 ~]# appmgr update network-properties session show config
======= Current configuration ======
Hostname dcnm1.cisco.com
NTP Server         1.ntp.esl.cisco.com
DNS Server         171.70.168.183,1.0.0.246
eth0 IPv4 addr     172.28.10.246/255.255.255.0
eth0 IPv4 GW       172.28.10.1
eth0 IPv6 addr
eth0 IPv6 GW
eth1 IPv4 addr     1.0.0.246/255.0.0.0
eth1 IPv4 GW
eth1 IPv6 addr
eth1 IPv6 GW
eth2 IPv4 addr     /
eth2 IPv4 GW
eth2 IPv6 addr
eth2 IPv6 GW
Peer hostname dcnm2.cisco.com
Peer eth0 IP     172.28.10.247
Peer eth1 IP     1.0.0.247
Peer eth2 IP
Peer eth0 IPv6
Peer eth1 IPv6
eth0 VIP         172.28.10.248/24
eth1 VIP         1.0.0.248/8
eth2 VIP         /
eth0 VIPv6       /
eth1 VIPv6       /
VIP hostname dcnm6.cisco.com

====== Session configuration ======
Hostname dcnm3.cisco.com
NTP Server       1.ntp.esl.cisco.com
DNS Server       171.70.168.183,1.0.0.246
eth0 IPv4 addr   172.28.10.244/255.255.255.0
eth0 IPv4 GW     172.28.10.1
eth0 IPv6 addr
eth0 IPv6 GW
eth1 IPv4 addr   1.0.0.244/255.0.0.0
eth1 IPv4 GW     1.0.0.1
eth1 IPv6 addr
eth1 IPv6 GW
eth2 IPv4 addr   2.0.0.244/255.0.0.0
eth2 IPv4 GW     2.0.0.1
eth2 IPv6 addr
eth2 IPv6 GW
Peer hostname     dcnm4.cisco.com
Peer eth0 IP      172.29.10.238
Peer eth1 IP      1.0.0.238
Peer eth2 IP      2.0.0.238
Peer eth0 IPv6
Peer eth1 IPv6
eth0 VIP          172.28.10.239/24
eth1 VIP          1.0.0.239/8
eth2 VIP          2.0.0.239/8
eth0 VIPv6 /
eth1 VIPv6 /
VIP hostname dcnm5.cisco.com
[root@dcnm1 ~]#

[root@dcnm2 ~]# appmgr update network-properties session show changes
eth0 IPv4 addr     172.28.10.247/255.255.255.0     ->     172.28.10.238/255.255.255.0
eth1 IPv4 addr     1.0.0.247/255.0.0.0             ->     1.0.0.238/255.0.0.0
eth1 IPv4 GW                                       ->     1.0.0.1
eth2 IPv4 addr     /                               ->     2.0.0.238/255.0.0.0
eth2 IPv4 GW                                       ->     2.0.0.1
Hostname           dcnm2.cisco.com                 ->     dcnm4.cisco.com
eth0 VIP           172.28.10.248/24                ->     172.28.10.239/24
eth1 VIP           1.0.0.248/8                     ->     1.0.0.239/8
eth2 VIP           /                               ->     2.0.0.239/8
Peer eth0 IP       172.28.10.246                   ->     172.29.10.244
Peer eth1 IP       1.0.0.246                       ->     1.0.0.244
Peer eth2 IP                                       ->     2.0.0.244
Peer hostname     dcnm1.cisco.com                  ->     dcnm3.cisco.com
VIP hostname      dcnm6.cisco.com                  ->     dcnm5.cisco.com
[root@dcnm2 ~]# appmgr update network-properties session show configuration
======= Current configuration ======
Hostname dcnm2.cisco.com
NTP Server        1.ntp.esl.cisco.com
DNS Server        171.70.168.183,1.0.0.247
eth0 IPv4 addr    172.28.10.247/255.255.255.0
eth0 IPv4 GW      172.28.10.1
eth0 IPv6 addr
eth0 IPv6 GW
eth1 IPv4 addr    1.0.0.247/255.0.0.0
eth1 IPv4 GW
eth1 IPv6 addr
eth1 IPv6 GW
eth2 IPv4 addr    /
eth2 IPv4 GW
eth2 IPv6 addr
eth2 IPv6 GW
Peer hostname     dcnm1.cisco.com
Peer eth0 IP      172.28.10.246
Peer eth1 IP      1.0.0.246
Peer eth2 IP
Peer eth0 IPv6
Peer eth1 IPv6
eth0 VIP         172.28.10.248/24
eth1 VIP         1.0.0.248/8
eth2 VIP         /
eth0 VIPv6       /
eth1 VIPv6       /
VIP hostname dcnm6.cisco.com

====== Session configuration ======
Hostname dcnm4.cisco.com
NTP Server        1.ntp.esl.cisco.com
DNS Server        171.70.168.183,1.0.0.247
eth0 IPv4 addr    172.28.10.238/255.255.255.0
eth0 IPv4 GW      172.28.10.1
eth0 IPv6 addr
eth0 IPv6 GW
eth1 IPv4 addr    1.0.0.238/255.0.0.0
eth1 IPv4 GW      1.0.0.1
eth1 IPv6 addr
eth1 IPv6 GW
eth2 IPv4 addr    2.0.0.238/255.0.0.0
eth2 IPv4 GW      2.0.0.1
eth2 IPv6 addr
eth2 IPv6 GW
Peer hostname dcnm3.cisco.com
Peer eth0 IP      172.29.10.244
Peer eth1 IP      1.0.0.244
Peer eth2 IP      2.0.0.244
Peer eth0 IPv6
Peer eth1 IPv6
eth0 VIP         172.28.10.239/24
eth1 VIP         1.0.0.239/8
eth2 VIP         2.0.0.239/8
eth0 VIPv6       /
eth1 VIPv6       /
VIP hostname dcnm5.cisco.com
[root@dcnm2 ~]#

[root@dcnm1 ~]# appmgr update network-properties session apply
*********************************************************************
                           WARNING
Applications of both nodes of the DCNM HA system need to be stopped
for the changes to be applied properly.
            PLEASE STOP ALL APPLICATIONS MANUALLY
*********************************************************************

Have applications been stopped? [y/n]: y
Applying changes
DELETE 1
Node left the swarm.
Server configuration file loaded: /usr/local/cisco/dcm/fm//conf/server.properties
log4j:WARN No appenders could be found for logger (fms.db).
log4j:WARN Please initialize the log4j system properly.
log4j:WARN See http://logging.apache.org/log4j/1.2/faq.html#noconfig for more info.
UPDATE 1
UPDATE 1
DELETE 1
server signaled
INFO      : [ipv6_wait_tentative] Waiting for interface eth0 IPv6 address(es) to leave the 'tentative' state
INFO      : [ipv6_wait_tentative] Waiting for interface eth0 IPv6 address(es) to leave the 'tentative' state
**********************************************************************
Please run 'appmgr start afw; appmgr start all' to restart your nodes.
**********************************************************************
*********************************************************************
Please run 'appmgr update ssh-peer-trust' on the peer node.
*********************************************************************
[root@dcnm1 ~]#


[root@dcnm2 ~]# appmgr update network-properties session apply
*********************************************************************
                           WARNING
Applications of both nodes of the DCNM HA system need to be stopped
for the changes to be applied properly.
            PLEASE STOP ALL APPLICATIONS MANUALLY
*********************************************************************

Have applications been stopped? [y/n]: y
Applying changes
DELETE 1
Node left the swarm.
Server configuration file loaded: /usr/local/cisco/dcm/fm//conf/server.properties
log4j:WARN No appenders could be found for logger (fms.db).
log4j:WARN Please initialize the log4j system properly.
log4j:WARN See http://logging.apache.org/log4j/1.2/faq.html#noconfig for more info.
UPDATE 1
UPDATE 1
DELETE 1
afwnetplugin:0.1
server signaled
**********************************************************************
Please run 'appmgr start afw; appmgr start all' to restart your nodes.
**********************************************************************
*********************************************************************
Please run 'appmgr update ssh-peer-trust' on the peer node.
*********************************************************************
[root@dcnm2 ~]#


Step 7

[root@dcnm1 ~]# appmgr start afw; appmgr start all
Started AFW Server Processes
Started AFW Agent Processes
Started AFW Server Processes
Started AFW Agent Processes
Started applications managed by heartbeat..
Check the status using 'appmgr status all'
Starting High-Availability services: INFO:  Resource is stopped
Done.
Warning: PID file not written; -detached was passed.
AMQP User Check
Started AFW Server Processes
Started AFW Agent Processes
[root@dcnm1 ~]#

Waiting for dcnm1 to become active again.


[root@dcnm2 ~]# appmgr start afw; appmgr start all
Started AFW Server Processes
Started AFW Agent Processes
Started AFW Server Processes
Started AFW Agent Processes
Started applications managed by heartbeat..
Check the status using 'appmgr status all'
Starting High-Availability services: INFO:  Resource is stopped
Done.
Warning: PID file not written; -detached was passed.
AMQP User Check
Started AFW Server Processes
Started AFW Agent Processes
[root@dcnm2 ~]#


[root@dcnm1 ~]# appmgr update ssh-peer-trust
/usr/bin/ssh-copy-id: INFO: Source of key(s) to be installed: "/root/.ssh/id_rsa.pub"

Number of key(s) added: 1

Now try logging into the machine, with:   "ssh -o 'StrictHostKeyChecking=no' '172.28.10.245'"
and check to make sure that only the key(s) you wanted were added.

/usr/bin/ssh-copy-id: INFO: Source of key(s) to be installed: "/root/.ssh/id_rsa.pub"

Number of key(s) added: 1

Now try logging into the machine, with:   "ssh -o 'StrictHostKeyChecking=no' '100.0.0.245'"
and check to make sure that only the key(s) you wanted were added.

/usr/bin/ssh-copy-id: INFO: Source of key(s) to be installed: "/root/.ssh/id_rsa.pub"

Number of key(s) added: 1

Now try logging into the machine, with:   "ssh -o 'StrictHostKeyChecking=no' 'dcnm2.cisco.com'"
and check to make sure that only the key(s) you wanted were added.

[root@dcnm1 ~]#


[root@dcnm2 ~]# appmgr update ssh-peer-trust
/usr/bin/ssh-copy-id: INFO: Source of key(s) to be installed: "/root/.ssh/id_rsa.pub"

Number of key(s) added: 1

Now try logging into the machine, with:   "ssh -o 'StrictHostKeyChecking=no' '172.28.10.244'"
and check to make sure that only the key(s) you wanted were added.

/usr/bin/ssh-copy-id: INFO: Source of key(s) to be installed: "/root/.ssh/id_rsa.pub"

Number of key(s) added: 1

Now try logging into the machine, with:   "ssh -o 'StrictHostKeyChecking=no' '100.0.0.244'"
and check to make sure that only the key(s) you wanted were added.

/usr/bin/ssh-copy-id: INFO: Source of key(s) to be installed: "/root/.ssh/id_rsa.pub"

Number of key(s) added: 1

Now try logging into the machine, with:   "ssh -o 'StrictHostKeyChecking=no' 'dcnm1.cisco.com'"
and check to make sure that only the key(s) you wanted were added.

[root@dcnm2 ~]#
スタンドアロン セットアップで DCNM サーバ パスワードを変更する
The password to access Cisco DCNM Web UI にアクセスするためのパスワードは、展開タイプの Cisco DCNM をインストールする間に設定されます。ただし、必要に応じてインストール後にこのパスワードを変更できます。
インストール後にパスワードを変更するには、次の手順を実行します。
Procedure
|
Step 1 |
appmgr stop all コマンドを使用して、アプリケーションを停止します。 すべてのアプリケーションが稼働を停止するまで待ちます。 |
|
Step 2 |
appmgr change_pwd ssh {root|poap|sysadmin} [password コマンドを使用して、管理インターフェイスのパスワードを変更します。 新しいパスワードが次のパスワード要件に準拠していることを確認します。要件に従わない場合、DCNM アプリケーションは適切に機能しない場合があります。
|
|
Step 3 |
appmgr start all コマンドを使用して、アプリケーションを起動します。 |
Example
dcnm# appmgr stop all

dcnm# appmgr change_pwd ssh root <<new-password>>
dcnm# appmgr change_pwd ssh poap <<new-password>>
dcnm# appmgr change_pwd ssh sysadmin <<new-password>>

dcnm# appmgr start all
ネイティブ HA セットアップでの DCNM サーバー パスワードの変更
The password to access Cisco DCNM Web UI にアクセスするためのパスワードは、展開タイプの Cisco DCNM をインストールする間に設定されます。ただし、必要に応じてインストール後にこのパスワードを変更できます。
インストール後にパスワードを変更するには、次の手順を実行します。
Procedure
|
Step 1 |
appmgr stop all コマンドを使用して、スタンバイ アプライアンスですべてのアプリケーションを停止します。 appmgr status all コマンドを使用して、すべてのアプリケーションが停止していることを確認します。 |
||
|
Step 2 |
appmgr stop all コマンドを使用して、アクティブ アプライアンスですべてのアプリケーションを停止します。 appmgr status all コマンドを使用して、すべてのアプリケーションが停止していることを確認します。 |
||
|
Step 3 |
アクティブ モードとスタンバイ ノードの両方で、appmgr change_pwd ssh {root|poap|sysadmin} [password コマンドを使用して、管理インターフェイスのパスワードを変更します。
新しいパスワードが次のパスワード要件に準拠していることを確認します。要件に従わない場合、DCNM アプリケーションは適切に機能しない場合があります。
|
||
|
Step 4 |
appmgr start all コマンドを使用して、アクティブ アプライアンスでアプリケーションを停止します。 appmgr status all コマンドを使用して、すべてのアプリケーションが起動していることを確認します。 |
||
|
Step 5 |
appmgr start all コマンドを使用して、スタンバイ アプライアンスでアプリケーションを開始します。 appmgr status all コマンドを使用して、すべてのアプリケーションが起動していることを確認します。 |
Example
アクティブおよびスタンバイを dcnm1 および dcnm2 として個別に考慮します。
dcnm1# appmgr stop all
dcnm2# appmgr stop all

dcnm1# appmgr change_pwd ssh root <<new-password>>
dcnm1# appmgr change_pwd ssh poap <<new-password>>
dcnm1# appmgr change_pwd ssh sysadmin <<new-password>>

dcnm2# appmgr change_pwd ssh root <<new-password>>
dcnm2# appmgr change_pwd ssh poap <<new-password>>
dcnm2# appmgr change_pwd ssh sysadmin <<new-password>>

dcnm1# appmgr start all
dcnm2# appmgr start all
スタンドアロン セットアップで DCNM データベース パスワードを変更する
Cisco DCNM スタンドアロン セットアップで Postgres データベースのパスワードを変更するには、次の手順を実行します。
Procedure
|
Step 1 |
appmgr stop all コマンドを使用して、すべてのアプリケーションを停止します。 appmgr status all コマンドを使用してすべてのアプリケーションが停止していることを確認します。 |
|
Step 2 |
appmgr change_pwd db コマンドを使用して Postgres パスワードを変更します。 プロンプトで新しいパスワードを入力します。 |
|
Step 3 |
appmgr start all コマンドを使用して、アプリケーションを起動します。 appmgr status all コマンドを使用して、すべてのアプリケーションが起動していることを確認します。 |
Example
dcnm# appmgr stop all
dcnm# appmgr change_pwd db <<new-password>>
dcnm# appmgr start all
ネイティブ HA セットアップで DCNM データベース パスワードを変更する
Cisco DCNM ネイティブ HA セットアップで Postgres データベースのパスワードを変更するには、次の手順を実行します。
Procedure
|
Step 1 |
appmgr stop all コマンドを使用して、スタンバイ アプライアンスですべてのアプリケーションを停止します。 appmgr status all コマンドを使用して、すべてのアプリケーションが停止していることを確認します。 |
|
Step 2 |
appmgr stop all コマンドを使用して、アクティブ アプライアンスですべてのアプリケーションを停止します。 appmgr status all コマンドを使用して、すべてのアプリケーションが停止していることを確認します。 |
|
Step 3 |
アクティブおよびスタンバイ ノードで appmgr change_pwd db コマンドを使用して、 Postgres パスワードを変更します。 プロンプトで同じパスワードを提供するようにします。 |
|
Step 4 |
appmgr start all コマンドを使用して、アクティブ アプライアンスでアプリケーションを停止します。 appmgr status all コマンドを使用して、すべてのアプリケーションが起動していることを確認します。 |
|
Step 5 |
appmgr start all コマンドを使用して、スタンバイ アプライアンスでアプリケーションを開始します。 appmgr status all コマンドを使用して、すべてのアプリケーションが起動していることを確認します。 |
Example
アクティブおよびスタンバイを dcnm1 および dcnm2 として個別に考慮します。
dcnm1# appmgr stop all
dcnm2# appmgr stop all

dcnm1# appmgr change_pwd db <<new-password>>
dcnm2# appmgr change_pwd db <<new-password>>

dcnm1# appmgr start all
dcnm2# appmgr start all
 フィードバック