はじめに
このドキュメントでは、Nexusインターフェイスカウンタを使用してパケット損失をトラブルシューティングする方法について説明します。
前提条件
要件
次の項目に関する知識が推奨されます。
使用するコンポーネント
| [名前(Name)] |
掌状 |
バージョン |
| N9K1 |
N9K-C93108TC-EX |
9.3(10) |
| N9K2 |
N9K-C93108TC-EX |
9.3(10) |
| N9K3 |
N9K-C93108TC-EX |
9.3(10) |
このドキュメントの情報は、特定のラボ環境にあるデバイスに基づいて作成されました。このドキュメントで使用するすべてのデバイスは、クリアな(デフォルト)設定で作業を開始しています。本稼働中のネットワークでは、各コマンドによって起こる可能性がある影響を十分確認してください。
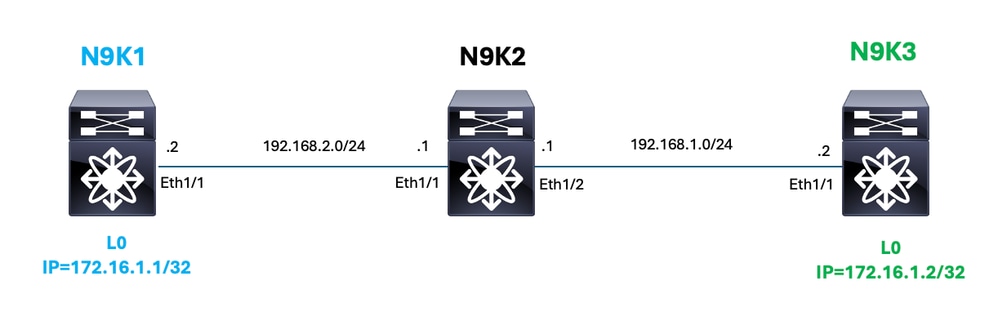
トポロジ
背景
特定の環境では、ELAMやSPANなどの従来のパケットキャプチャ方法は、ネットワーク問題を診断するための実行可能なオプションではありません。ただし、Nexusインターフェイスのパケットカウンタは、パケットドロップのトラブルシューティングに役立つ代替手段です。 特定のカウンタのアベイラビリティはネットワーク設定によって異なる可能性があるため、このトラブルシューティング方法は普遍的に適用できるわけではないことに注意してください。
この例では、Nexusインターフェイスカウンタを使用して、N9K1(172.16.1.1)とN9K3(172.16.1.2)のループバックインターフェイス間の接続の問題をトラブルシューティングする方法を示します。
インターフェイスの識別
このコマンド例でインターフェイスを識別するには、デバイスごとに入力および出力インターフェイスを識別する必要があります。show ip routeを使用します。
N9K1のルート
N9K1# sh ip route 172.16.1.2
<Snipped>
172.16.1.2/32, ubest/mbest: 1/0
   *via 192.168.2.1, Eth1/1, [1/0], static
Nexus N9K1の場合は、インターフェイスEth1/1が使用されます。
N9K2のルート
N9K2# sh ip route 172.16.1.1
<Snipped>
172.16.1.1/32, ubest/mbest: 1/0 time
   *via 192.168.2.2, Eth1/1, [1/0], static

N9K2# sh ip route 172.16.1.2
<Snipped>
172.16.1.2/32, ubest/mbest: 1/0 time
   *via 192.168.1.2, Eth1/2, [1/0], static
Nexus N9K1の場合、インターフェイスEth1/1およびEth1/2が使用されます。
N9K3のルート
N9K3# sh ip route 172.16.1.1
<Snipped>
172.16.1.1/32, ubest/mbest: 1/0 time
   *via 192.168.1.1, Eth1/1, [1/0], static
Nexus N9K1の場合は、インターフェイスEth1/1が使用されます。
パケットサイズの識別
インターフェイスカウンタを使用してパケットドロップのトラブルシューティングを行うには、増加していないカウンタを特定する必要があります。
次の例では、コマンドsh interface e1/1 counter detailedが2回実行されましたが、RXおよびTXに対してカウンタPackets from 512 to 1023 bytesが増加しなかったことがわかりました。
このプロセスは、送信元と宛先の間にあるすべての関連デバイスで実行する必要があります。
N9K1# sh interface e1/1 counters detailed
Ethernet1/1
 Rx Packets: 31774
 Rx Unicast Packets: 8419
 Rx Multicast Packets: 23784
 Rx Broadcast Packets: 3
 Rx Bytes: 8115383
 Rx Packets from 0 to 64 bytes: 322
 Rx Packets from 65 to 127 bytes: 22822
 Rx Packets from 128 to 255 bytes: 3393
 Rx Packets from 256 to 511 bytes: 1652
 Rx Packets from 512 to 1023 bytes: 63
 Rx Packets from 1024 to 1518 bytes: 3522
 Tx Packets: 26430
 Tx Unicast Packets: 7351
 Tx Multicast Packets: 19509
 Tx Broadcast Packets: 2
 Tx Bytes: 5114894
 Tx Packets from 0 to 64 bytes: 90
 Tx Packets from 65 to 127 bytes: 20724
 Tx Packets from 128 to 255 bytes: 2243
 Tx Packets from 256 to 511 bytes: 1642
 Tx Packets from 512 to 1023 bytes: 10
 Tx Packets from 1024 to 1518 bytes: 1766

N9K1# sh interface e1/1 counters detailed
Ethernet1/1
 Rx Packets: 31821
 Rx Unicast Packets: 8437
 Rx Multicast Packets: 23817
 Rx Broadcast Packets: 3
 Rx Bytes: 8125733
 Rx Packets from 0 to 64 bytes: 329
 Rx Packets from 65 to 127 bytes: 22878
 Rx Packets from 128 to 255 bytes: 3468
 Rx Packets from 256 to 511 bytes: 1670
 Rx Packets from 512 to 1023 bytes: 63
 Rx Packets from 1024 to 1518 bytes: 3544
 Tx Packets: 26467
 Tx Unicast Packets: 7367
 Tx Multicast Packets: 19534
 Tx Broadcast Packets: 2
 Tx Bytes: 5121572
 Tx Packets from 0 to 64 bytes: 95
 Tx Packets from 65 to 127 bytes: 20768
 Tx Packets from 128 to 255 bytes: 2290
 Tx Packets from 256 to 511 bytes: 1657
 Tx Packets from 512 to 1023 bytes: 10
 Tx Packets from 1024 to 1518 bytes: 1798

注意:実稼働環境では、どのカウンタが増えていないのかを特定するために、インターフェイスカウンタをクリアできます。MTUが最大に設定されているインターフェイスの場合は、1518より大きいカウンタが表示されます。特定のサイズのパケットがNexusを通過しない場合、カウンタは表示されません。
テストの実行
このテストでは、制御された環境が使用されているため、すべてのデバイスで1024 ~ 1518のカウンタパケットが使用されます。すべてのインターフェイスのカウンタは、テストの前にクリアされます。
N9K1# clear counters interface e1/1
N9K2# clear counters interface e1/1-2
N9K3# clear counters interface e1/1
すべてのnexusで次のコマンドを実行して、目的のパケットサイズのトラフィックがnexusを通過していないことを確認できます。トラフィックが何も表示されないことが想定されます。
N9K1# sh int e1/1 cou detailed | i i " 1024 to 1518"
N9K2# sh int e1/1-2 cou detailed | i i " 1024 to 1518"
N9K3# sh int e1/1 cou detailed | i i " 1024 to 1518"
すべてのカウンタがクリアされたため、DF-BITを設定した1024 ~ 1518の範囲のパケットサイズを指定して、pingを生成できます(IPアドレスを使用)。
N9K1# ping 172.16.1.2 source 172.16.1.1  packet-size 1050 df-bit
PING 172.16.1.2(172.16.1.2) from 172.16.1.1: 1050 data bytes
1058 bytes from 172.16.1.2: icmp_seq=0 ttl=254 time=1.102 ms
1058 bytes from 172.16.1.2: icmp_seq=1 ttl=254 time=0.668 ms
1058 bytes from 172.16.1.2: icmp_seq=2 ttl=254 time=0.644 ms
1058 bytes from 172.16.1.2: icmp_seq=3 ttl=254 time=0.626 ms
1058 bytes from 172.16.1.2: icmp_seq=4 ttl=254 time=0.631 ms

--- 172.16.1.2 ping statistics ---
5 packets transmitted, 5 packets received, 0.00% packet loss
round-trip min/avg/max = 0.626/0.734/1.102 ms
ICMP要求の確認
次の例では、N9K1からN9K3へのICMP要求に関連するデバイスのTX/RX方向でカウンタがどのように増加しているかを観察できます。
| N9K1 |
N9K2 |
N9K3 |
N9K1# sh int e1/1 cou detailed | i i " 1024 to 1518"
  Rx Packets from 1024 to 1518 bytes: 0
  Tx Packets from 1024 to 1518 bytes: 5
|
N9K2# sh int e1/1 cou detailed | i i " 1024 to 1518"
  Rx Packets from 1024 to 1518 bytes: 5
  Tx Packets from 1024 to 1518 bytes: 0
N9K2# sh int e1/2 cou detailed | i i " 1024 to 1518"
  Rx Packets from 1024 to 1518 bytes: 0
  Tx Packets from 1024 to 1518 bytes: 5
|
N9K3# sh int e1/1 cou detailed | i i " 1024 to 1518"
  Rx Packets from 1024 to 1518 bytes: 5
  Tx Packets from 1024 to 1518 bytes: 0
|
| N9K1がインターフェイスe1/1に5パケットを送信したことがわかります |
N9K2はインターフェイスe1/1で5個のパケットを受信し、インターフェイスe1/2で5個のパケットを送信したことがわかります |
N9K3がインターフェイスe1/1で5個のパケットを受信したことがわかります |
ICMP応答の確認
ICMP要求パッチが検証されたら、ICMP応答の確認に進むことができます。
次の例では、N9K3からN9K1へのICMP応答に関連するデバイスで、カウンタがTX/RX方向にどのように増加するかを確認できます
| N9K1 |
N9K2 |
N9K3 |
N9K1# sh int e1/1 cou detailed | i i " 1024 to 1518"
  Rx Packets from 1024 to 1518 bytes: 5
  Tx Packets from 1024 to 1518 bytes: 5
|
N9K2# sh int e1/1 cou detailed | i i " 1024 to 1518"
  Rx Packets from 1024 to 1518 bytes: 5
  Tx Packets from 1024 to 1518 bytes: 5
N9K2# sh int e1/2 cou detailed | i i " 1024 to 1518"
  Rx Packets from 1024 to 1518 bytes: 5
  Tx Packets from 1024 to 1518 bytes: 5
|
N9K3# sh int e1/1 cou detailed | i i " 1024 to 1518"
  Rx Packets from 1024 to 1518 bytes: 5

  Tx Packets from 1024 to 1518 bytes: 5
|
| N9K1がインターフェイスe1/1で5パケットを受信していることがわかります |
N9K2はインターフェイスe1/1で5パケットを送信し、インターフェイスe1/2で5パケットを受信したことがわかります |
N9K3がインターフェイスe1/1に5パケットを送信したことがわかります |
このテストでは、トラフィックが3つのスイッチ間を正しく流れたことを確認できます。いずれかのNexusのカウンタに不一致がある場合は、トラフィックがドロップされる可能性のあるRXまたはTX。
 フィードバック