Microsoft Intuneを使用したCisco Secure Endpoint Secure Clientの展開

内容
はじめに
このドキュメントでは、Microsoft Intuneを使用してCisco Secure EndpointまたはSecure Clientを導入するプロセスの概要を説明します。
背景
このドキュメントでは、Secure Endpoint/Secure ClientインストーラーからMicrosoft Intuneでサポートされるアプリを作成し、Microsoft Intune管理センターを使用して展開するために使用する手順について説明します。具体的には、Intune Win32コンテンツ準備ツールを使用してCisco Secure EndpointインストーラーをWin32アプリケーションとしてパッケージ化し、Intuneを使用してアプリケーションを構成および展開します。
コンフィギュレーション
セキュアなエンドポイントの導入
ステップ 1:Cisco Secure Endpoint Installerのダウンロード
-
地域に応じて、該当するSecure Endpoint Portalにログインします。
2. Managementタブに移動し、Download Connectorを選択します。
3. コネクタを登録するセキュアエンドポイントグループを選択します。
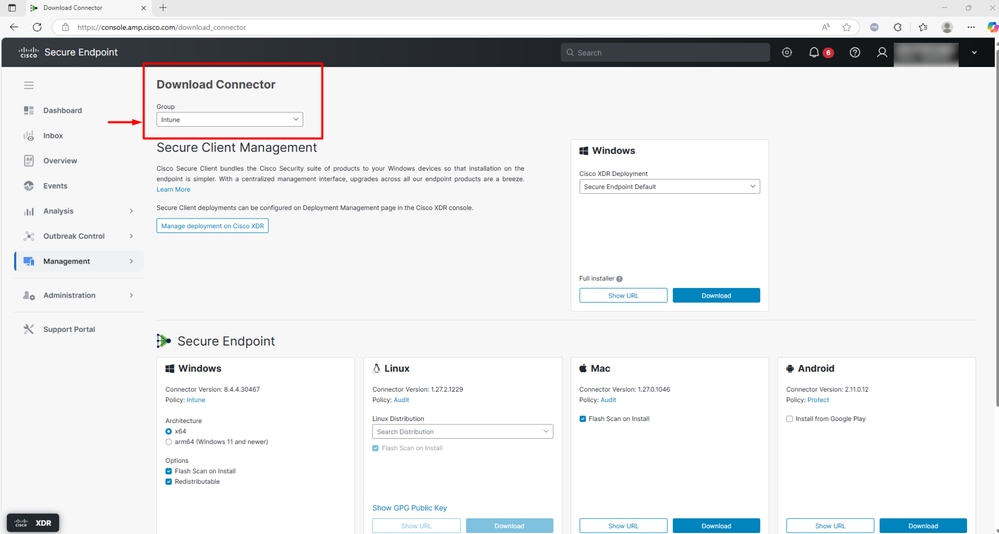
4. downloadを選択すると、EXEインストーラがローカルにダウンロードされます。
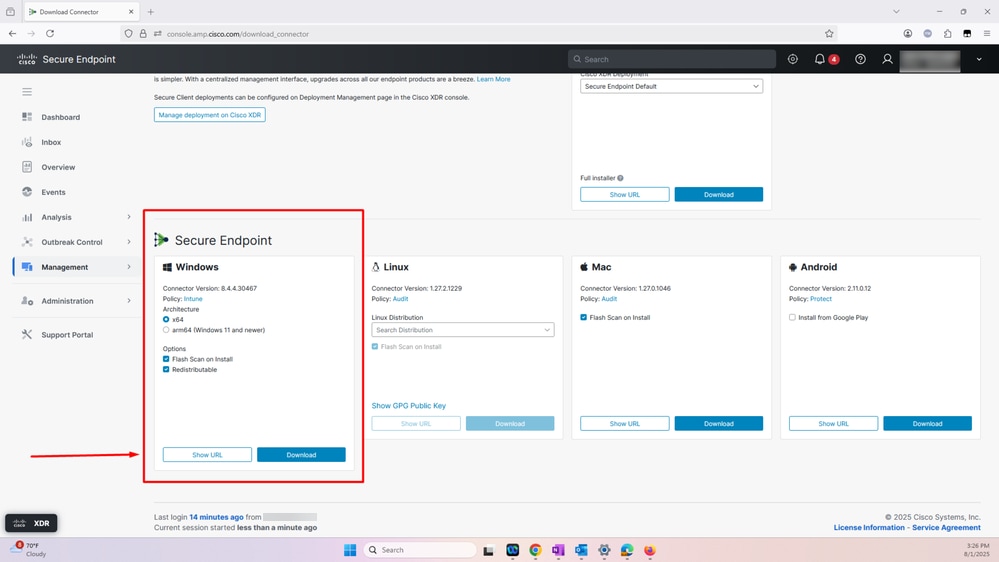
ステップ 2Win32コンテンツ準備ツールを使用してIntuneファイルを準備する
Win32コンテンツ準備ツールはMicrosoft Intuneによって提供されるユーティリティで、IT管理者が(従来のWindowsデスクトップアプリ用の)Win32アプリケーションをMicrosoft Intuneを介して展開できるように準備するのに役立ちます。このツールは、Win32アプリケーションインストーラー(.exe、.msi、関連ファイルなど)を.intunewinファイル形式に変換します。このファイル形式は、Intuneを介してこれらのアプリを展開するために必要です。
Intuneファイルを準備するには:
- GithubからWin32 Content Prep Toolをダウンロードしてください。
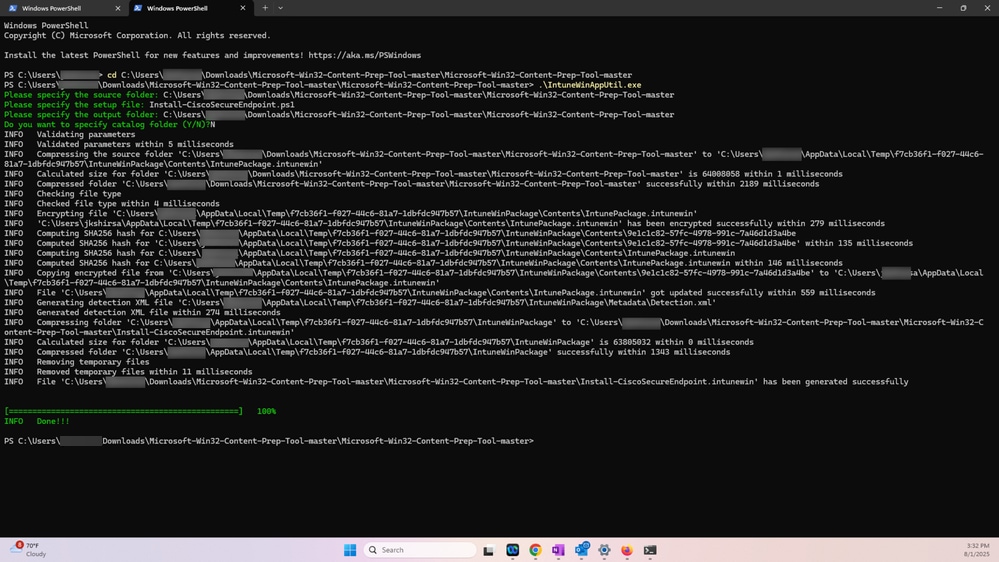
2. IntuneWinAppUtil.exeを実行します。
3. 次の手順で、ディレクトリを、手順1でダウンロードしたCisco Secure Endpoint実行可能ファイルとinstall powershellスクリプト(Install-CiscoSecureEndpoint.ps1)が含まれているフォルダに変更します。
4. セットアップファイルのスクリプトファイル名Install-CiscoSecureEndpoint.ps1を指定します。
5. 次の手順で、Intunewinファイルを生成する必要があるフォルダを指定します。
6. カタログの指定を求めるプロンプトが表示されたら、Nと入力します。
7. スクリーンショットに示すように、Intunewinファイルが生成されます。
ステップ 3 Secure Endpoint IntuneWinファイルをMicrosoft Intune管理センターにアップロードする
- Microsoft Intune Admin Centerにログインします。
2. Microsoft Intune管理センターでWindowsアプリに移動し、アプリの種類 – Win32を選択して、スクリーンショットに示されている2つのアクションを選択します。
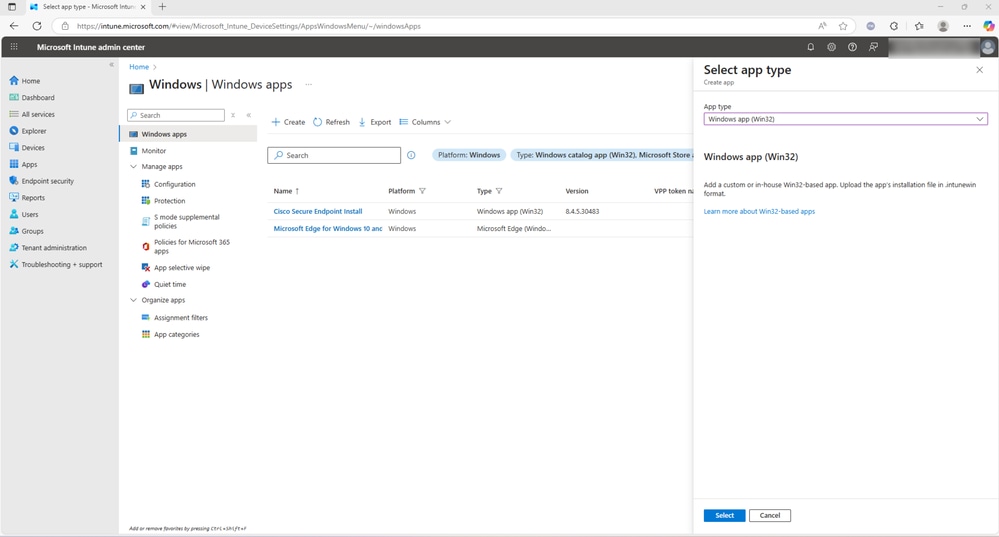
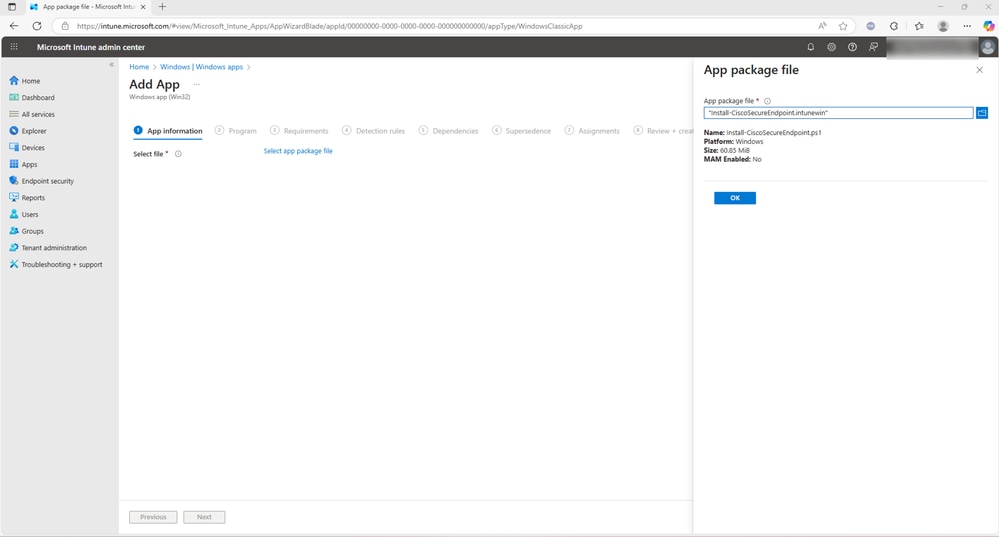
3. 次のステップで、ステップ2で作成したセキュアエンドポイントイントゥーンウィンのファイルをアップロードし、OKを選択します。
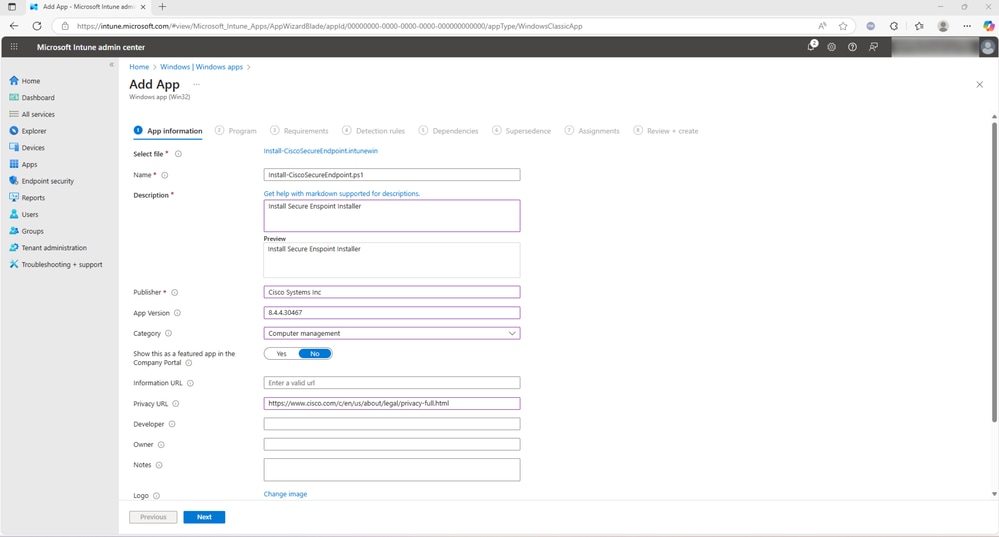
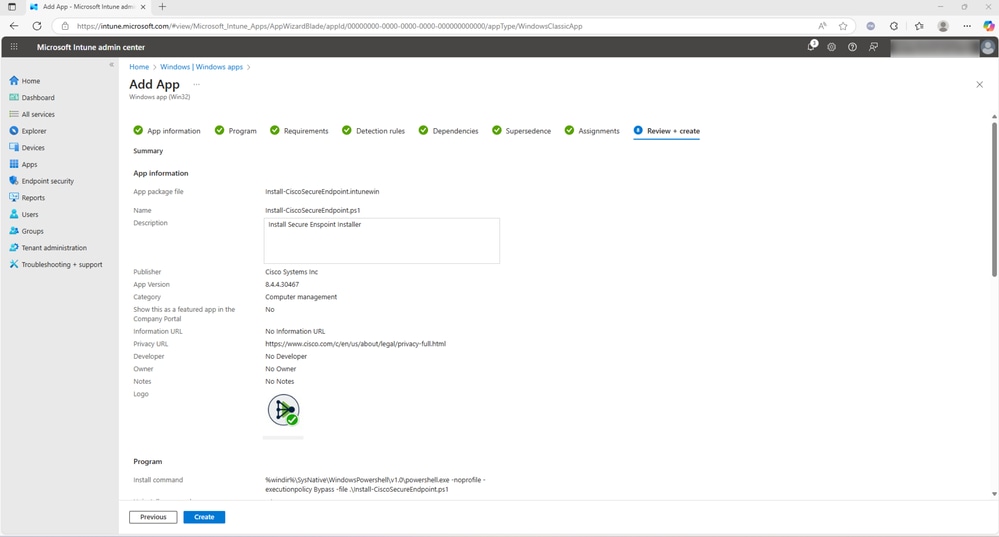
4. 「OK」を選択した後、スクリーンショットに示されている情報を入力します。各タブのオプションフィールドは空白のままにして、Nextをクリックします。
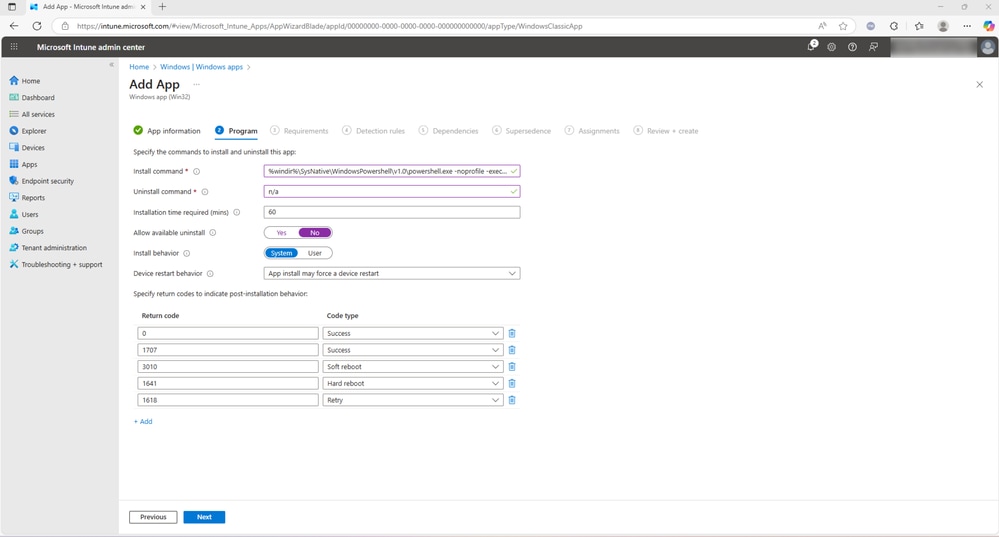
5. installコマンドを実行します。
%windir%\SysNative\WindowsPowershell\v1.0\powershell.exe -noprofile -executionpolicy Bypass -file .\Install-CiscoSecureEndpoint.ps1
注:示されているコードは例であり、任意のコードをこのインストーラのインストールコマンドとして使用できます。
6. 「Uninstall」に「n/a」と入力し、インストール時間を「60」に入力します(オプション)。 Allow available uninstallをNoに設定し、Install behavior as Systemを選択します。Nextを選択する前に、オプションの詳細情報を追加します。
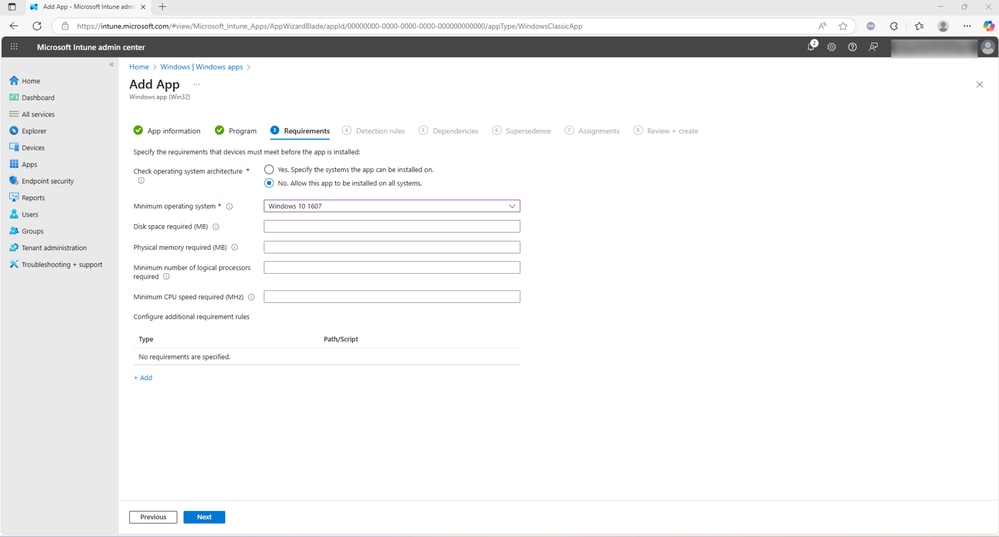
7. 「要件」タブで、「いいえ」をチェックします。このアプリをすべてのシステムにインストールすることを許可し、最小限のオペレーティングシステムを選択します。必要に応じてオプションフィールドに入力し、Nextを選択します。
8. 「検出規則」タブでは、「規則の形式」ドロップダウンメニューに2つのオプションが表示されます。「検出規則を手動で構成する」および「カスタム検出スクリプトを使用する」。どちらのオプションも、導入要件に基づいて選択できます。
9. [検出規則を手動で構成する]を選択すると、MSI、ファイル、またはレジストリなどの規則の種類を定義して、アプリケーションの存在を検出できます。このドキュメントでは、代替オプションのカスタム検出スクリプトを使用するが選択されています。
10. Confirm-CSEInstall.ps1という名前のPowerShellスクリプトは、Cisco Secure Endpointが正常にインストールされたことを確認するために使用されます(このドキュメントの最後に記載されています)。
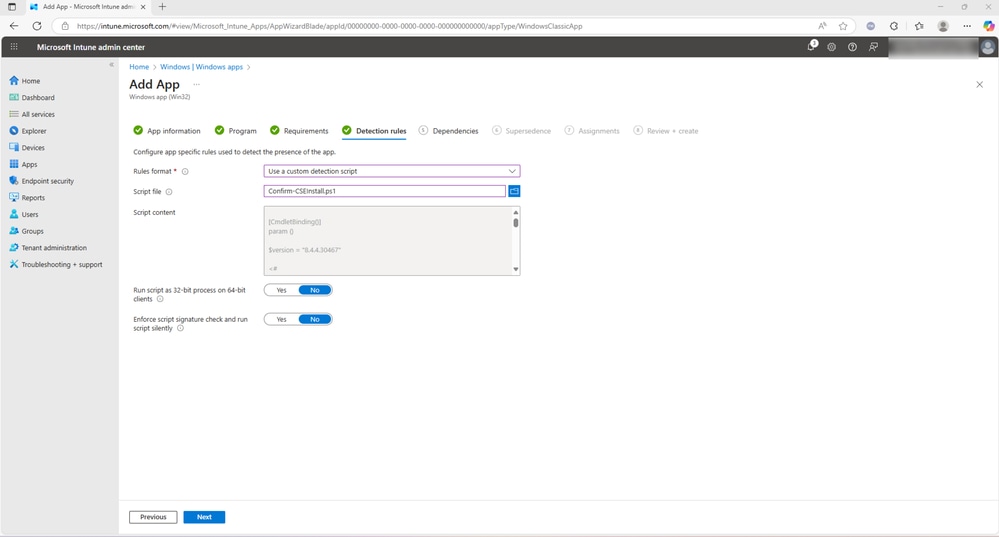
11. Nextを選択して続行します。
注:環境および検出条件に合わせて、この導入プロセス専用のカスタム検出スクリプトを作成できます。
12. (次のいくつかのタブはオプションです)依存関係を構成する必要はありません。必要なグループにアプリケーションを割り当て、「レビュー+作成」を選択します。
セキュアなクライアント展開
ステップ 1:Cisco Secure Client完全導入のダウンロード
- 地域に応じて、XDRまたはSecure Client Cloud Managementコンソールにログインします。
2. 新しい展開を作成し、展開の種類に応じてFull InstallerまたはNetwork Installerを選択します。
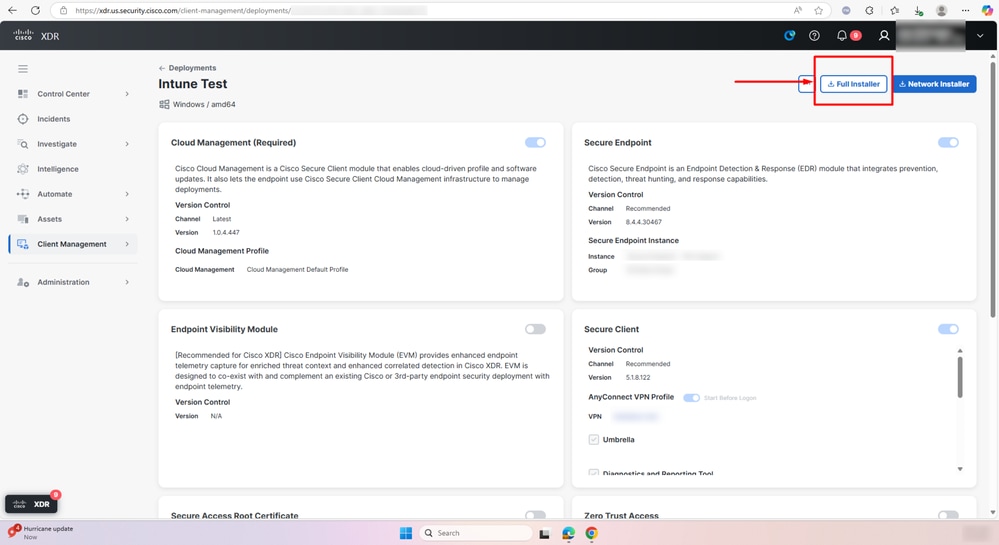
3. スクリーンショットに示すように、csc-deploy-full-Intune Test.exeがダウンロードされます。
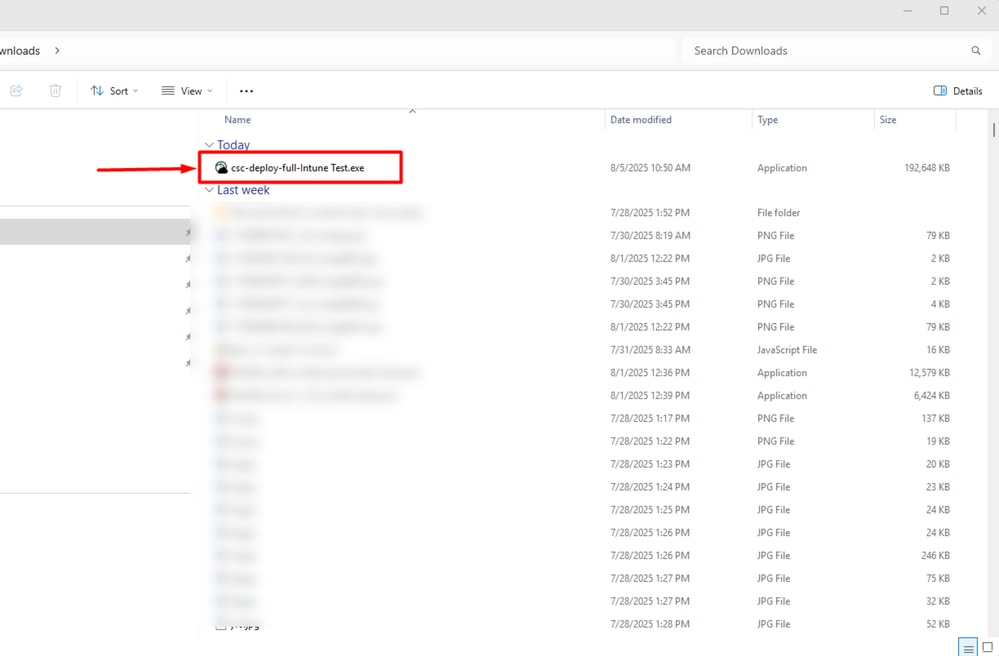
手順2: Intuneファイルを準備します。手順は手順2.と同じです。これにより、csc-deploy-full-Intune Test.intunewinファイルが作成されます
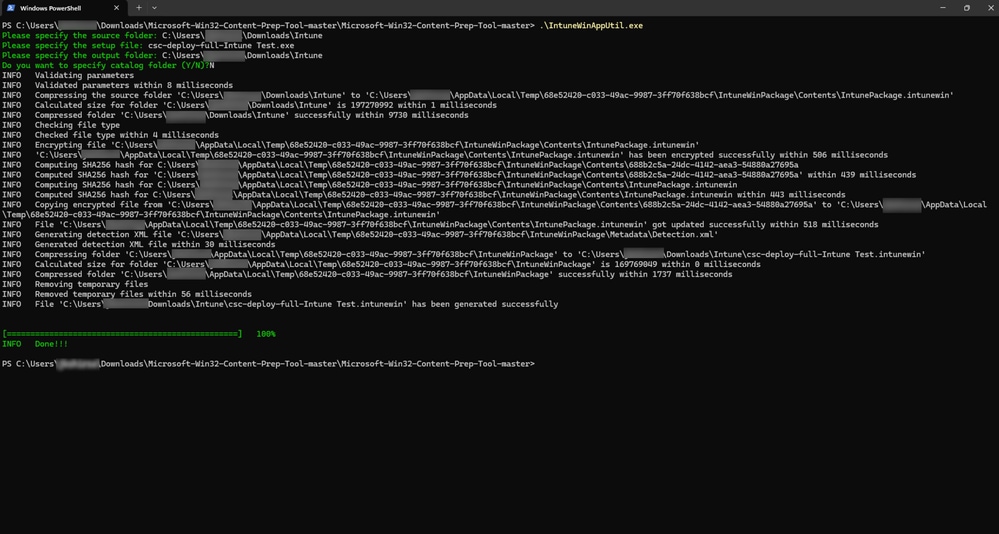
- 前のスクリーンショットの手順では、csc-deploy-full-Intune Test.intunewinファイルが作成されます。
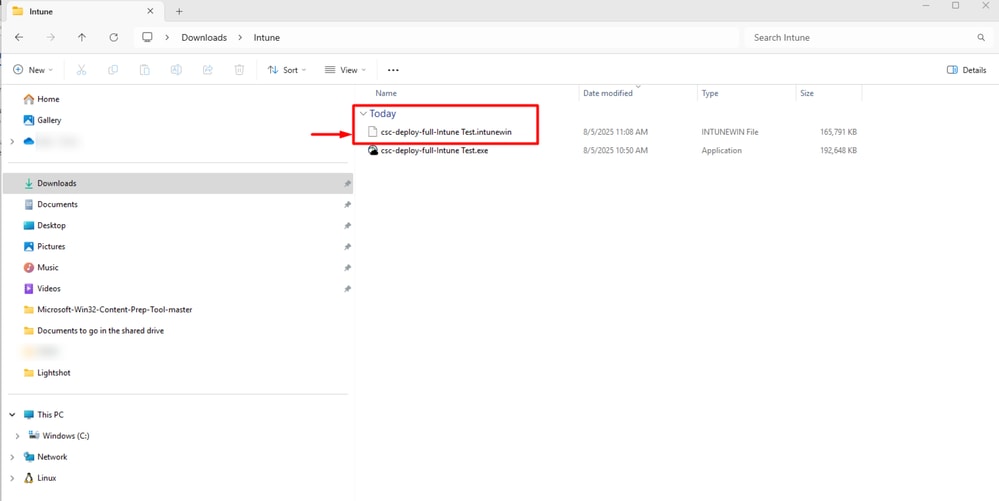
ステップ 3 Stept 1からMicrosoft Intune管理センターにcsc-deploy-full-intune Test.intunewinファイルをアップロードします
これで、Intuneを使用してCisco Secure Endpointを展開するプロセスが完了しました。

注意:このインストールスクリプトは、Intuneコンバーターを使用しているインストーラーと、このガイドの手順3で説明したコマンドラインで参照されているPSスクリプトの正確な名前と組み合わせて、次の場所にあるIntuneに配置する必要があります:
Add App > Program > Install Commandの順に選択します。
注:次のセクションのスクリプトは、このガイドを作成するためにラボ環境で使用されるデモンストレーションの作業サンプルです。適切なテストの後にそのまま使用することも、必要に応じて変更することもできます。
Install-CiscoSecureEndpoint.ps1スクリプト
[CmdletBinding()]
param ()

$cse_exe =
$version =

if ($PSCommandPath -eq $null) {
    function GetPSCommandPath() {
        return $MyInvocation.PSCommandPath;
    }
    $PSCommandPath = GetPSCommandPath
}

$script = [pscustomobject]@{
    "Path" = Split-Path $PSCommandPath -Parent
    "Name" = Split-Path $PSCommandPath -Leaf
}

Set-Location -Path $script.Path

$cse_installer = [IO.Path]::Combine($script.Path, $cse_exe)
$csc_installer_args = "/R /S"

<#
    Cannot use -wait for 'Cisco Secure Endpoint' and therefore cannot get the exit code to return.
    Using -wait, returns varied results, instead use Get-Process and while loop to wait for installation to complete.
#>
$install = Start-Process -WorkingDirectory "$($script.Path)" -FilePath "${cse_installer}" -ArgumentList "${csc_installer_args}" -PassThru -NoNewWindow

while (Get-Process "$($cse_exe -replace '.exe', '')" -ErrorAction SilentlyContinue)
{
    Start-Sleep -Seconds 10
}
Install-CiscoXDRDeployment.ps1スクリプト
$exeName =
$exePath = Join-Path -Path $PSScriptRoot -ChildPath $exeName

if (-not (Test-Path $exePath)) {
    Write-Error "Executable not found: $exePath"
    exit 1
}

# Use silent mode – the most commonly documented switch for Cisco XDR / Secure Client installers
$arguments = "-q"   # or try "--quiet" if -q fails in your specific build

try {
    $process = Start-Process -FilePath $exePath -ArgumentList $arguments -NoNewWindow -Wait -PassThru

    if ($process.ExitCode -eq 0) {
        Write-Output "Cisco XDR installation completed successfully (exit code 0)."
        exit 0
    } else {
        Write-Error "Installation failed with exit code: $($process.ExitCode)"
        exit $process.ExitCode
    }
}
catch {
    Write-Error "Exception during installation: $_"
    exit 1
}
Confirm-CSEInstall.ps1スクリプト

ヒント:オプション: Intune管理ポータルで、手動で構成された検出ルールを使用できます。
[CmdletBinding()]
param ()

$version =

<#
    https://learn.microsoft.com/en-us/intune/intune-service/apps/apps-win32-add#step-4-detection-rules
    The app gets detected when the script both returns a 0 value exit code and writes a string value to STDOUT

    The Intune agent checks the results from the script. It reads the values written by the script to the STDOUT stream,
    the standard error (STDERR) stream, and the exit code. If the script exits with a nonzero value, the script fails and
    the application detection status isn't installed. If the exit code is zero and STDOUT has data, the application
    detection status is installed.
#>

$cse = Get-ItemProperty HKLM:\Software\Microsoft\Windows\CurrentVersion\Uninstall\*, HKLM:\SOFTWARE\Wow6432Node\Microsoft\Windows\CurrentVersion\Uninstall\* -ErrorAction SilentlyContinue | Where-Object { $_ -like "*Immunet Protect*" } | Where-Object { $_.DisplayName -like "*Cisco Secure Endpoint*" }
if ($cse | Where-Object { [System.Version] $_.DisplayVersion -ge [System.Version] "${version}" })
{
    Write-Host "Installed"
    exit 0
}

exit 1 注:上記のスクリプトは情報提供のみを目的としており、Cisco TACではサポートされていません。環境はそれぞれ異なるルールやポリシーによって異なる可能性があり、適切なテストを実施する必要があります。サードパーティの展開ツールのトラブルシューティングはベストエフォートとして扱われ、最初にポータルまたは管理ステーションの両方でIntuneログを確認する必要があります。
更新履歴
| 改定 | 発行日 | コメント |
|---|---|---|
2.0 |
25-Aug-2026
|
タイトル、スペル、文法、読みやすさを考慮したセクションへの水平線の挿入、代替テキストとCCWアラートの更新。 |
1.0 |
12-Aug-2025
|
初版 |
 フィードバック