はじめに
このドキュメントでは、セルラーゲートウェイ(PGW)およびプラガブルインターフェイスモジュール(PIM)のDM Diagnostic Monitor(DM)ログ収集のプロセスについて説明します。
DMログとは
DM:診断モニタ:ログは、RFインターフェイスを介したモデムとネットワークの間のデータトランザクションをキャプチャするために使用され、4Gおよび5Gのデータ接続またはパフォーマンスの問題のトラブルシューティングに役立ちます。
基本的な5Gコールフロー
DMログの収集と分析に進む前に、基本的なコールフローを理解することが重要です。
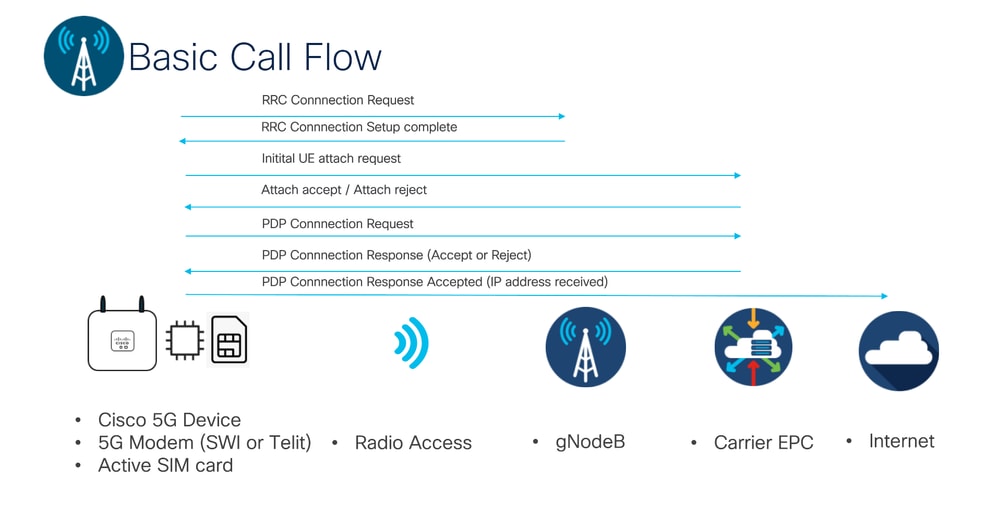 基本的な5Gコールフロー
1. デバイスの初期化とセル検索:
- 5Gデバイスの電源がオンになり、使用可能な5Gセルの検索が開始されます。
- 付近の基地局(gNB)からブロードキャストされる同期信号をスキャンします。
2. 初期アクセス:
- 適切なセルが見つかると、デバイスはgNBのタイミングと周波数との同期を試みます。
- 接続を要求するメッセージ(RRC Connection Request)をgNBに送信します。
3. RRC接続の確立:
- gNBは要求を受信し、デバイスとのRadio Resource Control(RRC)接続を確立します。
- この接続により、デバイスとネットワークの間で安全で信頼性の高い通信が可能になります。
4. 登録:
- デバイスはネットワークで自身を認証します(SIMカード情報を使用)。
- 自身のプレゼンスをネットワークに登録し、サービスへのアクセスを要求します。
5. データ伝送:
- 登録すると、デバイスは5Gネットワークを介してデータを送受信できるようになります。
- これには、音声コール、データトラフィック(ブラウジング、ストリーミング)、またはその他のアプリケーションが含まれます。
6. 接続リリース:
- ユーザがコールを終了するか、ネットワークから切断すると、デバイスはgNBとの接続を解放します。
キー ポイント:
- RRC接続:これは、デバイスとネットワークの間で安全で信頼性の高い通信を可能にする重要な手順です。
- データプレーン:RRC接続が確立されると、デバイスはデータプレーンを使用してデータを送受信できます。
- コントロールプレーン:コントロールプレーンは、接続の確立やリソースの管理などのシグナリングおよび制御機能に使用されます。
セルラーゲートウェイのDMログ収集
まず、DMログを有効にする前にモデムをシャットダウンします。これを行うには、ATコマンドAT+CFUN=0を使用します
CellularGateway# cellular 1 modem-at-commands
Value for '' (<string>): AT+CFUN=0
このコマンドは、数秒でSSHセッションをフリーズし、セルラーゲートウェイに対して別のSSHセッションを開きます。
ATコマンドAT+CFUN?
CellularGateway# cellular 1 modem-at-commands
Value for '' (<string>): AT+CFUN?

cellular_modem_at_cmd: modem-at-response AT+CFUN?
+CFUN: 0
OK
DMログのサイズ、ローテーション、および自動停止の設定
CellularGateway# config terminal
Entering configuration mode terminal
CellularGateway(config)# controller cellular 1
CellularGateway(config-cellular-1)# dm-log rotation
CellularGateway(config-cellular-1)# dm-log max_dm_log_size 60
CellularGateway(config-cellular-1)# dm-log autostop-event MODEM_STATE_DNS_ACQUIRED
CellularGateway(config-cellular-1)# dm-log autostop-timer 2
これらの設定は、ログ収集フローに基づいて調整できます。問題がセルラーパフォーマンスに関連する場合は、オプションでフィルタを適用できます。
DMログの有効化
CellularGateway(config-cellular-1)# dm-log enable
CellularGateway(config-cellular-1)# commit
AT+CFUN=1 ATコマンドを使用してモデムを有効にします。
CellularGateway# cellular 1 modem-at-commands
Value for '' (<string>): AT+CFUN=1

cellular_modem_at_cmd: modem-at-response AT+CFUN=1
OK

CellularGateway#
CellularGateway# cellular 1 modem-at-commands
Value for '' (<string>): AT+CFUN?

cellular_modem_at_cmd: modem-at-response AT+CFUN?
+CFUN: 1
OK
作成されたファイルを確認します。
CellularGateway# gw-action:request file list
-rw-r--r-- 97272745 Dec 11 09:05 dmlog-slot0-20241211-090453.tar.gz
-rw-r--r-- 10550241 Dec 25 10:58 dmlog-slot0-20241225-105827.tar.gz
drwx------ 16384 Sep 27 18:29 lost+found
drwxr-xr-x 4096 Dec 25 11:03 storage
drwxr-xr-x 4096 Sep 27 18:29 tmp
これらのファイルは、ネクストホップからコピーを開始することで転送できます。
5GSwitch#copy tftp://192.168.1.1/dmlog-slot0-20241211-090453.tar.gz flash:
Destination filename [dmlog-slot0-20241211-090453.tar.gz]?
Accessing tftp://192.168.1.1/dmlog-slot0-20241211-090453.tar.gz...
Loading dmlog-slot0-20241211-090453.tar.gz from 192.168.1.1 (via GigabitEthernet1/0/3): !!!!!!!!!!!!!!!!!!!!!!!!!!!!!!!!!!!!!!!!!
デバッグ完了後にDMログを無効にする
CellularGateway# config terminal
Entering configuration mode terminal
CellularGateway(config-cellular-1)# no dm-log enable
CellularGateway(config-cellular-1)# commit
PIMモジュールのDMログ収集
まず、セルラーインターフェイスと無線をシャットダウンします。
ISR2#configure terminal
ISR2(config)#interface cellular 0/2/0
ISR2(config-if)#shutdown
ISR2(config-if)#exit
ISR2(config)#controller cellular 0/2/0
ISR2(config-controller)#lte radio off
ローテーション、ファイルサイズ、自動停止、フィルタが必要かどうかなど、DMロギングパラメータを設定します。
ISR2(config)#controller cellular 0/2/0
ISR2(config-controller)#lte modem dm-log rotation
ISR2(config-controller)#lte modem dm-log filesize 20
ISR2(config-controller)#lte modem dm-log autostop timer 20
DMログの有効化
ISR2(config-controller)#lte modem dm-log enable
無線およびセルラーインターフェイスを有効にします。
ISR2(config)#controller cellular 0/2/0
ISR2(config-controller)#no lte radio off
ISR2(config)#interface cellular 0/2/0
ISR2(config-if)#no shutdown
DMログの統計情報とファイルを確認します。
ISR2#show cellular 0/2/0 logs dm-log
Integrated DM logging is on
Output path = bootflash:
Filter Type = MC73xx generic
Filter Name = Telit Default log mask.bin
Maximum log size = 64 MB
Maximum file size = 20 MB
Log rotation = Enabled

ISR2#dir bootflash: | inc dm
24 -rw- 4236574 Jan 3 2025 11:39:33 +00:00 dmlog-slot2-20250103-113930.tar.gz
デバッグが完了したら、DMログを無効にします。
ISR2(config)#controller cellular 0/2/0

ISR2(config-controller)#no lte modem dm-log enable
PIMモジュールでDMロギングを無効にするEEMスクリプトの使用
EEMスクリプトを使用して、特定のログメッセージまたはイベントに基づいてDMロギングを無効にすることができます。最も一般的な使用例は、セルラーインターフェイスまたはトンネルインターフェイスフラップです。
event manager applet Cellular-Capture authorization bypass
event syslog pattern "Syslog Messege Needed to stop logging" maxrun 600
action 100 cli command "enable"
action 101 cli command "terminal length 0"
action 102 cli command "term exec prompt timestamp"
action 103 cli command "show cellular 0/2/0 all | append flash:Out_info"
action 104 cli command "show controller cellular 0/2/0 | append flash:Out_info"
action 105 cli command "show dialer | append flash:Out_info"
action 106 cli command "show int cellular 0/2/0 | append flash:Out_info"
action 112 syslog msg "Information loaded"
action"113"wait"180
action 114 cli command "show log | append flash:Out_info"
action 115 cli command "enable"
action 116 cli command "conf t"
action 117 cli command "controller cellular 0 1"
action 118 cli command "no lte modem dm-log enable"
action 119 syslog msg "DM-logs disabled"
action 120 cli command "en
結論
収集したファイルにはデコードが必要なため、DMログの分析にはTACのサポートが必要です。DMログの記録が必要な問題が発生した場合は、TACケースをオープンしてください。
 フィードバック