UCCE SSOのAD FSログインページでのユーザIDの自動入力の設定
ダウンロード オプション
偏向のない言語
この製品のドキュメントセットは、偏向のない言語を使用するように配慮されています。このドキュメントセットでの偏向のない言語とは、年齢、障害、性別、人種的アイデンティティ、民族的アイデンティティ、性的指向、社会経済的地位、およびインターセクショナリティに基づく差別を意味しない言語として定義されています。製品ソフトウェアのユーザインターフェイスにハードコードされている言語、RFP のドキュメントに基づいて使用されている言語、または参照されているサードパーティ製品で使用されている言語によりドキュメントに例外が存在する場合があります。シスコのインクルーシブ ランゲージの取り組みの詳細は、こちらをご覧ください。
翻訳について
シスコは世界中のユーザにそれぞれの言語でサポート コンテンツを提供するために、機械と人による翻訳を組み合わせて、本ドキュメントを翻訳しています。ただし、最高度の機械翻訳であっても、専門家による翻訳のような正確性は確保されません。シスコは、これら翻訳の正確性について法的責任を負いません。原典である英語版(リンクからアクセス可能)もあわせて参照することを推奨します。
概要
このドキュメントでは、Unified Contact Center Enterprise(UCCE)シングルサインオン(SSO)ログインのエンドユーザエクスペリエンスを向上させる方法について説明します。 ユーザがIdentity Provider(IdP)ログインページでログインIDを2回入力する必要がない場合は、この機能を改善できます。
前提条件
要件
次の項目に関する知識があることが推奨されます。
- UCCE SSOログインフローおよびAD FS
- Hyper-Text Transfer Protocol(HTTP)
- ハイパーテキストマークアップ言語(HTML)
- Security Assertion Markup Language 2.0(SAMLv2)
- Open Authorization 2.0(OAutv2)
- Windows PowerShell(PS)に関する知識
- JavaScript(JS)に関する知識
使用するコンポーネント
このドキュメントの情報は、次のソフトウェアとハードウェアのバージョンに基づいています。
- UCCE 11.5(1)以降
- Finesse 11.5(1)以降
- Cisco Unified Intelligence Center(CUIC)11.5(1)以降
- Microsoft Active Directory(AD ):Windows サーバにインストールされている AD
- AD FS 2.0/3.0
- Windows Server 2012 R2
このドキュメントの情報は、特定のラボ環境にあるデバイスに基づいて作成されました。このドキュメントで使用するすべてのデバイスは、初期(デフォルト)設定の状態から起動しています。本稼働中のネットワークでは、各コマンドによって起こる可能性がある影響を十分確認してください。
背景説明
UCCE SSOログインでは、ユーザはログインIDを2回入力する必要があります。最初にUCCEアプリケーションのログインページ(Finesse、CUICなど)、2番目にIdPログインページ(フォーム認証方式を使用する場合)です。 このドキュメントの例では、IdPとしてActive Directoryフェデレーションサービス(AD FS)が使用されています。
UCCEでSSOが有効な場合、ログインIDを入力し、CUIC/Finesseで[Submit/Login]ボタンを押すと、入力したログインIDがcookie cc_usernameに保存され、アイデンティティサーバ(IdS)へのリダイレクトのために保存されます。IdPログインページでこのCookieを使用すると、ログインIDを自動的に入力できます。
ここでは、エンドユーザがFinesseエージェントで、UCCEアプリケーションがFinesseサーバであるHTTP/SAMLフロー図の例を示します。
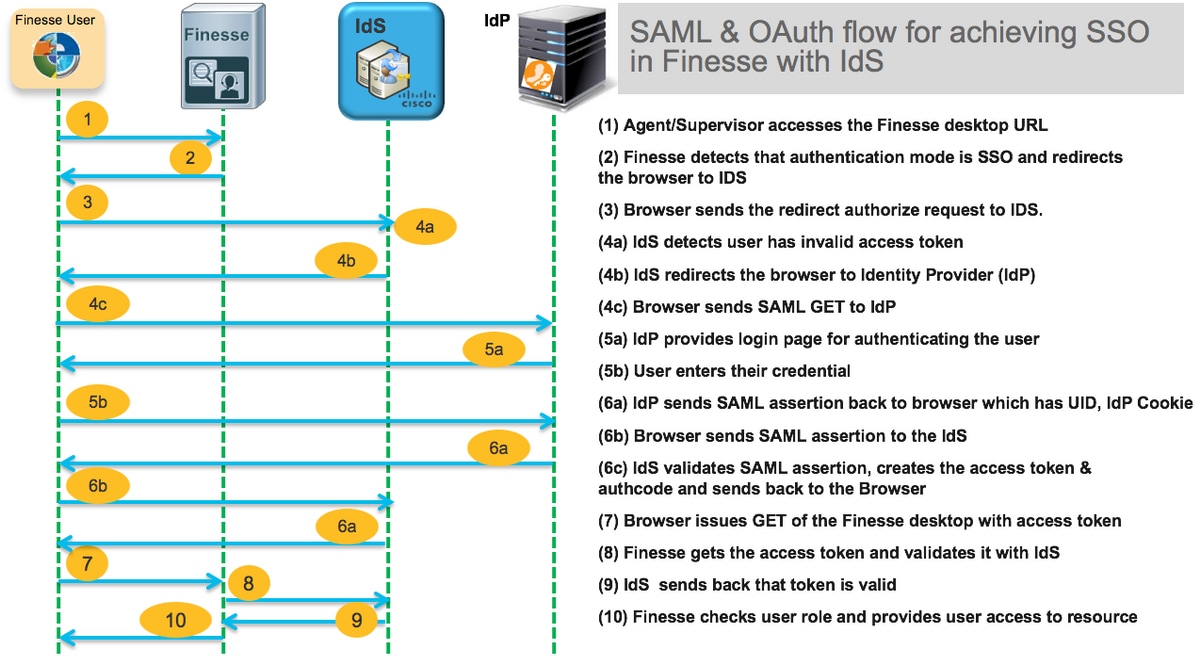
これは、エンドユーザーWebブラウザがAD FS(IdP)に送信するステップ4c HTTP要求ヘッダーの例です。
Request URL: https://dc01.omozol.lab/adfs/ls/?SAMLRequest=tZTBjtowEIbv%2BxSR...
Accept: text/html,application/xhtml+xml,application/xml;q=0.9,image/webp,image/apng,*/*;q=0.8
Accept-Encoding: gzip, deflate, br
Accept-Language: en-US,en;q=0.9
Cache-Control: no-cache
Connection: keep-alive
Cookie: cc_username=agent1%40omozol.lab
Host: dc01.omozol.lab
Pragma: no-cache
Referer: https://fns01p.omozol.lab/desktop/container/landing.jsp?locale=en_US
Upgrade-Insecure-Requests: 1
User-Agent: Mozilla/5.0 (Windows NT 6.3; Win64; x64) AppleWebKit/537.36 (KHTML, like Gecko) Chrome/69.0.3497.100 Safari/537.36
設定
AD FS 3.0をIdPとして使用すると、onload.jsファイルの変更によって設定が行われます。このファイルは、https://<AD FS FQDN>/adfs/ls/への要求に応じてユーザに返されたHTMLページに挿入されます。
ステップ1: onload.jsファイルを変更するには、PowerShellコマンドレットを使用してファイルをファイルシステムにエクスポートします。
PS C:\> Export-AdfsWebTheme -Name default -DirectoryPath c:\temp\adfs\
onload.jsファイルは次のディレクトリに配置されます。
C:\temp\adfs\script
ステップ2:ログイン形式に応じて、適切なJSコードスニペットを、既存のコード構造/ロジックの外のファイル内の任意の場所に追加します。簡単にファイルの末尾に追加します。
既定では、Windows Server 2012 R2のAD FSによってSSOユーザーに表示されるサインインページには、userPrincipleName (UPN)フォームのユーザー名が必要です。これは、電子メールに似た形式です。user@cisco.com。単一ドメインのコンタクトセンターでは、AD FSサインインページを変更して、ユーザー名の一部としてドメイン名を含まない単純なsAMAccountNameUser ID (UID)を許可できます。
AD FSログインページでUPNユーザ名を入力する必要がある場合は、次のコードスニペットを使用します。
// Get cc_username as login ID from HTTP Cookie header
if (document.cookie) {
    // If the position of cc_username in the cookie is the first position, 0...
    if (document.cookie.indexOf('cc_username') == 0) {
        // Split the cookie into an array with the delimitor being '='
        var cookies = document.cookie.split('=');
        // If the first element of the array is cc_username then...
        if (cookies[0] == 'cc_username') {
            // ...the second element will be the actual username and we should save that.
            var cc_login_name = cookies[1];
        }
        // Customize Login page: add domain if needed as AD FS by default require login ID in UPN form
        // If the parsed login is not null, do the following logic
        if (cc_login_name != null) {
            // If %40 (encoded '=') does not exist in the login name...
            if (cc_login_name.indexOf('%40') == -1) {
                // ...then add '@domain.com' to ensure a UPN format is input
                var userNameValue = cc_login_name + '@' + 'domain.com';
                // Populate the UPN into the userNameInput of the page, and put the focus
                // on the password.
                document.getElementById("userNameInput").value = userNameValue;
                document.getElementById("passwordInput").focus();
            } else {
                // Otherwise, if %40 does exist in the username, replace it with the @ sign
                // and populate the UPN into the userNameInput of the page, and put the
                // focus on the password.
                var userNameValue = cc_login_name.replace('%40', '@');
                document.getElementById("userNameInput").value = userNameValue;
                document.getElementById("passwordInput").focus();
            }
        }
    }
}
この行では、UPNがログインUIDとして使用されている場合は、domain.comをUCCEエージェントのドメインと一致するように変更する必要があります。
var userNameValue = cc_login_name + '@' + 'domain.com';
注:AD FSはデフォルトでUPNログインを使用します。sAMAを許可するようにAD FSログインページを設定する方法については、『UCCE機能ガイド』の「シングルサインオン」の章の「Windows Server 2012 R2でAD FSサインインページをカスタマイズしてユーザIDを可能」をするcountNameログイン。
sAMAccountName (ドメインのないUID)ユーザ名をAD FSログインページに入力する必要がある場合は、次のコードスニペットを使用します。
// Get cc_username as login ID from HTTP Cookie header
if (document.cookie) {
    // If the position of cc_username in the cookie is the first position, 0...
    if (document.cookie.indexOf('cc_username') == 0) {
        // Split the cookie into an array with the delimitor being '='
        var cookies = document.cookie.split('=');
        // If the first element of the array is cc_username then...
        if (cookies[0] == 'cc_username') {
            // ...the second element will be the actual username and we should save that.
            var cc_login_name = cookies[1];
        }
        // Customize Login page: remove domain if needed to use login ID in sAMAccount form
        // If the parsed login is not null, do the following logic
        if (cc_login_name != null) {
            // If %40 (encoded '=') DOES exist in the login name...
            if (cc_login_name.indexOf('%40') != -1) {
                // ...then split the login into an array about the @ sign and only keep the username.
                var domainLogin = cc_login_name.replace('%40', '@')
                var noDomainLogin = domainLogin.split('@');
                var userNameValue = noDomainLogin[0];
                // Populate the sAMAccountName into the userNameInput of the page, and put the focus
                // on the password.
                document.getElementById("userNameInput").value = userNameValue;
                document.getElementById("passwordInput").focus();
            } else {
                // Otherwise, if %40 does not exist in the username, there is no "@domain",
                // so populate the sAMAccountName into the userNameInput of the page,
                // and put the focus on the password.
                document.getElementById("userNameInput").value = cc_login_name;
                document.getElementById("passwordInput").focus();
            }
        }
    }
}
注:コード内の//記号はコメントを表します。必要に応じて、これらの行を削除できます。Javascriptの目的は、Javascriptコードを理解できるようにすることです。
ステップ3:次のPowerShellコマンドを使用して、onload.jsを保存し、新しいAD FS Webテーマにリロードします。
デフォルトのテーマのテンプレートを使用して、カスタムAD FSテーマを作成します。
PS C:\> New-AdfsWebTheme -Name custom -SourceName default
カスタムAD FSテーマをアクティブに設定します。
PS C:\> Set-AdfsWebConfig -ActiveThemeName custom
変更したonload.jsファイルをカスタム・テーマにロードします。
PS C:\> Set-AdfsWebTheme -TargetName custom -AdditionalFileResource @{Uri='/adfs/portal/script/onload.js';path="c:\temp\adfs\script\onload.js"}
注:AD FSの再起動は必要ありません。アクティブなテーマは自動的に変更されます。
確認
ここでは、設定が正常に機能しているかどうかを確認します。
sAMAccountNameまたはUPNを持つSSO対応アカウントをログインID(AD FSの設定に依存)としてFinesseまたはCUICにログインし、AD FSログインページでユーザIDが自動的に入力されます。ログインをするには、パスワードをを入力入力します。

トラブルシュート
ここでは、設定のトラブルシューティングに使用できる情報を示します。
問題が発生した場合、WebブラウザのDeveloper Toolsを使用して、onload.jsからの変更が返されたHTMLページに挿入されているかどうかと、Webブラウザのコンソールにエラーが表示されているかどうかを確認します。
関連情報
シスコ エンジニア提供
- Oleksandr MozolCisco TAC Engineer
- Jared CompianoCisco TAC Engineer
 フィードバック
シスコに問い合わせ
- サポート ケースをオープン

- (シスコ サービス契約が必要です。)