Configure Auto-Populating User ID on AD FS Login Page for UCCE SSO
Available Languages
Download Options
Bias-Free Language
The documentation set for this product strives to use bias-free language. For the purposes of this documentation set, bias-free is defined as language that does not imply discrimination based on age, disability, gender, racial identity, ethnic identity, sexual orientation, socioeconomic status, and intersectionality. Exceptions may be present in the documentation due to language that is hardcoded in the user interfaces of the product software, language used based on RFP documentation, or language that is used by a referenced third-party product. Learn more about how Cisco is using Inclusive Language.
Contents
Introduction
This document describes how the end-user experience in Unified Contact Center Enterprise (UCCE) Single Sign-On (SSO) login can be improved. This can be improved, if the the user is not forced to enter its login ID for a second time on the Identity Provider (IdP) login page.
Prerequisites
Requirements
Cisco recommends that you have knowledge of these topics:
- UCCE SSO login-flow and AD FS
- Hyper-Text Transfer Protocol (HTTP)
- Hyper-Text Markup Language (HTML)
- Security Assertion Markup Language 2.0 (SAMLv2)
- Open Authorization 2.0 (OAuthv2)
- Familiarity with Windows PowerShell (PS)
- Familiarity with JavaScript (JS)
Components Used
The information in this document is based on these software and hardware versions:
- UCCE 11.5(1) and above
- Finesse 11.5(1) and above
- Cisco Unified Intelligence Center (CUIC) 11.5(1) and above.
- Microsoft Active Directory (AD) - AD installed on Windows Server
- AD FS 2.0/3.0
- Windows Server 2012 R2
The information in this document was created from the devices in a specific lab environment. All of the devices used in this document started with a cleared (default) configuration. If your network is live, ensure that you understand the potential impact of any command.
Background Information
In a UCCE SSO login, the user must enter their login ID two times: first on the UCCE application login page (Finesse, CUIC, e.g.) and second on the IdP login page (if a Forms Authentication method is used). In the example in this document, Active Directory Federation Service (AD FS) is used as the IdP.
When SSO is enabled in UCCE, after the login ID is entered and the Submit/Login button is pressed on CUIC/Finesse, the entered login ID is stored in cookie cc_username and preserved for the redirects to the Identity Server (IdS) and then to the IdP. It is possible to use this cookie on the IdP login page to automatically populate the login ID.
For review, here is an example HTTP/SAML flow diagram where the end-user is a Finesse agent and the UCCE application is a Finesse server.
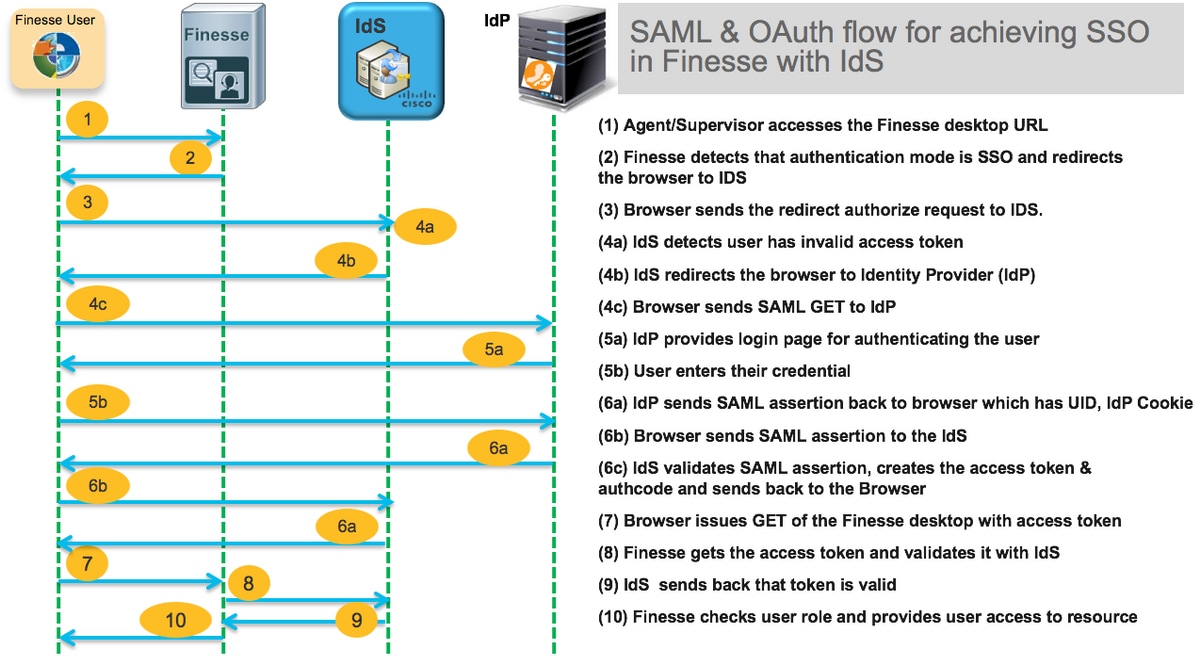
This is an example of the step 4c HTTP request headers sent by the end-user web browser to AD FS (the IdP).
Request URL: https://dc01.omozol.lab/adfs/ls/?SAMLRequest=tZTBjtowEIbv%2BxSR...
Accept: text/html,application/xhtml+xml,application/xml;q=0.9,image/webp,image/apng,*/*;q=0.8
Accept-Encoding: gzip, deflate, br
Accept-Language: en-US,en;q=0.9
Cache-Control: no-cache
Connection: keep-alive
Cookie: cc_username=agent1%40omozol.lab
Host: dc01.omozol.lab
Pragma: no-cache
Referer: https://fns01p.omozol.lab/desktop/container/landing.jsp?locale=en_US
Upgrade-Insecure-Requests: 1
User-Agent: Mozilla/5.0 (Windows NT 6.3; Win64; x64) AppleWebKit/537.36 (KHTML, like Gecko) Chrome/69.0.3497.100 Safari/537.36
Configure
With AD FS 3.0 as the IdP, the configuration is achieved by the modification of the onload.js file, which AD FS injects into the HTML page returned to the user in response to the request to https://<AD FS FQDN>/adfs/ls/.
Step 1. In order to modify the onload.js file, export the file via the PowerShell cmdlet to the filesystem:
PS C:\> Export-AdfsWebTheme –Name default –DirectoryPath c:\temp\adfs\
The onload.js file is placed in this directory:
C:\temp\adfs\script
Step 2. Depending on the login format, add the proper JS code snippet any place in the file outside of already present code structures/logic. For ease, add it to the bottom of the file.
By default, the sign-in page presented to SSO users by AD FS in Windows Server 2012 R2 requires a username that is a userPrincipleName (UPN) form. This is an email-like format, for example, user@cisco.com. In a single domain contact center, the AD FS sign-in page can be modified to allow a simple sAMAccountNameUser ID (UID) that does not include a domain name as part of the user name.
If a UPN username needs to be input on the AD FS login page, use this code snippet:
// Get cc_username as login ID from HTTP Cookie header
if (document.cookie) {
    // If the position of cc_username in the cookie is the first position, 0...
    if (document.cookie.indexOf('cc_username') == 0) {
        // Split the cookie into an array with the delimitor being '='
        var cookies = document.cookie.split('=');
        // If the first element of the array is cc_username then...
        if (cookies[0] == 'cc_username') {
            // ...the second element will be the actual username and we should save that.
            var cc_login_name = cookies[1];
        }
        // Customize Login page: add domain if needed as AD FS by default require login ID in UPN form
        // If the parsed login is not null, do the following logic
        if (cc_login_name != null) {
            // If %40 (encoded '=') does not exist in the login name...
            if (cc_login_name.indexOf('%40') == -1) {
                // ...then add '@domain.com' to ensure a UPN format is input
                var userNameValue = cc_login_name + '@' + 'domain.com';
                // Populate the UPN into the userNameInput of the page, and put the focus
                // on the password.
                document.getElementById("userNameInput").value = userNameValue;
                document.getElementById("passwordInput").focus();
            } else {
                // Otherwise, if %40 does exist in the username, replace it with the @ sign
                // and populate the UPN into the userNameInput of the page, and put the
                // focus on the password.
                var userNameValue = cc_login_name.replace('%40', '@');
                document.getElementById("userNameInput").value = userNameValue;
                document.getElementById("passwordInput").focus();
            }
        }
    }
}
In this line, domain.com must be modified to match the domain of the UCCE agents if a UPN is used as the login UID.
var userNameValue = cc_login_name + '@' + 'domain.com';
Note: AD FS uses a UPN login by default. Refer to the UCCE Feature guide, Single Sign-On chapter, Optionally Customize the AD FS Sign-In Page in Windows Server 2012 R2 to Allow User ID section on how to configure the AD FS login page to allow for sAMAccountName login.
If a sAMAccountName (UID with no domain) username should be input on the AD FS login page, use this code snippet:
// Get cc_username as login ID from HTTP Cookie header
if (document.cookie) {
    // If the position of cc_username in the cookie is the first position, 0...
    if (document.cookie.indexOf('cc_username') == 0) {
        // Split the cookie into an array with the delimitor being '='
        var cookies = document.cookie.split('=');
        // If the first element of the array is cc_username then...
        if (cookies[0] == 'cc_username') {
            // ...the second element will be the actual username and we should save that.
            var cc_login_name = cookies[1];
        }
        // Customize Login page: remove domain if needed to use login ID in sAMAccount form
        // If the parsed login is not null, do the following logic
        if (cc_login_name != null) {
            // If %40 (encoded '=') DOES exist in the login name...
            if (cc_login_name.indexOf('%40') != -1) {
                // ...then split the login into an array about the @ sign and only keep the username.
                var domainLogin = cc_login_name.replace('%40', '@')
                var noDomainLogin = domainLogin.split('@');
                var userNameValue = noDomainLogin[0];
                // Populate the sAMAccountName into the userNameInput of the page, and put the focus
                // on the password.
                document.getElementById("userNameInput").value = userNameValue;
                document.getElementById("passwordInput").focus();
            } else {
                // Otherwise, if %40 does not exist in the username, there is no "@domain",
                // so populate the sAMAccountName into the userNameInput of the page,
                // and put the focus on the password.
                document.getElementById("userNameInput").value = cc_login_name;
                document.getElementById("passwordInput").focus();
            }
        }
    }
}
Note: The // symbols in the code denote comments. Those lines can be removed if desired. Their purpose is to aid in understanding the Javascript code.
Step 3. Save onload.js and reload it onto a new AD FS web theme with these PowerShell commands:
Create a custom AD FS theme with the template from default theme:
PS C:\> New-AdfsWebTheme –Name custom –SourceName default
Set the custom AD FS theme as active:
PS C:\> Set-AdfsWebConfig -ActiveThemeName custom
Load the modified onload.js file to the custom theme:
PS C:\> Set-AdfsWebTheme -TargetName custom -AdditionalFileResource @{Uri=’/adfs/portal/script/onload.js’;path="c:\temp\adfs\script\onload.js"}
Note: No restart of AD FS is needed. The active theme is modified automatically.
Verify
Use this section in order to confirm that your configuration works properly.
Log in to Finesse or CUIC with an SSO-enabled account with sAMAccountName or UPN as login ID (depends on AD FS configuration) and observe that on the AD FS login page the user ID is automatically populated with focus on password prompt field. Only the password needs to be entered for the login to proceed.

Troubleshoot
This section provides information you can use in order to troubleshoot your configuration.
In case of issues, the web browser Developer Tools are used to check if the modifications from the onload.js are injected into the returned HTML page and if any errors are observed in web browser Console.
Related Information
Contributed by Cisco Engineers
- Oleksandr MozolCisco TAC Engineer
- Jared CompianoCisco TAC Engineer
 Feedback
Contact Cisco
- Open a Support Case

- (Requires a Cisco Service Contract)