Risoluzione dei problemi di GuestShell sulle piattaforme Catalyst 9K
Opzioni per il download
Linguaggio senza pregiudizi
La documentazione per questo prodotto è stata redatta cercando di utilizzare un linguaggio senza pregiudizi. Ai fini di questa documentazione, per linguaggio senza di pregiudizi si intende un linguaggio che non implica discriminazioni basate su età, disabilità, genere, identità razziale, identità etnica, orientamento sessuale, status socioeconomico e intersezionalità. Le eventuali eccezioni possono dipendere dal linguaggio codificato nelle interfacce utente del software del prodotto, dal linguaggio utilizzato nella documentazione RFP o dal linguaggio utilizzato in prodotti di terze parti a cui si fa riferimento. Scopri di più sul modo in cui Cisco utilizza il linguaggio inclusivo.
Informazioni su questa traduzione
Cisco ha tradotto questo documento utilizzando una combinazione di tecnologie automatiche e umane per offrire ai nostri utenti in tutto il mondo contenuti di supporto nella propria lingua. Si noti che anche la migliore traduzione automatica non sarà mai accurata come quella fornita da un traduttore professionista. Cisco Systems, Inc. non si assume alcuna responsabilità per l’accuratezza di queste traduzioni e consiglia di consultare sempre il documento originale in inglese (disponibile al link fornito).
Sommario
Introduzione
In questo documento viene descritto come risolvere i problemi con Guest Shell sugli switch Cat9K.
Prerequisiti
Requisiti
- Conoscenze base del software Cisco IOS® XE
- File system Linux
- Comandi Linux
Componenti usati
Le informazioni fornite in questo documento si basano sulle seguenti versioni software e hardware:
- Catalyst 9200
- Catalyst 9300
- Catalyst 9400
- Catalyst 9500
- Catalyst 9600
- Cisco IOS XE 17.9.1 e versioni successive
Le informazioni discusse in questo documento fanno riferimento a dispositivi usati in uno specifico ambiente di emulazione. Su tutti i dispositivi menzionati nel documento la configurazione è stata ripristinata ai valori predefiniti. Se la rete è operativa, valutare attentamente eventuali conseguenze derivanti dall'uso dei comandi.
Premesse
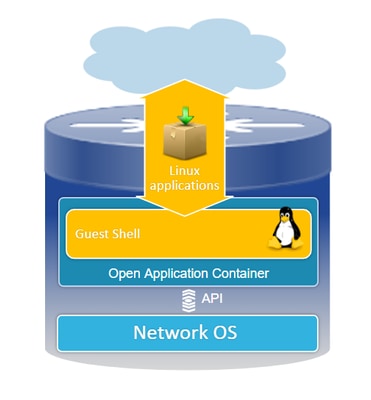
Panoramica della shell guest
- La shell guest offre un ambiente di esecuzione isolato che opera all'interno di un contenitore Linux (LXC).
- Accesso alla rete: Gli amministratori possono connettersi alla rete tramite interfacce di rete Linux, consentendo una connettività e una gestione affidabili.
- Accesso Bootflash: È disponibile l'accesso diretto allo storage bootflash, che facilita la gestione efficiente dei file e le operazioni di sistema.
- Accesso CLI di Cisco IOS: Gli amministratori possono interagire direttamente con l'interfaccia della riga di comando di Cisco IOS, consentendo un'integrazione e un controllo senza problemi.
- Esecuzione script: L'ambiente supporta l'installazione e l'esecuzione di script Python, consentendo l'automazione e la personalizzazione.
- Supporto applicazioni: È possibile installare ed eseguire applicazioni Linux sia a 32 che a 64 bit, offrendo flessibilità e un'ampia gamma di possibilità funzionali.
Risoluzione dei problemi
.
Configurazione
1. Abilitare IOX.
Switch#conf terminal
Switch(config)#iox
Switch(config)#
Attendere 1-5 minuti per l'inizializzazione di IOX. Verificare che IOX sia operativo. è possibile controllare i messaggi visualizzati durante la sessione CLI o esaminando l'output del comando show.
*Mar 10 15:35:40.206: %UICFGEXP-6-SERVER_NOTIFIED_START: Switch 1 R0/0: psd: Server iox has been notified to start
*Mar 10 15:35:51.186: %IOX-3-PD_PARTITION_CREATE: Switch 1 R0/0: run_ioxn_caf: IOX may take upto 5 mins to be ready. Wait for iox to be ready before installing the apps
*Mar 10 15:37:56.643: %IOX-3-IOX_RESTARTABITLITY: Switch 1 R0/0: run_ioxn_caf: Stack is in N+1 mode, disabling sync for IOx restartability
*Mar 10 15:38:05.835: %IM-6-IOX_ENABLEMENT: Switch 1 R0/0: ioxman: IOX is ready.
Switch#show iox-service

IOx Infrastructure Summary:
---------------------------
IOx service (CAF)              : Running
IOx service (HA)               : Running
IOx service (IOxman)           : Running
IOx service (Sec storage)      : Running
Libvirtd 5.5.0                 : Running
Dockerd v19.03.13-ce           : Running
Sync Status                    : Disabled
2. Configurazione della rete.
In questo esempio viene utilizzata l'interfaccia AppGigabit Ethernet per fornire l'accesso alla rete.
!
interface AppGigabitEthernet1/0/1
 switchport trunk allowed vlan 50
 switchport mode trunk
!
app-hosting appid guestshell
 app-vnic AppGigabitEthernet trunk
  vlan 50 guest-interface 0
   guest-ipaddress 192.168.10.10 netmask 255.255.255.0
 name-server0 192.168.10.254
end
!

Nota: GuestShell utilizza un indirizzo IP statico poiché non include il servizio client DHCP per impostazione predefinita. È possibile installare il servizio client DHCP per ottenere un indirizzo IP in modo dinamico.
In questo esempio viene utilizzata l'interfaccia di gestione (Gi0/0) per fornire l'accesso alla rete. In modalità di gestione, guestshell utilizza la porta di gestione per la rete. L'indirizzo IP della porta di gestione configurata da Cisco IOS funge da gateway.
!
app-hosting appid guestshell
 app-vnic management guest-interface 0
 name-server0 8.8.8.8
!
Nota: Quando si utilizza l'interfaccia di gestione, la configurazione predefinita per l'interfaccia Guest Shell eth0 viene hardcoded sull'indirizzo IP 192.168.30.2.
È possibile configurare l'interfaccia del gruppo di porte virtuali:
- Configurazione gruppo porte virtuali: Stabilire un gruppo di porte virtuali con un indirizzo IP statico.
- Connettività Internet: Accertarsi che l'interfaccia della porta anteriore sia collegata a Internet per consentire l'accesso esterno.
- Configurazione della NAT: Configurare NAT tra il gruppo di porte virtuali e la porta anteriore per facilitare la conversione degli indirizzi di rete.
- Assegnazione IP GuestShell: Assegnare un indirizzo IP a GuestShell nella stessa subnet dell'interfaccia del gruppo di porte virtuali.
!
interface VirtualPortGroup0
 ip address 192.168.35.1 255.255.255.0
 ip nat inside
!
interface GigabitEthernet1/0/3
 no switchport
 ip address 192.168.100.10 255.255.255.0
 ip nat outside
!
ip route 0.0.0.0 0.0.0.0 192.168.100.254
ip route vrf Mgmt-vrf 0.0.0.0 0.0.0.0 192.168.10.254
ip nat inside source static tcp 192.168.35.2 7023 192.168.100.10 7023 extendable
!
!
ip access-list standard NAT_ACL
 10 permit 192.168.0.0 0.0.255.255
!
app-hosting appid guestshell
 app-vnic gateway1 virtualportgroup 0 guest-interface 0
  guest-ipaddress 192.168.35.2 netmask 255.255.255.0
 app-default-gateway 192.168.35.1 guest-interface 0
 name-server0 8.8.8.8
end
3. Abilitare guestshell.
Switch#guestshell enable
Interface will be selected if configured in app-hosting
Please wait for completion
guestshell installed successfully
Current state is: DEPLOYED
guestshell activated successfully
Current state is: ACTIVATED
guestshell started successfully
Current state is: RUNNING
Guestshell enabled successfully
Nota: Il comando guestshell enable è l'unico modo per installare guestshell. L'utilizzo di App-hosting CLI activate/connect/deactivate può essere utilizzato per controllare guestshell. In alternativa, si consiglia di utilizzare guestshell exec CLI.
Ciclo di vita di Guestshell
Guestshell disabilitato: Disabilita Guesthell rimuove l'accesso a Guestshell e interrompe le sessioni correnti. I file/dati vengono conservati. È possibile utilizzare guestshell enable per ripristinare l'accesso.
Switch#guestshell disable
Guestshell disabled successfully
Guestshell distruggi: Il file system della shell guest viene eliminato in modo irreversibile. Tutti i file/dati/script/settinguestshell/ pacchetti e moduli installati.
Switch#guestshell destroy
Guestshell destroyed successfully
Nota: quando si esegue questo comando, tutti i dati vengono persi in modo irreversibile.
Esecuzione di Guestshell: Guestshell esegue il comando guestshell run bash per creare una shell all'interno della shell guest, consentendo di utilizzare qualsiasi file binario di Linux in /bin e /sbin.
Switch#guestshell run bash
[guestshell@guestshell ~]$ ping 192.168.10.1
PING 192.168.10.1 (192.168.10.1) 56(84) bytes of data.
64 bytes from 192.168.10.1: icmp_seq=2 ttl=254 time=0.517 ms
64 bytes from 192.168.10.1: icmp_seq=3 ttl=254 time=0.552 ms
64 bytes from 192.168.10.1: icmp_seq=4 ttl=254 time=0.447 ms
64 bytes from 192.168.10.1: icmp_seq=5 ttl=254 time=0.549 ms
Guestshell run python: Utilizzare questo comando per avviare l'interprete Python interattivo.
Switch#guestshell run python3
Python 3.6.8 (default, Dec 22 2020, 19:04:08)
[GCC 8.4.1 20200928 (Red Hat 8.4.1-1)] on linux
Type "help", "copyright", "credits" or "license" for more information.
>>>
Convalide
È possibile utilizzare i seguenti comandi per convalidare la shell guest:
Switch#show app-hosting detail appid guestshell
App id                 : guestshell
Owner                  : iox
State                  : RUNNING
Application
  Type                 : lxc
  Name                 : GuestShell
  Version              : 3.3.0
  Description          : Cisco Systems Guest Shell XE for x86_64
  Author               : Cisco Systems
  Path                 : /guestshell/:guestshell.tar
  URL Path             :
  Multicast            : yes
Activated profile name : custom

Resource reservation
  Memory               : 256 MB
  Disk                 : 1 MB
  CPU                  : 800 units
  CPU-percent          : 11 %
  VCPU                 : 1

Platform resource profiles
  Profile Name                  CPU(unit)  Memory(MB)  Disk(MB)
  --------------------------------------------------------------

Attached devices
  Type              Name               Alias
  ---------------------------------------------
  serial/shell     iox_console_shell   serial0
  serial/aux       iox_console_aux     serial1
  serial/syslog    iox_syslog          serial2
  serial/trace     iox_trace           serial3

Network interfaces
   ---------------------------------------
eth0:
   MAC address         : 52:54:dd:5b:c4:b8
   IPv4 address        : 192.168.30.2
   IPv6 address        : ::
   Network name        : mgmt-bridge200

Port forwarding
  Table-entry  Service  Source-port  Destination-port
  ---------------------------------------------------
  Switch#show app-hosting list
App id                                   State
---------------------------------------------------------
guestshell                               RUNNING
Switch#guestshell run sudo ifconfig
eth0: flaguestshell=4163<UP,BROADCAST,RUNNING,MULTICAST>  mtu 1500
        inet 192.168.10.10  netmask 255.255.255.0  broadcast 192.168.10.255
        inet6 fe80::5054:ddff:fece:a7c9  prefixlen 64  scopeid 0x20
        ether 52:54:dd:ce:a7:c9  txqueuelen 1000  (Ethernet)
        RX packets 3  bytes 266 (266.0 B)
        RX errors 0  dropped 0  overruns 0  frame 0
        TX packets 9  bytes 726 (726.0 B)
        TX errors 0  dropped 0 overruns 0  carrier 0  collisions 0

lo: flaguestshell=73<UP,LOOPBACK,RUNNING>  mtu 65536
        inet 127.0.0.1  netmask 255.0.0.0
        inet6 ::1  prefixlen 128  scopeid 0x10
        loop  txqueuelen 1000  (Local Loopback)
        RX packets 338  bytes 74910 (73.1 KiB)
        RX errors 0  dropped 0  overruns 0  frame 0
        TX packets 338  bytes 74910 (73.1 KiB)
        TX errors 0  dropped 0 overruns 0  carrier 0  collisions 0
Ridimensionamento delle risorse
!
app-hosting appid guestshell
 app-vnic management guest-interface 0
 app-resource profile custom
  cpu 1000
  memory 512
  persist-disk 200
!
Per rendere effettive le modifiche, è necessario disabilitare e quindi abilitare la shell guest.
Switch#guestshell disable
Guestshell disabled successfully
Switch#guestshell enable
*Mar 11 01:17:46.841: %SYS-5-CONFIG_I: Configured from console by coguestshell enable
Interface will be selected if configured in app-hosting
Please wait for completion
guestshell activated successfully
Current state is: ACTIVATED
guestshell started successfully
Current state is: RUNNING
Guestshell enabled successfully
Switch#show app-hosting detail appid guestshell | sec Resource reservation
Resource reservation
  Memory               : 512 MB
  Disk                 : 200 MB
  CPU                  : 1110 units
  CPU-percent          : 15 %
  VCPU                 : 1
Nota: Sugli switch, il ridimensionamento delle risorse è consentito fino ai limiti massimi dalla piattaforma. Per ulteriori informazioni, fare riferimento al documento Cisco Catalyst 9000 Platform Hardware Resources for Applications.
Scenari comuni
Configurazione DHCP
Problema: Il file binario del client DHCP (DHCLIENT) non è presente.
Soluzione
È possibile installare il client DHCP utilizzando l'utility Yum con il comando sudo yum install dhcp-client. Tuttavia, i repository per CentOS Stream 8 non sono più disponibili.
1. È necessario evitare di impostare l'indirizzo IP nell'app-hosting per consentire il funzionamento di DHCP.
!
interface AppGigabitEthernet1/0/1
 switchport trunk allowed vlan 50
 switchport mode trunk
!
app-hosting appid guestshell
 app-vnic AppGigabitEthernet trunk
  vlan 50 guest-interface 0
name-server0 8.8.8.8
!
2. Cambiare l'elenco di mirroring in vault baseurl nel repository yum.
Switch#guestshell run bash
[guestshell@guestshell ~]$ sudo find /etc/yum.repos.d/ -type f -exec sed -i 's/mirrorlist=/#mirrorlist=/g' {} +
[guestshell@guestshell ~]$ sudo find /etc/yum.repos.d/ -type f -exec sed -i 's/#baseurl=/baseurl=/g' {} +
[guestshell@guestshell ~]$ sudo find /etc/yum.repos.d/ -type f -exec sed -i 's/mirror.centos.org//g' {} +
[guestshell@guestshell ~]$ cat /etc/yum.repos.d/CentOS-Stream-RealTime.reporepo
# CentOS-Stream-RealTime.repo
# The mirrorlist system uses the connecting IP address of the client and the
# update status of each mirror to pick current mirrors that are geographically
# close to the client.  You should use this for CentOS updates unless you are
# manually picking other mirrors.
#
# If the mirrorlist does not work for you, you can try the commented out
# baseurl line instead.

[rt]
name=CentOS Stream $releasever - RealTime
#mirrorlist=http://mirrorlist.centos.org/?release=$stream&arch=$basearch&repo=RT&infra=$infra
baseurl=http:///$contentdir/$stream/RT/$basearch/os/
gpgcheck=1
enabled=0
gpgkey=file:///etc/pki/rpm-gpg/RPM-GPG-KEY-centosofficial
3. Installare i pacchetti.
guestshell@guestshell ~]$ sudo yum install dhcp-client
ast metadata expiration check: 0:50:34 ago on Wed Mar 12 17:44:46 2025.
Dependencies resolved.
================================================================================
 Package                Architecture Version                 Repository    Size
================================================================================
Installing:
 dhcp-client            x86_64       12:4.3.6-50.el8         baseos       319 k
Installing dependencies:
 bind-export-libs       x86_64       32:9.11.36-13.el8       baseos       1.1 M
 dhcp-common            noarch       12:4.3.6-50.el8         baseos       208 k
 dhcp-libs              x86_64       12:4.3.6-50.el8         baseos       148 k

Transaction Summary
================================================================================
Install  4 Packages

Total download size: 1.8 M
Installed size: 3.9 M
Is this ok [y/N]: y
Downloading Packages:
(1/4): dhcp-client-4.3.6-50.el8.x86_64.rpm      284 kB/s | 319 kB     00:01
(2/4): dhcp-common-4.3.6-50.el8.noarch.rpm      171 kB/s | 208 kB     00:01
(3/4): dhcp-libs-4.3.6-50.el8.x86_64.rpm        572 kB/s | 148 kB     00:00
(4/4): bind-export-libs-9.11.36-13.el8.x86_64.r 577 kB/s | 1.1 MB     00:02
--------------------------------------------------------------------------------
Total                                           908 kB/s | 1.8 MB     00:02
CentOS Stream 8 - BaseOS                        1.6 MB/s | 1.6 kB     00:00
Importing GPG key 0x8483C65D:
 Userid     : "CentOS (CentOS Official Signing Key) <CentOS Official Signing Key>"
 Fingerprint: 99DB 70FA E1D7 CE22 7FB6 4882 05B5 55B3 8483 C65D
 From       : /etc/pki/rpm-gpg/RPM-GPG-KEY-centosofficial
Is this ok [y/N]: y
Key imported successfully
Running transaction check
Transaction check succeeded.
Running transaction test
Transaction test succeeded.
Running transaction
  Preparing        :                                                        1/1
  Installing       : dhcp-libs-12:4.3.6-50.el8.x86_64                       1/4
  Installing       : dhcp-common-12:4.3.6-50.el8.noarch                     2/4
  Installing       : bind-export-libs-32:9.11.36-13.el8.x86_64              3/4
  Running scriptlet: bind-export-libs-32:9.11.36-13.el8.x86_64              3/4
  Installing       : dhcp-client-12:4.3.6-50.el8.x86_64                     4/4
  Running scriptlet: dhcp-client-12:4.3.6-50.el8.x86_64                     4/4
  Verifying        : bind-export-libs-32:9.11.36-13.el8.x86_64              1/4
  Verifying        : dhcp-client-12:4.3.6-50.el8.x86_64                     2/4
  Verifying        : dhcp-common-12:4.3.6-50.el8.noarch                     3/4
  Verifying        : dhcp-libs-12:4.3.6-50.el8.x86_64                       4/4

Installed:
  bind-export-libs-32:9.11.36-13.el8.x86_64  dhcp-client-12:4.3.6-50.el8.x86_64
  dhcp-common-12:4.3.6-50.el8.noarch         dhcp-libs-12:4.3.6-50.el8.x86_64

Complete!
Nota: (PER CALO) È possibile configurare un proxy per Yum. Ciò consente a Yum di connettersi tramite un server proxy per i download dei pacchetti:
[guestshell@guestshell ~]$ echo "proxy=http://<indirizzo_IP:porta>/" | sudo tee -a /etc/yum.conf > /dev/null
4. .Richiedere un indirizzo IP DHCP per eth0.
[guestshell@guestshell ~]$ sudo dhclient eth0
5. Verificare che il client DHCP funzioni controllando l'assegnazione dell'indirizzo IP.
Switch#guestshell run ifconfig
eth0: flags=4163<UP,BROADCAST,RUNNING,MULTICAST>  mtu 1500
        inet 192.168.10.2  netmask 255.255.255.0  broadcast 192.168.10.255
        inet6 fe80::5054:ddff:fea0:4aef  prefixlen 64  scopeid 0x20
        ether 52:54:dd:a0:4a:ef  txqueuelen 1000  (Ethernet)
        RX packets 1516  bytes 2009470 (1.9 MiB)
        RX errors 0  dropped 0  overruns 0  frame 0
        TX packets 687  bytes 54603 (53.3 KiB)
        TX errors 0  dropped 0 overruns 0  carrier 0  collisions 0

lo: flags=73<UP,LOOPBACK,RUNNING>  mtu 65536
        inet 127.0.0.1  netmask 255.0.0.0
        inet6 ::1  prefixlen 128  scopeid 0x10
        loop  txqueuelen 1000  (Local Loopback)
        RX packets 773  bytes 90658 (88.5 KiB)
        RX errors 0  dropped 0  overruns 0  frame 0
        TX packets 773  bytes 90658 (88.5 KiB)
        TX errors 0  dropped 0 overruns 0  carrier 0  collisions 0
Aggiornamento Gestione pacchetti DNF non riuscito
Problema: Impossibile completare l'aggiornamento sudo dnf -y su Guestshell a causa di un errore:
[guestshell@guestshell ~]$ sudo dnf upgrade --refresh
Warning: failed loading '/etc/yum.repos.d/CentOS-Base.repo', skipping.
Soluzione
1. Reinstallare e aggiornare i pacchetti RPM.
! Clean packages

[guestshell@guestshell ~]$ sudo dnf clean all

! Reinstall and update the tpm2-tss package:

[guestshell@guestshell ~]$ sudo dnf install tpm2-tss-2.3.2-3.el8
[guestshell@guestshell ~]$ sudo dnf upgrade rpm
2. Installare il pacchetto git separatamente.
[guestshell@guestshell ~]$ sudo dnf install git -y
Accesso a Guestshell perso dopo l'aggiornamento
Problema: Dopo l'aggiornamento alla versione 17.08.01 o successiva, la shell guest diventa inaccessibile e non sarà più possibile eseguire gli script.
Switch#guestshell run bash
Switch#
Soluzione
Il problema è relativo all'ID bug Cisco CSCwi63075  , che viene attivata durante un aggiornamento quando sullo switch è abilitato FIPS.
1. Disabilitare FIPS.
Switch#configure terminal
Switch(config)#no fips authorization-key
FIPS: Authorization-key erased ONLY from the  Flash.
But the authorization-key is still operational. Use "reload" command for complete removal of key and to enter into non fips-mode.
Make sure to remove fips key from all the members of the stack individually
2. È possibile eseguire l'aggiornamento a una delle versioni che includono la correzione, la versione 17.12.04 o qualsiasi versione successiva.
Limita indirizzamento IPv6
Problema: Il problema riguarda gli indirizzi IPv6 non desiderati visualizzati sulle interfacce nell'ambiente Cisco Guest Shell. Anche se non configurato intenzionalmente.
La configurazione osservata sullo switch con IPV4 è:
!
app-hosting appid guestshell
 app-vnic AppGigabitEthernet trunk
  vlan 50 guest-interface 0
   guest-ipaddress 192.168.20.10 netmask 255.255.255.0  <-- IPv4 address configured
 app-default-gateway 192.168.20.1 guest-interface 0
 app-resource profile custom
 name-server1 192.168.20.1
 !
Quando si esegue il comando ifconfig nell'ambiente Guestshell, vengono visualizzati sia gli indirizzi IPv4 che gli indirizzi IPv6.
lat1-2-ssw01.gts#guestshell run bash
[guestshell@guestshell ~]$ sudo ifconfig
eth0: flags=4163  mtu 1500
        inet 192.168.20.10  netmask 255.255.255.0 broadcast 192.168.20.255
        inet6 2620:119:5022:515:5054:ddff:fe41:c643  prefixlen 64  scopeid 0x0
        inet6 fe80::5054:ddff:fe41:c643  prefixlen 64  scopeid 0x20
        ether 52:54:dd:41:c6:43  txqueuelen 1000  (Ethernet)
        RX packets 7829  bytes 1750981 (1.6 MiB)
        RX errors 0  dropped 0  overruns 0  frame 0
        TX packets 5551  bytes 744320 (726.8 KiB)
        TX errors 0  dropped 0 overruns 0  carrier 0  collisions 0

lo: flags=73  mtu 65536
        inet 127.0.0.1  netmask 255.0.0.0
        inet6 ::1  prefixlen 128  scopeid 0x10
        loop  txqueuelen 1000  (Local Loopback)
        RX packets 292  bytes 63812 (62.3 KiB)
        RX errors 0  dropped 0  overruns 0  frame 0
        TX packets 292  bytes 63812 (62.3 KiB)
        TX errors 0  dropped 0 overruns 0  carrier 0  collisions 0
Soluzione
Passaggio 1: Disabilitare il routing e l'indirizzamento IPv6 in Guestshell.
lat1-2-ssw01.gts#guestshell run bash
[guestshell@guestshell ~]$ sudo sysctl -w net.ipv6.conf.all.disable_ipv6=1
[guestshell@guestshell ~]$ sudo sysctl -w net.ipv6.conf.default.disable_ipv6=1
[guestshell@guestshell ~]$ sudo sysctl -w net.ipv6.conf.lo.disable_ipv6=1
Passaggio 2: Verificare che IPv6 sia disabilitato.
[guestshell@guestshell ~]$ /sbin/ifconfig
eth0: flags=4163  mtu 1500
        inet 192.168.20.10  netmask 255.255.255.0 broadcast 192.168.20.255
        ether 52:54:dd:41:c6:43  txqueuelen 1000  (Ethernet)
        RX packets 7829  bytes 1750981 (1.6 MiB)
        RX errors 0  dropped 0  overruns 0  frame 0
        TX packets 5551  bytes 744320 (726.8 KiB)
        TX errors 0  dropped 0 overruns 0  carrier 0  collisions 0

lo: flags=73  mtu 65536
        inet 127.0.0.1  netmask 255.0.0.0
        loop  txqueuelen 1000  (Local Loopback)
        RX packets 292  bytes 63812 (62.3 KiB)
        RX errors 0  dropped 0  overruns 0  frame 0
        TX packets 292  bytes 63812 (62.3 KiB)
        TX errors 0  dropped 0 overruns 0  carrier 0  collisions 0
Errori di spazio su disco durante l'esecuzione di script Python
Problema: Il problema riguarda uno script Python in esecuzione su un Embedded Event Manager (EEM) all'interno della shell guest. Script non riuscito a causa di spazio su disco insufficiente con l'errore:
guestshell run python3 /flash/guest-share/monitoring.py -rt True -bgp True
---- pushing bgp status ----
OSError: [Errno 28] No space left on device

During handling of the above exception, another exception occurred:

Traceback (most recent call last):
  File "/flash/guest-share/monitoring_periodic_tasks.py", line 18, in
    print(bgp_status())
  File "/bootflash/guest-share/monitoring_bgp_status.py", line 15, in bgp_status
    vrf = cli.cli('show vrf')
  File "/usr/lib/python3.6/site-packages/cli/__init__.py", line 311, in cli
    _log_to_file("CLI execution invoked for '" + command + "'")
  File "/usr/lib/python3.6/site-packages/cli/__init__.py", line 87, in _log_to_file
    logfile.close()
OSError: [Errno 28] No space left on device
! This error indicates that the disk space allocated for logging command executions within the Guestshell environment has been exhausted.
Soluzione
Per risolvere il problema di esaurimento dello spazio su disco, è necessario aumentare le dimensioni del disco persistente per l'ambiente Guestshell:
1. Modificare il profilo delle risorse dell'applicazione per aumentare le dimensioni del disco di salvataggio permanente.
Switch(config-app-hosting)# app-resource profile custom
Switch(config-app-hosting-profile)# persist-disk 100
Switch(config-app-hosting-profile)# cpu 800
Switch(config-app-hosting-profile)# memory 256
Switch(config-app-hosting-profile)# end
2. Salvare la configurazione e abilitare/disabilitare la shell del guest.
Switch# write memory
Switch#guestshell disable
Guestshell disabled successfully
Switch#guestshell enable
Interface will be selected if configured in app-hosting
Please wait for completion
guestshell installed successfully
Current state is: DEPLOYED
guestshell activated successfully
Current state is: ACTIVATED
guestshell started successfully
Current state is: RUNNING
Guestshell enabled successfully
Syslog di registrazione
È possibile eseguire questi comandi in guestshell per visualizzare i messaggi syslog:
[guestshell@guestshell ~]$ sudo logger -p 1 "Priority 1"
[guestshell@guestshell ~]$ sudo cat /var/log/messages
Mar 11 02:05:24 localhost systemd[248]: user@0.service: Failed at step PAM spawning /usr/lib/systemd/systemd: Operation not permitted
Mar 11 02:05:24 localhost systemd[1]: user@0.service: Failed with result 'protocol'.
Mar 11 02:05:24 localhost systemd[1]: Failed to start User Manager for UID 0.
Mar 11 02:05:24 localhost systemd[1]: Stopping /run/user/0 mount wrapper...
Mar 11 02:05:24 localhost systemd[1]: run-user-0.mount: Succeeded.
Mar 11 02:05:24 localhost systemd[1]: user-runtime-dir@0.service: Succeeded.
Mar 11 02:05:24 localhost systemd[1]: Stopped /run/user/0 mount wrapper.
Mar 11 02:05:24 localhost root[250]: Priority 1
[guestshell@guestshell ~]$ sudo cat /var/log/secure
Mar 11 02:05:24 localhost systemd[248]: pam_unix(systemd-user:account): expired password for user root (root enforced)
Mar 11 02:05:24 localhost sudo[246]: pam_systemd(sudo:session): Failed to create session: Start job for unit user@0.service failed with 'failed'
Mar 11 02:05:24 localhost sudo[246]: pam_unix(sudo:session): session opened for user root by (uid=0)
Tracelog
Per ruotare il file, è possibile usare il log di appid guestshell di hosting dell'applicazione su bootflash:nome_cartella. Questa opzione può essere utilizzata per eseguire la rotazione in una directory di destinazione, ma viene eseguita anche nella directory traceloguestshell.
Switch#app-hosting move appid guestshell log to bootflash:
Successfully moved tracelog to flash:/ioxapploguestshell/iox_R0-0_R0-0.14195_0.20250311023831.bin.gz
Nota: IOX guestshell.log è sempre il file tracelog attivo in /tmp/rp/trace · Quando questo file raggiunge 1 MB, viene ruotato automaticamente in bootflash:traceloguestshell/ con un timestamp e ne viene avviato uno nuovo.
Informazioni correlate
- White paper sull'hosting delle applicazioni sugli switch Cisco Catalyst serie 9000
- Guida all'installazione dell'hardware degli switch Cisco Catalyst serie 9300
- Guida alla configurazione della programmabilità, Cisco IOS XE 17.9.x
- White paper sull'architettura del sistema Catalyst 9300 Stackwise
- Cisco bug ID CSCwi63075 - Guestshell non è accessibile dalla CLI dopo un aggiornamento alla versione 17.08.01 o successive se la modalità FIPS è abilitata
- Documentazione e supporto tecnico – Cisco Systems
Cronologia delle revisioni
| Revisione | Data di pubblicazione | Commenti |
|---|---|---|
1.0 |
17-Mar-2025
|
Versione iniziale |
Contributo dei tecnici Cisco
- Christopher Martinez BarriosTecnico di consulenza
 Feedback