- Preface
- Chapter 1 - Product Overview
- Chapter 2 - Preparing for Installation
- Chapter 3 - Installing the Client Adapter
- Chapter 4 - Using the Profile Manager
- Chapter 5 - Configuring the Client Adapter
- Chapter 6 - Using EAP Authentication
- Chapter 7 - Viewing Status and Statistics
- Chapter 8 - Using the Aironet System Tray Utility (ASTU)
- Chapter 9 - Routine Procedures
- Chapter 10 - Troubleshooting
- Appendix A - Technical Specifications
- Appendix B - Translated Safety Warnings
- Appendix C - Declarations of Conformity and Regulatory Information
- Appendix D - Channels, Power Levels, and Antenna Gains
- Appendix E - Configuring the Client Adapter through the Windows XP Operating System
- Appendix F - Performing a Site Survey
- Appendix G - Using the Profile Migration Tool
- Glossary
- Index
Cisco Aironet 802.11a/b/g Wireless LAN Client Adapters (CB21AG and PI21AG) Installation and Configuration Guide, Release 4.0
Bias-Free Language
The documentation set for this product strives to use bias-free language. For the purposes of this documentation set, bias-free is defined as language that does not imply discrimination based on age, disability, gender, racial identity, ethnic identity, sexual orientation, socioeconomic status, and intersectionality. Exceptions may be present in the documentation due to language that is hardcoded in the user interfaces of the product software, language used based on RFP documentation, or language that is used by a referenced third-party product. Learn more about how Cisco is using Inclusive Language.
- Updated:
- October 12, 2007
Chapter: Chapter 8 - Using the Aironet System Tray Utility (ASTU)
Using the Aironet System Tray Utility (ASTU)
This chapter explains how to use the Aironet System Tray Utility (ASTU) to access status information about your client adapter and perform basic tasks.
The following topics are covered in this chapter:
Overview of ASTU
ASTU is an optional application that provides a small subset of the features available through ADU. Specifically, it enables you to access status information about your client adapter and perform basic tasks. ASTU is accessible from an icon in the Windows system tray, making it easily accessible and convenient to use. The ASTU icon appears only if a client adapter is installed into your computer and you did not disable ASTU during installation.
ASTU provides information and options in the following ways:
•![]() In the appearance of the icon itself
In the appearance of the icon itself
•![]() Through a tool tip window that appears when you hover the cursor over the icon
Through a tool tip window that appears when you hover the cursor over the icon
•![]() Through a pop-up menu that appears when you right-click the icon
Through a pop-up menu that appears when you right-click the icon
•![]() Through a Connection Status window that appears when you double-click the icon
Through a Connection Status window that appears when you double-click the icon
The ASTU Icon
The appearance of the ASTU icon indicates the connection status of your client adapter. ASTU reads the client adapter status and updates the icon every 1 to 5 seconds, depending on the value entered for the Refresh Interval on the Display Settings window. Table 8-1 interprets the different appearances of the ASTU icon.

Note ![]() Windows 2000 and XP may display their own wireless network connection status icon in the system tray. Cisco recommends that you turn off the Windows icon and use the ASTU icon to monitor your wireless connection.
Windows 2000 and XP may display their own wireless network connection status icon in the system tray. Cisco recommends that you turn off the Windows icon and use the ASTU icon to monitor your wireless connection.


Tool Tip Window
When you hover the cursor over the ASTU icon, the Tool Tip window appears (see Figure 8-1).
Note ![]() If the client adapter's radio is disabled, a message appears instead of the Tool Tip window to inform you that the wireless network interface is disabled.
If the client adapter's radio is disabled, a message appears instead of the Tool Tip window to inform you that the wireless network interface is disabled.
Figure 8-1 Tool Tip Window

This window provides information on the current status of your client adapter. Table 8-2 lists and describes each element of the Tool Tip window.
|
|
|
|
|---|---|---|
Active profile |
The network configuration (or profile) that your client adapter is currently using. Note |
|
SSID |
The name of the network to which your client adapter is currently associated. Note Note |
|
Connection status |
The operational mode of your client adapter. |
|
|
|
|
|
Not Associated |
The client adapter has not established a connection to an access point (in infrastructure mode) or another client (in ad hoc mode). |
|
Associated |
The client adapter has established a connection to an access point (in infrastructure mode) or another client (in ad hoc mode). |
|
Authenticating |
The client adapter is associated to an access point, and the EAP authentication process has begun but not yet succeeded. |
|
Authenticated |
The client adapter is associated to an access point, and the user is EAP authenticated. |
|
Authentication Failed |
The client adapter is associated to an access point, but the user has failed to EAP authenticate. Note |
|
Authentication Failed Retrying |
The client adapter is associated to an access point, the user has failed to EAP authenticate, but another authentication attempt is being made. Note |
|
Link quality |
The client adapter's signal strength for all received packets. |
|
Link speed and 802.11 mode |
The rate at which your client adapter is currently transmitting data packets and the 802.11 mode that your client adapter is currently using for communications. |
|
Client adapter type |
A description of your client adapter. |
|
Client adapter IP address |
The IP address of your client adapter. |
|
Pop-Up Menu
When you right-click the ASTU icon, the ASTU pop-up menu appears (see Figure 8-2).
Figure 8-2 ASTU Pop-Up Menu
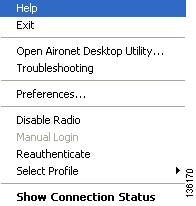
The following sections describe each ASTU pop-up menu option.
Note ![]() If you used the Aironet System Tray Utility Preferences window or your system administrator used an administrative tool to deactivate certain ASTU menu options, these options do not appear in the menu and therefore cannot be selected.
If you used the Aironet System Tray Utility Preferences window or your system administrator used an administrative tool to deactivate certain ASTU menu options, these options do not appear in the menu and therefore cannot be selected.
Help
This option enables you to access the online help.
Exit
This option closes ADU and ASTU.
Note ![]() To reactivate ADU, double-click the Aironet Desktop Utility icon on your computer desktop. To reactivate ASTU, choose the Enable Tray Icon option from the ADU Action drop-down menu.
To reactivate ADU, double-click the Aironet Desktop Utility icon on your computer desktop. To reactivate ASTU, choose the Enable Tray Icon option from the ADU Action drop-down menu.
Open Aironet Desktop Utility
This option activates ADU.
Troubleshooting
This option activates the troubleshooting utility, which enables you to identify and resolve configuration and association problems with your client adapter. Refer to the "Using the Cisco Aironet Troubleshooting Utility" section on page 10-3 for detailed instructions on using this utility.
Preferences
When you choose this option, the Aironet System Tray Utility Preferences window appears (see Figure 8-3).
Figure 8-3 Aironet System Tray Utility Preferences Window
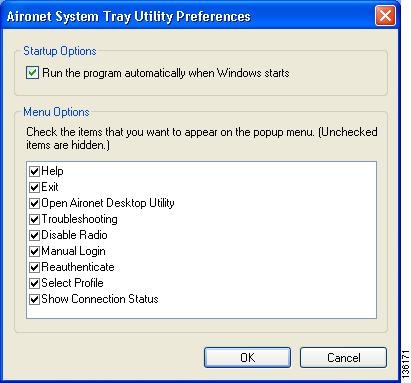
This window enables you to determine when ADU and ASTU run and to choose the options that appear on the ASTU pop-up menu. Follow these steps to make your selections.
Step 1 ![]() If you want ASTU to run automatically when Windows starts, make sure the Run the program automatically when Windows starts check box is checked. Otherwise, uncheck this check box.
If you want ASTU to run automatically when Windows starts, make sure the Run the program automatically when Windows starts check box is checked. Otherwise, uncheck this check box.
Note ![]() If you do not choose this option and later want to run ASTU, you must choose the Enable Tray Icon option from the Action drop-down menu in ADU.
If you do not choose this option and later want to run ASTU, you must choose the Enable Tray Icon option from the Action drop-down menu in ADU.
Step 2 ![]() In the Menu Options portion of the window, make sure the check boxes of all the options that you want to appear in the ASTU pop-up menu are checked. Any options that are not checked will not be included in the menu.
In the Menu Options portion of the window, make sure the check boxes of all the options that you want to appear in the ASTU pop-up menu are checked. Any options that are not checked will not be included in the menu.
Note ![]() The Preferences option cannot be deselected. It always appears in the ASTU pop-up menu.
The Preferences option cannot be deselected. It always appears in the ASTU pop-up menu.
Step 3 ![]() Click OK to save your changes.
Click OK to save your changes.
Enable/Disable Radio
This option enables you to disable or enable the client adapter's radio. Disabling the radio prevents the adapter from transmitting RF energy. You might want to disable the client adapter's radio in the following situations:
•![]() You are not transmitting data and want to conserve battery power.
You are not transmitting data and want to conserve battery power.
•![]() You are using a laptop on an airplane, hospital, or any other location where radio transmission is not allowed and want to prevent the adapter's transmissions from potentially interfering with the operation of certain devices.
You are using a laptop on an airplane, hospital, or any other location where radio transmission is not allowed and want to prevent the adapter's transmissions from potentially interfering with the operation of certain devices.
When the radio is enabled, it periodically sends out probes even if it is not associated to an access point (in infrastructure mode) or another client (in ad hoc mode), as required by the 802.11 specification. Therefore, it is important to disable it around devices that are susceptible to RF interference.
Note ![]() If the client adapter's radio is disabled, your client adapter is not associated, and a message appears when you hover the cursor over the ASTU icon to inform you that the wireless network interface is disabled.
If the client adapter's radio is disabled, your client adapter is not associated, and a message appears when you hover the cursor over the ASTU icon to inform you that the wireless network interface is disabled.
Note ![]() If your client adapter's radio is disabled before your computer enters standby or hibernate mode or before you reboot the computer, the radio remains disabled when the computer resumes. You must enable the radio to resume operation.
If your client adapter's radio is disabled before your computer enters standby or hibernate mode or before you reboot the computer, the radio remains disabled when the computer resumes. You must enable the radio to resume operation.
If the radio is enabled, choose Disable Radio to disable the radio.
If the radio is disabled, choose Enable Radio to enable the radio.
Manual Login
This option enables you to manually invoke the authentication process for a profile that is configured to use a manually prompted LEAP or EAP-FAST username and password. When you choose this option, the Enter Wireless Network Password window appears. Enter your LEAP or EAP-FAST credentials and click OK. The LEAP or EAP-FAST Authentication Status window appears, and the authentication process begins.
Note ![]() Refer to Chapter 5 for information on setting a manual LEAP or EAP-FAST profile and Chapter 6 for details on the authentication process.
Refer to Chapter 5 for information on setting a manual LEAP or EAP-FAST profile and Chapter 6 for details on the authentication process.
Reauthenticate
This option forces your client adapter to try to reauthenticate using the username and password of the current profile. It is available for all EAP-enabled profiles. When you choose this option, the authentication process begins.
If your client adapter is unable to authenticate using the specified username and password, you may be prompted to re-enter them. If you click Cancel, a message appears indicating that the current profile will be disabled until you choose the Reauthenticate option, reboot your computer, or eject and reinsert the client adapter.
Select Profile
This option enables you to select the active profile for your client adapter. When you choose this option, a profiles submenu appears (see Figure 8-4).
Figure 8-4 Profiles Submenu
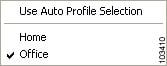
From this menu, you can choose between the following options:
•![]() Use Auto Profile Selection—Causes the client adapter's driver to automatically select a profile from the list of profiles that were set up in ADU to be included in auto profile selection.
Use Auto Profile Selection—Causes the client adapter's driver to automatically select a profile from the list of profiles that were set up in ADU to be included in auto profile selection.
If the client adapter loses association for more than 10 seconds (or for more than the time specified by the LEAP/EAP-FAST authentication timeout value on the LEAP/EAP-FAST Settings window if LEAP/EAP-FAST is enabled), the driver switches automatically to another profile that is included in auto profile selection. The adapter will not switch profiles as long as it remains associated or reassociates within 10 seconds (or within the time specified by the LEAP/EAP-FAST authentication timeout value). To force the client adapter to associate to a different access point (in infrastructure mode) or another client (in ad hoc mode), you must select a new profile.
Note ![]() This option is available only if two or more profiles are included in auto profile selection.
This option is available only if two or more profiles are included in auto profile selection.
Note ![]() Login scripts are not reliable if you use auto profile selection with LEAP or EAP-FAST. If you authenticate and achieve full network connectivity before or at the same time as you log into the computer, the login scripts will run. However, if you authenticate and achieve full network connectivity after you log into the computer, the login scripts will not run.
Login scripts are not reliable if you use auto profile selection with LEAP or EAP-FAST. If you authenticate and achieve full network connectivity before or at the same time as you log into the computer, the login scripts will run. However, if you authenticate and achieve full network connectivity after you log into the computer, the login scripts will not run.
•![]() A specific profile—When you select a profile from the list of available profiles, the client adapter attempts to establish a connection to an access point (in infrastructure mode) or another client (in ad hoc mode) using the parameters that were configured for that profile.
A specific profile—When you select a profile from the list of available profiles, the client adapter attempts to establish a connection to an access point (in infrastructure mode) or another client (in ad hoc mode) using the parameters that were configured for that profile.
If the client adapter cannot associate to the access point (or other client) or loses association while using the selected profile, the adapter does not attempt to associate using another profile. To get it to associate, you must select a different profile or select Use Auto Profile Selection.
Simply click the desired profile to select it. A check mark appears beside the profile, and the client adapter attempts to establish a connection using the selected profile.
Show Connection Status
When you choose this option, the Connection Status window appears (see Figure 8-5).
Figure 8-5 Connection Status Window
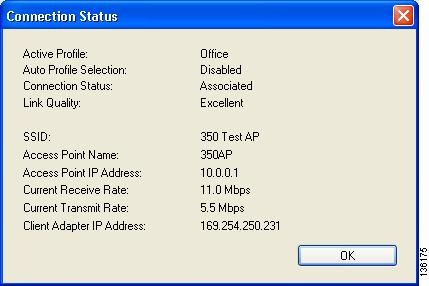
This window provides information on the current status of your client adapter. Table 8-3 interprets each element of the Connection Status window.
Note ![]() You can also access the Connection Status window by double-clicking the ASTU icon.
You can also access the Connection Status window by double-clicking the ASTU icon.
|
|
|
|
|---|---|---|
Active Profile |
The network configuration (or profile) that your client adapter is currently using. |
|
Auto Profile Selection |
Indicates whether your client adapter is using auto profile selection. Value: Enabled or Disabled |
|
Connection Status |
The operational mode of your client adapter. Value: Not Associated, Associated, Authenticating, Authenticated, Authentication Failed, or Authentication Failed Retrying |
|
|
|
|
|
Not Associated |
The client adapter has not established a connection to an access point (in infrastructure mode) or another client (in ad hoc mode). |
|
Associated |
The client adapter has established a connection to an access point (in infrastructure mode) or another client (in ad hoc mode). |
|
Authenticating |
The client adapter is associated to an access point, and the EAP authentication process has begun but not yet succeeded. |
|
Authenticated |
The client adapter is associated to an access point, and the user is EAP authenticated. |
|
Authentication Failed |
The client adapter is associated to an access point, but the user has failed to EAP authenticate. Note |
|
Authentication Failed Retrying |
The client adapter is associated to an access point, the user has failed to EAP authenticate, but another authentication attempt is being made. Note |
|
Link Quality |
The client adapter's signal strength for all received packets. Value: Excellent, Good, Fair, Poor, or No Link |
|
SSID |
The name of the network to which your client adapter is currently associated. Note |
|
Access Point Name |
The name of the access point to which your client adapter is associated. It is shown only if the client adapter is in infrastructure mode, the access point was configured with a name, and Aironet Extensions are enabled (on access points running Cisco IOS Release 12.2(4)JA or later). Note |
|
Access Point IP Address |
The IP address of the access point to which your client adapter is associated. It is shown only if the client adapter is in infrastructure mode, the access point was configured with an IP address, and Aironet Extensions are enabled (on access points running Cisco IOS Release 12.2(4)JA or later). Note |
|
Current Receive Rate |
The rate at which your client adapter is currently receiving data packets. Value: 1, 2, 5.5, 6, 9, 11, 12, 18, 24, 36, 48, or 54 Mbps |
|
Current Transmit Rate |
The rate at which your client adapter is currently transmitting data packets. Value: 1, 2, 5.5, 6, 9, 11, 12, 18, 24, 36, 48, or 54 Mbps |
|
Client Adapter IP Address |
The IP address of your client adapter. |
|
 Feedback