Managing CPS
Interfaces And APIs
- CPS vDRA Interfaces And APIs
- Multi-user Policy Builder
- CRD APIs
- Architecture
- API Endpoints And Examples
- Logging Support Using Journald
- Bulk Provisioning of Records in SLF Database
- vDRA Peer API
CPS vDRA Interfaces And APIs
CPS vDRA includes various application APIs to configure and manage the application.
CRD REST API
Purpose
The Custom Reference Data (CRD) REST API enables the query of creation, deletion, and update of CRD table data without the need to access the Control Center GUI. The CRD APIs are available using an HTTP REST interface.
URL and Port
https:// <master ip or control node >:443/custrefdata
Protocol
HTTPS
Accounts and Roles
Security for the CRD REST API is accomplished by using HTTP basic authentication to support read-only and read-write access to the CRD REST API.
Assigning a Read-Only UserUse the nacm groups group command to assign the user to the "crd-read-only" group.
For Example, nacm groups group crd-read-only user-name oper
Grafana
Purpose
Grafana is a metrics dashboard and graph editor used to display graphical representations of system, application KPIs, bulkstats of various CPS components.
URL and Port
https:// <master ip or control node >:443/grafana
Protocol
HTTPS
Accounts and Roles
For more information on adding or deleting these user accounts, refer to the Prometheus and Grafana chapter in this guide.
JMX Interface
Purpose
Java Management Extension (JMX) interface can be used for managing and monitoring applications and system objects.
Resources to be managed or monitored are represented by objects called managed beans (mbeans). MBean represents a resource running in JVM and external applications can interact with mbeans through the use of JMX connectors and protocol adapters for collecting statistics (pull), for getting/setting application configurations (push/pull), and notifying events like faults or state changes(push).
CLI Access
Port
All applications run on port 9045.
This port is not exposed externally.
Accounts and Roles
Not applicable.
OSGi Console
Purpose
CPS is based on Open Service Gateway initiative (OSGi) and OSGi console is a command-line shell which can be used for analyzing problems at OSGi layer of the application. It may become necessary to connect to the OSGi console to execute specific commands. These commands are not documented in this guide but the connection process is described below.
CLI Access
Ports
All applications run on port 9091 within the executing container.
This port is not exposed externally.
Accounts and Roles
Not applicable.
Policy Builder GUI
Purpose
Policy Builder is the alternative web-based client interface for the configuration of the Cisco Policy Suite.
URL and Port
https://<lbvip01>/pb
https://<master or control ip>/pb
Protocol
HTTPS
Accounts and Roles
Assigning a Read-Only UserIt is not necessary to assign a read-only role. Any valid user that can login will have read-only access.
Assigning a Read-Write User
Use the nacm groups group command to assign the user to the "policy-admin" group.
For example, nacm groups group policy-admin user-name admin
DRA Central GUI
Purpose
DRA Central is the primary web-based client interface for the configuration and operational control of the CPS vDRA.
URL and Port
https://<lbvip01>/central/dra/
https://<master or control ip>/central/dra/
Protocol
HTTPS
Accounts and Roles
Assigning a Read-Only User
Use the nacm groups group command to assign the user to the "policy-ro" group.
Assigning a Read-Write User
Use the nacm groups group command to assign the user to the "policy-admin" group.
For example: nacm groups group policy-admin user-name admin
SVN Interface
Apache ™ Subversion (SVN) is the versioning and revision control system used within CPS. It maintains all the CPS policy configurations and has repositories in which files can be created, updated and deleted. SVN maintains the file difference each time any change is made to a file on the server and for each change it generates a revision number.
In general, most interactions with SVN are performed via Policy Builder.
CLI Access
Use the following command to access SVN:
From a remote machine with the SVN client installed, use the following command to access SVN:
Access all files from the server as follows:
svn checkout --username <username> --password <password> <SVN Repository URL> <Local Path>
Example:
svn checkout --username admin --password admin https://<master ip or control ip>/repos/
If <Local Path>is not provided, files are checked out to the current directory.
Check-in the changed files to the server as follows:
svn commit --username <username> --password <password> <Local Path> -m “modified config”
Example:
svn commit --username broadhop --password broadhop /root/configuration -m “modified config”
Update local copy to latest from SVN:
svn update <Local Path>
Example:
svn update /root/configuration/
Check current revision of files:
svn info <Local Path>
Example:
svn info /root/configuration/
Use svn --help for a list of other commands.
Protocol
HTTPS
URL and Port
https://<lbvip01>/repos/
https://<master or control ip>/repos/
Accounts and Roles
Assigning a Read-Only User
It is not necessary to assign a read-only role. Any valid user that can login will have read-only access.
Assigning a Read-Write User
Use the nacm groups group command to assign the user to the "policy-admin" group.
For example, nacm groups group policy-admin user-name admin
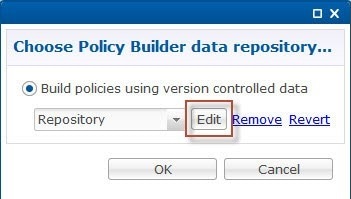
Multi-user Policy Builder
Multiple users can be logged into Policy Builder at the same time.
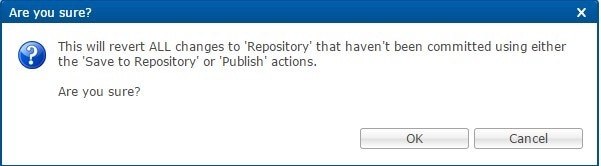
In the event that two users attempt to make changes on same screen and one user saves their changes to the client repository, the other user may receive errors. In such cases the user must return to the login page, revert the configuration, and repeat their changes.
Revert Configuration
You can revert the configuration if changes since the last publish/save to client repository are not wanted.
This can also be necessary in the case of a ' syn conflict ' error where both pcrfclient01 and pcrfclient02 are in use at the same time by different users and publish/save to client repository changes to the same file. The effect of reverting changes is that all changes since the publish/save to client repository will be undone.
Publishing Data
This section describes publishing Cisco Policy Builder data to the Cisco Policy Server. Publishing data occurs in the Cisco Policy Builder client interface, but affects the Cisco Policy Server.
Cisco Policy Builder manages data stored in two areas:
-
The Client Repository stores data captured from the Policy Builder GUI in Subversion. This is a place where trial configurations can be developed and saved without affecting the operation of the Cisco Policy Builder server data.
The default URL is http://svn/repos/configuration.
-
The Server Repository is where a copy of the client repository is created/updated and where the CPS picks up changes. This is done on Publish from Policy Builder.
The default URL is http://svn/repos/run.
CRD APIs
You can use Custom Reference Data (CRD) APIs to query, create, delete, and update CRD table data without the need to utilize the Control Center interface. The CRD APIs are available via a REST interface.
Limitations
These APIs allow maintenance of the actual data rows in the table. They do not allow the creation of new tables or the addition of new columns. Table creation and changes to the table structure must be completed via the Policy Builder application.
All table names should be in lowercase alphanumeric to utilize these APIs. Spaces and special characters are not allowed in the table name.
Setup Requirements
Policy Builder
| Step 1 | Log in to the Policy Builder. | ||||||||||||
| Step 2 | Select Reference Data tab. | ||||||||||||
| Step 3 | Select Systems from the left pane. | ||||||||||||
| Step 4 | Select and expand your system name. | ||||||||||||
| Step 5 | Select
Plugin
Configurations (or a sub cluster or instance), a Custom Reference
Data Configuration plugin configuration is defined.
The following parameters can be configured under Custom Reference Data Configuration:
| ||||||||||||
| Step 6 | In
Reference Data tab >
Custom
ReferenceData Tables, at least one Custom Reference Data Table must
be defined.
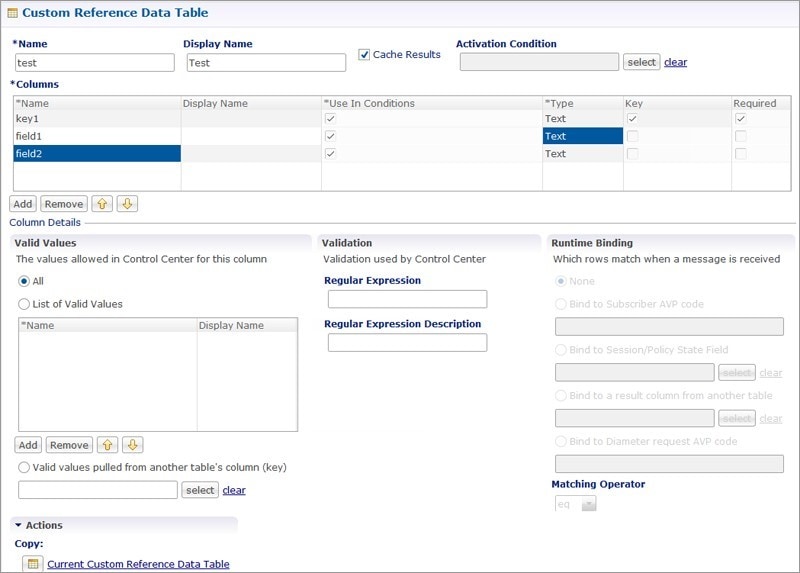 The following parameters can be configured under Custom Reference Data Table: |
Architecture
MongoDB Caching
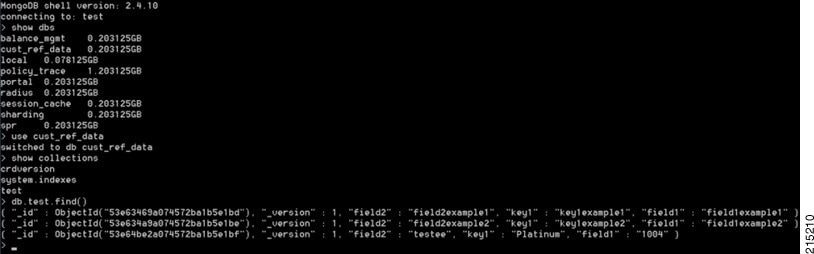
The MongoDB database containing the CRD tables and the data is located in the MongoDB instance specified in the CRD plugin configuration.
The database is named cust_ref_data.
-
This collection contains a document for each row you define in the CRD table.
-
Each document contains a field for each column you define in the CRD table.
-
The field contains the value specified for the column for that row in the table.
-
Additionally, there is a _id field which contains the internal key used by MongoDB and _version which is used by CPS to provide optimistic locking protection, essentially to avoid two threads overwriting the other's update, on the document.
An example is shown below:
Setting the Cache Results to true (checked) is the default and recommended settings in most cases as it yields the best performance. Use of the cached copy also removes the dependency on the availability of the CRD database. So if there is an outage or performance issue the policy decisions utilizing the CRD data will not be impacted.
The cached copy of the table is refreshed on CPS restart and whenever the API writes a change to the CRD table, otherwise the cached copy is used and the database is not accessed.
API Endpoints And Examples
The URL used to access the CRD API is located at https://<masterip or control ip>/custrefdata/<tablename>/_<operation>
- Query API
- Create API
- Update API
- Delete API
- Data Comparison API
- Table Drop API
- Export API
- Import API
- Snapshot POST API
- Snapshot GET API
- Revert API
- Tips for Usage
- View Logs
Query API
Purpose
Returns all rows currently defined in the specified table.
HTTP Operation Type
GET
Example URL
https://<lbvip01>:8443/custrefdata/test/_query
https://<master or control ip>:8443/custrefdata/test/_query
Example URL with Filtering
https://<lbvip01>:8443/custrefdata/test/_query?key1=Platinum
https://<master or control ip>:8443/custrefdata/test/_query?key1=Platinum
Payload
None, although parameters can be specified on the URL for filtering.
Response
Success returns code 200 Ok; XML indicating rows defined is returned. If there are no records in the table, 200 Ok is returned with empty rows in it.
If the table does not exist, code 400 Bad Request is returned.
Example Response without Filtering
<rows>
		<row>
				<field code=”field1” value=”1004”/>
				<field code=”field2” value=”testee”/>
				<field code=”key1” value=”Platinum”/>
		</row>
		<row>
				<field code=”field1” value=”1004”/>
				<field code=”field2” value=”testee”/>
				<field code=”key1” value=”Platinum99”/>
		</row>
		<row>
				<field code=”field1” value=”field1example1”/>
				<field code=”field2” value=”field2example1”/>
				<field code=”key1” value=”key1example1”/>
		</row>
		<row>
				<field code=”field1” value=”field1example2”/>
				<field code=”field2” value=”field2example2”/>
				<field code=”key1” value=”key1example2”/>
		</row>
</rows>
Example Response with Filtering
<rows>
<rows>
		<row>
				<field code=”field1” value=”1004”/>
				<field code=”field2” value=”testee”/>
				<field code=”key1” value=”Platinum”/>
		</row>
</rows>
The response returns keys with the tag “field code”. If you want to use the output of Query as input to one of the other APIs, the tag needs to be changed to “key code”. Currently using “field code” for a key returns code 404 Bad Request and a java.lang.NullPointerException.
Create API
Purpose
Create a new row in the specified table.
HTTP Operation Type
POST
Example Endpoint URL
https://<lbvip01>:8443/custrefdata/test/_create
https://<master or control ip>:8443/custrefdata/test/_create
Example Payload
<row>
		<key code=”key1” value=”Platinum”/>
		<field code=”field1” value=”1004”/>
		<field code=”field2” value=”testee”/>
</row>
Response
Success returns code 200 Ok; no data is returned. The key cannot already exist for another row; submission of a duplicate key returns code 400 Bad Request.
If creating a row fails, API returns 400 Bad Request.
 Note | Create API does not support SVN CRD table operations and displays the following error message when Snv Crd Data checkbox is enabled in CRD table configuration: Create operation is not allowed for subversion table |
Update API
Purpose
Updates the row indicated by the key code in the table with the values specified for the field codes.
HTTP Operation Type
POST
Example Endpoint URL
https://<lbvip01>:8443/custrefdata/test/_update
https://<master or control ip>:8443/custrefdata/test/_update
Example Payload
<row>
		<key code="key1" value="Platinum"/>
		<field code="field1" value="1005"/>
		<field code="field2" value="tester"/>
</row>
Response
Success returns code 200 Ok; no data is returned. The key cannot be changed. Any attempt to change the key returns code 404 Not Found.
If updating a row fails, API returns 400 Bad Request.
Note | Update API does not support SVN CRD table operations and displays the following error message when Snv Crd Data checkbox is enabled in CRD table configuration: Update operation is not allowed for subversion table |
Delete API
Purpose
Removes the row indicated by the key code from the table.
HTTP Operation Type
POST
Example Endpoint URL
https://<lbvip01>:8443/custrefdata/test/_delete
https://<master or control ip>:8443/custrefdata/test/_delete
Example Payload
<row>
<key code="key1" value="Platinum"/>"/>
</row>
Response
Success returns code 200 Ok; no data is returned. If the row to delete does not exist, code 404 Not Found is returned.
If deleting a row fails, API returns 400 Bad Request.
Note | Delete API does not support SVN CRD table operations and displays the following error message when Snv Crd Data checkbox is enabled in CRD table configuration: Delete operation is not allowed for subversion table |
Data Comparison API
Purpose
Determines whether the same CRD table data content is being used at different data centers.
The following three optional parameters can be provided to the API:
-
tableName: Returns the checksum of a specified CRD table tableName indicating if there is any change in the specified table. If the value returned is same on different servers, it means there is no change in the configuration and content of that table.
-
includeCrdversion: Total database checksum contains combination of checksum of all CRD tables configured in Policy Builder. If this parameter is passed as true in API, then total database checksum includes the checksum of "crdversion" table. Default value is false.
-
orderSensitive: Calculates checksum of the table by utilizing the order of the CRD table content. By default, it does not sort the row checksums of the table and returns order sensitive checksum of every CRD table. Default value is true.
custrefdata/_checksum
Database level Checksum API returns checksum details for all the CRD tables and the database. If the value returned is same on different servers, there will be no change in the configuration and content of any CRD table configured in Policy Builder.
HTTP Operation Type
GET
Example Endpoint URL
https://<lbvip01>:8443/custrefdata/_checksum
https://<master or control ip>:8443/custrefdata/_checksum
Response
<response>
    <checksum><all-tables-checksum></checksum>
    <tables>
        <table name="<table-1-name>" checksum="<checksum-of-table-1>"/>
        <table name="<table-2-name>" checksum="<checksum-of-table-2>"/>

        <table name="<table-n-name>" checksum="<checksum-of-table-n>"/>
   </tables>
</response>
/custrefdata/_checksum?tableName=<user-provided-table-name>
Table specific Checksum API returns the checksum details for the specific CRD table. If the value returned is same on different servers, there will be no change in the configuration and content of that table.
HTTP Operation Type
GET
Example Endpoint URL
https://<lbvip01>:8443 /custrefdata/_checksum?tableName=<user-provided-table-name>
https://<master or control ip>:8443 /custrefdata/_checksum?tableName=<user-provided-table-name>
Response
<response>
    <tables>
        <table name="<user-provided-table-name>" checksum="<checksum-of-specified-table"/>
    </tables>
</response>
Note | Table specific Checksum API does not support SVN CRD table operations and displays the following error message when Snv Crd Data checkbox is enabled in CRD table configuration: Checksum operation is not allowed for subversion table |
Table Drop API
Purpose
Drops custom reference table from MongoDB to avoid multiple stale tables in the system.
The Table Drop API is used in the following scenarios:
-
If a CRD table does not exist in Policy Builder but exists in the database, the API can be used to delete the table from the database.
-
If a CRD table exists in Policy Builder and database, the API cannot delete the table from the database. If this is attempted the API will return an error: “Not permitted to drop this table as it exists in Policy Builder”.
-
If a CRD table does not exist in Policy Builder and database, the API will also return an error No table found:<tablename>.
/custrefdata/<table_name>/_drop
HTTP Operation Type
POST
Example Endpoint URL
https://<lbvip01>:8443/custrefdata/<table_name>/_drop
https://<master or control ip>:8443/custrefdata/<table_name>/_drop
Note | Drop API does not support SVN CRD table operations and displays the following error message when Snv Crd Data checkbox is enabled in CRD table configuration: Drop operation is not allowed for subversion table |
Export API
Purpose
Exports single and multiple CRD table and its data.
/custrefdata/_export?tableName=<table_name>
Exports single CRD table and its data.
Returns an archived file containing csv file with information of specified CRD table table_name.
HTTP Operation Type
GET
Example Endpoint URL
https://<lbvip01>:8443/custrefdata/_export?tableName=<table_name>
https://<master or control ip>:8443/custrefdata/_export?tableName=<table_name>
/custrefdata/_export
Exports all CRD tables and its data.
Returns an archived file containing csv file with information for each CRD Table.
HTTP Operation Type
GET
Example Endpoint URL
https://<lbvip01>:8443 /custrefdata/_export
https://<master or control ip>:8443 /custrefdata/_export
Note | Export API does not support Svn CRD tables and displays the following warning message in the Response Header "Export-Warning": Datasource for tables [table1, table2,...] is subversion. Response will not contain data for these tables and skipped SVN CRD tables to be a part of archive. |
Import API
Purpose
Imports CRD table and its data.
It takes an archived file as an input which contains one or more csv files containing CRD tables information.
HTTP Operation Type
POST
Example Endpoint URL
https://<lbvip01>:8443/custrefdata/_import
https://<master or control ip>:8443/custrefdata/_import
https://<lbvip01>:8443/custrefdata/_import?batchOperation=true
https://<lbvip01>:8443/custrefdata/_import?batchOperation=false&duplicateValidation=true
Note | Import API supports SVN CRD table operations in the following scenarios:
|
Snapshot POST API
Purpose
Creates a snapshot of the CRD tables on the system. The created snapshot will contain CRD table data, policy configuration and checksum information for all CRD tables.
/custrefdata/_snapshot?userId=<user_id>&userComments=<user_comments>
HTTP Operation Type
POST
Example Endpoint URL
https://<lbvip01>:8443/custrefdata/_snapshot?userId=<user_id>&userComments=<user_comments>
https://<master or control ip>:8443/custrefdata/_snapshot?userId=<user_id>&userComments=<user_comments>
Optional Parameters
userComments
Note | Snapshot POST API does not support export of the contents of Svn CRD tables. The API returns the following warning message if there are any Svn CRD tables present while creating snapshot: Datasource for tables [table_1, table_2…] is subversion. Data for these tables will not come from database (mongodb) |
Snapshot GET API
Purpose
Enables you to get the list of all valid snapshots in the system.
The following information is available in the list of snapshots:
/custrefdata/_snapshot
HTTP Operation Type
GET
Example Endpoint URL
https://<lbvip01>:8443/custrefdata/_snapshot
https://<master or control ip>:8443/custrefdata/_snapshot
Example Response
<snapshots>
    <snapshot>
        <name><date-and-time>_<user-id></name>
        <snapshotPath>/var/broadhop/snapshot/20160620011825306_qns</snapshotPath>
        <creationDateAndTime>20/06/2016 01:18:25:306</creationDateAndTime>
        <comments>snapshot-1 june</comments>
        <policyVersion>903</policyVersion>
        <checksum checksum="60f51dfd4cd4554910da44a776c66db1">
            <table name=<table-name-1> checksum="<table-checksum-1>"/>
                …
            <table name=<table-name-n> checksum="<table-checksum-n>"/>
        </checksum>
    </snapshot>
    <snapshot>
                …
    </snapshot>
</snapshots>
Note | Snapshot GET API does not return checksum information of Svn CRD tables as they are not part of created snapshots. |
Revert API
Purpose
Enables you to revert the CRD data to a specific snapshot. If the specific snapshot name is not provided, the API will revert to the latest snapshot.
/custrefdata/_revert?snapshotName=<snapshot_name>
HTTP Operation Type
POST
Example Endpoint URL
https://<lbvip01>:8443/custrefdata/_revert?snapshotName=<snapshot_name>
https://<master or control ip>:8443/custrefdata/_revert?snapshotName=<snapshot_name>
Optional Parameter
snapshotName
Note | Revert API does not support reverting of CRD data for Svn CRD tables. For Svn CRD table, it clears the mongodb table and displays the following warning message: Datasource for tables [table_1, table_2…] is subversion. Data for these tables will be reverted using svn datasource not from database (mongodb) |
Tips for Usage
The Query API is a GET operation which is the default operation that occurs when entering a URL into a typical web browser.
The POST operations, Create, Update, and Delete, require the use of a REST client so that the payload and content type can be specified in addition to the URL. REST clients are available for most web browsers as plug-ins or as part of web service tools, such as SoapUI. The content type when using these clients should be specified as application/xml or the equivalent in the chosen tool.
View Logs
You can view the API logs in the OAM (pcrfclient) VM at the following location:
/var/log/broadhop/consolidated-qns.log
You can view the API logs with the following commands:
Logging Support Using Journald
To monitor and view logs, journald system service has been added that collects and stores logging data. It creates and maintains structured, indexed journals based on logging information received from a variety of sources. The following is a sample of CLI commands:
-
monitor log application - This command is used to tail the current Policy Server (qns) log.
-
monitor log engine - This command is used to tail the current Policy Server (qns) engine log
-
monitor log container <container id> - This command is used to tail the container logs.
-
show log application - This command opens the consolidated logs.
-
show log engine - This command is used to open the consolidate engine logs using Linux 'less' command.
For further log access, you need to connect to the OpenStack control node and from there to respective master or control node. For example, to connect to master/control nodes use the following command:
ssh -i cps.pem cps@IPAddress
where, IPAddress is the IP address of the master or control node.
To access the logs once you are connected to control node, use the following command:
docker logs container-id
For example, use docker logs mongo-s1 to display all the logs of mongo-s1 container.
Bulk Provisioning of Records in SLF Database
CPS vDRA provides APIs for bulk provisioning of subscriber records in the SLF database.
You can use the CSV file to provision create and update of bulk subscriber records using SLF API. You can also check the status of the upload using the API.
Note | SLF bulk provisioning generates high number of database write operations in a short duration of time. To spread out the operations over a period of time and mitigate the performance issue, configure the transactions per second (TPS) for SLF provisioning in Policy Builder. For more information, see the CPS vDRA Configuration Guide. |
CSV File
The CSV file format is used to bulk provision the subscriber records in SLF database. The Actions column in the CSV file determines whether the record is for creation, updation, or deletion.
You can use # in the beginning of the line to indicate comments in the CSV file. The line is ignored when the file is processed.
|
Column |
Description |
|---|---|
|
Action |
The action to be performed on the subscriber record.
|
|
Subscriber Id |
The subscriber ID of the subscriber. |
|
IMSI |
The IMSI of the subscriber. If the same subscriber has multiple IMSI, then add multiple IMSI columns for the subscriber. |
|
MSISDN |
The MSISDN of the subscriber. If the same subscriber has multiple MSISDN, then add multiple MSISDN columns for the subscriber. |
|
Destination:<Tag> |
The destinations of the subscriber. To provision multiple destinations, add column name/header with prefix “Destination:” and suffix it with the tag, for example: Destination:HSS, Destination:MME, Destination:PCRF, etc |
Sample CSV File
Action, Subscriber Id, IMSI, IMSI, MSISDN, MSISDN, Destination:MME, Destination:HSS
Put,    1001,         34101, 34102, 91001, 91002,  MME1,            HSS1
Put,    1001,         34101,      ,  91005,     ,  MME2,            HSS2
Delete, 1010, , , , , ,
Bulk Upload API
Schedules the SLF bulk subscribers provisioning task. Bulk Upload API takes the input as csv file and schedules the job to execute in the background.
Request
Method: POST
URI: /dra/slfapi/subscriber/bulkUpload
Header: Content-Type: multipart/form-data
Body: CSV File
Request Example
HTTP POST /dra/slfapi/subscriber/bulkUpload
Response Example
HTTP STATUS: 202 (Accepted)
{
  "success": {
    "code": 1,
    "message": "Request accepted, slf bulk upload task is scheduled for execution"
  }
}
Example of Curl Command
curl -X POST --progress-bar -H "Content-Type: multipart/form-data"
-H "Content-Type: application/json" \ -F "file=@create_subscribers.csv"
https://<MasterIP>/dra/slfapi/subscriber/bulkUpload --insecure
-u admin:admin
The file named create_subscribers.csv must be created before running this command.
Bulk Upload Status
Returns the list of bulk upload status of the bulk provisioning sorted by the latest first. Latest 10 statuses would be saved in the system for reference, old status will automatically get purged.
The following table describes the fields in the Bulk Upload Status:
|
Field |
Description |
|---|---|
|
fileName |
The name of csv file uploaded. |
|
startTime |
The time when task was scheduled. |
|
endTime |
The time when task was finished |
|
approxEndTime |
The future time when task is expected to be finished |
|
status |
The status of the task Status can be one of these statues (scheduled, in-progress, complete, failed) |
|
statusMessage |
The detailed status of the task |
|
numberOfTotalSubscriber |
Total number of subscriber in csv file |
|
numberOfPending |
The number of subscriber pending for execution |
|
numberOfComplete |
The number of subscriber, whose execution is finished |
|
numberOfSuccess |
The number of subscriber provisioned successfully. |
|
numberOfFailure |
The number of subscriber failed in provisioning. |
|
failedSubscriber |
This field contains the failure reason for each failed subscriber. This is a map, with key as error code and value as the list of failed subscribers. |
Request
Method: GET
URI: /dra/slfapi/subscriber/bulkUploadStatus
Request Example
HTTP GET /dra/slfapi/subscriber/bulkUploadStatus
Response Example
HTTP STATUS: 200
	[{
	"approxEndTime": "08-17-2017 13:31:59",
       	"failedSubscriber": {
            "1001": [
                "1000000000",
                "1000000001",
                "1000000002"
            ]
        	},
        	"fileName": "create_subscribers_1k.csv",
        	"numberOfComplete": 700,
        	"numberOfFailure": 3,
        	"numberOfPending": 300,
        	"numberOfSuccess": 697,
        	"numberOfTotalSubscriber": 1000,
        	"startTime": "08-17-2017 13:30:16",
        	"status": "complete",
        	"statusMessage": "Slf bulk upload task execution is in progress"
    },
   {
   	"endTime": "08-18-2017 12:41:27",
        	"failedSubscriber": {},
    	"fileName": "create_subscribers_10.csv",
        	"numberOfComplete": 10,
        	"numberOfFailure": 0,
        	"numberOfPending": 0,
    	"numberOfSuccess": 10,
        	"numberOfTotalSubscriber": 10,
        	"startTime": "08-18-2017 12:41:27",
    	"status": "complete",
        	"statusMessage": "Slf bulk upload task is completed"
    }]
Example of Curl Command
curl -X GET --progress-bar -H "Content-Type:
application/json" \https://<MasterIP>/dra/slfapi/subscriber/bulkUploadStatus
 --insecure -u admin:admin
vDRA Peer API
The vDRA Peer API provides a REST API interface for the following functions:
-
view active and inactive peer endpoints - local and remote
-
view peer details for each host and/or peer key
-
peer status logs
For more information about the Peer API, see the API RAML at: https://<master ip>/dra/docs/api/
 Feedback