- Prerequisites for Setting Up and Accessing Cisco Mobility Express
- Configuring the Switch Port
- Starting the Initial Configuration Wizard
- Using the Initial Configuration Wizard
- Checking if an AP has CAPWAP Lightweight AP Software or Cisco Mobility Express Software
- Converting from CAPWAP Lightweight AP to Cisco Mobility Express Software
- Preparing APs to Associate with the Master AP
- Logging in to Cisco Mobility Express
- Understanding the Mobility Express Controller Web Interface
Getting
Started
Prerequisites for Setting Up and Accessing Cisco Mobility Express
-
You must not have other Cisco wireless controllers, neither appliance nor virtual, in the same network, during setup or during daily operation of a Cisco Mobility Express network.
The Cisco Mobility Express controller cannot interoperate or co-exist with other wireless controllers in the same network. Ensure that there no wireless controllers, other than the Cisco Mobility Express controller, in the network.
-
Decide on the first access point (AP) to be set up. The first AP to be set up should be one that supports the Cisco Mobility Express wireless controller functionality. This is to ensure that this AP can act as the master AP, and the other APs can then connect to it. This will ensure that the pre-defined CiscoAirProvision Service Set Identifier (SSID) is advertised only by the master AP and not by other APs.
-
Ensure that the AP is properly installed as per its Hardware Installation Guide.
-
Ensure that a DHCP server is present and accessible in the network. The Mobility Express controller uses an external DHCP server for IP address management of the access points and the wireless clients.
-
The initial setup of the Cisco Mobility Express controller can be done only through the controller configuration wizard and over Wi-Fi.
You require a Wi-Fi-enabled laptop to connect to the pre-defined CiscoAirProvision SSID advertised by the master AP. You cannot access this SSID through a wired network.
-
Your laptop should have a compatible browser. For a list of browsers compatible with the Cisco Mobility Express wireless controller web interface and the initial configuration wizard, see Supported Browsers.
-
If your network is using universal regulatory domain access points, then you will need prime the access point to the right regulatory domain, before the APs start serving clients. See the Cisco Aironet Universal AP Priming and Cisco AirProvision User Guide, at this URL: http://www.cisco.com/c/en/us/td/docs/wireless/access_point/ux-ap/guide/uxap-mobapp-g.html.
After these prerequisites are met, proceed to Configuring the Switch Port.
 Note | A CLI-based Initial Configuration Wizard is also available, but recommended only for advanced users. See Using the CLI Initial Configuration Wizard. |
Configuring the Switch Port
-
All access points, including the Master AP, in a Mobility Express network should be in the same L2 broadcast domain. Management traffic must not be tagged.
-
The switch port to which the Master AP is connected can be a trunk port or an access port and must be configured to trunk Native VLAN for management traffic. Data traffic must be trunked with appropriate VLANs for local switching as well.
The following is a sample switch port configuration. Interface GigabitEthernet1/0/37 description » Connected to Master AP « switchport trunk native vlan 122 switchport trunk allowed vlan 10,20,122 switchport mode trunk
After the switch port configuration is done, proceed to Starting the Initial Configuration Wizard.
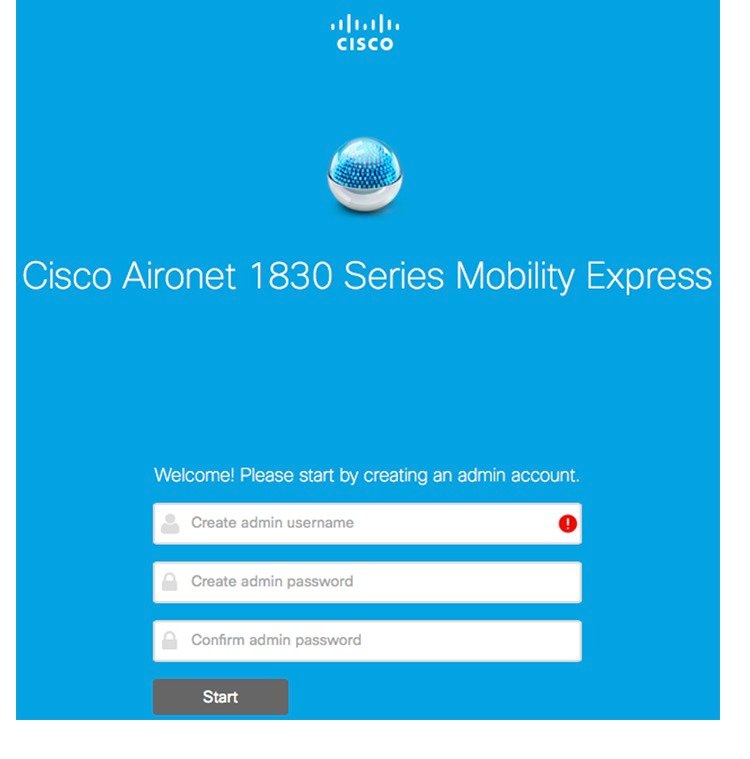
Starting the Initial Configuration Wizard
What to Do Next
If the initial configuration wizard's admin account window is displayed, then proceed to Using the Initial Configuration Wizard, else proceed to Checking if an AP has CAPWAP Lightweight AP Software or Cisco Mobility Express Software.
Using the Initial Configuration Wizard
The initial configuration wizard helps you configure certain basic parameters on your Cisco Mobility Express wireless LAN controller, and thereby gets your Cisco Mobility Express network running.
Use the following sections as a reference for the data that you enter in the initial configuration wizard.
Initial Configuration Wizard Opening window
The banner on this window shows the name of the AP model on which the Cisco Mobility Express wireless controller is being configured, for example, Cisco Aironet 1830 Series Mobility Express.
-
Enter an administrative username. You can enter up to 24 ASCII characters.
-
Enter a password. You can enter up to 24 ASCII characters.
When specifying a password, ensure the following: -
The password must contain characters from at least three of the following classes, lowercase letters, uppercase letters, digits, and special characters.
-
No character in the password can be repeated more than three times consecutively.
-
The new password must not be the same as the associated username or the username reversed.
-
The password must not be cisco, ocsic, or any variant obtained by changing the capitalization of the letters in the word Cisco. In addition, you cannot substitute 1, I, or ! for i, 0 for o, or $ for s.
-
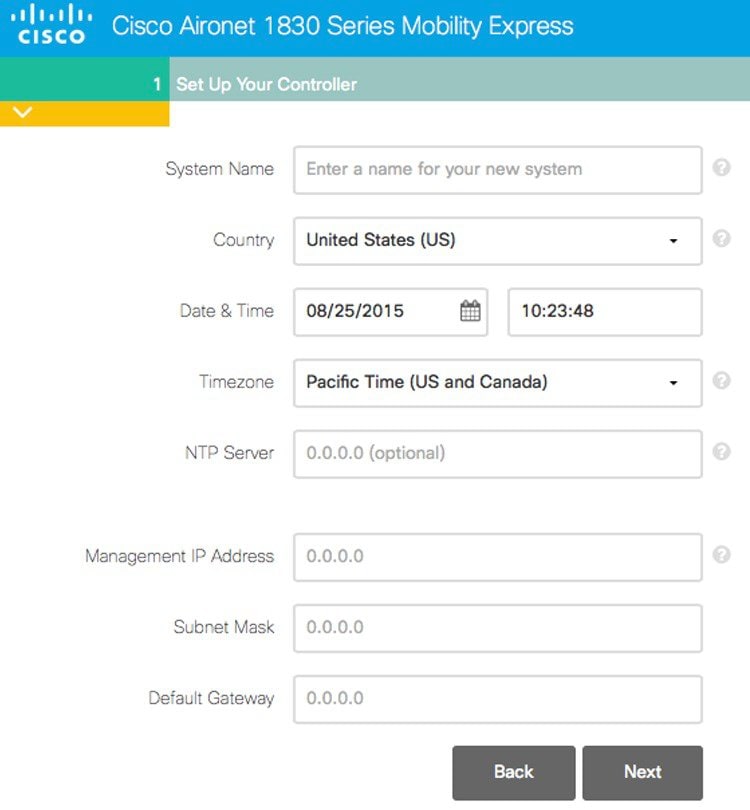
Step 1—Set Up Your Controller
-
System Name—Enter the name that you want to assign to this controller.
-
Country—Enter the country where this Cisco Mobility Express network is located.
-
Date and Time—Specify the date. By default, your device's system time is applied here. You can manually edit the time, if required.
-
Timezone—Select your time zone.
-
NTP Server—To have the date and time set automatically using an Network Time Protocol (NTP) server, you can enter the IPv4 address or the FQDN name of the NTP server here.
By default three NTP servers are automatically created. The default FQDN names of the NTP servers are: The IPv4 address or the FQDN name, which you specify here, will be applied to the server with NTP Index 1, thereby overwriting its default FQDN, 0.ciscome.pool.ntp.org . For editing NTP server details, go to Management > Time.
-
Management IP Address—Enter the IP address for managing the controller.
-
Subnet Mask—Enter the subnet mask for the controller.
-
Default Gateway—Enter the default gateway for the controller.
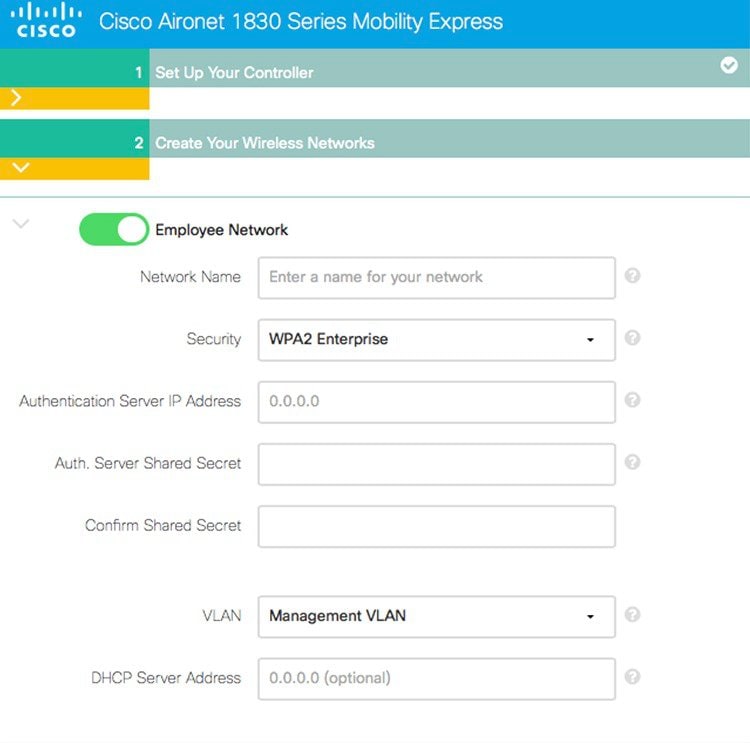
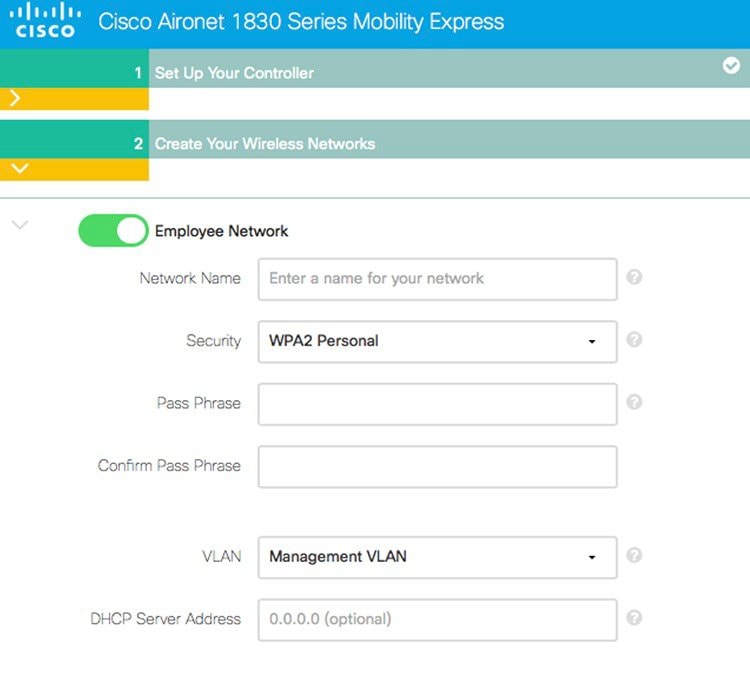
Step 2—Create Your Wireless Networks
-
Network Name—Specify the SSID for your Employee network.
-
Security—You can choose either WPA2 Personal that uses pre-shared key (PSK) authentication or WPA2 Enterprise (also called 802.1x), which requires a RADIUS server for authentication.
-
Pass Phrase—If you have chosen WPA2 Personal security, specify the PSK here.
-
Authentication Server IP Address—If you have chosen WPA2 Enterprise security, enter the IP address of the RADIUS server.
-
Shared Secret—Enter the password for the RADIUS server.
-
VLAN—Choose Management VLAN (VLAN 0) or create a New VLAN (with a VLAN ID ranging from 1 to 4094).
-
VLAN ID—Specify the VLAN ID for the new VLAN here.
-
DHCP Server Address—This is optional.
-
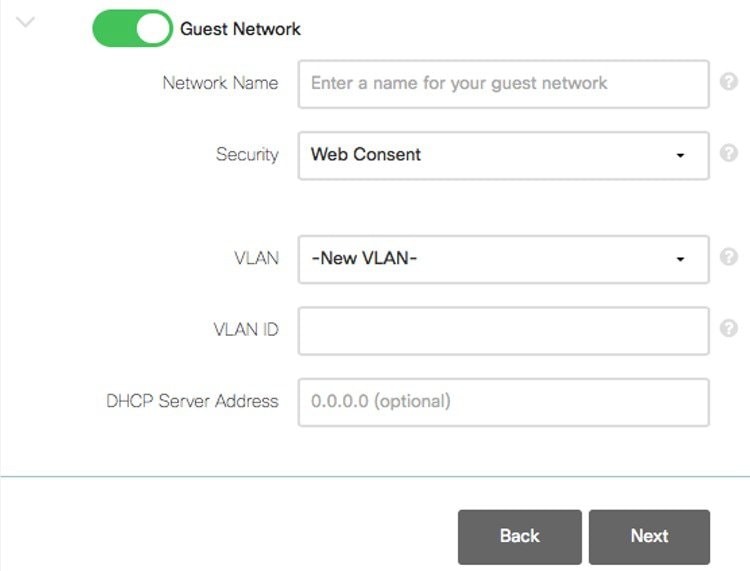
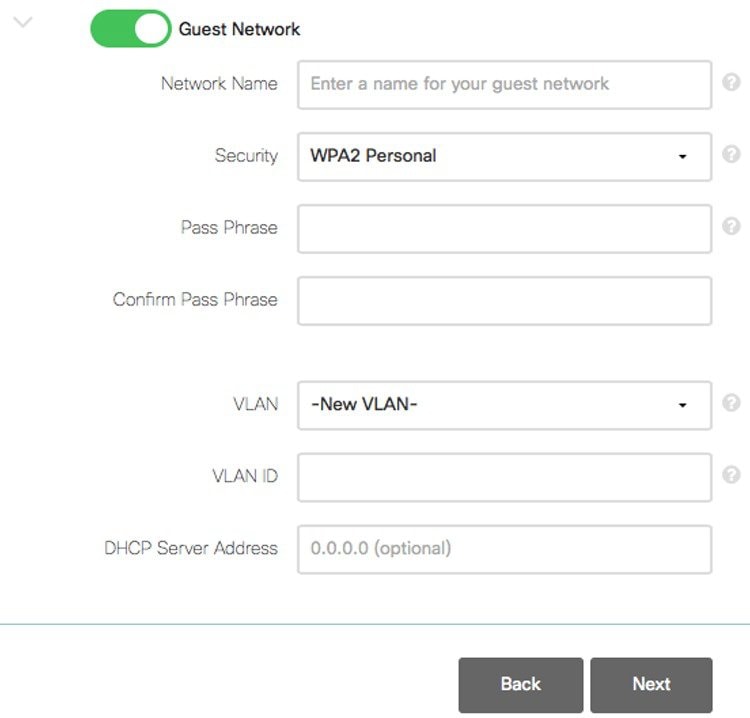
Network Name—Specify the SSID for your Guest network.
-
Security—Choose Web Consent, which requires no authentication or WPA2 Personal, which uses PSK authentication.
-
Pass Phrase—If you have chosen WPA2 Personal security, specify the PSK here.
-
VLAN—Choose Employee VLAN to have the same VLAN as that defined for the Employee Network or create a New VLAN (with a VLAN ID ranging from 1 to 4094).
-
VLAN ID—Specify the VLAN ID for the new VLAN.
-
DHCP Server Address—This is optional.
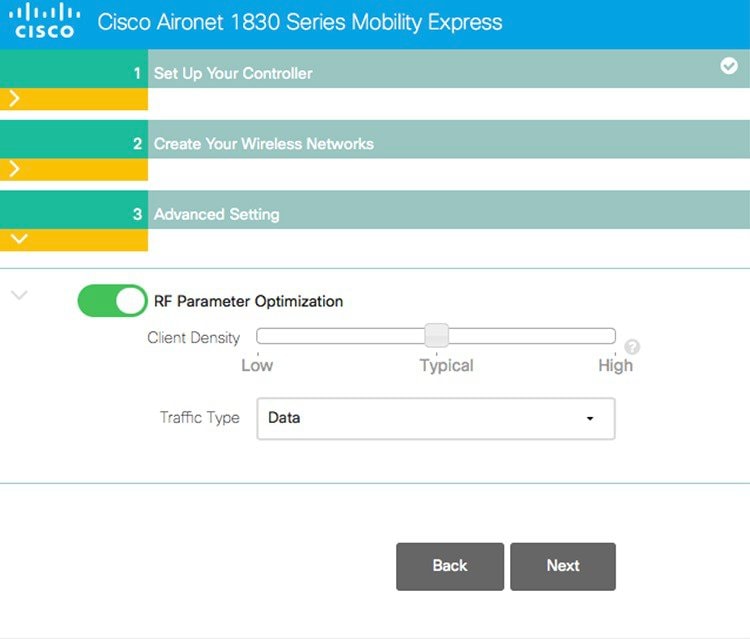
Step 3—Advanced Settings
Note | If you do not enable RF Parameter Optimization during the initial configuration wizard, then client density is set to Typical (the default value), and RF traffic type is set to Data (the default value). |
Once you apply these configuration settings, the access point reboots and the controller restarts. You can now proceed to Logging in to Cisco Mobility Express.
Checking if an AP has CAPWAP Lightweight AP Software or Cisco Mobility Express Software
Both the Cisco 1850 Series and 1830 Series APs can be ordered with a factory-shipped CAPWAP lightweight AP software or a Cisco Mobility Express controller software. However, you can convert a CAPWAP AP to Cisco Mobility Express software, and vice-versa, on site. To determine if your AP has a Cisco Mobility Express image or CAPWAP Lightweight AP image, follow these steps:
What to Do Next
Fields
and Their Values in the Output
What to
do Next
AP Image
Type:
MOBILITY EXPRESS IMAGE
AP
Configuration:
MOBILITY EXPRESS CAPABLE
No
conversion is required.
Reboot the
AP and proceed to
Starting the Initial Configuration Wizard.
AP Image
Type:
MOBILITY EXPRESS IMAGE
AP
Configuration:
NOT
MOBILITY EXPRESS CAPABLE
This
means that the AP has the Cisco Mobility Express software, but is running as a
CAPWAP lightweight AP.
This AP is
currently not configured to run as Mobility Express controller, does not take
part in the master AP election process either, and hence does not broadcast the
the
CiscoAirProvision SSID. This AP can, however, function as a
subordinate AP in a Mobility Express network.
To enable
the Mobility Express controller functionality of this AP, run the command
ap-type mobility-express tftp on the AP console. The
AP will reboot, come back online, and take part in the master AP election
process. If and when it is elected as master, it will broadcast the
CiscoAirProvision SSID.
The
AP Image Type and
AP Configuration fields are not present in the
output
This
means that the AP has a CAPWAP lightweight AP software and not Cisco Mobility
Express software. Proceed to
Converting from CAPWAP Lightweight AP to Cisco Mobility Express Software.
Converting from CAPWAP Lightweight AP to Cisco Mobility Express Software
Follow this procedure to convert the AP software to Cisco Mobility Express configuration-capable software.
note Tip | If you face issues with converting the AP software to a Cisco Mobility Express software, upgrade the AP CAPWAP software to the latest AP software version ap3g3-k9w8-tar.153-3.JD.tar. Now, you can convert the CAPWAP software to the Cisco Mobility Express software AIR-AP2800-K9-ME-8-3-102-0.tar. This issue occurs in Mobility Express-capable APs shipped with default images or a version of the images prior to Cisco Wireless Release 8.3. This is due to insufficient space in the AP’s memory or because the AP has been started in U-boot mode where the image is not found in flash. |
Note | The following procedure shows a conversion from the 8.1.122.0 Lightweight AP release on an 1850 series AP, and hence uses the corresponding software file. Ensure that you use the appropriate software file depending on the release you are converting from and the AP model. |
- Your AP is either a Cisco 1850 Series or a 1830 Series AP with Lightweight AP software Release 15.3.3-JBB5, for Cisco Wireless Controller Software Release 8.1.122.0, or a newer software.
-
A TFTP server and a DHCP server should be configured and accessible.
-
Ensure that there are no Cisco WLCs, physical or virtual, in the network while you are performing this upgrade. The AP must not interface with any other wireless controller while you are performing this upgrade.
What to Do Next
Proceed to Starting the Initial Configuration Wizard.
For an alternative to the above conversion process, using the .ZIP file, see Alternative Method for CAPWAP to Mobility Express Conversion.
To convert an AP from Mobility Express type to CAPWAP type, see Converting an AP from Mobility Express to CAPWAP Type.
Preparing APs to Associate with the Master AP
Follow this procedure to enable a new AP to associate itself with the Cisco Mobility Express wireless controller on the master AP, and thereby enabling it to join the Cisco Mobility Express network.
-
A master AP with Cisco Mobility Express wireless controller should be up and running.
-
If the AP that has to be prepared to associate with the master AP is a universal regulatory domain AP, then it should be primed using the Cisco AirProvision mobile application. For more information, see the Cisco Aironet Universal AP Priming and Cisco AirProvision User Guide at:
What to Do Next
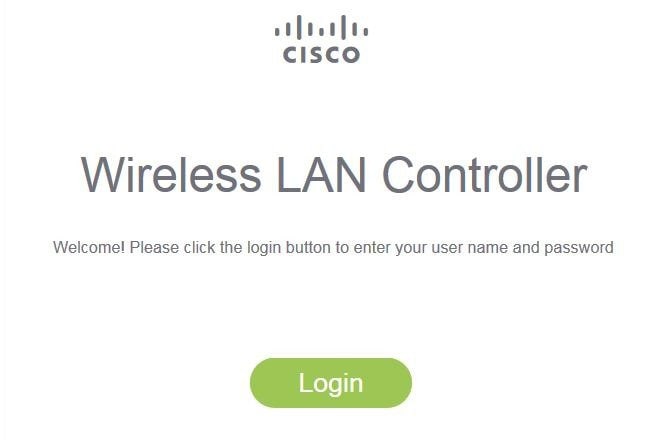
Logging in to Cisco Mobility Express
What to Do Next
After you log in, the default landing page is the Network Summary window. For more information, see About the Cisco Mobility Express Monitoring Service.
Understanding the Mobility Express Controller Web Interface
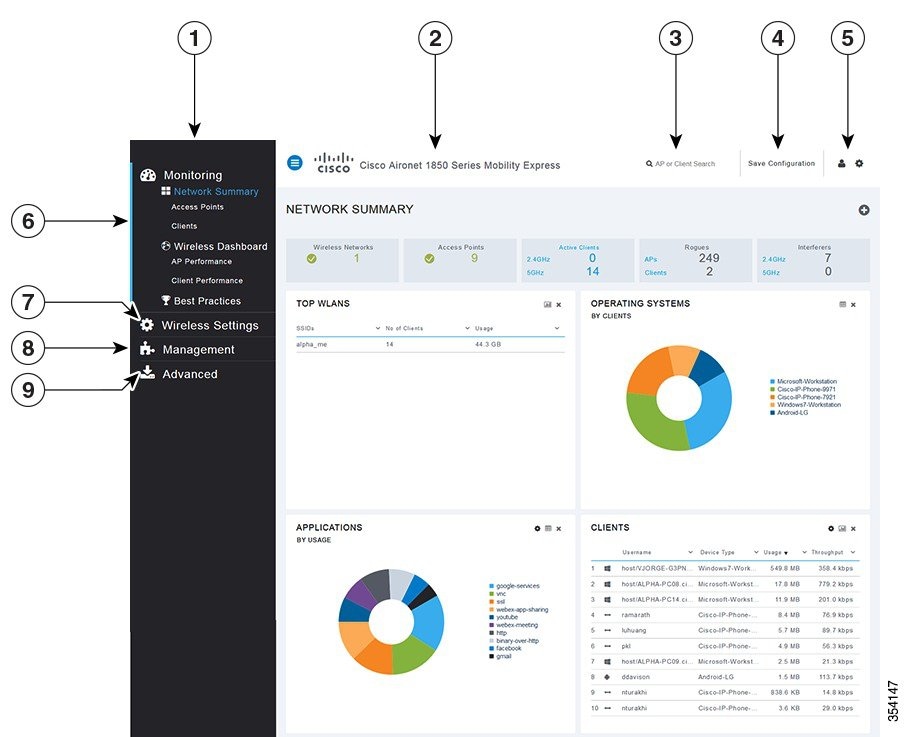
|
No. |
Web Interface Section or Feature |
|---|---|
|
1 |
The side pane of the web interface. This is main navigational pane using which you can navigate to the various sub-sections in the web interface. |
|
2 |
The title of the web interface. It indicates the AP model of the master AP (on which the integrated controller functionality is currently operating) |
|
3 |
Search for an AP or client using its MAC address. |
|
4 |
Click to save the current controller configuration to the NVRAM. For more information, see Saving Controller Configuration. |
|
5 |
Click to view the current system information or to log off the controller web interface. |
|
6 |
The Mobility Express Network Monitoring section. For more information, see About the Cisco Mobility Express Monitoring Service. |
|
7 |
The Wireless Settings section, where you can administer associated APs, manage WLANs, WLAN user accounts, and guest user accounts. For more information, see Specifying Wireless Settings. |
|
8 |
The Management section, where you can set management access parameters, manage admin accounts, network time, and perform software updates. For more information, see Managing the Network. |
|
9 |
The Advanced section, where you can set SNMP settings, sys log settings, and perform a reset to factory default. For more information, see Using Advanced Settings and Operations. |
 Feedback