Cisco WebAttendant User Guide for Cisco CallManager 2.4
Bias-Free Language
The documentation set for this product strives to use bias-free language. For the purposes of this documentation set, bias-free is defined as language that does not imply discrimination based on age, disability, gender, racial identity, ethnic identity, sexual orientation, socioeconomic status, and intersectionality. Exceptions may be present in the documentation due to language that is hardcoded in the user interfaces of the product software, language used based on RFP documentation, or language that is used by a referenced third-party product. Learn more about how Cisco is using Inclusive Language.
- Updated:
- April 5, 2004
Chapter: Using the Speed Dial Area
Using the Speed Dial Area
Cisco WebAttendant provides 26 buttons that can be configured for speed dialing. You can program the buttons to speed dial an outside number (although only six digits will appear in the button) or to speed dial an internal directory number for an employee who receives a large volume of calls. This feature is particularly useful if you have customer support or sales groups in your organization.
The speed dial area is located in the upper right corner of Cisco WebAttendant. When Cisco WebAttendant is used for the first time, no speed dial buttons have been set.
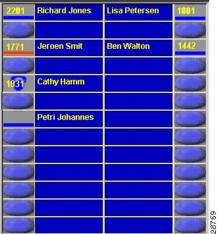
The speed dial area indicates the status of the user's phone using the same icons as in the directory, as shown in Figure 4-1.
Figure 4-1 Speed Dial Area
Setting Speed Dial Buttons
You can set the speed dial buttons by selecting directory numbers from the directory or by using the Button Configuration dialog box.
Using the Directory to Set Speed Dial Buttons
Setting a speed dial button using the directory:
Step 1 ![]() Select a directory number or person in the directory.
Select a directory number or person in the directory.
Step 2 ![]() Use your mouse to drag the line from the directory and drop it onto an available speed dial button.
Use your mouse to drag the line from the directory and drop it onto an available speed dial button.
The directory number (up to six digits) is displayed in the button and the name (up to 14 characters) is displayed next to the number. The speed dial button has been programmed and is available for use.
Configuring Speed Dial Buttons
Setting a speed dial button using the Button Configuration dialog box:
Step 1 ![]() Right-click the mouse over the speed dial button you want to configure.
Right-click the mouse over the speed dial button you want to configure.
A menu is displayed.
Step 2 ![]() Click Button Configuration.
Click Button Configuration.
The Button Configuration dialog box is displayed.
Figure 4-2 Button Configuration dialog box
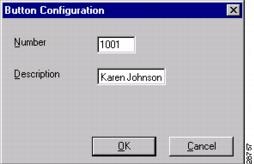
Step 3 ![]() In the Number box, type the telephone number you want to program for this speed dial button, including any access codes for an outside line, such as 9, or long distance code or area codes, such as 1-972 or 972. Only six digits will display on the button.
In the Number box, type the telephone number you want to program for this speed dial button, including any access codes for an outside line, such as 9, or long distance code or area codes, such as 1-972 or 972. Only six digits will display on the button.
Step 4 ![]() In the Description box, type a description for the speed dial, such as a name or the complete number. Because the Number displays only six digits, the description can be very important. Type up to 14 alphanumeric characters.
In the Description box, type a description for the speed dial, such as a name or the complete number. Because the Number displays only six digits, the description can be very important. Type up to 14 alphanumeric characters.
Step 5 ![]() Click OK.
Click OK.
The speed dial button has been programmed and is available for use.
 Feedback