Task Flow to Enable Digital Channels
License Requirements
The digital channel features of Cisco SocialMiner are available in the Premium license version of Cisco Unified Contact Center Express. The feature availability in Unified CCX is based on the type of license for Cisco Unified Contact Center Express.
Install Cisco SocialMiner
SocialMiner is installed as an appliance using the Cisco Unified Operating System (Unified OS). The operating system and the SocialMiner application are installed together using a similar installation process as other Unified OS products such as Cisco Unified Communications Manager and Cisco Unified Intelligence Center.
SocialMiner operates on a VMware Virtual Machine (VM) on hardware that is running a VMware Host Server. SocialMiner currently supports installation of only a single node (as opposed to a duplexed or redundant system).
Perform the following steps to install SocialMiner:
Procedure
| Step 1 |
Create a virtual machine using a VMware Open Virtual Format template. |
| Step 2 |
Use the latest OVA template for the fresh installation of SocialMiner release. Go to https://software.cisco.com/download/home/270569179 and download this template. |
| Step 3 |
When deploying the template, select either a large or a small deployment from the drop-down list. |
| Step 4 |
Mount the SocialMiner DVD or ISO file to the virtual machine and set the virtual machine to boot from the SocialMiner DVD. The installation wizard opens. Use Tab to navigate between elements and then press the space bar or the Enter key to select the element and proceed. |
| Step 5 |
Perform the media check when prompted. |
| Step 6 |
Follow the instructions on the screen and select Yes or Continue. |
| Step 7 |
Use the arrow keys to highlight the correct time zone and then use Tab to navigate to the OK button. Press Enter to proceed. |
| Step 8 |
Provide the network information for SocialMiner . You must provide valid hostname with matching IP address. The system confirms that the hostname matches the IP address later in the installation process. |
| Step 9 |
Select Yes to provide DNS Client Settings for SocialMiner . Provide DNS servers and the domain. Select OK. DNS configuration is mandatory. |
| Step 10 |
Provide an Administrator ID and password. This credential is for platform (Unified OS) administration. |
| Step 11 |
Provide information about your organization. This information generates the security (SSL) certificates for this server. |
| Step 12 |
You must provide at least one NTP Server. Enter the NTP host address and select OK. |
| Step 13 |
Provide a security password. |
| Step 14 |
Provide a username and password for the SocialMiner administrator. You can import additional SocialMiner users from Active Directory after the SocialMiner installation is complete. |
| Step 15 |
The confirmation window opens. You can select Back to change settings or OK to complete the installation. Installation can take up to 2 hours. The server may reboot to complete the installation steps. If you install from an ISO file and see the virtual machine message, to "Disconnect anyway (and override the lock)?", select Yes. A sign-in prompt appears on the server console. |
| Step 16 |
After the installation is complete, perform the one-time setup tasks like:
|
Configure SocialMiner in Unified CCX
SocialMiner Configuration
Use the SocialMiner Configuration web page to configure Cisco SocialMiner . You must configure information only on this web page to enable the chat and email features.
Cisco Unified CCX does not support custom configuration changes on the chat and email campaigns or feeds from the SocialMiner administration page.
This option is available only with the Unified CCX Premium license package. The email feature support for Unified CCX depends on the SocialMiner version. For information about feature compatibility, see the Unified CCX Compatibility related information, located at: https://www.cisco.com/c/en/us/support/customer-collaboration/unified-contact-center-express/products-device-support-tables-list.html.
Any configuration change using SocialMiner Administration interface is not supported.
 Note |
On a high availability setup, after the Add to Cluster operation is successful, the following message is displayed: In case of HA, configure the SocialMiner on secondary node after adding to cluster in the secondary node. |
Every time you navigate to this page, the state of feeds, campaigns, and notifications rules are validated for chat and email, the connectivity to the email server is checked, and the web page shows the appropriate status. Icons are used as visual indicators to display the status of each service. Hover the cursor over the icon to display a tool tip that explains the reason for the current state. As part of validation, Unified CCX checks the following:
-
SocialMiner XMPP Service
Unified CCX checks the connectivity with the SocialMiner XMPP service. If the XMPP service is down, the following message is displayed:
SocialMiner XMPP service is not accessible. Check the logs for more details.
- SocialMiner Runtime Service
Unified CCX checks the connectivity with the SocialMiner runtime service. If the runtime service is down, the following message is displayed:
SocialMiner runtime service is not accessible. Check the logs for more details.
-
SocialMiner Tomcat Service
Unified CCX checks the connectivity with the SocialMiner Tomcat service. If the Tomcat service is down, the following message is displayed:
Unable to communicate to the SocialMiner on the IP address(Hostname) provided. Please verify whether SocialMiner is running on this IP address(Hostname) or check the network connection and make sure that SocialMiner is reachable from CCX.
-
SocialMiner Status
-
Feeds
Unified CCX validates the status of the intended chat and email feeds in SocialMiner .
-
 —All the feeds are operating normally in SocialMiner
.
—All the feeds are operating normally in SocialMiner
.
-
 —One or more feeds mismatches with SocialMiner
.
—One or more feeds mismatches with SocialMiner
.
-
 —All the feeds are missing in SocialMiner
.
—All the feeds are missing in SocialMiner
.
-
-
Campaigns
Unified CCX validates the status of the intended chat and email campaigns in SocialMiner .
-
—All the campaigns are operating normally in SocialMiner
.
-
—One or more campaigns mismatches with SocialMiner
.
-
—All the campaigns are missing in SocialMiner
.
-
-
Notifications
Unified CCX validates the status of the intended chat and email notifications in SocialMiner .
-
—All the notifications are operating normally in SocialMiner
.
-
—One or more notifications mismatches with SocialMiner
. This status icon also appears after configuration, when no chat and email contact is injected yet. The status
will change to normal after successful injection of chat and email contact.
-
—All the notifications are missing in SocialMiner
.
-
-
Email Cache
Unified CCX checks and alerts the user about the email cache.
-
—Email cache is operating normally.
-
 —Unable to cache emails. No new emails will be fetched.
-
Not Applicable—SocialMiner version is not compatible.
-
-
Email Server
Unified CCX checks the connectivity with the email server.
-
—Email server is operating normally.
-
Not Configured—Channel provider is not configured.
-
Not Applicable—The following are the reasons for the current state:
-
Cisco Finesse is not active.
-
Email CSQ is not configured.
-
SocialMiner version is incompatible with the Email feature.
-
-
—Unable to reach the email server.
-
-
SocialMiner Chat Gateway
This indicates the status of the SocialMiner Chat Gateway and the Channel that is integrated.
-
SocialMiner Chat Gateway
-
— The gateway is operating normally and is configured with a channel.
-
— The gateway is not in an operating state as it is either Unreachable or configurations are incorrect.
-
Not Configured — The gateway is not configured and no channels are configured.
-
Not Applicable—The following are the reasons for the current state:
Cisco Finesse is not active.
SocialMiner version is incompatible or is not configured.
-
-
Facebook Messenger Integration — This indicates whether the channel is enabled. It also indicates the last failure recorded in the channel. This helps to determine any intermittent or permanent errors.
-
-
Procedure
| Step 1 |
From the Unified CCX Administration menu bar, choose CCP OR SocialMiner as applicable. The Configuration web page appears. |
||||||||||
| Step 2 |
Complete or modify the following fields for SocialMiner :
|
||||||||||
| Step 3 |
Click Save to save the changes.
|
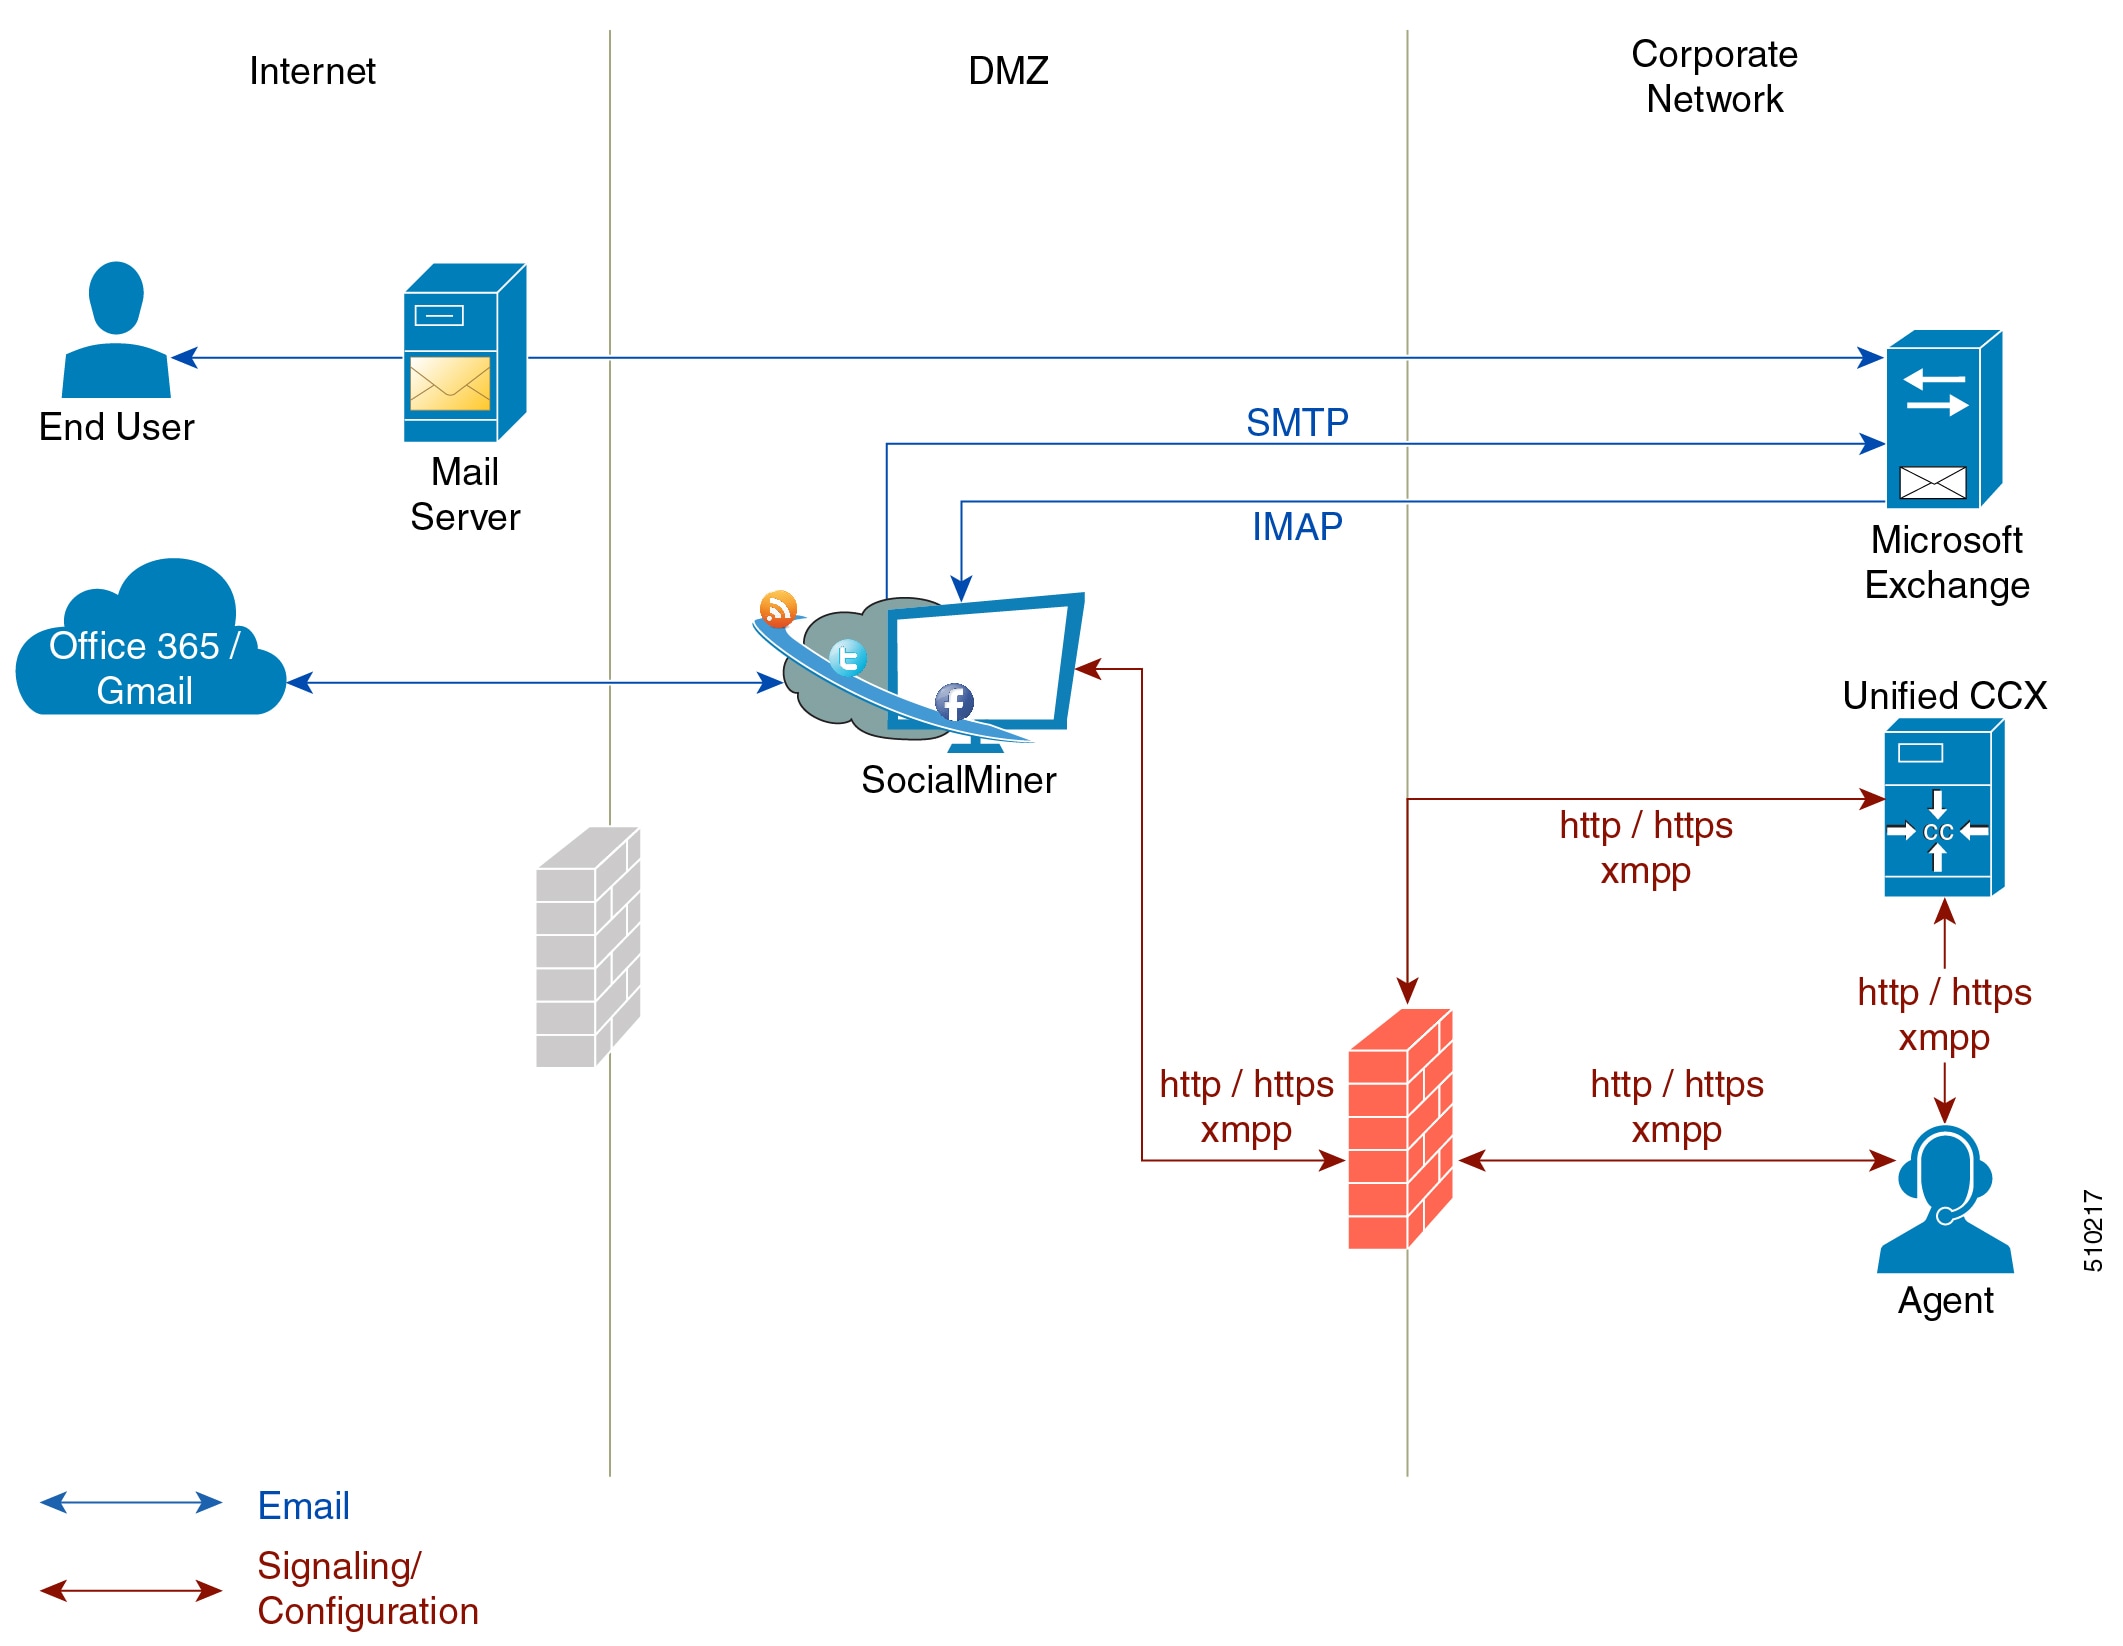
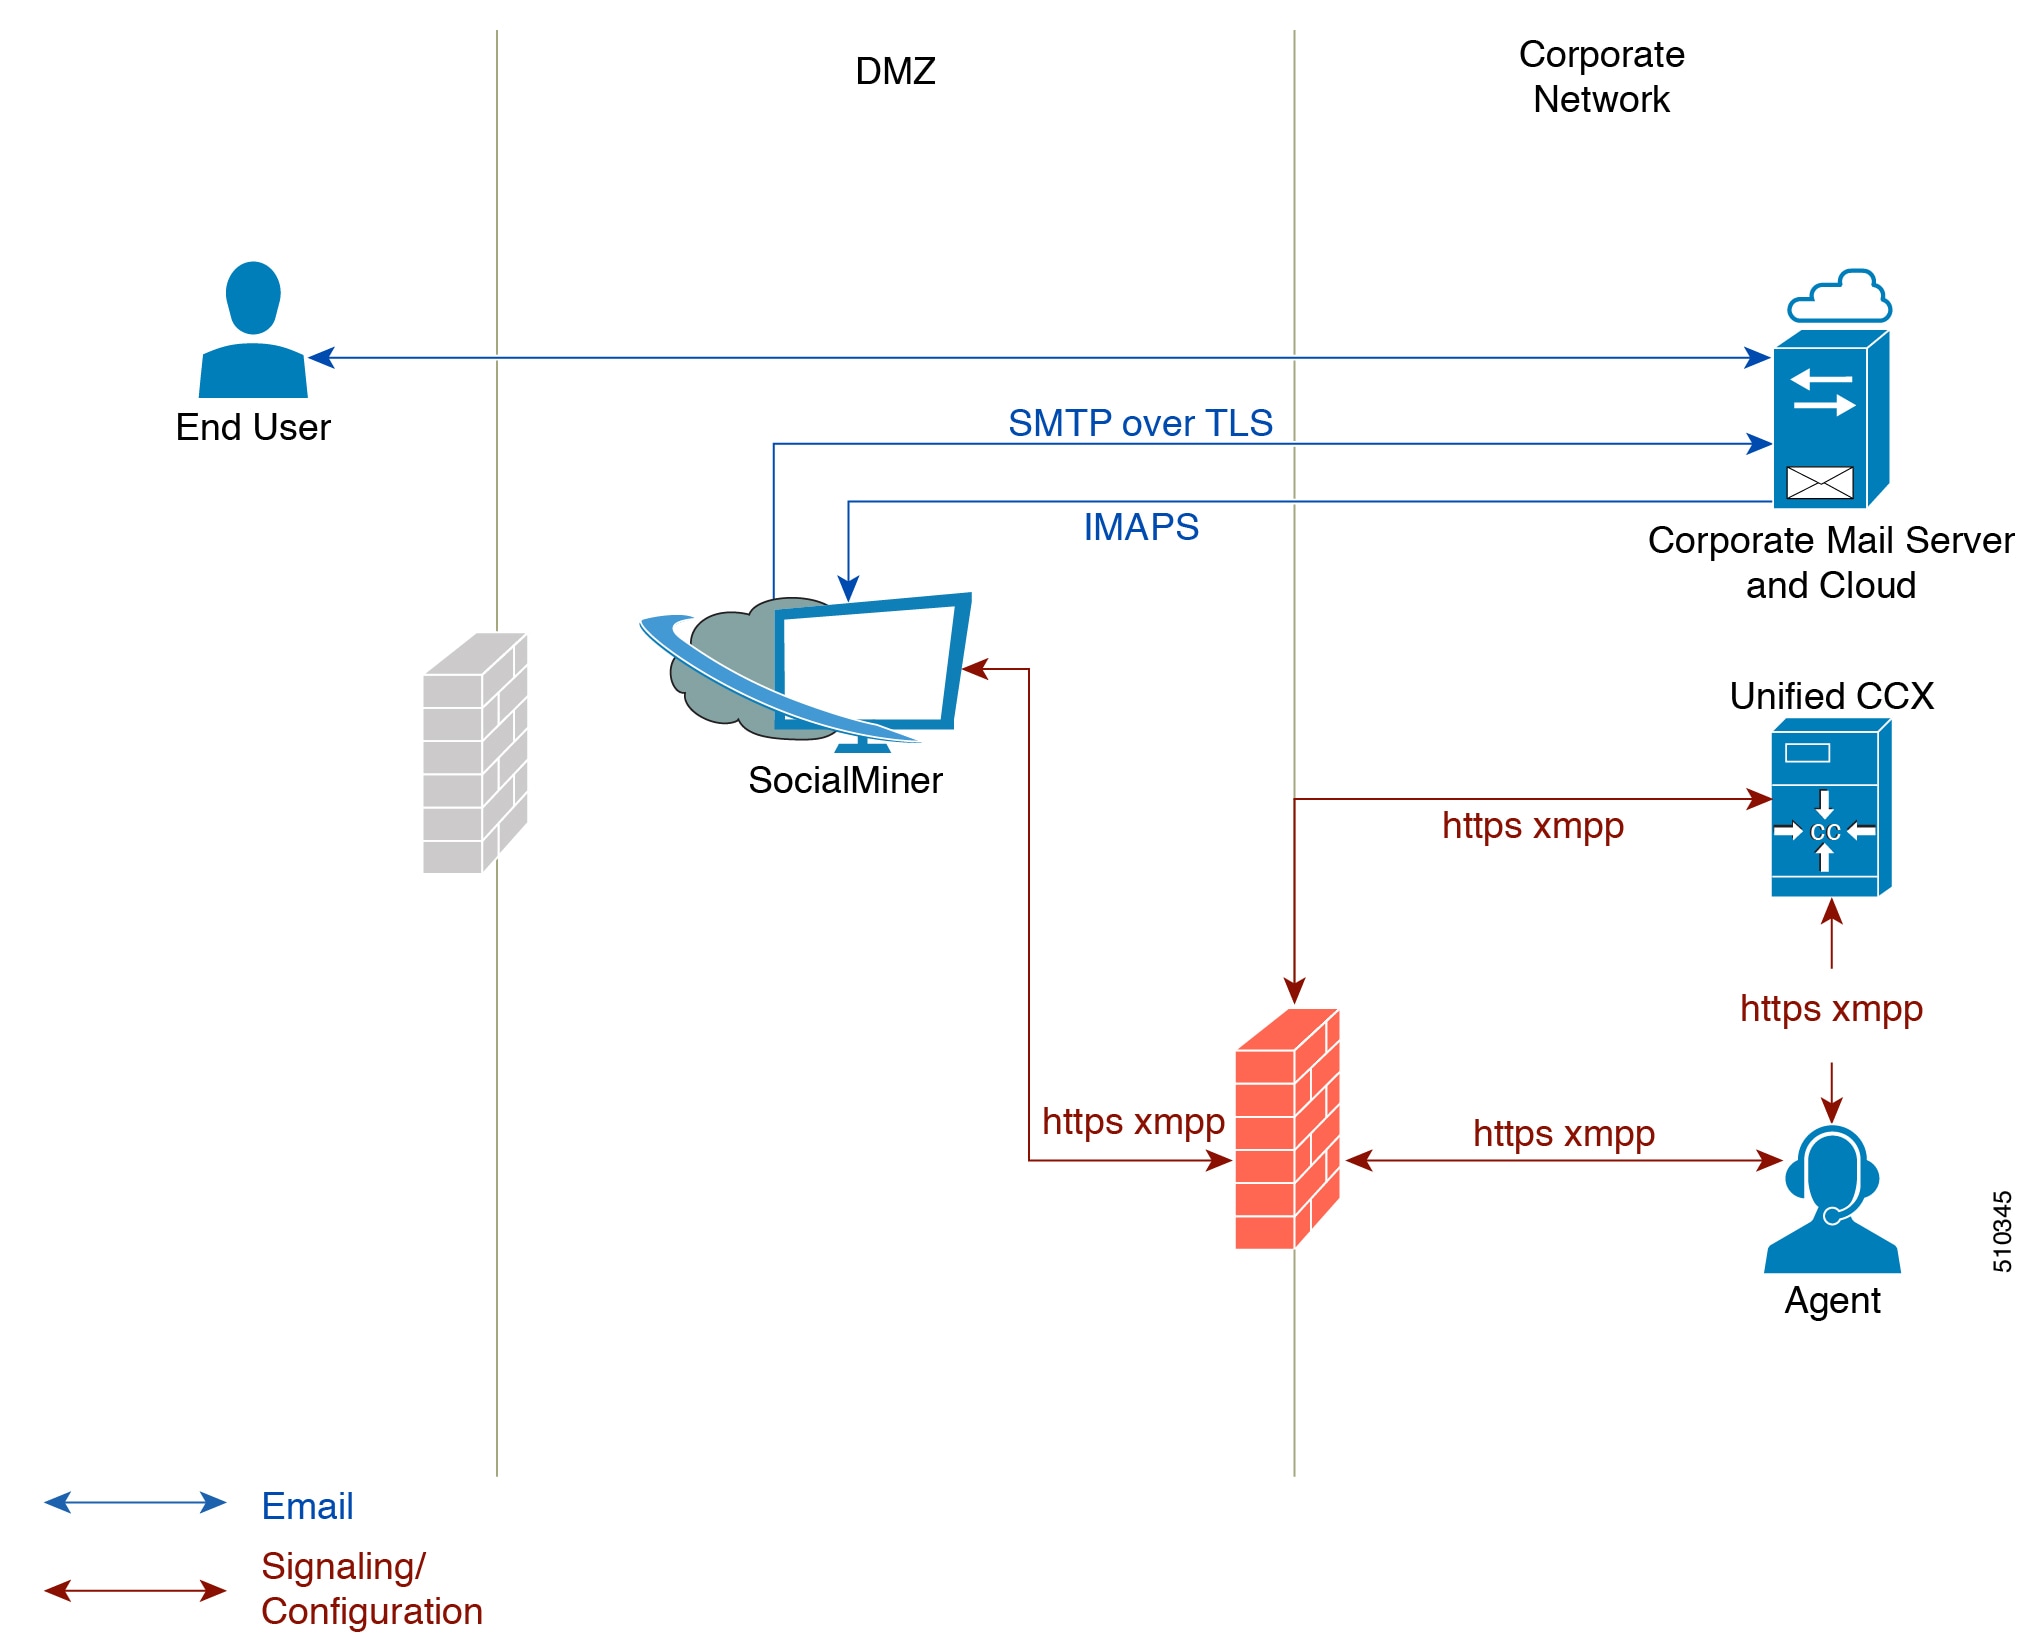
Mail Server Configuration
Use the Mail Server Configuration web page to configure the mail server. This web page is available on the Unified CCX node with a premium license.
Before you begin
-
Execute the commands set-service msExchangeIMAP4 -startuptype automatic, and start-service msExchangeIMAP4 on Microsoft Exchange to set the Microsoft Exchange IMAP4 service to start automatically.
-
Execute the command set-service msExchangeIMAP4BE -startuptype automatic, and execute start-service msExchangeIMAP4BE (for Microsoft Exchange 2013) on Microsoft Exchange to set the Microsoft Exchange IMAP4 Back End service to start automatically.
These commands are specific to the local Exchange server.
-
Create accounts and email addresses to be used for CSQ creation.
Procedure
| Step 1 |
From the Unified CCX Administration menu bar, choose . |
||||||||||||||||||||||||||||||||||
| Step 2 |
Complete or modify the following fields for the mail server:
|
||||||||||||||||||||||||||||||||||
| Step 3 |
Click Update to save the changes. |
||||||||||||||||||||||||||||||||||
Contact Service Queues
Before you begin
-
You must create a skill before creating a CSQ. For information about creating a skill, see Skill Configuration section in the Cisco Unified Contact Center Express Administration and Operations Guide.
-
Before creating an email CSQ, you must have configured the mail server.
Procedure
| Step 1 |
From the Unified CCX Administration menu bar, choose or as applicable. The Contact Service Queues (CSQs) web page opens and displays the information for existing chat and email CSQs if any. |
||||||||||||||||||||||||||||||||||||||
| Step 2 |
To add a new chat or email CSQ, click the Add New icon that appears in the toolbar in the upper left corner of the window or the Add New button that appears at the bottom of the window. The Contact Service Queue Configuration web page opens. |
||||||||||||||||||||||||||||||||||||||
| Step 3 |
Specify the following fields:
|
||||||||||||||||||||||||||||||||||||||
| Step 4 |
Click Next. The Skill Association for CSQ area opens with the newly assigned CSQ name.
|
||||||||||||||||||||||||||||||||||||||
| Step 5 |
From the Available Skills list, choose the skill that you want to associate with the CSQ by clicking it. To choose more than one skill, press the Ctrl key and click the skills that you want to associate with the CSQ. |
||||||||||||||||||||||||||||||||||||||
| Step 6 |
Click Add. The chosen skill and the minimum competence level for that skill are displayed in the right pane under the heading Selected.
|
||||||||||||||||||||||||||||||||||||||
| Step 7 |
Specify a minimum competence level for the skill assigned to the CSQ. |
||||||||||||||||||||||||||||||||||||||
| Step 8 |
To view the associated resources, click Show Resources. |
||||||||||||||||||||||||||||||||||||||
| Step 9 |
Click Save to save the changes for the CSQ. The newly added CSQ appears in the List of CSQs.
You can sort the CSQs by title by clicking the CSQ Name header and by type by clicking the CSQ Type header. |
||||||||||||||||||||||||||||||||||||||
| Step 10 |
To view the printable report and associated resources, click the CSQ for which you want to view the report and the associated resources and then click Open Printable Report.
|
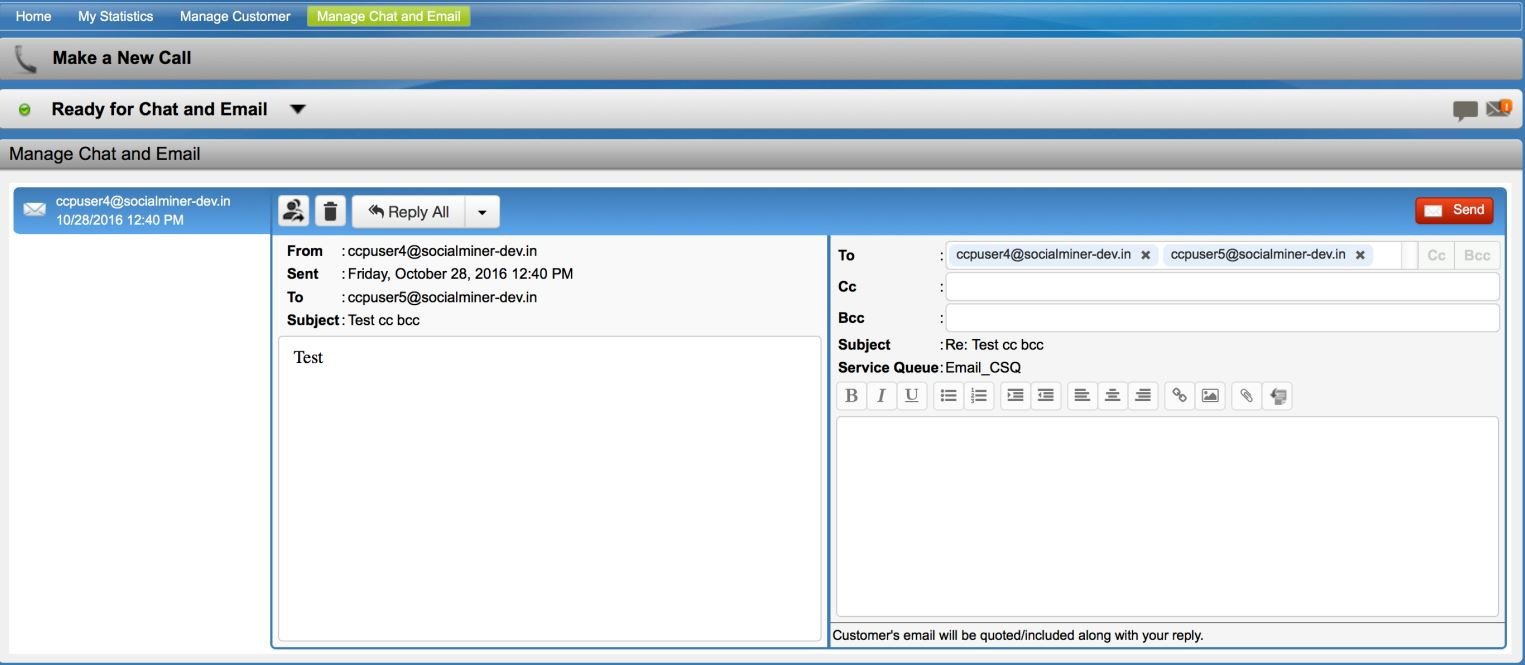
Predefined Responses
To access the predefined responses, choose OR as applicable.
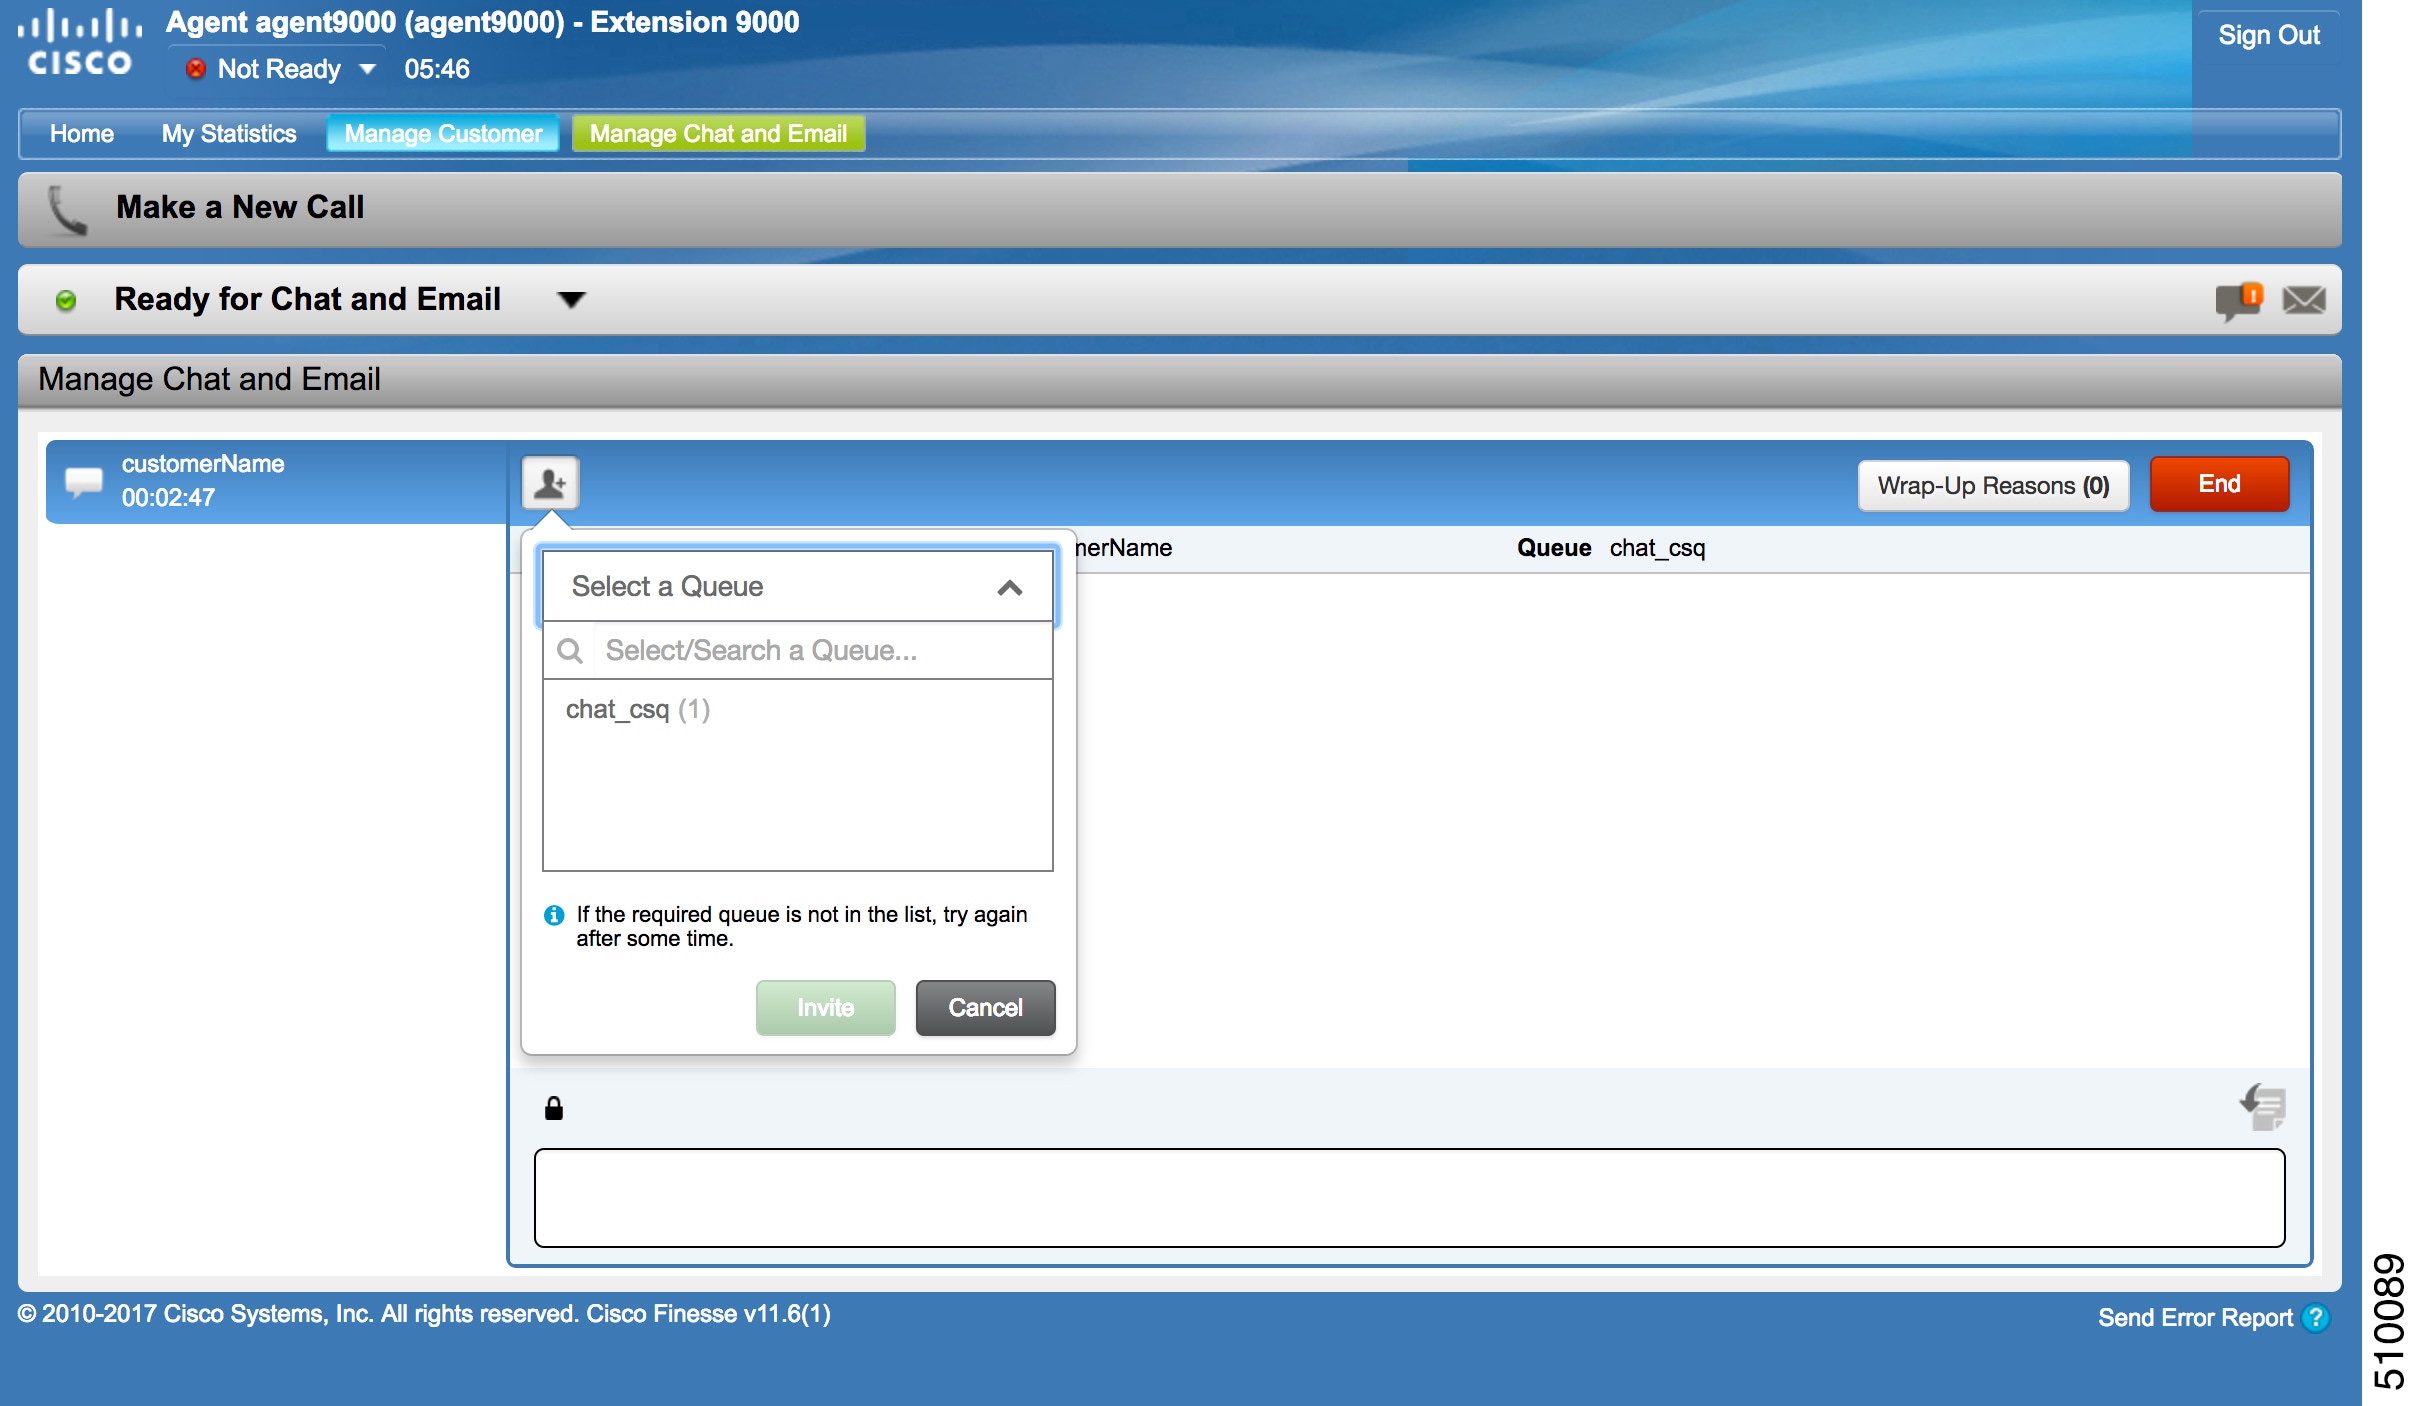
Use the Predefined Responses page to configure and manage chat and email predefined responses. You can add a maximum of 500 chat and email predefined responses in total. These predefined responses are available in the Manage Chat and Email gadget on the Finesse Agent Desktop.
You can configure the responses to be available either to all the agents or only to the agents that are associated with specific CSQs.
Note |
Predefined responses are not available in the Cisco Agent Desktop. They are only available with the Finesse Agent Desktop. |
Predefined Responses
Using this web page, you can add, modify, and delete predefined responses.
You can add a maximum of 500 chat and email predefined responses in total.
Note |
To modify an existing predefined response, click the Title header for the predefined response that you want to modify. To delete an existing predefined response, click the Delete icon for the predefined response that you want to delete. |
Procedure
| Step 1 |
From the Unified CCX Administration menu bar, choose OR as applicable. The Predefined Responses web page opens, displaying the information for existing responses, if any. |
||||||||||||||||
| Step 2 |
Click the Add New icon that is displayed in the toolbar in the upper left corner of the window or the Add New button that is displayed at the bottom of the window to create a new response. The Predefined Response Configuration web page opens. |
||||||||||||||||
| Step 3 |
Specify the following information:
|
||||||||||||||||
| Step 4 |
Click Save. The newly added predefined response appears with the assigned tags in the List of Predefined Responses. You can sort the predefined responses by title by clicking the Title header and by type by clicking the Type header. |
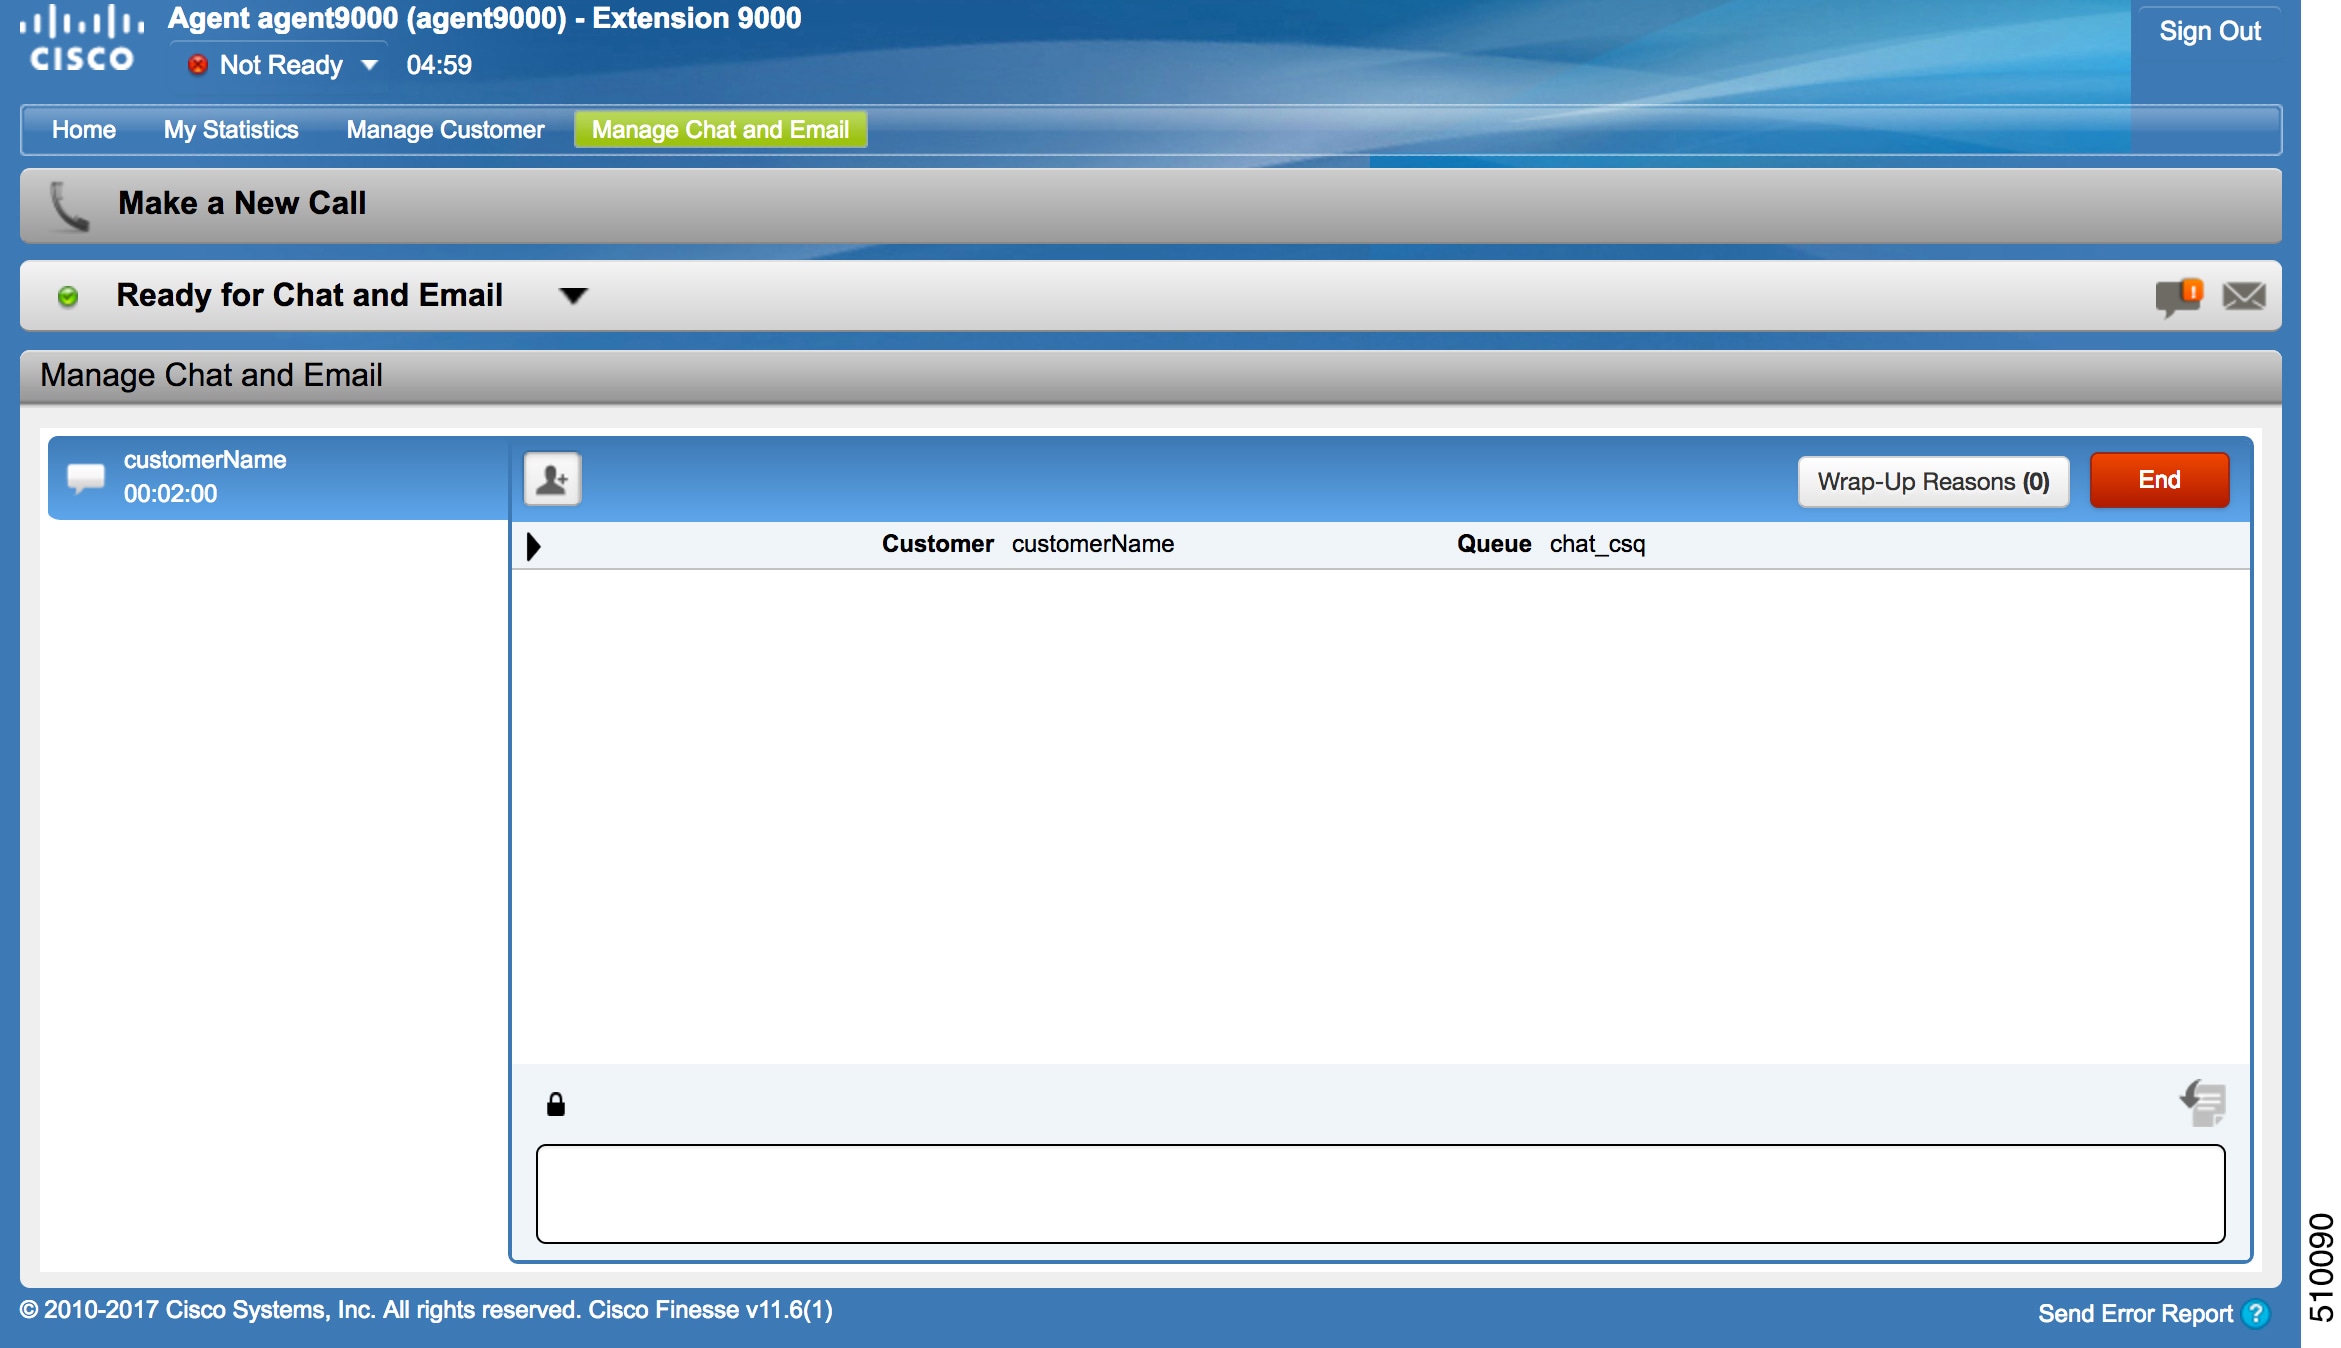
Wrap-Up Reasons
To access the Wrap-Up Reasons, choose .
Use the Wrap-Up Reasons page to configure and manage Wrap-Up categories and reasons for chat and email Contact Service Queues (CSQs). Use the Ellipsis (...) to view all the Wrap-Up Reasons that are added for each Wrap-Up category.
Wrap-Up Reasons
Using this web page, you can add, modify, and delete the Wrap-Up Reasons.
You can add a maximum of 25 Wrap-Up categories. If you exceed the maximum number of categories, the Add New button is disabled.
Procedure
| Step 1 |
From the Unified CCX Administration menu bar, choose . |
||||||||||
| Step 2 |
Click the Add New icon or the Add New button that is displayed in the toolbar in the upper left corner of the window. The Wrap-Up Reasons web page opens. |
||||||||||
| Step 3 |
Specify the following information:
|
||||||||||
| Step 4 |
Click Save. The newly added Wrap-Up category appears with the assigned tags in the List of Wrap-Up Reasons.
|
Email Signatures
To access the email signatures, choose .
Email Signature Configuration
Using this web page, you can add, modify, and delete email signatures.
Note |
To modify an existing email signature, click the Title header for the email signature that you want to modify. To delete an existing email signature, click the Delete icon for the email signature that you want to delete. |
Procedure
| Step 1 |
From the Unified CCX Administration menu bar, choose . The Email Signature web page opens, displaying the list of existing email signatures that are configured, if any. |
||||||||||||||
| Step 2 |
Click the Add New icon that is displayed in the toolbar in the upper left corner of the window or the Add New button that is displayed at the bottom of the window to create a new email signature. The Email Signature Configuration web page opens. |
||||||||||||||
| Step 3 |
Specify the following information:
|
||||||||||||||
| Step 4 |
Click Save. The newly added email signature appears with the assigned tags in the List of Email Signatures. You can sort the email signatures by title by clicking the Title header and by type by clicking the Type header. |
Channel Parameters
Use the Channel Parameters web page to configure channel parameters.
Procedure
| Step 1 |
From the Unified CCX Administration menu bar, choose OR as applicable. The Channel Parameters Configuration web page opens. |
||||||||||||||||||||||||||||
| Step 2 |
Use this web page to specify or modify the following fields for channel parameters:
|
||||||||||||||||||||||||||||
| Step 3 |
Click Save to save the changes for the channel parameters.
|
Chat Widgets
Use the Chat Widgets section to configure the Bubble Chat widget and generate HTML code snippet that can be hosted on the customer website.
-
Classic Chat
-
Bubble Chat
To access the Chat Widgets page, choose .
Chat Widgets Page
The Chat Widgets page lists the following information and options for each chat widget:
|
Field |
Description |
||
|---|---|---|---|
|
Name |
Name of the chat widget. |
||
|
Description |
A brief description. |
||
|
Post Chat Rating |
Whether post chat rating is available for the chat.
|
||
|
Code |
Option to generate the web form code for the configured chat widget. |
||
|
Delete |
Option to delete the chat widget. |
Chat Widget Configuration
You can add, modify, and delete chat widgets. You can schedule business hours in the chat widget for week days, custom business days, and holidays. You can also configure an off hours message.
Note |
|
You can configure or modify Classic Chat and Bubble Chat widgets.
Classic Chat Widget
Procedure
| Step 1 |
From the Unified CCX Administration menu bar, choose . The Chat Widgets web page opens, displaying information for existing chat widgets and widget type, if any.
|
||||||||||||||||||||
| Step 2 |
Click the Add New icon or the Add New button. The Add New Chat Widget web page opens. |
||||||||||||||||||||
| Step 3 |
Select Classic Chat and click Next. The Chat Web Form Configuration web page opens. |
||||||||||||||||||||
| Step 4 |
In the Widget Details area, specify the following information:
|
||||||||||||||||||||
| Step 5 |
In the User Form Fields area, select the desired field from the Available Fields and move it to the Selected Fields. To create new field(s) in addition to the list of available fields, click Add Custom Field, enter the name of the new custom field in the pop-up window and click OK. The new custom field appears in the list of Selected Fields. |
||||||||||||||||||||
| Step 6 |
Click Next. The Add problem Statement CSQ mapping area opens. |
||||||||||||||||||||
| Step 7 |
Enter the problem statement for the Chat Web Form and map the same with an existing chat CSQ from the CSQ List drop-down list. To add more problem statements and associate these statements with the Chat CSQs, click Add More. Click the delete icon beside the CSQ List drop down to delete the newly created problem statement. |
||||||||||||||||||||
| Step 8 |
Click Next. |
||||||||||||||||||||
| Step 9 |
In the Schedule Business Hours area, select one of the following options to configure the Business Days:
|
||||||||||||||||||||
| Step 10 |
In the Schedule Holidays area, configure holidays.
|
||||||||||||||||||||
| Step 11 |
In the Schedule Custom Business Days area, configure business hours for a custom business day.
|
||||||||||||||||||||
| Step 12 |
In the Off Hours Details area, enter a message in the Off Hours Message text box. |
||||||||||||||||||||
| Step 13 |
Click Next. The Web Form Preview area displays a preview of the Chat Web Form as per the configured schedule. It displays all the fields that you had selected for the user form and problem statements along with CSQ mapping. |
||||||||||||||||||||
| Step 14 |
Click Finish to generate the web form code.
|
||||||||||||||||||||
| Step 15 |
Click Save Code to File to save the generated code. To go to the main Chat Widgets page, click Back to Chat Widgets.
|
Bubble Chat Widget
Procedure
-
In Context Service Fieldsets, enter valid fieldsets for configuring the chat widgets.
Note -
Fieldsets are comma separated strings in the format fieldset1, fieldset2 (for example: cisco.base.pod,cisco.ccx.pod). You can enter a maximum number of 10 fieldsets.
-
All the selected User Form Fields except Name and Email must be part of the fieldsets specified, otherwise Context Service operations for chat would fail.
-
To perform Context Service Lookup Customer for chat, the Email field is mandatory in the chat form.
-
-
From Available Fields, select the desired fields and move it to Selected Fields.
To create new fields in addition to the list of available fields, click Add Custom Field, enter the name of the new custom field in the pop-up window and click OK. The new custom field appears in the list of Selected Fields.
-
In Problem Statement Caption, enter the label for the problem statement field.
-
Enter the problem statement for the Chat Web Form and map the problem statement with an existing chat CSQ from the CSQ List drop-down list.
- Default (24 hours x 7 days)- Select this option if the contact center works 24 hours and 7 days in a week.
- Select Calendar- Select this option to configure the business hours. Calendar drop-down is enabled for this selection.
From the Unified CCX Administration menu bar, choose .
The Chat Widgets web page opens, displaying the information for existing chat widgets.
| Note |
During the widget configuration, live preview of the widget is possible. |
Click the Add New icon or the Add New button.
The Bubble Chat Configuration web page opens. The administrator can configure the messages and labels in any language.
In the Widget Details area, specify the following information:
|
Field |
Description |
|---|---|
|
Name |
Unique name of the chat widget. |
|
Description |
Chat widget description. |
Click Next.
Specify the following information:
| Section |
Field |
Description |
||
|---|---|---|---|---|
|
Font Family |
Typeface |
Font family used for the text in the Chat Web Form and chat window.
|
||
|
Chat Title |
Text |
Title text displayed on the Chat Web Form and Chat Bubble. |
||
|
Text Color |
Color of the title text. |
|||
|
Button |
Text |
Text displayed on the button of the Chat Web Form. |
||
|
Color |
Color of the button. |
|||
|
Text Color |
Color of the text displayed on the button. |
|||
| Agent Message |
Message Color |
Background color of the agent message in the chat window. |
||
|
Text Color |
Color of the agent message text. |
| Note |
|
Click Next.
Specify the following information:
|
Field |
Description |
|---|---|
|
Enable Post Chat Rating |
If this checkbox is checked, post-chat rating will be available for the chat. The Post Chat Rating column in the Chat Widgets page indicates whether post chat rating is available for a chat. |
|
Label |
Text asking the user to rate the chat experience. |
|
Button Text |
Text displayed on the button that is used to submit the rating. |
| Note |
|
Click Next.
In the User Form Fields area, specify the following information:
In the Add problem Statement CSQ mapping area, specify the following information:
To add more problem statements and associate them with a chat CSQ, click Add More. Click the delete icon for a problem statement to delete that problem statement.
Click Next. The Chat Messages area appears.
Specify the following information:
| Section |
Field |
Description |
|---|---|---|
|
Initialization Messages |
Widget Wait Message |
Message displayed to the customer when the customer submits the chat form and waits for an agent to join. |
|
Join Time-out Message |
Message displayed on the chat window to inform the customer that no agent is available currently. | |
|
In Progress Messages |
Text for Text Typing Box |
Text directing the customer to enter a message. This text appears in the text box of the chat window where the customer enters messages to be sent. |
|
Agent Joined Message |
Message displayed on the chat window to inform the customer that an agent has joined. This message has the Agent Alias or Agent ID. Two text boxes are available to enter text to be displayed before and after the Agent Alias or Agent ID. | |
|
Agent Left Message |
Message displayed on the chat window to inform the customer that the agent has left. This message will have the Agent Alias or Agent ID. Two text boxes are available to enter text to be displayed before and after the Agent Alias or Agent ID. | |
|
End Messages |
Close Chat Confirmation Pop-up message |
Message displayed on the pop-up window to confirm if the customer wants to close the chat.
In the Negative Response and Positive Response text boxes, enter the text to be displayed on the pop-up window buttons that allows the user to either accept or reject the chat closure. |
|
Close Chat and Download Transcript Confirmation Pop-up Message |
Message displayed on the pop-up window to inform the customer that the chat has ended and the chat transcript is ready for
download.
In the Negative Response and Positive Response text boxes, enter the text appears on the pop-up window buttons that allows the user to either accept or reject the transcript download. |
|
|
Error Messages |
System Error Message |
Message displayed to the customer when the chat service is not available to handle chat requests. |
|
Connectivity Error Message |
Message displayed to the customer when the chat is disconnected due to inactivity timeout or connection failure. |
Click Next. The Service Hours page appears.
In Service Hours area, select one of the following options to configure the business hours.
Select the desired calendar from the drop-down list and click the View link to preview the calendar details such as Business Hours, Custom Business Days, and Holidays.
In the Messages area, specifiy the following:
| Field | Description |
|---|---|
|
Holiday |
Message displayed on the bubble chat widget to inform the customer during a holiday. |
|
Off Hours |
Message displayed on the bubble chat widget to inform the customer during non-working hours. |
|
Label |
Heading text displayed on the bubble chat widget to inform the customer for the business hours details. |
In the Label for Days of Week area, specify a label for each day of the week.
Click Finish.
| Note |
|
Click Save Code to File to save the generated code. Click Back to Chat Widgets to go to the main Chat Widgets page.
| Note |
You can also generate the code from the main Chat Widgets page by clicking on the Code icon against the chat widget name. The generated code appears on a pop-up window. To save this code, click Save Code to File. |
Teams
Choose OR as applicable from the Unified CCX Administration menu bar to access this configuration area.
Note |
The team configuration for chat is the same as it is for voice. |
Change the Desktop Layout
Procedure
| Step 1 |
Sign in to Cisco Finesse Administration Console. |
||
| Step 2 |
In the Desktop Layout tab, you can define the layout of the Finesse desktop . |
||
| Step 3 |
In the Finesse Layout XML area, make changes to the XML as required to include the new gadgets. |
||
| Step 4 |
Click Save. Finesse validates the XML file to ensure that it is a valid XML syntax and confirms to the Finesse schema.
|
Configuration of Proxy Based on Deployment of SocialMiner
Procedure
| Step 1 |
Sign in to Cisco Unified Contact Center Express Administration. |
||
| Step 2 |
Navigate to System Menu > System Parameters to modify the fields in Proxy Parameters.
|
Certificate Management
Procedure
| Step 1 |
Sign in to Cisco Unified OS Administration using your administrator password. |
| Step 2 |
Navigate to Security > Certificate Management menu. |
| Step 3 |
You can use the Find controls to filter the certificate list. |
| Step 4 |
Click the file name of the certificate. The Certificate Configuration window appears and perform the necessary actions. |

 Feedback