Corporate and Personal Directory Setup

Configure Directory Services

With the Directory Services, you control the display of the directories:
  • Personal address book

  • All enabled directories

Also, you control the directory browse mode and the maximum number of contacts displayed on the phone.

Before you begin

Access the phone administration web page. See Access the Phone Web Interface.

Procedure


Step 1

Select Voice > Phone.

Step 2

In the Directory Services, set up the fields as described in Parameters for Directory Services.

Step 3

Click Submit All Changes.


Parameters for Directory Services

The following table defines the function and usage of the parameters in the Directory Services section under the Voice > Phone tab in the phone web interface. It also defines the syntax of the string that is added in the phone configuration file (cfg.xml) with XML code to configure a parameter.

Table 1. Parameters for Directory Services

Parameter

Description

Personal Directory Enable

Enables the personal address book directory for the phone user.

Select Yes to enable the directory and select No to disable it.

If you disable the directory:

  • users can't search contacts from their personal address book

  • users can't add a contact in their personal address book

Perform one of the following:

  • In the phone configuration file with XML(cfg.xml), enter a string in this format:
    <Personal_Directory_Enable ua="na">Yes</Personal_Directory_Enable>
  • In the phone web interface, set this field to Yes to enable the personal address book directory.

Valid values: Yes|No

Default: Yes

Search All Enable

Determines whether the phone user can search for contacts in the All directories.

Select Yes to enable the search operation and select No to disable it.

The All directories contain the following directories with the priority from highest to lowest:

  1. Personal address book

  2. BroadSoft directory

  3. LDAP directory

  4. Bluetooth phone directory

The All directories only contain the enabled directories.

Perform one of the following:

  • In the phone configuration file with XML(cfg.xml), enter a string in this format:
    <Search_All_Enable ua="na">Yes</Search_All_Enable>
  • In the phone web interface, set this field to Yes to enable the search operation.

Valid values: Yes|No

Default: Yes

Browse Mode Enable

Determines whether to trigger an auto preload operation to show the contacts when you enter a directory in the phone.

Select Yes to enable the browse mode for any directories and select No to disable it.

Perform one of the following:

  • In the phone configuration file with XML(cfg.xml), enter a string in this format:
    <Browse_Mode_Enable ua="na">Yes</Browse_Mode_Enable>
  • In the phone web interface, set this field to Yes to enable the browse mode.

Valid values: Yes|No

Default: No

Disable Contact Search in All Directories

By default, the user can search for contacts in all the directories on the phone. You can configure the phone to disable this feature. Then, the user can only search for a contact in a single directory each time.

When you complete this procedure, the All directories option doesn't display under the Directories menu on the phone screen.

You can also configure this parameter in the configuration file (cfg.xml) with a string in this format:
<Search_All_Enable ua="na">No</Search_All_Enable>

The valid values are Yes and No. The default setting is Yes.

Procedure


Step 1

Select Voice > Phone.

Step 2

In the Directory Services section, set the Search All Enable field to No.

Step 3

Click Submit All Changes.


Disable Personal Directory

By default, the personal directory is enabled on the phone. You can disable the personal directory from the phone web interface. When you disable the personal directory:

  • the Personal Directory tab doesn't display in the phone web interface.

  • the Personal address book option doesn't display on the Directories phone screen.

  • the user can't add contacts to the personal directory from the call history or other directories.

  • the phone skips the personal directory when the user searches for a contact in all the directories.

  • as the user dials a number with the keypad or there is an incoming call, the phone skips the personal directory when it searches for a matching number in directories.

You can also configure the parameter in the configuration file (cfg.xml) with a string in this format:
<Personal_Directory_Enable ua="na">No</Personal_Directory_Enable>

The valid values are Yes and No. The default setting is Yes.

Procedure


Step 1

Select Voice > Phone.

Step 2

In the Directory Services section, set the Personal Directory Enable field to No.

By default, this field is set to Yes.

Step 3

Click Submit All Changes.


LDAP Configuration

The Cisco IP Phone supports Lightweight Directory Access Protocol (LDAP) v3. LDAP Corporate Directory Search allows a user to search a specified LDAP directory for a name, phone number, or both. LDAP-based directories, such as Microsoft Active Directory 2003 and OpenLDAP-based databases, are supported.

Users access LDAP from the Directory menu on their IP phone. An LDAP search returns up to 20 records.

The instructions in this section assume that you have installed an LDAP server, such as OpenLDAP or Microsoft Active Directory Server 2003.

Prepare the LDAP Corporate Directory Search

Before you begin

Access the phone administration web page. See Access the Phone Web Interface.

Procedure


Step 1

Select Voice > System.

Step 2

In the IPv4 Settings section, enter the IP address of the DNS server in the Primary DNS field.

This step is required only if you are using Active Directory with authentication set to MD5.

You can configure this parameter in the configuration file by entering a string in this format:
<Primary_DNS ua="na">10.74.2.7</Primary_DNS>
Step 3

In the Optional Network Configuration section, in the Domain field, enter the LDAP domain.

This step is required only if you are using Active Directory with authentication set to MD5.

Some sites might not deploy DNS internally and instead use Active Directory 2003. In this case, it is not necessary to enter a Primary DNS address and an LDAP Domain. However, with Active Directory 2003, the authentication method is restricted to Simple.

You can configure this parameter in the configuration file by entering a string in this format:
<Domain ua="na">LDAPdomainname.com</Domain>
Step 4

Click the Phone tab.

Step 5

Configure the LDAP fields as described in Parameters for LDAP Directory.

Step 6

Click Submit All Changes.


Parameters for LDAP Directory

The following table defines the function and usage of the LDAP directory parameters in the LDAP section under the Voice > Phone tab in the phone web interface. It also defines the syntax of the string that is added in the phone configuration file (cfg.xml) with XML code to configure a parameter.

Table 2. Parameters for LDAP Directory

Parameter

Description

LDAP Dir Enable

Enables or disables the LDAP directory.

Perform one of the following:

  • In the phone configuration file with XML(cfg.xml), enter a string in this format:
    <LDAP_Dir_Enable ua="na">Yes</LDAP_Dir_Enable>
  • In the phone web interface, set this field to Yes or No to enable or disable LDAP directory.

Valid values: Yes and No

Default: No

Corp Dir Name

Enter a free-form text name, such as “Corporate Directory”.

Perform one of the following:

  • In the phone configuration file with XML(cfg.xml), enter a string in this format:
    <LDAP_Corp_Dir_Name ua="na">Coprorate Directory</LDAP_Corp_Dir_Name>
  • In the phone web interface, enter the name of the corporate directory.

Valid values: Text string with no more than 63 characters

Default: Empty

Server

Enter a fully qualified domain name or IP address of an LDAP server.

Enter the host name of the LDAP server if the MD5 authentication method is used.

Perform one of the following:

  • In the phone configuration file with XML(cfg.xml), enter a string in this format:
    <LDAP_Server ua="na">ldapserver.com</LDAP_Server>
  • In the phone web interface, enter IP address or host name of the LDAP server.

Default: Empty

Search Base

Specify a starting point in the directory tree from which to search. Separate domain components [dc] with a comma. For example:

dc=cv2bu,dc=com

Perform one of the following:

  • In the phone configuration file with XML(cfg.xml), enter a string in this format:
    <LDAP_Search_Base ua="na">dc=cv2bu,dc=com</LDAP_Search_Base>
  • In the phone web interface, enter the search base.

Default: Empty

Client DN

Enter the distinguished name (DN) domain components [dc]; for example:
dc=cv2bu,dc=com

If you’re using the default Active Directory schema (Name(cn)->Users->Domain), an example of the client DN follows:

cn=”David Lee”,dc=users,dc=cv2bu,dc=com
cn=”David Lee”,dc=cv2bu,dc=com

username@domain is the client DN format for a Windows server

For example, DavidLee@cv2bu.com

This parameter is available when Auth Method is set to Simple.

Perform one of the following:

  • In the phone configuration file with XML(cfg.xml), enter a string in this format:
    <LDAP_Client_DN ua="na">dc=cv2bu,dc=com</LDAP_Client_DN>
  • In the phone web interface, enter the client domain name.

Default: Empty

User Name

Enter the user name for a credentialed user on the LDAP server.

This parameter is available when Auth Method is set to DIGEST-MD5.

Perform one of the following:

  • In the phone configuration file with XML(cfg.xml), enter a string in this format:
    <LDAP_User_Name ua="na">dc=cv2bu,dc=com</LDAP_User_Name>
  • In the phone web interface, enter the user name.

Default: Empty

Password

If you allow the user to access the LDAP directory without entering the credentials, enter the password for the user in this field. If you allow access of specific users, leave this field empty. The phone prompts for credentials to access the LDAP directory.

User entry of credentials on the phone updates this field and the configuration file.

The password entered in this field shows as the following in the configuration file (cfg.xml).
<!-- <LDAP_Password ua="na">**********</LDAP_Password >-->

Default: Empty

Auth Method

Select the authentication method that the LDAP server requires. Choices are:

  • None—No authentication is used between the client and the server.

  • Simple—The client sends its fully-qualified domain name and password to the LDAP server. Might present security issues.

    If selected, the phone prompts the Client DN and Password credentials to access the LDAP directory.

    If either or both of the credentials are empty, the operation used to authenticate the clients is the anonymous simple bind. The success of the operation depends on whether the LDAP server supports it.

    Users can access the LDAP directory without the need to enter the user credentials when the one of the following situations is satisfied:

    • The user credentials are cached on the phone.

    • The LDAP server allows the anonymous simple bind operation, and the operation succeeds. And the parameter LDAP Prompt For Empty Credentials is set to No.

  • Digest-MD5—The LDAP server sends authentication options and a token to the client. The client returns an encrypted response that is decrypted and verified by the server.

    If selected, the phone prompts the Username and Password credentials to access the LDAP directory.

    Users can access the LDAP directory without the need to enter the user credentials when the credentials are cached on the phone.

For more information, see Overview of LDAP Directory Access.

Perform one of the following:

  • In the phone configuration file with XML(cfg.xml), enter a string in this format:
    <LDAP_Auth_Method ua="na">Simple</LDAP_Auth_Method>
  • In the phone web interface, choose a authentication method.

Default: None

LDAP Prompt For Empty Credentials

Enable or disable the LDAP sign-in prompt when there’s no user credential on the phone. This function is used only for the simple authentication method that involves the anonymous simple bind operation.

  • If the value is Yes, the phone always prompts for LDAP credentials. If the LDAP server supports the anonymous simple bind, users can either enter the credentials or leave them empty to access the LDAP directory.

  • If the value is No, users can directly access the LDAP directory when the anonymous simple bind operation succeeds.

If the LDAP server doesn't support the anonymous simple bind (empty credentials), then the users must enter the client DN and password to access the LDAP directory.

This parameter doesn't display on the phone administration web page. To configure the parameter, perform the following:

In the phone configuration file with XML(cfg.xml), enter a string in this format:

<LDAP_Prompt_For_Empty_Credentials ua="na">Yes</LDAP_Prompt_For_Empty_Credentials>

Valid values: Yes and No

Default: No

StartTLS Enable

Enable or disable the Start Transport Layer Security (StartTLS) operation. It provides the ability to establish TLS in an LDAP session.

When StartTLS Enable is set to Yes, the phone behaviour vary depending on the LDAP server setting:

  • If the LDAP server is defined as "ldap://server:port", then the phone sends the StartTLS request to the LDAP server.

  • If the LDAP server is defined as "ldaps://server:port", then the phone directly performs the LDAP over TLS (LDAPS) operation.

When StartTLS Enable is set to No, the phone behaviour vary depending on the LDAP server setting:

  • If the LDAP server is defined as "ldap://server:port", then the phone performs the LDAP operation.

  • If the LDAP server is defined as "ldaps://server:port", then the phone performs the LDAPS operation.

Perform one of the following:

  • In the phone configuration file with XML(cfg.xml), enter a string in this format:
    <LDAP_StartTLS_Enable ua="na">Yes</LDAP_StartTLS_Enable>
  • In the phone web interface, set this field to Yes or No to enable or disable the StartTLS operation.

Valid values: Yes and No

Default: No

Last Name Filter

Use this field to specify how the phone must perform searches based on the last name or surname (sn), when users search for contacts.

Examples:

sn:(sn=$VALUE*) instructs the phone to find all last names that begin with the entered search string.

sn:(sn=*$VALUE*) instructs the phone to find all last names in which the entered search string appears anywhere in the last name. This method is more inclusive and retrieves more search results. This method is consistent with the search method in other directories such as the BroadSoft directories and the user's personal address book on the phone.

Perform one of the following:

  • In the phone configuration file with XML(cfg.xml), enter a string in this format:
    <LDAP_Last_Name_Filter ua="na">sn:(sn=L*)</LDAP_Last_Name_Filter>
  • In the phone web interface, enter the filter.

Default: Empty

First Name Filter

Use this field to specify how the phone must perform searches based on the first name or common name (cn), when users search for contacts.

Examples:

cn:(cn=$VALUE*) instructs the phone to find all first names that begin with the entered search string.

cn:(cn=*$VALUE*) instructs the phone to find all first names in which the entered search string appears anywhere in the first name. This method is more inclusive and retrieves more search results. This method is consistent with the search method in other directories such as the BroadSoft directories and the user's personal address book on the phone.

Perform one of the following:

  • In the phone configuration file with XML(cfg.xml), enter a string in this format:
    <LDAP_First_Name_Filter ua="na">cn:(cn=John*)</LDAP_First_Name_Filter>
  • In the phone web interface, enter the filter.

Default: Empty

Search Item 3

Additional customized search item. Can be blank if not needed.

This parameter is used only for the reserve name lookup feature for the LDAP directory. For more information about the feature, see Enable Reverse Name Lookup.

Perform one of the following:

  • In the phone configuration file with XML(cfg.xml), enter a string in this format:
    <LDAP_Search_Item_3 ua="na">search_item</LDAP_Search_Item_3>
  • In the phone web interface, enter a name for the additional item to search.

Default: Empty

Search Item 3 Filter

Customized filter for the searched item. Can be blank if not needed.

This parameter is used only for the reserve name lookup feature for the LDAP directory. For more information about the feature, see Enable Reverse Name Lookup.

Perform one of the following:

  • In the phone configuration file with XML(cfg.xml), enter a string in this format:
    <LDAP_Item_3_Filter ua="na">cn:(cn=John*)</LDAP_Item_3_Filter>
  • In the phone web interface, enter the filter.

Default: Empty

Search Item 4

Additional customized search item. Can be blank if not needed.

Perform one of the following:

  • In the phone configuration file with XML(cfg.xml), enter a string in this format:
    <LDAP_Search_Item_4 ua="na">search_item</LDAP_Search_Item_4>
  • In the phone web interface, enter a name for the additional item to search.

Default: Empty

Search Item 4 Filter

Customized filter for the searched item. Can be blank if not needed.

Perform one of the following:

  • In the phone configuration file with XML(cfg.xml), enter a string in this format:
    <LDAP_Item_4_Filter ua="na">cn:(cn=John*)</LDAP_Item_4_Filter>
  • In the phone web interface, enter the filter.

Default: Empty

Display Attrs

Format of LDAP results displayed on phone, where:

  • a—Attribute name

    For example, a=telephoneNumber means that the attribute name is used for a phone number.

    Other typical values: facsimileTelephoneNumber, mobile, mobiletelephonenumber, ipphone, homephone, otherphone, and pagertelephonenumber

  • cn—Common name

  • sn—Surname (last name)

  • n—Display name

    For example, n=Phone causes "Phone" to be displayed in front of the phone number of an LDAP query result when the details softkey is pressed.

  • t—type

    When t=p, that is, t is a phone number, the retrieved number can be dialed. Only one number can be made dialable. If two numbers are defined as dialable, only the first number is used. For example, a=ipPhone, t=p; a=mobile, t=p;

    This example results in only the IP Phone number being dialable and the mobile number is ignored.

  • p—phone number

    When p is assigned to a type attribute, example t=p, the retrieved number is dialable by the phone.

    For example, a=givenName,n=firstname;a=sn,n=lastname;a=cn,n=cn;a=telephoneNumber,n=tele,t=p

Perform one of the following:

  • In the phone configuration file with XML(cfg.xml), enter a string in this format:
    <LDAP_Display_Attrs ua="na">a=givenName,n=firstname;a=sn,n=lastname;a=cn,n=cn;a=telephoneNumber,n=tele,t=p;a=mail,n=mail;a=postalAddress,n=address;a=postalCode,n=postalcode;a=uid,n=uid;a=facsimileTelephoneNumber,n=fax;a=title,n=title</LDAP_Display_Attrs>
  • In the phone web interface, enter the attributes to display.

Default: Empty

Number Mapping

With the LDAP number mapping, you can manipulate the number that was retrieved from the LDAP server. For example, you can append 9 to the number if your dial plan requires a user to enter 9 before dialing. Add the 9 prefix by adding (<:9xx.>) to the LDAP Number Mapping field. For example, 555 1212 would become 9555 1212.

If you don’t manipulate the number in this fashion, a user can use the Edit Dial feature to edit the number before dialing out.

Leave this field blank if not needed.

Perform one of the following:

  • In the phone configuration file with XML(cfg.xml), enter a string in this format:
    <LDAP_Number_Mapping ua="na"><:9xx.></LDAP_Number_Mapping>
  • In the phone web interface, enter the mapping number.

Default: Empty

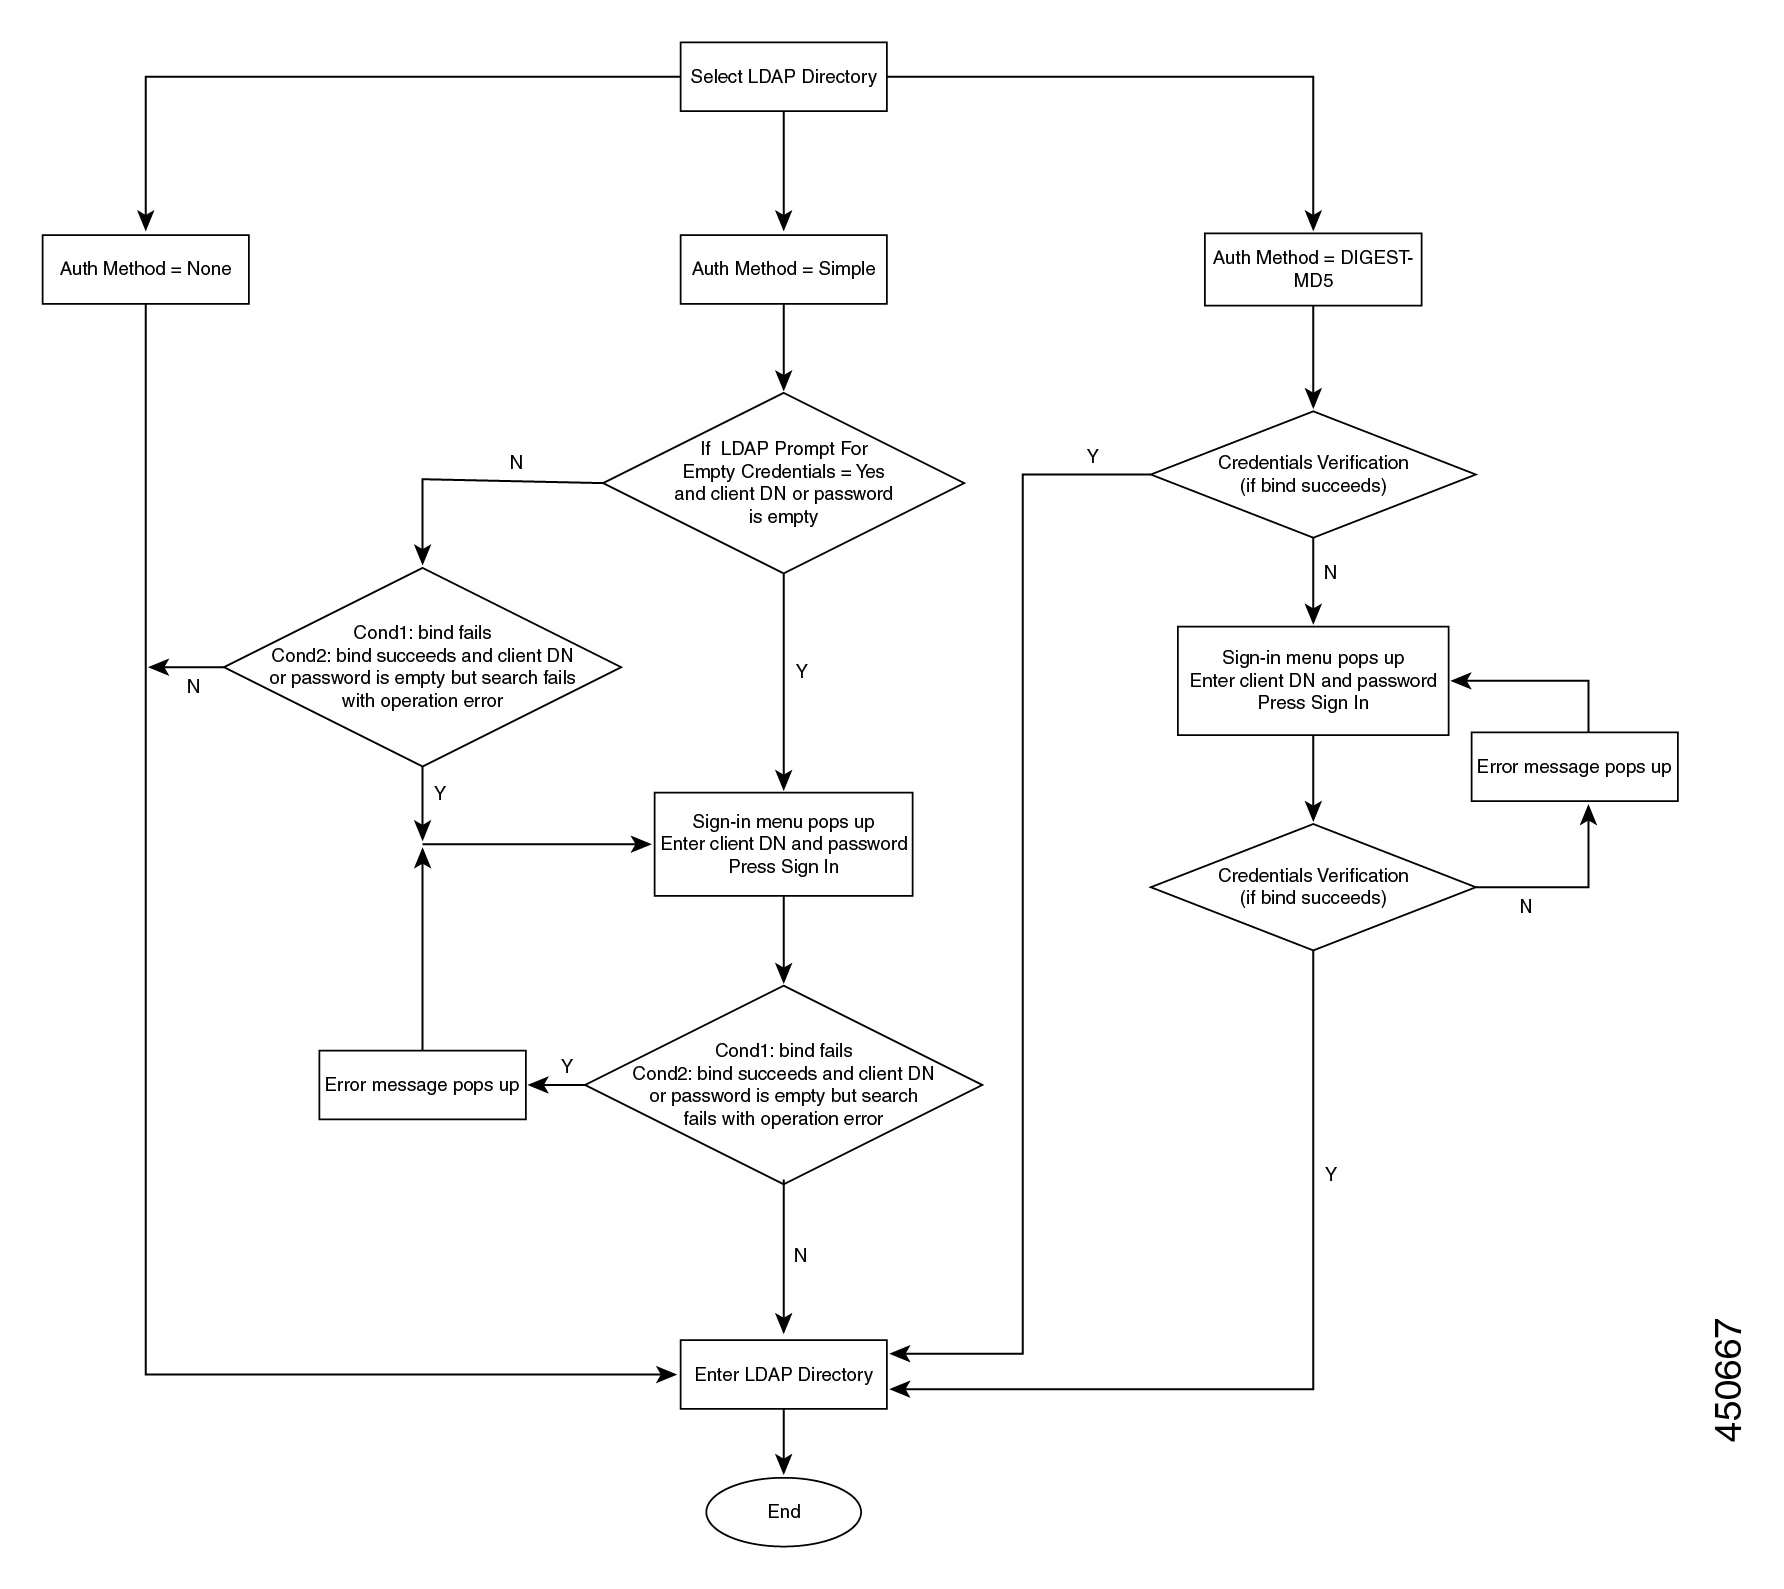
Overview of LDAP Directory Access

The following diagram shows the logic of the LDAP directory access in different authentication methods:

Configure BroadSoft Settings

The BroadSoft directory service enables users to search and view their personal, group, or enterprise contacts. This application feature uses BroadSoft's Extended Services Interface (XSI).

To improve security, the phone firmware places access restrictions on the host server and directory name entry fields.

The phone uses two types of XSI authentication methods:

  • User login credentials: The phone uses the XSI user id and password.

  • SIP credentials: The register name and password of the SIP account registered on the phone. For this method, the phone can use the XSI user ID along with the SIP authentication credentials for the authentication.

Procedure


Step 1

Select Voice > Phone.

Step 2

In the XSI Service section, choose Yes from the Directory Enable drop down list box.

You can also configure this parameter in the configuration file (cfg.xml) by entering a string in this format:
<Directory_Enable ua="na">Yes</Directory_Enable>
Step 3

Set up the fields as described in Parameters for XSI Phone Service.

Step 4

Click Submit All Changes.


Parameters for XSI Phone Service

The following table defines the function and usage of the XSI directory parameters in the XSI Phone Service section under the Voice > Phone tab in the phone web interface. It also defines the syntax of the string that is added in the phone configuration file (cfg.xml) with XML code to configure a parameter.

Table 3. Parameters for XSI Phone Service

Parameter

Description

XSI Host Server

Enter the name of the server; for example,
xsi.iop1.broadworks.net
Note 

XSI Host Server uses http protocol by default. To enable XSI over HTTPS, you can specify https:// in the server.

Perform one of the following:

  • In the phone configuration file with XML(cfg.xml), enter a string in this format:
    <XSI_Host_Server ua="na">https://xsi.iop1.broadworks.net</XSI_Host_Server>
  • In the phone web interface, enter the XSI server to use.

Default: Empty

XSI Authentication Type

Determines the XSI authentication type.

Select Login Credentials to authenticate access with XSI id and password. Select SIP Credentials to authenticate access with the register user ID and password of the SIP account registered on the phone.

Perform one of the following:

  • In the phone configuration file with XML(cfg.xml), enter a string in this format:
    <XSI_Authentication_Type ua="na">SIP Credentials</XSI_Authentication_Type>
  • In the phone web interface, specify the authentication type for XSI service.

Valid values: Login credentials|SIP Credentials

Default: Login Credentials

Login User ID

BroadSoft User ID of the phone user; for example, johndoe@xdp.broadsoft.com.

Enter SIP Auth ID when you select Login Credentials or SIP Credentials for XSI authentication type.

When you choose SIP Auth ID as SIP Credentials, you must enter Login User ID. Without Login User ID, the BroadSoft directory will not appear under the phone Directory list.

Perform one of the following:

  • In the phone configuration file with XML(cfg.xml), enter a string in this format:
    <Login_User_ID ua="na">username</Login_User_ID>
  • In the phone web interface, enter the username used to authenticate the access to the XSI server.

Default: Empty

Login Password

Alphanumeric password associated with the User ID.

Enter login password, when you select Login Credentials for XSI authentication type.

Default: Empty

SIP Auth ID

The registered user ID of the SIP account registered on the phone.

Enter SIP Auth ID when you select SIP Credentials for XSI authentication type.

Perform one of the following:

  • In the phone configuration file with XML(cfg.xml), enter a string in this format:
    <SIP_Auth_ID ua="na">username</SIP_Auth_ID>
  • In the phone web interface, enter the username used to authenticate the access to the XSI server.

Default: Empty

SIP Password

The password of the SIP account registered on the phone.

Enter SIP password when you select SIP Credentials for XSI authentication type.

Default: Empty

Directory Enable

Enables BroadSoft directory for the phone user.

Select Yes to enable the directory and select No to disable it.

Perform one of the following:

  • In the phone configuration file with XML(cfg.xml), enter a string in this format:
    <Directory_Enable ua="na">Yes</Directory_Enable>
  • In the phone web interface, set this field to Yes to enable the BroadSoft directory.

Valid values: Yes and No

Default: No

Directory Individual Mode Enable

Enables the individual mode for the BroadSoft directories. The parameter is valid only when Directory Enable is set to Yes.

When this mode is enabled, the individual BroadSoft directories (such as, Enterprise, Group, Personal, and so on) display in the phone.

When this mode is disabled, only the BroadSoft directory displays in the phone.

Perform one of the following:

  • In the phone configuration file with XML(cfg.xml), enter a string in this format:
    <XsiDir_Individual_Mode_Enable ua="na">Yes</XsiDir_Individual_Mode_Enable>
  • In the phone web interface, set this field to Yes to enable the individual mode for the BroadSoft directories.

Valid values: Yes and No

Default: No

Directory Type

Select the type of BroadSoft directory:

  • Enterprise: Allows users to search on last name, first name, user or group ID, phone number, extension, department, or email address.

  • Group: Allows users to search on last name, first name, user ID, phone number, extension, department, or email address.

  • Personal: Allows users to search on last name, first name, or telephone number.

  • Enterprise Common: Allows users to search on name or number.

  • Group Common: Allows users to search on name or number.

This parameter is valid only when "Directory Enable" is set to Yes and "Directory Individual Mode Enable" is set to No.

Perform one of the following:

  • In the phone configuration file with XML(cfg.xml), enter a string in this format:
    <Directory_Type ua="na">Enterprise</Directory_Type>
  • In the phone web interface, specify the type of BroadSoft directory.

Valid values: Enterprise, Group, Personal, Enterprise Common, and Group Common

Default: Enterprise

Directory Name

Name of the directory. Displays on the phone as a directory choice.

Perform one of the following:

  • In the phone configuration file with XML(cfg.xml), enter a string in this format:
    <Directory_Name ua="na">DirName</Directory_Name>
  • In the phone web interface, enter the name of the BroadSoft directory to display on the phone.

Default: Empty

If the value is empty, the phone displays "BoradSoft directory".

Directory Personal Enable

Enables the BroadSoft personal directory for the phone user.

Select Yes to enable the directory and select No to disable it.

The parameter is valid only when both Directory Enable and Directory Individual Mode Enable are set to Yes.

Perform one of the following:

  • In the phone configuration file with XML(cfg.xml), enter a string in this format:
    <XsiDir_Personal_Enable ua="na">Yes</XsiDir_Personal_Enable>
  • In the phone web interface, set this field to Yes to enable the directory.

Valid values: Yes and No

Default: No

Directory Personal Name

Name of the BroadSoft personal directory. Displays on the phone as a directory choice.

Perform one of the following:

  • In the phone configuration file with XML(cfg.xml), enter a string in this format:
    <XsiDir_Personal_Name ua="na">DirPersonalName</XsiDir_Personal_Name>
  • In the phone web interface, enter the name of the directory to display on the phone.

Default: Empty

If the value is empty, the phone displays "Personal".

Directory Group Enable

Enables the BroadSoft group directory for the phone user.

Select Yes to enable the directory and select No to disable it.

The parameter is valid only when both Directory Enable and Directory Individual Mode Enable are set to Yes.

Perform one of the following:

  • In the phone configuration file with XML(cfg.xml), enter a string in this format:
    <XsiDir_Group_Enable ua="na">Yes</XsiDir_Group_Enable>
  • In the phone web interface, set this field to Yes to enable the directory.

Valid values: Yes and No

Default: No

Directory Group Name

Name of the BroadSoft group directory. Displays on the phone as a directory choice.

Perform one of the following:

  • In the phone configuration file with XML(cfg.xml), enter a string in this format:
    <XsiDir_Group_Name ua="na">DirGroupName</XsiDir_Group_Name>
  • In the phone web interface, enter the name of the directory to display on the phone.

Default: Empty

If the value is empty, the phone displays "Group".

Directory Enterprise Enable

Enables the BroadSoft enterprise directory for the phone user.

Select Yes to enable the directory and select No to disable it.

The parameter is valid only when both Directory Enable and Directory Individual Mode Enable are set to Yes.

Perform one of the following:

  • In the phone configuration file with XML(cfg.xml), enter a string in this format:
    <XsiDir_Enterprise_Enable ua="na">Yes</XsiDir_Enterprise_Enable>
  • In the phone web interface, set this field to Yes to enable the directory.

Valid values: Yes and No

Default: No

Directory Enterprise Name

Name of the BroadSoft enterprise directory. Displays on the phone as a directory choice.

Perform one of the following:

  • In the phone configuration file with XML(cfg.xml), enter a string in this format:
    <XsiDir_Enterprise_Name ua="na">DirEnterpriseName</XsiDir_Enterprise_Name>
  • In the phone web interface, enter the name of the directory to display on the phone.

Default: Empty

If the value is empty, the phone displays "Enterprise".

Directory GroupCommon Enable

Enables the BroadSoft GroupCommon directory for the phone user.

Select Yes to enable the directory and select No to disable it.

The parameter is valid only when both Directory Enable and Directory Individual Mode Enable are set to Yes.

Perform one of the following:

  • In the phone configuration file with XML(cfg.xml), enter a string in this format:
    <XsiDir_GroupCommon_Enable ua="na">Yes</XsiDir_GroupCommon_Enable>
  • In the phone web interface, set this field to Yes to enable the directory.

Valid values: Yes and No

Default: No

Directory GroupCommon Name

Name of the BroadSoft GroupCommon directory. Displays on the phone as a directory choice.

Perform one of the following:

  • In the phone configuration file with XML(cfg.xml), enter a string in this format:
    <XsiDir_GroupCommon_Name ua="na">DirGroupCommon</XsiDir_GroupCommon_Name>
  • In the phone web interface, enter the name of the directory to display on the phone.

Default: Empty

If the value is empty, the phone displays "Group Common".

Directory EnterpriseCommon Enable

Enables the BroadSoft EnterpriseCommon directory for the phone user.

Select Yes to enable the directory and select No to disable it.

The parameter is valid only when both Directory Enable and Directory Individual Mode Enable are set to Yes.

Perform one of the following:

  • In the phone configuration file with XML(cfg.xml), enter a string in this format:
    <XsiDir_EnterpriseCommon_Enable ua="na">Yes</XsiDir_EnterpriseCommon_Enable>
  • In the phone web interface, set this field to Yes to enable the directory.

Valid values: Yes and No

Default: No

Directory EnterpriseCommon Name

Name of the BroadSoft EnterpriseCommon directory. Displays on the phone as a directory choice.

Perform one of the following:

  • In the phone configuration file with XML(cfg.xml), enter a string in this format:
    <XsiDir_EnterpriseCommon_Name ua="na">DirEnterpriseCommon</XsiDir_EnterpriseCommon_Name>
  • In the phone web interface, enter the name of the directory to display on the phone.

Default: Empty

If the value is empty, the phone displays "Enterprise Common".

Add Contacts to Directory Personal

Enables the user to add contacts to the BroadSoft personal directory instead of the local personal address book.

The parameter is valid only when Directory Personal Enable is set to Yes.

  • If Directory Personal Enable is set to No and Personal Directory Enable is set to Yes, the contacts will be added to the local personal address book.

    Personal Directory Enable is under the Directory Services section from Voice > Phone.

  • If both parameters are set to No, the user can't add the contacts on the phone.

Perform one of the following:

  • In the phone configuration file with XML(cfg.xml), enter a string in this format:
    <Add_Contacts_to_Directory_Personal ua="na">Yes</Add_Contacts_to_Directory_Personal>
  • In the phone web interface, set this field to Yes to enable the feature.

Valid values: Yes and No

Default: No

Set up Personal Directory

Phone users can set up personal directory from either the web interface or the Contacts > Personal address book menu on the phone. The setup of personal directory is not available in the configuration file (cfg.xml)

Before you begin

Access the phone administration web page. See Access the Phone Web Interface.

Procedure


Step 1

Select the Personal Directory tab.

Step 2

You can do the following on this tab:

  • Click Add to Personal Directory to add a contact to the personal address book.

    Up to 3 phone numbers can be added to a contact entry.

  • Click Edit on an existing contact entry to edit the contact information.
  • Click Assign to assign a speed dial index to a phone number of the contact entry.
  • Select an existing contact entry and click Delete Contact to delete it.
Step 3

Click Submit All Changes.


Enable Reverse Name Lookup

Reverse name lookup searches for the name of a number in an incoming, outgoing, conference, or transferred call. The reverse name lookup acts when the phone cannot find a name using the service provider directory, Call History, or your contacts. Reverse name lookup needs a valid BroadSoft (XSI) Directory, LDAP Directory, or XML Directory configuration.

The reverse name lookup searches the phone's external directories. When a search succeeds, the name is placed in the call session and in the call history. For simultaneous, multiple phone calls, reverse name lookup searches for a name to match the first call number. When the second call connects or is placed on hold, reverse name lookup searches for a name to match the second call. The reverse lookup searches the external directories for 8 secs, if in 8secs there are no results found, there will be no display of the name. If results are found in 8secs, the name is diplayed on the phone. The external directory search priority order is : BroadSoft (XSI) > LDAP > XML.

While searching if the lower priority name is received before the higher priority name, the search shows the lower prioirty name first and then replaced it with the higher priority name if the higher priority name is found within 8 secs.

The precedence of the phone list lookup in BroadSoft (XSI) Directory is:

  1. Personal phone list

  2. Group common phone list

  3. Enterprise common phone list

Reverse name lookup is enabled by default.

Reverse name lookup searches the directories in the following order:
  1. Personal Address Book

  2. SIP Header

  3. Call History

  4. BroadSoft (XSI) Directory

  5. LDAP Directory

  6. XML Directory


    Note

    The phone searches the XML directory using this format: directory_url?n=incoming_call_number.

    Example: For a multiplatform phone using a third-party service, the phone number (1234) search query has this format, http://your-service.com/dir.xml?n=1234.


Before you begin

  • Configure one of these directories before you can enable or disable the reverse name lookup:

    • BroadSoft (XSI) Directory

    • LDAP Corporate Directory

    • XML Directory

  • Access the phone administration web page. See Access the Phone Web Interface.

Procedure


Step 1

Select Voice > Phone.

Step 2

In the Supplementary Services area, set the Reverse Phone Lookup Serv parameter to Yes to enable this feature.

You can also configure this parameter in the configuration file (cfg.xml) by entering a string in this format:
<Reverse_Phone_Lookup_Serv ua="na">Yes</Reverse_Phone_Lookup_Serv>

The allowed values are Yes|No. The default value is Yes.

Step 3

Click Submit All Changes.