Jabber for Everyone Quick Start Guide, Release 10.0(1)
Bias-Free Language
The documentation set for this product strives to use bias-free language. For the purposes of this documentation set, bias-free is defined as language that does not imply discrimination based on age, disability, gender, racial identity, ethnic identity, sexual orientation, socioeconomic status, and intersectionality. Exceptions may be present in the documentation due to language that is hardcoded in the user interfaces of the product software, language used based on RFP documentation, or language that is used by a referenced third-party product. Learn more about how Cisco is using Inclusive Language.
- Updated:
- November 28, 2013
Chapter: Jabber for Everyone Deployment Workflow
- Core IM and Presence Deployment
- Set Up Users on Unified Communications Manager
- Install IM and Presence Service
- Verify Essential Services on Unified Communications Manager and IM and Presence Service
- Specify End-User Capabilities on Unified Communications Manager
- LDAP Configuration on IM and Presence Service
- Cisco Jabber Installation
Jabber for Everyone Deployment Workflow
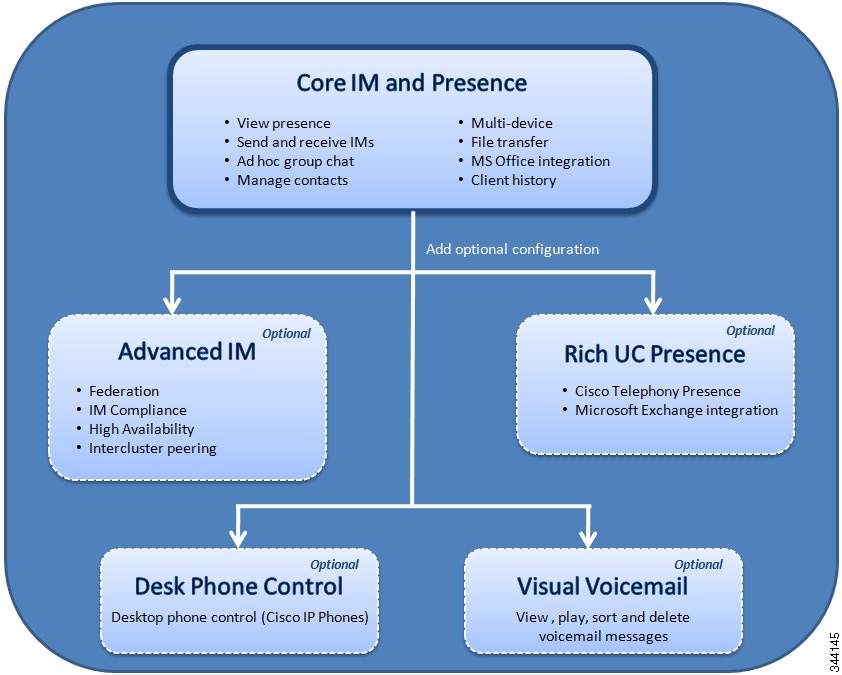
Core IM and Presence represents the baseline offering for the "Jabber for Everyone" solution. You can extend your deployment by incorporating any of the following additional, optional feature sets:
Each deployment scenario assumes that Unified Communications Manager is installed.
The following figure shows the Core IM and Presence feature set and the optional features that can be deployed with additional configuration for Advanced IM, Rich UC Presence, Desk Phone Control and Visual Voicemail.
- Core IM and Presence Deployment
- Advanced IM Deployment
- Rich UC Presence Deployment
- Desk Phone Control Deployment
- Visual Voicemail Deployment
Core IM and Presence Deployment
The following are the high-level tasks that you must complete to enable core IM and presence features in your network:
- Set up users on Unified Communications Manager.
- Install IM and Presence Service.
- Verify essential services on Unified Communications Manager and IM and Presence Service.
- Specify capabilities assignments for end users on Unified Communications Manager.
- Create an LDAP profile on IM and Presence Service.
- Install Cisco Jabber.
 Note |
You can deploy "Jabber for Everyone" in a mixed cluster where you provision some users with only instant messaging and availability and other users with instant messaging and availability along with audio capabilities. You should create separate service profiles for users that have only instant messaging and availability capabilities. If the service profile contains a CTI or CCMCIP profile, the client attempts to retrieve device lists for users from Cisco Unified Communications Manager. If no device lists exist for users, the client continually requests device lists from the server. As a result, the server consumes additional CPU resources. |
- Set Up Users on Unified Communications Manager
- Install IM and Presence Service
- Verify Essential Services on Unified Communications Manager and IM and Presence Service
- Specify End-User Capabilities on Unified Communications Manager
- LDAP Configuration on IM and Presence Service
- Cisco Jabber Installation
Set Up Users on Unified Communications Manager
The Cisco Jabber clients retrieve user details from Cisco Unified Communications Manager. For this reason, you must add users to Cisco Unified Communications Manager, including users who are not Cisco IP phone users.
Install IM and Presence Service
"Jabber for Everyone" requires integration with IM and Presence Service. If your environment does not already include IM and Presence Service, you must install the IM and Presence Service software that is included in your Unified Communications software delivery.
Verify Essential Services on Unified Communications Manager and IM and Presence Service
A number of essential services must be activated and in a started state on Unified Communications Manager and IM and Presence Service to ensure that data synchronizes between the two servers and that the Cisco Jabber clients can access IM and presence feature services.
Note |
Most services automatically activate and start when you install the server. However, you should verify that the services that are listed in the following procedure are in a started state before you proceed with any other deployment tasks. |
| Step 1 |
Verify that the following service is activated and in a started state on Cisco Unified Communications Manager:
This service ensures that Cisco Unified Communications Manager synchronizes data to IM and Presence Service. See the “Activate feature services” section in the Cisco Unified Serviceability Administration Guide for more information. |
| Step 2 |
Verify that the following feature services are activated and started on IM and Presence Service:
See the “Activate and deactivate feature services” section in the Cisco Unified Serviceability Administration Guide for more information. |
| Step 3 | Verify that all network services on IM and Presence Service are activated and started. |
Specify End-User Capabilities on Unified Communications Manager
You must assign IM and presence capabilities to users in Cisco Unified Communications Manager.
| Step 1 | Open the Cisco Unified Communications Manager Administration interface. |
| Step 2 | Select . |
| Step 3 | Use the filters to the find the user that you want to enable for IM and Presence. |
| Step 4 | In the End User Configuration screen, check Enable User for Unified Communications Manager IM and Presence. |
| Step 5 | Select Save. |
Note |
You can also assign IM and presence capabilities in bulk. See the Cisco Unified Communications Manager Bulk Administration Guide for more information. |
LDAP Configuration on IM and Presence Service
IM and Presence Service LDAP profiles provide contact search capabilities to the client. See the appropriate Cisco Jabber client documentation for more information about directory requirements and setup.
Note |
You should create an LDAP profile and verify LDAP attribute mappings, even if your Cisco Jabber client does not currently integrate with LDAP profiles on IM and Presence Service. |
Create LDAP Profile
|
See the “LDAP directory integration” section in the Deployment Guide for IM and Presence Service on Cisco Unified Communications Manager.
|
Verify LDAP Attribute Mappings
You must ensure that the same LDAP attribute mappings are used for IM and Presence Service and Cisco Jabber.
| Step 1 | Open the Cisco Unified Communications Manager IM and Presence Administration interface. |
| Step 2 | Select . |
| Step 3 | Verify the attribute mappings in the Legacy Client LDAP Attribute Mapping section. |
| Step 4 | Select Save. |
Cisco Jabber Installation
After you complete the procedures to set up Cisco Unified Communications Manager and IM and Presence Service, you must configure and install the appropriate Cisco Jabber clients. However, it is beyond the scope of this document to provide detailed instructions on installing all of the Cisco Jabber clients. This document provides a high-level overview of the steps you must complete to install an IM and Presence deployment of Cisco Jabber. Refer to the appropriate client documentation for detailed instructions.
- Install Cisco Jabber for Windows
- Install Cisco Jabber for Mac
- Develop with Cisco Jabber Web SDK
- Install Cisco Jabber IM for BlackBerry
- Install Cisco Jabber IM for iPhone
- Install Cisco Jabber IM for Android
Install Cisco Jabber for Windows
This topic describes the high-level tasks you must complete to install Cisco Jabber for Windows.
See the “Cisco Jabber for Windows Administration Guide” for instructions on configuring and installing Cisco Jabber for Windows.
| Step 1 |
Review configuration parameters for Cisco Jabber for Windows.
See the “Configure Cisco Jabber for Windows in an on-premises deployment” section of the “Cisco Jabber for Windows Administration Guide”. |
||
| Step 2 |
(Optional)Complete the following steps if your deployment requires configuration:
|
||
| Step 3 |
Install Cisco Jabber for Windows. See the “Deploy Cisco Jabber for Windows” section of the “Cisco Jabber for Windows Administration Guide”. |
Install Cisco Jabber for Mac
This topic describes the high-level tasks you must complete to install Cisco Jabber for Mac.
See the “Cisco Jabber for Mac Installation and Configuration Guide” for instructions on configuring and installing Cisco Jabber for Mac.
| Step 1 |
Review the configuration parameters for Cisco Jabber for Mac. See the “Overview of Cisco Jabber for Mac” and “Deploy Cisco Jabber for Mac on-premises” sections of the “Cisco Jabber for Mac Installation and Configuration Guide”. |
| Step 2 |
Install Cisco Jabber for Mac. See the following topics in the “Overview of Cisco Jabber for Mac” and “Deploy Cisco Jabber for Mac on-premises” sections of the “Cisco Jabber for Mac Installation and Configuration Guide”. |
Develop with Cisco Jabber Web SDK
The Cisco Jabber Web SDK enables you to integrate Cisco Unified Communications capabilities in web applications. To integrate IM capabilities in a web application, you use the Cisco AJAX XMPP Library (CAXL). CAXL is a client-side JavaScript library that runs in a web browser and sends and receives XMPP messages as HTTP POSTs.
| Step 1 | Set up a web server. |
| Step 2 | Download the CAXL library from the Cisco Developer Network. |
| Step 3 | Extract the contents of the CAXL library to the working directory of your website. |
| Step 4 | Implement the required HTML with JavaScript objects to send and receive XMPP messages. |
Install Cisco Jabber IM for BlackBerry
This topic describes the high-level tasks you must complete to install Cisco Jabber IM for BlackBerry.
See the “Cisco Jabber IM for BlackBerry Quick Start Guide” and “Administration Guide” for instructions on configuring and installing Cisco Jabber IM for BlackBerry.
| Step 1 | Install the client application from BlackBerry App World. See the “Updating or reinstalling Cisco Jabber IM for BlackBerry” section in the “Cisco Jabber IM for BlackBerry Release 1.0 Quick Start Guide” for details. |
| Step 2 | Sign in to Cisco Jabber IM for BlackBerry. The following sections in the “Cisco Jabber IM for BlackBerry Release 1.0 Quick Start Guide” contain information on signing in to the application: |
Install Cisco Jabber IM for iPhone
This topic describes the high-level tasks you must complete to install Cisco Jabber IM for iPhone.
See the “Cisco Jabber IM for iPhone Administrator's Guide” for instructions on configuring and installing Cisco Jabber IM for iPhone.
| Step 1 | Install the client application from Apple App Store. See the section “Deployment and Distribution” in the “Cisco Jabber IM for iPhone Administrator's Guide” for details. |
| Step 2 | Sign in to Cisco Jabber IM for iPhone. The following sections in the “Cisco Jabber IM for iPhone Administrator's Guide” contain information on signing in to the application: |
Install Cisco Jabber IM for Android
This topic describes the high-level tasks you must complete to install Cisco Jabber IM for Android.
See the Frequently Asked Questions: Cisco Jabber IM for Android for instructions on configuring and installing Cisco Jabber IM for Android.
| Step 1 | Obtain the application from Google Play (formerly known as Google Android Market). Install Cisco Jabber IM for Android the same way that you normally install any application from Google Play on your Android device. If you need help, consult the user manual for your device, or contact your system administrator. |
| Step 2 | Sign in to Cisco Jabber IM for Android. For details on how to sign in, including system and account requirements, see Frequently Asked Questions: Cisco Jabber IM for Android. |
Advanced IM Deployment
"Jabber for Everyone" supports optional advanced IM and presence features that extend your baseline deployment.
Supported Federation
"Jabber for Everyone" supports interdomain federation and partitioned intradomain federation.
Interdomain Federation
For more information about deploying interdomain federation on Cisco Unified Presence, see the Interdomain Federation for IM and Presence Service on Cisco Unified Communications Manager.
See the appropriate Cisco Jabber client documentation to review support for interdomain federation and any required configuration.
Partitioned Intradomain Federation
For more information about deploying partitioned intradomain federation, see the Partitioned Intradomain Federation for IM and Presence Service on Cisco Unified Communications Manager.
See the appropriate Cisco Jabber client documentation to review support for partitioned intradomain federation and any required configuration.
IM Compliance
For more information about configuring IM compliance, see Instant Messaging Compliance for IM and Presence Service on Cisco Unified Communications Manager.
Intercluster Peering
You can deploy multiple clusters of IM and Presence for large-scale deployments. If you deploy multiple clusters, you must define peer relationships for each IM and Presence cluster within the same domain.
For more information about multiple cluster deployments, see Cisco Unified Communications System 9.x SRND.
For more information about configuring an intercluster deployment, see the "IM and Presence Intercluster Deployment" section of the Deployment Guide for IM and Presence Service on Cisco Unified Communications Manager.
High Availability
The IM and Presence Service supports high availability (HA) with clustered servers. If a node in a subcluster fails, the IM and presence services from that node fail over to the second node in the subcluster. As a result, there is no loss of IM and presence services for users.
For information about configuring HA deployments, see the Deployment Guide for IM and Presence Service on Cisco Unified Communications Manager.
Rich UC Presence Deployment
You can optionally expand your "Jabber for Everyone" deployment to include Telephone Presence ("On a call") for Cisco IP phone users and Meeting Status ("In a Meeting") through integration with Microsoft Exchange.
Telephony Presence Integration
The following are the high-level tasks that you must complete if you want to deploy rich presence for Cisco IP phone users in your network:
- Set Up SIP Publish Trunk
- Set Up Presence Gateway for Unified Communications Manager
- Associate Line Appearances with Users
Set Up SIP Publish Trunk
Cisco Unified Communications Manager communicates with the IM and Presence Service through a SIP trunk.
| Step 1 |
Configure the SIP trunk on Cisco Unified Communications Manager. For instructions, see the "SIP Trunk configuration on Cisco Unified Communications Manager" section in the Deployment Guide for IM and Presence Service on Cisco Unified Communications Manager. |
| Step 2 | Select the SIP publish trunk on IM and Presence. |
Set Up Presence Gateway for Unified Communications Manager
You must configure Cisco Unified Communications Manager as a presence gateway on IM and Presence Service. The presence gateway enables Cisco Unified Communications Manager and IM and Presence Service to share availability status for users.
| Step 1 | Open the Cisco Unified Communications Manager IM and Presence Administration interface. |
| Step 2 | Select . |
| Step 3 | Select Add New. |
| Step 4 | Select CUCM from the Presence Gateway Type drop-down list. |
| Step 5 | Enter a description in the Description field. |
| Step 6 |
Specify one of the following values in the Presence Gateway field:
|
| Step 7 |
Select Save. For more information about configuring a presence gateway, see the "Presence Gateway configuration on IM and Presence" section in the Deployment Guide for IM and Presence Service on Cisco Unified Communications Manager. |
Associate Line Appearances with Users
To enable telephony presence, you must associate each IM and presence enabled user with a line appearance in Cisco Unified Communications Manager.
| Step 1 | Open the Cisco Unified Communications Manager Administration interface. |
| Step 2 | Select . |
| Step 3 | Do one of the following to retrieve a list of phones: |
| Step 4 |
Select the appropriate device name from the list. The Phone Configuration window opens. |
| Step 5 |
Select the link for the appropriate line in the Association Information section. The Directory Number Configuration window opens. |
| Step 6 |
Select Associate End Users in the Users Associated with Line section. The Find and List Users window opens. |
| Step 7 | Do one of the following to retrieve a list of users: |
| Step 8 | Select the appropriate users from the list. |
| Step 9 | Select Add Selected. |
| Step 10 | Select Save in the Directory Number Configuration window. |
Integration with Microsoft Exchange
IM and Presence Service integrates with Microsoft Exchange so that events in a user’s Microsoft Outlook calendar change the user’s availability status in the client application.
To enable integration between IM and Presence Service and Microsoft Exchange, you must establish a gateway connection to the Microsoft Exchange server.
Note |
IM and Presence Service supports integration with Microsoft Exchange 2003, 2007, and 2010. |
For more information about Microsoft Exchange integration, see the Microsoft Exchange for IM and Presence Service on Cisco Unified Communications Manager.
Desk Phone Control Deployment
Computer Telephony Integration (CTI), or desk phone control, allows users to control their Cisco IP Phone through Cisco Jabber. To enable desk phone control, you must set up a CTI UC service and assign it to a service profile.
See the Cisco Unified Communications Manager Administration Guide for more information about how to set up desk phone control for Cisco IP Phones.
Visual Voicemail Deployment
Cisco Unity Connection provides Cisco Jabber users with the ability to view, play, sort, and delete voicemail messages from the Cisco Jabber interface.
See the Deployment Guide for IM and Presence Service on Cisco Unified Communications Manager for more information about how to set up visual voicemail for Cisco Jabber users.
Note |
The information regarding setting up visual voicemail in the Deployment Guide for IM and Presence Service on Cisco Unified Communications Manager refers to Cisco Unified Personal Communicator, however, the same information also applies to Cisco Jabber. |
 Feedback