Upgrading to Release 3.2.1
This chapter describes the upgrade procedure for the CDSM, VVIM, and CDS servers. This chapter covers the following topics:
•![]() Upgrading the Software on a CDSM or VVIM
Upgrading the Software on a CDSM or VVIM
•![]() Manually Upgrading a TV CDS Server to Release 3.2.1
Manually Upgrading a TV CDS Server to Release 3.2.1
•![]() Remotely Upgrading a TV CDS Server to Release 3.2.1
Remotely Upgrading a TV CDS Server to Release 3.2.1
•![]() Upgrading a New CDS Server to Release 3.2.1
Upgrading a New CDS Server to Release 3.2.1
•![]() Imaging a CDS Server with 64-Bit OS using a DVD
Imaging a CDS Server with 64-Bit OS using a DVD

Upgrading the Software on a CDSM or VVIM
If the VVI or CDS has redundant CDSMs or VVIMs, upgrade the secondary CDSM or VVIM first, then upgrade the primary. The primary and secondary CDSM (or VVIM) can be determined by entering the ifconfig -a | more command. The primary has the following output:
eth0:1 Link encap:Ethernet HWaddr 00:11:00:00:00:00
inet addr:172.22.98.54 Bcast:172.22.99.255 Mask:255.255.254.0
UP BROADCAST RUNNING MULTICAST MTU:1500 Metric:1
Memory:b880000-b8840000
The primary CDSM or VVIM has device eth0:1. The secondary CDSM or VVIM does not have the virtual IP address as up.

Note ![]() Upgrading a CDSM requires that the CDS-TV-3.2.1.iso and cdsinstall software files have been downloaded and copied to the CDSM. The cdsinstall script has changed for Release 3.2.1. Make sure you download the cdsinstall script from Cisco and copy it to /root directory on each CDSM before upgrading them. Use the scp command to copy the software files. For example, if the remote server that you downloaded the software files to has an IP address of 172.22.97.109 and the files are stored in the CDSdownloads directory, the following commands are used:
Upgrading a CDSM requires that the CDS-TV-3.2.1.iso and cdsinstall software files have been downloaded and copied to the CDSM. The cdsinstall script has changed for Release 3.2.1. Make sure you download the cdsinstall script from Cisco and copy it to /root directory on each CDSM before upgrading them. Use the scp command to copy the software files. For example, if the remote server that you downloaded the software files to has an IP address of 172.22.97.109 and the files are stored in the CDSdownloads directory, the following commands are used:
# scp -p 172.22.97.109:/CDSdownloads/CDS-TV-3.2.1.iso / root
# scp -p 172.22.97.109:/CDSdownloads/cdsinstall /root
Note ![]() Before upgrading the CDSMs, review the information in the "Introduction" section. For information on downloading the software files, see the "Getting the Cisco TV CDS Software Files for Release 3.2.1" section.
Before upgrading the CDSMs, review the information in the "Introduction" section. For information on downloading the software files, see the "Getting the Cisco TV CDS Software Files for Release 3.2.1" section.
Note ![]() If custom modifications have been made to the root crontab (for example, in ISA environments the MSV script to delete orphaned content), create the /etc/cds_noCrontabOverwrite file before upgrading the TV CDS software in order to avoid the custom crontab being overwritten. To create this file, enter the following command:
If custom modifications have been made to the root crontab (for example, in ISA environments the MSV script to delete orphaned content), create the /etc/cds_noCrontabOverwrite file before upgrading the TV CDS software in order to avoid the custom crontab being overwritten. To create this file, enter the following command:
touch /etc/cds_noCrontabOverwrite
To upgrade the software on a CDSM or VVIM, do the following:
Step 1 ![]() Log in to the secondary CDSM or VVIM as root.
Log in to the secondary CDSM or VVIM as root.
Step 2 ![]() Back up the configuration and database files on the existing CDSM or VVIM. For information on this procedure, see the "Performing a Backup on the CDSM or VVIM" section.
Back up the configuration and database files on the existing CDSM or VVIM. For information on this procedure, see the "Performing a Backup on the CDSM or VVIM" section.
Step 3 ![]() Verify there is enough disk space on / and /arroyo.
Verify there is enough disk space on / and /arroyo.
# df-h
Filesystem Size Used Avail Use% Mounted on
/dev/sda2 3.5G 624M 2.7G 19% /
/dev/sdc1 3.9G 2.4G 1.4G 64% /usr
/dev/sde1 7.8G 5.0G 2.4G 68% /arroyo
/dev/sdh1 97G 9.0G 83G 10% /arroyo/db
/dev/sdf1 7.8G 529M 6.9G 8% /home
/dev/sdd1 7.8G 204M 7.2G 3% /var
/dev/sda1 244M 12M 219M 6% /boot
tmpfs 3.9G 0 3.9G 0% /dev/shm
If the disk space is high and you run the script, you receive the following message:
# ./cdsinstall
Continuing first-time installation after kickstart using image //CDS-TV.iso
The filesystem usage is more than 90% for at least one of the Mount Points
The image installation may fail.
Step 4 ![]() Run the cdsinstall script to upgrade the ISO image to Release 3.2.1.
Run the cdsinstall script to upgrade the ISO image to Release 3.2.1.
# cd /root
# ./cdsinstall CDS-TV-3.2.1.iso
Select Deployment Type (ctrl-c to quit):
1) CDSM
1
CDSM Selected
Mounting CDS-TV-3.2.1.iso at /mnt/cdrom
Running inst.sh for isa
Killing running processes: statsd
Un-taring isa-base.tgz
Calling forprod.sh
Removing RTSP-specific files
Installing ISA-specific files (existing files backed up to .file)
ISA installation complete
Starting fixperms.sh
Loading File List
Processing File List
Ending fixperms.sh
Calling inst.sh for cdsm
Killing running processes: statsd
Starting cdsupgrade.sh
Current SW version to backup is cdstv-2.1.3-es4-b4
Processing File Lists
/arroyo/image/backup/cdstv-2.1.3-es4-b4/files/common-files: does not exist
/arroyo/image/backup/cdstv-2.1.3-es4-b4/files/isa-files: does not exist
/arroyo/image/backup/cdstv-2.1.3-es4-b4/files/rtsp-files: does not exist
Processing /arroyo/image/backup/cdstv-2.1.3-es4-b4/files/cdsm-files
Ending cdsupgrade.sh
Un-taring cdsm-base.tgz
Calling forprod.sh
Installing CDSM-specific files (existing files backed up to .file)
Upgrading CmdTool2 if necessary
Set Write Policy to WriteBack on Adapter 0, VD 0 (target id: 0) success
Set Write Policy to WriteBack on Adapter 0, VD 1 (target id: 1) success
Set Write Policy to WriteBack on Adapter 0, VD 2 (target id: 2) success
Set Write Policy to WriteBack on Adapter 0, VD 3 (target id: 3) success
Set Write Policy to WriteBack on Adapter 0, VD 4 (target id: 4) success
Set Write Policy to WriteBack on Adapter 0, VD 5 (target id: 5) success
Set Write Policy to WriteBack on Adapter 0, VD 6 (target id: 6) success
Set Write Cache OK if bad BBU on Adapter 0, VD 0 (target id: 0) success
Set Write Cache OK if bad BBU on Adapter 0, VD 1 (target id: 1) success
Set Write Cache OK if bad BBU on Adapter 0, VD 2 (target id: 2) success
Set Write Cache OK if bad BBU on Adapter 0, VD 3 (target id: 3) success
Set Write Cache OK if bad BBU on Adapter 0, VD 4 (target id: 4) success
Set Write Cache OK if bad BBU on Adapter 0, VD 5 (target id: 5) success
Set Write Cache OK if bad BBU on Adapter 0, VD 6 (target id: 6) success
Set Disk Cache Policy to Enabled on Adapter 0, VD 0 (target id: 0) success
Set Disk Cache Policy to Enabled on Adapter 0, VD 1 (target id: 1) success
Set Disk Cache Policy to Enabled on Adapter 0, VD 2 (target id: 2) success
Set Disk Cache Policy to Enabled on Adapter 0, VD 3 (target id: 3) success
Set Disk Cache Policy to Enabled on Adapter 0, VD 4 (target id: 4) success
Set Disk Cache Policy to Enabled on Adapter 0, VD 5 (target id: 5) success
Set Disk Cache Policy to Enabled on Adapter 0, VD 6 (target id: 6) success
CDSM installation complete
Starting fixperms.sh
Loading File List
Processing File List
Ending fixperms.sh
Unmounting /mnt/cdrom
cdsinstall completed. Please reboot the device.
Step 5 ![]() Verify that the required baud is 9600 in /etc/grub.conf. If it is 115200, edit the file to change it to 9600See Baud Setting for additional information on setting the baud.
Verify that the required baud is 9600 in /etc/grub.conf. If it is 115200, edit the file to change it to 9600See Baud Setting for additional information on setting the baud.
Step 6 ![]() Stop the logging script:
Stop the logging script:
# exit
Script done, file is upgradelog.txt
Step 7 ![]() Shut the database by stopping the avdsb process on the CDSM or VVIM:
Shut the database by stopping the avdsb process on the CDSM or VVIM:
# db_shutdown
Step 8 ![]() Reboot the CDSM or VVIM.
Reboot the CDSM or VVIM.
# reboot
Step 9 ![]() After both CDSMs or VVIMs are upgraded, you must reset the password on one CDSM or VVIM.
After both CDSMs or VVIMs are upgraded, you must reset the password on one CDSM or VVIM.
a. ![]() To reset the password, run the following script as root user:
To reset the password, run the following script as root user:
# /home/stats/resetpw
Parsed 4 tokens, use SHA, image version: 3.2.1-b204
Did not find regular file /etc/cdsremoteauth
Password values reset successfully
b. ![]() Then login the the CDSM or VVIM GUI. Login with the User Name and Password as "admin".
Then login the the CDSM or VVIM GUI. Login with the User Name and Password as "admin".
c. ![]() Go to Maintain then Users. In the Edit Users page, change the password and select Submit.
Go to Maintain then Users. In the Edit Users page, change the password and select Submit.
Step 10 ![]() Configure Sites and thin pipes for Vault Group and Cache Groups using upgraded VVIMs. On the VVIM GUI, go to the Configure > Array Level > Site Setup page, configure new sites. Each site includes one array: Vault Group or a Cache Group.
Configure Sites and thin pipes for Vault Group and Cache Groups using upgraded VVIMs. On the VVIM GUI, go to the Configure > Array Level > Site Setup page, configure new sites. Each site includes one array: Vault Group or a Cache Group.
Note ![]() Be sure to use a new thin pipe name and not one that was used in a previous configuration; otherwise, previous thin pipes will be deleted if you downgrade this CDSM or VVIM.
Be sure to use a new thin pipe name and not one that was used in a previous configuration; otherwise, previous thin pipes will be deleted if you downgrade this CDSM or VVIM.
Step 11 ![]() After all sites are configured, go to the Configure >Array Level > Thin Pipe Map and define the thin pipe between Vault Groups, from a Vault group to a Cache Group, or from a Cache Group to Vault Group. For example, this is the thin pipe 500 Mbps defined from Site1 to Site2.
After all sites are configured, go to the Configure >Array Level > Thin Pipe Map and define the thin pipe between Vault Groups, from a Vault group to a Cache Group, or from a Cache Group to Vault Group. For example, this is the thin pipe 500 Mbps defined from Site1 to Site2.
Step 12 ![]() If you want to define thin pipes between Stream Groups or from a Stream Group to Cache Group, you must define these through the CDSM GUI.
If you want to define thin pipes between Stream Groups or from a Stream Group to Cache Group, you must define these through the CDSM GUI.
Step 13 ![]() Generate Ethernet Interface configurations for Cache/Fill links:
Generate Ethernet Interface configurations for Cache/Fill links:
a. ![]() Restart avsdb
Restart avsdb
# db_shutdown
# pgrep avsdb (to make sure there is no avsdb process running)
# netstat -na | grep 9999 (to make sure there is no avsdb connections)
# su - isa (to start avsdb)
b. ![]() Verify avsdb has two processes running and "AVSDB Databases Created/Registered Successfully" is shown in avsdb.log.yyyymmdd.
Verify avsdb has two processes running and "AVSDB Databases Created/Registered Successfully" is shown in avsdb.log.yyyymmdd.
c. ![]() Restart statsd:
Restart statsd:
# pkill statsd
# pgrep statsd (to make sure there is no statsd running)
# /home/stats/statsd -d eth0 (copy statsd start line from /etc/rc.local and run it
here)
Step 14 ![]() To complete the software upgrade, log in to the CDSM GUI as a user with Engineering access level. The CDSM Setup page is displayed. In the Deployed CServer Version drop-down list, choose 2.5.x. In all deployments, verify all settings on the CDSM Setup page and click Submit.
To complete the software upgrade, log in to the CDSM GUI as a user with Engineering access level. The CDSM Setup page is displayed. In the Deployed CServer Version drop-down list, choose 2.5.x. In all deployments, verify all settings on the CDSM Setup page and click Submit.
Step 15 ![]() Upgrade the primary CDSM or VVIM (Step 1 to Step 14), if applicable.
Upgrade the primary CDSM or VVIM (Step 1 to Step 14), if applicable.
Manually Upgrading a TV CDS Server to Release 3.2.1
This section describes the procedure for upgrading a server to TV CDS 3.2.1 software release. Servers may be caching nodes or Vaults.
There may be several Cache Groups in your configuration, but only upgrade them one group at a time. When upgrading a Cache Node in one group, update the slave server first then upgrade the master server.
There are two Vault Groups in an NGOD environment, first upgrade the slave group then upgrade the master group. Keep the following in mind:
•![]() While upgrading a slave Vault Group, you can upgrade all Vaults in this group at the same time.
While upgrading a slave Vault Group, you can upgrade all Vaults in this group at the same time.
•![]() While upgrading a master Vault Group, first upgrade all slave Vaults in this group together, then upgrade the master server.
While upgrading a master Vault Group, first upgrade all slave Vaults in this group together, then upgrade the master server.
•![]() While upgrading a vault, confirm the backup live content indicated with a #B#.
While upgrading a vault, confirm the backup live content indicated with a #B#.
/home/isa/bss/etc/fsi.conf
live_ingest_redundancy_backup_postfix=#B#
Note ![]() Before upgrading the CDS servers, review the information in Chapter 2 "Overview of Upgrading and Downgrading the TV CDS Software."
Before upgrading the CDS servers, review the information in Chapter 2 "Overview of Upgrading and Downgrading the TV CDS Software."
Note ![]() For RTSP environments with NGOD deployments, before upgrading to Release 3.2.1 from Release 2.1.1, log in to the CDSM, choose Configure > Server Level > RTSP Server, select the IP address of a Streamer and write down the settings for the SOP fields for each Streamer. For more information, see the "Configuring Source Output Ports" section in the Cisco TV CDS 2.5 RTSP Software Configuration Guide.
For RTSP environments with NGOD deployments, before upgrading to Release 3.2.1 from Release 2.1.1, log in to the CDSM, choose Configure > Server Level > RTSP Server, select the IP address of a Streamer and write down the settings for the SOP fields for each Streamer. For more information, see the "Configuring Source Output Ports" section in the Cisco TV CDS 2.5 RTSP Software Configuration Guide.
Note ![]() If custom modifications have been made to the root crontab (for example, in ISA environments the MSV script to delete orphaned content), create the /etc/cds_noCrontabOverwrite file before upgrading the TV CDS software in order to avoid the custom crontab being overwritten. To create this file, enter the following command:
If custom modifications have been made to the root crontab (for example, in ISA environments the MSV script to delete orphaned content), create the /etc/cds_noCrontabOverwrite file before upgrading the TV CDS software in order to avoid the custom crontab being overwritten. To create this file, enter the following command:
touch /etc/cds_noCrontabOverwrite
To upgrade a CDS server, do the following:
Step 1 ![]() If you are upgrading a vault, disable mirroring on all vaults in all Vault Groups before upgrading the software. Mirroring will be enabled once all the vaults in all the Vault Groups have been upgraded to release 3.2.1. If you are upgrading a Cache Node, go to Step 4.
If you are upgrading a vault, disable mirroring on all vaults in all Vault Groups before upgrading the software. Mirroring will be enabled once all the vaults in all the Vault Groups have been upgraded to release 3.2.1. If you are upgrading a Cache Node, go to Step 4.
Step 2 ![]() Disable ingest from the Content Ingest System through the Server Offload option in the CDSM GUI. Go to Maintain > Servers > Server Offload. The Server Offload page is displayed. Select Offline (No Ingest) and select Submit.
Disable ingest from the Content Ingest System through the Server Offload option in the CDSM GUI. Go to Maintain > Servers > Server Offload. The Server Offload page is displayed. Select Offline (No Ingest) and select Submit.
Step 3 ![]() If you are upgrading a vault you must first disable the Vault Group Mirror. Use Secure Shell (SSH) to access each Vault and enter the following command at the root:
If you are upgrading a vault you must first disable the Vault Group Mirror. Use Secure Shell (SSH) to access each Vault and enter the following command at the root:
# echo 0 > /proc/calypso/tunables/allowvaultarraymirroring
a. ![]() Make sure the following lines are in /arroyo/test/afterrun for all Vaults in all Vault Groups:
Make sure the following lines are in /arroyo/test/afterrun for all Vaults in all Vault Groups:
echo <# of copy> > /proc/calypso/tunables/maintenancemirrorcopies
echo 0 > /proc/calypso/tunables/maintenancearraymirroringallowed
echo <server_down_time> > /proc/calypso/tunables/maintenancetimer
echo 0 > /proc/calypso/tunables/allowvaultarraymirroring
The # of copy here should be one less than the mirror copies setting.
b. ![]() Run the following lines in the command lines on all the Vaults in all Vault Groups:
Run the following lines in the command lines on all the Vaults in all Vault Groups:
echo <# of copy> > /proc/calypso/tunables/maintenancemirrorcopies
echo 0 > /proc/calypso/tunables/maintenancearraymirroringallowed
echo <server_down_time> > /proc/calypso/tunables/maintenancetimer
The # of copy here should be one less than the mirror copies setting.
Note ![]() When modifying /proc/calypso/tunables/maintenancetimer, it stays with the modified value until the cserver has reacted to it. Once the cserver has reacted to it, the value is reset to ffffffff. So whether it is set to 60 or 0, it is not really in effect until the value is reset to ffffffff.
When modifying /proc/calypso/tunables/maintenancetimer, it stays with the modified value until the cserver has reacted to it. Once the cserver has reacted to it, the value is reset to ffffffff. So whether it is set to 60 or 0, it is not really in effect until the value is reset to ffffffff.
c. ![]() Add the following line to /home/isa/.arroyorc on all offline content library servers. Do not add this line to the servers in the Master Vault Group.
Add the following line to /home/isa/.arroyorc on all offline content library servers. Do not add this line to the servers in the Master Vault Group.
nofailover 1
d. ![]() Verify the databases are in sync across all the Vaults:
Verify the databases are in sync across all the Vaults:
# cd root
# ./asset_to_goids.py asset_goid.out
Note ![]() Only perform Step 4 through Step 7 when upgrading Release 2.0.x or 2.1.x software to Release 3.2.1 software.
Only perform Step 4 through Step 7 when upgrading Release 2.0.x or 2.1.x software to Release 3.2.1 software.
Step 4 ![]() Verify that the CDS server has the necessary space and copy the upgrade kit to it.
Verify that the CDS server has the necessary space and copy the upgrade kit to it.
# ssh <IP_addr_CDS_server> -l root
# df -k /root
# scp -p <remote ip>:<remote location of kit> /root
Step 5 ![]() Verify the MD5 checksum value.
Verify the MD5 checksum value.
# md5sum cdstv-3.2.1-b169-x86_64-os-kit.sh
The value provided should be compared against the value shown on the Cisco software download website. If they do not match, remove the file and download it again.
Step 6 ![]() Change permissions assigned to the upgrade kit to allow the file to be executed.
Change permissions assigned to the upgrade kit to allow the file to be executed.
# chmod+x cdstv-3.2.1-b169-x86_64-os-kit.sh
Step 7 ![]() Step 7 Run the self-extracting file to extract the contents.
Step 7 Run the self-extracting file to extract the contents.
# ./cdstv-3.2.1-b169-x86_64-os-kit.sh
The remote upgrade files are extracted to directory /root/cds_remote_upgrade. There should be no errors during the extraction of the files in the kit. After extracting the kit, verify that there are no errors before proceeding. If an error message is displayed or "cdstv-os-5.1-x86_64.iso: OK" is not displayed as the last line, the kit may have had errors in downloading. Download and extract the kit again. See the "Upgrade Kit Content" section for more information on the content of the kit.
Step 8 ![]() Log into the server as root.
Log into the server as root.
Step 9 ![]() Ensure that the server is fully offloaded.
Ensure that the server is fully offloaded.
a. ![]() Verify that the TRICKLE_DOWN file exists in the /usr/tmp directory.
Verify that the TRICKLE_DOWN file exists in the /usr/tmp directory.
b. ![]() For a Streamer, check that the protocoltiming log displays a warning message indicating that the server is going offline.
For a Streamer, check that the protocoltiming log displays a warning message indicating that the server is going offline.
tail -f /arroyo/log/protocoltiming.log.20090917
You should see the following:
Remote vaults 2 caches 0 streamers 1, Adapters fill 4 (1024) stream 4 (1316)
CPU Receive: Ave0+0+0 Cur 0+0+0, Network: 0, Poll: 34 (0 scaled)
Warning: Server is going OFFLINE
c. ![]() For a Streamer, make sure that all the active streams have moved over to the other Streamers. Check the Active Streams line in the protocoltiming log.
For a Streamer, make sure that all the active streams have moved over to the other Streamers. Check the Active Streams line in the protocoltiming log.
d. ![]() For a Vault, make sure that all active ingests on this server have finished. Check that there is no Active Ingest Connections line in the protocoltiming log.
For a Vault, make sure that all active ingests on this server have finished. Check that there is no Active Ingest Connections line in the protocoltiming log.
e. ![]() Check there is no active traffic on the network interface cards (NICs) using the /home/stats/ifstats command.
Check there is no active traffic on the network interface cards (NICs) using the /home/stats/ifstats command.
Note ![]() Only perform Step 10 through Step 12 when upgrading Release 2.0.xor 2.1.x software to Release 3.2.1 software.
Only perform Step 10 through Step 12 when upgrading Release 2.0.xor 2.1.x software to Release 3.2.1 software.
Step 10 ![]() Run the cds_remote_iso_install script with the --upgrade option, and vnc-listener sub-option if being used.
Run the cds_remote_iso_install script with the --upgrade option, and vnc-listener sub-option if being used.
Following are some user prompts and operation to be aware of when running the upgrade script:
•![]() If the vnc-listener sub-option is not used, the script prompts for the listener. If a listener is not available, then press Enter to continue the upgrade.
If the vnc-listener sub-option is not used, the script prompts for the listener. If a listener is not available, then press Enter to continue the upgrade.
Note ![]() Not using a listener may limit the ability to debug issues that might occur during the upgrade process.
Not using a listener may limit the ability to debug issues that might occur during the upgrade process.
•![]() Prerequisite checks are performed to ensure the server can be upgraded.
Prerequisite checks are performed to ensure the server can be upgraded.
•![]() If the TV CDS processes are still running when the upgrade script runs, you are prompted to stop the processes and reboot the server. This is a required step to perform a backup of the configuration and database files on the server. After the server reboots, run the upgrade script again.
If the TV CDS processes are still running when the upgrade script runs, you are prompted to stop the processes and reboot the server. This is a required step to perform a backup of the configuration and database files on the server. After the server reboots, run the upgrade script again.
•![]() Before the server reboots, /etc/rc.d/rc.local is moved to /etc/rc.d/upgrade.rc.local. When the CDS server reboots, there is no rc.local file, so the CDS processes are not started.
Before the server reboots, /etc/rc.d/rc.local is moved to /etc/rc.d/upgrade.rc.local. When the CDS server reboots, there is no rc.local file, so the CDS processes are not started.
•![]() When the upgrade script is run again, prerequisite checks are performed again and a backup is created. The scp command is used to copy the backup to a remote server. You are prompted to enter the following remote server information:
When the upgrade script is run again, prerequisite checks are performed again and a backup is created. The scp command is used to copy the backup to a remote server. You are prompted to enter the following remote server information:
–![]() IP address of the remote server
IP address of the remote server
–![]() Remote directory location
Remote directory location
–![]() User for the scp operation
User for the scp operation
•![]() After the backup is copied to the remote server, you are prompted one last time to choose to perform the upgrade. If yes is provided, power must be maintained to the system until the upgrade is complete. The upgrade is complete when a login prompt is provided on the serial console.
After the backup is copied to the remote server, you are prompted one last time to choose to perform the upgrade. If yes is provided, power must be maintained to the system until the upgrade is complete. The upgrade is complete when a login prompt is provided on the serial console.
Upgrade Script Output—First-Time Run
# ./cds_remote_iso_install --upgrade
******************************************************************
****** WARNING WARNING WARNING ******
******************************************************************
This program will perform an OS upgrade on this CDS server.
The current configuration will be backed up and stored on the
/boot_cds partition. This backup will be used to restore the
the system.
This program will request the following information:
- Location of OS ISO for upgrade (if default value is not used)
- Serial console baud rate (if default value is not used)
- Details for VNC listener
- Details for saving backup on a remote server
This program will check the following:
- CDS application running state
- Connectivity to the vnc listener (If vnc option is requested)
- Needed files, disk space, and system integrity
Details of the upgrade process will be logged in:
/var/log/cds/cds_upgrade_host.log
Continue the upgrade procedure? [yes/no]: yes
VNC Listener IP[:Port]? []: 10.74.124.187
Upgrade version: cdstv-3.2.1
Script mode: --upgrade
Hardware type: Lindenhurst
ISO location: /root/cds_remote_upgrade/cdstv-os-5.1-x86_64.iso
Baud rate: 115200
Script running directory: /root/cds_remote_upgrade
Command line options: --upgrade
Doing prerequisite checking... [DONE]
VNC Listener 10.74.124.187 is reachable.
Found file backup.list.
Found file backup_cfg.sh.
Found file cds_remote_iso_install.
Found file cds_upg_report.sh.
Found file cdsinstall.
Found file cdsmodify.sh.
Found file check_tcp_port.pl.
Found file ks_remote_template.cfg.
Found file restore.list.
Found file restore_cfg.sh.
Found file version.
  ISO image SHA1 checksum 7e0977dc5ad93c13593f165315d5bb98db840da5 matches
7e0977dc5ad93c13593f165315d5bb98db840da5 in iso.sha1sum.
Created directory /mnt/cdrom.
Mounted /root/cds_remote_upgrade/cdstv-os-5.1-x86_64.iso on /mnt/cdrom.
Server has offline enabled
CDSTV application processes "avsdb statsd cserver" are running
/dev/hda1 is mounted on /boot.
/boot is 21% used.
/dev/hda2 is mounted on /.
/ has 4798544 KB space available, more than 1000000 KB required.
/dev/sda2 is mounted on /home.
/dev/sda3 is mounted on /var.
/dev/sda6 is mounted on /arroyo.
/dev/sda1 is mounted on /arroyo/db.
***WARNING: /dev/sda7 does not exist, it needs to be created from /dev/sda6.
  /dev/sda6 has 37150281KB total disk space, more than 8000000KB required to create new
/dev/sda7.
Stored chkconfig --list output to chkconfig-list.output.
Copied chkconfig-list.output to /root/chkconfig-list.output.
Copied /etc/rc.d/rc.local to /etc/rc.d/upgrade.rc.local.
Found CDS version cdstv-2.1.4-b6 to backup
Found restore.list.
Found backup.list.
Detailed size of backup files list:
/home/isa 197952KB
/etc 31432KB
/root/chkconfig-list.output 4KB
/arroyo/test 48KB
/arroyo/image/tags 4KB
/usr/local/share/snmp/snmpd.conf 4KB
/var/spool/cron 12KB
/var/net-snmp 8KB
Total available space on /arroyo/db: 46095492 KB,
Space needed for /arroyo/db/DATADIR: 25120 KB,
Space needed for /arroyo/log: 1860 KB,
Total estimated space required for all archives is: 256444 KB,
Excluded space of preexisting backups: 0 KB,
Calculated space needed for backup: 85481 KB.
There is enough space for backup.
******* NOTICE *********
CDS-TV processes are running. A reboot is required to stop these processes.
Note: If the system is active (i.e. "offline disabled" state), the reboot may disrupt live
services.
After the reboot this program will need to be manually rerun to continue.
Reboot this system now to stop the CDS-TV processes? [yes/no]: yes
********** NOTICE *********
The /etc/rc.d/rc.local has been moved so the CDS-TV application processes will not start
after reboot.
Cleaning up... [DONE]
/mnt/cdrom is unmounted.
Logfile at: /var/log/cds/cds_upgrade_host.log.
It's also available at boot_cds/upgrade/cds_upgrade_host.log after upgrade completed.
The system is going to reboot in 5 seconds...
INIT: Sending processes the TERM signal
... details omitted ...
Step 11 ![]() If you are upgrading a Vault, edit the setup file. If you are upgrading a caching node, skip this step.
If you are upgrading a Vault, edit the setup file. If you are upgrading a caching node, skip this step.
In the /arroyo/test/vault/setupfile, edit the following line:
# allow vault array mirroring 1
Upgrade Script Output—Second-Time Run
# ./cds_remote_iso_install --upgrade
******************************************************************
****** WARNING WARNING WARNING ******
******************************************************************
This program will perform an OS upgrade on this CDS server.
The current configuration will be backed up and stored on the
/boot_cds partition. This backup will be used to restore the
the system.
This program will request the following information:
- Location of OS ISO for upgrade (if default value is not used)
- Serial console baud rate (if default value is not used)
- Details for VNC listener
- Details for saving backup on a remote server
This program will check the following:
- CDS application running state
- Connectivity to the vnc listener (If vnc option is requested)
- Needed files, disk space, and system integrity
Details of the upgrade process will be logged in:
/var/log/cds/cds_upgrade_host.log
Continue the upgrade procedure? [yes/no]: yes
VNC Listener IP[:Port]? []: 10.74.124.187:5500
Upgrade version: cdstv-3.2.1
Script mode: --upgrade
Hardware type: Lindenhurst
ISO location: /root/cds_remote_upgrade/cdstv-os-5.1-x86_64.iso
Baud rate: 115200
Script running directory: /root/cds_remote_upgrade
Command line options: --upgrade
Doing prerequisite checking... [DONE]
VNC Listener 10.74.124.187:5500 is reachable.
Found file backup.list.
Found file backup_cfg.sh.
Found file cds_remote_iso_install.
Found file cds_upg_report.sh.
Found file cdsinstall.
Found file cdsmodify.sh.
Found file check_tcp_port.pl.
Found file ks_remote_template.cfg.
Found file restore.list.
Found file restore_cfg.sh.
Found file version.
  ISO image SHA1 checksum 7e0977dc5ad93c13593f165315d5bb98db840da5 matches
7e0977dc5ad93c13593f165315d5bb98db840da5 in iso.sha1sum.
Created directory /mnt/cdrom.
Mounted /root/cds_remote_upgrade/cdstv-os-5.1-x86_64.iso on /mnt/cdrom.
CDSTV application processes are not running.
/dev/hda1 is mounted on /boot.
/boot is 21% used.
/dev/hda2 is mounted on /.
/ has 4795500 KB space available, more than 1000000 KB required.
/dev/sda2 is mounted on /home.
/dev/sda3 is mounted on /var.
/dev/sda6 is mounted on /arroyo.
/dev/sda1 is mounted on /arroyo/db.
***WARNING: /dev/sda7 does not exist, it needs to be created from /dev/sda6.
  /dev/sda6 has 37150281KB total disk space, more than 8000000KB required to create new
/dev/sda7.
Stored chkconfig --list output to chkconfig-list.output.
Copied chkconfig-list.output to /root/chkconfig-list.output.
Found CDS version cdstv-2.1.4-b6 to backup
Found restore.list.
Found backup.list.
Detailed size of backup files list:
/home/isa 197952KB
/etc 31428KB
/root/chkconfig-list.output 4KB
/arroyo/test 48KB
/arroyo/image/tags 4KB
/arroyo/db/db.cfg 4KB
/usr/local/share/snmp/snmpd.conf 4KB
/var/spool/cron 12KB
Total available space on /arroyo/db: 46095308 KB,
Space needed for /arroyo/db/DATADIR: 25304 KB,
Space needed for /arroyo/log: 1952 KB,
Total estimated space required for all archives is: 256716 KB,
Excluded space of preexisting backups: 0 KB,
Calculated space needed for backup: 85572 KB.
There is enough space for backup.
Doing backup... [DONE]
  Successfully created backup archive
/arroyo/db/host_cdstv-2.1.4-b1_20100319-144833_backup.tgz.
  Successfully created backup db archive
/arroyo/db/host_cdstv-2.1.4-b1_20100319-144833_backup_db.tgz.
  Successfully created backup log archive
/arroyo/db/host_cdstv-2.1.4-b1_20100319-144833_backup_log.tgz.
Backup archive /arroyo/db/host_cdstv-2.1.4-b1_20100319-144833_backup.tgz is complete.
Backup db archive /arroyo/db/host_cdstv-2.1.4-b1_20100319-144833_backup_db.tgz is
complete.
Backup log archive /arroyo/db/host_cdstv-2.1.4-b1_20100319-144833_backup_log.tgz is
complete.
Would you like to upload backup archives to a remote server? [yes/no]: yes
Remote SSH server address:192.168.28.25
Remote SSH server path: /arroyo/backup
Username: root
scp /arroyo/db/host_cdstv-2.1.4-b1_20100319-144833_backup*.tgz root@1.1.1.1:/arroyo/backup
root@1.1.1.1's password:
Successfully copied /arroyo/db/host_cdstv-2.1.4-b1_20100319-144833_backup.tgz to
192.168.28.25
Successfully copied /arroyo/db/host_cdstv-2.1.4-b1_20100319-144833_backup_db.tgz to
192.168.28.25
Successfully copied /arroyo/db/host_cdstv-2.1.4-b1_20100319-144833_backup_log.tgz to
192.168.28.25
********** WARNING *********
All prerequisite checking has completed and the upgrade is ready
to continue. In the next section of this upgrade, the OS will be
reloaded and power must be maintained to the system. This is
the last chance to manually terminate this upgrade.
Would you like to continue? [yes/no]: yes
Creating upgrade partition for remote installation... [DONE]
Located hard drive sda.
Located /dev/sda6 on /dev/sda.
***ERROR: Partition /dev/sda7 does not exist on /dev/sda.
  /dev/sda6 has 37150281KB total disk space, more than 8000000KB required to create new
/dev/sda7.
Unmounted /arroyo/db.
Unmounted /arroyo.
Detected /dev/sda6 has label /arroyo.
Deleted /dev/sda6.
Created /dev/sda6 starting from 103GB to 136GB.
Created ext3 for /dev/sda6.
Restored label /arroyo for /dev/sda6.
Created /dev/sda7 starting from 136GB to 141GB.
Created ext3 for /dev/sda7.
Created directory /boot_cds.
Mounted /dev/sda7 on /boot_cds.
Created directory /boot_cds/upgrade.
Mounted /dev/sda6 on /arroyo.
Created directory /arroyo/db.
Mounted /dev/sda1 on /arroyo/db.
Copying install ISO Image /root/cds_remote_upgrade/cdstv-os-5.1-x86_64.iso to
/boot_cds/upgrade... [DONE]
Copied /root/cds_remote_upgrade/cdstv-os-5.1-x86_64.iso to /boot_cds/upgrade/.
Removing other ISO in /boot_cds/upgrade (other than cdstv-os-5.1-x86_64.iso)... [DONE]
Copying upgrade files to upgrade directory /boot_cds/upgrade... [DONE]
Copied ks_remote_template.cfg to /boot_cds/upgrade/ks_remote_template.cfg.
Copied cds_remote_iso_install to /boot_cds/upgrade/cds_remote_iso_install.
Copied cdsmodify.sh to /boot_cds/upgrade/cdsmodify.sh.
Copied backup.list to /boot_cds/upgrade/backup.list.
Copied restore.list to boot_cds/upgrade/restore.list.
Copied cdsinstall to /boot_cds/upgrade/cdsinstall.
Copied chkconfig-list.output to /boot_cds/upgrade/chkconfig-list.output.
Copied /mnt/cdrom/isolinux/vmlinuz to /boot/vmlinuz-cds.
Copied /mnt/cdrom/isolinux/initrd.img to /boot/initrd-cds.img.
Copied restore_cfg.sh to /boot_cds/upgrade/restore_cfg.sh.
Copied backup_cfg.sh to /boot_cds/upgrade/backup_cfg.sh.
Copied cds_upg_report.sh to boot_cds/upgrade/cds_upg_report.sh.
Generating stage1 kickstart for selected upgrade options... [DONE]
Copying upgrade files from /boot_cds/upgrade to /upgrade... [DONE]
Created directory /upgrade.
Copied /boot_cds/upgradecdstv-os-5.1-x86_64.iso to /upgrade/cdstv-os-5.1-x86_64.iso.
Copied //upgrade/cdsmodify.sh to /upgrade/cdsmodify.sh.
Copied boot_cds/upgrade/CDS_UPGRADE_INFO to /upgrade/CDS_UPGRADE_INFO.
  Copied /boot_cds/upgrade/ks_upgrade_host_stage1.cfg to
/upgrade/ks_upgrade_host_stage1.cfg.
Modifying grub.conf for selected upgrade options... [DONE]??
Removing unnecessary backup files... [DONE]
Removed /root/CDS_BACKUP_INFO
Cleaning up... [DONE]
/mnt/cdrom is unmounted.
Logfile at: /var/log/cds/cds_upgrade_host.log.
It's also available at /boot_cds/upgrade/cds_upgrade_host.log after upgrade completed.
The system is going to reboot in 5 seconds...
...output omitted...
The server reboots three times to perform different stages of the upgrade. If a VNC Listener is used, on the second reboot, a new window is provided to the user with the status of the stage 2 operations taking place. This includes formatting the system progress bar, specific files that are being installed.
The details provided to the serial port console when the VNC Listener is used are the following:
Running anaconda, the Red Hat Enterprise Linux Server system installer - please wait...
Probing for video card: ATI Technologies Inc ES1000
Starting VNC...
WARNING!!! VNC server running with NO PASSWORD!
You can use the vncpassword=<password> boot option
if you would like to secure the server.
The VNC server is now running.
Attempting to connect to vnc client on host 1.1.1.1...
Connected!
Press <enter> for a shell
Starting graphical installation...
XKB extension not present on:1
If a VNC Listener is not used during the upgrade, details similar to the following are provided to the serial console:
Welcome to Red Hat Enterprise Linux Server
+---------------------+ Formatting +----------------------+
| |
| Formatting /home file system... |
| |
| 98% |
| |
+---------------------------------------------------------+
<Tab>/<Alt-Tab> between elements | <Space> selects | <F12> next screen
Welcome to Red Hat Enterprise Linux Server
+------------------+ Package Installation +------------------+
| |
| Name : kernel-2.6.18-53.el5-x86_64 |
| Size : 77104k |
| Summary: The Linux kernel (the core of the Linux |
| operating system) |
| |
| 100% |
| |
| Packages Bytes Time |
| Total : 211 470M 0:01:48 |
| Completed: 202 375M 0:01:26 |
| Remaining: 9 95M 0:00:21 |
| |
| 79% |
| |
+------------------------------------------------------------+
<Tab>/<Alt-Tab> between elements | <Space> selects | <F12> next screen
Additional messages are provided to the serial console that include, but are not be limited to, the following:
... Details omitted ...
/mnt/sysimage/dev done
/mnt/sysimage/boot_cds done
/mnt/sysimage done
rebooting system
Restarting system.
... details omitted ...
Starting atd: [ OK ]
Starting HAL daemon: [ OK ]
Red Hat Enterprise Linux Server release 5.1 (Tikanga)
Kernel 2.6.18-53.el5 on an x86_64
Host login:
Step 12 ![]() IOnce the server is back up, perform this step to clean the 64bit OS. During this process, the system asks you to supply one SSH server and path to store backup files. Make sure three backup files are created, something like *backup_db.tgz,*backup_log.tgz,*backup.tgz. This step automatically restores all three backup files once the 64bit OS is installed. This process can take between 15 to 20 minutes.
IOnce the server is back up, perform this step to clean the 64bit OS. During this process, the system asks you to supply one SSH server and path to store backup files. Make sure three backup files are created, something like *backup_db.tgz,*backup_log.tgz,*backup.tgz. This step automatically restores all three backup files once the 64bit OS is installed. This process can take between 15 to 20 minutes.
Step 13 ![]() Copy the CDS-TV-3.2.1.iso and cdsinstall files to the /root directory of the CDS server and run the cdsinstall script.
Copy the CDS-TV-3.2.1.iso and cdsinstall files to the /root directory of the CDS server and run the cdsinstall script.
# scp -p <user>@<remote_ip_address>:CDS-TV-3.2.1.iso /root
# scp -p <user>@<remote_ip_address>:cdsinstall /root
# cd /root
# ./cdsinstall CDS-TV-3.2.1.iso
Step 14 ![]() Select the deployment type of the server, choose 1 for an ISA deployment and 2 for an RTSP/FSI deployment and 3 for Playout.
Select the deployment type of the server, choose 1 for an ISA deployment and 2 for an RTSP/FSI deployment and 3 for Playout.
Select Deployment Type (ctrl-c to quit):
1) ISA
2) RTSP/FSI
3) PEG/BARKER
Choice :1
ISA Selected
Mounting CDS-TV-PROD.iso at /mnt/cdrom
Calling inst.sh for common files
Killing running process: statsd
Starting cdsupgrade.sh
Current SW version to backup is cdstv-3.2.1-b222
Processing File Lists
Processing /arroyo/image/backup/cdstv-3.2.1-b222/files/common-files
Processing /arroyo/image/backup/cdstv-3.2.1-b222/files/isa-files
Processing /arroyo/image/backup/cdstv-3.2.1-b222/files/rtsp-files
Processing /arroyo/image/backup/cdstv-3.2.1-b222/files/peg-files
Ending cdsupgrade.sh
Un-taring common-base.tgz
Fixing modprobe.conf
Loading File List
...done
Processing File List
...done
Moving modprobe.conf into place
...done
Removing Existing Cserver
warning: /arroyo/test/run saved as /arroyo/test/run.rpmsave
Removing Existing CDS Kernel
Installing kernel rpm
Installing cserver production rpm
Disabled various startup scripts in /etc/init.d
Upgrading busybox if necessary
warning: /home/packages/busybox-1.2.0-4.el5.i386.rpm: Header V3 DSA signature: NOKEY,
keyID 37017186
Upgrading kdump if necessary
warning: /home/packages/kexec-tools-1.101-194.4.el5.x86_64.rpm: Header V3 DSA signature:
NOKEY, key ID 37017186
Configuring kdump ...
Upgrading logrotate if necessary
warning: /home/packages/logrotate-3.7.4-8.i386.rpm: Header V3 DSA signature: NOKEY, key ID
37017186
Upgrading CmdTool2 if necessary
Upgrading Lib_Utils if necessary
Upgrading MegaCli if necessary
Upgrading apr if necessary
Upgrading postgresql-libs if necessary
Upgrading apr-util if necessary
Upgrading httpd if necessary
Upgrading distcache if necessary
Upgrading mod_ssl if necessary
Upgrading crack if necessary
Upgrading audit if necessary
Upgrading pam if necessary
Upgrading pwauth if necessary
Upgrading apache2-mod_authnz_external if necessary
Upgrading jre if necessary
Upgrading libcap if necessary
Upgrading libidn if necessary
Upgrading curl if necessary
Upgrading syslog-ng if necessary
VD 0 already set to WriteBack, skipping.
Set Write Cache OK if bad BBU on Adapter 0, VD 0 (target id: 0) success
Set Disk Cache Policy to Enabled on Adapter 0, VD 0 (target id: 0) success
Link /usr/sbin/app_logger -> /home/isa/logging/app_logger
Link /usr/sbin/loginfo -> /home/isa/logging/loginfo
Link /usr/sbin/logconfig -> /home/isa/logging/logconfig
Link /usr/sbin/logconvert -> /home/isa/logging/logconvert
Copying current syslog-ng.conf file to /opt/syslog-ng/etc/syslog-ng.conf.save
Restarting syslog-ng: Stopping syslog-ng:
Starting syslog-ng:
Starting fixperms.sh
Loading File List
Processing File List
Ending fixperms.sh
Calling inst.sh for isa
Un-taring isa-base.tgz
Calling forprod.sh
Removing RTSP-specific files
Installing ISA-specific files (existing files backed up to .file)
ISA installation complete
Starting fixperms.sh
Loading File List
Processing File List
Ending fixperms.sh
Current drive firmware version
No available firmware for Device ST9146802SS. No update needed.
Current MegaRAID firmware version 1.40.132-0796
Target MegaRAID firmware version 1.40.132-0796
No MegaRAID firmware update needed
Unmounting /mnt/cdrom
cdsinstall completed. Please reboot the device.
Note ![]() Only perform Step 15 through Step 17 when upgrading Release 2.0.x or 2.1.x software to Release 3.2.1 software.
Only perform Step 15 through Step 17 when upgrading Release 2.0.x or 2.1.x software to Release 3.2.1 software.
Step 15 ![]() Delete the old database *idx file.
Delete the old database *idx file.
# rm -f /aroyo/db/DATADIR/*.idx
Step 16 ![]() Move the /etc/rc.d/upgrade.rc.local file to /etc/rc.d/rc.local and reboot the server.
Move the /etc/rc.d/upgrade.rc.local file to /etc/rc.d/rc.local and reboot the server.
# mv -f /etc/rc.d/upgrade.rc.local /etc/rc.d/rc.local
# init 6
Step 17 ![]() Verify the partition, there should be one boot_cds partition.
Verify the partition, there should be one boot_cds partition.
# df-h
Filesystem Size Used Avail Use% Mounted on
/dev/hda2 7.2G 1.2G 5.7G 17% /
/dev/sda3 9.5G 163M 8.9G 2% /var
/dev/sda2 29G 387M 27G 2% /home
/dev/sda6 35G 177M 33G 1% /arroyo
/dev/sda1 48G 273M 45G 1% /arroyo/db
/dev/hda1 244M 34M 197M 15% /boot
/dev/sda7 4.6G 704M 3.7G 16% /boot_cds
tmpfs 16G 0 16G 0% /dev/shm
Step 18 ![]() Comment the "nice -n 19 /usr/local/sbin/snmpd" line from /etc/rc.local.
Comment the "nice -n 19 /usr/local/sbin/snmpd" line from /etc/rc.local.
Step 19 ![]() For ISA deployments, comment the ISA start command "run_isa" and add "run_isa_boot" in /etc/rc.local.
For ISA deployments, comment the ISA start command "run_isa" and add "run_isa_boot" in /etc/rc.local.
Step 20 ![]() Generate Ethernet Interface configurations for Cache/Fill links:
Generate Ethernet Interface configurations for Cache/Fill links:
a. ![]() Restart avsdb:
Restart avsdb:
# db_shutdown
# pgrep avsdb (to make sure there is no avsdb process running)
# netstat -na | grep 9999 (to make sure there is no avsdb connections)
# su - isa (to start avsdb)
b. ![]() Verify avsdb has two processes running and "AVSDB Databases Created/Registered Successfully" is shown in avsdb.log.yyyymmdd.
Verify avsdb has two processes running and "AVSDB Databases Created/Registered Successfully" is shown in avsdb.log.yyyymmdd.
c. ![]() Restart statsd:
Restart statsd:
# pkill statsd
# pgrep statsd (to make sure there is no statsd running)
# /home/stats/statsd -d eth0 (copy statsd start line from /etc/rc.local and run it
here)
Step 21 ![]() Migrate SNMP settings from the old table to the new table. On the VVIM GUI, go to Configure > Server Level > SNMP Agent page and select the Vault. Verify field SNMP Contact, SNMP Location, Community Name, Trap Station and Version have correct settings and select Submit.
Migrate SNMP settings from the old table to the new table. On the VVIM GUI, go to Configure > Server Level > SNMP Agent page and select the Vault. Verify field SNMP Contact, SNMP Location, Community Name, Trap Station and Version have correct settings and select Submit.
Step 22 ![]() Go to the CDSM Server Setup page and select Submit for the Streamer to generate cache/fill/streaming interface configurations in /etc/sysconfig/network-scripts.
Go to the CDSM Server Setup page and select Submit for the Streamer to generate cache/fill/streaming interface configurations in /etc/sysconfig/network-scripts.
Step 23 ![]() Shutdown the database and Reboot the server.
Shutdown the database and Reboot the server.
# db_shutdown
# reboot
Note ![]() During the initialization process of a CDS server or after recovering a CDS server that has been down for less than an hour, the CDS database performs a complete synchronization. The database synchronization takes about five minutes before the server becomes ready for service. If the CDS server is down for a much longer time than an hour, the database synchronization takes longer than five minutes. The netstat command does not show the interfaces as up until the synchronization has completed.
During the initialization process of a CDS server or after recovering a CDS server that has been down for less than an hour, the CDS database performs a complete synchronization. The database synchronization takes about five minutes before the server becomes ready for service. If the CDS server is down for a much longer time than an hour, the database synchronization takes longer than five minutes. The netstat command does not show the interfaces as up until the synchronization has completed.
Step 24 ![]() If you are upgrading a Vault in an RTSP configuration, resubmit the FSI log level. If you are upgrading a caching node, go to Step 26.
If you are upgrading a Vault in an RTSP configuration, resubmit the FSI log level. If you are upgrading a caching node, go to Step 26.
After the server is up, re-submit the FSI log level through the VVIM.
a. ![]() Click Configuration > Server Level > Logging. The FSI Setup Screen is displayed.
Click Configuration > Server Level > Logging. The FSI Setup Screen is displayed.
b. ![]() Enter the following commands at the root to validate the process.
Enter the following commands at the root to validate the process.
# su - isa
$ arroyo stop fsi
arroyo: fsi: stopped
$ arroyo start fsi
arroyo: fsi: started
Step 25 ![]() If you are upgrading a Vault in an ISA configuration, execute the following command to verify if the Content Store Master and Slave are up running:
If you are upgrading a Vault in an ISA configuration, execute the following command to verify if the Content Store Master and Slave are up running:
# su - isa; cdint
$ ./show_calypso_services
************************************************************
****** ContentStore (MASTER + SLAVE) Services Status *******
************************************************************
ContentStoreMaster ======> Running
ContentStoreSlave ======> Running
************************************************************
PvrAssetManager ******> NOT Running
************************************************************
AVSIngestMgr ******> NOT Running
************************************************************
IngestDriver ******> NOT Running
************************************************************
Step 26 ![]() After the CDS server has been verified as being reachable, log in to the CDSM GUI and disable the server offload.
After the CDS server has been verified as being reachable, log in to the CDSM GUI and disable the server offload.
a. ![]() Click Maintain > Servers > Server Offload. The Server Offload page is displayed.
Click Maintain > Servers > Server Offload. The Server Offload page is displayed.
b. ![]() From the Server IP drop-down list, choose the IP address or nickname of the server.
From the Server IP drop-down list, choose the IP address or nickname of the server.
c. ![]() From the New Server Status drop-down list, choose Online and click Submit.
From the New Server Status drop-down list, choose Online and click Submit.
Step 27 ![]() Using the CDSM GUI, verify the server is online.
Using the CDSM GUI, verify the server is online.
a. ![]() Click Monitor > System Health. The System Health Monitor page is displayed.
Click Monitor > System Health. The System Health Monitor page is displayed.
b. ![]() The status boxes for the server should all be green.
The status boxes for the server should all be green.
Note ![]() It takes a few minutes to synchronize the database. Wait until the other CDS servers become reachable and the services are running. The CDSM GUI System Health Monitor Page can be used to verify that the CDS server is functioning correctly after the upgrade. The CDSM GUI System Health Monitor page shows the states of the network, disk, and services on each CDS server.
It takes a few minutes to synchronize the database. Wait until the other CDS servers become reachable and the services are running. The CDSM GUI System Health Monitor Page can be used to verify that the CDS server is functioning correctly after the upgrade. The CDSM GUI System Health Monitor page shows the states of the network, disk, and services on each CDS server.
Step 28 ![]() Perform this step only if you are upgrading a Vault. After all Vaults are upgraded (in slave and master group), enable the Vault Mirror. USe SSH to access each Vault and enter the following command at the root:
Perform this step only if you are upgrading a Vault. After all Vaults are upgraded (in slave and master group), enable the Vault Mirror. USe SSH to access each Vault and enter the following command at the root:
# echo 1 > /proc/calypso/tunables/allowvaultarraymirroring
Check the /arroyo/test/vault/setupfile, and edit the following line:
allow vault array mirroring 1
The upgrade is complete. If you are upgrading from Releases 2.0.x or 2.1.x software to Release 3.2.1 software and there are any issues, or if you want to review the upgrade process, run the /boot_cds/upgrade/cds_upg_report.sh script and use the resulting archive for the review.
Note ![]() When upgrading to Release 3.2.1, you must run the cdsconfig script in order to disable the Redirect Server for RTSP Deployments. The cdsconfig script displays the following prompt:
When upgrading to Release 3.2.1, you must run the cdsconfig script in order to disable the Redirect Server for RTSP Deployments. The cdsconfig script displays the following prompt:
Do you want to enable Redirect Server ? (yes/no) [y]
Upgrading from Release 2.0.x to Release 3.2.1
Upgrading from Release 2.0.x to Release 3.2.1 has the following additional steps after upgrading the software:
•![]() Transition from RoutingTable to SubnetTable
Transition from RoutingTable to SubnetTable
Transition from RoutingTable to SubnetTable
Release 2.1.x introduced the ability to route interfaces to different subnets. After upgrading the TV CDS software to Release 3.2.1 from Release 2.0, any servers with incompatible routes are listed in red on the Route Tables page. This is because all routes that have CServer Source as the Route Type use the SubnetTable instead of the RoutingTable.
You can review the Route Table configuration for each of these servers, modify or delete the routes, and click Submit to apply the changes. The routes are converted to the new format and the server is listed in black. When all servers with incompatible routes are fixed, the warning message is removed and the entry in the system alarm drop-down list in the GUI banner is removed.
For more information, see either the Cisco TV CDS 2.5 ISA Software Configuration Guide or the Cisco TV CDS 2.5 RTSP Software Configuration Guide.
To verify the RoutingTable configuration has been transitioned to the SubnetTable, do the following:
Step 1 ![]() Log in to the CDS server as root.
Log in to the CDS server as root.
Step 2 ![]() View the RoutingTable configuration.
View the RoutingTable configuration.
# cat /arroyo/test/RoutingTable
default gateway 192.169.78.94
network 192.169.78.64 netmask 255.255.255.224 gateway 0.0.0.0
default cache gateway 192.169.78.94
local cache network 192.169.78.64 netmask 255.255.255.224
Step 3 ![]() View the c2k.log file.
View the c2k.log file.
tail -f /arroyo/log/c2k.log.<date>
Step 4 ![]() Log in to the CDSM and resubmit the route table.
Log in to the CDSM and resubmit the route table.
a. ![]() Choose Configure > Server Level > Route Tables. The Route Tables page is displayed.
Choose Configure > Server Level > Route Tables. The Route Tables page is displayed.
b. ![]() From the drop-down list, choose the IP address of a server and click Display. Any configured routes are displayed.
From the drop-down list, choose the IP address of a server and click Display. Any configured routes are displayed.
c. ![]() In the Enter New Route section, enter the values displayed when you viewed the RoutingTable (Step 2); for example, in the Network field enter 192.169.78.64, in the Subnet Mask field enter 255.255.255.224, and in the Gateway field enter 192.169.78.94.
In the Enter New Route section, enter the values displayed when you viewed the RoutingTable (Step 2); for example, in the Network field enter 192.169.78.64, in the Subnet Mask field enter 255.255.255.224, and in the Gateway field enter 192.169.78.94.
d. ![]() From the Route Type drop-down list choose CServer Source and click Submit.
From the Route Type drop-down list choose CServer Source and click Submit.
Step 5 ![]() On the CDS server, monitor the c2k.log file for any error messages that are displayed after submitting the Route Tables page in the CDSM GUI. For example. if the following routes are configured:
On the CDS server, monitor the c2k.log file for any error messages that are displayed after submitting the Route Tables page in the CDSM GUI. For example. if the following routes are configured:
default gateway 192.169.78.94
network 192.169.78.64 netmask 255.255.255.0 gateway 0.0.0.0
network 192.0.0.0 netmask 255.0.0.0 gateway 192.169.78.94
the following error message is displayed in the c2k.log file when submitting the Route Tables page:
err:RoutingTable: intersecting network, ignoring network 192.0.0.0
Correct the intersecting routes by removing the route with the smaller subnet. In the example above, this is the192.169.78.64 route.
Step 6 ![]() Verify that the RoutingTable is empty and the SubnetTable now has the information.
Verify that the RoutingTable is empty and the SubnetTable now has the information.
# cat /arroyo/test/RoutingTable
# cat /arroyo/test/SubnetTable
network 192.169.78.64 netmask 255.255.255.224 gateway 192.169.78.94
[root@Streamer210 ~]#
Resubmitting DNS Entries
Release 2.1.x also has the ability to configure up to 16 DNS servers on each of the System Level, Array Level, and Server Level DNS pages. After upgrading the TV CDS software to Release 2.5 from Release 2.0, any DNS entries need to be resubmitted. When all DNS entries are resubmitted, the warning message is removed and the entry in the system alarm drop-down list in the GUI banner is removed.
Remotely Upgrading a TV CDS Server to Release 3.2.1
Release 3.2.1 introduces the ability to upgrade the CDS servers (Vault, Caching Node, and Streamer) remotely through the CDSM GUI. Before upgrading any of the CDS servers, first upgrade the CDSM/VVIM. If your system has redundant CDSMs/VVIMs, upgrade the secondary CDSM/VVIM followed by the primary CDSM/VVIM.
Manually upgrading each CDS server is still supported. Both the manual upgrade and the remote upgrade cover general upgrade procedures. Any deviations from the general upgrade procedures for a specific TV CDS software release are described in the Release Notes for that release.
The Software Upgrade page offers the option to upgrade all CDS servers in the system, CDS servers in a specific group (Stream Group, Vault Group, or Cache Group), or a specific CDS server in a specific group.
Remote Software Upgrade Workflow
The Remote Software Upgrade feature performs the following tasks:
1. ![]() Sends parameters set in the CDSM GUI or through the Web Services API to the CDS server.
Sends parameters set in the CDSM GUI or through the Web Services API to the CDS server.
2. ![]() Logs in to the CDS server using the credentials specified in the parameter settings and copies the new cdsinstall script, the .bin image file, and the required libraries.
Logs in to the CDS server using the credentials specified in the parameter settings and copies the new cdsinstall script, the .bin image file, and the required libraries.
3. ![]() Runs the new cdsinstall script on the CDS server, which performs the following tasks:
Runs the new cdsinstall script on the CDS server, which performs the following tasks:
a. ![]() Copies ISO image file from specified location. If the file is already present, this step is skipped.
Copies ISO image file from specified location. If the file is already present, this step is skipped.
b. ![]() Backs up the essential configuration files
Backs up the essential configuration files
/etc/hosts
/etc/rc.local
/etc/sysconfig/network
/etc/sysconfig/network-scripts/ifcfg-eth()
/home/isa/.arroyorc
Output of the ifconfig -a command to a new file (/root/ifconfig_<system_date>
Note ![]() A backup of the /arroyo/db/DATADIR and /arroyo/test is not performed.
A backup of the /arroyo/db/DATADIR and /arroyo/test is not performed.
c. ![]() Performs the pre-upgrade checks.
Performs the pre-upgrade checks.
d. ![]() Backs up existing software image.
Backs up existing software image.
e. ![]() Performs the upgrade process.
Performs the upgrade process.
4. ![]() Sends the upgrade status to statsd by writing into the /tmp/.upgrade_status file.
Sends the upgrade status to statsd by writing into the /tmp/.upgrade_status file.
After upgrading the software on the CDS server, restart the server by logging in to the Linux operating system on the server as user root and enter the reboot command. After the CDS server has rebooted, set the server to online (Maintain > Servers > Server Offload).
Configuring the Software Upgrade Settings on the CDSM GUI
Before upgrading the software, perform the following tasks:
1. ![]() Download the Cisco TV CDS software file and copy it to the server that will be accessed during the upgrade (this could be "Local Image," which is the CDS server that is being upgraded).
Download the Cisco TV CDS software file and copy it to the server that will be accessed during the upgrade (this could be "Local Image," which is the CDS server that is being upgraded).
For information on getting the Cisco TV CDS software file, see the Cisco TV CDS 3.2 Installation, Upgrade, and Maintenance Guide.
2. ![]() Offload each CDS server you want to upgrade (Maintain > Servers > Server Offload).
Offload each CDS server you want to upgrade (Maintain > Servers > Server Offload).
To configure the software upgrade settings on the CDSM GUI, do the following:
Step 1 ![]() Choose Maintain > Servers > Software Upgrade. The Software Upgrade page is displayed.
Choose Maintain > Servers > Software Upgrade. The Software Upgrade page is displayed.
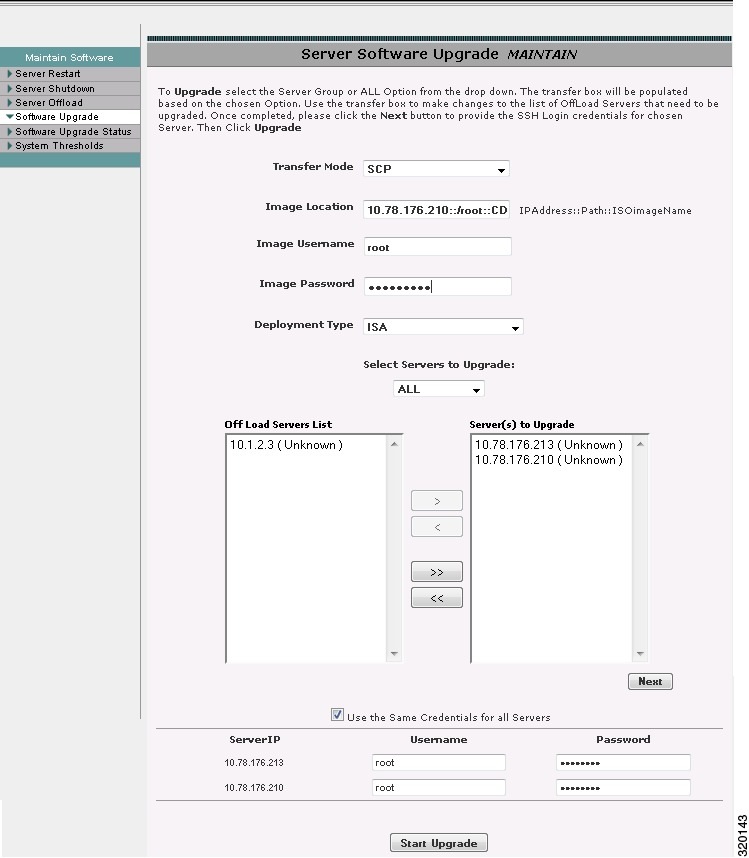
Step 2 ![]() From the Transfer Mode drop-down list, select one of the following options:
From the Transfer Mode drop-down list, select one of the following options:
•![]() FTP
FTP
•![]() SCP
SCP
•![]() HTTP
HTTP
•![]() Local Image
Local Image
FTP, SCP, and HTTP are the possible protocols used to get the software file from the server used to store it. Local Image is selected when the software image file was downloaded to the CDS servers that are being upgraded.
Step 3 ![]() In the Image Location field, enter the location of the software file. For FTP, SCP, and HTTP, the format is IP_address::/absolute_path/::filename. For Local Image, the format is /absolute_path/::filename.
In the Image Location field, enter the location of the software file. For FTP, SCP, and HTTP, the format is IP_address::/absolute_path/::filename. For Local Image, the format is /absolute_path/::filename.
The Deployment Type field is informational only and displays the environment (ISA or RTSP) of the CDS.
Step 4 ![]() From the Select Servers to Upgrade drop-down list, select All or the server group of the CDS servers you want to upgrade.
From the Select Servers to Upgrade drop-down list, select All or the server group of the CDS servers you want to upgrade.
Note ![]() Only the server groups (Vault Group, Cache Group, Stream Group, and SSV Group) of the CDS servers that were offloaded are listed.
Only the server groups (Vault Group, Cache Group, Stream Group, and SSV Group) of the CDS servers that were offloaded are listed.
The Off Load Servers List is populated with the CDS servers that were offloaded and are part of the group selected in the Select Servers to Upgrade.
Step 5 ![]() To select a CDS server for software upgrade, click the CDS server and click the right-arrow button. To select multiple CDS servers, hold down the Shift key while selecting each CDS server. To select all CDS servers, click the double right-arrow.
To select a CDS server for software upgrade, click the CDS server and click the right-arrow button. To select multiple CDS servers, hold down the Shift key while selecting each CDS server. To select all CDS servers, click the double right-arrow.
To deselect a CDS Server, click the CDS server in the Servers to Upgrade list and click the left-arrow button. To deselect multiple CDS servers, hold down the Shift key while selecting each CDS server. To deselect all CDS servers, click the double left-arrow.
Step 6 ![]() Click Next. A Username and Password is listed for each CDS server IP address.
Click Next. A Username and Password is listed for each CDS server IP address.
Step 7 ![]() Enter the Username and Password for each CDS server that has "root" login credentials.
Enter the Username and Password for each CDS server that has "root" login credentials.
If more than one CDS server is being upgraded the Use the Same Credentials for all Servers check box is displayed. If all the CDS servers have the same login credentials, you can check the Use the Same Credentials for all Servers check box.
Step 8 ![]() Click Start Upgrade.
Click Start Upgrade.
To view the status of the software upgrade or to cancel a software upgrade, do the following:
Step 1 ![]() Choose Maintain > Servers > Software Upgrade Status. The Software Upgrade Status page is displayed listing all the CDS servers that have been scheduled for a software upgrade.
Choose Maintain > Servers > Software Upgrade Status. The Software Upgrade Status page is displayed listing all the CDS servers that have been scheduled for a software upgrade.
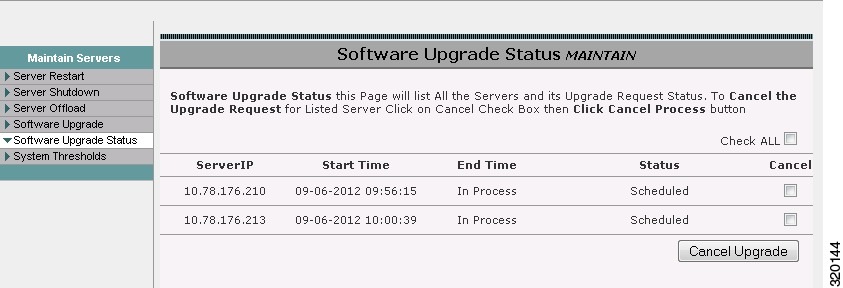
The Status column displays the current status of the software upgrade for each CDS server. If the status is red, move the mouse pointer over the red box to get more information about the failure.
Step 2 ![]() If the status is Scheduled or Failure, the option to cancel the upgrade is available. To cancel a scheduled or failed software upgrade for a CDS server, check the Cancel check box and click Cancel Upgrade. To cancel all scheduled software upgrades, click the Check ALL check box and click Cancel Upgrade.
If the status is Scheduled or Failure, the option to cancel the upgrade is available. To cancel a scheduled or failed software upgrade for a CDS server, check the Cancel check box and click Cancel Upgrade. To cancel all scheduled software upgrades, click the Check ALL check box and click Cancel Upgrade.
Step 3 ![]() If the status is a green box, the software upgrade was successful. After upgrading the software on the CDS server, restart the server (Maintain > Servers > Server Restart) and set the server to online (Maintain > Servers > Server Offload).
If the status is a green box, the software upgrade was successful. After upgrading the software on the CDS server, restart the server (Maintain > Servers > Server Restart) and set the server to online (Maintain > Servers > Server Offload).
Software Upgrade using the Web Service API
The same remote software upgrade capabilities provided by the CDSM GUI are also provided by a Web Service API. The following upgrade.xsd XML schema can be used to create an upgrade XML file that is uploaded to the CDSM.
Upgrade XML Schema
Following is the ciscoweb_server_upgrade.xsd XML schema:
<?xml version="1.0" encoding="UTF-8"?>
<xs:schema xmlns:xs="http://www.w3.org/2001/XMLSchema"
xmlns:ws="http://www.cisco.com/schemas/VCPBU/CDS-TV/R0/ciscowebsvcs"
targetNamespace="http://www.cisco.com/schemas/VCPBU/CDS-TV/R0/ciscowebsvcs">
<xs:element name="UpgradeServerList">
<xs:complexType>
<xs:sequence>
<xs:element ref="ws:UpgradeServer" minOccurs="0" maxOccurs="unbounded" />
</xs:sequence>
</xs:complexType>
</xs:element>
<xs:element name="UpgradeServer">
<xs:complexType>
<xs:sequence>
<xs:element ref="ws:ServerDetails" minOccurs="0" maxOccurs="unbounded" />
</xs:sequence>
<xs:attribute name="TransfereMode" type="ws:TransfereMode" />
<xs:attribute name="ImageHostName" type="xs:string" />
<xs:attribute name="ImagePath" type="xs:string" />
<xs:attribute name="ImageName" type="xs:string" />
<xs:attribute name="ImageServerUserName" type="xs:string" />
<xs:attribute name="ImageServerPassword" type="xs:string" />
</xs:complexType>
</xs:element>
<xs:element name="ServerDetails">
<xs:complexType>
<xs:attribute name="ServerID" type="xs:string" use="required" />
<xs:attribute name="GroupID" type="xs:string" use="required" />
<xs:attribute name="ServerUserName" type="xs:string" use="required" />
<xs:attribute name="ServerPassword" type="xs:string" use="required" />
</xs:complexType>
</xs:element>
<xs:simpleType name="TransfereMode">
<xs:restriction base="xs:string">
<xs:enumeration value="FTP" />
<xs:enumeration value="SCP" />
<xs:enumeration value="HTTP" />
<xs:enumeration value="Local Image" />
</xs:restriction>
</xs:simpleType>
<!--Cancel Server Request-->
<xs:element name="CancelUpgradeServers">
<xs:complexType>
<xs:sequence>
<xs:element ref="ws:CancelServers" minOccurs="0" maxOccurs="unbounded" />
</xs:sequence>
</xs:complexType>
</xs:element>
<xs:element name="CancelServers">
<xs:complexType>
<xs:attribute name="ServerID" type="xs:string" use="required" />
<xs:attribute name="GroupID" type="xs:string" use="required" />
</xs:complexType>
</xs:element>
<!--End of Cancel Server Request-->
</xs:schema>
Note ![]() The TransfereMode element value is case sensitive (SCP, FTP, HTTP, or Local Image).
The TransfereMode element value is case sensitive (SCP, FTP, HTTP, or Local Image).
Example of Upgrade XML File
Following is an example of the Upgrade XML file:
<?xml version="1.0" encoding="UTF-8"?>
<UpgradeServerList xmlns="http://www.cisco.com/schemas/VCPBU/CDS-TV/R0/ciscowebsvcs">
    <UpgradeServer TransfereMode="SCP" ImageHostName="10.10.10.1" ImagePath="/root/"
ImageName="CDS-TV-PRO-3-2b2" ImageServerUserName="root"
ImageServerPassword="myrootPassword">
        <ServerDetails ServerID="210" GroupID="10" ServerUserName="root"
ServerPassword="myrootPassword"/>
        <ServerDetails ServerID="218" GroupID="10" ServerUserName="root"
ServerPassword="rootpasw"/>
</UpgradeServer>
</UpgradeServerList>
Start Software Upgrade
The following curl utility command can be used to start a software upgrade:
curl --form upload=@/<absolute_path>/Upgrade.xml --form press=OK  'Content-Type:
text/xml;charset=UTF-8' 'enctype=multipart/form-data'
http://<CDSMIP>/api/services/maintain/server/id/serverupgrade
Get Status of Software Upgrade
The following curl utility command can be used to get the status of the software upgrade:
curl http://<CDSMIP>/api/services/maintain/server/id/serverupgradestatus
Cancel Software Upgrade
The following curl utility command can be used to cancel a software upgrade:
curl --form upload=@/<absolute_path>CancelServerUpgrade.xml --form press=OK
'Content-Type: text/xml;charset=UTF-8' 'enctype=multipart/form-data'
http://<CDSMIP>/api/services/maintain/server/id/cancelupgradeservers
Following is an example of the XML file for canceling a software upgrade:
<?xml version="1.0" encoding="UTF-8"?>
<CancelUpgradeServers xmlns="http://www.cisco.com/schemas/VCPBU/CDS-TV/R0/ciscowebsvcs">
<CancelServers ServerID="210" GroupID="10" />
<CancelServers ServerID="218" GroupID="10" />
<CancelServers ServerID="219" GroupID="10" />
</CancelUpgradeServers>
Upgrading a New CDS Server to Release 3.2.1
The Cisco TV CDS CDEs ship with the software installation files for Release 2.1.3. If a CDE received from Cisco is expected to be installed into a Release 3.2.1 deployment, it must be upgraded with the upgrade kit.
To upgrade a new CDS server, configure the management network on the CDS server by performing the following steps:
Step 1 ![]() To configure the Ethernet interface (eth0), which will be used to connect to the management network, use a text editor to modify the file /etc/sysconfig/network-scripts/ifcfg-eth0 and add the following lines:
To configure the Ethernet interface (eth0), which will be used to connect to the management network, use a text editor to modify the file /etc/sysconfig/network-scripts/ifcfg-eth0 and add the following lines:
•![]() DEVICE=eth0
DEVICE=eth0
•![]() BOOTPROTO=static
BOOTPROTO=static
•![]() ONBOOT=yes
ONBOOT=yes
•![]() IPADDR=ip_address_for_eth0
IPADDR=ip_address_for_eth0
•![]() NETMASK=netmask_for_eth0
NETMASK=netmask_for_eth0
For example:
DEVICE=eth0
BOOTPROTO=static
ONBOOT=yes
IPADDR=172.22.97.162
NETMASK=255.255.255.128
Step 2 ![]() Save and close the ifcfg-eth0 file.
Save and close the ifcfg-eth0 file.
Step 3 ![]() To configure the network characteristics, use a text editor to modify the file /etc/sysconfig/network and add the following lines:
To configure the network characteristics, use a text editor to modify the file /etc/sysconfig/network and add the following lines:
•![]() NETWORKING=yes
NETWORKING=yes
•![]() NETWORKING_IPV6=no
NETWORKING_IPV6=no
•![]() HOSTNAME=name
HOSTNAME=name
•![]() GATEWAY=gateway_ip_address
GATEWAY=gateway_ip_address
For example:
NETWORKING=yes
NETWORKING_IPV6=no
HOSTNAME=cdsm162
GATEWAY=172.22.97.129
The gateway_ip_address is the default gateway IP address—the address of the interface on the router that is directly attached to the CDE110 eth0 interface.
Step 4 ![]() Save and close the network file.
Save and close the network file.
Step 5 ![]() To restart the network, issue the following command:
To restart the network, issue the following command:
[root]# /etc/init.d/network restart
Shutting down interface eth0: [ OK ]
Shutting down loopback interface: [ OK ]
Bringing up loopback interface: [ OK ]
Bringing up interface eth0: [ OK ]
[root]#
Note ![]() A serial console connection is highly recommended.
A serial console connection is highly recommended.
Perform the software upgrade procedure in "Manually Upgrading a TV CDS Server to Release 3.2.1" section After completing the upgrade procedure, perform the add a server procedure in the "Adding a Server" section.
Imaging a CDS Server with 64-Bit OS using a DVD
If the CDS server upgrade process is interrupted because of power failure or for some similar reason, and if the upgrade was corrupted, you can use the DVD imaging process to load the OS and Release 3.2.1 software files. The DVD ISO imaging process can also be used for a clean installation. After the imaging is complete, you need to run the cdsinstall script to install the software.
To image a CDS server with the OS required to run the TV CDS Release 3.2.1 software, do the following:
Step 1 ![]() Download the CDS-TV-3.2.1-DVD-OS.iso file from the Cisco software download website. See the "Getting the Cisco TV CDS Software Files for Release 3.2.1" section for more information.
Download the CDS-TV-3.2.1-DVD-OS.iso file from the Cisco software download website. See the "Getting the Cisco TV CDS Software Files for Release 3.2.1" section for more information.
Step 2 ![]() Burn the ISO image file to a DVD.
Burn the ISO image file to a DVD.
Step 3 ![]() Power the CDS server down.
Power the CDS server down.
Step 4 ![]() Remove all content drives (external drives) from the server.
Remove all content drives (external drives) from the server.
Step 5 ![]() Connect a USB DVD ROM drive to the CDS server.
Connect a USB DVD ROM drive to the CDS server.
Step 6 ![]() Boot to the DVD ROM.
Boot to the DVD ROM.
Step 7 ![]() At the boot: prompt, enter the server type to be installed. The server type options consist of the following:
At the boot: prompt, enter the server type to be installed. The server type options consist of the following:
a. ![]() 250—CDE250 server
250—CDE250 server
a. ![]() x00— CDE200/300/400 servers
x00— CDE200/300/400 servers
b. ![]() x20— CDE220-2C1/2C2/2D1 and CDE420 HDD servers
x20— CDE220-2C1/2C2/2D1 and CDE420 HDD servers
c. ![]() x20ssd—CDE220-2S1/2S3 servers
x20ssd—CDE220-2S1/2S3 servers
Note ![]() Sometimes the kickstart file is not found on initial boot. If this occurs, an error message is displayed. Press Enter on the cdrom:line and select OK. The installation proceeds. For more information, see CSCtf87159 in "Troubleshooting."
Sometimes the kickstart file is not found on initial boot. If this occurs, an error message is displayed. Press Enter on the cdrom:line and select OK. The installation proceeds. For more information, see CSCtf87159 in "Troubleshooting."
Note ![]() For each Option (x00, x20, x20ssd), if the "console=ttyS0,115200n8" is added at the end of the option on the boot: line, the OS installation is performed by way of the serial console.
For each Option (x00, x20, x20ssd), if the "console=ttyS0,115200n8" is added at the end of the option on the boot: line, the OS installation is performed by way of the serial console.
Step 8 ![]() After the server imaging has completed, halt the server.
After the server imaging has completed, halt the server.
init 0
Step 9 ![]() Power down the server.
Power down the server.
poweroff
Step 10 ![]() Remove the USB DVD-ROM drive.
Remove the USB DVD-ROM drive.
Step 11 ![]() Re-insert all the content drives,
Re-insert all the content drives,
Step 12 ![]() Power on the server and proceed with normal installation of the TV CDS Release 3.2.1 software by running the cdsinstall script.
Power on the server and proceed with normal installation of the TV CDS Release 3.2.1 software by running the cdsinstall script.
Note ![]() The CDS-TV-3.2.1-DVD-OS.iso file includes the ISO image file for the Release 3.2.1 software, so the cdsinstall and cdsconfig can be performed without additional transfer of files to the server.
The CDS-TV-3.2.1-DVD-OS.iso file includes the ISO image file for the Release 3.2.1 software, so the cdsinstall and cdsconfig can be performed without additional transfer of files to the server.
 Feedback