Cisco usNIC Deployment Guide for cisco UCS B-Series Blade Servers
Overview of Cisco usNIC
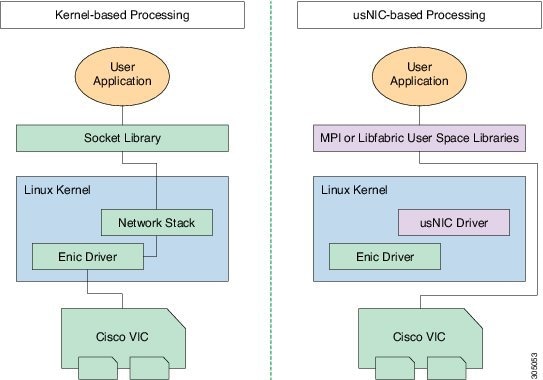
The Cisco user-space NIC (Cisco usNIC) feature improves the performance of software applications that run on the Cisco UCS servers in your data center by bypassing the kernel when sending and receiving networking packets. The applications interact directly with a Cisco UCS VIC second generation or later adapter, which improves the networking performance of your high-performance computing cluster. To benefit from Cisco usNIC, your applications must use the Message Passing Interface (MPI) or the Libfabric interface instead of sockets or other communication APIs.
Cisco usNIC offers the following benefits for your applications:
-
Provides a low-latency and high-throughput communication transport.
-
Employs the standard and application-independent Ethernet protocol.
-
Low jitter, or near constant latency, communications.
-
Takes advantage of low latency forwarding, Unified Fabric, and integrated management support in the following Cisco data center platforms:
-
Cisco UCS server
-
Cisco UCS VIC second generation or later generation adapter
-
Standard Ethernet applications use user-space socket libraries, which invoke the networking stack in the Linux kernel. The networking stack then uses the Cisco eNIC driver to communicate with the Cisco VIC hardware. The following figure shows the contrast between a regular software application and an MPI application that uses usNIC.
Cisco usNIC Prerequisites
To benefit from Cisco usNIC, your configuration has the following prerequisites:
-
A supported Linux operating system distribution release. For more information on supported Linux operating system releases, please refer to the UCS Hardware and Software Compatibility Tool.
-
The UCS Driver ISO corresponding to the UCS server model, selected Linux operating system, and version of UCS firmware installed on the server as identified by the UCS Hardware and Software Compatibility Tool. For more information, see Downloading Cisco UCS VIC drivers.
-
A supported MPI implementation, such as IBM Sprectrum MPI, the open source Community Open MPI package.
Configuring Cisco usNIC
The overall flow to configure Cisco usNIC is as follows:
-
Create or Modify a Service Profile to support usNIC
-
Install a supported Linux OS (if not already installed)
-
Configure Linux kernel and OS to support usNIC
-
Install usNIC drivers and utilities
-
Install libfabric and MPI software
-
Verify the usNIC installation
Creating a Cisco usNIC Connection Policy using the Cisco Manager GUI
To create a Cisco usNIC Connection Policy, use the below steps:
Procedure
|
Step 1 |
In the Navigation pane, click LAN. |
||||||||||
|
Step 2 |
Expand . |
||||||||||
|
Step 3 |
Expand the root node. |
||||||||||
|
Step 4 |
Right-click usNIC Connection Policies and choose Create usNIC Connection Policy. |
||||||||||
|
Step 5 |
In the Create usNIC Connection Policy dialog box, complete the following fields:
|
Configuring a usNIC Ethernet Adapter Policy
Procedure
|
Step 1 |
In the Navigation pane, click Servers. |
||||||||||||||
|
Step 2 |
On the Servers tab, expand . |
||||||||||||||
|
Step 3 |
Click Eth Adapter Policy usNIC. |
||||||||||||||
|
Step 4 |
In the Work pane, click the General tab. You can modify the details in the
Resources and
Options sections as needed. We recommend
that you use the following default values for Resources:
|
Modifying a usNIC using the Cisco UCS Manager GUI
Procedure
|
Step 1 |
In the Navigation pane, click Servers. |
|
Step 2 |
On the Servers tab, expand . |
|
Step 3 |
Expand the service profile node where you want to configure the usNIC and click vNICs. |
|
Step 4 |
In the Work pane, click the Network tab. |
|
Step 5 |
In the vNICs area, choose a vNIC and click Modify. |
|
Step 6 |
In the Adapter Performance Profile area of the Modify vNIC dialog box, choose Linux from the Adapter Policy drop-down list. |
|
Step 7 |
In the Connection Policies area, click the usNIC radio button. |
|
Step 8 |
Choose the usNIC connection policy that you created from the usNIC Connection Policy drop-down list. |
|
Step 9 |
Click OK. |
|
Step 10 |
Click Save Changes. |
|
Step 11 |
In the Navigation pane, click the service profile that you just modified. |
|
Step 12 |
In the Work pane, click the Policies tab. |
|
Step 13 |
Expand the BIOS Policy bar and choose usNIC in the BIOS Policy drop-down list. |
|
Step 14 |
Click Save Changes. |
Creating a usNIC using the Cisco UCS Manager CLI
Before you begin
You must log in with admin privileges to perform this task.
Procedure
| Command or Action | Purpose | |
|---|---|---|
|
Step 1 |
UCS-A # scope service-profile server chassis-id / blade-id or rack_server-id |
Enters the service profile for the specified chassis, blade or UCS managed rack server ID. |
|
Step 2 |
UCS-A /org/service-profile # show vnic |
Displays the
vnics that are available on the server. A usNIC vNIC is available by default
when you upgrade to Cisco UCS Manager, release 2.2.
|
|
Step 3 |
UCS-A /org/service-profile # scope vnic vnic name |
Enters the vNIC
mode for the specified vNIC.
|
|
Step 4 |
UCS-A /org/service-profile/vnic # set adapter-policy Linux |
Specifies Linux
and the adapter policy for the usNIC.
|
|
Step 5 |
UCS-A /org/service-profile/vnic # enter usnic-conn-policy-ref usnic connection policy reference name |
Creates the
usNIC connection policy reference for the vNIC with the specified name. The
maximum size for the connection policy name is 16 characters.
|
|
Step 6 |
UCS-A /org/service-profile/vnic/usnic-conn-policy-ref* # commit-buffer |
Commits the
transaction to the system configuration.
|
|
Step 7 |
UCS-A /org/service-profile/vnic/usnic-conn-policy-ref # top |
Enters the
top-level mode.
|
|
Step 8 |
UCS-A # scope org |
Enters the root
organization mode.
|
|
Step 9 |
UCS-A /org # create usnic-conn-policy usnic connection policy name |
Creates a usNIC
connection policy with the specified name.
|
|
Step 10 |
UCS-A /org/usnic-conn-policy* # set usnic-count number of usnics |
Specifies the number of Cisco usNICs to create. It is recommended that you enter 58 for this value. |
|
Step 11 |
UCS-A /org/usnic-conn-policy* # set adaptor-profile usNIC |
Specifies the
usNIC Ethernet adaptor profile for the usNIC connection policy. This usNIC
adaptor profile is created by default when you upgrade from previous versions
of Cisco UCS Manager to release 2.2.
|
|
Step 12 |
UCS-A /org/usnic-conn-policy* # commit-buffer |
Commits the
transaction to the system configuration.
|
Example
This example shows how to create a Cisco usNIC and specify its properties:
Server # scope org
Server /org # create usnic-conn-policy usnic1
Server /org/usnic-conn-policy* # set usnic-count 58
Server /org/usnic-conn-policy* # set adaptor-profile usNIC
Server /org/usnic-conn-policy* # commit-buffer
Server /org/usnic-conn-policy # top


Server # scope service-profile server 1/1
Server /org/service-profile # show vnic

vNIC:
Name Fabric ID Dynamic MAC Addr Virtualization Preference
------------------ --------- ------------------ -------------------------
eth0 A 00:25:B5:00:00:A1 NONE
eth1 B 00:25:B5:00:00:A2 NONE
eth2 A 00:25:B5:00:00:A3 NONE
Server /org/service-profile # scope vnic eth0
Server /org/service-profile/vnic # set adapter-policy Linux
Server /org/service-profile/vnic # enter usnic-conn-policy-ref usnic1
Server /org/service-profile/vnic/usnic-conn-policy-ref* # commit-buffer
Server /org/service-profile/vnic/usnic-conn-policy-ref # exit
Modifying a usNIC using the Cisco UCS Manager CLI
Before you begin
You must log in with admin privileges to perform this task.
Procedure
| Command or Action | Purpose | |
|---|---|---|
|
Step 1 |
UCS-A # scope service-profile server chassis-id / blade-id or rack_server-id |
Enters the service profile for the specified chassis, blade or UCS managed rack server ID. |
|
Step 2 |
UCS-A /org/service-profile # show vnic |
Displays the
vnics that are available on the server. A usnic vnic is available by default
when you upgrade to Cisco UCS Manager, release 2.2.
|
|
Step 3 |
UCS-A /org/service-profile # scope vnic vnic name |
Enters the vnic
mode for the specified vNIC.
|
|
Step 4 |
UCS-A /org/service-profile/vnic # enter usnic-conn-policy-ref usnic connection policy reference name |
Specifies the
usnic connection policy reference for the vNIC that you want to use.
|
|
Step 5 |
UCS-A /org/service-profile/vnic/usnic-conn-policy-ref* # commit-buffer |
Commits the
transaction to the system configuration.
|
Example
This example shows how to modify Cisco usNIC properties:
Server # scope service-profile server 1/1
Server /org/service-profile # show vnic

vNIC:
Name Fabric ID Dynamic MAC Addr Virtualization Preference
------------------ --------- ------------------ -------------------------
eth0 A 00:25:B5:00:00:A1 SRIOV USNIC
eth1 B 00:25:B5:00:00:A2 NONE
eth2 A 00:25:B5:00:00:A3 NONE
Server /org/service-profile # scope vnic eth0
Server /org/service-profile/vnic # enter usnic-conn-policy-ref usnic2
Server /org/service-profile/vnic/usnic-conn-policy-ref* # commit-buffer
Server /org/service-profile/vnic/usnic-conn-policy-ref # exit
Deleting a usNIC using the Cisco UCS Manager CLI
Before you begin
You must log in with admin privileges to perform this task.
Procedure
| Command or Action | Purpose | |
|---|---|---|
|
Step 1 |
UCS-A # scope service-profile server chassis-id / blade-id or rack_server-id |
Enters the service profile for the specified chassis, blade or UCS managed rack server ID. |
|
Step 2 |
UCS-A /org/service-profile # show vnic |
Displays the
vNICs that are available on the server. A usNIC vNIC is available by default
when you upgrade to Cisco UCS Manager, release 2.2.
|
|
Step 3 |
UCS-A /org/service-profile # scope vnic vnic name |
Enters the vNIC
mode for the specified vNIC.
|
|
Step 4 |
UCS-A /org/service-profile/vnic # show usnic-conn-policy-ref usnic connection policy reference name |
Specifies the
usNIC connection policy reference for the vNIC that you want to use.
|
|
Step 5 |
UCS-A /org/service-profile/vnic # delete usnic-conn-policy-ref usnic connection policy reference name |
Deletes the
specified usNIC connection policy reference.
|
|
Step 6 |
UCS-A /org/service-profile/vnic/usnic-conn-policy-ref* # commit-buffer |
Commits the
transaction to the system configuration.
|
Example
This example shows how to modify Cisco usNIC properties:
Server # scope service-profile server 1/1
Server /org/service-profile # show vnic

vNIC:
Name Fabric ID Dynamic MAC Addr Virtualization Preference
------------------ --------- ------------------ -------------------------
eth0 A 00:25:B5:00:00:A1 SRIOV USNIC
eth1 B 00:25:B5:00:00:A2 NONE
eth2 A 00:25:B5:00:00:A3 NONE
Server /org/service-profile # scope vnic eth0
Server /org/service-profile/vnic # show usnic-conn-policy-ref

usNIC Connection Policy Reference:
usNIC Connection Policy Name
----------------------------
usnic2
Server /org/service-profile/vnic # delete usnic-conn-policy-ref usnic2
Server /org/service-profile/vnic* # commit-buffer
Server /org/service-profile/vnic # exit
Configuring the Linux Kernel for Cisco usNIC
Before you begin
Make sure that the following software and hardware components are installed on the Cisco UCS server:
-
A supported Linux operating system distribution release. For more information, see the UCS Hardware and Software Compatibility Tool.
-
GCC, G++, and Gfortran
-
DAT user library (if using Intel ® MPI)
-
libnl user library development package (either version 1 or version 3)
-
Cisco UCS VIC, second generation or later adapter
Procedure
|
Step 1 |
Ensure the kernel option CONFIG_INTEL_IOMMU is selected in the kernel. Enable the Intel IOMMU driver in the Linux kernel by manually adding 'intel_iommu =on' in the grub.conf file (for example, /boot/grub/grub.conf). For example, if your grub.conf file contains a "kernel" line such as For Red Hat Enterprise Linux use the grubby command line tool to add intel_iommu=on to the configuration file. For SLES, add "intel_iommu=on" to the GRUB_CMDLINE_LINUX_DEFAULT option found in /etc/default/grub configuration file then run the grub2-mkconfig command below to apply the changes. For Ubuntu, add "intel_iommu=on" to the GRUB_CMDLINE_LINUX_DEFAULT option found in /etc/default/grub configuration file then run the update-grub command below to apply the changes. |
||
|
Step 2 |
Reboot your Cisco UCS server. You must reboot your server for the changes to take after you enable the Intel IOMMU. |
||
|
Step 3 |
Verify that the running kernel has booted with the intel_iommu=on option. |
||
|
Step 4 |
Install the Cisco usNIC Linux drivers. For more information about installing the drivers, see "Installing Linux Drivers" section in the guide.
|
Installing Linux Software Packages for Cisco usNIC
The following section lists the content of the usNIC folder, specific for each supported Linux operating system distribution that is included in the UCS Drivers ISO bundle. Documentation about known issues and installation instructions are also included in the README file in the usNIC folder.
-
kmod-usnic_verbs-{version}.x86_64.rpm —Linux kernel verbs driver for the usNIC feature of the Cisco VIC SR-IOV Ethernet NIC.

Note
On systems with SLES 12.1 and later, there is a single RPM that contains both the enic and usnic_verbs drivers named cisco-enic-usnic-kmp-default-{version}.x86_64.rpm. Due to how SLES kernel module dependencies work, this "combo" RPM must be installed instead of installing individual enic and usnic_verbs RPMs.
-
usnic_tools-{version}.x86_64.rpm — Utility programs for usNIC.
-
usd_tools-{version}.x86_64.rpm — Additional diagnostic tools for usNIC.
-
libfabric-cisco-{version}.x86_64.rpm— Libfabric package with built-in support for the Cisco usNIC transport.
-
libfabric-cisco-devel-{version}.x86_64.rpm — Development headers for the Libfabric package with built-in support for the Cisco usNIC transport.
-
libusnic_verbs-{version}.x86_64.rpm — A dummy library that causes the libibverbs library to skip Cisco usNIC Linux devices (because Cisco usNIC functionality is exposed through libfabric, not libibverbs). This RPM is only necessary on older Linux distros that have not upgraded to the "rdma-core" packaging of the libibverbs library (e.g., RHEL 6).
Procedure
|
Step 1 |
Upgrade to the latest version of the enic driver included in the Cisco UCS ISO for your Linux distribution as documented in Cisco UCS Virtual Interface Card Drivers for Linux Installation Guide. |
||
|
Step 2 |
Install the Cisco usNIC software packages from the Cisco UCS Drivers ISO for your Linux distribution. |
||
|
Step 3 |
Enable the Linux RDMA services. Once enabled, RDMA services will be started automatically after a system reboot. The exact command to enable Linux RDMA may vary between each operating system. For example, on Red Hat Enterprise Linux 6.X use the following command:
|
||
|
Step 4 |
Reboot your server for the installation changes to take effect automatically. By rebooting at this point and performing the installation validation steps found below, you will be confident your system is configured properly.
|
Source code for Linux Cisco usNIC software packages
The source code for the Cisco usNIC software packages is provided on the Cisco UCS Drivers ISO. It is recommended that you do not mix source code and binary package installations.
Manually Loading the Kernel Modules for Cisco usNIC
Assuming that the operating system was booted with Intel IOMMU support enabled, you can manually load the Cisco usNIC kernel modules with the following steps.
Before you begin
Ensure you delete all the existing versions of the driver before you load the latest version of the driver. This will help you configure the system successfully.
Procedure
| Command or Action | Purpose | |||
|---|---|---|---|---|
|
Step 1 |
# rmmod enic |
Unloads the existing enic driver module.
|
||
|
Step 2 |
# modprobe enic |
Loads the enic driver module. |
||
|
Step 3 |
# dmesg | grep 'Cisco VIC Ethernet NIC Driver' |
Verify that the correct version of the enic driver was loaded. The output from this command should show a version string that matches the version of the enic RPM from the Cisco UCS Driver ISO that you just installed. |
||
|
Step 4 |
# modprobe usnic_verbs |
Loads the usnic_verbs driver module. |
||
|
Step 5 |
# lsmod | grep usnic_verbs |
Verify that the usnic_verbs module loaded successfully. If it did, you should see some output. If the usnic_verbs module did not load, you should see no output. |
Uninstalling Linux Software Packages for Cisco usNIC
Procedure
|
Step 1 |
Uninstall the following usNIC software packages:
|
|
Step 2 |
Reboot your Cisco server. |
Upgrading the Linux Software Packages for Cisco usNIC
Procedure
|
Step 1 |
Follow the procedure in "Uninstalling Linux Drivers" to uninstall the previous versions of the usNIC software packages. |
|
Step 2 |
Follow the procedure in "Installing Linux Drivers" to install usNIC software packages from the Cisco UCS Drivers ISO for your Linux distribution. |
Installing MPI
Installing Community Open MPI
Before you begin
Procedure
|
Step 1 |
Download the latest version of Open MPI from https://www.open-mpi.org/software/ompi/current/. This URL will automatically redirect you to the current release. |
||
|
Step 2 |
Extract the Open MPI tarball with the following command: |
||
|
Step 3 |
In the directory that is created, run the configure command with the following options: Substitute an appropriate directory for "INSTALL_DIRECTORY" (e.g., /opt/openmpi/VERSION).
|
||
|
Step 4 |
At the successful conclusion of configure, build Open MPI: |
||
|
Step 5 |
At the successful conclusion of make, install Open MPI (you may need root or specific user permissions to write to your chosen INSTALL_DIRECTORY): |
Installing IBM Spectrum MPI
Procedure
Installing the Intel MPI Library
Procedure
Adding MPI to User Environments
Before MPI applications can be compiled and launched, an MPI implementation must be added to each user's environment. It is recommended that you only add one MPI implementation to a user's environment at a time.
Environment for IBM Spectrum MPI Library
Spectrum MPI needs very little in terms of environment setup. You can invoke Spectrum MPI's commands either through an absolute path or by adding the directory with the Spectrum MPI commands in to your PATH, and then invoking them without an absolute path.
Environment for Community Open MPI
Community Open MPI requires that you add its installation binary and library paths to the environment variables. It is usually best to add these paths to the environment in your shell startup files so that they are automatically set upon login to all nodes in your cluster.
Specifically, you should prepend the PATH environment variable with INSTALL_DIRECTORY/bin, and prefix the LD_LIBRARY_PATH environment variable with INSTALL_DIRECTORY/lib. Optionally, you can also add the INSTALL_DIRECTORY/share/man to the MANPATH environment variable.
For example, if you configured Community Open MPI with an INSTALL_DIRECTORY of /opt/openmpi, if you are using Bash as your login shell, you can add these lines to your shell startup file (which is typically $HOME/.bashrc):
export PATH=/opt/openmpi/bin:$PATH
export LD_LIBRARY_PATH=/opt/openmpi/lib:$LD_LIBRARY_PATH
export MANPATH=/opt/openmpi/share/man:$MANPATH
Alternatively, if you're using C shell as your login shell, you can add these lines to your shell startup file (which is typically $HOME/.cshrc):
set path=(/opt/openmpi/bin $path)
setenv LD_LIBRARY_PATH /opt/openmpi/lib:$LD_LIBRARY_PATH
if ("1" == "$?MANPATH") then
    setenv MANPATH /opt/openmpi/share/man:${MANPATH}
else
    setenv MANPATH /opt/openmpi/share/man:
endif
Your system may require slightly different commands. Check the Open MPI Community FAQ (https://www.open-mpi.org/faq/) in the "Running MPI Jobs" section for more information about how to set your PATH, LD_LIBRARY_PATH, MANPATH environment variables.
Environment for the Intel ® MPI Library
In addition to the instructions provided by the Intel ® MPI Library documentation, additional environment variables must be set in each user's environment to enable Cisco usNIC functionality. Two scripts are installed by the libdaplusnic software package to help set the required environment variables. One script is for Bourne shell users; the other script is for C shell users:
-
/opt/cisco/intelmpi-usnic-vars.sh (For Bourne shell users)
-
/opt/cisco/intelmpi-usnic-vars.csh (For C shell users)
The appropriate script should be sourced as part of the users's shell startup / login sequence.
Using the Intel ® MPI Library with usNIC requires the network to be configured with flow control enabled. This can be either IEEE 802.3x link-level flow control or IEEE 802.1Qbb Priority-based Flow Control (PFC). This feature is sometimes also called "no-drop." Refer to the configuration guide for the switches in your network for information about enabling flow control. If flow control is not enabled in the network, then applications utilizing the Intel® MPI Library may work correctly, but possibly with extremely degraded performance.
In deployments of the Intel ® MPI Library, the MPI traffic must have flow control enabled on all Cisco usNIC ports with Class of Service (CoS) 6 in Cisco CIMC.
Adding Libfabric to User Environments
If you are developing Libfabric-specific applications, you may benefit from having the Libfabric test executables (such as fi_pingpong) and/or man pages in your environment. Two scripts are installed by the Cisco libfabric package to help set the required environment variables. One script is for Bourne shell users, the other is for C shell users:
-
/opt/cisco/libfabric-vars.sh
-
/opt/cisco/libfabric-vars.csh
The appropriate script should be sourced as part of the users's shell startup / login sequence.
Adding usNIC Tools to User Environments
Adding the usNIC tools to the environment can be accomplished via the following scripts; the first is for Bourne shell users, the second is for C shell users:
-
/opt/cisco/usnic/bin/usnic-vars.sh
-
/opt/cisco/usnic/bin/usnic-vars.csh
Verifying the Cisco usNIC Installation for Cisco UCS B-Series Blade Servers
After you install the required Linux drivers for Cisco usNIC, perform the following procedure at the Linux prompt to make sure that the installation completed successfully.
Note |
The examples shown below are configurations verified on Linux operating system distribution RHEL 6.5. |
Procedure
|
Step 1 |
Search and verify if the usnic_verbs kernel module was loaded during the OS driver installation. The following details are displayed when you enter the lsmod | grep usnic_verbs command. The kernel modules listed on your console may differ based on the modules that you have currently loaded in your OS. |
||||
|
Step 2 |
View the configuration of Cisco usNIC-enabled NICs. The following section is a brief example of the results that are displayed when you execute the usnic_devinfo command. The results may differ based on your current installation. When the results are displayed on your console, ensure that the link state for each of the listed ports are shown as UP. The following example shows two interfaces (usnic_1 and usnic_0 ) that are configured on a Cisco UCS VIC adapter. If you configured only one Cisco usNIC-enabled vNIC, you will see a listing for only usnic_0 .
|
||||
|
Step 3 |
Run the usnic_check script to view the installed RPMs and their versions.
|
||||
|
Step 4 |
Verify that the Cisco usNIC network packets are being transmitted correctly between the client and server hosts. The following example shows the results that are displayed when you run the fi_pingpong program.
|
||||
|
Step 5 |
Download, compile, and execute the ring_c test program to validate that the MPI traffic is correctly transmitted between the client and server hosts. You can obtain the ring_c test program from this link: https://raw.githubusercontent.com/open-mpi/ompi/v2.x/examples/ring_c.c. The following example shows how to use the wget utility to obtain, compile, and execute the ring_c . Alternatively, you can use other methods of obtaining and running the test program.
|
If the fi_pingpong program and the ring_c program executed successfully, you should now be able to run general MPI applications over Cisco usNIC.
Troubleshooting Information
Problem
Viewing the list of installed RPMs using usnic_check causes the following:
-
A warning such as No usnic devices found.
-
A version mismatch error such as usnic_verbs_xxxx does not match installed version.
Possible Cause
-
A previously-installed version of usnic_verbs can cause this error.
-
The usnic_verbs driver may have failed to load if the loaded enic driver is not compatible with usnic_verbs.
Solution
This problem is typically caused by one of two things:
- An old version of the usnic_verbs RPM is still installed.
-
List all installed versions using the following command: rpm -qa | grep usnic_verbs
-
Uninstall all versions using the following command: rpm -e
-
Reboot your system.
-
Re-install all the RPMs.
-
-
The enic driver loaded by the Linux kernel is not compatible with this version of usnic_verbs.
-
This can happen if the distro-provided enic RPM was loaded instead of the enic driver on the same UCS Driver ISO from which you obtained the usnic_verbs driver.
-
Specifically: the enic and usnic_verbs drivers must "match" -- if they don't, it is likely that usnic_verbs will fail to load with messages in "dmesg" from usnic_verbs about missing enic symbols.
-
If this is the case, ensure that both the enic and usnic_verbs drivers are loaded from the UCS Drivers ISO.
-
Also ensure that the correct enic driver version is being loaded upon bootup: check the output from "dmesg" to ensure that the enic version number matches that of the enic RPM that you installed.
-
If they do not match, you may need to check depmod output and/or make a new initrd to ensure that the correct enic driver is bootstrapped and loaded into the kernel at boot time.
-
Problem
Verifying that Cisco usNIC packets are being transmitted correctly between client and server using fi_pingpong causes the following errors:
-
“No such address or device” error. See the following example:
$ /opt/cisco/libfabric/bin/fi_pingpong -p usnic
fi_getinfo: -61
Possible Cause
-
The Cisco usNIC connection policy is not assigned or set as 'not set' in the vNIC interface.
-
The server side does not receive packets from the client side.
Solution
-
Make sure that valid Cisco usNIC connection policy is configured in usNIC Connection Policies and assigned to the vNICs in the Service Profile.
-
Make sure that IP addresses of the Cisco usNIC devices on both the server and client are configured correctly.
-
Make sure that the client pingpong is attempting to send packets to the correct server IP address of Cisco usNIC device.
Problem
Running the Cisco usNIC traffic using the mpirun causes the following errors:
Example:
# Enter the command below at the prompt on a single line from mpirun up to Sendrecv.
# The backslash is included here as a line continuation and is not needed when the command is
# entered at the prompt.
$ mpirun --host node05,node06 -np 12 --mca btl usnic,vader,self \
--mca btl_usnic_if_include usnic_1 IMB-MPI1 Sendrecv

The MTU does not match on local and remote hosts.  All interfaces on
all hosts participating in an MPI job must be configured with the same
MTU.  The usNIC interface listed below will not be used to communicate
with this remote host.

  Local host:      node05
  usNIC interface: usnic_1
  Local MTU:       8958
  Remote host:     node06
  Remote MTU:      1458
Possible Cause
-
The MTU size is incorrectly set on the appropriate VLANs.
-
The MTU size is incorrectly set in the QoS.
Solution
Make sure that the MTU size has been set correctly on the VLANs and QoS.
See: Configuring QoS System Classes with the LAN Uplinks Manager.
Problem
# rpm -ivh kmod-usnic_verbs-1.0.4.318.rhel6u5-1.x86_64.rpm
error: Failed dependencies:
                ksym(enic_api_devcmd_proxy_by_index) = 0x107cb661 is needed by kmod-usnic_verbs-1.0.4.318.rhel6u5-1.x86_64
                ksym(vnic_dev_alloc_discover) = 0xfb7e4707 is needed by kmod-usnic_verbs-1.0.4.318.rhel6u5-1.x86_64
                ksym(vnic_dev_get_pdev) = 0xae6ae5c9 is needed by kmod-usnic_verbs-1.0.4.318.rhel6u5-1.x86_64
                ksym(vnic_dev_get_res) = 0xd910c86b is needed by kmod-usnic_verbs-1.0.4.318.rhel6u5-1.x86_64
                ksym(vnic_dev_get_res_bar) = 0x31710a7e is needed by kmod-usnic_verbs-1.0.4.318.rhel6u5-1.x86_64
                ksym(vnic_dev_get_res_bus_addr) = 0x7be7a062 is needed by kmod-usnic_verbs-1.0.4.318.rhel6u5-1.x86_64
                ksym(vnic_dev_get_res_count) = 0x759e4b07 is needed by kmod-usnic_verbs-1.0.4.318.rhel6u5-1.x86_64
                ksym(vnic_dev_get_res_type_len) = 0xd122f0a1 is needed by kmod-usnic_verbs-1.0.4.318.rhel6u5-1.x86_64
                ksym(vnic_dev_unregister) = 0xd99602a1 is needed by kmod-usnic_verbs-1.0.4.318.rhel6u5-1.x86_64
#
Possible Cause
-
The enic driver is incorrectly installed.
-
The enic driver is not installed.
Solution
Ensure that the correct enic driver has been installed. In addition, make sure of the following:-
Specifically, you must ensure the following: the enic and usnic_verbs drivers must match. If you have a mismatch, you can get the above version errors.
-
Specifically, the enic and usnic_verbs that come in the Cisco UCS drivers ISO must be matched together. If you use an enic from one Cisco UCS driver ISO and usnic_verbs from another Cisco UCS driver ISO, it will result in the above version errors.
Note
When installing the "combo" enic and usnic_verbs RPM on systems with SLES 12.1 and later, it is guaranteed that the enic and usnic_verbs drivers will match.
Problem
# rpm -ivh kmod-usnic_verbs-1.0.4.318.rhel6u5-1.x86_64.rpm
Preparing...                ########################################### [100%]
   1:kmod-usnic_verbs       ########################################### [100%]
WARNING -
Intel IOMMU does not appear to be enabled - please add kernel parameter
intel_iommu=on to your boot configuration for USNIC driver to function.
#
Possible Cause
The Intel IOMMU support is not enabled in the Linux kernel.
Solution
Enable Intel IOMMU driver in the Linux kernel.
Problem
Installing DAT user library can cause the following failed dependencies errors:
# rpm -ivh libdaplusnic-2.0.39cisco1.0.0.317-1.el6.x86_64.rpm
error: Failed dependencies:
                dapl is needed by libdaplusnic-2.0.39cisco1.0.0.317-1.el6.x86_64
#
Possible Cause
The libdapl is installed without installing the DAT library.
Solution
Install the DAT library.
Problem
When viewing the configuration of Cisco usNIC enabled VICS using usnic_devinfo, the command output does not list any usNIC interfaces..
Possible Cause
The RDMA service is not enabled.
Solution
# service rdma start
Or
# chkconfig rdma on
 Feedback