- Preface
- Overview of Application Containers
- Implementing Gateway
- Implementing Load Balancing
- Setting Up a Fenced Virtual Container
- Setting Up a Virtual Secure Gateway Application Container
- Setting Up a Fabric Container
- Setting Up an Cisco Application Policy Infrastructure Controller Container
- Managing Application Containers
- Self Service Management Options
Cisco UCS Director Application Container Guide, Release 6.0
Bias-Free Language
The documentation set for this product strives to use bias-free language. For the purposes of this documentation set, bias-free is defined as language that does not imply discrimination based on age, disability, gender, racial identity, ethnic identity, sexual orientation, socioeconomic status, and intersectionality. Exceptions may be present in the documentation due to language that is hardcoded in the user interfaces of the product software, language used based on RFP documentation, or language that is used by a referenced third-party product. Learn more about how Cisco is using Inclusive Language.
- Updated:
- September 16, 2016
Chapter: Setting Up a Fenced Virtual Container
Setting Up a Fenced
Virtual Container
This chapter contains the following sections:
- Fenced Virtual Container
- Fenced Virtual Container Prerequisites
- Fenced Virtual Container Limitations
- Fenced Virtual Application Container Creation Process
Fenced Virtual Container
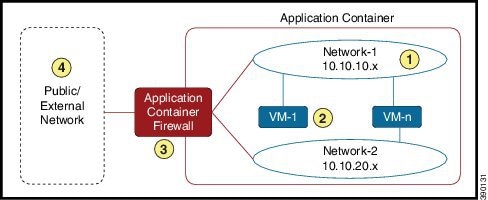
-
Define a gateway policy—In the gateway policy, you must define the gateway type for the container and on which cloud account (vCenter) the gateway gets deployed.
-
Define fenced container template—You must perform the following tasks in the template: -
Define the cloud account on which the container is created
-
Configure the network
-
Add VMs for the container
-
Define port mapping and outbound access control lists (ACLs)
-
Choose a gateway policy (created earlier)
-
Choose the deployment policies that define VM provisioning
-
Choose self-service options for the container
-
Choose a workflow (optional)
-
-
Create a fenced container from the defined container template—A fenced container is created from the template defined in step 2. You must choose a group for which the container is created.
-
Fenced container—After creating the fenced container, you can do various management actions, such as power management of the container, add VMs to a container, clone or delete the container, and open a console for VMs and view reports.
Fenced Virtual Container Prerequisites
The following is the prerequisite for fenced virtual container configuration:
-
If you want to use Distributed Virtual Portgroup or Distributed Virtual Portgroup N1K as the virtual network types in the Allocate Container VM Resources task, ensure that you specify primary DVSwitch and alternate DVSwitch names in the Allocate Container VM Resources task. By default, Virtual Network Portgroup is set as the virtual network type.
Fenced Virtual Container Limitations
The following is the limitation of fenced virtual container:
Fenced Virtual Application Container Creation Process
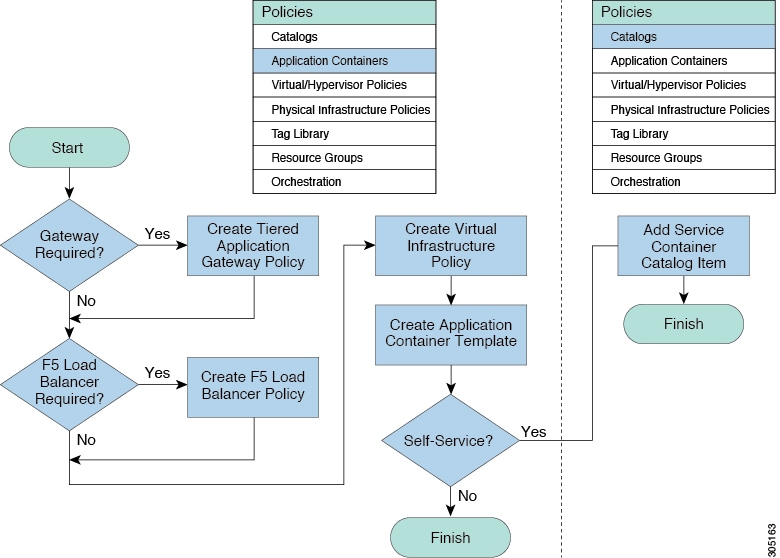
The following process explains the creation of a fenced virtual application container in Cisco UCS Director:
-
If a gateway is required, create a tiered application gateway policy.
-
If a load balancer is required, create a load balancer policy.
-
Create a virtual infrastructure policy to define the cloud account, the type of container and, if appropriate, the tiered application gateway and load balancer policies.
-
Create an application container template.
-
Add networks (one network per application tier).
-
Add virtual machines and baremetal servers.
-
Add a compute policy, storage policy, network policy, and systems policy. If desired, you can also add a cost model.
-
Add an end user self-service policy and configure the self-service options.
-
Add the container setup workflow required to deliver the service offering to the user as part of a service request. The workflow must consider the type of container and the application to be provisioned.
-
-
Create a container based on the container template.
The figure illustrates the creation of the fenced virtual application container template within Cisco UCS Director.
- Creating a Virtual Infrastructure Policy for a Fenced Virtual Container
- Creating an Application Container Template for Fenced Virtual Container
- Creating a Custom Workflow for Fenced Virtual Containers
Creating a Virtual Infrastructure Policy for a Fenced Virtual Container
What to Do Next
Create an application container template for creating a fenced virtual container.
Creating an Application Container Template for Fenced Virtual Container
Create a virtual infrastructure policy. For more information, see Creating a Virtual Infrastructure Policy for a Fenced Virtual Container.
| Step 1 | On the menu bar, choose . | ||||||||||||||||||||||||||||||
| Step 2 | Click the Application Container Templates tab. | ||||||||||||||||||||||||||||||
| Step 3 | Click
Add
Template. The
Application Container Template dialog box appears.
Complete the following fields:
| ||||||||||||||||||||||||||||||
| Step 4 | Click Next | ||||||||||||||||||||||||||||||
| Step 5 | In the Application Container Template - Select a Virtual infrastructure policy dialog box, from the Select Virtual Infrastructure Policy drop-down list, choose a virtual infrastructure policy. | ||||||||||||||||||||||||||||||
| Step 6 | Click Next. | ||||||||||||||||||||||||||||||
| Step 7 | The Application Container: Template - Internal Networks dialog box appears. You can add and configure multiple networks for a container. These networks are applicable to the VM that is provisioned using this template. | ||||||||||||||||||||||||||||||
| Step 8 | Click the
(+) Add
icon to add a network. Complete the following fields:
| ||||||||||||||||||||||||||||||
| Step 9 | Click
Submit.
Next, you can add and configure the VM that will be provisioned in the application container. | ||||||||||||||||||||||||||||||
| Step 10 | Click OK. | ||||||||||||||||||||||||||||||
| Step 11 | Click
the Add
(+) icon to add a VM. The
Add
Entry dialog box appears. Complete the following fields:
| ||||||||||||||||||||||||||||||
| Step 12 | Click Next. | ||||||||||||||||||||||||||||||
| Step 13 | In the
Application Container Template - External Gateway Security
Configuration dialog box, click the
Port
Mappings (+) Add icon to add port mappings. Complete the following
fields:
| ||||||||||||||||||||||||||||||
| Step 14 | In the
Application Container Template - External Gateway Security
Configuration dialog box, click the
Outbound ACLs (+) Add icon to add outbound ACL.
Complete the following fields:
| ||||||||||||||||||||||||||||||
| Step 15 | Click Next. The
Application Container: Template - Deployment Policies
dialog box appears.
You must select the compute, storage, network, system policy, and cost model required for VM provisioning. A policy is a group of rules that determine where and how a new VM is to be provisioned within an application container (based on the availability of system resources).
| ||||||||||||||||||||||||||||||
| Step 16 | Click Next. The
Application Container: Template - Options dialog box
appears.
You can select options to enable or disable certain privileges for the self-service end user. Complete the following fields:
| ||||||||||||||||||||||||||||||
| Step 17 | Click
Next. The
Application Container: Template - Setup Workflows
screen appears. Complete the following field:
| ||||||||||||||||||||||||||||||
| Step 18 | Click Next. The Application Container Template - Summary dialog box appears, displaying your current settings. | ||||||||||||||||||||||||||||||
| Step 19 | Click Submit to complete the creation of the application container template. |
What to Do Next
You can customize certain aspects of template using the custom workflow task. For more information, see Creating a Custom Workflow for Fenced Virtual Containers.
Creating a Custom Workflow for Fenced Virtual Containers
 Note | For more information about using the orchestration to run workflows, see the Cisco UCS Director Orchestration Guide. |
- Gateway Type: CISCO ASA—If the gateway type is CISCO ASA for the container, you must specifically choose Application Container with ASA Gateway from the list of available workflows. You can search for the workflow and check its check box in order to select it.
-
Distributed Virtual Portgroups—If you choose the Distributed Virtual Portgroup in the network policy that is associated with the container, then you must perform the following steps manually:
-
Choose Virtual Network Type and enter its name as required in a workflow associated with the container.
-
Choose a specific workflow. This type of workflow depends on which gateway type was associated with the container. For a Linux gateway, choose Application Container Setup workflow. For a CISCO ASA gateway type, choose the Application Container with ASA Gateway.
-
Edit or clone the required workflow by going to the Cisco UCS Director Orchestrator application and editing the workflow on the Workflow Designer page.
-
In the workflow window, double-click the Allocate Container VM Resources task.
-
Choose the required virtual network type (either Distributed Virtual Portgroup or Distributed Virtual Portgroup N1K).
-
Specify the primary DVSwitch and alternate DVSwitch names.
-
Click Save to save the workflow.
-
 Feedback