- About EMC VPLEX
- Adding an EMC VPLEX Account
- System Requirements
- Assigning a Pod to a Cluster
- Viewing VPLEX Engines
- Rediscovering a Storage Array
- Storage Volume Claiming
- Extents
- VPLEX Storage Devices
- Consistency Groups
- Distributed Devices and RuleSets
- Initiators
- Virtual Volumes
- Viewing Target Ports
- Storage Views
- Logging Volumes
- Managing VPLEX System Tasks
EMC VPLEX
About EMC VPLEX
VPLEX is an EMC technology that provides a virtual storage system and access to data in the private cloud. A VPLEX can be implemented on Cisco UCS Director through a pod deployment such as Vblock, or as a standalone device. VPLEX has the following capabilities:
-
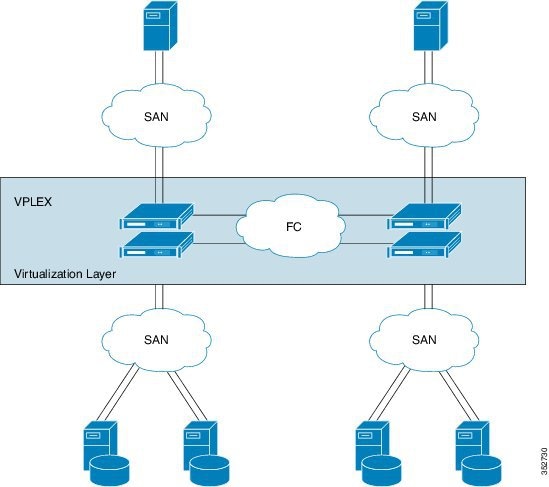
Uses a single interface for a multi-vendor high-availability storage and compute infrastructure to dynamically move applications and data across different compute and storage locations in real time, with no outage required. VPLEX combines scaled clustering with distributed cache coherence intelligence within the same data center, across a campus, or within a specific geographical region. Cache coherency manages the cache so that data is not lost, corrupted, or overwritten.
-
Dynamically makes data available for organizations. For example, a business can be sustained through a failure that would have traditionally required outages or manual restore procedures.
-
Presents and maintains the same data consistently within and between sites, and enables distributed data collaboration.
-
Establishes itself between ESX hosts that act as servers for virtual machines (VMs) and storage in a storage area network (SAN) where data can be extended within, between, and across pods.
EMC VPLEX Technology
EMC VPLEX encapsulates traditional physical storage array devices and applies three layers of logical abstraction to them. The logical relationships of each layer are shown in the Figure below.
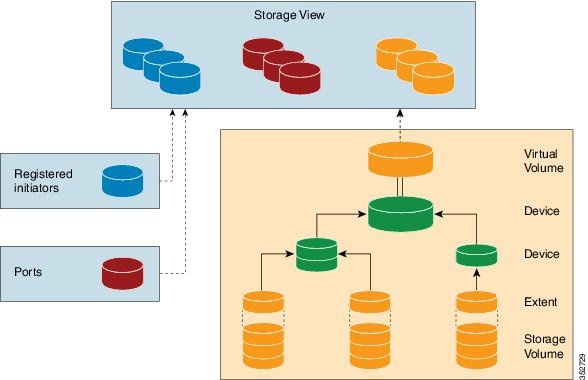
VPLEX uses extents to divide storage volumes. Extents can be all or part of the underlying storage volume. VPLEX aggregates extents and applies RAID protection in the device layer. Devices are constructed using one or more extents.
At the top layer of the VPLEX storage structures are virtual volumes, which are created by underlying devices and inherit their size. A virtual volume can be a single contiguous volume that is distributed over two or more storage volumes.
VPLEX exposes virtual volumes to hosts that need to use them with its front-end (FE) ports, which are visible to hosts. Access to virtual volumes is controlled through storage views. Storage views act as logical containers that determine host initiator access to VPLEX FE ports and virtual volumes.
VPLEX can use a Local or Metro external hardware interface depending on the network implementation described in the following sections. For more information on VPLEX solutions for VPLEX Local or Metro see the Data Center Interconnect Design Guide for Virtualized Workload Mobility with Cisco, EMC, and VMware.
VPLEX Local
Use VPLEX Local when homogeneous or heterogeneous storage systems are integrated into a pod and data mobility is managed between the physical data storage entities.
VPLEX Metro
Use VPLEX Metro when access and data mobility is required between two locations that are separated by synchronous distances. VPLEX Metro allows a remote site to present logical unit numbers (LUNs) without needing physical storage for them. VPLEX Metro configurations help users to transparently move and share workloads, consolidate a pod, and optimize resource utilization across pods.
VPLEX Clustering Architecture
Managing the VPLEX Storage System for a Pod
The VPLEX virtual storage system technology for accessing data in the private cloud is associated with and supported by a pod. Cisco UCS Director collects data through the VPLEX Element Manager API and connects to the VPLEX server through HTTPS. After you establish a VPLEX account and associate a pod with a VPLEX cluster (made up of one, two, or four engines in a physical cabinet), you can configure, manage, and monitor the following VPLEX features in Cisco UCS Director:
-
Cluster inventory of ESX hosts and reports for two or more VPLEX directors that form a single fault-tolerant cluster and that are deployed as one to four engines.
-
VPLEX engine inventory and reports for an engine that contains two directors, management modules, and redundant power.
-
Director inventory and reports for the CPU module(s) that run GeoSynchrony, the core VPLEX software. Two directors are in each engine; each has dedicated resources that can function independently.
-
Port inventory and reports for Fast Ethernet ports and initiator ports.
-
VPLEX (local, metro, or global) data cache report for the temporary storage of recent writes and recently accessed data.
-
Storage volume inventory and reports for a logical unit number (LUN) exported from an array.
-
Extent management (create, delete, report) for a slice (range of blocks) of a storage volume.
-
Device management (create, delete, attach/detach mirror, report) for a RAID 1 device whose mirrors are in geographically separate locations.
-
Virtual volume management (create, modify, delete, report) for a virtual volume that can be distributed over two or more storage volumes that are presented to ESX hosts.
-
Storage views management (create, modify, delete, report) for a combination of registered initiators (hosts), front-end ports, and virtual volumes that are used to control host access to storage.
-
Recovery point for determining the amount of data that can be lost before a given failure event.
For more information about VPLEX use cases, see the EMC VPLEX Metro Functional Overview section of the Cisco Virtualized Workload Mobility Design Considerations chapter in the Data Center Interconnect Design Guide for Virtualized Workload Mobility with Cisco, EMC, and VMware.
Adding an EMC VPLEX Account
Cisco UCS Director tests the connection to the EMC VPLEX server. If that test is successful, it adds the VPLEX account and discovers all infrastructure elements in the storage system that are associated with that account. This discovery process and inventory collection cycle takes few minutes to complete.
The polling interval configured on the System Tasks tab on the window specifies the frequency of inventory collection. For more information about configuring the polling interval, see the Cisco UCS Director Network Devices Management Guide.
System Requirements
| Component | Requirement |
|---|---|
|
Networking |
Two Cisco Nexus 5000/5500 or 7000 Series switches Two Cisco UCS 6100 or 6200 Series Fabric Interconnects Cisco Nexus 1000V switch |
|
Computing |
One or multiple Cisco UCS chassis with modules that have two Fabric Extenders per chassis |
|
Storage |
EMC VNX, VMAX, Vblock, or VSPEX storage systems |
|
Cisco UCS Director |
See the Compatibility Matrix for all supported versions. |
|
Cisco UCS Director Bare Metal Agent |
See the Compatibility Matrix for all supported versions. |
|
Cisco UCS Director—resource reservation |
2 GB memory and minimum 3000-GHz CPU |
|
Cisco UCS Director Bare Metal Agent—resource reservation |
2 GB memory and minimum 2000-GHz CPU |
|
VMware (vCenter Server/ESXI/ESXi/vSphere, or Microsoft Hyper-V Manager) server |
See the Compatibility Matrix for all supported versions. |
Assigning a Pod to a Cluster
You must also create a pod with each VPLEX cluster (1 and 2).
| Step 1 | Choose . | ||||
| Step 2 | On the Storage page, choose the account under Multi-Domain Managers. | ||||
| Step 3 | Choose EMC VPLEX to expand the connected VPLEX device(s) and click the VPLEX device that you want. | ||||
| Step 4 | Choose Clusters and click the cluster that you want to assign to the pod. | ||||
| Step 5 | Click Assign to Pod. | ||||
| Step 6 | In the Assign Pod to Cluster page, complete the required field:
| ||||
| Step 7 | Click Submit. | ||||
| Step 8 | Repeat the previous steps to assign a pod to the other cluster. |
Unassigning a Pod from a Cluster
| Step 1 | Choose . |
| Step 2 | On the Storage page, choose the account under Multi-Domain Managers. |
| Step 3 | Choose EMC VPLEX to expand the connected VPLEX device(s) and click the VPLEX device you want. |
| Step 4 | Choose Clusters and click the cluster you want. |
| Step 5 | Click Unassign Pod. |
| Step 6 | In the Unassign Pod from Cluster page, click Submit to unassign the pod from the cluster. |
Viewing VPLEX Engines
| Step 1 | Choose . |
| Step 2 | On the Storage page, choose the account under Multi-Domain Managers. |
| Step 3 | Choose EMC VPLEX to expand the connected VPLEX device(s) and click the VPLEX device you want. |
| Step 4 | Choose Engines. Information displays for the VPLEX engines, such as the serial numbers, engine IDs, and operational status. |
| Step 5 | To view specific information about a specific engine, click on the engine and click View Details. Information about the director, director ID, port, hostname, cluster, and so on, is displayed. |
Rediscovering a Storage Array
Rediscover a storage array to view recently zoned and masked storage that has been presented to VPLEX.
| Step 1 | Choose . |
| Step 2 | On the Storage page, choose the account under Multi-Domain Managers. |
| Step 3 | Choose EMC VPLEX to expand the connected VPLEX device(s) and click the VPLEX device you want. |
| Step 4 | Choose Clusters and double-click the cluster you want to expand. |
| Step 5 | Choose Storage Arrays. |
| Step 6 | Click on a storage array. |
| Step 7 | Click Rediscover. |
| Step 8 | In the Rediscover Storage Array screen, click Submit. |
Storage Volume Claiming
Storage volumes are logical unit numbers (LUNs) that are exported from an array. The claim process ensures that only relevant storage volumes can be processed when presented to the VPLEX cluster.
Claiming a Storage Volume
| Step 1 | Choose . | ||||||||||
| Step 2 | On the Storage page, choose the account under Multi-Domain Managers. | ||||||||||
| Step 3 | Choose EMC VPLEX to expand the connected VPLEX device(s) and click the VPLEX device you want. | ||||||||||
| Step 4 | Choose Clusters and double-click the cluster you want to expand. | ||||||||||
| Step 5 | Choose Storage Volumes. | ||||||||||
| Step 6 | Click Claim. | ||||||||||
| Step 7 | In the Claim Storage Volume screen, complete the required fields, including the following:
| ||||||||||
| Step 8 | Click Submit. |
Unclaiming a Storage Volume
Storage volumes are logical unit numbers (LUNs) that are exported from an array. Unclaim storage volumes that are no longer relevant for processing by the VSPEX cluster.
| Step 1 | Choose . |
| Step 2 | On the Storage page, choose the account under Multi-Domain Managers. |
| Step 3 | Choose EMC VPLEX to expand the connected VPLEX device(s) and click the VPLEX device you want. |
| Step 4 | Choose Clusters and double-click the cluster you want to expand. |
| Step 5 | Choose Storage Volumes. |
| Step 6 | Choose the storage volume that you want to unclaim. |
| Step 7 | Click Unclaim. |
| Step 8 | In the Unclaim Storage Volume screen, click Submit to unclaim the storage volume. |
Extents
VPLEX uses extents to divide storage volumes. Extents can be all or part of the underlying storage volume. VPLEX aggregates extents and applies RAID protection in the device layer. Devices are constructed using one or more extents and can be combined into more complex RAID schemes and device structures as wanted.
 Note | Do not create smaller extents and then use devices to concatenate or stripe the extents. |
Creating an Extent
You can create an extent for a storage volume and specify its capacity.
| Step 1 | Choose . | ||||||||
| Step 2 | On the Storage page, choose the account under Multi-Domain Managers. | ||||||||
| Step 3 | Choose EMC VPLEX to expand the connected VPLEX device(s) and click the VPLEX device you want. | ||||||||
| Step 4 | Choose Clusters and double-click the cluster you want to expand. | ||||||||
| Step 5 | Choose Extents. | ||||||||
| Step 6 | Click Create. | ||||||||
| Step 7 | In the Create Extent screen, complete the required fields, including the following:
| ||||||||
| Step 8 | Click Submit. |
Deleting an Extent
| Step 1 | Choose . |
| Step 2 | On the Storage page, choose the account under Multi-Domain Managers. |
| Step 3 | Choose EMC VPLEX to expand the connected VPLEX device(s) and click the VPLEX device you want. |
| Step 4 | Choose Clusters and double-click the cluster you want to expand. |
| Step 5 | Choose Extents. |
| Step 6 | Choose the appropriate extent to delete. |
| Step 7 | Click Delete. |
| Step 8 | In the Delete Extent screen, click Submit to confirm your deletion. |
VPLEX Storage Devices
-
RAID-0—Provides a performance-oriented striped or dispersed data mapping technique.
-
RAID-1—Provides a mirroring data mapping technique to keep two (or more) devices in an identical state at all times. If one device fails, the operating system (OS) can continue, using the remaining disk(s).
- Concatenated RAID—Shows that data is concatenated across a linear collection of disks.
- Creating a VPLEX Storage Device
- Mirroring a VPLEX Storage Device
- Viewing a VPLEX Storage Device
- Detaching a Mirror from a VPLEX Storage Device
- Deleting a VPLEX Storage Device
Creating a VPLEX Storage Device
| Step 1 | Choose . | ||||||||||
| Step 2 | On the Storage page, choose the account under Multi-Domain Managers. | ||||||||||
| Step 3 | Choose EMC VPLEX to expand the connected VPLEX device(s) and click the VPLEX device you want. | ||||||||||
| Step 4 | Choose Clusters and double-click the cluster you want to expand. | ||||||||||
| Step 5 | Choose Devices. | ||||||||||
| Step 6 | Click Create. | ||||||||||
| Step 7 | In the Create Device screen, complete the required fields, including the following:
| ||||||||||
| Step 8 | Click Submit. |
Mirroring a VPLEX Storage Device
When a VPLEX storage device is mirrored, it creates a single view of storage data and makes this data accessible immediately to the host. This process eliminates the need for host-based mirroring, which saves the host CPU processing resources and increases high availability for critical applications.
| Step 1 | Choose . | ||||||
| Step 2 | On the Storage page, choose the account under Multi-Domain Managers. | ||||||
| Step 3 | Choose EMC VPLEX to expand the connected VPLEX device(s) and click the VPLEX device you want. | ||||||
| Step 4 | Choose Clusters and double-click the cluster you want to expand. | ||||||
| Step 5 | Choose Devices. | ||||||
| Step 6 | Click Attach Mirror. | ||||||
| Step 7 | In the Attach Local/Remote Mirror screen, complete the required fields, including the following:
| ||||||
| Step 8 | Click Submit. |
Viewing a VPLEX Storage Device
| Step 1 | Choose . |
| Step 2 | On the Storage page, choose the account under Multi-Domain Managers. |
| Step 3 | Choose EMC VPLEX to expand the connected VPLEX device(s) and click the VPLEX device you want. |
| Step 4 | Choose Clusters and double-click the cluster you want to expand. |
| Step 5 | Choose Devices. |
| Step 6 | Click View Details. |
| Step 7 | Click Submit. |
Detaching a Mirror from a VPLEX Storage Device
| Step 1 | Choose . |
| Step 2 | On the Storage page, choose the account under Multi-Domain Managers. |
| Step 3 | Choose EMC VPLEX to expand the connected VPLEX device(s) and click the VPLEX device you want. |
| Step 4 | Choose Clusters and double-click the cluster you want to expand. |
| Step 5 | Choose Devices. |
| Step 6 | Click Detach Mirror icon. |
| Step 7 | In the Detach Local/Remote Mirror dialog box, click Select. In the Select dialog box, choose the name of the mirrored device and click Submit to remove it from the VPLEX storage device. |
Deleting a VPLEX Storage Device
You can delete a single block storage device that uses storage from the cluster.
| Step 1 | Choose . |
| Step 2 | On the Storage page, choose the account under Multi-Domain Managers. |
| Step 3 | Choose EMC VPLEX to expand the connected VPLEX device(s) and click the VPLEX device you want. |
| Step 4 | Choose Clusters and double-click the cluster you want to expand. |
| Step 5 | Choose Devices. |
| Step 6 | Choose the appropriate device to delete. |
| Step 7 | Click Delete. |
| Step 8 | In the Delete Device dialog box, click Submit to confirm your deletion. |
Consistency Groups
Volumes are protected by consistency groups. If two data sets are dependent on one another (such as a database and a database log), they should be part of the same consistency group.
Virtual volumes are added to a consistency group when a consistency group is created. A consistency group ensures that there is application-dependent write consistency of application data on distributed virtual volumes within the system if a disaster occurs. The properties of the consistency group are then immediately applied to the added volumes.
-
Only volumes with visibility and storage-at-cluster properties that match those properties of the consistency group can be added to the consistency group.
-
The maximum number of volumes in a consistency group is 1000.
-
You should group together volumes used by the same application or host in a consistency group.
-
Only volumes with storage at both clusters (distributed volumes) are allowed in remote consistency groups.
-
If any of the specified volumes are already in the consistency group, these volumes are skipped.
-
When you initiate a detach rule for a consistency group, it takes 5 seconds to suspend the nonpreferred cluster and maintain input and output functions on the preferred cluster.
- Creating a Consistency Group
- Adding a Virtual Volume to an Existing Consistency Group
- Removing a Virtual Volume from a Consistency Group
- Enabling or Disabling a RecoverPoint for a Consistency Group
- Viewing a Consistency Group
- Deleting an Existing Consistency Group
Creating a Consistency Group
Consistency groups allow you to group volumes together and apply a set of properties to the entire group.
| Step 1 | Choose . | ||||||||||||||
| Step 2 | On the Storage page, choose the account under Multi-Domain Managers. | ||||||||||||||
| Step 3 | Choose EMC VPLEX to expand the connected VPLEX device(s) and click the VPLEX device you want. | ||||||||||||||
| Step 4 | Choose Clusters and double-click the cluster you want to expand. | ||||||||||||||
| Step 5 | Choose Consistency Groups. | ||||||||||||||
| Step 6 | Click Create. | ||||||||||||||
| Step 7 | In the Create Consistency Group page, complete the required fields, including the following:
| ||||||||||||||
| Step 8 | Click Submit. |
Adding a Virtual Volume to an Existing Consistency Group
You can add one or more virtual volumes to an existing consistency group.
Note | You can also add virtual volumes when you create a consistency group. |
| Step 1 | Choose . |
| Step 2 | On the Storage page, choose the account under Multi-Domain Managers. |
| Step 3 | Choose EMC VPLEX to expand the connected VPLEX device(s) and click the VPLEX device you want. |
| Step 4 | Choose Clusters and double-click the cluster you want to expand. |
| Step 5 | Choose Consistency Groups. |
| Step 6 | Choose Add Virtual Volumes. |
| Step 7 | In the Add Virtual Volume(s) to Consistency Groups page, click Select. |
| Step 8 | In the Select dialog box, choose the virtual volume(s) to add to the consistency group and click Select. |
| Step 9 | Click Submit. |
Removing a Virtual Volume from a Consistency Group
You can remove one or more virtual volumes from an existing consistency group.
| Step 1 | Choose . |
| Step 2 | On the Storage page, choose the account under Multi-Domain Managers. |
| Step 3 | Choose EMC VPLEX to expand the connected VPLEX device(s) and click the VPLEX device you want. |
| Step 4 | Choose Clusters and double-click the cluster you want to expand. |
| Step 5 | Choose Consistency Groups. |
| Step 6 | Click Remove Virtual Volumes. |
| Step 7 | In the Remove Virtual Volume(s) from Consistency Groups page, click Select. |
| Step 8 | In the Select dialog box, choose the virtual volume(s) to add to the consistency group and click Select. |
| Step 9 | Click Submit. |
Enabling or Disabling a RecoverPoint for a Consistency Group
A RecoverPoint can be enabled for a consistency group to provide any-point-in-time recovery for diversified storage environments both within and across pods to provide continuous data protection for operational and disaster recovery on VPLEX distributed virtual volumes within the VPLEX system. RecoverPoint can also be disabled for a consistency group.
| Step 1 | Choose . |
| Step 2 | On the Storage page, choose the account under Multi-Domain Managers. |
| Step 3 | Choose EMC VPLEX to expand the connected VPLEX device(s) and click the VPLEX device you want. |
| Step 4 | Choose Clusters and double-click the cluster you want to expand. |
| Step 5 | Choose Consistency Groups. |
| Step 6 | Click Enable/Disable Recoverpoint. |
| Step 7 | In the Enable/Disable Recoverpoint on Consistency Group page, choose either Enable or Disable from the Select Option drop-down list. |
| Step 8 | Click Submit. |
Viewing a Consistency Group
You can view the virtual volumes that belong to a consistency group.
| Step 1 | Choose . | ||
| Step 2 | On the Storage page, choose the account under Multi-Domain Managers. | ||
| Step 3 | Choose EMC VPLEX to expand the connected VPLEX device(s) and click the VPLEX device you want. | ||
| Step 4 | Choose Clusters and double-click the cluster you want to expand. | ||
| Step 5 | Choose Consistency Groups. | ||
| Step 6 | Choose the
consistency group that you want to view.
|
Deleting an Existing Consistency Group
| Step 1 | Choose . |
| Step 2 | On the Storage page, choose the account under Multi-Domain Managers. |
| Step 3 | Choose EMC VPLEX to expand the connected VPLEX device(s) and click the VPLEX device you want. |
| Step 4 | Choose Clusters and double-click the cluster you want to expand. |
| Step 5 | Choose Consistency Groups. |
| Step 6 | Choose the consistency group that you want to delete. |
| Step 7 | Click Delete. |
| Step 8 | In the Delete Consistency Groups confirmation dialog box, click Submit. |
Distributed Devices and RuleSets
Creating a distributed device allows you to use storage from both clusters in a single VPLEX cluster (plex).
Each distributed device that spans two VPLEX clusters must have a RuleSet assigned to it. The RuleSet defines which cluster is declared a preferred cluster that maintains access to the volume and which cluster should be declared the nonpreferred cluster in a failure event. Once these roles are declared, the clusters' distributed devices detach so that they can resume normal input and output operations (I/O).
- Viewing a RuleSet for a Distributed Device
- Creating a Distributed Device
- Deleting a Distributed Device
Viewing a RuleSet for a Distributed Device
Creating a Distributed Device
| Step 1 | Choose . | ||||||||||||||
| Step 2 | On the Storage page, choose the account under Multi-Domain Managers. | ||||||||||||||
| Step 3 | Choose EMC VPLEX to expand the connected VPLEX device(s) and click the VPLEX device you want. | ||||||||||||||
| Step 4 | Choose Distributed Devices. | ||||||||||||||
| Step 5 | Click Create. | ||||||||||||||
| Step 6 | In the Create Distributed Device screen, complete the required fields, including the following:
| ||||||||||||||
| Step 7 | Click Submit. |
Deleting a Distributed Device
| Step 1 | Choose . |
| Step 2 | On the Storage page, choose the account under Multi-Domain Managers. |
| Step 3 | Choose EMC VPLEX to expand the connected VPLEX device(s) and click the VPLEX device you want. |
| Step 4 | Choose Distributed Devices. |
| Step 5 | Choose the distributed device that you want to delete. |
| Step 6 | Click Delete. |
| Step 7 | In the Delete Distributed Device screen, click Submit to confirm your deletion. |
Initiators
An initiator is a host that is registered with a port so that it can access the VPLEX storage network.
Creating an Initiator
| Step 1 | Choose . | ||||||||||
| Step 2 | On the Storage page, choose the account under Multi-Domain Managers. | ||||||||||
| Step 3 | Choose EMC VPLEX to expand the connected VPLEX device(s) and click the VPLEX device you want. | ||||||||||
| Step 4 | Choose Clusters and double-click the cluster you want to expand. | ||||||||||
| Step 5 | Choose Initiators. | ||||||||||
| Step 6 | Click Register. | ||||||||||
| Step 7 | In the Register Host Initiator screen, complete the required fields, including the following:
| ||||||||||
| Step 8 | Click Submit. |
Viewing an Initiator
You can view an initiator host that has access to VPLEX storage:
| Step 1 | Choose . |
| Step 2 | On the Storage page, choose the account under Multi-Domain Managers. |
| Step 3 | Choose EMC VPLEX to expand the connected VPLEX device(s) and click the VPLEX device you want. |
| Step 4 | Choose Clusters and double-click the cluster you want to expand. |
| Step 5 | Choose Initiators. |
| Step 6 | Click the initiator you want and click View Details. |
Deleting an Initiator
You can delete an initiator that currently has VPLEX storage access.
| Step 1 | Choose . | ||
| Step 2 | On the Storage page, choose the account under Multi-Domain Managers. | ||
| Step 3 | Choose EMC VPLEX to expand the connected VPLEX device(s) and click the VPLEX device you want. | ||
| Step 4 | Choose Clusters and double-click the cluster you want to expand. | ||
| Step 5 | Choose Initiators. | ||
| Step 6 | Choose the name of the initiator host and click Delete. | ||
| Step 7 | In the Deregister Initiator Port confirmation screen, click Submit.
|
Virtual Volumes
VPLEX uses extents to divide storage volumes. Extents can be all or part of the underlying storage volume. VPLEX aggregates extents and applies RAID protection in the device layer. Devices are constructed using one or more extents.
At the top layer of the VPLEX storage structures are virtual volumes, which are created by underlying devices and inherit their size. A virtual volume can be a single contiguous volume that is distributed over two or more storage volumes.
VPLEX exposes virtual volumes to hosts that need to use them with its front-end (FE) ports, which are visible to hosts. Access to virtual volumes is controlled through storage views. Storage views act as logical containers that determine host initiator access to VPLEX FE ports and virtual volumes.
- Creating a Virtual Volume
- Enabling Remote Access on a Virtual Volume
- Expanding a Virtual Volume
- Viewing a Virtual Volume
- Deleting a Virtual Volume
Creating a Virtual Volume
| Step 1 | Choose . | ||||||
| Step 2 | On the Storage page, choose the account under Multi-Domain Managers. | ||||||
| Step 3 | Choose EMC VPLEX to expand the connected VPLEX device(s) and click the VPLEX device you want. | ||||||
| Step 4 | Choose Clusters and double-click the cluster you want to expand. | ||||||
| Step 5 | Choose Virtual Volumes. | ||||||
| Step 6 | Click Create. | ||||||
| Step 7 | In the Create Virtual Volume screen, complete the required fields, including the following:
| ||||||
| Step 8 | Click Submit. |
Enabling Remote Access on a Virtual Volume
You can allow remote access to a virtual volume for a host that needs to use it.
| Step 1 | Choose . | ||||
| Step 2 | On the Storage page, choose the account under Multi-Domain Managers. | ||||
| Step 3 | Choose EMC VPLEX to expand the connected VPLEX device(s) and click the VPLEX device you want. | ||||
| Step 4 | Choose Clusters and double-click the cluster you want to expand. | ||||
| Step 5 | Choose Virtual Volumes. | ||||
| Step 6 | Choose a virtual volume name from the list. | ||||
| Step 7 | Click Remote Access. | ||||
| Step 8 | In the Remote Access on Virtual Volume screen, complete the following required field:
| ||||
| Step 9 | Click Submit. |
Expanding a Virtual Volume
A virtual volume is presented to a host that needs to use it.
Note | A virtual volume can be expanded to include either extents or local devices. |
| Step 1 | Choose . | ||||||||
| Step 2 | On the Storage page, choose the account under Multi-Domain Managers. | ||||||||
| Step 3 | Choose EMC VPLEX to expand the connected VPLEX device(s) and click the VPLEX device you want. | ||||||||
| Step 4 | Choose Clusters and double-click the cluster you want to expand. | ||||||||
| Step 5 | Choose Virtual Volumes. | ||||||||
| Step 6 | Click Expand. | ||||||||
| Step 7 | In the Expand Virtual Volume screen, complete the required fields, including the following:
| ||||||||
| Step 8 | Click Submit. |
Viewing a Virtual Volume
You can view a single virtual volume from the cluster.
| Step 1 | Choose . |
| Step 2 | On the Storage page, choose the account under Multi-Domain Managers. |
| Step 3 | Choose EMC VPLEX to expand the connected VPLEX device(s) and click the VPLEX device you want. |
| Step 4 | Choose Clusters and double-click the cluster you want to expand. |
| Step 5 | Choose Virtual Volumes. |
| Step 6 | Choose the appropriate virtual volume to view. |
| Step 7 | Click View. Information about the virtual volume appears in a new view that describes the virtual volume attributes. |
Deleting a Virtual Volume
You can delete a single block storage device that uses storage from the cluster.
| Step 1 | Choose . |
| Step 2 | On the Storage page, choose the account under Multi-Domain Managers. |
| Step 3 | Choose EMC VPLEX to expand the connected VPLEX device(s) and click the VPLEX device you want. |
| Step 4 | Choose Clusters and double-click the cluster you want to expand. |
| Step 5 | Choose Virtual Volumes. |
| Step 6 | Choose the appropriate virtual volume to delete. |
| Step 7 | Click Delete. |
| Step 8 | In the Delete Virtual Volume screen, click Submit to confirm your deletion. |
Viewing Target Ports
| Step 1 | Choose . |
| Step 2 | On the Storage page, choose the account under Multi-Domain Managers. |
| Step 3 | Choose EMC VPLEX to expand the connected VPLEX device(s) and click the VPLEX device you want. |
| Step 4 | Choose Clusters and double-click the cluster you want to expand. |
| Step 5 | Choose Target Ports. |
| Step 6 | Click View Details to see more detailed information about an individual target port. |
Storage Views
VPLEX allows host access to virtual volumes through storage views. Storage views act as logical containers that determine host initiator access to VPLEX front-end (FE) ports and virtual volumes.
- Creating a Storage View
- Deleting a Storage View
- Adding an Initiator to a Storage View
- Removing an Initiator from a Storage View
- Adding a Virtual Volume to a Storage View
- Removing a Virtual Volume from a Storage View
- Adding a Port to a Storage View
- Removing a Port from a Storage View
Creating a Storage View
You can create a storage view that includes virtual volumes, and VPLEX ports to control host access to the virtual volumes.
| Step 1 | Choose . | ||||||
| Step 2 | On the Storage page, choose the account under Multi-Domain Managers. | ||||||
| Step 3 | Choose EMC VPLEX to expand the connected VPLEX device(s) and click the VPLEX device you want. | ||||||
| Step 4 | Choose Clusters and double-click the cluster you want to expand. | ||||||
| Step 5 | Choose Storage Views. | ||||||
| Step 6 | Click Create. | ||||||
| Step 7 | In the Create Storage View screen, complete the following fields:
| ||||||
| Step 8 | Click Submit. |
Deleting a Storage View
| Step 1 | Choose . | ||
| Step 2 | On the Storage page, choose the account under Multi-Domain Managers. | ||
| Step 3 | Choose EMC VPLEX to expand the connected VPLEX device(s) and click the VPLEX device you want. | ||
| Step 4 | Choose Clusters and double-click the cluster you want to expand. | ||
| Step 5 | Choose Storage Views. | ||
| Step 6 | Click Delete. | ||
| Step 7 | In the Delete Storage View confirmation screen, click Submit.
| ||
| Step 8 | Click Submit. |
Adding an Initiator to a Storage View
You can create a storage view that includes one or more initiator ports.
| Step 1 | Choose . |
| Step 2 | On the Storage page, choose the account under Multi-Domain Managers. |
| Step 3 | Choose EMC VPLEX to expand the connected VPLEX device(s) and click the VPLEX device you want. |
| Step 4 | Choose Clusters and double-click the cluster you want to expand. |
| Step 5 | Choose Storage Views. |
| Step 6 | Choose the storage view you want from the Storage Views panel. |
| Step 7 | Click Add Initiator. |
| Step 8 | In the Add Initiators to Storage View screen, click Select. |
| Step 9 | In the Select screen, choose one or more initiator host accounts to add to the storage view and click Select. |
| Step 10 | Click Submit. |
Removing an Initiator from a Storage View
You can remove one or more initiator ports from a storage view.
| Step 1 | Choose . |
| Step 2 | On the Storage page, choose the account under Multi-Domain Managers. |
| Step 3 | Choose EMC VPLEX to expand the connected VPLEX device(s) and click the VPLEX device you want. |
| Step 4 | Choose Clusters and double-click the cluster you want to expand. |
| Step 5 | Choose Storage Views. |
| Step 6 | Choose the storage view you want from the Storage Views panel. |
| Step 7 | Click Remove Initiator. |
| Step 8 | In the Remove Initiators from Storage View screen, click Select. |
| Step 9 | In the Select screen, choose one or more initiator host accounts to remove from the storage view and click Select. |
| Step 10 | Click Submit. |
Adding a Virtual Volume to a Storage View
You can create a storage view that includes virtual volumes.
| Step 1 | Choose . | ||||||
| Step 2 | On the Storage page, choose the account under Multi-Domain Managers. | ||||||
| Step 3 | Choose EMC VPLEX to expand the connected VPLEX device(s) and click the VPLEX device you want. | ||||||
| Step 4 | Choose Clusters and double-click the cluster you want to expand. | ||||||
| Step 5 | Choos Storage Views. | ||||||
| Step 6 | Choose the storage view you want from the Storage Views panel. | ||||||
| Step 7 | Click Add Virtual Volume. | ||||||
| Step 8 | In the Add Virtual Volume to Storage View screen, complete the required fields, including the following:
| ||||||
| Step 9 | Click Submit. |
Removing a Virtual Volume from a Storage View
| Step 1 | Choose . |
| Step 2 | On the Storage page, choose the account under Multi-Domain Managers. |
| Step 3 | Choose EMC VPLEX to expand the connected VPLEX device(s) and click the VPLEX device you want. |
| Step 4 | Choose Clusters and double-click the cluster you want to expand. |
| Step 5 | Choose Storage Views. |
| Step 6 | Choose the storage view you want from the Storage Views panel. |
| Step 7 | Click Remove Virtual Volume. |
| Step 8 | In the Remove Virtual Volume from Storage View screen, click Select from the Virtual volume field. |
| Step 9 | In the Select screen, choose a virtual volume and click Select. |
| Step 10 | Click Submit. |
Adding a Port to a Storage View
You can create a storage view that includes target ports. Target ports are front-end (FE) ports where the director port is connected to host initiators. These ports are visible to hosts and contain such information as their name, node worldwide number (WWN), port WWN, whether they are enabled, their Director IDs, and so on.
| Step 1 | Choose . |
| Step 2 | On the Storage page, choose the account under Multi-Domain Managers. |
| Step 3 | Choose EMC VPLEX to expand the connected VPLEX device(s) and click the VPLEX device you want. |
| Step 4 | Choose Clusters and double-click the cluster you want to expand. |
| Step 5 | Choose Storage Views. |
| Step 6 | Choose the storage view you want from the Storage Views panel. |
| Step 7 | Click Add Port. |
| Step 8 | In the Add Target Ports to Storage View screen, click Select. |
| Step 9 | In the Select screen, choose one or more target ports to add to the storage view and click Select. |
| Step 10 | Click Submit. |
Removing a Port from a Storage View
You can remove target port(s) from a storage view.
| Step 1 | Choose . |
| Step 2 | On the Storage page, choose the account under Multi-Domain Managers. |
| Step 3 | Choose EMC VPLEX to expand the connected VPLEX device(s) and click the VPLEX device you want. |
| Step 4 | Choose Clusters and double-click the cluster you want to expand. |
| Step 5 | Choose Storage Views. |
| Step 6 | Choose the storage view you want from the Storage Views panel. |
| Step 7 | Click Remove Port. |
| Step 8 | In the Remove Target Ports from Storage View screen, click Select. |
| Step 9 | In the Select screen, choose one or more target ports to remove from the storage view and click Select. |
| Step 10 | Click Submit. |
Logging Volumes
VPLEX uses logging volumes to track changes during a loss of connectivity or loss of a volume (mirror in a distributed device). You should create a logging volume on each cluster. Each logging volume must be large enough to contain one bit for every page of distributed storage space (approximately 10 gigabytes of logging volume space for every 320 terrabytes of distributed devices). The logging volumes can experience a lot of input and output during and after-link outages, so each logging volume should be striped across many disks for speed, and have a mirror on another fast disk to secure this information.
Creating a Logging Volume
| Step 1 | Choose . | ||||||||||
| Step 2 | On the Storage page, choose the account under Multi-Domain Managers. | ||||||||||
| Step 3 | Choose EMC VPLEX to expand the connected VPLEX device(s) and click the VPLEX device you want. | ||||||||||
| Step 4 | Choose Clusters and double-click the cluster you want to expand. | ||||||||||
| Step 5 | Choose Logging Volumes. | ||||||||||
| Step 6 | Click Create. | ||||||||||
| Step 7 | In the Create Logging Volume screen, complete the required fields, including the following:
| ||||||||||
| Step 8 | Click Submit. |
Adding a Mirror to a Logging Volume
| Step 1 | Choose . |
| Step 2 | On the Storage page, choose the account under Multi-Domain Managers. |
| Step 3 | Choose EMC VPLEX to expand the connected VPLEX device(s) and click the VPLEX device you want. |
| Step 4 | Choose Clusters and double-click the cluster you want to expand. |
| Step 5 | Choose Logging Volumes. |
| Step 6 | Choose a logging volume from the list. |
| Step 7 | Click Add Mirror. |
| Step 8 | In the Select screen, choose a storage volume and click Select. |
| Step 9 | Click Submit. The mirror is added to the logging storage volume. |
Deleting a Logging Volume
| Step 1 | Choose . |
| Step 2 | On the Storage page, choose the account under Multi-Domain Managers. |
| Step 3 | Choose EMC VPLEX to expand the connected VPLEX device(s) and click the VPLEX device you want. |
| Step 4 | Choose Clusters and double-click the cluster you want to expand. |
| Step 5 | Choose Logging Volumes. |
| Step 6 | Choose the appropriate logging volume to delete. |
| Step 7 | Click Delete. |
| Step 8 | In the Delete Logging Volume screen, click Submit to confirm your deletion. |
Managing VPLEX System Tasks
| Step 1 | Choose . | ||||||||
| Step 2 | On the Storage page, choose the account under Multi-Domain Managers. | ||||||||
| Step 3 | Choose EMC VPLEX to expand the connected VPLEX device(s) and click the VPLEX device you want. | ||||||||
| Step 4 | Choose System Tasks. | ||||||||
| Step 5 | Double-click the EMC VPLEX Tasks folder icon. | ||||||||
| Step 6 | Choose a VPLEX task and click Manage Task. | ||||||||
| Step 7 | In the Manage Task screen, complete the following fields:
| ||||||||
| Step 8 | Click Submit. | ||||||||
| Step 9 | If you want to run this VPLEX task, click Run Now. | ||||||||
| Step 10 | If you want to view this VPLEX task, click View Details. |
 Feedback