Drive Replacement
You can remove and install hard drives without removing the blade server from the chassis.
The drives supported in this blade server come with the drive sled attached. Spare drive sleds are not available. A list of currently supported drives is in the specification sheets at this URL:http://www.cisco.com/c/en/us/products/servers-unified-computing/ucs-b-series-blade-servers/datasheet-listing.html
Before upgrading or adding a drive to a running blade server, check the service profile in Cisco UCS Manager and make sure the new hardware configuration will be within the parameters allowed by the service profile.
 Caution |
To prevent ESD damage, wear grounding wrist straps during these procedures. |
Removing a Blade Server Drive
Procedure
|
Step 1 |
Push the button to release the ejector, and then pull the hard drive from its slot. 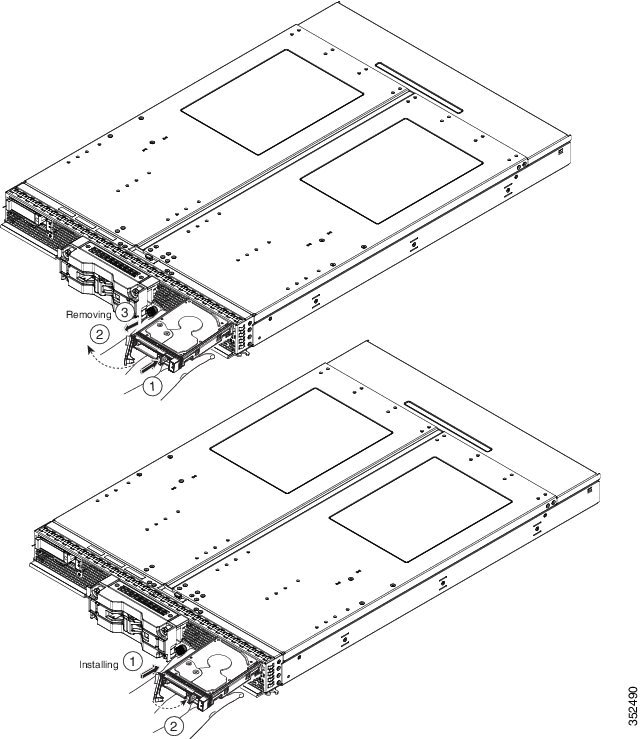 |
|
Step 2 |
Place the hard drive on an antistatic mat or antistatic foam if you are not immediately reinstalling it in another blade server. |
|
Step 3 |
Install a blank faceplate (N20-BBLKD) to keep dust out of the blade server if the slot will remain empty. |
Installing a Blade Server Drive
Procedure
|
Step 1 |
Place the hard drive lever into the open position by pushing the release button. |
|
Step 2 |
Gently slide the hard drive into the opening in the blade server until it seats into place and the latch fully engages. |
|
Step 3 |
Push the hard drive lever into the closed position. You can use Cisco UCS Manager to format and configure RAID services. See the UCS Manager configuration guide for your software release for details on RAID configuration. If you need to move a RAID cluster from one server to another, refer to the "Moving a RAID Cluster" section of the "Troubleshooting Server Hardware" chapter of the Cisco UCS Troubleshooting Guide. |


 Feedback