- Index
- New and Changed Information
- Preface
- Fabric Overview
- Configuring and Managing VSANs
- SAN Device Virtualization
- Creating Dynamic VSANs
- Configuring and Managing Zones
- Distributing Device Alias Services
- Configuring FCoE
- Configuring Fibre Channel Routing Services and Protocols
- Dense Wavelength Division Multiplexing
- Managing FLOGI, Name Server, FDMI, and RSCN Databases
- Discovering SCSI Targets
- Configuring FICON
- Advanced Features and Concepts
Cisco Fabric Manager Fabric Configuration Guide
Bias-Free Language
The documentation set for this product strives to use bias-free language. For the purposes of this documentation set, bias-free is defined as language that does not imply discrimination based on age, disability, gender, racial identity, ethnic identity, sexual orientation, socioeconomic status, and intersectionality. Exceptions may be present in the documentation due to language that is hardcoded in the user interfaces of the product software, language used based on RFP documentation, or language that is used by a referenced third-party product. Learn more about how Cisco is using Inclusive Language.
- Updated:
- December 21, 2009
Chapter: Managing FLOGI, Name Server, FDMI, and RSCN Databases
Managing FLOGI, Name Server, FDMI, and RSCN Databases
This chapter describes the fabric login (FLOGI) database, the name server features, the Fabric-Device Management Interface, and Registered State Change Notification (RSCN) information provided in the Cisco MDS 9000 Family. It includes the following sections:
•![]() FDMI
FDMI
•![]() RSCN
RSCN
About FLOGI
In a Fibre Channel fabric, each host or disk requires an FC ID. If the required device is displayed in the FLOGI table, the fabric login is successful. Examine the FLOGI database on a switch that is directly connected to the host HBA and connected ports. See the "Default Company ID List" section on page 13-8 and the "Switch Interoperability" section on page 13-8.
Displaying FLOGI Details
To verify that a storage device is in the fabric login (FLOGI) table using Fabric Manager, follow these steps:
Step 1 ![]() Expand Switches, expand Interfaces and then select FC Physical.
Expand Switches, expand Interfaces and then select FC Physical.
You see the interface configuration in the Information pane.
Step 2 ![]() Click the FLOGI tab.
Click the FLOGI tab.
You see all end devices that are logged into the fabric (see Figure 10-1).
Figure 10-1 FLOGI Physical Interfaces

Name Server Proxy
The name server functionality maintains a database containing the attributes for all hosts and storage devices in each VSAN. Name servers allow a database entry to be modified by a device that originally registered the information.
The proxy feature is useful when you want to modify (update or delete) the contents of a database entry that was previously registered by a different device.
This section includes the following topics:
•![]() About Registering Name Server Proxies
About Registering Name Server Proxies
•![]() Registering Name Server Proxies
Registering Name Server Proxies
•![]() About Rejecting Duplicate pWWN
About Rejecting Duplicate pWWN
•![]() Viewing Name Server Database Entries
Viewing Name Server Database Entries
About Registering Name Server Proxies
All name server registration requests come from the same port whose parameter is registered or changed. If it does not, then the request is rejected.
This authorization enables WWNs to register specific parameters for another node.
Registering Name Server Proxies
To register the name server proxy using Fabric Manager, follow these steps:
Step 1 ![]() Expand a fabric, expand a VSAN, and then select Advanced.
Expand a fabric, expand a VSAN, and then select Advanced.
You see the VSAN advanced configuration in the Information pane.
Step 2 ![]() Click the NS Proxies tab.
Click the NS Proxies tab.
You see the existing name server proxy for the selected VSAN shown in Figure 10-2.
Figure 10-2 Name Server Proxies
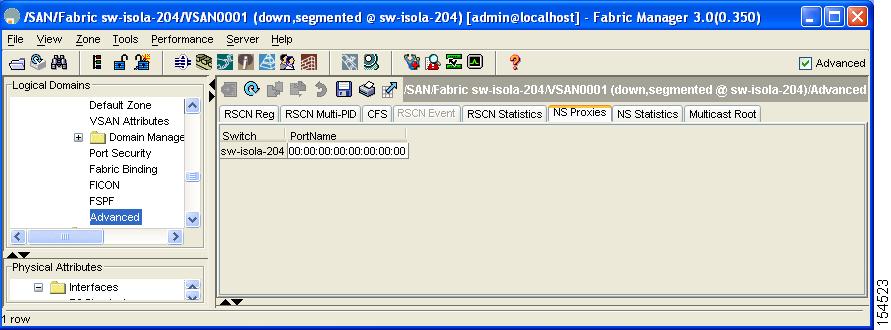
Step 3 ![]() Double-click the PortName field to register a new name server proxy.
Double-click the PortName field to register a new name server proxy.
Step 4 ![]() Click Apply Changes to save these changes, or click Undo Changes to cancel any unsaved changes.
Click Apply Changes to save these changes, or click Undo Changes to cancel any unsaved changes.
About Rejecting Duplicate pWWN
You can prevent a malicious or accidental login when using another device's pWWN. These pWWNs are allowed to log in to the fabric and replace the first device in the name server database.
Rejecting Duplicate pWWNs
To reject duplicate pWWNs, refer to the Cisco MDS 9000 Family CLI Configuration Guide. About Name Server Database Entries
The name server stores name entries for all hosts in the FCNS database. The name server permits an Nx port to register attributes during a PLOGI (to the name server) to obtain attributes of other hosts. These attributes are deregistered when the Nx port logs out either explicitly or implicitly.
In a multiswitch fabric configuration, the name server instances running on each switch shares information in a distributed database. One instance of the name server process runs on each switch.
Viewing Name Server Database Entries
To view the name server database using Device Manager, follow these steps:
Step 1 ![]() Click FC > Name Server.
Click FC > Name Server.
You see the Name Server dialog box as shown in Figure 10-3.
Figure 10-3 Name Server Dialog Box
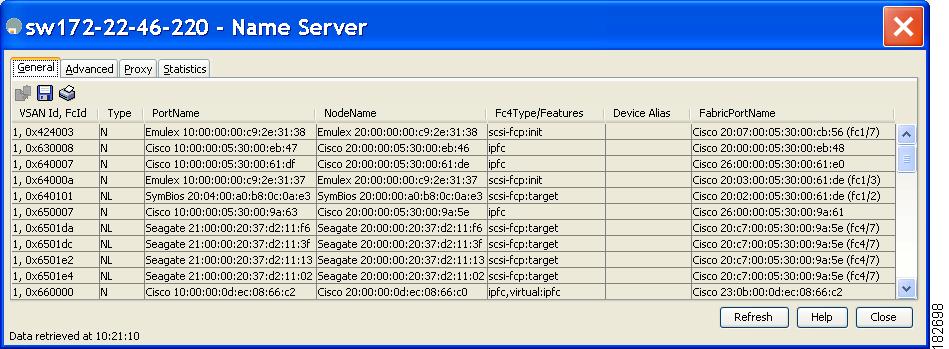
The General tab is the default tab; you see the name server database.
Step 2 ![]() Click the Statistics tab.
Click the Statistics tab.
You see the name server statistics.
Step 3 ![]() Click Close to close the dialog box.
Click Close to close the dialog box.
FDMI
Cisco MDS 9000 Family switches provide support for the Fabric-Device Management Interface (FDMI) functionality, as described in the FC-GS-4 standard. FDMI enables management of devices such as Fibre Channel Host Bus Adapters (HBAs) through in-band communications. This addition complements the existing Fibre Channel name server and management server functions.
Using the FDMI functionality, the NX-OS software can extract the following management information about attached HBAs and host operating systems without installing proprietary host agents:
•![]() Manufacturer, model, and serial number
Manufacturer, model, and serial number
•![]() Node name and node symbolic name
Node name and node symbolic name
•![]() Hardware, driver, and firmware versions
Hardware, driver, and firmware versions
•![]() Host operating system (OS) name and version number
Host operating system (OS) name and version number
All FDMI entries are stored in persistent storage and are retrieved when the FDMI process is started.
Displaying FDMI
To display the FDMI database information using Device Manager, choose FC > Advanced > FDMI. You see the FDMI dialog box.
RSCN
The Registered State Change Notification (RSCN) is a Fibre Channel service that informs hosts about changes in the fabric. Hosts can receive this information by registering with the fabric controller (through SCR). These notifications provide a timely indication of one or more of the following events:
•![]() Disks joining or leaving the fabric.
Disks joining or leaving the fabric.
•![]() A name server registration change.
A name server registration change.
•![]() A new zone enforcement.
A new zone enforcement.
•![]() IP address change.
IP address change.
•![]() Any other similar event that affects the operation of the host.
Any other similar event that affects the operation of the host.
This section includes the following topics:
•![]() Configuring the multi-pid Option
Configuring the multi-pid Option
•![]() RSCN Timer Configuration Distribution Using CFS
RSCN Timer Configuration Distribution Using CFS
•![]() Configuring the RSCN Timer with CFS
Configuring the RSCN Timer with CFS
About RSCN Information
Apart from sending these events to registered hosts, a switch RSCN (SW-RSCN) is sent to all reachable switches in the fabric.

Note ![]() The switch sends an RSCN to notify registered nodes that a change has occurred. It is up to the nodes to query the name server again to obtain the new information. The details of the changed information are not delivered by the switch in the RSCN sent to the nodes.
The switch sends an RSCN to notify registered nodes that a change has occurred. It is up to the nodes to query the name server again to obtain the new information. The details of the changed information are not delivered by the switch in the RSCN sent to the nodes.
Displaying RSCN Information
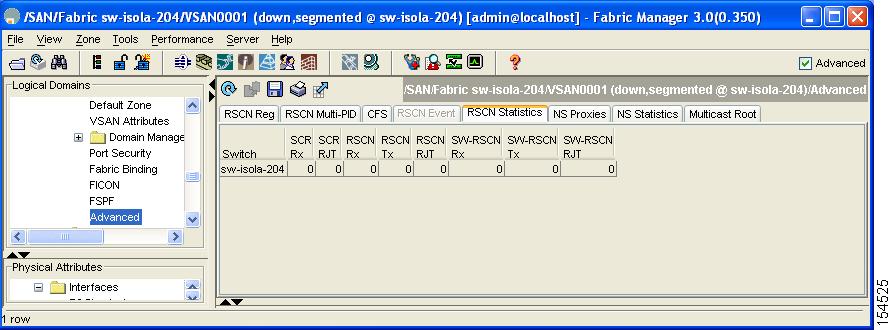
To display RSCN information using Fabric Manager, follow these steps:
Step 1 ![]() Expand a fabric, expand a VSAN and then select Advanced.
Expand a fabric, expand a VSAN and then select Advanced.
You see the VSAN advanced configuration in the Information pane.
Step 2 ![]() Select the RSCN Reg tab or the RSCN Statistics tab (see Figure 10-4).
Select the RSCN Reg tab or the RSCN Statistics tab (see Figure 10-4).
Figure 10-4 RSCN Statistics
About the multi-pid Option
If the RSCN multi-pid option is enabled, then RSCNs generated to the registered Nx ports may contain more than one affected port IDs. In this case, zoning rules are applied before putting the multiple affected port IDs together in a single RSCN. By enabling this option, you can reduce the number of RSCNs. For example: Suppose you have two disks (D1, D2) and a host (H) connected to switch 1. Host H is registered to receive RSCNs. D1, D2 and H belong to the same zone. If disks D1 and D2 are online at the same time, then one of the following applies:
•![]() The multi-pid option is disabled on switch 1: two RSCNs are generated to host H—one for the disk D1 and another for disk D2.
The multi-pid option is disabled on switch 1: two RSCNs are generated to host H—one for the disk D1 and another for disk D2.
•![]() The multi-pid option is enabled on switch 1: a single RSCN is generated to host H, and the RSCN payload lists the affected port IDs (in this case, both D1 and D2).
The multi-pid option is enabled on switch 1: a single RSCN is generated to host H, and the RSCN payload lists the affected port IDs (in this case, both D1 and D2).
Note ![]() Some Nx ports may not understand multi-pid RSCN payloads. If so, disable the RSCN multi-pid option.
Some Nx ports may not understand multi-pid RSCN payloads. If so, disable the RSCN multi-pid option.
Configuring the multi-pid Option
To configure the multi-pid option using Fabric Manager, follow these steps:
Step 1 ![]() Expand a fabric, expand a VSAN and then select Advanced.
Expand a fabric, expand a VSAN and then select Advanced.
You see the VSAN advanced configuration in the Information pane.
Step 2 ![]() Click the RSCN Multi-PID tab.
Click the RSCN Multi-PID tab.
You see the screen shown in Figure 10-5.
Figure 10-5 RSCN Multi-PID
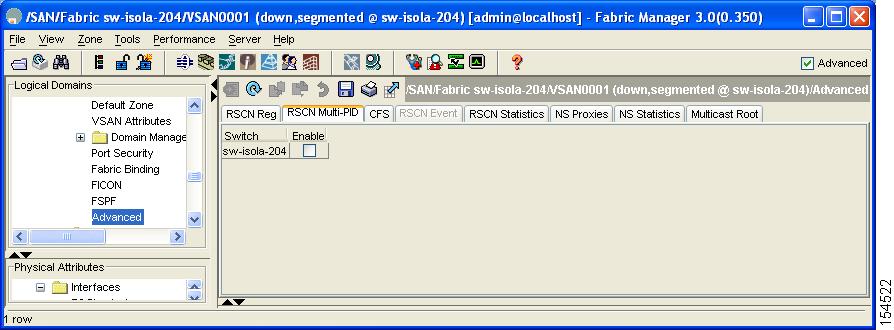
Step 3 ![]() Check the Enable check box.
Check the Enable check box.
Step 4 ![]() Click Apply Changes to save these changes, or click Undo Changes to cancel any unsaved changes.
Click Apply Changes to save these changes, or click Undo Changes to cancel any unsaved changes.
Clearing RSCN Statistics
You can clear the counters and later view the counters for a different set of events. For example, you can keep track of how many RSCNs or SW-RSCNs are generated on a particular event (such as ONLINE or OFFLINE events). You can use these statistics to monitor responses for each event in the VSAN.
To clear the RSCN statistics for the specified VSAN, refer to the Cisco MDS 9000 Family CLI Configuration Guide.
RSCN Timer Configuration Distribution Using CFS
Because the timeout value for each switch is configured manually, a misconfiguration occurs when different switches time out at different times. This means different N-ports in a network can receive RSCNs at different times. Cisco Fabric Services (CFS) alleviates this situation by automatically distributing configuration information to all switches in a fabric. This also reduces the number of SW-RSCNs.
RSCN supports two modes, distributed and nondistributed. In distributed mode, RSCN uses CFS to distribute configuration to all switches in the fabric. In nondistributed mode, only the configuration commands on the local switch are affected.
Note ![]() All configuration commands are not distributed. Only the rscn event-tov tov vsan vsan command is distributed.
All configuration commands are not distributed. Only the rscn event-tov tov vsan vsan command is distributed.
The RSCN timer is registered with CFS during initialization and switchover. For high availability, if the RSCN timer distribution crashes and restarts or a switchover occurs, it resumes normal functionality from the state prior to the crash or switchover.
Note ![]() Before performing a downgrade, make sure that you revert the RCSN timer value in your network to the default value. Failure to do so will disable the links across your VSANs and other devices.
Before performing a downgrade, make sure that you revert the RCSN timer value in your network to the default value. Failure to do so will disable the links across your VSANs and other devices.
Compatibility across various Cisco MDS NX-OS releases during an upgrade or downgrade is supported by conf-check provided by CFS. If you attempt to downgrade from Cisco MDS SAN-OS Release 3.0, you are prompted with a conf-check warning. You are required to disable RSCN timer distribution support before you downgrade.
By default, the RSCN timer distribution capability is disabled and is therefore compatible when upgrading from any Cisco MDS SAN-OS release earlier than Release 3.0.
Configuring the RSCN Timer with CFS
To configure the RSCN timer with CFS using Fabric Manager, follow these steps:
Step 1 ![]() Expand a fabric, expand a VSAN and then select Advanced in the Logical Domains pane.
Expand a fabric, expand a VSAN and then select Advanced in the Logical Domains pane.
Step 2 ![]() Select the RSCN Event tab.
Select the RSCN Event tab.
You see the VSAN advanced configuration in the Information pane shown in Figure 10-6.
Figure 10-6 VSAN Advanced Configuration
Step 3 ![]() Double-click the TimeOut value to change the value (in milliseconds) for the selected VSAN.
Double-click the TimeOut value to change the value (in milliseconds) for the selected VSAN.
Step 4 ![]() Click Apply Changes to save these changes, or click Undo Changes to cancel any unsaved changes.
Click Apply Changes to save these changes, or click Undo Changes to cancel any unsaved changes.
Default Settings
Table 10-1 lists the default settings for RSCN.
|
|
|
|---|---|
RSCN timer value |
2000 milliseconds for Fibre Channel VSANs |
RSCN timer configuration distribution |
Disabled |
 Feedback