Performing Common Tasks
This chapter contains the following sections:
- Performing Common Tasks
- Logging In
- Adding a Tenant
- Adding a User
- Changing Your Own User Credentials
- Deploying Endpoint Groups and Contracts for a Three-Tier Application
Performing Common Tasks
 Note | You can find detailed procedures of many common tasks using the API in the Cisco APIC Getting Started Guide. |
This section provides simple examples of typical tasks that are required in order to create a tenant and deploy an application. These are the general steps:
-
Logging in—Open a session to perform configuration tasks.
-
Creating a tenant—Create a private domain within the fabric for a tenant company who will host an application.
-
Creating a user—Create an account for the tenant's administrator, who will deploy and maintain the tenant's application.
-
Deploying an application—Configure the endpoint groups and contracts in a tenant network to connect the servers needed to host an application.
Note | In the examples, the JSON and XML structures have been expanded with line feeds, spaces, and indentations for readability. |
Logging In
You can log in to the APIC REST API by sending a valid username and password in a data structure to the aaaLogin API method, as described in Authenticating and Maintaining an API Session. Following a successful login, you must periodically refresh the session.
The following examples show how to log in as an administrator, refresh the session during configuration, and log out using XML and JSON.
Example: Using the XML API to Authenticate a User
This example logs in a user by using an XML data structure that contains the username and password:
POST https://192.0.20.123/api/aaaLogin.xml

<aaaUser name="georgewa" pwd="paSSword1"/>
This example shows the response upon a successful login:
<imdata>
  <aaaLogin
    token=
"mk/i+LHZMhFQ47YyMlfZOjmUQQV4PXwFAY/6Dyg5Bm7PC0SVdm
MVWeOlLw69AoNoRVziR8GQeNqPbX/Vu92PxWyPjGx7kOQpoTaUY
P4Y2NkBwRfl5fEDwUe5WnGl3VoBXF4nrc8QSG8N1UWCuIFIyt9O
OzgsLG58fTf4OPCUqQL="
    refreshTimeoutSeconds="300" lastName="Washington" firstName="George">
      <aaaUserDomain name="all" rolesR="0" rolesW="2">
        <aaaReadRoles/>
        <aaaWriteRoles>
          <role name="admin"/>
        </aaaWriteRoles>
      </aaaUserDomain>
      <aaaUserDomain name="common" rolesR="0" rolesW="1">
        <aaaReadRoles/>
        <aaaWriteRoles>
          <role name="read-only"/>
        </aaaWriteRoles>
      </aaaUserDomain>
    <DnDomainMapEntry dn="uni/tn-common" readPrivileges="0" writePrivileges="3"/>
  </aaaLogin>
</imdata>
The response contains a session timeout period and a session token, along with domain and role information about the user.
This example refreshes the session using the aaaRefresh API method:
GET https://192.0.20.123/api/aaaRefresh.xml
This example shows the response upon a successful session refresh:
<?xml version="1.0" encoding="UTF-8"?>
<imdata>
  <aaaLogin
    token=
"mk/i+LHZMhFQ47YyMlfZOua51veZ5mdbJAbHG7vjKVJ7QAuUDW
YGGkAdwSxjjcPYK/4Hav3QdZN/E7zJ/Rhc87tmpihVWpkP42VqU
D4aeELVQULz97ZpKnGfF0ki9vqBYkCYRg0vMstXO8IhxNYLtlC8
rxzgZFti+6biMQ+boRx="
    refreshTimeoutSeconds="0"
    lastName=""
    firstName=""/>
</imdata>
This example logs out a user using the aaaLogout API method:
POST https://192.0.20.123/api/aaaLogout.json

<aaaUser name="admin" />
This example shows the response upon a successful logout:
<?xml version="1.0" encoding="UTF-8"?>
<imdata>
</imdata>
Example: Using the JSON API to Authenticate a User
This example logs in a user by using a JSON data structure that contains the username and password:
POST https://192.0.20.123/api/aaaLogin.json

{
  "aaaUser":{
    "attributes":{
      "name":"georgewa",
      "pwd":"paSSword1"
    }
  }
}
This example shows the response upon a successful login:
{
  "imdata":[{
      "aaaLogin":{
        "attributes":{
          "token":"token":
"GkZl5NLRZJl5+jqChouaZ9CYjgE58W/pMccR+LeXmdO0obG9NB
Iwo1VBo7+YC1oiJL9mS6I9qh62BkX+Xddhe0JYrTmSG4JcKZ4t3
bcP2Mxy3VBmgoJjwZ76ZOuf9V9AD6Xl83lyoR4bLBzqbSSU1R2N
IgUotCGWjZt5JX6CJF0=",
          "refreshTimeoutSeconds":"300",
          "lastName":"Washington",
          "firstName":"George"
        },
        "children":[{
            "aaaUserDomain":{
              "attributes":{
                "name":"all",
                "rolesR":"0",
                "rolesW":"2"
              },
              "children":[{
                  "aaaReadRoles":{
                    "attributes":{}
                  }
                }, {
                  "aaaWriteRoles":{
                    "attributes":{},
                    "children":[{
                        "role":{
                          "attributes":{
                            "name":"admin"
                          }
                        }
                      }
                    ]
                  }
                }
              ]
            }
          }, {
            "aaaUserDomain":{
              "attributes":{
                "name":"common",
                "rolesR":"0",
                "rolesW":"1"
              },
              "children":[{
                  "aaaReadRoles":{
                    "attributes":{}
                  }
                }, {
                  "aaaWriteRoles":{
                    "attributes":{},
                    "children":[{
                        "role":{
                          "attributes":{
                            "name":"read-only"
                          }
                        }
                      }
                    ]
                  }
                }
              ]
            }
          }, {
            "DnDomainMapEntry":{
              "attributes":{
                "dn":"uni/tn-common",
                "readPrivileges":"0",
                "writePrivileges":"3"
              }
            }
          }
        ]
      }
    }
  ]
}
The response contains a session timeout period and a session token, along with domain and role information about the user.
This example refreshes the session using the aaaRefresh API method:
GET https://192.0.20.123/api/aaaRefresh.json
This example shows the response upon a successful session refresh:
{
  "imdata":[{
      "aaaLogin":{
        "attributes":{
          "token":
"Zs8jf2rcseiiYydx9WbyRVOScWs6c0Orti7EBg1H02jt0JV9oe
icX1ULLquI+LCN/93cAf46AErXpT4kN0mrCQRcCMRAl6m0ObT/r
G4D9UTm6/NNnqzhntCWTKt9IovTFDpD8Ocx1oXn2jpmS6PYDBJt
Wp4rIAu11sdM8BA24g6=",
          "refreshTimeoutSeconds":"0",
          "lastName":"",
          "firstName":""
        }
      }
    }
  ]
}
This example logs out a user using the aaaLogout API method:
POST https://192.0.20.123/api/aaaLogout.json

{
  "aaaUser":{
    "attributes":{
      "name":"georgewa"
    }
  }
}
This example shows the response upon a successful logout:
{
  "imdata":[]
}
Adding a Tenant
A tenant is a policy owner in the virtual fabric. A tenant can be either a private or a shared entity. For example, you can create a securely partitioned private tenant or a tenant with contexts and bridge domains shared by other tenants. A shared type of tenant is typically named common, default, or infra.
In the management information model, a tenant is represented by a managed object (MO) of class fv:Tenant. According to the Cisco APIC Management Information Model Reference, an object of the fv:Tenant class is a child of the policy resolution universe (uni) class and has a distinguished name (DN) format of uni/tn-[name].
The following examples show how to add a new tenant named ExampleCorp using XML and JSON.
Example: Using the XML API to Add a Tenant
To create a new tenant, you must specify the class and sufficient naming information, either in the message body or in the URI.
To create a new tenant named ExampleCorp using the XML API, send this HTTP POST message:
POST https://192.0.20.123/api/mo/uni.xml

<fvTenant name="ExampleCorp"/>
Alternatively, you can name the tenant in the URI, as in this example:
POST https://192.0.20.123/api/mo/uni/tn-ExampleCorp.xml

<fvTenant />
If a response is requested (by appending ?rsp-subtree=modified to the POST URI), a successful operation returns the following response body:
<imdata>
    <fvTenant
        instanceId="0:0"
        childAction="deleteNonPresent"
        dn="uni/tn-ExampleCorp"
        lcOwn="local"
        name="ExampleCorp"
        replTs="never"
        rn=""
        status="created"
    />
</imdata>
To delete the tenant, send this HTTP DELETE message:
DELETE https://192.0.20.123/api/mo/uni/tn-ExampleCorp.xml
Alternatively, you can send an HTTP POST message with sufficient naming information and with status="deleted" in the fv:Tenant attributes, as in this example:
POST https://192.0.20.123/api/mo/uni.xml

<fvTenant name="ExampleCorp" status="deleted"/>
Example: Using the JSON API to Add a Tenant
To create a new tenant, you must specify the class and sufficient naming information, either in the message body or in the URI.
To create a new tenant using the JSON API, send this HTTP POST message:
POST https://192.0.20.123/api/mo/uni.json

{
  "fvTenant" : {
    "attributes" : {
      "name" : "ExampleCorp"
    }
  }
}
Alternatively, you can name the tenant in the URI, as in this example:
POST https://192.0.20.123/api/mo/uni/tn-ExampleCorp.json

{
  "fvTenant" : {
    "attributes" : {
    }
  }
}
If a response is requested (by appending ?rsp-subtree=modified to the POST URI), a successful operation returns the following response body:
{
  "imdata" :
  [{
      "fvTenant" : {
        "attributes" : {
          "instanceId" : "0:0",
          "childAction" : "deleteNonPresent",
          "dn" : "uni/tn-ExampleCorp",
          "lcOwn" : "local",
          "name" : "ExampleCorp",
          "replTs" : "never",
          "rn" : "",
          "status" : "created"
        }
      }
    }
  ]
}
To delete the tenant, send this HTTP DELETE message:
DELETE https://192.0.20.123/api/mo/uni/tn-ExampleCorp.json
Alternatively, you can send an HTTP POST message with sufficient naming information and with "status" : "deleted" in the fv:Tenant attributes, as in this example:
POST https://192.0.20.123/api/mo/uni.json

{
  "fvTenant" : {
    "attributes" : {
      "name" : "ExampleCorp",
      "status" : "deleted"
    }
  }
}
Adding a User
An APIC user account contains, in addition to a name and password, information about the user's privilege level (role) and the scope (domain) of the user's control in the fabric. A cloud administrator, for example, might have global control, including the ability to create tenants and to assign additional administrators, while a tenant administrator is typically restricted to the tenant's domain or network. When you configure a user account, you can specify additional configuration items, such as a password expiration policy, or you can omit those items to accept the default settings.
In the management information model, an APIC user is represented by a managed object (MO) of class aaa:User. According to the Cisco APIC Management Information Model Reference, an object of the aaa:User class has a distinguished name (DN) format of uni/userext/user-[name]. The direct properties (attributes) of the aaa:User class do not include fields for the user domain or privilege level, but the reference for this class indicates a child class (subtree) of aaa:UserDomain, which has a child class of aaa:UserRole. The API command structure to add the new user can include the configuration of the user domain and privilege level in these child classes in the following hierarchy:
The following examples show how to add a new user to the user domain ExampleCorp with administrator privileges using XML and JSON. An additional example shows how to use a cURL command to perform the task from a command line.
- Example: Using the XML API to Add a User
- Example: Using the JSON API to Add a User
- Example: Using the JSON API to Add a User with cURL
Example: Using the XML API to Add a User
To create a new object, you must specify the class and sufficient naming information, either in the URI or in the message body. In this example, the URI contains the DN and the message body contains the object class.
To create and configure a new user using the XML API, send this HTTP POST message:
POST https://192.0.20.123/api/mo/uni/userext/user-georgewa.xml

<aaaUser
  pwd="password1"
  firstName="George"
  lastName="Washington"
  phone="4085551212"
  email="georgewa@example.com" >
    <aaaUserDomain name="ExampleCorp" >
        <aaaUserRole name="admin" />
    </aaaUserDomain>
</aaaUser>
Alternatively, you can POST to /api/mo.xml and provide the DN attribute dn="uni/userext/user-georgewa", or you can POST to /api/mo/uni/userext.xml and provide the name attribute name="georgewa".
The children sections of this command structure configure the new user to be in the ExampleCorp user domain with a role of admin in that user domain. When you create a new user, you can specify less information or more information than is shown in this example. Additional attributes can be configured in subsequent operations.
If a response is requested (by appending ?rsp-subtree=modified to the POST URI), a successful operation returns the following response body:
<imdata>
  <aaaUser
    instanceId="0:0"
    accountStatus="active"
    childAction="deleteNonPresent"
    clearPwdHistory="no"
    descr=""
    dn="uni/userext/user-georgewa"
    email="georgewa@example.com"
    encPwd=""
    expiration="never"
    expires="no"
    firstName="George"
    intId="none"
    lastName="Washington"
    lcOwn="local"
    name="georgewa"
    phone="4085551212"
    pwd="password1"
    pwdLifeTime="no-password-expire"
    pwdSet="no"
    replTs="never"
    rn=""
    status="created" >
      <aaaUserDomain
        instanceId="0:0"
        childAction="deleteNonPresent"
        descr="" intId="none"
        lcOwn="local"
        name="common"
        replTs="never"
        rn="userdomain-common"
        status="created" >
          <aaaUserRole
            instanceId="0:0"
            childAction="deleteNonPresent"
            descr=""
            intId="none"
            lcOwn="local"
            name="read-only"
            privType="readPriv"
            replTs="never"
            rn="role-read-only"
            status="created" />
          </aaaUserDomain>
      <aaaUserDomain
        instanceId="0:0"
        childAction="deleteNonPresent"
        descr=""
        intId="none"
        lcOwn="local"
        name="ExampleCorp"
        replTs="never"
        rn="userdomain-ExampleCorp"
        status="created" >
          <aaaUserRole
            instanceId="0:0"
            childAction="deleteNonPresent"
            descr=""
            intId="none"
            lcOwn="local"
            name="admin"
            privType="readPriv"
            replTs="never"
            rn="role-admin"
            status="created" />
      </aaaUserDomain>
  </aaaUser>
</imdata>
This response indicates that the user has been created and added to two user domains. The user has admin privileges in the ExampleCorp user domain, as requested. By default, the user also has read-only privileges in the common user domain.
To delete the user, send this HTTP DELETE message:
DELETE https://192.0.20.123/api/mo/uni/userext/user-georgewa.xml
Alternatively, you can send an HTTP POST message with sufficient naming information and with status="deleted" in the aaa:User attributes, as in this example:
POST https://192.0.20.123/api/mo.xml

<aaaUser dn="uni/userext/user-georgewa" status="deleted" />
Example: Using the JSON API to Add a User
To create a new object, you must specify the class and sufficient naming information, either in the URI or in the message body. In this example, the URI contains the DN and the message body contains the object class.
To create and configure a new user using the JSON API, send this HTTP POST message:
POST https://192.0.20.123/api/mo/uni/userext/user-georgewa.json

{
  "aaaUser" : {
    "attributes" : {
      "pwd" : "password1",
      "firstName" : "George"
      "lastName" : "Washington",
      "phone" : "4085551212",
      "email" : "georgewa@example.com"
    },
    "children" : [{
        "aaaUserDomain" : {
          "attributes" : {
            "name" : "ExampleCorp"
          },
          "children" : [{
              "aaaUserRole" : {
                "attributes" : {
                  "name" : "admin"
                }
              }
            }
          ]
        }
      }
    ]
  }
}
Alternatively, you can POST to /api/mo.json and provide the DN attribute "dn":"uni/userext/user-georgewa", or you can POST to /api/mo/uni/userext.json and provide the name attribute "name":"georgewa".
The children sections of this command structure configure the new user to be in the ExampleCorp user domain with a role of admin in that user domain. When you create a new user, you can specify less information or more information than is shown in this example. Additional attributes can be configured in subsequent operations.
If a response is requested (by appending ?rsp-subtree=modified to the POST URI), a successful operation returns the following response body:
{
  "imdata" : [{
      "aaaUser" : {
        "attributes" : {
          "instanceId" : "0:0",
          "accountStatus" : "active",
          "childAction" : "deleteNonPresent",
          "clearPwdHistory" : "no",
          "descr" : "",
          "dn" : "uni/userext/user-georgewa",
          "email" : "georgewa@example.com",
          "encPwd" : "",
          "expiration" : "never",
          "expires" : "no",
          "firstName" : "George",
          "intId" : "none",
          "lastName" : "Washington",
          "lcOwn" : "local",
          "name" : "georgewa",
          "phone" : "5551212",
          "pwd" : "password1",
          "pwdLifeTime" : "no-password-expire",
          "pwdSet" : "no",
          "replTs" : "never",
          "rn" : "",
          "status" : "created"
        },
        "children" : [{
            "aaaUserDomain" : {
              "attributes" : {
                "instanceId" : "0:0",
                "childAction" : "deleteNonPresent",
                "descr" : "",
                "dn" : "",
                "intId" : "none",
                "lcOwn" : "local",
                "name" : "common",
                "replTs" : "never",
                "rn" : "userdomain-common",
                "status" : "created"
              },
              "children" : [{
                  "aaaUserRole" : {
                    "attributes" : {
                      "instanceId" : "0:0",
                      "childAction" : "deleteNonPresent",
                      "descr" : "",
                      "dn" : "",
                      "intId" : "none",
                      "lcOwn" : "local",
                      "name" : "read-only",
                      "privType" : "readPriv",
                      "replTs" : "never",
                      "rn" : "role-read-only",
                      "status" : "created"
                    }
                  }
                }
              ]
            }
          }, {
            "aaaUserDomain" : {
              "attributes" : {
                "instanceId" : "0:0",
                "childAction" : "deleteNonPresent",
                "descr" : "",
                "dn" : "",
                "intId" : "none",
                "lcOwn" : "local",
                "name" : "ExampleCorp",
                "replTs" : "never",
                "rn" : "userdomain-ExampleCorp",
                "status" : "created"
              },
              "children" : [{
                  "aaaUserRole" : {
                    "attributes" : {
                      "instanceId" : "0:0",
                      "childAction" : "deleteNonPresent",
                      "descr" : "",
                      "dn" : "",
                      "intId" : "none",
                      "lcOwn" : "local",
                      "name" : "admin",
                      "privType" : "writePriv",
                      "replTs" : "never",
                      "rn" : "role-admin",
                      "status" : "created"
                    }
                  }
                }
              ]
            }
          }
        ]
      }
    }
  ]
}
This response indicates that the user has been created and added to two user domains. The user has admin privileges in the ExampleCorp user domain, as requested. By default, the user also has read-only privileges in the common user domain.
To delete the user, send this HTTP DELETE message:
DELETE https://192.0.20.123/api/mo/uni/userext/user-georgewa.json
Alternatively, you can send an HTTP POST message with sufficient naming information and with "status":"deleted" in the aaa:User attributes, as in this example:
POST https://192.0.20.123/api/mo.json

{
  "aaaUser" : {
    "attributes" : {
      "dn" : "uni/userext/user-georgewa",
      "status" : "deleted"
    }
  }
}
Example: Using the JSON API to Add a User with cURL
To create a new object, you must specify the class and sufficient naming information, either in the URI or in the message body. In this example, the URI contains the DN and the message body contains the object class.
Create a local file that contains a JSON structure in the form shown in Example: Using the JSON API to Add a User. In this example, the filename is newuser.json, and the file is in a different directory.
On the cURL command line, you must specify the HTTP method (such as POST), the path and name of the local file, and the URI of the API operation.
Using the curl command, send the JSON file in a POST message to the API as in this example:
curl -X POST --data "@../users/newuser.json" https://192.0.20.123/api/mo/uni/userext/user-georgewa.json
Note | Be sure to include the @ sign before the filename. The cURL tool is free and open software. You can find detailed information about using cURL online. |
If a response is requested (by appending ?rsp-subtree=modified to the POST URI), a successful operation returns the response body shown in Example: Using the JSON API to Add a User.
To delete the user, edit the JSON file to contain a aaaUser attribute of "status":"deleted" and send the command again.
Alternatively, you can send this HTTP DELETE message:
curl -X DELETE https://192.0.20.123/api/mo/uni/userext/user-georgewa.json
Changing Your Own User Credentials
When logged in to APIC, you can change your own user credentials, including your password, SSH key, and X.509 certificate. The following API methods are provided for changing the user credentials of the logged-in user:
Note | Using these methods, you can change the credentials only for the account under which you are logged in. |
The message body of each method contains the properties of the object to be modified. The properties are shown in the Cisco APIC Management Information Model Reference.
Changing Your Password
To change your password, send the changeSelfPassword API method, which modifies the aaa:changePassword object. The following object properties are required in the message body:
This example, when sent by User1, changes the password for User1.
POST http://192.0.20.123/api/changeSelfPassword.json

{
  "aaaChangePassword" : {
    "attributes" : {
      "userName" : "User1",
      "oldPassword" : "p@$sw0rd",
      "newPassword" : "dr0ws$@p"
    }
  }
}
A successful operation returns an empty imdata element, as in this example:
{
    "totalCount" : "0",
    "imdata" : []
}
Changing Your SSH Key
To change your SSH key, send the changeSelfSshKey API method, which modifies the aaa:changeSshKey object. The following object properties are required in the message body:
-
userName — Your login ID.
-
name — The symbolic name of the key. APIC supports up to 32 SSH keys for a single user.
-
data — Your new SSH key.
This example, when sent by User1, changes the SSH key for User1.
POST http://192.0.20.123/api/changeSelfSshKey.json

{
  "aaaChangeSshKey" : {
    "attributes" : {
      "userName" : "User1",
      "name" : "A",
      "data" : "ssh-rsa AAAAB3NzaC1yc2EAAAABIwAAAQEAuKxY5E4we6uCR2z== key@example.com"
    }
  }
}
A successful operation returns an empty imdata element.
Changing Your X.509 Certificate
To change your X.509 certificate, send the changeSelfX509Cert API method, which modifies the aaa:changeX509Cert object. The following object properties are required in the message body:
-
userName — Your login ID.
-
name — The symbolic name of the certificate. APIC supports up to 32 X.509 certificates for a single user.
-
data — The entire data body of your new X.509 certificate.
This example, when sent by User1, changes the X.509 certificate for User1.
POST http://192.0.20.123/api/changeSelfX509Cert.json

{
  "aaaChangeX509Cert" : {
    "attributes" : {
      "userName" : "User1",
      "name" : "A",
      "data" : "-----BEGIN CERTIFICATE-----\nMIIE2TCCA8GgAwIBAgIKamlnsw

[EXAMPLE TRUNCATED]

       1BCIolblPFft6QKoSJFjB6thJksaE5/k3Npf\n-----END CERTIFICATE-----"
    }
  }
}
A successful operation returns an empty imdata element.
Deleting an SSH Key or X.509 Certificate
To delete a key or certificate, send the key or certificate change method with the name of the key or certificate to be deleted and with the data attribute blank.
This example, when sent by User1, deletes the SSH key for User1.
POST http://192.0.20.123/api/changeSelfSshKey.json

{
  "aaaChangeSshKey" : {
    "attributes" : {
      "userName" : "User1",
      "name" : "A",
      "data" : ""
    }
  }
}
A successful operation returns an empty imdata element.
Deploying Endpoint Groups and Contracts for a Three-Tier Application
A typical use case of the Cisco Application Centric Infrastructure (ACI) fabric is hosting a three-tier application within a tenant network. You can configure endpoint groups and contracts for such an application using the APIC REST API. In this example, the application is implemented using three servers—a web server, an application server, and a database server, as shown in this figure:
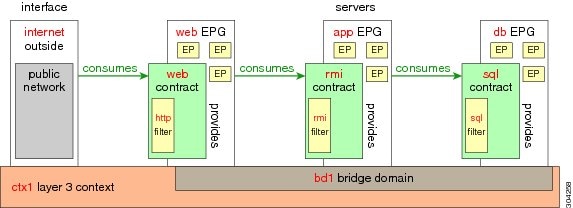
The following are key components of the configuration:
-
Endpoint groups (EPGs)—Each server represents an endpoint group, sourcing or consuming traffic from other endpoint groups according to the contracts associated with each endpoint group.
-
Contracts—Traffic to and from an endpoint is constrained by contracts, which apply filter sets for traffic sourced from (provided by) the endpoint and traffic consumed by the endpoint.
-
Filters—A filter specifies the data protocols to be allowed or denied by a contract that contains the filter.
The following network components are assumed to already exist:
-
Bridge Domain (BD)—A Layer 2 network associated with the Layer 3 context.
-
Context—A Layer 3 private network for communication between the servers.
-
External port—A Layer 3 network port for external access to the application.
-
Virtual Machine manager (VMM) and hypervisor components
-
VLAN
Note | For an expanded and comprehensive example of deploying a three-tier application, see the Cisco APIC Getting Started Guide. |
The configuration information is contained in a single XML structure that is sent to the distinguished name (DN) of the tenant. In this example, the name of the tenant is ExampleCorp. To deploy the application using the XML API, send this HTTP POST message:
POST https://192.0.20.123/api/mo/uni/tn-ExampleCorp.xml
Include this XML structure in the body of the POST message:
<fvTenant name="ExampleCorp">

    <fvAp name="OnlineStore">
        <fvAEPg name="web">
            <fvRsBd tnFvBDName="bd1"/>
            <fvRsCons tnVzBrCPName="rmi"/>
            <fvRsProv tnVzBrCPName="web"/>
            <fvRsDomAtt tDn="uni/vmmp-VMware/dom-datacenter"/>
        </fvAEPg>

        <fvAEPg name="db">
            <fvRsBd tnFvBDName="bd1"/>
            <fvRsProv tnVzBrCPName="sql"/>
            <fvRsDomAtt tDn="uni/vmmp-VMware/dom-datacenter"/>
        </fvAEPg>

        <fvAEPg name="app">
            <fvRsBd tnFvBDName="bd1"/>
            <fvRsProv tnVzBrCPName="rmi"/>
            <fvRsCons tnVzBrCPName="sql"/>
            <fvRsDomAtt tDn="uni/vmmp-VMware/dom-datacenter"/>
        </fvAEPg>
    </fvAp>

    <vzFilter name="http" >
        <vzEntry dFromPort="80" name="DPort-80" prot="tcp" etherT="ip" />
        <vzEntry dFromPort="443" name="DPort-443" prot="tcp" etherT="ip" />
    </vzFilter>

    <vzFilter name="rmi" >
        <vzEntry dFromPort="1099" name="DPort-1099" prot="tcp" etherT="ip" />
    </vzFilter>

    <vzFilter name="sql">
        <vzEntry dFromPort="1521" name="DPort-1521" prot="tcp" etherT="ip" />
    </vzFilter>

    <vzBrCP name="web">
        <vzSubj name="web">
            <vzRsSubjFiltAtt tnVzFilterName="http"/>
        </vzSubj>
    </vzBrCP>

    <vzBrCP name="rmi">
        <vzSubj name="rmi">
            <vzRsSubjFiltAtt tnVzFilterName="rmi"/>
        </vzSubj>
    </vzBrCP>

    <vzBrCP name="sql">
        <vzSubj name="sql">
           <vzRsSubjFiltAtt tnVzFilterName="sql"/>
        </vzSubj>
    </vzBrCP>
</fvTenant>
In the XML structure, the first line modifies, or creates if necessary, the tenant named ExampleCorp.
<fvTenant name="ExampleCorp">
This line creates an application network profile named OnlineStore:
<fvAp name="OnlineStore">
The elements within the application network profile create three endpoint groups, one for each of the three servers. The following lines create an endpoint group named web and associate it with an existing bridge domain named bd1. This endpoint group is a consumer, or destination, of the traffic allowed by the binary contract named rmi and is a provider, or source, of the traffic allowed by the binary contract named web. The endpoint group is associated with the VMM domain named datacenter.
<fvAEPg name="web">
    <fvRsBd tnFvBDName="bd1"/>
    <fvRsCons tnVzBrCPName="rmi"/>
    <fvRsProv tnVzBrCPName="web"/>
    <fvRsDomAtt tDn="uni/vmmp-VMware/dom-datacenter"/>
</fvAEPg>
The remaining two endpoint groups, for the application server and the database server, are created in a similar way.
The following lines define a traffic filter named http that specifies TCP traffic of types HTTP (port 80) and HTTPS (port 443).
<vzFilter name="http">
    <vzEntry dFromPort="80" name="DPort-80" prot="tcp"  />
    <vzEntry dFromPort="443" name="DPort-443" prot="tcp"  />
</vzFilter>
The remaining two filters, for application data and database (sql) data, are created in a similar way.
The following lines create a binary contract named web that incorporates the filter named http:
<vzBrCP name="web">
    <vzSubj name="web">
        <vzRsSubjFiltAtt tnVzFilterName="http"/>
    </vzSubj>
</vzBrCP>
The remaining two contracts, for rmi and sql data protocols, are created in a similar way.
The final line closes the structure:
</fvTenant>
 Feedback