Cisco Connected Grid Design Suite (CGDS) Substation Workbench Monitor User Guide
Bias-Free Language
The documentation set for this product strives to use bias-free language. For the purposes of this documentation set, bias-free is defined as language that does not imply discrimination based on age, disability, gender, racial identity, ethnic identity, sexual orientation, socioeconomic status, and intersectionality. Exceptions may be present in the documentation due to language that is hardcoded in the user interfaces of the product software, language used based on RFP documentation, or language that is used by a referenced third-party product. Learn more about how Cisco is using Inclusive Language.
- Updated:
- October 9, 2013
Chapter: Configuring the CGDS Monitor Settings
Configuring the CGDS Monitor Settings
This chapter provides information on the configuration tasks that administrators can perform in the Cisco Connected Grid Design Suite (CGDS) - Substation Workbench Monitor (CGDS Monitor).
Administrators have the capabilities to configure the CGDS Monitor settings, such as defining a time-period for the value analysis details, managing the packet captures, and specifying the alarm counts.
•![]() Configuring the Auto-Stop Period
Configuring the Auto-Stop Period
•![]() Configuring the Value Analysis Period
Configuring the Value Analysis Period
Configuring the Auto-Stop Period
You can configure the auto-stop time-period to automatically stop all of the generic object oriented substation events (GOOSE) and distributed network protocol (DNP3) messages.
To configure the auto-stop period, perform the following steps:
Step 1 ![]() Log in to the CGDS Monitor.
Log in to the CGDS Monitor.
For more information on logging in to the CGDS Monitor, see the "Logging In" section in Chapter 1 "Getting Started".
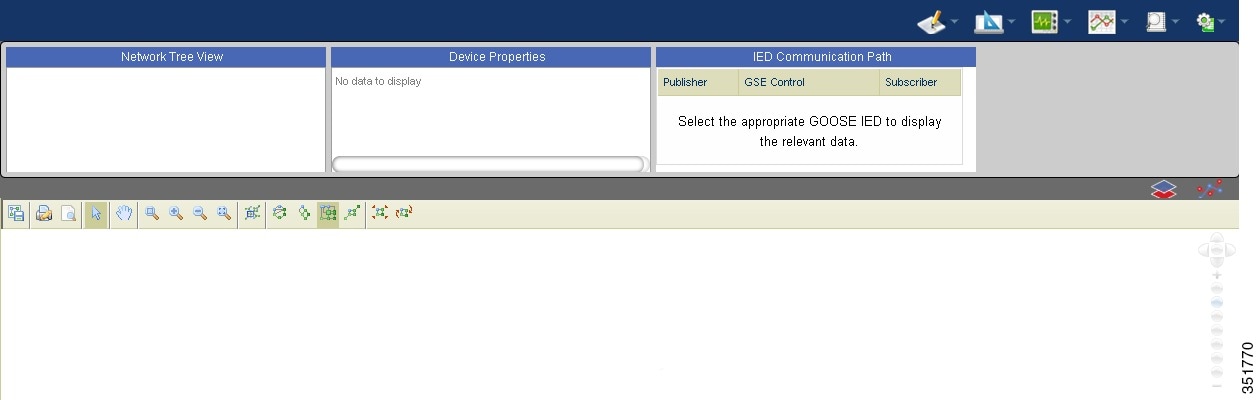
The CGDS Monitor home page appears.
Figure 4-1 CGDS Monitor - Home Page
Step 2 ![]() From the Settings menu, choose Configure Auto Stop Period.
From the Settings menu, choose Configure Auto Stop Period.
The Configure Auto Stop Period dialog box appears.
Step 3 ![]() In the Period text box, specify the time-period in seconds, and click Reset.
In the Period text box, specify the time-period in seconds, and click Reset.
A message appears indicating that the auto-stop time period is configured.
Configuring the Value Analysis Period
You can configure a time-period for displaying the value analysis report for the GOOSE IEDs.
To configure the value analysis time-period, perform the following steps:
Step 1 ![]() Log in to the CGDS Monitor.
Log in to the CGDS Monitor.
For more information on logging in to the CGDS Monitor, see the "Logging In" section in Chapter 1 "Getting Started".
The CGDS Monitor home page (see Figure 4-1) appears.
Step 2 ![]() From the Settings menu, choose Configure Value Analysis Period.
From the Settings menu, choose Configure Value Analysis Period.
The Configure Value Analysis Period dialog box appears.
Step 3 ![]() In the Period text box, specify the time-period in minutes, and click Reset.
In the Period text box, specify the time-period in minutes, and click Reset.
A message appears indicating that the value analysis time-period is configured.
Deleting the Packet Captures
You can view and delete one or more GOOSE and DNP3 sessions that all of the users have captured in a substation.

Note ![]() A maximum of eight users can concurrently capture the sessions in a substation. If the number of users exceeds the maximum allowed limit, no more users are allowed to capture the sessions until you delete the exceeding packet captures.
A maximum of eight users can concurrently capture the sessions in a substation. If the number of users exceeds the maximum allowed limit, no more users are allowed to capture the sessions until you delete the exceeding packet captures.
To delete the packet captures, perform the following steps:
Step 1 ![]() Log in to the CGDS Monitor.
Log in to the CGDS Monitor.
For more information on logging in to the CGDS Monitor, see the "Logging In" section in Chapter 1 "Getting Started".
The CGDS Monitor home page (see Figure 4-1) appears.
Step 2 ![]() From the Settings menu, choose Delete Packet Capture.
From the Settings menu, choose Delete Packet Capture.
The Capture Sessions dialog box appears with the following details:
•![]() Creator—User who captured the session.
Creator—User who captured the session.
•![]() Capture Type—GOOSE or DNP3 packet capture.
Capture Type—GOOSE or DNP3 packet capture.
•![]() Name—Name of the packet capture.
Name—Name of the packet capture.
•![]() Status—Status of the packet capture as started or stopped.
Status—Status of the packet capture as started or stopped.
Step 3 ![]() Select one or more sessions that you want to delete, and click Delete Selected Session.
Select one or more sessions that you want to delete, and click Delete Selected Session.
A message appears indicating that the selected session is deleted from the CGDS Monitor.
Configuring the Alarm Counts
You can configure the rise and fall counts for the network traffic in a substation. The alarm summary graph is displayed based on these configured alarm counts.
To configure the alarm counts, perform the following steps:
Step 1 ![]() Log in to the CGDS Monitor.
Log in to the CGDS Monitor.
For more information on logging in to the CGDS Monitor, see the "Logging In" section in Chapter 1 "Getting Started".
The CGDS Monitor home page (see Figure 4-1) appears.
Step 2 ![]() From the Settings menu, choose Configure Alarm.
From the Settings menu, choose Configure Alarm.
The Configure Alarm dialog box appears.
Step 3 ![]() Do the following:
Do the following:
•![]() From the Protocol drop-down list, choose either GOOSE or DNP3.
From the Protocol drop-down list, choose either GOOSE or DNP3.
•![]() In the Detail area, specify the following details for the packets:
In the Detail area, specify the following details for the packets:
–![]() Rising—Upper limit that is allowed in one second.
Rising—Upper limit that is allowed in one second.
–![]() Falling—Lower limit that is allowed in one second.
Falling—Lower limit that is allowed in one second.
Step 4 ![]() Click Reset.
Click Reset.
A message appears indicating that the alarm counts are configured.
 Feedback