Cisco Smart+Connected Meeting Spaces User Guide
Bias-Free Language
The documentation set for this product strives to use bias-free language. For the purposes of this documentation set, bias-free is defined as language that does not imply discrimination based on age, disability, gender, racial identity, ethnic identity, sexual orientation, socioeconomic status, and intersectionality. Exceptions may be present in the documentation due to language that is hardcoded in the user interfaces of the product software, language used based on RFP documentation, or language that is used by a referenced third-party product. Learn more about how Cisco is using Inclusive Language.
Chapter: Smart+Connected MS Web Portal
Smart+Connected MS Web Portal
This chapter describes the Smart+Connected MS web portal and explains the user interface and the portal tabs.
About the Smart+Connected MS Web Portal
The Smart+Connected MS web portal allows you to search for, book, and set up the conference rooms for meetings, book resources for the meeting rooms, send out invites to the attendees, and manage your meetings. You can apply your preferred settings to customize the booking experience, save the search results to use them for future bookings, and set certain conference rooms as your favorites so that they show up whenever you search for rooms.
The portal displays the daily, weekly, and monthly meeting calendar, which is up-to-date and synchronized with your enterprise calendaring system. You can use the calendar to quickly view all the meetings that you are a part of, whether as the attendee or the organizer. You have the option of accepting, declining, or deleting the meetings from the calendar itself. The recurring meeting feature allows you to create a single reservation for multiple meetings that you have to repeatedly organize over a period of time. This saves you the inconvenience of creating separate reservations on a daily, weekly, or monthly basis. You can add the WebEx meeting option which allows the attendees to log in remotely over web if they cannot be physically present in the meeting room.
Logging In
You can log in to the Smart+Connected MS web portal using any of the browsers certified for the application. The portal can be accessed using http://host-name:domain-port/calendar. You can log in using your enterprise login credentials.
To log in to the Smart+Connected MS web portal, perform the following steps:
Step 1![]() Enter the URL in the address field of the web browser, and click Enter.
Enter the URL in the address field of the web browser, and click Enter.
The Smart+Connected MS login page appears.
Step 2![]() Enter the username and password.
Enter the username and password.
The Smart+Connected MS home page appears.
After logging in, if you do not use the portal for a while, your browsing session will time out. In such a situation, you must re-log in to the portal.
Understanding the User Interface
Figure 2-1 shows the home page of the Smart+Connected MS web portal.
Figure 2-1 Smart+Connected MS Home Page
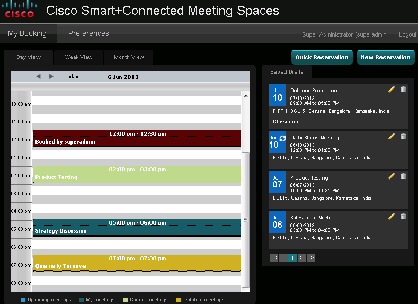
list the main areas of the home page.
Portal Tabs
The Smart+Connected MS web portal has two main tabs:
My Booking
The My Booking tab allows you to book meetings rooms, and view, search for, edit, and accept/decline meetings.
You can change the calendar view of your meetings as per your preference using the three sub-tabs: Day View, Week View, and Month View. The meeting legend is displayed below the calendar and lists the meeting status that each of the colors in the calendar signify. You can click any meeting invite in the calendar and accept, tentatively accept, decline, or delete it depending on the existing status of the meeting. For the meetings that you have organized, you can click on the meeting instance in the calendar and choose the Detailed Edit or Delete option. For the recurring meetings you organize, you have the option of editing and deleting the entire series of meetings or any single occurrence. The icon displayed in the bottom right corner of a meeting instance indicates that it is a recurring meeting.

Note The background color of the recurrence icon depends of the status of the meeting instance. For more information, see the “Meeting Legend” section.
The Quick Reservation and New Reservation buttons allow you to book meeting rooms instantly or opt for a detailed booking process where you can avail yourself of the various features that enhance the entire meeting experience.
Day View
The meeting calendar appears with the Day View tab selected by default. The current date is displayed on the top along with the left and right navigation buttons. Click these buttons to view the meetings scheduled for the other dates. Click the Today link to go back to the current date view.
The 24 hour slots in the day are displayed as a row each. Only a certain number of hours are seen at a time. Use the vertical scroll bar to move the view up and down and see the remaining time slots and meetings. The meetings, if any, for the time slots appear with various background colors depending on the meeting status. The subject and duration of each meeting is displayed. For more information, see the “Meeting Legend” section.
Note When the meeting calendar is in the day or week view, you can click and hold down the mouse key and drag across the time slots to book a meeting for the selected time period. Click Yes in the New Reservation dialog box that appears asking you to confirm if you want to initiate a booking. This opens the booking wizard.
Week View
Click the Week View tab to view the meeting schedule for entire week. The days of the week appear as separate columns with the current date column selected. The 24 hour slots for each day appear as rows and the meetings, if any, are displayed for these slots. Use the left and right navigation buttons to view the calendar for other weeks. Clicking the Today link takes you back to the current week. Only a certain number of hours are seen at a time. Use the vertical scroll bar to move the view up and down and see the remaining time slots and meetings.
Month View
The Month View has columns for the seven weekdays and lists all dates in the current month similar to a traditional calendar. The current date is highlighted. Use the left and right navigation buttons to view the calendar for the other months. Clicking the Today link takes you back to the current month. Click any meeting to accept, tentatively accept, decline, or delete it. Click any date to initiate a new booking for that day.
Meeting Legend
The meeting legend can be found below the calendar view. It conveys the meaning of the different colors used for the meetings shown in the calendar.
 Meetings to which you have been invited but have not yet begun.
 Meetings that you have organized and can edit/cancel.
 Meetings currently going on which you are a part of.
 Meetings that you are not sure about attending and have tentatively accepted.
Note Past meetings appear with a brown background.
Quick Reservation
The Quick Reservation button is displayed in the top right corner. You can use this option to quickly book a conference room using a single screen interface. The process is simple and fast. It can come in handy when you want to book a room on a short notice and are hard pressed for time or when you simply want to book a meeting space without inviting any participants for the meeting. For more information, see the “About Quick Reservation” section in Chapter 3, “Booking Rooms Using the Portal”.
New Reservation
The New Reservation option allows you book conference rooms, send invites to attendees, request change in room setup, book equipment for the room, and provides several other features such as adding WebEx, and so on. For more information, see the “About New Reservation” section in Chapter 3, “Booking Rooms Using the Portal”.
Saved Drafts
This pane lists the reservation drafts that you have saved as separate rows. Details such as the meeting date, meeting subject, duration, and venue, are shown. The edit icon  allows you to edit the draft. To discard the draft, click the delete icon
  .
.
Only a certain number of drafts appear at a time and the remaining are listed on subsequent pages. Click the page number and the arrow buttons displayed below the drafts list to view the other drafts.
Preferences
The second main tab in the Smart+Connected MS web portal, the Preferences tab, allows you to specify your meeting preferences such as the time zone, your location, and favorite rooms. The application saves these details and customizes the settings to suit your requirements. For more information, see the “Configuring Meeting Preferences” section in Chapter 4, “Managing Meetings Using the Portal”.
 Feedback