Cisco Smart+Connected Meeting Spaces User Guide
Bias-Free Language
The documentation set for this product strives to use bias-free language. For the purposes of this documentation set, bias-free is defined as language that does not imply discrimination based on age, disability, gender, racial identity, ethnic identity, sexual orientation, socioeconomic status, and intersectionality. Exceptions may be present in the documentation due to language that is hardcoded in the user interfaces of the product software, language used based on RFP documentation, or language that is used by a referenced third-party product. Learn more about how Cisco is using Inclusive Language.
Chapter: Getting Started
Getting Started
Cisco Smart+Connected Meeting Spaces (Smart+Connected MS) is a solution that leverages the Cisco Service Delivery Platform (SDP). This solution enables viewing of the conference room details on IP phones, signage, room panels, and Smart+Connected MS web portal and also allows booking of meetings rooms using these devices.
About the Smart+Connected Meeting Spaces
The Smart+Connected MS is a solution that leverages the Service Delivery Platform (SDP). It provides features for conference room management using signage, room panels, and Smart+Connected MS web portal, and signage-based messaging using IP phones. The Smart+Connected MS leads to enhanced user experience, enhanced enterprise communication, and enhanced meeting room resource utilization as the updated meeting room information is widely available and easily accessible to the employees and the administrator. It leads to better resource management and energy savings that translate to reduced energy bills and more environment-friendly corporate practices.
The Smart+Connected MS solution allows you to do the following:
–![]() Book conference/TelePresence (TP) rooms.
Book conference/TelePresence (TP) rooms.
–![]() View detailed floor plans with the locations of the conference rooms.
View detailed floor plans with the locations of the conference rooms.
–![]() View the conference room schedule in different views—Building level, Floor level, and Conference Room level.
View the conference room schedule in different views—Building level, Floor level, and Conference Room level.
–![]() View the news content associated with the location.
View the news content associated with the location.
–![]() Quickly book the conference/TP room wherever the IP phone is located based on the room availability.
Quickly book the conference/TP room wherever the IP phone is located based on the room availability.
–![]() Control the meeting room devices and equipment.
Control the meeting room devices and equipment.
–![]() Save energy by manually releasing a room for the duration it is unoccupied, in addition to the energy savings made when the solution automatically switches off devices.
Save energy by manually releasing a room for the duration it is unoccupied, in addition to the energy savings made when the solution automatically switches off devices.
–![]() Configure multiple devices to suit your meeting and presentation needs using a single menu selection.
Configure multiple devices to suit your meeting and presentation needs using a single menu selection.
–![]() Create a case to resolve a fault in a conference room, and convey the same to the others in the organization by sending messages to the IP phone in the room. Creating a case also notifies the administrator of the building who tries to resolve the fault.
Create a case to resolve a fault in a conference room, and convey the same to the others in the organization by sending messages to the IP phone in the room. Creating a case also notifies the administrator of the building who tries to resolve the fault.
–![]() Search for the available conference/TP rooms based on your requirements such as room setup, room size, location, and so on and book them. Rooms that closely meet your search criteria are displayed if no exact match is found.
Search for the available conference/TP rooms based on your requirements such as room setup, room size, location, and so on and book them. Rooms that closely meet your search criteria are displayed if no exact match is found.
–![]() View the current and upcoming meetings that you are part of or have organized.
View the current and upcoming meetings that you are part of or have organized.
–![]() Accept, decline, or tentatively accept meeting invites.
Accept, decline, or tentatively accept meeting invites.
–![]() View all the scheduled meetings as a day, week, or month based calendar view.
View all the scheduled meetings as a day, week, or month based calendar view.
–![]() Book conference rooms easily by holding down the mouse key and dragging across the required time slot in the calendar view.
Book conference rooms easily by holding down the mouse key and dragging across the required time slot in the calendar view.
–![]() Book conference rooms instantly using the Quick Booking option. Reservation is made simpler as you can key in the number of participants. Booking duration options range from 30 (the default duration) to 60 minutes. Location is by default the one specified in your Preferences.
Book conference rooms instantly using the Quick Booking option. Reservation is made simpler as you can key in the number of participants. Booking duration options range from 30 (the default duration) to 60 minutes. Location is by default the one specified in your Preferences.
–![]() Use the detailed booking option where you can request for change in the room setup, book equipment, add meeting agenda and notes, and so on.
Use the detailed booking option where you can request for change in the room setup, book equipment, add meeting agenda and notes, and so on.
–![]() Edit the details of the meetings you have organized.
Edit the details of the meetings you have organized.
–![]() Save drafts of the bookings and edit them later.
Save drafts of the bookings and edit them later.
–![]() Save your preferred settings such as favorite rooms, location, and time zone.
Save your preferred settings such as favorite rooms, location, and time zone.
–![]() View the conference/TP room schedule and availability/occupancy status.
View the conference/TP room schedule and availability/occupancy status.
–![]() Confirm conference/TP room occupancy (by using the Start Meeting option).
Confirm conference/TP room occupancy (by using the Start Meeting option).
–![]() Release conference/TP rooms manually.
Release conference/TP rooms manually.
In addition, the solution can help in energy savings by automatically switching devices to a standby mode when the meeting room is unoccupied and based on the configuration, turn them back on before the actual occupancy.
The overall configuration, maintenance, and content creation for the Smart+Connected MS solution is managed by the administrator through a web application. As an end user, the Smart+Connected MS helps you to effectively utilize and manage office resources using the digital signage/IEC, IP phones, room panels, and the web application. You can view the availability of the conference rooms/TP rooms and book them using digital signage/IEC/room panels, search for and book available meeting spaces using the Smart+Connected MS web application, control the conference room resources and customize the settings using IP phones, save energy by releasing the conference room ahead of the booking schedule, send messages to the digital signage/IEC from the conference room/TP room, and so on.
For more information, see: Chapter 5, “Managing the Conference Room Resources”
Smart+Connected Meeting Spaces Feature Matrix
You can view/access the various features of the Smart+Connected MS application using touchscreen and non-touchscreen IP phones, signage/IEC, room panels, and the web portal. Some additional features are available when using touchscreen signage and touchscreen IP phones. For more information, see the “Features Available in Signage” section and the “Features Available in IP Phones” section in Chapter 5, “Managing the Conference Room Resources”.
Viewing the Conference/TP Room Availability
To book a conference/TP room, you first need to check the availability of the rooms. You can do this by viewing the display on the Smart+Connected solution enabled signage. The three types of views on the signage are as follows:
- Building View—Displays the schedule for all the conference/TP rooms in the building categorized at the floor level.
- Floor Level View—Displays the plan for the current floor with the location of the conference/TP rooms, the availability status, and the schedule. For touchscreen signage, you can book a room on the current floor or navigate to other floors and book any room located there.
- Conference Room View—The conference room schedule is displayed on the signage as well as room panels. A room panel is a small tablet like device with an LCD screen, which is placed outside a conference/TP room. It is a touch-based interface that allows you to book/release the room and start meetings.
–![]() Signage—Displays the schedule of the primary conference/TP room and the other rooms associated to the signage. For touchscreen signage, you can use the signage to check the available meeting slots and book the room for those slots.
Signage—Displays the schedule of the primary conference/TP room and the other rooms associated to the signage. For touchscreen signage, you can use the signage to check the available meeting slots and book the room for those slots.
–![]() Room Panel—Displays the schedule of the conference/TP room outside which it is placed. The room type, capacity, and features available are also shown. You can use the room panel to book and release the room.
Room Panel—Displays the schedule of the conference/TP room outside which it is placed. The room type, capacity, and features available are also shown. You can use the room panel to book and release the room.
The view on the signage is displayed for a specific preset duration of time, after which the other content added to the signage, if any, appears in a sequence.
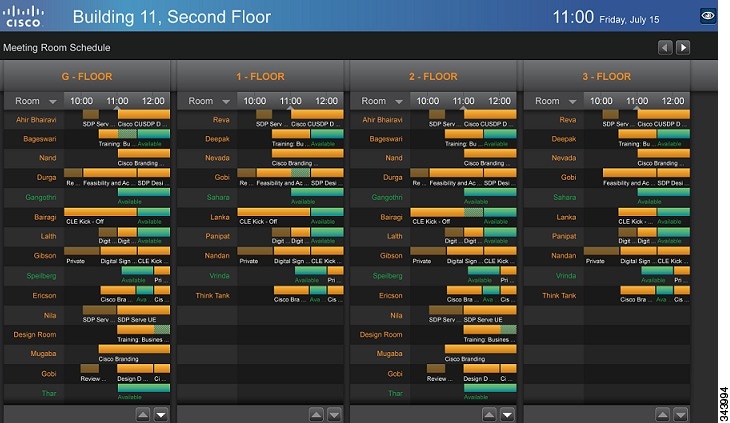
Building View
The building view displays the following information:
- Location, Time, and Date—These details are shown as the header on the signage screen. The location includes the building and floor name. The time and date are also displayed.
- Floors—The floors in the building are displayed as columns with the conference rooms on each floor listed as rows below the floor name. If there are several floors in the building, the screen displays a certain number of floors, and then the view changes to the next few floors. For touchscreen signage, you can also use the left and right arrow buttons to navigate to the required floor.
- Meeting Room Schedule—The schedule is available for three hours for all the conference rooms on each of the floors. The rooms are listed in alphabetical order. The available rooms and time slots are shown in green and the unavailable rooms and time slots are shown in orange. If the number of rooms is more than what can be shown in the initial view, the remaining rooms will be shown in the next flip. For touchscreen signage, you can also use the up and down arrow buttons to navigate to the required conference room.
Figure 1-1 shows the building view displayed on the signage.
Figure 1-1 Building Level View
Understanding the Building View
Table 1-1 lists the main areas of the building view.
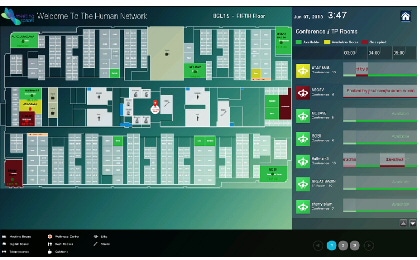
Floor Level View
The floor level view displays the following information:
- Location, Time, Date, and Logo—These details are shown as the header on the signage screen. The location includes the building and floor name. The time, date, and the Meeting Spaces logo are also displayed.
- Floor Plan—It is a map of the floor and appears towards the top-left corner, and occupies more than 75% of the signage display area. The conference room/TelePresence room names appear as per the location on the floor map, and are indicated with a red dot to show a reserved status and a green dot to show an available status. There is a user location indicator titled “You Are Here”.
- Schedule—The meeting details for each of the conference room/TelePresence room on the floor are shown at the top-right corner of the display. The schedule can list the details of 10 conference rooms at a time. If there are more than 10 rooms on the floor, the display cycles through the rooms every few seconds. The rooms are listed in the alphabetical order, and the room details are available for three hours. The icons for the available rooms are shown in green, the icons for the unavailable rooms are shown in maroon, and the icons for the rooms that will be available soon are shown in yellow. There are scrolling bars for the different booking slots for each room. These bars too appear in green, maroon, and yellow indicating the meeting room status. Rose color bars appear for the past time slots for which meetings have got over. For touchscreen signage, you can select any of the available conference rooms, and make a booking for the required time slot by tapping it.

Note You can book any room plotted in the floor plan, if it is available, by tapping it. The Booking Details pop-up dialog opens.
- Legend—The legend is located at the bottom-left corner of the display. It displays the icons that are used in the floor plan. For example, Meeting Room.
- Floor Navigation—The floor navigation buttons appear towards the right side of the footer section. There are numbered buttons for each floor in the building and only three buttons are displayed at a time. The left and right arrow buttons allow you to scroll to the numbered buttons for the other floors. The button for the floor for which the plan is currently displayed is highlighted. For touchscreen signage, you can tap any of the buttons and navigate to all the floors in the building where the signage is located.
- News Content—At the bottom of the signage screen, there is a section for the news content that is associated to the location. The title of the news items is displayed.
- Home Icon—For touchscreen signage, you can click the home icon and select any of the other content you want to view.
Figure 1-2 shows the floor view displayed on the signage.
Understanding the Floor View
Table 1-2 lists the main areas of the floor view.
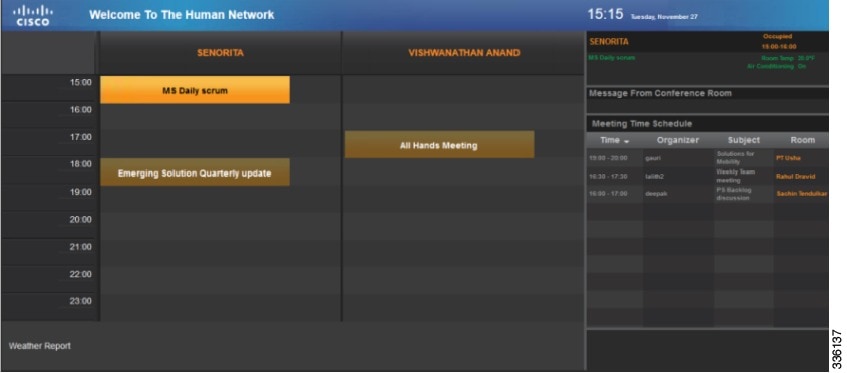
Conference Room View on Signage
The conference room view displayed on the signage provides the following information:
- Date & Time—These details are shown as a header on the signage screen.
- Occupancy Status & Temperature—The status and temperature of the conference room is displayed in the top right corner of the view. The word “Occupied” appears next to the name of the conference room along with time slot of the booking, if the room is occupied. The subject of the meeting, room temperature, and information about whether the air conditioner is on/off is also displayed.
- Primary Room Schedule(s)—The detailed schedules of the one or two primary conference rooms with which the signage is associated are displayed as separate columns for each room. The schedule is displayed as a rolling 9-hour window, which is constantly updated to show the latest room schedule. The room name is displayed as the column header followed by rows depicting availability the room. The available and unavailable time slots are displayed in different colors. For booked slots, the subject of the meeting is also displayed. For touchscreen signage, you can book any of the primary room(s).
Note If a conference room has been booked using the mail client, the subject of the meeting and the attendee list is displayed on the signage. These details are not displayed if the administrator enables the ‘Hide Subject’ and ‘Hide Attendees’ options for the conference room. When the ‘Hide Subject’ option is enabled, the subject of the meeting is displayed in the format “Booked by <name of the meeting organizer>”.
- Conference Room Message—All the messages that are sent to the signage using the IP phones in the conference rooms with which the signage is associated (primary conference rooms) are shown at the right hand side of the view. News content appears at the bottom of the display.
- Meeting Time Schedule—The schedule of other rooms in the zone where the signage is located is shown at the right side of the display. The names of the rooms are displayed in a chronological order of meetings. The available and unavailable rooms and slots are displayed in different colors. The meeting subject is also shown for each booked slot. For touchscreen signage, you can click the up and down arrow buttons to navigate to the desired conference room in case there are several rooms.
Figure 1-3 shows the conference room view displayed on the signage.
Figure 1-3 Conference Room View on the Signage
Understanding the Conference Room View on the Signage
Table 1-3 lists the main areas of the conference room view.
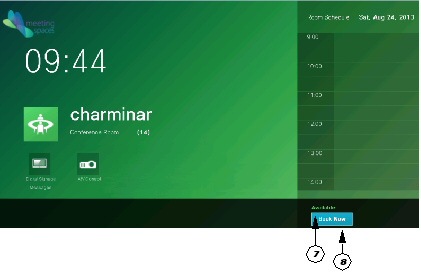
Conference Room View on Room Panel
The conference room view displayed on the room panel provides the following information:
- Logo—The Meeting Spaces logo is displayed on the top-left corner of the room panel screen.
- Day, Date, and Time—The current day, date, and time at the location where the room panel is situated is displayed prominently on the room panel screen.
- Room Details—An icon is shown below the time indicating whether the room is a conference room or a TP room. The name of the room, the words “Conference Room” or “Telepresence Room”, and the seating capacity of the room are displayed next to the room type icon.
- Room Features—Icons representing the features available in the room such as A/V controls, digital signage messaging and so on, are provided below the room details. The feature name is also provided below each icon.
- Day and Date—The current date and the day of the week are displayed at the top right corner of the screen.
- Room Schedule—The schedule of the conference/TP room, outside which the room panel is placed, is displayed on the right-hand side of the screen. The schedule is a rolling hour window, which is constantly updated to show the latest room schedule. The time slots for which the room is booked are displayed in a background that is a few shades lighter than the screen background color. The name of the person who has booked the room for each of these slots is also displayed. If the room is currently available, the screen has a green
 background. If the room cannot be booked currently, the screen background is brown
  .
.
–![]() Available—No meeting is scheduled/going on for the current time slot. The screen has a green background.
Available—No meeting is scheduled/going on for the current time slot. The screen has a green background.
Note Just because a conference/TP room is available currently, it does not mean you can book it. The Book Now button will be shown only if the room is available for the next half-hour slot. For example, you see that the room is free at 9.45 am but the booking button is not displayed. This is because the room is booked from 10 to 10.30 am. As there is no booking after 10.30, the Book Now button will be shown only after 10.30 am.
–![]() Meeting in progress—Room is unavailable as a meeting is going on. The screen has a brown background and the Release Room button is displayed.
Meeting in progress—Room is unavailable as a meeting is going on. The screen has a brown background and the Release Room button is displayed.
–![]() Booked—Room is unavailable as a meeting is scheduled for the time slot. The screen has a brown background and the Start Meeting button is displayed.
Booked—Room is unavailable as a meeting is scheduled for the time slot. The screen has a brown background and the Start Meeting button is displayed.
–![]() Room released—Room is not occupied and has been released before the booking time ends. The screen has a brown background and no task button is displayed. The status changes to Available and the screen background turns green after the screen is refreshed. This means that the room is free and is available for use. The Book Now button is also displayed, if the room is available for the next half-hour slot.
Room released—Room is not occupied and has been released before the booking time ends. The screen has a brown background and no task button is displayed. The status changes to Available and the screen background turns green after the screen is refreshed. This means that the room is free and is available for use. The Book Now button is also displayed, if the room is available for the next half-hour slot.
–![]() Book Now—Displayed only if the room is available for the next half-hour slot.
Book Now—Displayed only if the room is available for the next half-hour slot.
–![]() Start Meeting—Displayed for the first x minutes for each room booking. Where, x is the time interval configured by the administrator for the automatic release of the room due to non-occupancy. If the button is not tapped during this time period, the room is automatically released and energy saving settings are applied to the devices in the room. When you tap the Start Meeting button, a message appears on the top of the screen informing you that the meeting is started successfully.
Start Meeting—Displayed for the first x minutes for each room booking. Where, x is the time interval configured by the administrator for the automatic release of the room due to non-occupancy. If the button is not tapped during this time period, the room is automatically released and energy saving settings are applied to the devices in the room. When you tap the Start Meeting button, a message appears on the top of the screen informing you that the meeting is started successfully.
Note The Start Meeting button is displayed on a brown screen background indicating the unavailability of the conference/TP room.
–![]() Release Room—Displayed after the Start Meeting button is tapped and appears till the booking end time. Tap this to manually release the room before the booking end time. When you tap the Release Room button, a message appears on the top of the screen informing you that the meeting room is released successfully.
Release Room—Displayed after the Start Meeting button is tapped and appears till the booking end time. Tap this to manually release the room before the booking end time. When you tap the Release Room button, a message appears on the top of the screen informing you that the meeting room is released successfully.
Note If the room is released automatically or manually, the screen turns green after it is refreshed indicating availability of the conference room. The status is displayed as Available. The Book Now button is also displayed, if the room is available for the next half-hour slot. For more information, see the “Releasing Conference/TP Rooms using Room Panels” section.
Figure 1-4 shows the conference room view displayed on the room panel.
Figure 1-4 Conference Room View on Room Panel
Understanding the Conference Room View on Room Panel
Table 1-4 lists the main areas of the conference room view.
Features Available in Signage
Table 1-5 lists the features that are available/can be accessed using the following devices:
Booking the Conference/TP Rooms
Apart from booking the conference rooms using the traditional methods, you can use the touchscreen signage located in a building to book the available conference rooms in the building through the conference room and floor plan layout views. You can view the conference room schedule details using any of the three signage views. You can also book the conference rooms using the Smart+Connected MS user portal, room panels, and the IP phones located in the conference rooms.
Note Some of the signage within a premise can be without the touchscreen. Although you cannot use them to book the conference rooms, you can view the room availability as the display is similar to that in the touchscreen signage.
Using the Signage
You are allowed to book a conference/TP room up to three hours in advance.
To book a conference/TP room using the touchscreen signage, perform the following steps:
Step 1![]() Tap the time slot for which you want to book the conference/TP room from the schedule that is displayed on the signage.
Tap the time slot for which you want to book the conference/TP room from the schedule that is displayed on the signage.
The Schedule a Meeting dialog box appears. The start time of the booking is automatically displayed in the From drop-down list depending on the slot that you have selected. You can change the time by choosing another option from the drop-down list.
Figure 1-5 shows how to book a room using the signage.
Figure 1-5 Booking Room Using Signage
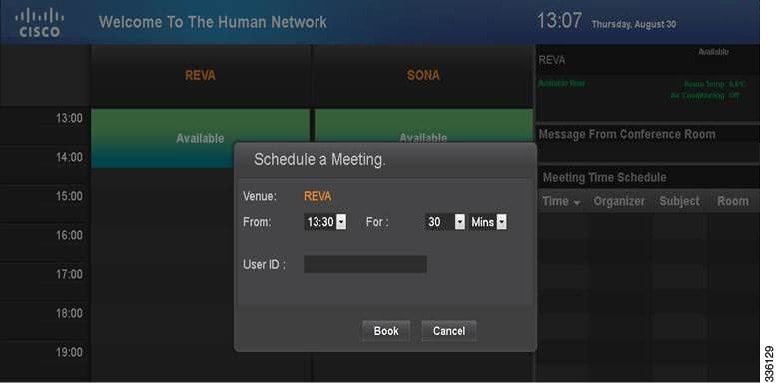
Step 2![]() Choose the duration for which you want to book the room from the first For drop-down list. Choose the Minutes option from the second For drop-down list. The time of the next meeting is displayed below the drop-down list, so that you can avoid selecting a time slot that clashes with it.
Choose the duration for which you want to book the room from the first For drop-down list. Choose the Minutes option from the second For drop-down list. The time of the next meeting is displayed below the drop-down list, so that you can avoid selecting a time slot that clashes with it.
Step 3![]() Enter your User ID with the help of the virtual keyboard that is displayed on the screen, and tap Accept. User ID is the ID that uniquely identifies a user in the corporate directory (LDAP).
Enter your User ID with the help of the virtual keyboard that is displayed on the screen, and tap Accept. User ID is the ID that uniquely identifies a user in the corporate directory (LDAP).
Step 4![]() Tap Book to book the conference room or tap Cancel to close the dialog box.
Tap Book to book the conference room or tap Cancel to close the dialog box.
If you tap Book, a dialog box appears informing you that the meeting schedule request has been received, and that you need to check your email to know the booking status.
A meeting is scheduled in Microsoft Exchange for the conference room, and an automatic acceptance mail is sent to you from the conference room stating that your meeting request has been accepted. The status of the conference room and the meeting details for the room are updated when the signage page is refreshed. The subject of the meeting will be displayed as: “Booked by <your name>”.
Using the IP Phones
You can book a conference/TP room using a touchscreen IP phone in the room only if the status of the room is “Available” at that time. If the room is occupied or a meeting is in progress, the option for booking the room is unavailable. After the booking is done, the schedule of the conference room is updated in the signage displays.
Using Touchscreen IP Phones to Book a Conference Room
To book a conference/TP room using touchscreen IP phone, perform the following steps:
Step 1![]() On the IP phone, press the Services button.
On the IP phone, press the Services button.
The list of available services appears.
Step 2![]() Tap the service that has been created for the Smart+Connected MS in Cisco Unified Communications Manager (CUCM).
Tap the service that has been created for the Smart+Connected MS in Cisco Unified Communications Manager (CUCM).
The Smart+Connected MS service screen appears.
Note For this guide, it is assumed that the name of the Smart+Connected MS service configured in CUCM is ‘S+CC Service’.
Step 3![]() Tap the book room
Tap the book room
 icon. Choose the duration for which you want to book the room from the drop-down list that appears.
Note This room booking feature will be available only if the "Room Booking" feature is added to the configuration that is associated to the location.
Step 4![]() Enter your user ID to book the room. The room is reserved for the selected time slot. The following room reservation details are displayed on the IP phone:
Enter your user ID to book the room. The room is reserved for the selected time slot. The following room reservation details are displayed on the IP phone:
Note The booking of conference/TP rooms feature is not available in non-touchscreen IP phones.
Using Room Panels
To book a conference/TP room using touchscreen IP phone, perform the following steps:
A dialog box appears displaying all the half-hour time slots available before the next booking for the room.
Step 2![]() (Optional) Only a certain number of half-hour time slots are displayed per view. Tap the left and right arrow buttons to scroll through the time slots.
(Optional) Only a certain number of half-hour time slots are displayed per view. Tap the left and right arrow buttons to scroll through the time slots.
Step 3![]() Tap the required time slot. By default, the next half-hour slot is highlighted.
Tap the required time slot. By default, the next half-hour slot is highlighted.
For example, you try to book the room at 9.20 am. The next slot is 9.30 am and the room is available from this slot. When you tap Book Now, the 10 am slot will be highlighted by default.
A dialog box appears displaying the Username field.
Step 5![]() Enter your user ID in the Username field by using the onscreen keyboard.
Enter your user ID in the Username field by using the onscreen keyboard.
A message appears at the top of the screen informing that your request has been received, and you are asked to check your mail to know the booking status. A booking confirmation mail, which displays details such as the date, time, and location of the meeting, is send to your e-mail ID.
The room panel interface is refreshed to display the updated schedule. Your name is displayed for the booked time slot in the room schedule that appears on the room panel.
Step 7![]() (Alternatively) Tap the
(Alternatively) Tap the  button on any of the two dialog boxes to return to the main room panel screen without booking the room.
Using the Smart+Connected MS Web Portal
You can book conference rooms by using the Smart+Connected MS web portal. For more information, see Chapter 3, “Booking Rooms Using the Portal”.
Releasing Conference/TP Rooms using Room Panels
To release a conference/TP room using a room panel, tap the Release Room button. This button is available after a meeting is started using the room panel, that is, after you tap the Start Meeting button. The button is available till the meeting time lapses. When you tap the Release Room button, the room status changes from ‘Meeting in progress’ to ‘Room Released’. The room can be used by other employees in the enterprise. Releasing a room results in energy savings as the devices in the room are reverted to non-occupancy settings.
Automatic Room Release
When no occupancy is detected in a conference/TP room or when the attendees fail to tap the Start Meeting button x minutes after the meeting start time, the conference/TP room is released automatically. Where, x is the automatic room release interval configured by the administrator. The words “Room Released” are displayed on the room panel screen and the room can be used by other employees in the enterprise.
 Feedback