Secure Workload Integration with Secure Firewall Management Center
About this Integration
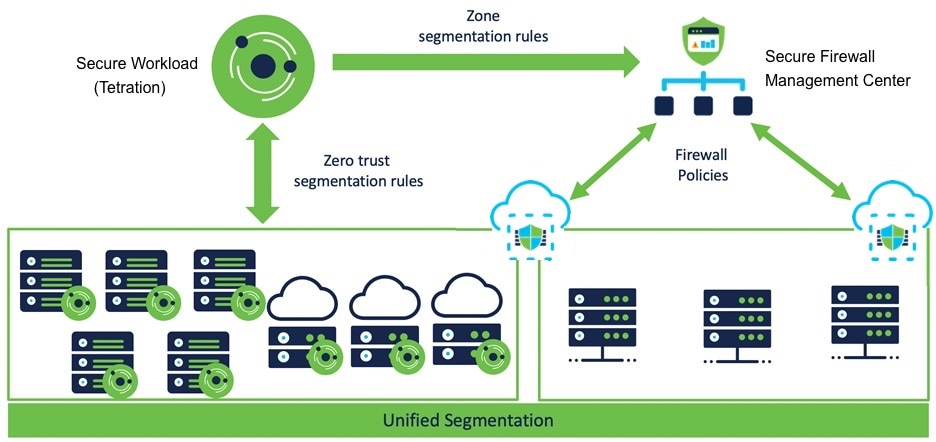
Integrate the capabilities of Cisco Secure Workload (formerly Cisco Tetration) with the robust features of Cisco's Secure Firewall (formerly Cisco FMC) to establish an agentless security solution specifically designed for:
-
Segmenting workloads where software agents cannot be installed.
For example, use this integration if you do not have control over workload operating systems (appliance-based software), or if workloads are running on legacy operating systems that are not supported by the agents.
-
Segmenting traffic for different zones within your datacenter and cloud.
For example, you can easily and broadly apply different sets of policies for traffic entering your network, for traffic exiting your network, and for traffic between workloads within your network.
With this integration, Secure Workload automatically enforces and manages segmentation policies on the Secure Firewall Threat Defense (formerly known as Firepower Threat Defense) firewalls managed by the FMC instance. Policies are updated dynamically, and the set of workloads to which policies apply is refreshed continually as the application environment changes.
All versions:
The FMC external orchestrator does not generate any user annotations.
Use this guide to deploy the applicable solution for your product versions.
Feature History
|
Feature Name |
Release |
Feature Description |
Where to Find |
|---|---|---|---|
|
Segmentation Workflow |
3.9.1.1 |
Simplified workflow for the mapping of Scope to Access Control Policies for Secure Firewall Management Center (FMC) and Firepower Threat Defense (FTD) enforcement. The enhanced API integration marks the decoupling of Segmentation and Virtual Patching workflows. |
|
|
Virtual Patching Workflow |
3.8.1.1 |
Simplified workflow for workload or Common Vulnerability and Exposure (CVE) filtering. |
Supported Deployments
Product Versions
|
Key Features |
Secure Workload Version |
Secure Firewall Management Center and Secure Firewall Threat Defense Version |
|---|---|---|
|
Simplified workflow for the mapping of Scope to Access Control Policies for Secure Firewall Management Center (FMC) and Firepower Threat Defense (FTD) enforcement. |
3.9.1.1 |
7.2 for Segmentation and Virtual Patching 7.1 for Virtual Patching 7.0.x for Segmentation |
|
3.8.1.1 3.8.1.36 |
7.2 for Segmentation and Virtual Patching 7.1 for Virtual Patching 7.0.x for Segmentation |
Supported Secure Firewall Platforms and Deployments
-
Supports only FTD devices managed by FMC.
-
Supports FMC high availability:
-
If you include the hostname/IP address of the standby/secondary FMC when configuring the FMC external orchestrator, then when FMC switches to the new active primary appliance, the integration automatically switches to use the new active FMC.
-
-
Supports FTD Routed and Transparent firewall modes.
For more information about FTD modes, see the Transparent or Routed Firewall Mode for Secure Firewall Threat Defense chapter in the Secure Firewall Management Center Configuration Guide for your version.
Prerequisites for Integration: Secure Workload
-
Set up a supported FMC and at least one supported FTD device. For complete information, see the Cisco Secure Firewall Management Center documentation for your products, including the Cisco Secure Firewall Management Center documentation roadmaps.
-
For enforcement, ensure that:
-
You have associated the FTD devices with the FMC.
-
You have assigned each FTD to an access control policy.
-
You have verified that policies can be deployed from the FMC to the FTD(s) and that the system processes network traffic as expected.
-
-
For Virtual Patching, ensure that:
-
The network discovery policy is correctly configured to discover hosts and these hosts are visible under Analysis > Network Map.
-
A Threat intelligence CVE data pack is installed on the Secure Workload cluster.
-
Secure Workload agents are installed on the workloads where Virtual Patching needs to be applied.
-
The workloads (where Virtual Patching needs to be applied) are using one of the FTD addresses as a network gateway.
-
Secure Workload detects CVEs on the workloads where Virtual Patching needs to be applied.
-
-
Set up and verify that your Secure Workload appliance (On-Premises) or account (SaaS) is functioning as expected.
-
If you are using Secure Workload SaaS, or if an on-premises Secure Workload cannot directly reach the FMC appliance:
-
Set up a Secure Connector tunnel to provide connectivity between the solution components.
By default, Secure Workload communicates with the FMC REST API using HTTPS on port 443.
For instructions on setting up the Secure Connector, see the Secure Workload User Guide, available as online help in your Secure Workload web interface.
-
About Upgrades
If you configured the FMC integration in version 3.9 and want to upgrade to version 3.10.2.11, see Cisco Secure Workload Upgrade Guide.
Implement this Integration for Secure Workload Version 3.10.2.11
This section applies to all versions of Secure Workload 3.10.
Connection Settings in 3.10.2.11
Create the Secure Firewall connector in Secure Workload to establish communication with the Secure Firewall Management Center.
-
From the navigation pane, choose .
-
Under Firewall, click Cisco Secure Firewall.
-
To configure the Secure Firewall connector, click Configure your new connector here.
-
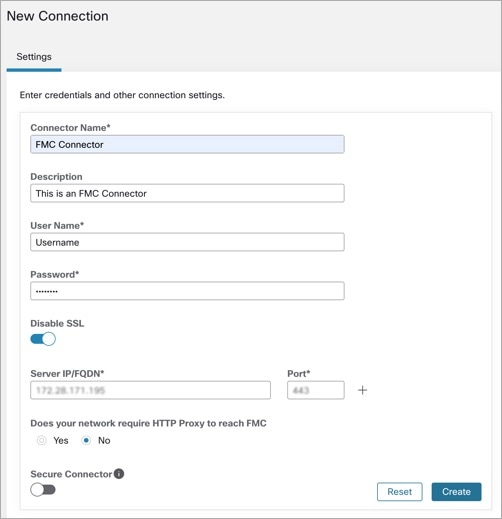
In the New Connection page, enter the credentials and other connection settings as follows:
Fields
Description
Connector Name
Enter a unique name for the FMC connector.
Description
Enter a description.
Username and Password
Enter the credentials that are used to communicate with the FMC.
CA Certificate
To use secure authentication, enter the CA Certificate that Secure Workload uses to authenticate this FMC, or you can Disable SSL where the network is trusted and Secure Workload does not validate the certificate.
You can obtain the CA certificate from FMC using the Object Management workflow.
Server IP/FQDN* and Port
Enter the Server IP address and Port Number for the associated FMC. The hostname must be a fully qualified domain name or an IP address of FMC.
Does your network require HTTP Proxy to reach FMC
If yes, enter the Proxy URL in the format <proxy.host> : <proxy.port>
Secure Connector
Enable if a Secure Connector is used to tunnel connections from Secure Workload to FMC.
Note
Ensure that you deploy a Secure Connector before enabling this option.
-
Click Create.
Segmentation in 3.10.2.11
Secure Workload enforced segmentation policies are converted into Access Control Policies, utilizing IP address sets derived from scopes, inventory filters, and clusters. These sets are transformed into dynamic objects within the Secure Firewall Management Center.
Converted segmentation policies from Secure Workload are added to the FMC as rules in the respective sections of the access control policy. The Absolute policies are added in the Mandatory rules section and the Default policies are added in the Default rules section.
Add the following types of access control rules:
-
Rules with prefix: Workload_golden_:
These rules, called golden rules, ensure that Secure Workload can communicate with any Secure Workload agents that are installed on workloads behind the Secure Firewalls.
-
Rules with prefix: Workload_:
These are the rules that are converted from segmentation policies in application workspaces for which enforcement is enabled.
-
Rules with prefix: Workload_ca_:
These are the converted catch-all rules for each enforced application workspace. From Secure Workload version, you can use the catch-all rules of Secure Workload only if you have selected the Use Secure Workload Catch-All option while configuring the FMC connector.
-
Dynamic objects are created with the prefix: WorkloadObj_
 Note |
|
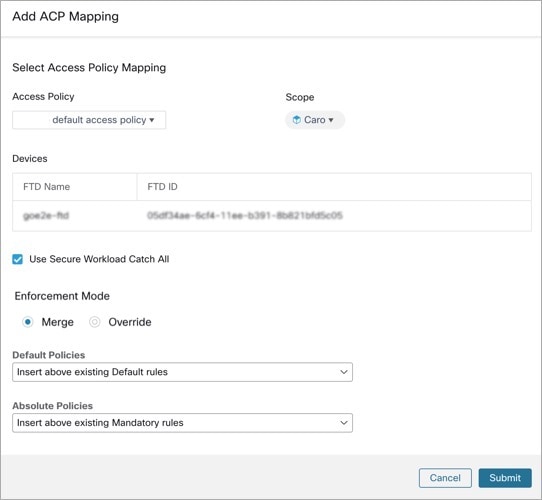
Add ACP Mapping
-
In the Segmentation tab, click + Add to map an Access Policy.
-
In the Add ACP Mapping window, choose an Access Policy from the drop-down list and map it to a Scope. You can map an Access Policy to only one Scope.
-
Check the Use Secure Workload Catch All check-box to enable catch-all rules from Secure Workload. The catch-all Secure Workload rules are listed after all other rules (Secure Workload rules and rules created directly in FMC, if any) in the Default section of Access Control Policies. If you decide to disable catch-all rules from Secure Workload, deselect this option to use the Default Action of the Secure Firewall Management Center Access Control Policy.
-
Select an option in the Enforcement Mode.
-
Merge: Secure Workload policy rules are added along with the existing rules created by users. You can configure the priority as explained in the next step.
-
Override: The existing rules created by users are replaced by Secure Workload policy rules.
Note
The priority drop-down list is available only when Merge is selected as the Enforcement Mode.
-
-
In the Absolute and Default Policies drop-down menus, choose the required option to set the priority for Secure Workload policies to be higher or lower to the pre-existing rules in the respective section of the Access Control Policy in FMC.
-
Choosing Insert above existing Mandatory rules makes Secure Workload policies take higher priority over Mandatory rules.
-
Choosing Insert below existing Mandatory rules makes Secure Workload policies take lower priority over Mandatory rules.
For example, from the Absolute Policies drop-down list, if you choose Insert above existing Mandatory rules, the Secure Workload rules are configured at the beginning of the Mandatory section followed by any pre-existing access control rules in the FMC. When a new rule is created, the rule order of the Access Control Policy is updated based on the selected priority for policies in Secure Workload.
-
-
Click Submit.
Edit ACP Mapping
To edit the Access Control Policy mapping
-
From the navigation pane, choose and click on the policy you want to edit.
-
Under Action, click the pencil icon to edit.
-
Update the details and click Submit.
-
Click Save to save all edits.

Virtual Patching in 3.10.2.11
Virtual Patching, also known as External Patching and Just-in-time Patching, is a security technique that is used to protect applications and computer systems from known vulnerabilities. Virtual Patching, originally used by the Intrusion Prevention System (IPS), implements temporary fixes or workarounds to address vulnerabilities until a permanent patch can be developed and applied.
For example, organisations following the Software Development Life Cycle, take time to detect, fix, and develop a new version of the application. The system can be protected by introducing a firewall and adding the IPS rules, until the newer version of the application is rolled out. Secure Workload publishes the CVEs to the firewall to consider while creating the IPS policies.
-
In the Create a Virtual Patching Rule window, enter a Rule Name and Description.
-
Select an Existing Filter from the drop-down list. You can select an existing scope or subscope to select the hosts to consider for Virtual Patching.
-
By default, the Use Filter as Host Query check box is checked. You can proceed by just entering the CVE query; without creating a new Virtual Patching filter. The Host Query includes the contents of the filter chosen.
Figure 4. Without Creating a New Virtual Patching Filter 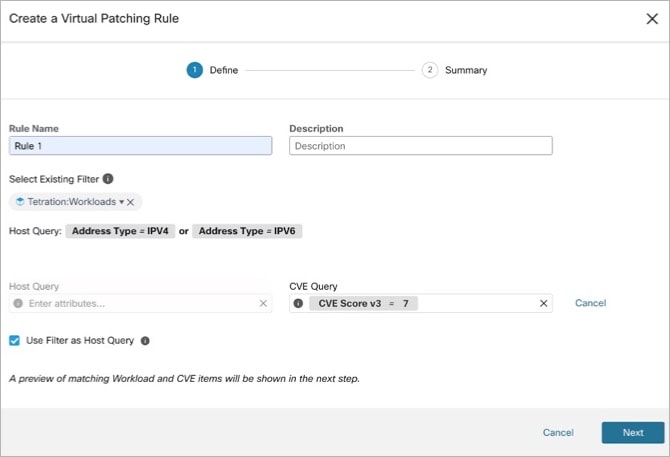
-
Uncheck the Use Filter as Host Query check box to enter both the Host and CVE query. This creates a new Virtual Patching filter.
Figure 5. Create a New Virtual Patching Filter 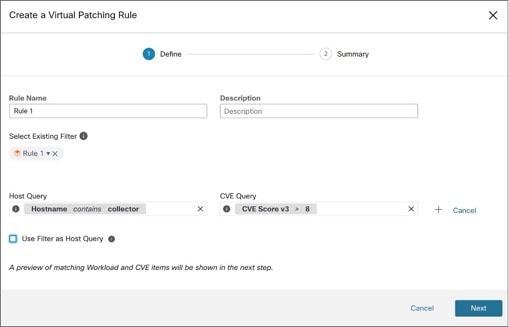
-
-
Enter a Host and CVE query. Click the + icon to add more queries.
Note
-
Hover over the info icon to view the supported query formats.
-
By default, a Virtual Patching filter is created based on the entered query combination.
-
-
Click Next. In the Summary window, lists of matching Workloads and CVEs are displayed. Workloads and CVEs are matched dynamically based on the query.
-
Click Create.
-
Added virtual patching rules are displayed under Rules. Enter attributes and click Filter to narrow down the search results.
-
Workloads with Published CVEs are displayed on the right.
-
Enter attributes and click Filter to narrow down the search results.
-
Click the column headers to sort the entries.
-
In the Exported column, click CVEs List to view a list of all published CVEs of a workload.
-
Click the hamburger menu to view the Audit Log of a workload. Logs for the last 48 hours are stored and displayed.
-
Edit a Virtual Patching Rule
-
Click Edit to add more rules, modify the details, and/or delete a rule.
Figure 6. Edit a Virtual Patching Rule 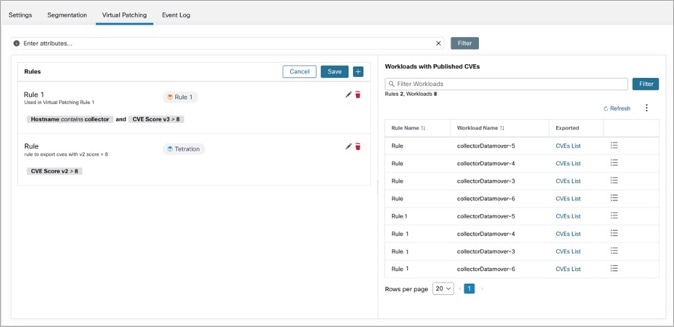
-
Click the + icon to add more rules. Click Save.
-
Click the bin icon to delete a rule.
-
-
Click the pencil icon to modify the details of a rule.
-
In the Edit Virtual Patching Rule window, modify the Host and CVE Query as required and save the changes.
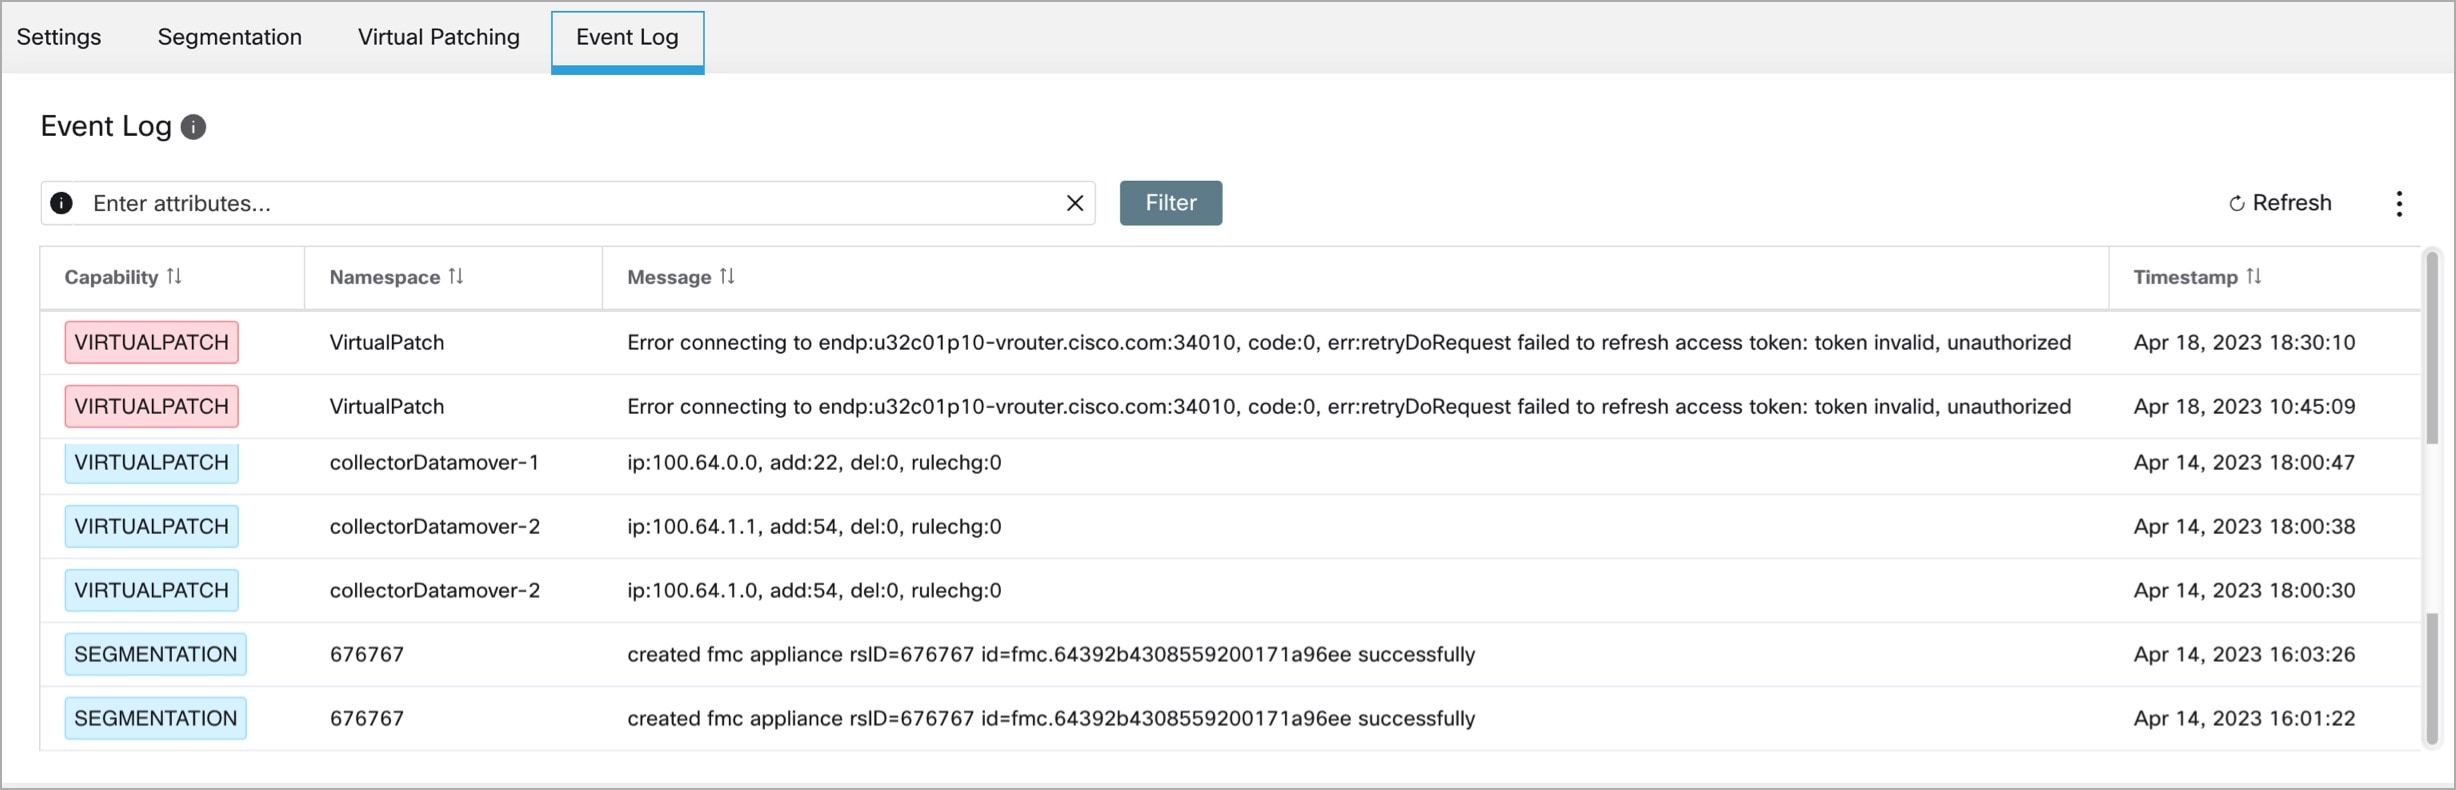
Event Log in 3.10.2.11
The Event Log tab lists the important events or transactions between Secure Workload and FMC.
-
Enter attributes to filter the events based on Capability, Event Level, Namespace, and Message.
Note
Color codes for the Event level are Information (blue), Warning (orange), and Error (red).
-
Click the column headers to sort the entries.
-
Click the three dot menu icon to download the details in JSON and/or CSV format.
-
Click Refresh to reset all filters.
Implement this Integration for Secure Workload Version 3.9.1.1
This section applies to all versions of Secure Workload 3.9.
Connection Settings in 3.9.1.1
Create the Secure Firewall connector in Secure Workload to establish communication with the Secure Firewall Management Center.
-
From the navigation pane, choose .
-
Under Firewall, click Cisco Secure Firewall.
-
To configure the Secure Firewall connector, click Configure your new connector here.
-
In the New Connection page, enter the credentials and other connection settings as follows:
Fields
Description
Connector Name
Enter a unique name for the FMC connector.
Description
Enter a description.
Username and Password
Enter the credentials that are used to communicate with the FMC.
CA Certificate
To use secure authentication, enter the CA Certificate that Secure Workload uses to authenticate this FMC, or you can Disable SSL where the network is trusted and Secure Workload does not validate the certificate.
You can obtain the CA certificate from FMC using the Object Management workflow.
Server IP/FQDN* and Port
Enter the Server IP address and Port Number for the associated FMC. The hostname must be a fully qualified domain name or an IP address of FMC.
Does your network require HTTP Proxy to reach FMC
If yes, enter the Proxy URL in the format <proxy.host> : <proxy.port>
Secure Connector
Enable if a Secure Connector is used to tunnel connections from Secure Workload to FMC.
Note
Ensure that you deploy a Secure Connector before enabling this option.
-
Click Create.
Segmentation in 3.9.1.1
Secure Workload enforced segmentation policies are converted into Access Control Policies, utilizing IP address sets derived from scopes, inventory filters, and clusters. These sets are transformed into dynamic objects within the Secure Firewall Management Center.
Converted segmentation policies from Secure Workload are added to the FMC as rules in the respective sections of the access control policy. The Absolute policies are added in the Mandatory rules section and the Default policies are added in the Default rules section.
Add the following types of access control rules:
-
Rules with prefix: Workload_golden_:
These rules, called golden rules, ensure that Secure Workload can communicate with any Secure Workload agents that are installed on workloads behind the Secure Firewalls.
-
Rules with prefix: Workload_:
These are the rules that are converted from segmentation policies in application workspaces for which enforcement is enabled.
-
Rules with prefix: Workload_ca_:
These are the converted catch-all rules for each enforced application workspace. From Secure Workload version, you can use the catch-all rules of Secure Workload only if you have selected the Use Secure Workload Catch-All option while configuring the FMC connector.
-
Dynamic objects are created with the prefix: WorkloadObj_
Note |
|
Add ACP Mapping
-
In the Segmentation tab, click + Add to map an Access Policy.
-
In the Add ACP Mapping window, choose an Access Policy from the drop-down list and map it to a Scope. You can map an Access Policy to only one Scope.
-
Check the Use Secure Workload Catch All check box to enable catch-all rules from Secure Workload. The catch-all Secure Workload rules are listed after all other rules (Secure Workload rules and rules created directly in FMC, if any) in the Default section of Access Control Policies. If you decide to disable catch-all rules from Secure Workload, deselect this option to use the Default Action of the Secure Firewall Management Center Access Control Policy.
-
Select an option in the Enforcement Mode.
-
Merge: Secure Workload policy rules are added along with the existing rules created by users. You can configure the priority as explained in the next step.
-
Override: The existing rules created by users are replaced by Secure Workload policy rules.
Note
The priority drop-down list is available only when Merge is selected as the Enforcement Mode.
-
-
In the Absolute and Default Policies drop-down menus, choose the required option to set the priority for Secure Workload policies to be higher or lower to the pre-existing rules in the respective section of the Access Control Policy in FMC.
-
Choosing Insert above existing Mandatory rules makes Secure Workload policies take higher priority over Mandatory rules.
-
Choosing Insert below existing Mandatory rules makes Secure Workload policies take lower priority over Mandatory rules.
For example, from the Absolute Policies drop-down list, if you choose Insert above existing Mandatory rules, the Secure Workload rules are configured at the beginning of the Mandatory section followed by any pre-existing access control rules in the FMC. When a new rule is created, the rule order of the Access Control Policy is updated based on the selected priority for policies in Secure Workload.
-
-
Click Submit.
Edit ACP Mapping
Edit the Access Control Policy Mapping:
-
From the navigation menu, choose and click on the policy you want to edit.
-
Under Action, click the pencil icon to edit.
-
Update the details and click Submit.
-
Click Save to save all edits.
Virtual Patching in 3.9.1.1
Virtual Patching, also known as External Patching and Just-in-time Patching, is a security technique that is used to protect applications and computer systems from known vulnerabilities. Virtual Patching, originally used by the Intrusion Prevention System (IPS), implements temporary fixes or workarounds to address vulnerabilities until a permanent patch can be developed and applied.
For example, organisations following the Software Development Life Cycle, take time to detect, fix, and develop a new version of the application. The system can be protected by introducing a firewall and adding the IPS rules, until the newer version of the application is rolled out. Secure Workload publishes the CVEs to the firewall to consider while creating the IPS policies.
-
In the Create a Virtual Patching Rule window, enter a Rule Name and Description.
-
Select an Existing Filter from the drop-down list. You can select an existing scope or subscope to select the hosts to consider for Virtual Patching.
-
By default, the Use Filter as Host Query check box is checked. You can proceed by just entering the CVE query; without creating a new Virtual Patching filter. The Host Query includes the contents of the filter chosen.
Figure 10. Without Creating a New Virtual Patching Filter
-
Uncheck the Use Filter as Host Query check box to enter both the Host and CVE query. This creates a new Virtual Patching filter.
Figure 11. Create a New Virtual Patching Filter
-
-
Enter a Host and CVE query. Click the + icon to add more queries.
Note
-
Hover over the info icon to view the supported query formats.
-
By default, a Virtual Patching filter is created based on the entered query combination.
-
-
Click Next. In the Summary window, lists of matching Workloads and CVEs are displayed. Workloads and CVEs are matched dynamically based on the query.
-
Click Create.
-
Added virtual patching rules are displayed under Rules. Enter attributes and click Filter to narrow down the search results.
-
Workloads with Published CVEs are displayed on the right.
-
Enter attributes and click Filter to narrow down the search results.
-
Click the column headers to sort the entries.
-
In the Exported column, click CVEs List to view a list of all published CVEs of a workload.
-
Click the hamburger menu to view the Audit Log of a workload. Logs for the last 48 hours are stored and displayed.
-
Edit a Virtual Patching Rule
-
Click Edit to add more rules, modify the details, and/or delete a rule.
Figure 12. Edit a Virtual Patching Rule
-
Click the + icon to add more rules. Click Save.
-
Click the bin icon to delete a rule.
-
-
Click the pencil icon to modify the details of a rule.
-
In the Edit Virtual Patching Rule window, modify the Host and CVE Query as required and save the changes.
Event Log in 3.9.1.1
The Event Log tab lists the important events or transactions between Secure Workload and FMC.
-
Enter attributes to filter the events based on Capability, Event Level, Namespace, and Message.
Note
Color codes for the Event level are Information (blue), Warning (orange), and Error (red).
-
Click the column headers to sort the entries.
-
Click the three dot menu icon to download the details in JSON and/or CSV format.
-
Click Refresh to reset all filters.
View Enforcement Status of Domains
For release 3.9.1.1 or later, to see which domains are enforced:
-
Edit the configuration for the particular FMC orchestrator.
-
Click Domains.
-
Enforcement is enabled for all domains listed on this Domains page.
Troubleshoot the Secure Workload Integration with Secure Firewall Management Center
Use the following procedures to troubleshoot common configuration issues in the integration between Secure Workload and Secure Firewall Management Center.
Troubleshoot Integration Connection Issues
Use the External Orchestrators page to identify common issues behind connection failures.
-
From the navigation pane, choose External Orchestrators.
-
On the External Orchestrators page, find the row for your FMC orchestrator.
-
The integration connection status appears under the Connection Status column. If this column displays
Failure, click on the row to show more details. -
In the Configuration Details table, find the Authentication Failure Error row.
If the Authentication Failure Error field displays Waiting to connect, wait another minute or two before refreshing the page.
fmc clusterUUID=602c4264755f0263ee16e5af failed to connect to appliance 172.28.171.193:10447Check for the following configuration issues:
|
Issue |
Troubleshooting Steps |
||
|---|---|---|---|
|
The configured IP |
Ensure that the FMC Verify your connectivity to the configured IP and port. |
||
|
The Username or Password is incorrect. |
Ensure that the Username and Password fields that you entered in the FMC orchestrator configuration match the dedicated user that you created in FMC, and that the user has the required privileges as specified previously in this document.
|
||
|
The Secure Connector Tunnel checkbox is checked in the FMC orchestrator's Basic Configs, but the Secure Connector is not deployed correctly. |
Ensure that the Secure Connector is deployed correctly. For more informaiton, see the Secure Connector section of the user guide: |
For more information on enforcement status of domains, see View Enforcement Status of Domains.
Note |
The Status list does not show per-domain enforcement status. |
Policy Update Fails in FMC High Availability Deployment
It can take up to four minutes for the update switchover to complete; during this time, any policy enforcement to the non-active Secure Firewall device fails.
Rules missing from Secure Workload in Access Control Policy
-
Rules are pushed only to access control policies that have at least one FTD assigned.
-
Check the connection status of the FMC orchestrator on the External Orchestrators page.
Contact Cisco TAC
If your issue persists, contact the appropriate Cisco support team based on your deployment:
-
Secure Workload On-Premises - Contact TAC
-
Secure Workload SaaS - Open a case with the SaaS support team
 Feedback