Integrating with Cisco SecureX and Cisco Threat Response

This chapter contains the following sections:

Integrating Your Appliance with Cisco SecureX

Cisco SecureX is a security platform embedded with every Cisco security product. It is cloud-native with no new technology to deploy. Cisco SecureX simplifies the demands of threat protection by providing a platform that unifies visibility, enables automation, and strengthens your security across network, endpoints, cloud, and applications. By connecting technology in an integrated platform, Cisco SecureX delivers measurable insights, desirable outcomes, and unparalleled cross-team collaboration. Cisco SecureX enables you to expand your capabilities by connecting your security infrastructure.

Integrating the Appliance with Cisco SecureX contains the following sections:

You can integrate your appliance with Cisco SecureX, and perform the following actions in Cisco SecureX:

  • View and send the email data from multiple appliances in your organization.

  • Identify, investigate and remediate threats observed in the email reports, sender and target relationships, search for multiple email addresses and subject lines and message tracking.

  • Block compromised users or users violating outgoing email policies.

  • Resolve the identified threats rapidly and provide recommended actions to take against the identified threats.

  • Document the threats to save the investigation and enable collaboration of information among other devices.

  • Block malicious domains, track suspicious observances, initiate an approval workflow or to create an IT ticket to update email policy.

You can access Cisco SecureX using the following URL:

https://securex.us.security.cisco.com/login

Cisco Security Management Appliance (SMA) centralizes management and reporting functions across multiple Cisco email security appliances. For more information on observables that can be enriched by the SMA Email module, see https://securex.us.security.cisco.com/help/module-sma.

How to Integrate Your Appliance with Cisco SecureX

Table 1. How to Integrate Your Appliance with Cisco SecureX

Do This

More Info

Step 1

Review the prerequisites.

Prerequisites

Step 2

On your Security Management appliance, enable the Cisco SecureX integration.

Enable the SecureX integration on your Security Management Appliance

Step 3

On Cisco SecureX, add your appliance as a device, register it, and generate a registration token.

See Configure Security Services Exchange topic on https://securex.us.security.cisco.com/help/module-sma.

Step 4

On your Security Management appliance, complete the Cisco SecureX registration.

Register Cisco SecureX on your Security Management Appliance

Step 5

Confirm whether the registration was successful.

Confirm whether the Registration was successful

Step 6

On Cisco SecureX, add SMA Email Module.

See Add SMA Email Module topic on https://securex.us.security.cisco.com/help/module-sma.

Prerequisites

  • Make sure that you create a user account in Cisco SecureX with admin access rights. To create a new user account, go to Cisco SecureX login page using the URL https://securex.us.security.cisco.com/login and click Create a SecureX Sign-on Account in the login page. If you are unable to create a new user account, contact Cisco TAC for assistance.

  • [Only if you are not using a proxy server .] Make sure that you open HTTPS (In and Out) 443 port on the firewall for the following FQDNs to register your appliance with Cisco SecureX:

    • api-sse.cisco.com (applicable for NAM users only)

    • api.eu.sse.itd.cisco.com (applicable for European Union (EU) users only)

    • api.apj.sse.itd.cisco.com (applicable for APJC users only)

    • est.sco.cisco.com (applicable for APJC, EU, and NAM users)

    For more information, see Firewall Information.

Enable the Cisco SecureX Integration on your Security Management Appliance

Procedure

Step 1

Log in to your appliance.

Step 2

Select Networks > Cloud Service Settings.

Step 3

Click Edit Settings.

Step 4

Check the Enable check box.

Step 5

Choose the required Cisco SecureX server to connect your appliance to Cisco SecureX.

Step 6

Submit and commit your changes.

Step 7

Wait for few minutes, and check whether the Register button appears on your appliance.


Note

To enable this integration using the CLI, use the threatresponseconfig command.
What to do next

Register your appliance on Cisco SecureX. For more information, see Configure Security Services Exchange topic on https://securex.us.security.cisco.com/help/module-sma.

Register Cisco SecureX on Your Security Management Appliance

Procedure

Step 1

Go to Networks > Cloud Service Settings.

Step 2

In Cloud Services Settings, enter the registration token, and click Register.


Note

To register Cisco SecureX using the CLI, use the cloudserviceconfig command.
What to do next

Confirm Whether the Registration was Successful

Confirm Whether the Registration was Successful

  • On Security Services Exchange, confirm successful registration by reviewing the status in Security Services Exchange.

  • On Cisco SecureX, navigate to the Devices page and view the SMA that has been registered with Security Services Exchange.


Note

If you want to switch to another Cisco SecureX server (for example, 'Europe - api.eu.sse.itd.cisco.com'), you must first deregister your appliance from Cisco SecureX and follow steps mentioned in How to Integrate Your Appliance with Cisco SecureX.

After you have integrated your appliance with Cisco SecureX, you do not need to integrate your Email Security appliance with Cisco SecureX because the email and web reporting features are centralized.

After successful registration of your appliance on Security Services Excange, add the SMA Email module on Cisco SecureX. For more information, see Add SMA Email Module topic on https://securex.us.security.cisco.com/help/module-sma.


Performing Threat Analysis using Cisco SecureX Ribbon


Note

When you upgrade from Security Management Appliance 13.6.1 or earlier versions, Casebook will be part of the Cisco SecureX Ribbon.


Cisco SecureX supports a distributed set of capabilities that unify visibility, enable automation, accelerate incident response workflows, and improve threat hunting. These distributed capabilities are presented in the form of applications (apps) and tools in the Cisco SecureX Ribbon.

This topic contains the following sections:

You will find the Cisco SecureX Ribbon at the bottom pane of the page, and it persists as you move between the dashboard and other security products in your environment. Cisco SecureX Ribbon consists of the following icons and elements:

  • Expand/Collapse Ribbon

  • Home

  • Casebook App

  • Incidents App

  • Orbital App

  • Enrichment Search Box

  • Find Observables

  • Settings

For more information on Cisco SecureX Ribbon, see https://securex.us.security.cisco.com/help/ribbon.

Accessing the Cisco SecureX Ribbon

Before you begin
Make sure that you meet all the prerequisites that are mentioned in Prerequisites.

Note

If you have already configured Casebook for Security Management Appliance 13.6.1 or earlier versions, you need not create a Client ID and Client Secret in Cisco Threat Response API client. You will be automatically logged into Cisco SecureX Ribbon.

You can drag the Cisco SecureX Ribbon, positioned at the bottom pane of the page, from right using button.

Procedure

Step 1

Log in to the new web interface of your appliance. For more information, see Accessing the Web Interface.

Step 2

Click the Cisco SecureX Ribbon.

Step 3

Create a Client ID and Client Secret in Threat Response API Client. For more information to generate API Client credentials, see Creating an API Client.

While creating a client ID and client password, make sure that you choose the following scopes:

  • casebook

  • enrich:read

  • global-intel:read

  • inspect:read

  • integration:read

  • profile

  • private-intel

  • response

  • registry/user/ribbon

  • telemetry:write

  • users:read

  • orbital (if you have access)

Step 4

Enter the client ID and client password obtained in Step 3 in the Login to use SecureX Ribbon dialog box in your appliance.

Step 5

Select the required Cisco SecureX server in the Login to use SecureX Ribbon dialog box.

Step 6

Click Authenticate.

Note 

If you want to edit the client ID, client password, and Cisco SecureX server, right-click on the Cisco SecureX Ribbon, and add the details.


What to do next

Adding Observable to Casebook for Threat Analysis

Adding Observable to Casebook for Threat Analysis

Before you begin

Make sure that you obtain the client ID and client password to access the casebook and pivot menu widgets on your appliance. For more information, see Accessing the Cisco SecureX Ribbon.

Procedure

Step 1

Log in to the new web interface of your appliance. For more information, see Accessing the Web Interface.

Step 2

Navigate to the Email Reporting or Web Reporting page, click the pivot menu button next to the required observable (for example, bit.ly).

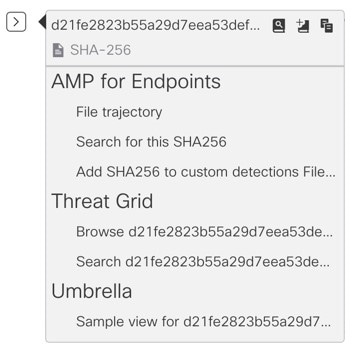
Perform the following:

  • Click button to add an observable to active case.

  • Click button to add the observable to new case.

Note 
Use the pivot menu button to pivot an observable to other devices registered on the portal (for example, AMP for Endpoints) to investigate for threat analysis.
Step 3

Hover over icon and click button to open the Casebook. Check whether the observable is added to a new or an existing case.

Step 4

(Optional) Click button to add a title, description, or notes to the Casebook.


Note

You can search for observables for threat analysis in two different ways:
  • Click the Enrichment search box from the Cisco SecureX Ribbon and search for the observables.

  • Click the Casebook icon inside the Cisco SecureX Ribbon and search for the observables in the search field.

For more information on Cisco SecureX Ribbon, see https://securex.us.security.cisco.com/help/ribbon.

Integrating Your Appliance with Cisco Threat Response

This topic contains the following sections:

Integrating with Cisco Threat Response

You can integrate your appliance with Cisco Threat Response, and perform the following actions in Cisco Threat Response:

  • View the email and web reporting data from multiple appliances in your organization.

  • Identify, investigate and remediate threats observed in the email reports, message tracking and web tracking.

  • Resolve the identified threats rapidly and provide recommended actions to take against the identified threats.

  • Document the threats to save the investigation, and enable collaboration of information among other devices.

To integrate your appliance with Cisco Threat Response, you need to register your appliance with Cisco Threat Response.

You can access Cisco Threat Response using the following URLs:

Before you begin

  • Make sure that you create a user account in Cisco Threat Response with admin access rights. To create a new user account, go to Cisco Threat Response login page using the following URL - https://visibility.amp.cisco.com and click Create a Cisco Security account in the login page. If you are unable to create a new user account, contact Cisco TAC for assistance.

  • Make sure that you enable Cisco Threat Response integration on the Cisco Security Services Exchange (SSE) portal. For more information, see the Cisco Threat Response documentation at https://visibility.amp.cisco.com/#/help/module-sma.

  • [Only if you are not using a proxy server.] Make sure that you open HTTPS (In and Out) 443 port on the firewall for the following FQDNs to register your appliance with Cisco Threat Response:

    • api.apj.sse.itd.cisco.com (applicable for APJC users only)

    • api.eu.sse.itd.cisco.com (applicable for European Union (EU) users only)

    • api-sse.cisco.com (applicable for NAM users only)

    • est.sco.cisco.com (applicable for APJC, EU, and NAM users)

For more information, see Firewall Information.

Procedure


Step 1

Log in to your appliance.

Step 2

Select Networks > Cloud Service Settings.

Step 3

Click Edit Settings.

Step 4

Check Enable.

Step 5

Choose the required Cisco Threat Response server to connect your appliance to Cisco Threat Response.

Step 6

[Optional] Choose Use Proxy to connect your appliance to Cisco Threat Response using a proxy server.

Note 
To add and configure a proxy server, go to System Administration > Update Settings page of the web interface of your appliance.
Step 7

Submit and commit your changes.

Step 8

Navigate back to the Cloud Service Settings page after few minutes to register your appliance with Cisco Threat Response.

Step 9

Obtain a registration token from Cisco Threat Response to register your appliance with Cisco Threat Response . For more information, see the Cisco Threat Response documentation at https://visibility.amp.cisco.com/#/help/module-sma.

Step 10

Enter the registration token obtained from Cisco Threat Response and click Register.

Step 11

Add your appliance as an integration module to Cisco Threat Response. For more information, see the Cisco Threat Response documentation at https://visibility.amp.cisco.com/#/help/module-sma.


You can integrate your appliance with Cisco Threat Response using the following CLI commands:

  • threatresponseconfig—Use this command to configure the Cisco Threat Response feature on your appliance.

  • cloudserviceconfig—Use this command to register the Cisco Threat Response feature on your appliance.

What to do next

  • After you add your appliance as an integration module in Cisco Threat Response, you can view the email and web reporting, and message tracking information from your appliance in Cisco Threat Response. For more information, see the Cisco Threat Response documentation at https://visibility.amp.cisco.com/#/help/module-sma.


    Note

    To deregister your appliance connection from Cisco Threat Response, click Deregister in the Cloud Services Settings page in your appliance.
  • You can now configure web modules on Cisco Threat Response.

    Navigate to Settings > Integration Modules > Configure Modules > SMA Web - Cisco Content Security Management Appliance - Web on Cisco Threat Response.

    For more information, see https://visibility.amp.cisco.com/?beta-modules=1.


    Note

    This feature is still in BETA.
  • If you want to switch to another Cisco Threat Response server (for example, 'Europe - api.eu.sse.itd.cisco.com'), you must first deregister your appliance from Cisco Threat Response and follow steps 1-9 of the 'Integrating the Appliance with Cisco Threat Response' procedure.


Note

After you have integrated your appliance with Cisco Threat Response, you do not need to integrate your Email Security appliance with Cisco Threat Response because the email and web reporting features are centralized.

Performing Threat Analysis using Casebooks

The casebook and pivot menu are widgets available in Cisco Threat Response.

Casebook - It is used to record, organize, and share sets of observables of interest primarily during an investigation and threat analysis. You can use a casebook to get the current verdicts or dispositions on the observables. For more information, see the Cisco Threat Response documentation at https://visibility.amp.cisco.com/#/help/casebooks.

Pivot Menu - It is used to pivot an observable to a new case, an existing case, or to other devices registered in Cisco Threat Response (for example, AMP for Endpoints, Cisco Umbrella, Cisco Talos Intelligence, and so on) to investigate for threat analysis. For more information, see the Cisco Threat Response documentation at https://visibility.amp.cisco.com/#/help/pivot-menus.

The Content Security Management appliance now includes the casebook and pivot menu widgets. You can perform the following actions in your appliance using the casebook and pivot menu widgets:

  • Add an observable to a casebook to investigate for threat analysis.

  • Pivot an observable to a new case, an existing case, or other devices registered in Cisco Threat Response (for example, AMP for Endpoints, Cisco Umbrella, Cisco Talos Intelligence, and so on) to investigate for threat analysis.

The following is a list of observables supported for this release:

  • IP addresses

  • Domains

  • URLs

  • File Hashes (SHA-256 only)


Note

  • The pivot menu widget is positioned next to the observables in the email and web reporting, and tracking pages of your appliance.

  • The casebook widget is positioned at the bottom-right corner of the Service Status page of Email and Monitoring page of Web page of your appliance.


Releted Topics

Obtaining Client ID and Client Password Credentials

You need the client ID and client password to access the casebook and pivot menu widgets on your appliance.

Before you begin

Make sure that you meet all the prerequisites mentioned in the ‘Before you begin’ section of Integrating with Cisco Threat Response

Procedure

Step 1

Log in to the new web interface of your appliance. For more information, see Accessing the Web Interface.

Step 2

Click the Casebook button.

Step 3

Add a new API Client.

  1. Click the Threat Response API Clients link.

    When you click on the Threat Response API Clients link, it redirects you to Cisco Threat Response login page.

  2. Log in to Cisco Threat Response.

  3. Click Add API Credentials.

  4. Enter the name of your appliance (for example, ‘Management_Appliance’) as the client name.

  5. Select the following scopes to provide full access to the casebook and pivot menu widgets:

    • Casebook

    • Enrich

    • Private Intelligence

    • Response

    • Inspect

    Note 
    • If you want to access the casebook widget only, select the following scopes - casebook, private intelligence, and inspect.

    • If you want to access the pivot menu widget only, select the following scopes - enrich and response.

  6. Click Add New Client.

  7. Copy the client ID and client password to the clipboard.

    Note 
    Make sure that you note the client ID and client password before you close the ‘Add New Client’ dialog box.
  8. Click Close.

    Note 
    If you want to add a new API client, you do not need to delete the existing API client.
Step 4

Enter the client ID and client password obtained in Step 3 in the ‘Login to use Casebook/Pivot Menu’ dialog box in your appliance.

Step 5

Select the required Cisco Threat Response server in the ‘Login to use Casebook/Pivot Menu’ dialog box.

Step 6

Click Authenticate.

Note 
If you want to edit the client ID, client password, and Cisco Threat Response server, right-click on the Casebook button and add the details.

What to do next

Add an observable to a casebook to investigate for threat analysis. See Adding Observable to Casebook for Threat Analysis.

Adding Observable to Casebook for Threat Analysis

Before you begin

Make sure that you obtain the client ID and client password to access the casebook and pivot menu widgets on your appliance. For more information, see Obtaining Client ID and Client Password Credentials.

Procedure

Step 1

Log in to the new web interface of your appliance. For more information, see Accessing the Web Interface.

Step 2

Navigate to the Email Reporting or Web Reporting page, click on the pivot menu button next to the required observable (for example, bit.ly) and click Add to New Case or Add to Current Case.

  • Use the drag and drop 
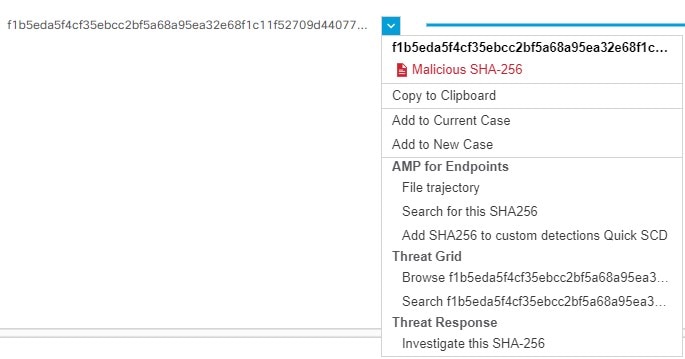
button next to the observable to drag and drop the observable into an existing case.

  • Use the pivot menu button to pivot an observable to other devices registered on the portal (for example, AMP for Endpoints) to investigate for threat analysis.

Step 3

Click the Casebook button positioned at the bottom-right corner of the Service Status page of Email and Monitoring page of Web page of your appliance and check whether the observable is added to a new or an existing case.

Step 4

(Optional) Click button to add a title, description, or notes to the casebook.

Step 5

Click Investigate this Case to investigate the observable for threat analysis. For more information, see the Cisco Threat Response documentation at https://visibility.amp.cisco.com/#/help/introduction.