-
null
- Understanding Deployment
- Working with Deployment and the Configuration Archive
- Viewing Deployment Status and History for Jobs and Schedules
- Deploying Configurations in Non-Workflow Mode
- Deploying Configurations in Workflow Mode
- Deploying Configurations Using an Auto Update Server or CNS Configuration Engine
- Deploying Configurations to a Token Management Server
- Previewing Configurations
- Redeploying Configurations to Devices
- Aborting Deployment Jobs
- Creating or Editing Deployment Schedules
- Suspending or Resuming Deployment Schedules
- Adding Configuration Versions from a Device to the Configuration Archive
- Viewing and Comparing Archived Configuration Versions
- Rolling Back Configurations
- Understanding Configuration Rollback
- Understanding Rollback for Devices in Multiple Context Mode
- Understanding Rollback for Failover Devices
- Understanding Rollback for Catalyst 6500/7600 Devices
- Understanding Rollback for IPS and IOS IPS
- Commands that Can Cause Conflicts after Rollback
- Commands to Recover from Failover Misconfiguration after Rollback
- Rolling Back Configurations to Devices Using the Deployment Manager
- Using Rollback to Deploy Archived Configurations
- Understanding Configuration Rollback
Managing Deployment
The settings and policies you define in Security Manager must be deployed to your devices so that you can implement them in your network. The steps you take to deploy configurations to devices depend on whether you are using Workflow mode or non-Workflow mode.
Although non-Workflow mode is the default mode of operation for Security Manager, you can use Workflow mode if your company requires it. For more information, see Selecting a Workflow Mode, page 1-12.
The following topics provide information about deploying configurations to devices, in each workflow mode:
•![]() Working with Deployment and the Configuration Archive
Working with Deployment and the Configuration Archive
Understanding Deployment
A deployment job defines how configuration changes are sent to devices. In a deployment job, you can define several parameters, such as the devices to which you want to deploy configurations and the method used to deploy configurations to devices. You can also create deployment schedules to automatically spawn deployment jobs at regular intervals.
The following topics will help you better understand and use deployment jobs:
•![]() Understanding What You Can Do with the Deployment Manager
Understanding What You Can Do with the Deployment Manager
•![]() Overview of the Deployment Process
Overview of the Deployment Process
•![]() Deployment in Non-Workflow Mode
Deployment in Non-Workflow Mode
•![]() Including Devices in Deployment Jobs or Schedules
Including Devices in Deployment Jobs or Schedules
•![]() Understanding Deployment Methods
Understanding Deployment Methods
•![]() Handling Device OS Version Mismatches
Handling Device OS Version Mismatches
Understanding What You Can Do with the Deployment Manager
The Deployment Manager, where you create and manage deployment jobs and schedules, provides the following benefits:
•![]() Previewing and comparing configurations—Before you deploy a configuration file to a device, you can preview the proposed configuration file. You can also compare the proposed configuration file to what was last imported from the device or what is currently running on the device.
Previewing and comparing configurations—Before you deploy a configuration file to a device, you can preview the proposed configuration file. You can also compare the proposed configuration file to what was last imported from the device or what is currently running on the device.
After successful deployment to a device, you can view a transcript of the configuration commands downloaded and the device's responses. For more information, see Previewing Configurations.
•![]() Aborting deployment jobs—You can stop a deployment job even if it is currently running. However, aborting a job that is in process does not roll back the configuration on devices that have already been reconfigured, or on devices that are in the process of being reconfigured. Only devices for which deployment has not started are prevented from being reconfigured. For more information, see Aborting Deployment Jobs.
Aborting deployment jobs—You can stop a deployment job even if it is currently running. However, aborting a job that is in process does not roll back the configuration on devices that have already been reconfigured, or on devices that are in the process of being reconfigured. Only devices for which deployment has not started are prevented from being reconfigured. For more information, see Aborting Deployment Jobs.
•![]() Rolling back to a previous configuration—If you deploy configurations to devices, and then determine that there is something wrong with the new configurations, you can revert to and deploy the previous configurations for those devices. For more information, see Rolling Back Configurations to Devices Using the Deployment Manager.
Rolling back to a previous configuration—If you deploy configurations to devices, and then determine that there is something wrong with the new configurations, you can revert to and deploy the previous configurations for those devices. For more information, see Rolling Back Configurations to Devices Using the Deployment Manager.
•![]() Viewing deployment job status—You can display information about the deployment to specific devices, including information about errors, the proposed configuration, and the transcript of the download. For more information, see Viewing Deployment Status and History for Jobs and Schedules.
Viewing deployment job status—You can display information about the deployment to specific devices, including information about errors, the proposed configuration, and the transcript of the download. For more information, see Viewing Deployment Status and History for Jobs and Schedules.
•![]() Scheduling deployment jobs—You can create deployment schedules to spawn deployment jobs at regular intervals. In Workflow mode, you can also schedule a deployment job to start at a future time when you deploy the job. Scheduling jobs lets you plan deployments for times when traffic on devices is low. For more information, see these topics:
Scheduling deployment jobs—You can create deployment schedules to spawn deployment jobs at regular intervals. In Workflow mode, you can also schedule a deployment job to start at a future time when you deploy the job. Scheduling jobs lets you plan deployments for times when traffic on devices is low. For more information, see these topics:
–![]() Creating or Editing Deployment Schedules
Creating or Editing Deployment Schedules
–![]() Deploying Configurations in Workflow Mode
Deploying Configurations in Workflow Mode
•![]() Logging deployment job history (Workflow mode only)—You can view the history of transactions for a job. The transactions show the changes in job status initiated by various users, such as job approval, and the comments related to those status changes. For more information, see Viewing Deployment Status and History for Jobs and Schedules.
Logging deployment job history (Workflow mode only)—You can view the history of transactions for a job. The transactions show the changes in job status initiated by various users, such as job approval, and the comments related to those status changes. For more information, see Viewing Deployment Status and History for Jobs and Schedules.
Overview of the Deployment Process
Broadly speaking, deployment is a three-step process, as described in Table 17-1.
During deployment, if Security Manager determines that the configuration on the device differs from the last-deployed configuration, Security Manager overwrites the changes by default. You can control this behavior using the deployment preferences; select Tools > Security Manager Administration, then select Deployment, and look for the When Out of Band Changes Detected setting. You can also control this for a specific deployment job by editing the deployment method for the job.
If you make changes to the device configuration outside of Security Manager, you have two choices for bringing those changes into Security Manager:
1. ![]() You can rediscover policies on the device, in which case all policies for the device become local policies, and any assignments of shared policies to the device are removed.
You can rediscover policies on the device, in which case all policies for the device become local policies, and any assignments of shared policies to the device are removed.
2. ![]() You can make the required changes in Security Manager and redeploy them to the device. During deployment, do not select the option to force an error if out-of-band changes are found on the device. This is the recommended approach.
You can make the required changes in Security Manager and redeploy them to the device. During deployment, do not select the option to force an error if out-of-band changes are found on the device. This is the recommended approach.
For more information on how out-of-band changes affect deployment, see Understanding How Out-of-Band Changes are Handled.
After configurations are deployed, you should make changes only through Security Manager for configurations that Security Manager controls. This varies based on operating system:
•![]() ASA, PIX, FWSM, IPS operating systems—Security Manager controls the entire configuration. You should make all changes through Security Manager.
ASA, PIX, FWSM, IPS operating systems—Security Manager controls the entire configuration. You should make all changes through Security Manager.
•![]() IOS Software—You have more control over which aspects of the device configuration Security Manager controls. If you do not create policies for a feature in Security Manager, such as routing policies, Security Manager does not control those features on the device. If you do create policies for these features, Security Manager overwrites the settings on the device with the settings you defined in Security Manager. Through administration settings, you can control the types of policies that will be available for IOS devices, thereby preventing Security Manager from displaying or changing policies for these features. To see the available features for IOS routers and control whether they are available for management in Security Manager, select Tools > Security Manager Administration, then select Policy Management. For IOS devices, Security Manager does manage VPN-related policies.
IOS Software—You have more control over which aspects of the device configuration Security Manager controls. If you do not create policies for a feature in Security Manager, such as routing policies, Security Manager does not control those features on the device. If you do create policies for these features, Security Manager overwrites the settings on the device with the settings you defined in Security Manager. Through administration settings, you can control the types of policies that will be available for IOS devices, thereby preventing Security Manager from displaying or changing policies for these features. To see the available features for IOS routers and control whether they are available for management in Security Manager, select Tools > Security Manager Administration, then select Policy Management. For IOS devices, Security Manager does manage VPN-related policies.
Related Topics
•![]() Deployment in Non-Workflow Mode
Deployment in Non-Workflow Mode
•![]() Policy Management Page, page A-33
Policy Management Page, page A-33
Deployment in Non-Workflow Mode
These topics help you understand deployment in non-Workflow mode:
•![]() Deployment Task Flow in Non-Workflow Mode
Deployment Task Flow in Non-Workflow Mode
•![]() Job States in Non-Workflow Mode
Job States in Non-Workflow Mode
Deployment Task Flow in Non-Workflow Mode
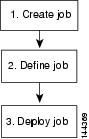
The deployment task flow in non-Workflow mode consists of three simple steps (see Figure 17-1):
1. ![]() Create the job: A deployment job is created for you when you do one of the following:
Create the job: A deployment job is created for you when you do one of the following:
–![]() Click the Submit and Deploy Changes button on the main toolbar, or select File > Submit and Deploy.
Click the Submit and Deploy Changes button on the main toolbar, or select File > Submit and Deploy.
–![]() Select File > Deploy.
Select File > Deploy.
–![]() Select Tools > Deployment Manager and click Deploy.
Select Tools > Deployment Manager and click Deploy.
2. ![]() Define the job: You specify parameters, such as the devices to which you want to deploy the configurations and whether you want to deploy directly to the devices or to a file.
Define the job: You specify parameters, such as the devices to which you want to deploy the configurations and whether you want to deploy directly to the devices or to a file.
During this step, you can also preview configurations and compare them to the previously deployed configurations or the configuration currently running on the device.

Note ![]() Devices selected for one job cannot be included in any other job. This measure ensures that the order in which policies are deployed is correct. However, you can include devices that are specified in deployment schedules.
Devices selected for one job cannot be included in any other job. This measure ensures that the order in which policies are deployed is correct. However, you can include devices that are specified in deployment schedules.
3. ![]() Deploy the job: Deploying the job sends the generated CLI to devices, either directly or through an intermediary transport server (such as AUS, CNS, or TMS) or to output files. You select the destination (device or file) when defining a job. The transport server is specified in the device properties. For more details about defining deployment methods and transport servers, see Understanding Deployment Methods.
Deploy the job: Deploying the job sends the generated CLI to devices, either directly or through an intermediary transport server (such as AUS, CNS, or TMS) or to output files. You select the destination (device or file) when defining a job. The transport server is specified in the device properties. For more details about defining deployment methods and transport servers, see Understanding Deployment Methods.
Figure 17-1 Deployment Task Flow in Non-Workflow Mode
Job States in Non-Workflow Mode
In non-Workflow mode, the Status column on the Deployment Manager window lists the state of each job. Table 17-2 lists and describes all possible job states in non-Workflow mode. For more details, see Deployment Manager Window (Non-Workflow Mode), page N-1.
Deployment in Workflow Mode
These topics help you understand deployment in Workflow mode:
•![]() Deployment Task Flow in Workflow Mode
Deployment Task Flow in Workflow Mode
•![]() Deployment Jobs and Multiple Users
Deployment Jobs and Multiple Users
Deployment Task Flow in Workflow Mode
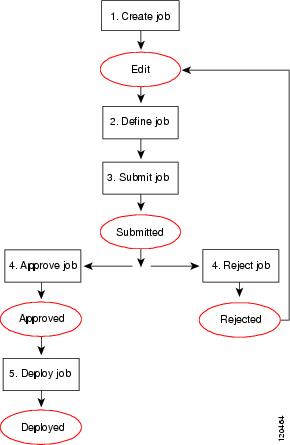
The following is a typical task flow in Workflow mode (see Figure 17-2):
1. ![]() Create the job: Before you deploy configurations to your devices, you must create a deployment job.
Create the job: Before you deploy configurations to your devices, you must create a deployment job.
2. ![]() Define the job: When you create a job, you specify parameters, such as the devices to which you want to deploy the configurations, whether you want to deploy directly to the devices or to a file, and when you want the job to take place.
Define the job: When you create a job, you specify parameters, such as the devices to which you want to deploy the configurations, whether you want to deploy directly to the devices or to a file, and when you want the job to take place.
3. ![]() Submit the job: In some organizations, before jobs can be deployed, they must be approved by a separate user with the appropriate permissions. In this case, Workflow mode is enabled with a deployment job approver, and you must submit the job to this user for review. The user reviews the job and either approves or rejects it.
Submit the job: In some organizations, before jobs can be deployed, they must be approved by a separate user with the appropriate permissions. In this case, Workflow mode is enabled with a deployment job approver, and you must submit the job to this user for review. The user reviews the job and either approves or rejects it.
4. ![]() Approve or reject the job: If you are working in Workflow mode with a deployment job approver, the approver reviews it, and can then either approve or reject the job. If the job is approved, the submitter can then deploy the job. If the job is rejected, the submitter can discard the job and start over or modify the job and resubmit it.
Approve or reject the job: If you are working in Workflow mode with a deployment job approver, the approver reviews it, and can then either approve or reject the job. If the job is approved, the submitter can then deploy the job. If the job is rejected, the submitter can discard the job and start over or modify the job and resubmit it.
If you are working in workflow mode without an approver, you can approve the job yourself.
5. ![]() Deploy the job: Deploying the job sends the generated CLI to either devices, intermediary transport servers (such as AUS, CNS, or TMS), or files. You select the destination (device or file) when defining the job. The transport server is specified in the device properties. For more details about defining deployment methods and transport servers, see Understanding Deployment Methods.
Deploy the job: Deploying the job sends the generated CLI to either devices, intermediary transport servers (such as AUS, CNS, or TMS), or files. You select the destination (device or file) when defining the job. The transport server is specified in the device properties. For more details about defining deployment methods and transport servers, see Understanding Deployment Methods.
For descriptions of job states (shown in red in Figure 17-2), see Job States in Workflow Mode.
Figure 17-2 Deployment Task Flow in Workflow Mode
Job States in Workflow Mode
In Workflow mode, the Status column in the Deployment Manager window lists the state of each job. Table 17-3 lists and describes all possible job states. For more details about the Deployment Manager window, see Deployment Manager Window (Workflow Mode), page N-3.
Related Topics
•![]() Deployment Manager Window (Workflow Mode), page N-3
Deployment Manager Window (Workflow Mode), page N-3
•![]() Working with Deployment and the Configuration Archive
Working with Deployment and the Configuration Archive
Deployment Job Approval
By default, Security Manager operates in non-Workflow mode; deployment jobs are handled behind the scenes and the user does not need to be aware of jobs or their approval. When using Workflow mode, you can choose to operate with or without a deployment job approver.
If you choose to operate without an approver, you have the permissions to define and approve jobs.
If your organization requires a different person with higher permissions to approve deployment of new or changed configurations to devices, use Workflow mode with a deployment job approver. When using Workflow mode with a deployment job approver, the job must be reviewed by a person with the appropriate permissions to approve or reject the job. This approval process helps to ensure that no inappropriate configurations reach the network devices and that deployment jobs are scheduled effectively.
Note ![]() You enable and disable deployment job approval under Tools > Security Manager Administration > Workflow. For more information, see Workflow Page, page A-42.
You enable and disable deployment job approval under Tools > Security Manager Administration > Workflow. For more information, see Workflow Page, page A-42.
Deployment Jobs and Multiple Users
Only one user can define or change parameters or devices within an individual deployment job at one time. However, multiple users can work on the same deployment job in sequence: if a deployment job is closed, another user can open it and make changes to it. Multiple users can work in parallel on different deployment jobs.
Including Devices in Deployment Jobs or Schedules
When you create a deployment job or schedule, you select the devices to include in it. The inclusion of a device influences how the device can be used in other jobs or schedules. When you select a device for a specific job, it cannot be selected for any other job until the original job is deployed, rejected (in Workflow mode), discarded, or aborted. This mechanism prevents two or more people from deploying changes to the same device at the same time and ensures that policies are deployed to devices in the correct order.
However, a device can be part of a deployment schedule and still be selected for specific deployment jobs. While a deployment job is running, the device is locked. The device cannot be included in other jobs while the deployment job is running.
When you create a deployment job, Security Manager displays the devices on which policy changes were made but were not yet deployed. You can deploy to these devices, and you can select additional devices for the job.
For VPNs, Security Manager must generate commands for devices that are affected by the policies defined for the devices you select for the job. So, if you select a device that is part of a VPN, Security Manager adds the other relevant devices to the job. For example, if you define a tunnel policy on a spoke, and you select the spoke for the job, Security Manager adds the spoke's assigned hub to the job. During job generation, Security Manager generates commands for both peers so that the VPN configuration is complete and the tunnel can be established. If you deselect one of the devices associated with the VPN, Security Manager warns that removing the device might result in the VPN not functioning property.
Understanding Deployment Methods
Security Manager lets you deploy configurations to devices using three main methods: deploying directly to the device, deploying to a configuration file (which you must then manually apply to the device), and deploying to an intermediate server (which is treated like deploying directly to the device). The system default deployment method is to deploy directly to the device.
When you add devices to Security Manager, you select the deployment method to be used by that device. This determines the method used for deploying to the device (instead of a file). When you create a deployment job, an additional deployment method default applies to the job as a whole, which determines whether deployment creates configuration files or whether it sends the configuration to the device using the method selected for the device. You control this default in the administration settings (select Tools > Security Manager Administration, then select Deployment; see Deployment Page, page A-7). When you create a deployment job, you can also change whether the deployment is to a file or to the device for each device by clicking Edit Deploy Method in the Create Job window. If you are using non-Workflow mode, see Deploying Configurations in Non-Workflow Mode. If you are using Workflow mode, see Creating and Editing Deployment Jobs.
The method you choose to use depends on the processes and procedures of your organization and the transport protocols supported by a particular type of device. If you are using Configuration Engine (CNS) or Auto Update Server (AUS), use those deployment methods. You must use one of these for devices that use dynamic IP addresses. Otherwise, for devices with static IP addresses, use SSL (HTTPS) for IOS, PIX, ASA, IPS, and standalone FWSM devices, and SSH for FWSM through the Catalyst chassis. If you are using a Token Management Server (TMS) for some devices, you can also use that method with Security Manager.
The following topics describe the deployment methods in more detail:
•![]() Deploying Directly to a Device
Deploying Directly to a Device
•![]() Deploying to a Device through an Intermediate Server
Deploying to a Device through an Intermediate Server
•![]() Understanding How Out-of-Band Changes are Handled
Understanding How Out-of-Band Changes are Handled
Deploying Directly to a Device
If you choose to deploy directly to a device, Security Manager uses the transport protocol defined in the device properties for the device (right click the device, select Device Properties, and click General). The protocol is typically the default protocol defined in the Device Communication page in the Security Manager Administration settings (see Device Communication Page, page A-11). Table 17-4 lists some of the default transport protocol settings.
When you select Device as the deployment method, deployment is affected if you configure a transport server for the device, such as an AUS or Configuration Engine. When using an intermediate transport server, configuration deployment goes through the server. For more information on using an intermediate server, see Deploying to a Device through an Intermediate Server.
Deployment can also be affected if you made out-of-band changes to the device since the last deployment. For more information, see Understanding How Out-of-Band Changes are Handled.
During deployment, Security Manager sends only the changes made since the last deployment to the device.

Related Topics
•![]() Managing Device Communication Settings and Certificates, page 5-21
Managing Device Communication Settings and Certificates, page 5-21
•![]() Handling Device OS Version Mismatches
Handling Device OS Version Mismatches
Deploying to a Device through an Intermediate Server
Deploying configurations through an intermediate server, such as an Auto Update Server (AUS), Cisco Networking Services (CNS) Configuration Engine, or Token Management Server (TMS), is a version of deploying directly to device. When selecting the deployment method, select Device. Security Manager sends the configuration updates to the intermediate server, where the device retrieves it (for AUS and CNS), or where you can download it to an eToken (for TMS).
You must use an intermediate server if you are using dynamic IP addresses for your device interfaces (that is, the IP addresses are provided by a DHCP server). You can also use them with static IP addresses. However, you cannot use Configuration Engine 1.5 or 2.0 to manage IOS devices with dynamic IP addresses if you configure features that use interactive CLI commands. The following features are affected:
•![]() Certificate Enrollment:
Certificate Enrollment:
–![]() crypto pki trustpoint
crypto pki trustpoint
–![]() crypto isakmp client configuration group
crypto isakmp client configuration group
–![]() crypto key generate rsa
crypto key generate rsa
•![]() IPS signature configuration (ip ips signature-category)
IPS signature configuration (ip ips signature-category)
•![]() IP Authproxy Banner (ip auth-proxy-banner)
IP Authproxy Banner (ip auth-proxy-banner)
•![]() Catalyst device interface switchport (interface switchport)
Catalyst device interface switchport (interface switchport)
Security Manager uses an intermediate server if you have configured the device to use one. The following topics describe the required configuration steps when using an intermediate server:
•![]() Deploying Configurations Using an Auto Update Server or CNS Configuration Engine
Deploying Configurations Using an Auto Update Server or CNS Configuration Engine
•![]() Deploying Configurations to a Token Management Server
Deploying Configurations to a Token Management Server
Deployment can be affected if you made out-of-band changes to the device since the last deployment. For more information, see Understanding How Out-of-Band Changes are Handled.
During deployment, Security Manager sends configuration changes based on the type of server:
•![]() Auto Update Server (standalone or running on Configuration Engine) for PIX and ASA devices—Security Manager sends the full configuration to Auto Update Server, where the device retrieves it. The delta configuration is not sent.
Auto Update Server (standalone or running on Configuration Engine) for PIX and ASA devices—Security Manager sends the full configuration to Auto Update Server, where the device retrieves it. The delta configuration is not sent.
•![]() Configuration Engine for IOS devices—Security Manager sends the delta configuration to Configuration Engine, where the device retrieves it.
Configuration Engine for IOS devices—Security Manager sends the delta configuration to Configuration Engine, where the device retrieves it.
•![]() TMS—Security Manager sends the delta configuration to the TMS server, from which it can be downloaded to an eToken to be loaded onto the device.
TMS—Security Manager sends the delta configuration to the TMS server, from which it can be downloaded to an eToken to be loaded onto the device.
Related Topics
•![]() Managing Device Communication Settings and Certificates, page 5-21
Managing Device Communication Settings and Certificates, page 5-21
•![]() Device Communication Page, page A-11
Device Communication Page, page A-11
Deploying to a File
If you choose to deploy configurations to configuration files, Security Manager creates two files: device_name _delta.cfg for the delta configuration, and device_name _full.cfg for the full configuration. If the files are created by a job that was generated from a deployment schedule, the name includes a time stamp. Configuration files are in TFTP format so that you can upload them to your devices using TFTP.
If you deploy to file, you are responsible for transferring the configurations to your devices. Security Manager assumes that you have done this, so the next time you deploy to the same devices, the generated incremental commands are based on the configurations from the previous deployment. If for some reason the last change was not applied to the device, the new delta configuration will not bring the device configuration up to the one reflected in Security Manager.
To set a default directory for file deployments, select Tools > Security Manager Administration, then select Deployment (see Deployment Page, page A-7). If you select File for the default deployment method, you also select the default directory. When you create a deployment job, you can change this directory for that job.
Deploying configurations to a file is useful when the devices are not yet in place in your network (known as green field deployment), if you have your own mechanisms in place to transfer configurations to your devices, or if you want to delay deployment. When deploying to a file, the deployment job might fail if you select a large number of devices or several devices that have large configuration files. If you encounter deployment failures, resubmit the job with fewer devices selected.

Tip ![]() Do not use commands that require interaction with the device during deployment when deploying to file. We recommend previewing your configuration before deployment to make sure there are no such commands in the file. For more information, see Previewing Configurations.
Do not use commands that require interaction with the device during deployment when deploying to file. We recommend previewing your configuration before deployment to make sure there are no such commands in the file. For more information, see Previewing Configurations.
Understanding How Out-of-Band Changes are Handled
Security Manager considers an out-of-band change to be any change made to a device manually or outside of Security Manager control, for example, by logging into the device directly and entering configuration commands through the CLI. If the deployment method you select is configured to compare the new configuration to the current configuration on the device, you can specify how to handle out-of-band changes when they are detected using the Out of Band Change Behavior setting.
This setting is ignored if you are using a deployment method that is configured to compare the new device configuration with the latest version stored in the Security Manager Configuration Archive. Whether a deployment method uses the current device configuration or the one in Configuration Archive, and the default way to handle out-of-band changes, is set in Tools > Security Manager Administration > Deployment; for more information see Deployment Page, page A-7. Look for the Deploy to File Reference Configuration, Deploy to Device Reference Configuration, and When Out of Band Changes Detected settings. By default, the out-of-band change setting is used when you deploy to device but it is not used when you deploy to file. You can change the default behavior, and you can also change the behavior when you create a specific deployment job by editing the deployment method for the job.
Tip ![]() When the deployment method is configured to use the reference configuration in Configuration Archive, out-of-band changes are always removed. This is equivalent to selecting Do not check for changes.
When the deployment method is configured to use the reference configuration in Configuration Archive, out-of-band changes are always removed. This is equivalent to selecting Do not check for changes.
Your options for handling out-of-band changes are:
•![]() Overwrite changes and show warning (also called Warn)—When configurations are deployed, Security Manager uploads the device's current configuration and compares it against the configuration it has in its database. If changes were made to the device manually, Security Manager continues with the deployment and displays a warning notifying you of this action. Out-of-band changes are removed from the device.
Overwrite changes and show warning (also called Warn)—When configurations are deployed, Security Manager uploads the device's current configuration and compares it against the configuration it has in its database. If changes were made to the device manually, Security Manager continues with the deployment and displays a warning notifying you of this action. Out-of-band changes are removed from the device.
•![]() Cancel deployment (also called Cancel)—When configurations are deployed, Security Manager uploads the device's current configuration and compares it against the configuration it has in its database. If changes were made to the device manually, Security Manager cancels the deployment and displays a warning notifying you of this action. You must either manually remove the out-of-band changes, or configure the same settings in Security Manager, before you can deploy configuration changes to the device.
Cancel deployment (also called Cancel)—When configurations are deployed, Security Manager uploads the device's current configuration and compares it against the configuration it has in its database. If changes were made to the device manually, Security Manager cancels the deployment and displays a warning notifying you of this action. You must either manually remove the out-of-band changes, or configure the same settings in Security Manager, before you can deploy configuration changes to the device.
•![]() Do not check for changes (also called Skip)—Security Manager does not check for changes and deploys the changes to the device. No warnings are issued, and any out-of-band changes are removed from the device configuration.
Do not check for changes (also called Skip)—Security Manager does not check for changes and deploys the changes to the device. No warnings are issued, and any out-of-band changes are removed from the device configuration.
Related Topics
•![]() Deploying Directly to a Device
Deploying Directly to a Device
•![]() Deploying to a Device through an Intermediate Server
Deploying to a Device through an Intermediate Server
Handling Device OS Version Mismatches
Before deploying a changed configuration file to a device, Security Manager uploads the current running configuration file from the device and checks the OS version running on the device with the OS version stored in the Security Manager database. Security Manager takes action depending on whether the OS versions match or differ from each other. In some cases, Security Manager deploys the configuration and issues a warning, but in other cases, Security Manager cannot deploy the configuration.
Table 17-5 lists the possible actions Security Manager takes depending on the whether the OS versions match or differ from each other. The table uses the PIX Firewall device as an example; however, the actions apply to all supported device types.
Working with Deployment and the Configuration Archive
The following topics provide information about managing deployment and using the Configuration Archive:
•![]() Viewing Deployment Status and History for Jobs and Schedules
Viewing Deployment Status and History for Jobs and Schedules
•![]() Deploying Configurations in Non-Workflow Mode
Deploying Configurations in Non-Workflow Mode
•![]() Deploying Configurations in Workflow Mode
Deploying Configurations in Workflow Mode
•![]() Deploying Configurations Using an Auto Update Server or CNS Configuration Engine
Deploying Configurations Using an Auto Update Server or CNS Configuration Engine
•![]() Deploying Configurations to a Token Management Server
Deploying Configurations to a Token Management Server
•![]() Redeploying Configurations to Devices
Redeploying Configurations to Devices
•![]() Creating or Editing Deployment Schedules
Creating or Editing Deployment Schedules
•![]() Suspending or Resuming Deployment Schedules
Suspending or Resuming Deployment Schedules
•![]() Adding Configuration Versions from a Device to the Configuration Archive
Adding Configuration Versions from a Device to the Configuration Archive
•![]() Viewing and Comparing Archived Configuration Versions
Viewing and Comparing Archived Configuration Versions
Viewing Deployment Status and History for Jobs and Schedules
Using the Deployment Manager, you can view status and history information for deployment jobs and schedules, as well as create and manage them. To open the Deployment Manager window, select Tools > Deployment Manager.
Jobs and schedules are displayed on separate tabs. However, as jobs are created based on a deployment schedule, those jobs appear in the regular jobs list. Click the appropriate tab to view the list of jobs or schedules, where you can see this information:
•![]() Deployment Jobs—The top pane displays a list of the deployment jobs. If you select a job, more detailed information appears in the lower pane:
Deployment Jobs—The top pane displays a list of the deployment jobs. If you select a job, more detailed information appears in the lower pane:
–![]() Summary tab—The Summary tab shows information such as the job status, number of devices deployed successfully, and number of devices deployed with errors.
Summary tab—The Summary tab shows information such as the job status, number of devices deployed successfully, and number of devices deployed with errors.
–![]() Details tab—The Details tab shows the status details for each device in the deployment.
Details tab—The Details tab shows the status details for each device in the deployment.
–![]() History tab (Workflow mode only)—The History tab displays transactions that occurred to the selected job since it was created. Each row in the table shows the action that occurred, the user who performed the action, the date and time it occurred, and comments, if any, that the user entered.
History tab (Workflow mode only)—The History tab displays transactions that occurred to the selected job since it was created. Each row in the table shows the action that occurred, the user who performed the action, the date and time it occurred, and comments, if any, that the user entered.
•![]() Deployment Schedules—The top pane displays a list of the deployment schedules. If you select a schedule, more detailed information appears in the lower pane:
Deployment Schedules—The top pane displays a list of the deployment schedules. If you select a schedule, more detailed information appears in the lower pane:
–![]() Summary tab—The Summary tab shows information such as the schedule, the time of the next job to be created from the schedule, the time a job was last run based on the schedule, the number of devices included in the schedule and the user ID of the person who last changed the schedule.
Summary tab—The Summary tab shows information such as the schedule, the time of the next job to be created from the schedule, the time a job was last run based on the schedule, the number of devices included in the schedule and the user ID of the person who last changed the schedule.
–![]() Devices tab—The Devices tab shows the list of devices that are included in the schedule.
Devices tab—The Devices tab shows the list of devices that are included in the schedule.
–![]() History tab—The History tab shows the state changes and related comments of the schedule. You can track which user performed each action.
History tab—The History tab shows the state changes and related comments of the schedule. You can track which user performed each action.
–![]() Jobs tab—The Jobs tab shows a list of deployment jobs that were created from the schedule and their statuses. You can also view these jobs on the Deployment Jobs tab.
Jobs tab—The Jobs tab shows a list of deployment jobs that were created from the schedule and their statuses. You can also view these jobs on the Deployment Jobs tab.
The status information in the Deployment Manager window refreshes automatically unless you turned off automatic refresh in the Security Manager Administration Deployment page (Tools > Security Manager Administration > Deployment). A message below the job or schedule table indicates whether automatic refresh is on. If it is off, refresh status information by clicking Refresh.
Related Topics
•![]() Overview of the Deployment Process
Overview of the Deployment Process
•![]() Deploying Configurations in Non-Workflow Mode
Deploying Configurations in Non-Workflow Mode
•![]() Deploying Configurations in Workflow Mode
Deploying Configurations in Workflow Mode
•![]() Deploying Configurations Using an Auto Update Server or CNS Configuration Engine
Deploying Configurations Using an Auto Update Server or CNS Configuration Engine
•![]() Deploying Configurations to a Token Management Server
Deploying Configurations to a Token Management Server
•![]() Redeploying Configurations to Devices
Redeploying Configurations to Devices
•![]() Rolling Back Configurations to Devices Using the Deployment Manager
Rolling Back Configurations to Devices Using the Deployment Manager
•![]() Creating or Editing Deployment Schedules
Creating or Editing Deployment Schedules
•![]() Suspending or Resuming Deployment Schedules
Suspending or Resuming Deployment Schedules
Deploying Configurations in Non-Workflow Mode
When you deploy configurations, you can transfer them to devices either directly or to another transport server (such as AUS, CNS, or TMS) in the network or create them as configuration files in a directory on the Security Manager server. See Understanding Deployment Methods for more information.
Notes
•![]() Deployment might take from a few minutes to an hour or more, depending on the number of devices in the deployment job.
Deployment might take from a few minutes to an hour or more, depending on the number of devices in the deployment job.
•![]() Firewall devices only—If you manually added a firewall device, we highly recommend that you discover (import) the factory-default policies for that device before deploying to that device. Bringing these policies into Security Manager prevents you from unintentionally removing them the first time you deploy to that device. For more information about factory-default policies for firewall devices, see Default Firewall Configurations, page 14-1. For more information about importing policies, see Discovering Policies, page 6-11.
Firewall devices only—If you manually added a firewall device, we highly recommend that you discover (import) the factory-default policies for that device before deploying to that device. Bringing these policies into Security Manager prevents you from unintentionally removing them the first time you deploy to that device. For more information about factory-default policies for firewall devices, see Default Firewall Configurations, page 14-1. For more information about importing policies, see Discovering Policies, page 6-11.
•![]() The status of deployments to Catalyst 6500/7600 devices shows deployment to the device as well as its interface contexts when policy changes contain interface commands that affect the interface contexts (child devices). This can occur when you deploy a policy change that affects a VLAN in which the switch participates or when you update inventory, for example, by adding or deleting interface contexts.
The status of deployments to Catalyst 6500/7600 devices shows deployment to the device as well as its interface contexts when policy changes contain interface commands that affect the interface contexts (child devices). This can occur when you deploy a policy change that affects a VLAN in which the switch participates or when you update inventory, for example, by adding or deleting interface contexts.
Before You Begin
•![]() Make sure that devices have been bootstrapped. For more information, see Chapter 4, "Preparing Devices for Management".
Make sure that devices have been bootstrapped. For more information, see Chapter 4, "Preparing Devices for Management".
•![]() If you are deploying to a transport server, such as AUS, CNS, or TMS, make sure the server, Security Manager settings, and device have been set up properly.
If you are deploying to a transport server, such as AUS, CNS, or TMS, make sure the server, Security Manager settings, and device have been set up properly.
Related Topics
•![]() Overview of the Deployment Process
Overview of the Deployment Process
•![]() Including Devices in Deployment Jobs or Schedules
Including Devices in Deployment Jobs or Schedules
•![]() Understanding Deployment Methods
Understanding Deployment Methods
•![]() Deploying Configurations Using an Auto Update Server or CNS Configuration Engine
Deploying Configurations Using an Auto Update Server or CNS Configuration Engine
•![]() Deploying Configurations to a Token Management Server
Deploying Configurations to a Token Management Server
•![]() Managing Device Communication Settings and Certificates, page 5-21
Managing Device Communication Settings and Certificates, page 5-21
•![]() Understanding How Out-of-Band Changes are Handled
Understanding How Out-of-Band Changes are Handled
Step 1 ![]() Click the Submit & Deploy Changes button on the Main toolbar.
Click the Submit & Deploy Changes button on the Main toolbar.
All policy changes since the last deployment are validated and the Deploy Saved Changes dialog box opens (see Deploy Saved Changes Dialog Box, page N-9). This dialog box shows all devices that have configuration changes since the last time policies were deployed.
If there are invalid policy changes, you are warned before proceeding to deployment. Fix invalid policies before deploying configurations to devices.
You can also start a deployment job using any of these methods:
•![]() Select File > Deploy or File > Submit and Deploy.
Select File > Deploy or File > Submit and Deploy.
•![]() Click Deploy in the Deployment Manager.
Click Deploy in the Deployment Manager.
Step 2 ![]() In the Deploy Saved Changes dialog box, do the following:
In the Deploy Saved Changes dialog box, do the following:
•![]() Select the devices to which you want to deploy configurations. Initially all changed devices are selected.
Select the devices to which you want to deploy configurations. Initially all changed devices are selected.
•![]() (Optional) To add devices that do not have proposed policy changes to the deployment job, click Add other devices to open the Add Devices dialog box (see Add Other Devices Dialog Box, page N-15). You might want to add unchanged devices if a device was manually modified and you want to return the device to its previous configuration (the one stored in the Security Manager database).
(Optional) To add devices that do not have proposed policy changes to the deployment job, click Add other devices to open the Add Devices dialog box (see Add Other Devices Dialog Box, page N-15). You might want to add unchanged devices if a device was manually modified and you want to return the device to its previous configuration (the one stored in the Security Manager database).
•![]() (Optional) To change the method used to deploy configurations, click Edit Deploy Method to open the Edit Deployment Method dialog box (see Edit Deploy Method Dialog Box, page N-13). There is a system default deployment method (which your organization chooses), so you might not need to change the method. You can select these methods:
(Optional) To change the method used to deploy configurations, click Edit Deploy Method to open the Edit Deployment Method dialog box (see Edit Deploy Method Dialog Box, page N-13). There is a system default deployment method (which your organization chooses), so you might not need to change the method. You can select these methods:
–![]() Device—Deploys the configuration directly to the device or to the transport mechanism specified for the device. For more information, see Deploying Directly to a Device or Deploying to a Device through an Intermediate Server.
Device—Deploys the configuration directly to the device or to the transport mechanism specified for the device. For more information, see Deploying Directly to a Device or Deploying to a Device through an Intermediate Server.
–![]() File—Deploys the configuration file to a directory you select on the Security Manager server. For more information, see Deploying to a File.
File—Deploys the configuration file to a directory you select on the Security Manager server. For more information, see Deploying to a File.
Note ![]() Before proceeding with the deployment, you can preview proposed configurations and compare them against last deployed configurations or current running configurations. For more information, see Previewing Configurations.
Before proceeding with the deployment, you can preview proposed configurations and compare them against last deployed configurations or current running configurations. For more information, see Previewing Configurations.
Step 3 ![]() Click Deploy to deploy the job.
Click Deploy to deploy the job.
The Deployment Status Details dialog box opens so that you can view the status of the deployment. It displays summary information about the job, status about the deployment to each device, and messages indicating why the deployment failed.
In the Deployment Details table, select a row corresponding to a device to display deployment status messages specifically for that device. For more information, see Deployment Status Details Dialog Box, page N-20.
If deployment to any device failed, you can redeploy configurations to the failed devices. For more information, see Redeploying Configurations to Devices.
Deploying Configurations in Workflow Mode
The task of deploying configurations in Workflow mode is a multiple step process. You must create a deployment job, get it approved, and then deploy the job. This process ensures that organizations that separate task authorizations among personnel can implement their control processes.
When you deploy configurations, you can transfer them to devices either directly or to another transport server (such as AUS, CNS, or TMS) in the network or create them as configuration files in a directory on the Security Manager server. See Understanding Deployment Methods for more information.
Before You Begin
•![]() Make sure that devices have been bootstrapped. For more information, see Chapter 4, "Preparing Devices for Management".
Make sure that devices have been bootstrapped. For more information, see Chapter 4, "Preparing Devices for Management".
•![]() If you are deploying to a transport server, such as AUS, CNS, or TMS, make sure the server, Security Manager settings, and device have been set up properly.
If you are deploying to a transport server, such as AUS, CNS, or TMS, make sure the server, Security Manager settings, and device have been set up properly.
Related Topics
•![]() Overview of the Deployment Process
Overview of the Deployment Process
•![]() Including Devices in Deployment Jobs or Schedules
Including Devices in Deployment Jobs or Schedules
•![]() Understanding Deployment Methods
Understanding Deployment Methods
•![]() Deploying Configurations Using an Auto Update Server or CNS Configuration Engine
Deploying Configurations Using an Auto Update Server or CNS Configuration Engine
•![]() Deploying Configurations to a Token Management Server
Deploying Configurations to a Token Management Server
•![]() Managing Device Communication Settings and Certificates, page 5-21
Managing Device Communication Settings and Certificates, page 5-21
•![]() Understanding How Out-of-Band Changes are Handled
Understanding How Out-of-Band Changes are Handled
Step 1 ![]() Click the Deployment Manager button in the Main toolbar.
Click the Deployment Manager button in the Main toolbar.
The Deployment Manager window appears. Click the Deployment Jobs tab if it is not active.
Step 2 ![]() Create the deployment job. Click Create and enter the job properties. For the procedure, see Creating and Editing Deployment Jobs.
Create the deployment job. Click Create and enter the job properties. For the procedure, see Creating and Editing Deployment Jobs.
When you finish creating a job, you can select whether to submit it. If you are not using a deployment job approver, you can also automatically submit, approve, and deploy the job, in which case you do not need to complete the other steps in this procedure.
Step 3 ![]() (Workflow with approver) Submit the job. If you did not submit the job, select it in the Deployment Manager window and click Submit. An e-mail is sent to the approver. For more information, see Submitting Deployment Jobs.
(Workflow with approver) Submit the job. If you did not submit the job, select it in the Deployment Manager window and click Submit. An e-mail is sent to the approver. For more information, see Submitting Deployment Jobs.
Step 4 ![]() (Workflow with or without an approver) Approve the job. If you did not approve the job when you created it, select it in the Deployment Manager window and click Approve. If there is a separate person who approves jobs, that person must perform this step. For more information, see Approving and Rejecting Deployment Jobs.
(Workflow with or without an approver) Approve the job. If you did not approve the job when you created it, select it in the Deployment Manager window and click Approve. If there is a separate person who approves jobs, that person must perform this step. For more information, see Approving and Rejecting Deployment Jobs.
Step 5 ![]() (Workflow with or without an approver) Deploy the job. If you did not deploy the job when you created it, select it in the Deployment Manager window and click Deploy. You can specify a future time to start the job, or start it immediately, and configurations are deployed according to the properties of the job. For more information, see Deploying a Deployment Job in Workflow Mode
(Workflow with or without an approver) Deploy the job. If you did not deploy the job when you created it, select it in the Deployment Manager window and click Deploy. You can specify a future time to start the job, or start it immediately, and configurations are deployed according to the properties of the job. For more information, see Deploying a Deployment Job in Workflow Mode
Note ![]() You can discard a deployment job at any time before you deploy it. For more information, see Discarding Deployment Jobs.
You can discard a deployment job at any time before you deploy it. For more information, see Discarding Deployment Jobs.
Creating and Editing Deployment Jobs
In Workflow mode, before you deploy policy configurations to your devices, you must create a deployment job. When you create a job, you select the devices to which you want to deploy the configurations, whether you want to deploy directly to the devices or to an output file, and when you want the job to take place.
Notes
•![]() If you choose to deploy the job immediately, deployment might take from a few minutes to an hour or more, depending on the number of devices in the deployment job.
If you choose to deploy the job immediately, deployment might take from a few minutes to an hour or more, depending on the number of devices in the deployment job.
•![]() Firewall devices only—If you manually added a firewall device, we highly recommend that you discover (import) the factory-default policies for that device before deploying to that device. Bringing these policies into Security Manager prevents you from unintentionally removing them the first time you deploy to that device. For more information about factory-default policies for firewall devices, see Default Firewall Configurations, page 14-1. For more information about importing policies, see Chapter 17 "Managing Deployment".
Firewall devices only—If you manually added a firewall device, we highly recommend that you discover (import) the factory-default policies for that device before deploying to that device. Bringing these policies into Security Manager prevents you from unintentionally removing them the first time you deploy to that device. For more information about factory-default policies for firewall devices, see Default Firewall Configurations, page 14-1. For more information about importing policies, see Chapter 17 "Managing Deployment".
•![]() The status of deployments to Catalyst 6500 switches shows deployment to the device as well as its interface contexts when policy changes contain interface commands that affect the interface contexts (child devices). This can occur when you deploy a policy change that affects a VLAN in which the switch participates or when you update inventory, for example, by adding or deleting interface contexts.
The status of deployments to Catalyst 6500 switches shows deployment to the device as well as its interface contexts when policy changes contain interface commands that affect the interface contexts (child devices). This can occur when you deploy a policy change that affects a VLAN in which the switch participates or when you update inventory, for example, by adding or deleting interface contexts.
Before You Begin
•![]() Make sure that devices have been bootstrapped. For more information, see Chapter 4, "Preparing Devices for Management".
Make sure that devices have been bootstrapped. For more information, see Chapter 4, "Preparing Devices for Management".
•![]() If you are deploying to a transport server, such as AUS, CNS, or TMS, make sure the server, Security Manager settings, and device have been set up properly.
If you are deploying to a transport server, such as AUS, CNS, or TMS, make sure the server, Security Manager settings, and device have been set up properly.
Related Topics
•![]() Including Devices in Deployment Jobs or Schedules
Including Devices in Deployment Jobs or Schedules
•![]() Understanding Deployment Methods
Understanding Deployment Methods
•![]() Understanding How Out-of-Band Changes are Handled
Understanding How Out-of-Band Changes are Handled
Step 1 ![]() Click the Deployment Manager button in the Main toolbar.
Click the Deployment Manager button in the Main toolbar.
The Deployment Manager window appears. Click the Deployment Jobs tab if it is not active.
Step 2 ![]() Do one of the following:
Do one of the following:
•![]() Click Create to create a new job.
Click Create to create a new job.
•![]() Select an existing job and click Open to edit the job. You cannot edit a job that has already been deployed.
Select an existing job and click Open to edit the job. You cannot edit a job that has already been deployed.
The Create a Job or Edit a Job dialog box opens (see Deployment—Create or Edit a Job Dialog Box, page N-11).
Step 3 ![]() In the dialog box, make at least these specifications to define the contents of the job:
In the dialog box, make at least these specifications to define the contents of the job:
•![]() Keep the default job name or enter a more meaningful name. You cannot change the name after you create the job.
Keep the default job name or enter a more meaningful name. You cannot change the name after you create the job.
•![]() Select the devices to which you want to deploy configurations. The device selector includes all devices whose configurations have changed since the last deployment. You can add other unchanged devices by clicking Add other devices. For example, you might want to do this if a device was manually modified, and you want to return the device to its previous configuration (the one stored in the Security Manager database). For more information, see Add Other Devices Dialog Box, page N-15.
Select the devices to which you want to deploy configurations. The device selector includes all devices whose configurations have changed since the last deployment. You can add other unchanged devices by clicking Add other devices. For example, you might want to do this if a device was manually modified, and you want to return the device to its previous configuration (the one stored in the Security Manager database). For more information, see Add Other Devices Dialog Box, page N-15.
•![]() (Optional) To change the method used to deploy configurations, click Edit Deploy Method to open the Edit Deployment Method dialog box (see Edit Deploy Method Dialog Box, page N-13). There is a system default deployment method (which your organization chooses), so you might not need to change the method. You can select these methods:
(Optional) To change the method used to deploy configurations, click Edit Deploy Method to open the Edit Deployment Method dialog box (see Edit Deploy Method Dialog Box, page N-13). There is a system default deployment method (which your organization chooses), so you might not need to change the method. You can select these methods:
–![]() Device—Deploys the configuration directly to the device or to the transport mechanism specified for the device. For more information, see Deploying Directly to a Device or Deploying to a Device through an Intermediate Server.
Device—Deploys the configuration directly to the device or to the transport mechanism specified for the device. For more information, see Deploying Directly to a Device or Deploying to a Device through an Intermediate Server.
–![]() File—Deploys the configuration file to a directory you select on the Security Manager server. For more information, see Deploying to a File.
File—Deploys the configuration file to a directory you select on the Security Manager server. For more information, see Deploying to a File.
Note ![]() Before proceeding with the deployment, you can preview proposed configurations and compare them against last deployed configurations or current running configurations. For more information, see Previewing Configurations.
Before proceeding with the deployment, you can preview proposed configurations and compare them against last deployed configurations or current running configurations. For more information, see Previewing Configurations.
Step 4 ![]() Select how you want the job handled when you close the dialog box. The options available to you depend on whether you are using Workflow mode with a deployment job approver:
Select how you want the job handled when you close the dialog box. The options available to you depend on whether you are using Workflow mode with a deployment job approver:
•![]() Without an approver—If you are not using a separate approver, you have these options:
Without an approver—If you are not using a separate approver, you have these options:
–![]() Close the job—Close the job and leave it in the edit state. Select this option if you know you want to make additional modifications to the job.
Close the job—Close the job and leave it in the edit state. Select this option if you know you want to make additional modifications to the job.
–![]() Approve the job—Close the job and approve it but do not deploy it. Ensure that your e-mail address is correct in the Submitter field so that you receive e-mail notifications about the job status.
Approve the job—Close the job and approve it but do not deploy it. Ensure that your e-mail address is correct in the Submitter field so that you receive e-mail notifications about the job status.
–![]() Deploy the job—Close the job, approve it, and deploy it. You can specify a future date and time to run the job if you do not want to run it immediately. You can also specify whether e-mail notifications will be sent for changes in the job status, and the e-mail addresses of those who should be notified.
Deploy the job—Close the job, approve it, and deploy it. You can specify a future date and time to run the job if you do not want to run it immediately. You can also specify whether e-mail notifications will be sent for changes in the job status, and the e-mail addresses of those who should be notified.
•![]() With an approver—If you are using a separate approver, you can select whether to submit the job. If you want to make changes to the job, do not submit it. If it is ready for approval, submit it and ensure that your and the approver's e-mail addresses are correct.
With an approver—If you are using a separate approver, you can select whether to submit the job. If you want to make changes to the job, do not submit it. If it is ready for approval, submit it and ensure that your and the approver's e-mail addresses are correct.
Step 5 ![]() Click OK.
Click OK.
Depending on your selection for how to handle the job, you might still need to submit, approve, and deploy the job. See these topics for more information:
•![]() Approving and Rejecting Deployment Jobs
Approving and Rejecting Deployment Jobs
•![]() Deploying a Deployment Job in Workflow Mode
Deploying a Deployment Job in Workflow Mode
Submitting Deployment Jobs
In some organizations, before jobs can be deployed, they must be approved by a separate user with the appropriate permissions. In this case, Workflow mode is enabled with a deployment job approver, and you must submit the job to this user for review. The user reviews the job and either approves or rejects it.
If you are using Workflow mode without a deployment job approver, you can review and approve the job yourself. You do not submit jobs in this mode. For more information, see Approving and Rejecting Deployment Jobs.
Note ![]() You enable and disable deployment job approval under Tools > Security Manager Administration > Workflow. For more information, see Workflow Page, page A-42.
You enable and disable deployment job approval under Tools > Security Manager Administration > Workflow. For more information, see Workflow Page, page A-42.
Related Topics
•![]() Deployment Manager Window (Workflow Mode), page N-3
Deployment Manager Window (Workflow Mode), page N-3
Step 1 ![]() Click the Deployment Manager button in the Main toolbar.
Click the Deployment Manager button in the Main toolbar.
The Deployment Status window appears. Click the Deployment Jobs tab if it is not active.
Step 2 ![]() Select the job to submit.
Select the job to submit.
Step 3 ![]() Click Submit.
Click Submit.
The job status changes to Submitted. The approver must approve the job before you can deploy it.
Approving and Rejecting Deployment Jobs
In some organizations, before jobs can be deployed, they must be approved by a separate user with the appropriate permissions. In Workflow mode with a deployment job approver, one user submits a job, and another one previews the job and either approves or rejects it.
In Workflow mode without a deployment job approver, you can create and approve the job at the same time. For more information, see Creating and Editing Deployment Jobs.
When you reject a job, the devices in the job immediately become available for inclusion in other jobs. A rejected job cannot be deployed, but it can be opened for viewing and editing.
Note ![]() You enable and disable deployment job approval under Tools > Security Manager Administration > Workflow. For more information, see Workflow Page, page A-42
You enable and disable deployment job approval under Tools > Security Manager Administration > Workflow. For more information, see Workflow Page, page A-42
Related Topics
•![]() Deployment Manager Window (Workflow Mode), page N-3
Deployment Manager Window (Workflow Mode), page N-3
Step 1 ![]() Click the Deployment Manager button in the Main toolbar.
Click the Deployment Manager button in the Main toolbar.
The Deployment Manager window appears. Click the Deployment Jobs tab if it is not active.
Step 2 ![]() Select a submitted job and do one of the following:
Select a submitted job and do one of the following:
•![]() Click Approve.
Click Approve.
•![]() Click Reject.
Click Reject.
You are prompted for an optional comment for your action. After submitting your comment, an e-mail notification is sent (if e-mail notifications are configured) and the job status changes to Approved or Rejected, as appropriate. The job can now be deployed (see Deploying a Deployment Job in Workflow Mode).
Deploying a Deployment Job in Workflow Mode
When you work in Workflow mode, to deploy configurations to devices you must create a deployment job and have it approved. If you are working without a separate approver, you can approve and deploy the job yourself. Otherwise, you must submit it to an approver.
Deploying a deployment job in workflow mode simply starts a job. You cannot change the contents of a job during deployment.
Note ![]() Deployment might take from a few minutes to an hour or more, depending on the number of devices in the deployment job.
Deployment might take from a few minutes to an hour or more, depending on the number of devices in the deployment job.
Before You Begin
•![]() Make sure that devices have been bootstrapped. For more information, see Chapter 4, "Preparing Devices for Management".
Make sure that devices have been bootstrapped. For more information, see Chapter 4, "Preparing Devices for Management".
•![]() If you are deploying to a transport server, such as AUS, CNS, or TMS, make sure the server, Security Manager settings, and device have been set up properly.
If you are deploying to a transport server, such as AUS, CNS, or TMS, make sure the server, Security Manager settings, and device have been set up properly.
•![]() Create a job. For more information, see Creating and Editing Deployment Jobs.
Create a job. For more information, see Creating and Editing Deployment Jobs.
•![]() If using Workflow mode with a deployment job approver, submit the job. For more information, see Submitting Deployment Jobs.
If using Workflow mode with a deployment job approver, submit the job. For more information, see Submitting Deployment Jobs.
•![]() Approve the job. For more information, see Approving and Rejecting Deployment Jobs.
Approve the job. For more information, see Approving and Rejecting Deployment Jobs.
Related Topics
•![]() Including Devices in Deployment Jobs or Schedules
Including Devices in Deployment Jobs or Schedules
•![]() Understanding Deployment Methods
Understanding Deployment Methods
•![]() Managing Device Communication Settings and Certificates, page 5-21
Managing Device Communication Settings and Certificates, page 5-21
Step 1 ![]() Click the Deployment Manager button in the Main toolbar.
Click the Deployment Manager button in the Main toolbar.
The Deployment Manager window appears. Click the Deployment Jobs tab if it is not active.
Step 2 ![]() Select the job to deploy.
Select the job to deploy.
Step 3 ![]() Click Deploy.
Click Deploy.
The Deploy Job dialog box opens (see Deploy Job Dialog Box, page N-19).
Step 4 ![]() In the Deploy Job dialog box, make at least these selections:
In the Deploy Job dialog box, make at least these selections:
•![]() Choose whether to run the job now or to schedule it for a future time. If you schedule the job for a future time, the changes deployed in the job are based on the changes that existed when the job was created, not when the job is run.
Choose whether to run the job now or to schedule it for a future time. If you schedule the job for a future time, the changes deployed in the job are based on the changes that existed when the job was created, not when the job is run.
•![]() Select whether to require that Security Manager send e-mail notifications of changes to the job status. If you select to get e-mail notifications, enter the e-mail addresses of those who should be notified when the deployment job finishes. If you enter more than one address, use commas to separate them.
Select whether to require that Security Manager send e-mail notifications of changes to the job status. If you select to get e-mail notifications, enter the e-mail addresses of those who should be notified when the deployment job finishes. If you enter more than one address, use commas to separate them.
Step 5 ![]() Click OK.
Click OK.
You are returned to the Deployment Manager window. The job status changes to Deploying. When the deployment is complete, the job status changes to Deployed.
Discarding Deployment Jobs
In Workflow mode, you can discard a job when it is in any state except Deployed, Deployment Failed, or Aborted. The job state is shown as discarded until the job is purged from the system, either automatically as set on the Workflow Management page or manually.
Related Topics
•![]() Deployment Manager Window (Workflow Mode), page N-3
Deployment Manager Window (Workflow Mode), page N-3
Step 1 ![]() Click the Deployment Manager button in the Main toolbar.
Click the Deployment Manager button in the Main toolbar.
The Deployment Manager window appears. Click the Deployment Jobs tab if it is not active.
Step 2 ![]() Select the job to discard.
Select the job to discard.
Step 3 ![]() Click Discard. You are prompted for an optional comment to explain why you are discarding the job.
Click Discard. You are prompted for an optional comment to explain why you are discarding the job.
Deploying Configurations Using an Auto Update Server or CNS Configuration Engine
If your organization uses Auto Update Server (AUS) or Cisco Networking Services (CNS) Configuration Engine to manage the deployment of configurations to your network devices, you can use these intermediate servers with Security Manager. To perform this type of deployment, you need to set up the device, the AUS or Configuration Engine, and Security Manager properly. This procedure explains the tasks that you need to perform.
Related Topics
•![]() Overview of the Deployment Process
Overview of the Deployment Process
•![]() Chapter 4, "Preparing Devices for Management"
Chapter 4, "Preparing Devices for Management"
•![]() Including Devices in Deployment Jobs or Schedules
Including Devices in Deployment Jobs or Schedules
•![]() Understanding Deployment Methods
Understanding Deployment Methods
•![]() Managing Device Communication Settings and Certificates, page 5-21
Managing Device Communication Settings and Certificates, page 5-21
Step 1 ![]() Set up the AUS or Configuration Engine using the documentation for those products.
Set up the AUS or Configuration Engine using the documentation for those products.
Step 2 ![]() Configure the devices to use the server. The following topics describe the configuration steps depending on the type of server and the desired setup:
Configure the devices to use the server. The following topics describe the configuration steps depending on the type of server and the desired setup:
•![]() Setting Up AUS on PIX Firewall and ASA Devices, page 4-8
Setting Up AUS on PIX Firewall and ASA Devices, page 4-8
•![]() Setting Up CNS on Cisco IOS Routers in Event-Bus Mode, page 4-9
Setting Up CNS on Cisco IOS Routers in Event-Bus Mode, page 4-9
•![]() Setting Up CNS on Cisco IOS Routers in Call-Home Mode, page 4-10
Setting Up CNS on Cisco IOS Routers in Call-Home Mode, page 4-10
Step 3 ![]() When you add the device to Security Manager, select the AUS or Configuration Engine for the device. If the AUS or Configuration Engine is not already defined in Security Manager, you can identify it to Security Manager as you add the network device. For detailed procedures, see these topics:
When you add the device to Security Manager, select the AUS or Configuration Engine for the device. If the AUS or Configuration Engine is not already defined in Security Manager, you can identify it to Security Manager as you add the network device. For detailed procedures, see these topics:
•![]() Adding Devices by Manual Definition, page 5-11
Adding Devices by Manual Definition, page 5-11
•![]() Adding Devices from an Inventory File, page 5-12
Adding Devices from an Inventory File, page 5-12
•![]() Adding, Editing, or Deleting Auto Update Servers or Configuration Engines, page 5-14
Adding, Editing, or Deleting Auto Update Servers or Configuration Engines, page 5-14
Tip ![]() After you add a device to the Security Manager inventory, you can change the assigned server in the device properties. Right-click the device and select Device Properties.
After you add a device to the Security Manager inventory, you can change the assigned server in the device properties. Right-click the device and select Device Properties.
Step 4 ![]() For devices that are using AUS, configure the AUS policy for the device in Security Manager. Do one of the following:
For devices that are using AUS, configure the AUS policy for the device in Security Manager. Do one of the following:
•![]() Configure the policy for a single device. In Device view, select the device, and then select Platform > Device Admin > Server Access > AUS from the Device Policy selector.
Configure the policy for a single device. In Device view, select the device, and then select Platform > Device Admin > Server Access > AUS from the Device Policy selector.
•![]() Configure a shared policy that you can assign to many devices that share the same AUS. In Policy view, select PIX/ASA/FWSM Platform > Device Admin > Server Access > AUS from the Policy Types selector. Right-click AUS and select New AUS Policy to create a policy, or select an existing policy from the Policies selector to change the policy. Select the Assignments tab to assign the policy to specific devices.
Configure a shared policy that you can assign to many devices that share the same AUS. In Policy view, select PIX/ASA/FWSM Platform > Device Admin > Server Access > AUS from the Policy Types selector. Right-click AUS and select New AUS Policy to create a policy, or select an existing policy from the Policies selector to change the policy. Select the Assignments tab to assign the policy to specific devices.
Step 5 ![]() In Security Manager, deploy your configurations using the Deploy to Device deployment method. Security Manager sends the configuration to the AUS or Configuration Engine, where the network device retrieves it.
In Security Manager, deploy your configurations using the Deploy to Device deployment method. Security Manager sends the configuration to the AUS or Configuration Engine, where the network device retrieves it.
Depending on the Workflow mode you are using, follow these procedures:
•![]() Deploying Configurations in Non-Workflow Mode
Deploying Configurations in Non-Workflow Mode
•![]() Deploying Configurations in Workflow Mode
Deploying Configurations in Workflow Mode
Deploying Configurations to a Token Management Server
If your organization requires the use of a Token Management Server (TMS) for applying configuration updates to routers, you can use Security Manager in conjunction with your TMS processes. To perform this type of deployment, you need to set up the device, TMS, and Security Manager properly. This procedure explains the tasks that you need to perform.
Related Topics
•![]() Overview of the Deployment Process
Overview of the Deployment Process
•![]() Chapter 4, "Preparing Devices for Management"
Chapter 4, "Preparing Devices for Management"
•![]() Including Devices in Deployment Jobs or Schedules
Including Devices in Deployment Jobs or Schedules
•![]() Understanding Deployment Methods
Understanding Deployment Methods
•![]() Managing Device Communication Settings and Certificates, page 5-21
Managing Device Communication Settings and Certificates, page 5-21
Step 1 ![]() Set up the TMS as an FTP server. Security Manager uses FTP to deploy the configuration file to the TMS, from which it can be downloaded and encrypted onto an eToken. The eToken can then be connected to the USB port of a router and the configuration downloaded. See the TMS product documentation for more information.
Set up the TMS as an FTP server. Security Manager uses FTP to deploy the configuration file to the TMS, from which it can be downloaded and encrypted onto an eToken. The eToken can then be connected to the USB port of a router and the configuration downloaded. See the TMS product documentation for more information.
Step 2 ![]() In Security Manager, select Tools > Security Manager Administration > Token Management to identify the TMS server to Security Manager.
In Security Manager, select Tools > Security Manager Administration > Token Management to identify the TMS server to Security Manager.
By default, Security Manager uses the Security Manager server as the TMS, but you can specify a different server. You must enter the hostname or IP address, a username and password for the TMS, the directory to which configuration files should be copied, and the public key file location in Security Manager. For more information, see Token Management Page, page A-40.
Step 3 ![]() Specify TMS as the transport protocol to be used for Cisco IOS routers.
Specify TMS as the transport protocol to be used for Cisco IOS routers.
You can set this parameter globally for all Cisco IOS routers or for a specific device:
•![]() Globally—Select Tools > Security Manager Administration > Device Communication and select TMS in Transport Protocol (IOS Routers 12.3 and above).
Globally—Select Tools > Security Manager Administration > Device Communication and select TMS in Transport Protocol (IOS Routers 12.3 and above).
•![]() Device—Right click the device in the Device selector and select Device Properties. On the General tab, select TMS as the transport protocol in the Device Communications Group. Because not all routers support TMS, you might not be able to configure TMS for specific devices.
Device—Right click the device in the Device selector and select Device Properties. On the General tab, select TMS as the transport protocol in the Device Communications Group. Because not all routers support TMS, you might not be able to configure TMS for specific devices.
Step 4 ![]() In Security Manager, deploy your configurations using the Deploy to Device deployment method. Security Manager sends the delta configuration to the TMS server.
In Security Manager, deploy your configurations using the Deploy to Device deployment method. Security Manager sends the delta configuration to the TMS server.
Depending on the Workflow mode you are using, follow these procedures:
•![]() Deploying Configurations in Non-Workflow Mode
Deploying Configurations in Non-Workflow Mode
•![]() Deploying Configurations in Workflow Mode
Deploying Configurations in Workflow Mode
Step 5 ![]() Using the TMS, download the configuration to the eToken. See the TMS product documentation for more information.
Using the TMS, download the configuration to the eToken. See the TMS product documentation for more information.
Step 6 ![]() Download the configuration from the eToken to the router and save the configuration to the device. Plug the eToken into the router, then enter the following commands to download the configuration to the router, where usb_token_id is either usbtoken0 or usbtoken1, depending on which USB port you used. The default PIN is 1234567890.
Download the configuration from the eToken to the router and save the configuration to the device. Plug the eToken into the router, then enter the following commands to download the configuration to the router, where usb_token_id is either usbtoken0 or usbtoken1, depending on which USB port you used. The default PIN is 1234567890.
router# crypto pki token usb_token_id login PIN
router# config terminal
router(config)# crypto pki token default secondary config CCCD
router(config)# exit
router# write memory
Tip ![]() CCCD is the private sector on the eToken where the configuration file resides. When you enter the crypto pki token default secondary config CCCD command, the CLI on the e-token merges with the CLI on the router.
CCCD is the private sector on the eToken where the configuration file resides. When you enter the crypto pki token default secondary config CCCD command, the CLI on the e-token merges with the CLI on the router.
Previewing Configurations
There are many ways to preview a device configuration. You can select a device from the Device selector and select Tools > Preview Configuration, or you can click the Preview Config button in several dialog boxes.
Tip ![]() You can also right click a device in Map view and select Preview Configuration.
You can also right click a device in Map view and select Preview Configuration.
When you preview a configuration, the configuration is displayed in the Config Version Viewer dialog box (see Config Version Viewer (Preview Configuration) Dialog Box, page N-17). The proposed configuration is on the left. You can select to view the delta configuration (which shows the changes since the last deployment) or the full configuration. You can also compare the configuration to the last one deployed to the device or the current running configuration in the right pane.
The contents of the proposed configuration can differ depending on where you view it from:
•![]() If you use Tools > Preview Configuration, or right click the device in the Device selector and select Preview Configuration, the proposed configuration includes changes that you have not yet submitted to the database.
If you use Tools > Preview Configuration, or right click the device in the Device selector and select Preview Configuration, the proposed configuration includes changes that you have not yet submitted to the database.
•![]() If you preview the configuration while creating a deployment job, the proposed configuration includes only those changes that you have submitted to the database. These are the changes that will be deployed to the device if you start the deployment job.
If you preview the configuration while creating a deployment job, the proposed configuration includes only those changes that you have submitted to the database. These are the changes that will be deployed to the device if you start the deployment job.
Redeploying Configurations to Devices
You can redeploy any deployment job. When redeploying a failed job, the devices that failed are automatically selected. However, you can also add devices to which deployment succeeded.
Tips on Redeploying a Configuration to a Replacement Device
If you have to replace a device, for example, due to hardware failure, you cannot simply redeploy the last deployment job from the device, because Security Manager does not know that the device is actually a new one. To deploy the old device's configuration to the new device, you have these options:
•![]() If the new device is the exact same model and operating system version as the replaced device, you can select the old device in the device selector, right-click and select Preview Configuration, and copy and paste the full configuration to the new device. However, this does not migrate certificates from the old device to the new one. You must re-enroll the device or renew the certificate yourself.
If the new device is the exact same model and operating system version as the replaced device, you can select the old device in the device selector, right-click and select Preview Configuration, and copy and paste the full configuration to the new device. However, this does not migrate certificates from the old device to the new one. You must re-enroll the device or renew the certificate yourself.
•![]() If the new device is not exactly identical to the old device, follow the procedure described in Changes That Change the Feature Set in Security Manager, page 5-19.
If the new device is not exactly identical to the old device, follow the procedure described in Changes That Change the Feature Set in Security Manager, page 5-19.
Before You Begin
•![]() Make sure that devices have been bootstrapped. For more information, see Chapter 4, "Preparing Devices for Management".
Make sure that devices have been bootstrapped. For more information, see Chapter 4, "Preparing Devices for Management".
•![]() If you are deploying to a transport server, such as AUS, CNS, or TMS, make sure the server, Security Manager settings, and device have been set up properly.
If you are deploying to a transport server, such as AUS, CNS, or TMS, make sure the server, Security Manager settings, and device have been set up properly.
Related Topics
•![]() Overview of the Deployment Process
Overview of the Deployment Process
•![]() Deploying Configurations in Non-Workflow Mode
Deploying Configurations in Non-Workflow Mode
•![]() Deploying Configurations in Workflow Mode
Deploying Configurations in Workflow Mode
•![]() Deploying Configurations Using an Auto Update Server or CNS Configuration Engine
Deploying Configurations Using an Auto Update Server or CNS Configuration Engine
•![]() Deploying Configurations to a Token Management Server
Deploying Configurations to a Token Management Server
•![]() Managing Device Communication Settings and Certificates, page 5-21
Managing Device Communication Settings and Certificates, page 5-21
•![]() Understanding Deployment Methods
Understanding Deployment Methods
•![]() Config Version Viewer (Preview Configuration) Dialog Box, page N-17
Config Version Viewer (Preview Configuration) Dialog Box, page N-17
•![]() Job States in Non-Workflow Mode
Job States in Non-Workflow Mode
Step 1 ![]() Click the Deployment Manager button in the Main toolbar.
Click the Deployment Manager button in the Main toolbar.
The Deployment Manager window appears. Click the Deployment Jobs tab if it is not active.
Step 2 ![]() Select the job that contains the devices to which you want to redeploy configurations, then do one of the following:
Select the job that contains the devices to which you want to redeploy configurations, then do one of the following:
•![]() In non-Workflow mode, click Redeploy.
In non-Workflow mode, click Redeploy.
•![]() In Workflow mode, click Deploy.
In Workflow mode, click Deploy.
The Redeploy a Job dialog box opens (see Redeploy a Job Dialog Box, page N-22).
Step 3 ![]() In the Redeploy a Job dialog box, do the following:
In the Redeploy a Job dialog box, do the following:
•![]() Select the devices to which you want to redeploy configurations. Initially all failed devices are selected.
Select the devices to which you want to redeploy configurations. Initially all failed devices are selected.
•![]() (Optional) You can change the method used to deploy configurations for individual devices. You can select these methods
(Optional) You can change the method used to deploy configurations for individual devices. You can select these methods
–![]() Device—Deploys the configuration directly to the device or to the transport mechanism specified for the device. For more information, see Deploying Directly to a Device or Deploying to a Device through an Intermediate Server.
Device—Deploys the configuration directly to the device or to the transport mechanism specified for the device. For more information, see Deploying Directly to a Device or Deploying to a Device through an Intermediate Server.
–![]() File—Deploys the configuration file to a directory you select on the Security Manager server. For more information, see Deploying to a File.
File—Deploys the configuration file to a directory you select on the Security Manager server. For more information, see Deploying to a File.
•![]() (Optional) Select how you want Security Manager to respond if it detects that changes were made on the device by someone other than Security Manager (these are called out of band changes).
(Optional) Select how you want Security Manager to respond if it detects that changes were made on the device by someone other than Security Manager (these are called out of band changes).
Note ![]() Before proceeding with the deployment, you can preview proposed configurations and compare them against last deployed configurations or current running configurations. Select a device and click Preview Config.
Before proceeding with the deployment, you can preview proposed configurations and compare them against last deployed configurations or current running configurations. Select a device and click Preview Config.
Step 4 ![]() Click OK.
Click OK.
Aborting Deployment Jobs
You can stop a deployment job if you do not want to deploy the defined configuration file or you want to postpone deployment.
You can abort deployment jobs only while they are in the Deploying, Scheduled, or Rolling Back state. Aborting a job stops deployment of configuration files to pending devices, but has no effect on devices to which deployments are in progress (commands are being written to a device) or to which deployment has already completed successfully.
After you abort a job, the deployment status of pending devices changes to Aborted.
To resume deployment, redeploy the job. See Redeploying Configurations to Devices for more information.
Note ![]() If you are viewing the status of a job in the Deployment Status window, you can abort the job by clicking the Abort button in that window. The following procedure assumes you are not viewing deployment status.
If you are viewing the status of a job in the Deployment Status window, you can abort the job by clicking the Abort button in that window. The following procedure assumes you are not viewing deployment status.
Related Topics
•![]() Viewing Deployment Status and History for Jobs and Schedules
Viewing Deployment Status and History for Jobs and Schedules
•![]() Job States in Non-Workflow Mode
Job States in Non-Workflow Mode
Step 1 ![]() Click the Deployment Manager button in the Main toolbar.
Click the Deployment Manager button in the Main toolbar.
The Deployment Manager window appears. Click the Deployment Jobs tab if it is not active.
Step 2 ![]() Select the deployment job and click Abort. You are asked to confirm your action.
Select the deployment job and click Abort. You are asked to confirm your action.
Creating or Editing Deployment Schedules
You can create deployment schedules to create deployment jobs at regular intervals. Schedules can help you ensure that the selected devices get regular configuration updates.
Related Topics
•![]() Overview of the Deployment Process
Overview of the Deployment Process
•![]() Viewing Deployment Status and History for Jobs and Schedules
Viewing Deployment Status and History for Jobs and Schedules
•![]() Suspending or Resuming Deployment Schedules
Suspending or Resuming Deployment Schedules
Step 1 ![]() Click the Deployment Manager button in the Main toolbar.
Click the Deployment Manager button in the Main toolbar.
The Deployment Manager window appears. Click the Deployment Schedules tab if it is not active (see Deployment Schedules Tab, Deployment Manager, page N-6).
Step 2 ![]() Do one of the following:
Do one of the following:
•![]() If you are creating a new schedule, click Create.
If you are creating a new schedule, click Create.
•![]() If you are editing an existing schedule, select it in the Deployment Schedule table and click Open.
If you are editing an existing schedule, select it in the Deployment Schedule table and click Open.
The Schedule dialog box opens (see Schedule Dialog Box, page N-25).
Step 3 ![]() Enter at least this information in the Schedule dialog box:
Enter at least this information in the Schedule dialog box:
•![]() The name of the schedule.
The name of the schedule.
•![]() If you are using Workflow mode with an approver, ensure that the approver e-mail address is correct. Also verify your e-mail address (in the Submitter field), and choose whether you want to get notifications whenever the status of the job changes.
If you are using Workflow mode with an approver, ensure that the approver e-mail address is correct. Also verify your e-mail address (in the Submitter field), and choose whether you want to get notifications whenever the status of the job changes.
•![]() Define the first date and time the schedule should start, and select how often deployment jobs will be generated based on the schedule. Also determine whether the schedule should have an end date, after which no new jobs are created from it.
Define the first date and time the schedule should start, and select how often deployment jobs will be generated based on the schedule. Also determine whether the schedule should have an end date, after which no new jobs are created from it.
•![]() Click Add Devices and select all the devices that should be included in the deployment job. Including devices does not lock them from being modified by users or included in other deployment jobs or schedules.
Click Add Devices and select all the devices that should be included in the deployment job. Including devices does not lock them from being modified by users or included in other deployment jobs or schedules.
If Security Manager is configured to use user-login credentials for accessing devices, your username and password are captured during schedule creation. If you change your password, you will need to recreate the schedule.
Step 4 ![]() Click OK. The schedule is added to the Deployment Schedule table.
Click OK. The schedule is added to the Deployment Schedule table.
Step 5 ![]() (Workflow mode only) If you are operating in Workflow mode, you must complete these additional steps:
(Workflow mode only) If you are operating in Workflow mode, you must complete these additional steps:
•![]() If you are using an approver for deployment jobs, select the schedule in the table and click Submit to submit the schedule to the approver. You are prompted to verify the approver's e-mail address and to enter comments to help the approver evaluate the schedule. The approver will have to approve the schedule before it becomes active.
If you are using an approver for deployment jobs, select the schedule in the table and click Submit to submit the schedule to the approver. You are prompted to verify the approver's e-mail address and to enter comments to help the approver evaluate the schedule. The approver will have to approve the schedule before it becomes active.
•![]() If you are not using an approver, select the schedule in the table and click Approve to approve it yourself and to activate the schedule.
If you are not using an approver, select the schedule in the table and click Approve to approve it yourself and to activate the schedule.
Suspending or Resuming Deployment Schedules
You can suspend an active deployment schedule without discarding it and then reactivate it later when you want to resume creating jobs based on the schedule. This allows you to turn off a schedule temporarily.
Related Topics
•![]() Viewing Deployment Status and History for Jobs and Schedules
Viewing Deployment Status and History for Jobs and Schedules
•![]() Creating or Editing Deployment Schedules
Creating or Editing Deployment Schedules
Step 1 ![]() Click the Deployment Manager button in the Main toolbar.
Click the Deployment Manager button in the Main toolbar.
The Deployment Manager window appears. Click the Deployment Schedules tab if it is not active (see Deployment Schedules Tab, Deployment Manager, page N-6).
Step 2 ![]() Do one of the following:
Do one of the following:
•![]() To suspend an active schedule, select it and click Suspend.
To suspend an active schedule, select it and click Suspend.
•![]() To resume a suspended schedule, select it and click Resume.
To resume a suspended schedule, select it and click Resume.
Adding Configuration Versions from a Device to the Configuration Archive
The Configuration Archive is updated with a new configuration version any time a configuration is deployed to the device or a file, including when you roll back a configuration to a device.
You can also retrieve a configuration directly from the device to add to the Configuration Archive. This is useful when changes have been made directly to device configurations, which are called out-of-band changes.
Note ![]() You cannot retrieve configurations from devices that are managed by AUS and that have been configured with dynamic IP addresses.
You cannot retrieve configurations from devices that are managed by AUS and that have been configured with dynamic IP addresses.
This procedure will help you retrieve a configuration from a device and add it to the archive.
Related Topics
•![]() Viewing and Comparing Archived Configuration Versions
Viewing and Comparing Archived Configuration Versions
Step 1 ![]() Select Tools > Configuration Archive to open the Configuration Archive (see Configuration Archive Window, page N-26).
Select Tools > Configuration Archive to open the Configuration Archive (see Configuration Archive Window, page N-26).
Step 2 ![]() In the Device selector, select the device from which you want to retrieve the configuration. The archived configurations appear in the right pane.
In the Device selector, select the device from which you want to retrieve the configuration. The archived configurations appear in the right pane.
Step 3 ![]() Click Add from Device. Security Manager logs into the device, retrieves the running configuration, and adds it to the archive.
Click Add from Device. Security Manager logs into the device, retrieves the running configuration, and adds it to the archive.
Viewing and Comparing Archived Configuration Versions
Using the Configuration Archive, you can view the previous configurations for a device, compare versions of the configuration, and view the transcripts related to configuration deployment. To open the Configuration Archive window, select Tools > Configuration Archive.
To view the configuration versions for a device, select the device in the device selector. All archived versions are listed in the right pane. You can do the following:
•![]() To view a configuration, select it and click View, which opens the Config Version Viewer dialog box with the configuration displayed in the left pane (for information about the dialog box, see Configuration Version Viewer, page N-28).
To view a configuration, select it and click View, which opens the Config Version Viewer dialog box with the configuration displayed in the left pane (for information about the dialog box, see Configuration Version Viewer, page N-28).
If there is more than one type of configuration available for the selected version, you can choose which type to view using the Config Type field. A Full version is a complete configuration, whereas a Delta version is just the commands that were different between this version and the device's previous full configuration. Delta configurations might include negative commands.
•![]() To compare configurations, select one and click View. In the Config Version Viewer window, select the configuration you want to compare in the Compare with Version field. The second version appears in the right pane with differences color-coded according to the caption below the display area.
To compare configurations, select one and click View. In the Config Version Viewer window, select the configuration you want to compare in the Compare with Version field. The second version appears in the right pane with differences color-coded according to the caption below the display area.
•![]() To view the transcript associated with the deployment of a configuration, do one of the following:
To view the transcript associated with the deployment of a configuration, do one of the following:
–![]() From the Configuration Archive window, double-click the icon in the Transcript column for the desired configuration.
From the Configuration Archive window, double-click the icon in the Transcript column for the desired configuration.
–![]() When viewing a configuration in the left pane of the Config Version Viewer dialog box, click Transcript View.
When viewing a configuration in the left pane of the Config Version Viewer dialog box, click Transcript View.
A transcript is the log file of transactions between Security Manager and a device captured during a deployment or rollback operation. It includes commands sent and received between server and device from the time of the deployment or rollback request, but it does not include communication that occurs during the initial discovery phase of deployment, when Security Manager obtains the current configuration from the device. If rollback is unsuccessful, there might be a partial transcript generated depending on which stage rollback or deployment failed. The transcript is displayed in the Transcript Viewer window (see Transcript Viewer Window, page N-30).
You can configure the number of configuration versions to archive on the Configuration Archive settings page (see Configuration Archive Page, page A-2).
Related Topics
•![]() Adding Configuration Versions from a Device to the Configuration Archive
Adding Configuration Versions from a Device to the Configuration Archive
Rolling Back Configurations
After you deploy a new configuration to a device, you can roll back the configuration to an older version if you find that the new configuration does not work correctly. However, it is usually a better idea to fix the configuration in Security Manager and deploy the fixed configuration, because rolling back a configuration creates a situation where the configuration defined in Security Manager is not the same one running on the device. Roll back configurations only in extreme circumstances.
The following topics will help you better understand and use configuration rollback:
•![]() Understanding Configuration Rollback
Understanding Configuration Rollback
•![]() Rolling Back Configurations to Devices Using the Deployment Manager
Rolling Back Configurations to Devices Using the Deployment Manager
•![]() Using Rollback to Deploy Archived Configurations
Using Rollback to Deploy Archived Configurations
Understanding Configuration Rollback
If you deploy configurations to devices using the Device method, either to deploy the configuration directly to the device or to an intermediate server, you can roll back the configuration to an older version if you find that the new configuration does not work correctly. You cannot roll back to a configuration that was deployed to a file.
You can roll back configurations using these tools:
•![]() Deployment Manager—You can roll back a deployment to the last good configuration if that configuration was deployed to the device rather than to a file. To open the Deployment Manager, select Tools > Deployment Manager.
Deployment Manager—You can roll back a deployment to the last good configuration if that configuration was deployed to the device rather than to a file. To open the Deployment Manager, select Tools > Deployment Manager.
•![]() Configuration Archive—You can roll back deployment to any archived configuration that was deployed to the device or that originated from the device. To open the Configuration Archive, select Tools > Configuration Archive.
Configuration Archive—You can roll back deployment to any archived configuration that was deployed to the device or that originated from the device. To open the Configuration Archive, select Tools > Configuration Archive.
When you roll back a configuration, Security Manager does the following:
•![]() On PIX Firewalls and ASA and FWSM devices, Security Manager uses the replace config option on the device's SSL interface to perform the equivalent of a reload (xlates are cleared, IPsec tunnels are torn down, and so on).
On PIX Firewalls and ASA and FWSM devices, Security Manager uses the replace config option on the device's SSL interface to perform the equivalent of a reload (xlates are cleared, IPsec tunnels are torn down, and so on).
•![]() For devices running IOS 12.3(7)T or later, Security Manager uses the configure replace command to replace the running configuration with the contents of a configuration file. Support for this command is dependent on the IOS version installed on the device:
For devices running IOS 12.3(7)T or later, Security Manager uses the configure replace command to replace the running configuration with the contents of a configuration file. Support for this command is dependent on the IOS version installed on the device:
–![]() On devices running IOS 12.3(7)T or later, Security Manager copies the configuration file to the startup configuration before executing the configure replace command. If the configure replace operation fails, Security Manager issues the reload command to reload the operating system using the contents of the startup configuration. The reload command restarts the system, which might result in a temporary network outage.
On devices running IOS 12.3(7)T or later, Security Manager copies the configuration file to the startup configuration before executing the configure replace command. If the configure replace operation fails, Security Manager issues the reload command to reload the operating system using the contents of the startup configuration. The reload command restarts the system, which might result in a temporary network outage.
–![]() On routers running a version prior to 12.3(7)T, Security Manager copies the configuration file to the startup configuration and issues the reload command, which restarts the system. Security Manager uses the TFTP server and directory specified in the Configuration Archive settings page (see Configuration Archive Page, page A-2) when using this method.
On routers running a version prior to 12.3(7)T, Security Manager copies the configuration file to the startup configuration and issues the reload command, which restarts the system. Security Manager uses the TFTP server and directory specified in the Configuration Archive settings page (see Configuration Archive Page, page A-2) when using this method.
•![]() The rolled-back configuration becomes another archived version in the Configuration Archive for that device.
The rolled-back configuration becomes another archived version in the Configuration Archive for that device.
Special considerations apply to the rollback of certain device types and configurations. See the following sections for more information:
•![]() Understanding Rollback for Devices in Multiple Context Mode
Understanding Rollback for Devices in Multiple Context Mode
•![]() Understanding Rollback for Failover Devices
Understanding Rollback for Failover Devices
•![]() Understanding Rollback for Catalyst 6500/7600 Devices
Understanding Rollback for Catalyst 6500/7600 Devices
•![]() Understanding Rollback for IPS and IOS IPS
Understanding Rollback for IPS and IOS IPS
•![]() Commands that Can Cause Conflicts after Rollback
Commands that Can Cause Conflicts after Rollback
•![]() Commands to Recover from Failover Misconfiguration after Rollback
Commands to Recover from Failover Misconfiguration after Rollback
Related Topics
•![]() Rolling Back Configurations to Devices Using the Deployment Manager
Rolling Back Configurations to Devices Using the Deployment Manager
•![]() Using Rollback to Deploy Archived Configurations
Using Rollback to Deploy Archived Configurations
Understanding Rollback for Devices in Multiple Context Mode
If the configuration of the system execution space to which you are rolling back specifies connectivity options to security contexts (for example, vlan config) and there is a mismatch between the configuration selected for rollback and the current running configurations of the security contexts, Security Manager might not be able to connect to the security contexts. In such cases. we recommend that you roll back configurations for the security contexts before rolling back a configuration for the system execution space.
If you roll back a configuration for the system execution space of a device in multiple context mode to one that includes a different set of security contexts, after rollback the security contexts on the device might not match the security contexts managed by Security Manager that appear in the Device selector.
Related Topics
•![]() Rolling Back Configurations to Devices Using the Deployment Manager
Rolling Back Configurations to Devices Using the Deployment Manager
•![]() Using Rollback to Deploy Archived Configurations
Using Rollback to Deploy Archived Configurations
•![]() Commands that Can Cause Conflicts after Rollback
Commands that Can Cause Conflicts after Rollback
•![]() Commands to Recover from Failover Misconfiguration after Rollback
Commands to Recover from Failover Misconfiguration after Rollback
Understanding Rollback for Failover Devices
If you roll back a configuration for a security context that contains a failover policy, Security Manager initially disables failover in the system execution space and both devices become active. After the rollback is completed, the devices should return to their failover configuration.
If a switchover occurs during rollback or connectivity between the active and standby units is lost, copy the bootstrap configuration to the standby unit after rollback completes. For more information, see Bootstrap Configuration for LAN Failover Dialog Box, page K-91.
Related Topics
•![]() Rolling Back Configurations to Devices Using the Deployment Manager
Rolling Back Configurations to Devices Using the Deployment Manager
•![]() Using Rollback to Deploy Archived Configurations
Using Rollback to Deploy Archived Configurations
•![]() Commands that Can Cause Conflicts after Rollback
Commands that Can Cause Conflicts after Rollback
•![]() Commands to Recover from Failover Misconfiguration after Rollback
Commands to Recover from Failover Misconfiguration after Rollback
Understanding Rollback for Catalyst 6500/7600 Devices
If you roll back a configuration to a Catalyst 6500/7600 device that specifies connectivity options to service modules (for example, vlan config) and there is a mismatch between the configuration selected for rollback and the current running configuration, Security Manager might not be able to connect to the service modules. We recommend that you roll back configurations for the service modules before rolling back a configuration to the Catalyst 6500/7600 chassis.
Thus, the proper order for performing rollback on Catalyst 6500/7600 devices is:
1. ![]() Security contexts.
Security contexts.
2. ![]() Service modules.
Service modules.
3. ![]() Chassis.
Chassis.
We recommend performing rediscovery after the rollback operation is complete.
If you are rolling back an FWSM deployment and the system is configured to retrieve security certificates when adding devices, you might need to retrieve the certificate after the rollback operation is complete. This can be done using either of the following methods:
•![]() Retrieving the certificate on a per-device basis from Device Properties.
Retrieving the certificate on a per-device basis from Device Properties.
•![]() Configuring Security Manager to automatically retrieve certificates after rollback. To do this, select Tools > Security Manager Administration > Device Communication, then select Retrieve while adding devices in the PIX/ASA/FWSM Device Authentication Certificates field (in SSL Certificate Parameters).
Configuring Security Manager to automatically retrieve certificates after rollback. To do this, select Tools > Security Manager Administration > Device Communication, then select Retrieve while adding devices in the PIX/ASA/FWSM Device Authentication Certificates field (in SSL Certificate Parameters).
Related Topics
•![]() Rolling Back Configurations to Devices Using the Deployment Manager
Rolling Back Configurations to Devices Using the Deployment Manager
•![]() Using Rollback to Deploy Archived Configurations
Using Rollback to Deploy Archived Configurations
•![]() Commands that Can Cause Conflicts after Rollback
Commands that Can Cause Conflicts after Rollback
•![]() Commands to Recover from Failover Misconfiguration after Rollback
Commands to Recover from Failover Misconfiguration after Rollback
Understanding Rollback for IPS and IOS IPS
Special considerations apply to the rollback of IPS devices and IOS IPS devices. For IPS devices and IOS IPS devices, rollback could possibly include rolling back sensor updates or signature updates. The reason for this is that for IPS devices and IOS IPS devices, Security Manager supports not only the management of configuration but also the support of image management in the form of manual and automatic upgrades and signature updates. Keep in mind that when you do a rollback, you are rolling back the configuration, not the sensor updates or signature updates. These updates are downgraded only if the configuration cannot be rolled back without downgrading the updates.
Rollback is accomplished through Configuration Archive. For IPS devices and IOS IPS devices, only the current configuration is archived. The current configuration for one device version (say, Version X) may not be valid for a different device version (say, Version Y). Security Manager rolls back a configuration of Version X to a sensor with Version Y as long as the configuration for X is valid for Y.
If the configuration for X is valid for Y, rollback proceeds and Security Manager displays a confirmation dialog box to you. If the configuration for X is not valid for Y, Security Manager displays a warning dialog box to you and provides you with the option of downgrading the sensor during rollback if such a downgrade will help accomplish the rollback.
For rollback of a deployment job, the warning dialog box contains one or more of the following types of warnings:
•![]() Security Manager warns you about IPS devices that need to have their sensor version downgraded before a rollback can be performed.
Security Manager warns you about IPS devices that need to have their sensor version downgraded before a rollback can be performed.
•![]() Security Manager warns you about IOS IPS devices whose signature level has changed. For these devices, only the non-IPS sections of the configuration can be rolled back.
Security Manager warns you about IOS IPS devices whose signature level has changed. For these devices, only the non-IPS sections of the configuration can be rolled back.
•![]() Security Manager warns you about IPS devices that must be downgraded more than one level, and as a result, Security Manager cannot do it. You must use the Cisco IPS CLI for such downgrades. The warning dialog box displays the version to which the device must be reimaged or downgraded.
Security Manager warns you about IPS devices that must be downgraded more than one level, and as a result, Security Manager cannot do it. You must use the Cisco IPS CLI for such downgrades. The warning dialog box displays the version to which the device must be reimaged or downgraded.
Note ![]() The option of downgrading an IOS IPS device during rollback is not available, because IOS IPS devices do not support downgrade.
The option of downgrading an IOS IPS device during rollback is not available, because IOS IPS devices do not support downgrade.
If the option of downgrading the sensor during rollback will not help accomplish the rollback, you receive an error message stating that rollback cannot occur and that you need to manually reinstall the image on the device to roll back. Only the update package most recently installed on a device can be downgraded, so downgrade does not help in the following cases:
•![]() Rollback of a deployment (signature update) that involves downloading more than one update package to the device.
Rollback of a deployment (signature update) that involves downloading more than one update package to the device.
•![]() Selection of an old deployment or configuration for rollback subsequent to which several upgrades occurred.
Selection of an old deployment or configuration for rollback subsequent to which several upgrades occurred.
•![]() Rollback of an upgrade that cannot be downgraded. Major, minor, and most service pack upgrades cannot be downgraded, as shown in Table 17-6
Rollback of an upgrade that cannot be downgraded. Major, minor, and most service pack upgrades cannot be downgraded, as shown in Table 17-6
For rollback of a configuration that requires a downgrade to a version prior to Cisco IPS 5.1(4), Security Manager does not support automatic downgrade. You must manually downgrade the device to the specified version and then proceed with rollback.
During rollback, if Security Manager discovers that there have been out-of-band changes to the device that prevent rollback, you will receive an error message stating that rollback is prevented.
Related Topics
•![]() Rolling Back Configurations to Devices Using the Deployment Manager
Rolling Back Configurations to Devices Using the Deployment Manager
•![]() Using Rollback to Deploy Archived Configurations
Using Rollback to Deploy Archived Configurations
Commands that Can Cause Conflicts after Rollback
The following commands can potentially cause conflicts after rollback is performed:
•![]() http server enable port
http server enable port
http ip_address net_mask interface_name
Applicable only to security contexts (not the system execution space).
•![]() allocate-interface {physical_interface | subinterface} [map_name] [visible | invisible]
allocate-interface {physical_interface | subinterface} [map_name] [visible | invisible]
Applicable only to the system execution space under the context subcommand.
•![]() config-url diskX:/path/filename
config-url diskX:/path/filename
Applicable only to the system execution space under the context subcommand.
•![]() join -failover-group group_number
join -failover-group group_number
Applicable only for active/active failover and only to the system execution space under the context subcommand. The failover group defaults to group 1 if not specified.
•![]() failover
failover
Applicable only to the system execution space. Enabling failover causes configuration synchronization to trigger between peers.
•![]() failover lan enable
failover lan enable
Applicable only to the system execution space. If this command is omitted, this implies serial cable failover on a PIX platform or warrants an incomplete failover configuration warning on ASA and FWSM.
•![]() failover lan unit {primary | secondary}
failover lan unit {primary | secondary}
Applicable only to the system execution space. If this command is not specified, both units are secondary by default. If rollback takes place on the wrong unit, both can become primary, which impacts which unit becomes active initially.
•![]() failover group group_number
failover group group_number
Applicable only to the system execution space. This command enables active/active failover. If this command is omitted, active/standby is enabled.
•![]() preempt delay
preempt delay
Applicable only to the system execution space and under the failover group subcommand to force which failover group becomes active if both units are booted up at the same time, or the primary does not boot up within the delay specified.
•![]() monitor-interface interface_name
monitor-interface interface_name
Applicable only to security contexts and used to enable health monitoring of critical interfaces. If this interface is `bounced' or fails, a switchover could occur.
Related Topics
•![]() Rolling Back Configurations to Devices Using the Deployment Manager
Rolling Back Configurations to Devices Using the Deployment Manager
•![]() Using Rollback to Deploy Archived Configurations
Using Rollback to Deploy Archived Configurations
•![]() Commands to Recover from Failover Misconfiguration after Rollback
Commands to Recover from Failover Misconfiguration after Rollback
Commands to Recover from Failover Misconfiguration after Rollback
If a switchover happens during rollback and the two units are no longer synchronized, you might need to use the following commands to recover:
•![]() failover active group_number
failover active group_number
•![]() failover reset group_number
failover reset group_number
•![]() failover reload-standby
failover reload-standby
•![]() clear configure failover
clear configure failover
For more information on these commands, please refer to the command reference for your security appliance.
Related Topics
•![]() Rolling Back Configurations to Devices Using the Deployment Manager
Rolling Back Configurations to Devices Using the Deployment Manager
•![]() Using Rollback to Deploy Archived Configurations
Using Rollback to Deploy Archived Configurations
•![]() Commands that Can Cause Conflicts after Rollback
Commands that Can Cause Conflicts after Rollback
Rolling Back Configurations to Devices Using the Deployment Manager
If you deploy configurations to devices and then determine that there is something wrong with the new configurations, you can revert to and deploy the previous configurations for those devices. You cannot roll back to a previous configuration if the previous deployment was to a file or if there are no previous configurations.
You can also use the Configuration Archive tool to roll back to any configuration archived from a device. For more information, see Using Rollback to Deploy Archived Configurations.
Before You Begin
Tip ![]() When you roll back a configuration, the action is not done as part of an activity or configuration session, which means the device is not locked. Thus, it is possible that two users might roll back configurations simultaneously on a device, which can generate unexpected problems. Before rolling back a configuration, ensure that there are no active deployment jobs for the device listed in the Deployment Manager window.
When you roll back a configuration, the action is not done as part of an activity or configuration session, which means the device is not locked. Thus, it is possible that two users might roll back configurations simultaneously on a device, which can generate unexpected problems. Before rolling back a configuration, ensure that there are no active deployment jobs for the device listed in the Deployment Manager window.
Roll back configurations only in extreme circumstances. Before rolling back configurations, carefully read these topics:.
•![]() Understanding Configuration Rollback
Understanding Configuration Rollback
•![]() Understanding Rollback for Devices in Multiple Context Mode
Understanding Rollback for Devices in Multiple Context Mode
•![]() Understanding Rollback for Failover Devices
Understanding Rollback for Failover Devices
•![]() Understanding Rollback for Catalyst 6500/7600 Devices
Understanding Rollback for Catalyst 6500/7600 Devices
•![]() Understanding Rollback for IPS and IOS IPS
Understanding Rollback for IPS and IOS IPS
•![]() Commands that Can Cause Conflicts after Rollback
Commands that Can Cause Conflicts after Rollback
•![]() Commands to Recover from Failover Misconfiguration after Rollback
Commands to Recover from Failover Misconfiguration after Rollback
Related Topics
•![]() Viewing Deployment Status and History for Jobs and Schedules
Viewing Deployment Status and History for Jobs and Schedules
•![]() Job States in Non-Workflow Mode
Job States in Non-Workflow Mode
Step 1 ![]() Click the Deployment Manager button in the Main toolbar. Click the Deployment Jobs tab if it is not active.
Click the Deployment Manager button in the Main toolbar. Click the Deployment Jobs tab if it is not active.
Step 2 ![]() Select the deployment job and click Rollback.
Select the deployment job and click Rollback.
The Rollback a Job dialog box opens (see Rollback a Job Dialog Box, page N-23).
Step 3 ![]() Select the devices for which you want to roll back configurations. You can select only devices that used the deploy to device method. By default, all the devices with the status Succeeded are selected.
Select the devices for which you want to roll back configurations. You can select only devices that used the deploy to device method. By default, all the devices with the status Succeeded are selected.
Step 4 ![]() Click OK.
Click OK.
Step 5 ![]() (Optional) To make the configuration defined in Security Manager consistent with the one running on the device, rediscover the device policies as described in Discovering Policies on Devices Already in Security Manager, page 6-14.
(Optional) To make the configuration defined in Security Manager consistent with the one running on the device, rediscover the device policies as described in Discovering Policies on Devices Already in Security Manager, page 6-14.
However, it is usually better to correct the policies for the device and to then redeploy the updated configuration. This preserves your changes and shared-policy configuration for the device, which would otherwise be removed if you rediscover policies.
Using Rollback to Deploy Archived Configurations
You can roll back any configuration version from Configuration Archive to the device for which it is archived, provided that the configuration was deployed to the device or originated from the device. You cannot roll back to a configuration that was deployed to a file. The rolled-back configuration then becomes another archived version in the list for that device.
Before You Begin
Tip ![]() When you roll back a configuration, the action is not done as part of an activity or configuration session, which means the device is not locked. Thus, it is possible that two users might roll back configurations simultaneously on a device, which can generate unexpected problems. Before rolling back a configuration, check the Deployment Manager to ensure that there are no active deployment jobs for the device (select Tools > Deployment Manager).
When you roll back a configuration, the action is not done as part of an activity or configuration session, which means the device is not locked. Thus, it is possible that two users might roll back configurations simultaneously on a device, which can generate unexpected problems. Before rolling back a configuration, check the Deployment Manager to ensure that there are no active deployment jobs for the device (select Tools > Deployment Manager).
Roll back configurations only in extreme circumstances. Before rolling back configurations, carefully read these topics:.
•![]() Understanding Configuration Rollback
Understanding Configuration Rollback
•![]() Understanding Rollback for Devices in Multiple Context Mode
Understanding Rollback for Devices in Multiple Context Mode
•![]() Understanding Rollback for Failover Devices
Understanding Rollback for Failover Devices
•![]() Understanding Rollback for Catalyst 6500/7600 Devices
Understanding Rollback for Catalyst 6500/7600 Devices
•![]() Understanding Rollback for IPS and IOS IPS
Understanding Rollback for IPS and IOS IPS
•![]() Commands that Can Cause Conflicts after Rollback
Commands that Can Cause Conflicts after Rollback
•![]() Commands to Recover from Failover Misconfiguration after Rollback
Commands to Recover from Failover Misconfiguration after Rollback
Related Topics
•![]() Rolling Back Configurations to Devices Using the Deployment Manager
Rolling Back Configurations to Devices Using the Deployment Manager
•![]() Adding Configuration Versions from a Device to the Configuration Archive
Adding Configuration Versions from a Device to the Configuration Archive
•![]() Chapter 17 "Managing Deployment"
Chapter 17 "Managing Deployment"
•![]() Viewing and Comparing Archived Configuration Versions
Viewing and Comparing Archived Configuration Versions
Step 1 ![]() Select Tools > Configuration Archive to open the Configuration Archive (see Configuration Archive Window, page N-26).
Select Tools > Configuration Archive to open the Configuration Archive (see Configuration Archive Window, page N-26).
Step 2 ![]() In the Device selector, select the device for which you want to roll back to a different configuration version. The archived configurations appear in the right pane.
In the Device selector, select the device for which you want to roll back to a different configuration version. The archived configurations appear in the right pane.
Step 3 ![]() Select the configuration version to which you want to roll back. You can roll back only to a configuration that was deployed to the device or that originated from the device. You cannot roll back to a configuration that was deployed to a file.
Select the configuration version to which you want to roll back. You can roll back only to a configuration that was deployed to the device or that originated from the device. You cannot roll back to a configuration that was deployed to a file.
Tip ![]() To view the configuration version before rollback, click View.
To view the configuration version before rollback, click View.
Step 4 ![]() Click Rollback to deploy the selected configuration version to the device. A progress box appears, followed by a notification message when the configuration version is successfully deployed.
Click Rollback to deploy the selected configuration version to the device. A progress box appears, followed by a notification message when the configuration version is successfully deployed.
Step 5 ![]() (Optional) To make the configuration defined in Security Manager consistent with the one running on the device, rediscover the device policies as described in Discovering Policies on Devices Already in Security Manager, page 6-14.
(Optional) To make the configuration defined in Security Manager consistent with the one running on the device, rediscover the device policies as described in Discovering Policies on Devices Already in Security Manager, page 6-14.
However, it is usually better to correct the policies for the device and to then redeploy the updated configuration. This preserves your changes and shared-policy configuration for the device, which would otherwise be removed if you rediscover policies.
 Feedback