Secure Wired Access
Network Devices Definitions in Cisco ISE
A network device such as a switch or a router is an authentication, authorization, and accounting (AAA) client through which AAA service requests are sent to Cisco ISE. You must define network devices for Cisco ISE to interact with the network devices. You can configure network devices for RADIUS or TACACS AAA, Simple Network Management Protocol (SNMP) for the Profiling service to collect Cisco Discovery Protocol and Link Layer Discovery Protocol attributes for profiling endpoints, and Trustsec attributes for Trustsec devices. A network device that is not defined in Cisco ISE cannot receive AAA services from Cisco ISE.
In the network device definition:
-
You can select the vendor profile that fits the network device . The profile includes pre-defined configurations for the device, such as settings for URL direct and change of authorization.
-
You can configure the RADIUS protocol for RADIUS authentications. When Cisco ISE receives a RADIUS request from a network device, it looks for the corresponding device definition to retrieve the shared secret that is configured. If it finds the device definition, it obtains the shared secret that is configured on the device and matches it against the shared secret in the request to authenticate access. If the shared secrets match, the RADIUS server will process the request further based upon the policy and configuration. If they do not match, a reject response is sent to the network device. A failed authentication report is generated, which provides the failure reason.
-
You can configure the TACACS+ protocol for TACACS+ authentications. When Cisco ISE receives a TACACS+ request from a network device, it looks for the corresponding device definition to retrieve the shared secret that is configured. If it finds the device definition, it obtains the shared secret that is configured on the device and matches it against the shared secret in the request to authenticate access. If the shared secrets match, the TACACS+ server will process the request further based upon the policy and configuration. If they do not match, a reject response is sent to the network device. A failed authentication report is generated, which provides the failure reason.
-
You can configure the Simple Network Management Protocol (SNMP) in the network device definition for the Profiling service to communicate with the network devices and profile endpoints that are connected to the network devices.
-
You must define Trustsec-enabled devices in Cisco ISE to process requests from Trustsec-enabled devices that can be part of the Cisco Trustsec solution. Any switch that supports the Trustsec solution is an Trustsec-enabled device.
Trustsec devices do not use the IP address. Instead, you must define other settings so that Trustsec devices can communicate with Cisco ISE.
Trustsec-enabled devices use the Trustsec attributes to communicate with Cisco ISE. Trustsec-enabled devices, such as the Nexus 7000 series switches, Catalyst 6000 series switches, Catalyst 4000 series switches, and Catalyst 3000 series switches are authenticated using the Trustsec attributes that you define while adding Trustsec devices.
Default Network Device Definition in Cisco ISE
 Note |
We recommend that you add the default device definition only for basic RADIUS and TACACS authentications. For advanced flows, you must add separate device definition for each network device. |
Cisco ISE looks for the corresponding device definition to retrieve the shared secret that is configured in the network device definition when it receives a RADIUS or TACACS request from a network device.
Cisco ISE performs the following procedure when a RADIUS or TACACS request is received:
-
Looks for a specific IP address that matches the one in the request.
-
Looks up the ranges to see if the IP address in the request falls within the range that is specified.
-
If both step 1 and 2 fail, it uses the default device definition (if defined) to process the request.
Cisco ISE obtains the shared secret that is configured in the device definition for that device and matches it against the shared secret in the RADIUS or TACACS request to authenticate access. If no device definitions are found, Cisco ISE obtains the shared secret from the default network device definition and processes the RADIUS or TACACS request.
Create a Network Device Definition in Cisco ISE
You can create a network device definition in Cisco ISE and use the default network device definition when there is no network device definition in Cisco ISE.
You can also create the network device definition in the page.
Procedure
| Step 1 |
Choose . |
||
| Step 2 |
Click Add. |
||
| Step 3 |
Complete all mandatory fields.
|
||
| Step 4 |
Check the RADIUS Authentication Settings check box to configure the RADIUS protocol for authentication. |
||
| Step 5 |
Check the TACACS Authentication Settings check box to configure the TACACS protocol for authentication. |
||
| Step 6 |
(Optional) Check the SNMP Settings check box to configure the Simple Network Management Protocol for the Profiling service to collect device information. |
||
| Step 7 |
(Optional) Check the Advanced Trustsec Settings check box to configure a Trustsec-enabled device. |
||
| Step 8 |
Click Submit. |
Import Network Devices into Cisco ISE
You can import a list of device definitions into a Cisco ISE node using a comma-separated value (CSV) file. You must first update the imported template before you can import network devices into Cisco ISE. You cannot run an import of the same resource type at the same time. For example, you cannot concurrently import network devices from two different import files.
You can download the CSV template from the Admin portal, enter your device definition details in the template, and save it as a CSV file, which you can then import this back in to Cisco ISE.
While importing devices, you can create new records or update existing records. Cisco ISE displays the summary of the number of devices that are imported and also reports any errors that were found during the import process. When you import devices, you can also define whether you want Cisco ISE to overwrite the existing device definitions with the new definitions or stop the import process when Cisco ISE encounters the first error.
You cannot import network devices that are exported in previous releases of Cisco ISE, as the import template for these releases are different.
Note |
You can import the network devices with IP ranges in all the octets. |
Note |
IPv4 and IPv6 are now supported for network device (TACACS and RADIUS) configuration and for external RADIUS server configuration. When entering an IPv4 address, you can use ranges and subnet masks. Ranges are not supported for IPv6. |
Procedure
| Step 1 |
Choose . |
| Step 2 |
Click Import. |
| Step 3 |
Click Browse to choose the CSV file from the system that is running the client browser. |
| Step 4 |
Check the Overwrite Existing Data with New Data check box. |
| Step 5 |
Check the Stop Import on First Error check box. |
| Step 6 |
Click Import. |
Export Network Devices from Cisco ISE
You can export network devices configured in Cisco ISE in the form of a CSV file that you can use to import these network devices into another Cisco ISE node.
Note |
You can export the network devices with IP ranges in all the octets. |
Procedure
| Step 1 |
Choose . |
| Step 2 |
Click Export. |
| Step 3 |
To export network devices, you can do one of the following:
|
| Step 4 |
Save the export.csv file to your local hard disk. |
Troubleshoot Network Device Configuration Issues
Procedure
| Step 1 |
Choose . |
| Step 2 |
Enter the Network Device IP address of the device whose configuration you want to evaluate, and specify other fields as necessary. |
| Step 3 |
Select the configuration options to compare against the recommended template. |
| Step 4 |
Click Run. |
| Step 5 |
Click User Input Required, and modify the fields as necessary. |
| Step 6 |
Check the check boxes next to the interfaces that you want to analyze, and click Submit. |
| Step 7 |
Click Show Results Summary. |
Execute Network Device Command Diagnostic Tool
The Execute Network Device Command diagnostic tool allows you to run the show command on any network device. The results are exactly what you would see on a console, and can be used to identify problems in the configuration of the device. You can use it when you suspect that the configuration is wrong, you want to validate it, or if you are just curious about how it is configured.
Third-Party Network Device Support in Cisco ISE
Cisco ISE supports third-party network access devices (NADs) through the use of network device profiles. NAD profiles define the capabilities of the third-party device with simplified policy configuration, regardless of the vendor-side implementation. A network device profile contains the following:
-
The protocols the network device support, such as RADIUS, TACACS+, and TrustSec. You can import any vendor-specific RADIUS dictionaries that exist for the device into Cisco ISE.
-
The attributes and values that the device uses for the various flows such as Wired MAB and 802.1x. This allows Cisco ISE to detect the right flow type for your device according to the attributes it uses.
-
The Change of Authorization (CoA) capabilities the device has. While RFC 5176 defines the types of CoA requests, the required attributes in the requests vary depending on the device. Most non-Cisco devices with RFC 5176 support will also support the "Push" and "Disconnect" functions. For devices that do not support the RADIUS CoA type, ISE also supports SNMP CoA. CoA types are described in further detail below.
-
The attributes and protocols the device uses for MAB. Network devices from different vendors perform MAB authentication differently.
-
The VLAN and ACL permissions used by the device. After the profile is saved, Cisco ISE automatically generates authorization profiles for each configured permission.
-
URL redirection is necessary for advanced flows like BYOD, Guest, and Posture. There are two types of URL redirection found on a device: static and dynamic. For static URL redirection, you can copy and paste the ISE portal URL into the configuration. For dynamic URL redirection, ISE uses a RADIUS attribute to tell the network device where to redirect to. In addition, if the device supports neither dynamic nor static URL redirect, ISE provides an Auth VLAN by which it simulates URL redirect. Auth VLAN is based on a DHCP/DNS service running on the ISE box. To create the Auth VLAN, define the DHCP/DNS service settings. For more information, see the DHCP and DNS Services section in Cisco ISE Admin Guide: Endpoint Profiling . The URL redirect flow is described in further detail below.
Once you have defined your devices in ISE, configure these device profiles or used the preconfigured device profiles offered by ISE in order to define the capabilities that Cisco ISE uses to enable basic flows, as well as advanced flows such as Profiler, Guest, BYOD, MAB, and Posture.
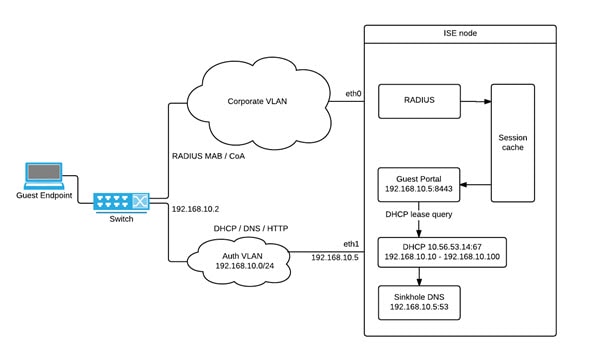
URL Redirect Mechanism and Auth VLAN
When a third-party device is used in the network and the device does not support dynamic or static URL redirect, ISE simulates the URL redirect flow. The URL redirect simulation flow for such devices is operated by running a DHCP/DNS service on the ISE box (For more information, see the DHCP and DNS Services section in Cisco ISE Admin Guide: Endpoint Profiling ), and the Auth VLAN flow is as follows:
-
A guest endpoint connects to the NAD.
-
The device sends the RADIUS/MAB request to ISE.
-
ISE runs the authentication/authorization policy and stores the user accounting information.
-
ISE sends the RADIUS access/accept message, containing the Auth VLAN ID.
-
The guest endpoint receives network access.
-
The endpoint broadcasts a DHCP request and obtains a client IP address and the ISE sinkhole DNS IP address from the ISE DHCP service.
-
The guest endpoint opens a browser. The browser sends a DNS query and receives the ISE IP address.
-
The endpoint HTTP or HTTPS request is directed to the ISE box.
-
ISE responds with HTTP 301/Moved, providing the guest portal URL. The endpoint browser redirects to the Guest portal page.
-
The guest endpoint user logs in for authentication.
-
Once compliance is validated, ISE responds to the NAD, sending the CoA, authorizing the endpoint and bypassing the sinkhole.
-
Appropriate access is provided to the user based on the CoA, the endpoint receives an IP address from an enterprise DHCP and the user can now use the network.
The Auth VLAN should be separated from the corporate network in order to prevent unauthorized network access by the guest endpoint before the endpoint passes authentication. Configure the Auth VLAN IP helper to point to the ISE machine, or connect one of the ISE network interfaces to the Auth VLAN. For more information about VLAN (DHCP/DNS server) settings,see the DHCP and DNS Services section in Cisco ISE Admin Guide: Endpoint Profiling . Multiple VLANs may be connected to one network interface card by configuring a VLAN IP-helper from the NAD configuration. For more information about configuring an IP helper, refer to the administration guide for the device for instructions. In addition, for Guest flows, define a guest portal and select that portal in an Authorization profile that is bound to MAB authorization, similar to regular Guest flows. For more information about guest portals, see the Cisco ISE Guest Services section in Cisco ISE Admin Guide: Guest and BYOD .
The following diagram displays the basic network setup when an Auth VLAN is defined (the Auth VLAN is connected directly to the Cisco ISE node):
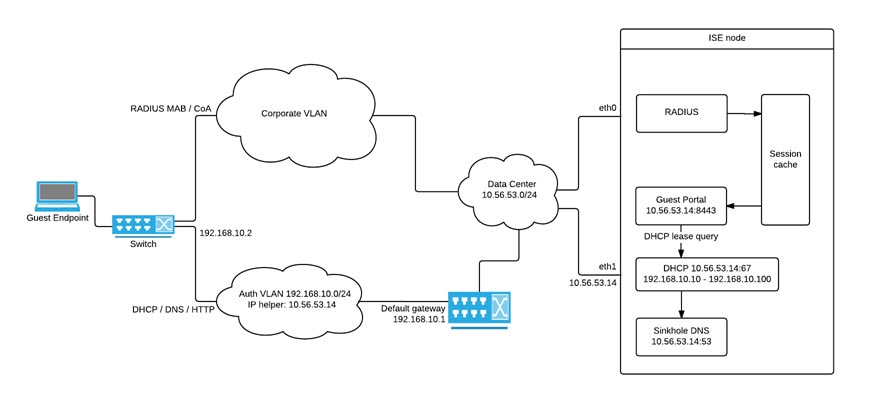
The following diagram displays the network with Auth VLAN and an IP helper:
CoA Types
ISE supports both RADIUS and SNMP CoA types. RADIUS or SNMP CoA type support is required in order for the NAD to work in complex flows, while it is not mandatory for basic flows. Define the RADIUS and SNMP settings supported by the device when configuring the NAD from ISE, and indicate the CoA type to be used for a specific flow when configuring the NAD profile. For more information about defining protocols for your NADs, see the Network Devices section in Cisco ISE Admin Guide: Secure Wired Access . Check with your third party supplier to verify which type your NAD supports prior to creating the device and NAD profile in ISE.
Network Device Profiles
Cisco ISE supports some third-party network access devices (NADs) through the use of network device profiles. These profiles define the capabilities that Cisco ISE uses to enable basic flows, and advanced flows such as Guest, BYOD, MAB, and Posture.
Cisco ISE includes predefined profiles for network devices from several vendors. Cisco ISE 2.1 has been tested with the vendor devices listed in the following table:
|
Device Type |
Vendor |
CoA Type |
URL Redirect Type |
Supported/Validated Use Cases |
||||
|
802.1X/ MAB |
Profiler without CoA |
Profiler with CoA |
Posture |
Guest/BYOD |
||||
|
Wireless |
Aruba 7000, InstantAP |
RADIUS |
Static URL |
√ |
√ |
√ |
√ |
√ |
|
Motorola RFS 4000 |
RADIUS |
Dynamic URL |
√ |
√ |
√ |
√ |
√ |
|
|
HP 830 |
RADIUS |
Static URL |
√ |
√ |
√ |
√ |
√ |
|
|
Ruckus ZD 1200 |
RADIUS |
— |
√ |
√ |
√ |
√ |
√ |
|
|
Wired |
HP A5500 |
RADIUS |
Auth VLAN provided by ISE |
√ |
√ |
√ |
√ |
√ |
|
HP 3800 and 2920 (ProCurve) |
RADIUS |
Auth VLAN provided by ISE |
√ |
√ |
√ |
√ |
√ |
|
|
Alcatel 6850 |
SNMP |
Dynamic URL |
√ |
√ |
√ |
√ |
√ |
|
|
Brocade ICX 6610 |
RADIUS |
Auth VLAN provided by ISE |
√ |
√ |
√ |
√ |
√ |
|
|
Juniper EX3300-24p |
RADIUS |
Auth VLAN provided by ISE |
√ |
√ |
√ |
√ |
√ |
|
|
For additional third-party NADs, you must identify the device properties and capabilities and create custom NAD profiles in Cisco ISE. |
√ |
√ |
Requires CoA support |
Requires CoA support. For URL redirect, if the wired device has no URL redirect, utilizes ISE Auth VLAN. Wireless devices have not been tested with Auth VLAN. |
||||
You can create custom NAD profiles for additional third-party network devices that do not have a predefined profile. For advanced flows such as Guest, BYOD, and Posture, the device needs to support RFC 5176, "Change of Authorization" (CoA) Support for these flows depends on the NAD's capabilities. You may need to refer to the device's administration guide for information on many of the attributes required for a network device profile.
If you have deployed non-Cisco NADs prior to Release 2.0 and created policy rules/RADIUS dictionaries to use them, after upgrade these will continue to work as usual.
|
For information about third-party NAD profiles, see ISE Third-Party NAD Profiles and Configs. |
Configure Third-Party Network Device in Cisco ISE
Cisco ISE supports third-party network access devices (NADs) through the use of network device profiles. These profiles define the capabilities that Cisco ISE uses to enable flows such as Guest, BYOD, MAB, and Posture.
Before you begin
Read the definition for Network Device Profiles in the Cisco Identity Services Engine Administration Guide.
Procedure
| Step 1 |
Ensure your device is configured in ISE. If you are configuring Guest, BYOD, or Posture workflows, ensure Change of Authorization (CoA) is defined and the NAD’s URL redirect mechanism is configured to point at the relevant ISE Portal. For the URL redirect, you can copy the ISE portal URL from the portal’s landing page. For more information about configuring CoA types and URL redirect for the NAD in ISE, see the Network Devices section in Cisco ISE Admin Guide: Secure Wired Access . In addition, refer to the third party device’s administration guide for instructions. |
| Step 2 |
Ensure an appropriate NAD profile for your device is available in ISE. To view existing profiles, choose . If an appropriate profile does not already exist in ISE, create a custom profile. See Create a Network Device Profile for information on how to create custom profiles. |
| Step 3 |
Assign a NAD profile to the NAD that you want to configure. Choose . Open the device to which you would like to assign a profile and from Device Profile, select the correct profile from the dropdown list. |
| Step 4 |
When you configure your policy rules, the authorization profile should be explicitly set to the NAD profile in step 1, or “Any” if you are just using VLAN or ACL or if you have different devices from different vendors in your network. To set the NAD profile for the authorization profile, choose . Open the relevant authorization profile and from Network Device Profile, select the relevant NAD profile from the dropdown list. When using Auth VLAN for Guest flows, you should also define a guest portal and select that portal in an Authorization profile that is bound to MAB authorization, similar to regular Guest flows. For more information about guest portals, see the Cisco ISE Guest Services section in Cisco ISE Admin Guide: Guest and BYOD . |
Create a Network Device Profile
Before you begin
-
For more information about creating a custom profile, read the Network Access Device Profiles with Cisco Identity Services Engine document.
-
Most NADs have a vendor-specific RADIUS dictionary that provides a number of vendor-specific attributes in addition to the standard IETF RADIUS attributes. If the network device has a vendor-specific RADIUS dictionary, import it into Cisco ISE. Refer to the third party device’s administration guide for instructions on which RADIUS dictionary is required. From ISE, choose . For more information about importing RADIUS dictionaries, see the Create RADIUS-Vendor Dictionaries section in Cisco ISE Admin Guide: Secure Wired Access .
-
For complex flows such as Guest and Posture, the device needs to support RFC 5176, Change of Authorization (CoA)
-
For more information about the fields and possible values for creating a network device profile, see the Network Device Profiles Settings section in Cisco ISE Admin Guide: Secure Wired Access .
Procedure
| Step 1 |
Choose . |
| Step 2 |
Click Add. |
| Step 3 |
Enter a name and description for the network device. |
| Step 4 |
Select the vendor of the network device. |
| Step 5 |
Check the check boxes for the protocols that the device supports. Check each box if your device supports RADIUS, TACACS+ and/or TrustSec. It is only necessary to check the protocols you want to actually use. If the device supports RADIUS, select the RADIUS dictionary to use with the network device from the dynamic dropdown list in the RADIUS Dictionaries field. |
| Step 6 |
From the Templates section, enter relevant details as follows:
|
| Step 7 |
Click Submit. |
Export Network Device Profiles from Cisco ISE
Export single or multiple network device profiles configured in Cisco ISE in the form of an XML file in order to edit the XML file and then import the file as new network profiles.
Before you begin
Read the Network Access Device Profiles with Cisco Identity Services Engine document.
Procedure
| Step 1 |
Choose . |
| Step 2 |
Click Export. |
| Step 3 |
Check the check boxes next to the devices that you want to export, and choose |
| Step 4 |
Th DeviceProfiles.xml file downloads to your local hard disk. |
Import Network Device Profiles into Cisco ISE
You can import a single or multiple network device profiles into ISE using a single XML file with the Cisco ISE XML structure. You cannot concurrently import network device profiles from multiple import files.
Typically, you would first export an existing profile from the Admin portal to use as a template. Enter your device profile details as necessary in the file and save it as an XML file, and then import the edited file back in to Cisco ISE. In order to work with multiple profiles, you can export multiple profiles structured together as a single XML file, edit the file and then import them together, creating multiple files in ISE.
While importing device profiles, you can only create new records. You cannot overwrite an existing profile. In order to edit an existing profile and then overwrite it, export the existing profile, delete the profile from ISE and then import that profile once you have edited it accordingly.
Before you begin
Read the Network Access Device Profiles with Cisco Identity Services Engine document.
Procedure
| Step 1 |
Choose . |
| Step 2 |
Click Import. |
| Step 3 |
Click Browse to choose the XML file from the system that is running the client browser. |
| Step 4 |
Click Import. |
Network Device Groups
Cisco ISE allows you to create hierarchical Network Device Groups (NDGs). NDGs can be used to logically group network devices based on various criteria, such as geographic location, device type, or the relative place in the network (Access Layer, Data Center, and so on). For example, to organize your network devices based on geographic location, you can group them by continent, region, or country:
-
Africa -> Southern -> Namibia
-
Africa -> Southern -> South Africa
-
Africa -> Southern -> Botswana
You can also group the network devices based on the device type:
-
Africa -> Southern -> Botswana -> Firewalls
-
Africa -> Southern -> Botswana -> Routers
-
Africa -> Southern -> Botswana -> Switches
Network devices can be assigned to one or more hierarchical NDGs. Thus, when Cisco ISE processes the ordered list of configured NDGs to determine the appropriate group to assign to a particular device, it may find that the same device profile applies to multiple Device Groups, and will apply the first Device Group matched.
There is no limit on the maximum number of NDGs that can be created. You can create up to 6 levels of hierarchy (including the parent group) for the NDGs.
You can view the device group hierarchy in Tree view or Flat Table view. In the Tree view, the root node appears at the top of the tree followed by the child groups in hierarchial order. Click Expand All to view all the device groups under each root group. Click Collapse All to list only the root groups.
In the Flat Table view, you can view the hierarchy of each device group in the Group Hierarchy column.
You can also view the number of network devices that are assigned to each child group. Click the number link to launch the Network Devices window, which lists all the network devices that are assigned to that device group. You can add additional devices to a device group or move the existing devices to another device group.
Note |
You cannot delete a device group if any devices are assigned to that device group. Before deleting a device group you must move all the existing devices to another device group. |
Root Network Device Groups
Cisco ISE includes two predefined root NDGs: All Device Types and All Locations. You cannot edit, duplicate, or delete these predefined NDGs, but you can add new device groups under them.
You can create a root Network Device Group (NDG), and then create child NDGs under the root group in the Network Device Groups page.
Network Device Attributes Used By Cisco ISE in Policy Evaluation
When you create a new network device group, a new network device attribute is added to the Device dictionary defined in the system, which you can use in policy definitions. Cisco ISE allows you to configure authentication and authorization policies based on Device dictionary attributes, such as device type, location, model name, and software version that is running on the network device.
Import Network Device Groups in to Cisco ISE
You can import network device groups in to a Cisco ISE node using a comma-separated value (CSV) file. You cannot run import of the same resource type at the same time. For example, you cannot concurrently import network device groups from two different import files.
You can download the CSV template from the Admin portal, enter your device group details in the template, and save the template as a CSV file, which you can then import back into Cisco ISE.
While importing device groups, you can create new records or update existing records. When you import device groups, you can also define whether you want Cisco ISE to overwrite the existing device groups with the new groups or stop the import process when Cisco ISE encounters the first error.
Procedure
| Step 1 |
Choose . |
| Step 2 |
Click Import. |
| Step 3 |
Click Browse to choose the CSV file from the system that is running the client browser. |
| Step 4 |
Check the Overwrite Existing Data with New Data check box. |
| Step 5 |
Check the Stop Import on First Error check box. |
| Step 6 |
Click Import or click the Network Device Groups List link to return to the Network Device Groups list page. |
Export Network Device Groups from Cisco ISE
You can export network device groups configured in Cisco ISE in the form of a CSV file that you can use to import these network device groups into another Cisco ISE node.
Procedure
| Step 1 |
Choose . |
| Step 2 |
To export the network device groups, you can do one of the following:
|
| Step 3 |
Save the export.csv file to your local hard disk. |
Network Device Groups
These pages enable you to configure and manage network device groups.
Network Device Group Settings
The following table describes the fields on the Network Device Groups Page, which you can use to create network device groups. The navigation path for this page is: .
You can also create network device groups in the page.
|
Fields |
Usage Guidelines |
|---|---|
|
Name |
Enter the name for the root Network Device Group (NDG). For all subsequent child network device groups under the root NDG, enter the name of the new network device group. You can have a maximum of six nodes in the NDG hierarchy, including the root node. Each NDG name can have a maximum of 32 characters. |
|
Description |
Enter the description for the root or the child Network Device Group. |
|
Parent Group |
You can select an already existing group as the parent group or add this new group as a root group. |
Network Device Group Import Settings
The following table describes the fields on the Network Device Group Import Page, which you can use to import network device groups into Cisco ISE. The navigation path for this page is: .
|
Fields |
Usage Guidelines |
|---|---|
|
Generate a Template |
Click this link to create a comma-separated value (.csv) template file. You must update the template with network device groups information in the same format, and save it locally to import those network device groups into any Cisco ISE deployment. |
|
File |
Click Browse to the location of the comma-separated value file that you might have created or previously exported from any Cisco ISE deployment. You can import network device groups in another Cisco ISE deployment with new and updated network device groups information using import. |
|
Overwrite Existing Data with New Data |
Check this check box if you want Cisco ISE to replace existing network device groups with the device groups in your import file. If you do not check this check box, new network device group that are available in the import file are added to the network device group repository. Duplicate entries are ignored. |
|
Stop Import on First Error |
Check this check box if you want Cisco ISE to discontinue import when it encounters an error during import, but Cisco ISE imports network device groups until that time of an error. If this check box is not checked and an error is encountered, the error is reported, and Cisco ISE continues to import device groups. |
Import Templates in Cisco ISE
Cisco ISE allows you to import a large number of network devices and network device groups using comma-separated value (CSV) files. The template contains a header row that defines the format of the fields. The header row should not be edited, and should be used as is.
By default, you can use the Generate a Template link to download a CSV file in the Microsoft Office Excel application and save the file format locally on your system. When you click the Generate a Template link, the Cisco ISE server displays the Opening template.csv dialog. This dialog allows you to open the template.csv file and save the template.csv file locally on your system with an appropriate name for network devices and network device groups. If you choose to open the template.csv file from the dialog, the file opens in the Microsoft Office Excel application by default.
Network Devices Import Template Format
The following table lists the fields in the template header and provides a description of the fields in the Network Device CSV file.
|
Field |
Description |
||
|---|---|---|---|
|
Name:String(32): |
(Required) This field is the network device name. It is an alphanumeric string, with a maximum of 32 characters in length. |
||
|
Description:String(256) |
This field is an optional description for the network device. A string, with a maximum of 256 characters in length. |
||
|
IP Address:Subnets(a.b.c.d/m|...) |
(Required) This field is the IP address and subnet mask of the network device. (It can take on more than one value separated by a pipe “|” symbol). IPv4 and IPv6 are both supported for network device (TACACS and RADIUS) configuration and for external RADIUS server configuration.
|
||
|
Model Name:String(32): |
(Required) This field is the network device model name. It is a string, with a maximum of 32 characters in length. |
||
|
Software Version:String(32): |
(Required) This field is the network device software version. It is a string, with a maximum of 32 characters in length. |
||
|
Network Device Groups:String(100): |
(Required) This field should be an existing network device group. It can be a subgroup, but must include both the parent and subgroup separated by a space. It is a string, with a maximum of 100 characters, for example, Location#All Location#US |
||
|
Authentication:Protocol:String(6) |
This is an optional field. It is the protocol that you want to use for authentication. The only valid value is RADIUS (not case sensitive). |
||
|
Authentication:Shared Secret:String(128) |
(Required, if you enter a value for the Authentication Protocol field) This field is a string, with a maximum of 128 characters in length. |
||
|
EnableKeyWrap:Boolean(true|false) |
This is an optional field. It is enabled only when it is supported on the network device. Valid value is true or false. |
||
|
EncryptionKey:String(ascii:16|hexa:32) |
(Required, if you enable KeyWrap) Indicates the encryption key that is used for session encryption. ASCII—16 characters (bytes) long Hexadecimal—32 characters (bytes) long. |
||
|
AuthenticationKey:String(ascii:20|hexa:40) |
(Required, if you enable KeyWrap). Indicates the keyed Hashed Message Authentication Code (HMAC) calculation over RADIUS messages. ASCII—20 characters (bytes) long Hexadecimal—40 characters (bytes) long. |
||
|
InputFormat:String(32) |
Indicates encryption and authentication keys input format. Valid value is ASCII or Hexadecimal. |
||
|
SNMP:Version:Enumeration (|2c|3) |
This is an optional field, used by the Profiler service. It is the version of the SNMP protocol. Valid value is 1, 2c, or 3. |
||
|
SNMP:RO Community:String(32) |
(Required, if you enter a value for the SNMP Version field) SNMP Read Only community. It is a string, with a maximum of 32 characters in length. |
||
|
SNMP:RW Community:String(32) |
(Required, if you enter a value for the SNMP Version field) SNMP Read Write community. It is a string, with a maximum of 32 characters in length. |
||
|
SNMP:Username:String(32) |
This is an optional field. It is a string, with a maximum of 32 characters in length. |
||
|
SNMP:Security Level:Enumeration(Auth|No Auth|Priv) |
(Required if you choose SNMP version 3) Valid value is Auth, No Auth, or Priv. |
||
|
SNMP:Authentication Protocol:Enumeration(MD5|SHA) |
(Required if you have entered Auth or Priv for the SNMP security level) Valid value is MD5 or SHA. |
||
|
SNMP:Authentication Password:String(32) |
(Required if you have entered Auth for the SNMP security level) It is a string, with a maximum of 32 characters in length. |
||
|
SNMP:Privacy Protocol:Enumeration(DES|AES128|AES192|AES256|3DES) |
(Required if you have entered Priv for the SNMP security level) Valid value is DES, AES128, AES192, AES256, or 3DES. |
||
|
SNMP:Privacy Password:String(32) |
(Required if you have entered Priv for the SNMP security level) It is a string, with a maximum of 32 characters in length. |
||
|
SNMP:Polling Interval:Integer:600-86400 seconds |
This is an optional field to set the SNMP polling interval. Valid value is an integer between 600 and 86400. |
||
|
SNMP:Is Link Trap Query:Boolean(true|false) |
This is an optional field to enable or disable the SNMP link trap. Valid value is true or false. |
||
|
SNMP:Is MAC Trap Query:Boolean(true|false) |
This is an optional field to enable or disable the SNMP MAC trap. Valid value is true or false. |
||
|
SNMP:Originating Policy Services Node:String(32) |
This is an optional field. Indicates which ISE server to be used to poll for SNMP data. By default, it is automatic, but you can overwrite the setting by assigning different values. |
||
|
Trustsec:Device Id:String(32) |
This is an optional field. It is the Trustsec device ID, and is a string, with a maximum of 32 characters in length. |
||
|
Trustsec:Device Password:String(256) |
(Required if you have entered Trustsec device ID) This is the Trustsec device password and is a string, with a maximum of 256 characters in length. |
||
|
Trustsec:Environment Data Download Interval:Integer:1-2147040000 seconds |
This is an optional field. It is the Trustsec environment data download interval. Valid value is an integer between 1 and 24850. |
||
|
Trustsec:Peer Authorization Policy Download Interval:Integer:1-2147040000 seconds |
This is an optional field. It is the Trustsec peer authorization policy download interval. Valid value is an integer between 1 and 24850. |
||
|
Trustsec:Reauthentication Interval:Integer:1-2147040000 seconds |
This is an optional field. It is the Trustsec reauthentication interval. Valid value is an integer between 1 and 24850. |
||
|
Trustsec:SGACL List Download Interval:Integer:1-2147040000 seconds |
This is an optional field. It is the Trustsec SGACL list download interval. Valid value is an integer between 1 and 24850. |
||
|
Trustsec:Is Other Trustsec Devices Trusted:Boolean(true|false) |
This is an optional field. Indicates whether Trustsec is trusted. Valid value is true or false. |
||
|
Trustsec:Notify this device about Trustsec configuration changes:String(ENABLE_ALL|DISABLE_ALL) |
This is an optional field. Notifies Trustsec configuration changes to the Trustsec device. Valid value is ENABLE_ALL or DISABLE_ALL |
||
|
Trustsec:Include this device when deploying Security Group Tag Mapping Updates:Boolean(true|false) |
This is an optional field. It is the Trustsec device included on SGT. Valid value is true or false. |
||
|
Deployment:Execution Mode Username:String(32) |
This is an optional field. It is the username that has privileges to edit the device configuration. It is a string, with a maximum of 32 characters in length. |
||
|
Deployment:Execution Mode Password:String(32) |
This is an optional field. It is the device password and is a string, with a maximum of 32 characters in length. |
||
|
Deployment:Enable Mode Password:String(32) |
This is an optional field. It is the enable password of the device that would allow you to edit its configuration and is a string, with a maximum of 32 characters in length. |
||
|
Trustsec:PAC issue date:Date |
This is the field that displays the issuing date of the last Trustsec PAC that has been generated by Cisco ISE for the Trustsec device. |
||
|
Trustsec:PAC expiration date:Date |
This is the field that displays the expiration date of the last Trustsec PAC that has been generated by Cisco ISE for the Trustsec device. |
||
|
Trustsec:PAC issued by:String |
This is a field that displays the name of the issuer (a Trustsec administrator) of the last Trustsec PAC that has been generated by Cisco ISE for the Trustsec device. It is a string. |
Network Device Groups Import Template Format
The following table lists the fields in the template header and provides a description of the fields in the Network Device Group CSV file.
|
Field |
Description |
|---|---|
|
Name:String(100): |
(Required) This field is the network device group name. It is a string with a maximum of 100 characters in length. The full name of an NDG can have a maximum of 100 characters in length. For example, if you are creating a subgroup India under the parent groups Global > Asia, then the full name of the NDG that you are creating would be Global#Asia#India and this full name cannot exceed 100 characters in length. If the full name of the NDG exceeds 100 characters in length, the NDG creation fails. |
|
Description:String(1024) |
This is an optional network device group description. It is a string, with a maximum of 1024 characters in length. |
|
Type:String(64): |
(Required) This field is the network device group type. It is a string, with a maximum of 64 characters in length. |
|
Is Root:Boolean(true|false): |
(Required) This is a field that determines if the specific network device group is a root group. Valid value is true or false. |
IPsec Security to Secure Cisco ISE-NAD Communication
Internet Protocol security (IPsec) is a set of protocols that provides security to Internet Protocol. The AAA protocols, RADIUS and TACACS+, use the MD5 hashing algorithm. For greater security, Cisco ISE offers the IPsec feature. IPsec provides secure communication by authenticating the sender, discovering any changes in data during transmission, and encrypting the data that is sent.
Cisco ISE supports IPsec in Tunnel and Transport modes. When you enable IPsec on a Cisco ISE interface and configure the peers, an IPsec tunnel is created between Cisco ISE and the NAD to secure the communication.
You can define a pre-shared key or use X.509 certificates for IPsec authentication. IPsec can be enabled on Gigabit Ethernet 1 through Gigabit Ethernet 5 interfaces. You can configure IPsec on only one Cisco ISE interface per PSN.
IPSec cannot be enabled on Gigabit Ethernet 2 as the smart license is enabled (e0/2—> eth2) by default. However, if you are required to enable IPSec, you have to choose a different interface for smart licensing.
Note |
Gigabit Ethernet 0 and Bond 0 (when Gigabit Ethernet 0 and Gigabit Ethernet 1 interfaces are bonded) are management interfaces in the Cisco ISE CLI; IPsec is not supported on Gigabit Ethernet 0 and Bond 0. |
Required components include:
-
Cisco ISE, Release 2.2 and later
-
Cisco IOS Software, C5921 ESR ( Embedded Services Router) Software (C5921_I86-UNIVERSALK9-M)—The ESR 5921 configuration, by default, supports IPsec in Tunnel and Transport modes. Diffie-Hellman Group 14 and Group 16 are supported.
Note
The C5921 ESR software is bundled with Cisco ISE, Releases 2.2 and later. You need an ESR license to enable it. See Cisco 5921 Embedded Services Router Integration Guide for ESR licensing information.
Configure RADIUS IPsec on Cisco ISE
To configure RADIUS IPsec on Cisco ISE, you must:
Procedure
| Step 1 |
Configure IP address on the interface from the Cisco ISE CLI. Gigabit Ethernet 1 through Gigabit Ethernet 5 interfaces (Bond 1 and Bond 2) support IPsec. However, IPsec can be configured on only one interface in a Cisco ISE node. |
||||
| Step 2 |
Add a directly-connected network device to the IPsec network device group.
|
||||
| Step 3 |
(Optional; required only for Smart Licensing) Add a separate management interface to interact with the Cisco Smart Software Manager (CSSM). You can also use Smart Software Manager satellite for ESR. To do this, from the Cisco ISE CLI, run the following command to select the corresponding management interface (Gigabit Ethernet 1-5 (or Bond 1 or 2)): ise/admin# license esr smart {interface} This interface must be able to reach Cisco.com to access the Cisco online licensing server. |
||||
| Step 4 |
Add a network device to a directly-connected gateway from the Cisco ISE CLI. ip route [ destination network] [ network mask] gateway [ next-hop address] |
||||
| Step 5 |
Activate Cisco ISE nodes for IPsec.
|
||||
| Step 6 |
Type esr to enter into the ESR shell.
|
||||
| Step 7 |
(Optional; required only if you have not enabled Smart Licensing in Step 3) Add a Classic license or an Evaluation license (that is valid for 90 days) to Cisco ISE appliances.
|
||||
| Step 8 |
Verify IPsec tunnel and RADIUS authentication over IPsec tunnel. |
Configure and Install X.509 Certificates on ESR-5921
To configure and install X.509 Certificates on ESR-5921:
Procedure
| Step 1 |
Type esr to enter into the ESR shell.
|
||||
| Step 2 |
Generate an RSA key pair using the following command: Example: |
||||
| Step 3 |
Create a trust point using the following command: Example: |
||||
| Step 4 |
Generate a CSR using the following command: Example: |
||||
| Step 5 |
Copy the output of the CSR to a text file, submit it to an external CA for signing, and obtain the signed certificate and the CA certificate. |
||||
| Step 6 |
Import the CA using the following command: Example:Copy and paste the contents of the CA certificate, including the “—BEGIN—“ and “—-End—“ lines. |
||||
| Step 7 |
Import the signed certificate using the following command: Example:Copy and paste the contents of the signed certificate, including the “—BEGIN—“ and “—-End—“ lines. Following is an example output when you configure and install X.509 Certificates on Cisco 5921 ESR: Following is an example output when you configure and install X.509 Certificates on Cisco Catalyst 3850: |
Example: Output of PreShared Key Configuration on Cisco Catalyst 3850
Following is an example of the output when you configure the pre-shared key on Cisco Catalyst 3850:
cat3850#show running-config

enable password lab
 !
 username lab password 0 lab
 aaa new-model
 !
 aaa group server radius ise
 server name ise-vm
 deadtime 60
 !
 aaa authentication login default group radius local

 aaa authentication enable default group radius enable

!

crypto isakmp policy 10

 encr aes

 hash sha256
 authentication pre-share
 group 16
 crypto isakmp key 123456789 address 0.0.0.0
 !
 crypto ipsec security-association lifetime seconds 86400
 !
 crypto ipsec transform-set radius esp-aes esp-sha256-hmac
 mode tunnel
 !
 crypto ipsec profile radius-profile
 !
 crypto map radius 10 ipsec-isakmp
 set peer 192.168.20.1
 set transform-set radius
 match address 100
!
interface GigabitEthernet1/0/1
 no switchport
 ip address 192.168.20.2 255.255.255.0

 crypto map radius
!
 access-list 100 permit ip host 192.168.20.2 host 192.168.20.1
 !
 snmp-server community public RO
 snmp-server community private RW
 !
 radius server rad-ise
 address ipv4 192.168.20.1 auth-port 1645 acct-port 1646

 key secret
Mobile Device Manager Interoperability with Cisco ISE
Mobile Device Management (MDM) servers secure, monitor, manage, and support mobile devices deployed across mobile operators, service providers, and enterprises. MDM servers act as a policy server that controls the use of some applications on a mobile device (for example, an e-mail application) in the deployed environment. However, the network is the only entity that can provide granular access to endpoints based on ACLs. Cisco ISE queries the MDM servers for the necessary device attributes to create ACLs that provide network access control for those devices.
You can run multiple active MDM servers on your network, including ones from different vendors. This allows you to route different endpoints to different MDM servers based on device factors such as location or device type.
Cisco ISE also integrates with MDM servers using Cisco's MDM API version 2 to allow devices access the network over VPN via AnyConnect 4.1 and Cisco ASA 9.3.2 or later.
In this illustration, Cisco ISE is the enforcement point and the MDM policy server is the policy information point. Cisco ISE obtains data from the MDM server to provide a complete solution.
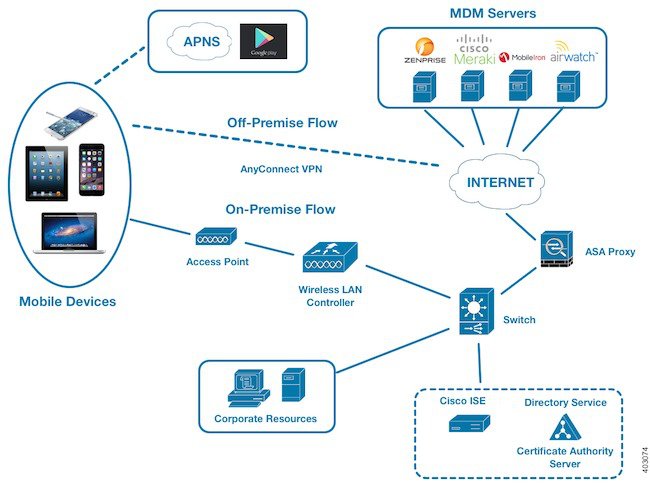
You can configure Cisco ISE to interoperate with one or more external Mobile Device Manager (MDM) servers. By setting up this type of third-party connection, you can leverage the detailed information available in the MDM database. Cisco ISE uses REST API calls to retrieve information from the external MDM server. Cisco ISE applies appropriate access control policies to switches, access routers, wireless access points, and other network access points to achieve greater control of remote device access to your Cisco ISE network.
The supported MDM vendors are listed here: Supported MDM Servers.
Supported MDM Use Cases
The functions Cisco ISE performs with the external MDM server are as follows:
-
Managing device registration—Unregistered endpoints accessing the network are redirected to a registration page, which is hosted on the MDM server. Device registration includes user role, device type, and so on.
-
Handling device remediation—Endpoints are granted only restricted access during remediation.
-
Augmenting endpoint data—Update the endpoint database with information from the MDM server that you cannot gather using the Cisco ISE Profiler. Cisco ISE uses six device attributes you can view using the page if an endpoint is an MDM monitored device. For example:
-
MDMImei: 99 000100 160803 3
-
MDMManufacturer: Apple
-
MDMModel: iPhone
-
MDMOSVersion: iOS 6.0.0
-
MDMPhoneNumber: 9783148806
-
MDMSerialNumber: DNPGQZGUDTF9
-
-
Cisco ISE polls the MDM server once every 4 hours for device compliance data. This is configurable by the administrator.
-
Issuing device instructions through the MDM server—Issues remote actions for users’ devices through the MDM server. Administrators initiate remote actions from the ISE console.
Vendor MDM Attributes
When you configure an MDM server in ISE, that vendor's attributes are added to a new entry in the ISE system dictionary, named mdm. The following attributes are used for registration status, and are commonly supported by MDM vendors.
-
DeviceRegisterStatus
-
DeviceCompliantStatus
-
DiskEncryptionStatus
-
PinLockStatus
-
JailBrokenStatus
-
Manufacturer
-
IMEI
-
SerialNumber
-
OsVersion
-
PhoneNumber
-
MDMServerName
-
MDMServerReachable
-
MEID
-
Model
-
UDID
Vendor's unique attributes are not supported, but you may be able to use ERS APIs to exchange vendor-specific attributes, if the vendor supports that.
The new MDM dictionary attributes are available to use in authorization policies.
Supported MDM Servers
Supported MDM servers include products from the following vendors:
-
Absolute
-
AirWatch
-
Citrix XenMobile
-
Globo
-
Good Technology
-
IBM MaaS360
-
JAMF Software
-
Meraki SM/EMM
-
MobileIron
-
SAP Afaria
-
SOTI
-
Symantec
-
Tangoe
-
Microsoft Intune - for mobile devices
-
Microsoft SCCM - for desktop devices
Ports Used by the MDM Server
The following table lists the ports that must be open between the Cisco ISE and the MDM server to enable them to communicate with each other. Refer to the MDM Server Documentation for a list of ports that must be open on the MDM agent and server.
|
MDM Server |
Ports |
|---|---|
|
MobileIron |
443 |
|
Zenprise |
443 |
|
Good |
19005 |
|
Airwatch |
443 |
|
Afaria |
443 |
|
Fiberlink MaaS |
443 |
|
Meraki |
443 |
|
Microsoft Intune |
80 and 443 |
|
Microsoft SCCM |
80 and 443 |
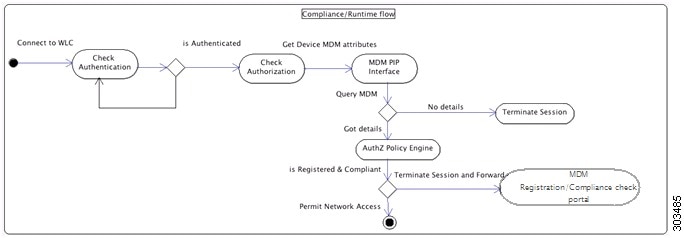
MDM Integration Process Flow
This section describes the MDM integration process:
-
The user associates a device to SSID.
-
Cisco ISE makes an API call to the MDM server.
-
This API call returns a list of devices for this user and the posture status for the devices.
Note
The input parameter is the MAC address of the endpoint device. For off-premise Apple iOS devices, this is the UDID.
-
If the user’s device is not in this list, it means the device is not registered. Cisco ISE sends an authorization request to the NAD to redirect to Cisco ISE. The user is presented the MDM server page.
Note
You must register a device that is enrolled on the MDM server outside of a Cisco ISE network via the MDM portal. This is applicable for Cisco ISE, Release 1.4 and later. Earlier ISE versions allow devices enrolled outside of a Cisco ISE network to be automatically enrolled if they are compliant with the posture policies.
-
Cisco ISE uses MDM to provision the device and presents an appropriate page for the user to register the device.
-
The user registers the device in the MDM server, and the MDM server redirects the request to Cisco ISE (through automatic redirection or manual browser refresh).
-
Cisco ISE queries the MDM server again for the posture status.
-
If the user’s device is not compliant to the posture (compliance) policies configured on the MDM server, the user is notified that the device is out of compliance and must be compliant.
-
After the user’s device becomes compliant, the MDM server updates the device state in its internal tables.
-
If the user refreshes the browser now, the control is transferred back to Cisco ISE.
-
Cisco ISE polls the MDM server once every four hours to get compliance information and issues Change of Authorization (CoA) appropriately. This can be configured by the administrator. Cisco ISE also checks the MDM server every 5 minutes to make sure that it is available.
The following figure illustrates the MDM process flow.
Note |
A device can only be enrolled to a single MDM server at a time. If you want to enroll the same device to an MDM service from another vendor, the previous vendor's profiles must be removed from the device. The MDM service usually offers a "corporate wipe", which only deletes the vendor's configuration from the device (not the whole device). The user can also remove the files. For example, on an IOS device, the user can go to Settings > General >Device management, and click remove management. Or the user can go to the MyDevices portal in ISE, and click corporate wipe. |
Set Up MDM Servers with Cisco ISE
To set up MDM servers with Cisco ISE, you must perform the following high-level tasks:
Procedure
| Step 1 |
Import MDM server certificate into Cisco ISE, except for Intune, where you import the PAN's certificate into Azure. |
| Step 2 |
Create mobile device manager definitions. |
| Step 3 |
Configure ACLs on the Wireless LAN Controllers. |
| Step 4 |
Configure an authorization profile that redirects non-registered devices to the MDM server. |
| Step 5 |
If there is more than one MDM server on the network, configure separate authorization profiles for each vendor. |
| Step 6 |
Configure authorization policy rules for the MDM use cases. |
Import MDM Server Certificate into Cisco ISE
For Cisco ISE to connect with the MDM server, you must import the MDM server certificate into the Cisco ISE Certificate Store. If your MDM server has a CA-signed certificate, you must import the root CA into the Cisco ISE Certificate Store.
Note |
For Microsoft Azure, you import the ISE certificate into Azure. For more information, see Configuring Microsoft Intune as an MDM Server. |
Procedure
| Step 1 |
Export the MDM server certificate from your MDM server and save it on your local machine. |
| Step 2 |
Choose . |
| Step 3 |
Click Browse to select the MDM server certificate that you obtained from the MDM server. |
| Step 4 |
Add a friendly name. |
| Step 5 |
Check Trust for authentication within ISE check box. |
| Step 6 |
Click Submit. |
| Step 7 |
Verify that the Certificate Store list page lists the MDM server certificate. |
What to do next
Define Mobile Device Management Servers in ISE
.
Define Mobile Device Management Servers in ISE
You can create one or more Mobile Device Management (MDM) and Desktop Device Manager (SCCM) definitions for external MDM servers.
-
Choose .
-
Click Add.
-
Enter the name and description of the MDM server that you want to add.
-
Choose the Server Type, Mobile Device Manager, or Desktop Device Manager. Your choice determines which fields you see next. If you chose Desktop Device Manager, go to Desktop Device Management. If you chose Mobile Device Manager, then continue this list of steps.
-
Choose Authentication Type, Basic, or OAuth - Client Credentials. If you chose OAuth - Client credentials to configure a Microsoft Intune server, go to Mobile Device Management - OAuth - Client Credentials. If you chose Basic, then continue this list of steps.
-
All screens ask for a name and describe this MDM server definition. The following section describes the additional fields and steps, which are based on server and authentication type.
Mobile Device Management - Basic
-
Host Name / IP Address—Enter the hostname or IP address of the MDM server.
-
Port—Enter the port to use when connecting to the MDM server, which is usually 443.
-
Instance Name - If this MDM server has several instances, enter the instance that you want to connect to.
-
Polling Interval—Enter the polling interval in minutes for Cisco ISE to poll the MDM server for compliance check information. Set this value to match the polling interval on your MDM server. The valid range is from 15 to 1440 minutes. The default value is 240 minutes. We recommend that you set the polling interval below 60 minutes only for testing a few active clients on your network. If you set this value below 60 minutes for a production environment with many active clients, the system’s load increases significantly and may negatively affect performance.
If you set the polling interval to 0, ISE disables communication with the MDM server.
-
Time Interval For Compliance Device ReAuth Query—When the endpoint is authenticated or re-authenticated, ISE uses a cache to get the MDM variables for that endpoint. If the age of cached value is older than the value of Time Interval For Compliance Device ReAuth Query, then ISE makes a device query to the MDM server to get new values. If the compliance status changed, then ISE triggers a CoA.
The valid range is from 1 to 1440 minutes. The default value is 1 minute.
Mobile Device Management - OAuth - Client Credentials
Using OAuth requires configuration of the OAuth server, which is described in Configuring Microsoft Intune as an MDM Server
-
Auto Discovery URL—Enter the value of Microsoft Azure AD Graph API Endpoint from the Microsoft Azure management portal. This URL is the endpoint at which an application can access directory data in your Microsoft Azure AD directory using the Graph API. The URL is of the form:
https://<hostname>/<tenant id>, for example, https://graph.ppe.windows.net/47f09275-5bc0-4807-8aae-f35cb0341329. An expanded version of this URL is also in the property file, which is of the form:https://<Graph_API_Endpoint>/<TenantId_Or_Domain>/servicePrincipalsByAppId/<Microsoft Intune AppId>/serviceEndpoints?api-version=1.6&client-request-id=<Guid.NewGuid()>. -
Client ID—The unique identifier for your application. Use this attribute if your application accesses data in another application, such as the Microsoft Azure AD Graph API, Microsoft Intune API, and so on.
-
Token Issuing URL—Enter the value of the Oauth2.0 Authorization Endpoint from the previous step. This is the endpoint at which your app can obtain an access token using OAuth2.0. After your app is authenticated, Microsoft Azure AD issues your app (ISE) an access token, which allows your app to call the Graph API/ Intune API.
-
Token Audience—The recipient resource that the token is intended for, which is a public, well-known APP ID URL to the Microsoft Intune API.
-
Polling Interval—Enter the polling interval in minutes for Cisco ISE to poll the MDM server for compliance check information. Set this value to match the polling interval on your MDM server. The valid range is from 15 to 1440 minutes. The default value is 240 minutes. We recommend that you set the polling interval below 60 minutes only for testing a few active clients on your network. If you set this value below 60 minutes for a production environment with many active clients, the system’s load increases significantly and may negatively affect performance.
If you set the polling interval to 0, ISE disables communication with the MDM server.
-
Time Interval For Compliance Device ReAuth Query—When the endpoint is authenticated or re-authenticated, ISE uses a cache to get the MDM variables for that endpoint. If the age of cached value is older than the value of Time Interval For Compliance Device ReAuth Query, then ISE makes a device query to the MDM server to get new values. If the compliance status changed, then ISE triggers a CoA.
The valid range is from 1 to 1440 minutes. The default value is 1 minute.
Desktop Device Management
The following settings require you to configure WMI on the SCCM server, so it can communicate with ISE. See Configure the Microsoft SCCM Server for ISE for more information.
-
Host Name / IP Address—Enter the hostname or IP address of the MDM server.
-
Site or Instance Name—Enter the site name, or if the MDM server has several instances, the instance name.
ISE MDM Support for Microsoft Intune and SCCM
-
Microsoft Intune- MDM-ISE supports Microsoft's Intune device management as a partner MDM server managing mobile devices.
You configure ISE as an OAuth 2.0 client application on the Intune server managing mobile devices. ISE gets a token from Azure to establish a session with that ISE Intune application.
See https://msdn.microsoft.com/en-us/library/azure/dn645543.aspx for more information about how Intune communicates with a client application.
-
Desktop Device Manager (Microsoft SCCM) - ISE supports Microsoft's System Center Configuration Manager (SCCM) as a partner MDM server for managing Windows computers. ISE retrieves compliance information from the SCCM server using WMI, and uses that information to grant or deny network access to the user's Windows device.
SCCM Workflow
ISE is able to retrieve information from the SCCM server about whether a device is registered, and if it is registered, is it compliant. The following diagram shows the workflow for devices managed by SCCM.
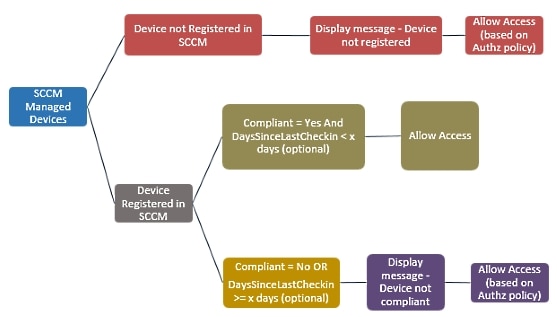
When a device connects and a SCCM policy is matched, ISE queries the SCCM server specified in the authorization policy to retrieve compliance and last logon (check-in) time. With this information, ISE updates the compliance status and lastCheckinTimeStamp of the device in the Endpoint list.
If the device is not compliant or not registered with SCCM, and a redirect profile is used in the authorization policy, a message is displayed to the user that the device is not compliant or not registered with the SCCM. After the user acknowledges the message, ISE can issue a CoA to the SCCM registration site. Users can be granted access based on the authorization policy and profile.
Microsoft SCCM Server Connection Monitoring
Polling is not configurable for SCCM.
ISE runs an MDM HeartBeat job that verifies connection to the SCCM server, and raises alarms if ISE loses the connection to the SCCM server. The HeartBeat job interval is not configurable.
Configuring Microsoft Intune as an MDM Server
Configuring Microsoft Intune as an MDM server for ISE is slightly differently from configuring other MDM servers. Use the following steps to configure ISE's connection to Azure and Azure's connection to ISE.
-
Get the public certificate from the Intune/Azure Active Directory tenant, and import it into ISE to support SSL handshake.
-
1. Log on to the Intune Admin Console or Azure Admin console, whichever site has your tenant.
-
Use the browser to get the certificate details. For, example, with Internet Explorer:
-
Click on the lock symbol in the browers toolbar, then click View Certficates.
-
In the Certificate window, select the tab Certification Path.
-
Find Baltimore Cyber Trust root, and export the root cert.
-
-
In ISE, choose , and import the root certificate that you just saved. Give the certificate a meaningful name, such as Azure MDM.
-
-
Export the ISE self-signed certificate, and prepare it for InTune/Azure.
-
On the PAN, navigate to , select the Default self-signed server certificate, and click Export.
-
Select Export Certificate Only (default), and select a place to save it.
Run the following PowerShell script on the exported certificate file:
$cer = New-Object System.Security.Cryptography.X509Certificates.X509Certificate2
$cer.Import(“mycer.cer”)
$bin = $cer.GetRawCertData()
$base64Value = [System.Convert]::ToBase64String($bin)

$bin = $cer.GetCertHash()
$base64Thumbprint = [System.Convert]::ToBase64String($bin)

$keyid = [System.Guid]::NewGuid().ToString()
Keep the values for $base64Thumbprint, $base64Value and $keyid, which will be used in the next step.
-
-
Create an ISE application in Intune.
-
Sign in to your customer domain on the Microsoft Azure management portal, navigate to , and choose Add an application my organization is developing.
-
Configure the ISE application in Azure with the following parameters:
-
Application Name— enter ISE.
-
Select WEB APPLICATION AND/OR WEB APP.
-
SIGN-ON URL and APP ID URL—Add any valid URL, these values are not used by ISE.
-
-
-
Get the manifest file from Azure, add the ISE certificate information, and upload the updated manifest into Azure.
-
On the Microsoft Azure management portal ((https://manage.windowsazure.com), open the AAD snap-in, and navigate to the ISE application.
Download the application manifest file from the Manage Manifest menu.
-
-
Update the keyCredentials field in Manifest json file as shown in the following example, replacing Base64 Encoded String of ISE PAN cert with the exported, edited, certificate file from ISE, which is the $base64Value from the PowerShell script:
"keyCredentials": [
                              {
                                “customKeyIdentifier“: “$base64Thumbprint_from_above”,
                                “keyId“: “$keyid_from_above“,
                                "type": "AsymmetricX509Cert",
                                "usage": "Verify",
                                "value": "Base64 Encoded String of ISE PAN cert"
                              }
                           ]
Note
Do not change the name of the manifest file.
The KeyCredentials complex type is documented here: http://msdn.microsoft.com/en-us/library/azure/dn151681.aspx.
-
Upload the updated manifest file to Azure.
-
On the Microsoft Azure management portal, navigate to the list of App Endpoints. You will use the values of following endpoint attributes to configure ISE:
-
MICROSOFT AZURE AD GRAPH API ENDPOINT
-
OAUTH 2.0 TOKEN ENDPOINT
-
-
In ISE, configure the Intune server in ISE. For more information about configuring and external MDM server, see Define Mobile Device Management Servers in ISE. The fields that are important for Intune are described below:
-
Auto Discovery URL—Enter the value of Microsoft Azure AD Graph API Endpoint from the Microsoft Azure management portal. This URL is the endpoint at which an application can access directory data in your Microsoft Azure AD directory using the Graph API. The URL is of the form:
https://<hostname>/<tenant id>, for example, https://graph.ppe.windows.net/47f09275-5bc0-4807-8aae-f35cb0341329. An expanded version of this URL is also in the property file, which is of the form:https://<Graph_API_Endpoint>/<TenantId_Or_Domain>/servicePrincipalsByAppId/<Microsoft Intune AppId>/serviceEndpoints?api-version=1.6&client-request-id=<Guid.NewGuid()>. -
Client ID—The unique identifier for your application. Use this attribute if your application accesses data in another application, such as the Microsoft Azure AD Graph API, Microsoft Intune API, and so on.
-
Token Issuing URL—Enter the value of the Oauth2.0 Authorization Endpoint from the previous step. This is the endpoint at which your app can obtain an access token using OAuth2.0. After your app is authenticated, Microsoft Azure AD issues your app (ISE) an access token, which allows your app to call the Graph API/ Intune API.
-
Token Audience—The recipient resource that the token is intended for, which is a public, well-known APP ID URL to the Microsoft Intune API.
-
For more information about Intune applications, see the following links:
-
https://msdn.microsoft.com/en-us/library/azure/dn645543.aspx
-
https://azure.microsoft.com/en-us/documentation/articles/active-directory-authentication-scenarios
-
https://azure.microsoft.com/en-us/documentation/articles/active-directory-integrating-applications
-
https://azure.microsoft.com/en-us/documentation/articles/active-directory-application-manifest
Policy Set Example for Microsoft SCCM
The following new dictionary entries can be used in policies to support SCCM.
-
MDM.DaysSinceLastCheckin - Number of days since a user last checked in or synched a device with SCCM, from 1 to 365 days.
-
MDM.UserNotified - Values are Y or N. Indicates whether the user was notified that they are not registered. You can then allow limited access and redirect to registration portal, or deny access.
-
MDM.ServerType - Values are MDM for Mobile Device Manager or DM for Desktop Device Manager.
The following example Policy Set shows a set of policies to support SCCM:
|
Policy Name |
If |
Then |
|---|---|---|
|
SCCM_Comp |
Wireless_802.1X AND MDM:MDMServerName EQUALS SccmServer1 AND MDM:DeviceRegisterStatus EQUALS Registered |
PermitAccess |
|
SCCM_NonComp_Notify |
Wireless_802.1X AND MDM:MDMServerName EQUALS SccmServer1 AND MDM:DeviceCompliantStatus EQUALS NonCompliant AND MDM:UserNotified EQUALS 28 |
PermitAccess |
|
SCCM_NonComp_Days |
Wireless_802.1X AND MDM:MDMServerName EQUALS SccmServer1 AND MDM:MDMDeviceCompliantStatus EQUALS Registered AND MDM:DaysSinceLastCheckin EQUALS 28 |
SCCMRedirect |
|
SCCM_NonComp |
Wireless_802.1X AND MDM:MDMServerName EQUALS SccmServer1 AND MDM:DeviceCompliantStatus EQUALS NonCompliant AND MDM:DeviceRegisterStatus EQUALS Registered |
SCCMRedirect |
|
SCCM_UnReg_Notify |
Wireless_802.1X AND MDM:DeviceRegisterStatus EQUALS Registered AND MDM:UserNotified EQUALS Yes |
PermitAccess |
Configure the Microsoft SCCM Server for ISE
ISE communicates with the SCCM server using WMI. WMI must be configured on the Windows server running SCCM.
Note |
The user account that you use for ISE integration must either:
|
Set Permissions When AD User in the Domain Admin Group
For Windows 2008 R2,Windows 2012, and Windows 2012 R2, the Domain Admin group does not have full control on certain registry keys in the Windows operating system by default. The Active Directory admin must give the Active Directory user Full Control permissions on the following registry keys:
-
HKEY_CLASSES_ROOT\CLSID\{76A64158-CB41-11D1-8B02-00600806D9B6}
-
HKLM\Software\Classes\Wow6432Node\CLSID\{76A64158-CB41-11D1-8B02-00600806D9B6}
No registry changes are required for the following Active Directory versions:
-
Windows 2003
-
Windows 2003R2
-
Windows 2008
To grant full control, the Active Directory admin must first take ownership of the key, as shown below.
Procedure
| Step 1 |
Go to the Owner tab by right clicking the key. |
| Step 2 |
Click Permissions. |
| Step 3 |
Click Advanced. |
Required Permissions when AD User not in Domain Admin Group
For Windows 2012 R2, give the Active Directory user Full Control permissions on the following registry keys:
-
HKEY_CLASSES_ROOT\CLSID\{76A64158-CB41-11D1-8B02-00600806D9B6} -
HKLM\Software\Classes\Wow6432Node\CLSID\{76A64158-CB41-11D1-8B02-00600806D9B6}
The following permissions also are required when an Active Directory user is not in the Domain Admin group, but is in the Domain Users group:
-
Add Registry Keys to Allow ISE to Connect to the Domain Controller (see below)
These permissions are only required for the following Active Directory versions:
-
Windows 2003
-
Windows 2003R2
-
Windows 2008
-
Windows 2008 R2
-
Windows 2012
-
Windows 2012 R2
-
Windows 2016
Add Registry Keys to Allow ISE to Connect to the Domain Controller
You must manually add some registry keys to the domain controller to allow ISE to connect as a Domain User, and retrieve login authentication events. An agent is not required on the domain controllers or on any machine in the domain.
The following registry script shows the keys to add. You can copy and paste this into a text file, save the file with a .reg extension, and double click the file to make the registry changes. To add registry keys, the user must be an owner of the root key.
Windows Registry Editor Version 5.00

[HKEY_CLASSES_ROOT\CLSID\{76A64158-CB41-11D1-8B02-00600806D9B6}]
"AppID"="{76A64158-CB41-11D1-8B02-00600806D9B6}"

[HKEY_CLASSES_ROOT\AppID\{76A64158-CB41-11D1-8B02-00600806D9B6}]
"DllSurrogate"="  "

[HKEY_CLASSES_ROOT\Wow6432Node\AppID\{76A64158-CB41-11D1-8B02-00600806D9B6}]
"DllSurrogate"="  "
Make sure that you include two spaces in the value of the key DllSurrogate.
Keep the empty lines as shown in the script above, including an empty line at the end of the file.
Permissions to Use DCOM on the Domain Controller
The Active Directory user used for ISE Passive Identity services must have permissions to use DCOM (remote COM) on the Domain Controller. You can configure permissions with the dcomcnfg command line tool.
Procedure
| Step 1 |
Run the dcomcnfg tool from the command line. |
| Step 2 |
Expand Component Services. |
| Step 3 |
Expand . |
| Step 4 |
Select Action from the menu bar, click properties, and click COM Security. |
| Step 5 |
Make sure that the account that ISE will use for both Access and Launch has Allow permissions. That Active Directory user should be added to all the four options (Edit Limits and Edit Default for both Access Permissions and Launch and Activation Permissions). |
| Step 6 |
Allow all Local and Remote access for both Access Permissions and Launch and Activation Permissions. 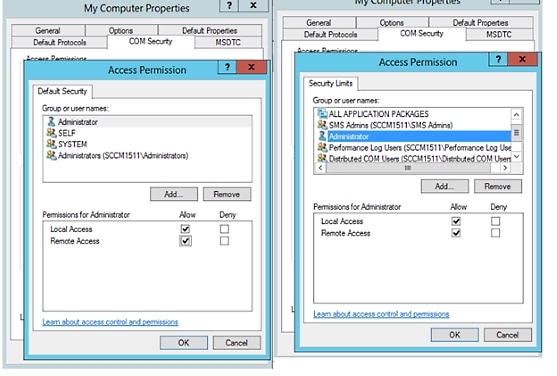 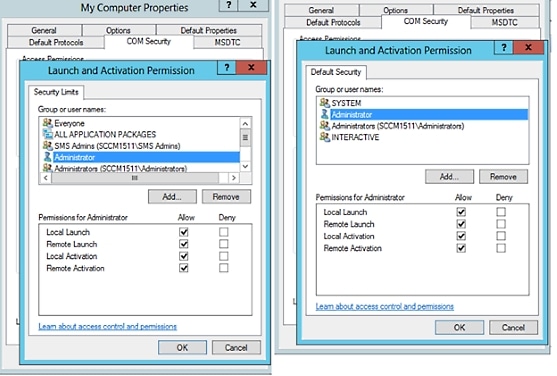 |
Set Permissions for Access to WMI Root/CIMv2 Name Space
By default, Active Directory users do not have permissions for the Execute Methods and Remote Enable. You can grant access using the wmimgmt.msc MMC console.
Procedure
| Step 1 |
Click Start
> Run and type
|
| Step 2 |
Right-click WMI Control and click Properties. |
| Step 3 |
Under the Security tab, expand Root and choose CIMV2. |
| Step 4 |
Click Security. |
| Step 5 |
Add the Active Directory user, and configure the required permissions as shown below.  |
Open Firewall Ports for WMI Access
The firewall software on the Active Directory Domain Controller may block access to WMI. You can either turn the firewall off, or allow access on a specific IP (ISE IP address) to the following ports:
-
TCP 135: General RPC Port. When doing asynchronous RPC calls, the service listening on this port tells the client which port the component servicing this request is using.
-
UDP 138: Netbios Datagram Service
-
TCP 139: Netbios Session Service
-
TCP 445: SMB
Note
Cisco ISE 1.3 and above support SMB 2.0.
Higher ports are assigned dynamically or you can configure them manually. We recommend that you add %SystemRoot%\System32\dllhost.exe as a target. This program manages ports dynamically.
All firewall rules can be assigned to specific IP (ISE IP).
Configure an Authorization Profile for Redirecting Nonregistered Devices
You must configure an authorization profile in Cisco ISE to redirect nonregistered devices for each external MDM server.
Before you begin
- Ensure that you have created an MDM server definition in Cisco ISE. Only after you successfully integrate ISE with the MDM server does the MDM dictionary gets populated and you can create authorization policy using the MDM dictionary attributes.
- Configure ACLs on the Wireless LAN Controller for redirecting unregistered devices.
-
If you are using a proxy for the internet connection and MDM server is part of internal network then you have to put the MDM server name or its IP address in the Proxy-Bypass list. Choose to perform this action.
Procedure
| Step 1 |
Choose . |
| Step 2 |
Create an authorization profile for redirecting nonregistered devices that are not compliant or registered. |
| Step 3 |
Enter a name for the authorization profile that matches the MDM server name. |
| Step 4 |
Choose ACCESS_ACCEPT as the Access Type. |
| Step 5 |
Check the Web Redirection check box and choose MDM Redirect from the drop-down list. |
| Step 6 |
Enter the name of the ACL that you configured on the wireless LAN controller in the ACL field. |
| Step 7 |
Select the MDM portal from the Value drop-down list. |
| Step 8 |
Select the MDM server you want to use from the drop-down list. |
| Step 9 |
Click Submit. |
What to do next
Configure Authorization Policy Rules for the MDM Use Cases
You must configure authorization policy rules in Cisco ISE to complete the MDM configuration.
Before you begin
-
Add the MDM server certificate to the Cisco ISE certificate store.
-
Ensure that you have created the MDM server definition in Cisco ISE. Only after you successfully integrate ISE with the MDM server, the MDM dictionary gets populated and you can create authorization policy using the MDM dictionary attributes.
-
Configure ACLs on the Wireless LAN Controller for redirecting unregistered or noncompliant devices.
Procedure
| Step 1 |
Choose , and expand the policy set to view the authorization policy rules. |
| Step 2 |
Add the following rules:
|
| Step 3 |
Click Save. |

Wipe or Lock a Device
Cisco ISE allows you to wipe or turn on pin lock for a device that is lost. You can do this from the Endpoints page.
Procedure
| Step 1 |
Choose . |
| Step 2 |
Check the check box next to the device that you want to wipe or lock. |
| Step 3 |
From the MDM Access drop-down list, choose any one of the following options:
|
| Step 4 |
Click Yes to wipe or lock the device. |
View Mobile Device Manager Reports
Cisco ISE records all additions, updates, and deletions of MDM server definitions. You can view these event in the “Change Configuration Audit” report, which provides all the configuration changes from any system administrator for a selected time period.
Choose , and specify the period of time to display in the resulting report.
View Mobile Device Manager Logs
You can use the Message Catalog page to view Mobile Device Manager log messages. Choose . The default reporting level for MDM log entries is "INFO." You can change the reporting level to "DEBUG" or "TRACE."
Mobile Device Manager Interoperability with Cisco ISE
Mobile Device Management (MDM) servers secure, monitor, manage, and support mobile devices deployed across mobile operators, service providers, and enterprises. MDM servers act as a policy server that controls the use of some applications on a mobile device (for example, an e-mail application) in the deployed environment. However, the network is the only entity that can provide granular access to endpoints based on ACLs. Cisco ISE queries the MDM servers for the necessary device attributes to create ACLs that provide network access control for those devices.
You can run multiple active MDM servers on your network, including ones from different vendors. This allows you to route different endpoints to different MDM servers based on device factors such as location or device type.
Cisco ISE also integrates with MDM servers using Cisco's MDM API version 2 to allow devices access the network over VPN via AnyConnect 4.1 and Cisco ASA 9.3.2 or later.
In this illustration, Cisco ISE is the enforcement point and the MDM policy server is the policy information point. Cisco ISE obtains data from the MDM server to provide a complete solution.
You can configure Cisco ISE to interoperate with one or more external Mobile Device Manager (MDM) servers. By setting up this type of third-party connection, you can leverage the detailed information available in the MDM database. Cisco ISE uses REST API calls to retrieve information from the external MDM server. Cisco ISE applies appropriate access control policies to switches, access routers, wireless access points, and other network access points to achieve greater control of remote device access to your Cisco ISE network.
The supported MDM vendors are listed here: Supported MDM Servers.
Supported MDM Use Cases
The functions Cisco ISE performs with the external MDM server are as follows:
-
Managing device registration—Unregistered endpoints accessing the network are redirected to a registration page, which is hosted on the MDM server. Device registration includes user role, device type, and so on.
-
Handling device remediation—Endpoints are granted only restricted access during remediation.
-
Augmenting endpoint data—Update the endpoint database with information from the MDM server that you cannot gather using the Cisco ISE Profiler. Cisco ISE uses six device attributes you can view using the page if an endpoint is an MDM monitored device. For example:
-
MDMImei: 99 000100 160803 3
-
MDMManufacturer: Apple
-
MDMModel: iPhone
-
MDMOSVersion: iOS 6.0.0
-
MDMPhoneNumber: 9783148806
-
MDMSerialNumber: DNPGQZGUDTF9
-
-
Cisco ISE polls the MDM server once every 4 hours for device compliance data. This is configurable by the administrator.
-
Issuing device instructions through the MDM server—Issues remote actions for users’ devices through the MDM server. Administrators initiate remote actions from the ISE console.
Vendor MDM Attributes
When you configure an MDM server in ISE, that vendor's attributes are added to a new entry in the ISE system dictionary, named mdm. The following attributes are used for registration status, and are commonly supported by MDM vendors.
-
DeviceRegisterStatus
-
DeviceCompliantStatus
-
DiskEncryptionStatus
-
PinLockStatus
-
JailBrokenStatus
-
Manufacturer
-
IMEI
-
SerialNumber
-
OsVersion
-
PhoneNumber
-
MDMServerName
-
MDMServerReachable
-
MEID
-
Model
-
UDID
Vendor's unique attributes are not supported, but you may be able to use ERS APIs to exchange vendor-specific attributes, if the vendor supports that.
The new MDM dictionary attributes are available to use in authorization policies.
Supported MDM Servers
Supported MDM servers include products from the following vendors:
-
Absolute
-
AirWatch
-
Citrix XenMobile
-
Globo
-
Good Technology
-
IBM MaaS360
-
JAMF Software
-
Meraki SM/EMM
-
MobileIron
-
SAP Afaria
-
SOTI
-
Symantec
-
Tangoe
-
Microsoft Intune - for mobile devices
-
Microsoft SCCM - for desktop devices
Ports Used by the MDM Server
The following table lists the ports that must be open between the Cisco ISE and the MDM server to enable them to communicate with each other. Refer to the MDM Server Documentation for a list of ports that must be open on the MDM agent and server.
|
MDM Server |
Ports |
|---|---|
|
MobileIron |
443 |
|
Zenprise |
443 |
|
Good |
19005 |
|
Airwatch |
443 |
|
Afaria |
443 |
|
Fiberlink MaaS |
443 |
|
Meraki |
443 |
|
Microsoft Intune |
80 and 443 |
|
Microsoft SCCM |
80 and 443 |
MDM Integration Process Flow
This section describes the MDM integration process:
-
The user associates a device to SSID.
-
Cisco ISE makes an API call to the MDM server.
-
This API call returns a list of devices for this user and the posture status for the devices.
Note
The input parameter is the MAC address of the endpoint device. For off-premise Apple iOS devices, this is the UDID.
-
If the user’s device is not in this list, it means the device is not registered. Cisco ISE sends an authorization request to the NAD to redirect to Cisco ISE. The user is presented the MDM server page.
Note
You must register a device that is enrolled on the MDM server outside of a Cisco ISE network via the MDM portal. This is applicable for Cisco ISE, Release 1.4 and later. Earlier ISE versions allow devices enrolled outside of a Cisco ISE network to be automatically enrolled if they are compliant with the posture policies.
-
Cisco ISE uses MDM to provision the device and presents an appropriate page for the user to register the device.
-
The user registers the device in the MDM server, and the MDM server redirects the request to Cisco ISE (through automatic redirection or manual browser refresh).
-
Cisco ISE queries the MDM server again for the posture status.
-
If the user’s device is not compliant to the posture (compliance) policies configured on the MDM server, the user is notified that the device is out of compliance and must be compliant.
-
After the user’s device becomes compliant, the MDM server updates the device state in its internal tables.
-
If the user refreshes the browser now, the control is transferred back to Cisco ISE.
-
Cisco ISE polls the MDM server once every four hours to get compliance information and issues Change of Authorization (CoA) appropriately. This can be configured by the administrator. Cisco ISE also checks the MDM server every 5 minutes to make sure that it is available.
The following figure illustrates the MDM process flow.
Note |
A device can only be enrolled to a single MDM server at a time. If you want to enroll the same device to an MDM service from another vendor, the previous vendor's profiles must be removed from the device. The MDM service usually offers a "corporate wipe", which only deletes the vendor's configuration from the device (not the whole device). The user can also remove the files. For example, on an IOS device, the user can go to Settings > General >Device management, and click remove management. Or the user can go to the MyDevices portal in ISE, and click corporate wipe. |
Set Up MDM Servers with Cisco ISE
To set up MDM servers with Cisco ISE, you must perform the following high-level tasks:
Procedure
| Step 1 |
Import MDM server certificate into Cisco ISE, except for Intune, where you import the PAN's certificate into Azure. |
| Step 2 |
Create mobile device manager definitions. |
| Step 3 |
Configure ACLs on the Wireless LAN Controllers. |
| Step 4 |
Configure an authorization profile that redirects non-registered devices to the MDM server. |
| Step 5 |
If there is more than one MDM server on the network, configure separate authorization profiles for each vendor. |
| Step 6 |
Configure authorization policy rules for the MDM use cases. |
Import MDM Server Certificate into Cisco ISE
For Cisco ISE to connect with the MDM server, you must import the MDM server certificate into the Cisco ISE Certificate Store. If your MDM server has a CA-signed certificate, you must import the root CA into the Cisco ISE Certificate Store.
Note |
For Microsoft Azure, you import the ISE certificate into Azure. For more information, see Configuring Microsoft Intune as an MDM Server. |
Procedure
| Step 1 |
Export the MDM server certificate from your MDM server and save it on your local machine. |
| Step 2 |
Choose . |
| Step 3 |
Click Browse to select the MDM server certificate that you obtained from the MDM server. |
| Step 4 |
Add a friendly name. |
| Step 5 |
Check Trust for authentication within ISE check box. |
| Step 6 |
Click Submit. |
| Step 7 |
Verify that the Certificate Store list page lists the MDM server certificate. |
What to do next
Define Mobile Device Management Servers in ISE
.
Define Mobile Device Management Servers in ISE
You can create one or more Mobile Device Management (MDM) and Desktop Device Manager (SCCM) definitions for external MDM servers.
-
Choose .
-
Click Add.
-
Enter the name and description of the MDM server that you want to add.
-
Choose the Server Type, Mobile Device Manager, or Desktop Device Manager. Your choice determines which fields you see next. If you chose Desktop Device Manager, go to Desktop Device Management. If you chose Mobile Device Manager, then continue this list of steps.
-
Choose Authentication Type, Basic, or OAuth - Client Credentials. If you chose OAuth - Client credentials to configure a Microsoft Intune server, go to Mobile Device Management - OAuth - Client Credentials. If you chose Basic, then continue this list of steps.
-
All screens ask for a name and describe this MDM server definition. The following section describes the additional fields and steps, which are based on server and authentication type.
Mobile Device Management - Basic
-
Host Name / IP Address—Enter the hostname or IP address of the MDM server.
-
Port—Enter the port to use when connecting to the MDM server, which is usually 443.
-
Instance Name - If this MDM server has several instances, enter the instance that you want to connect to.
-
Polling Interval—Enter the polling interval in minutes for Cisco ISE to poll the MDM server for compliance check information. Set this value to match the polling interval on your MDM server. The valid range is from 15 to 1440 minutes. The default value is 240 minutes. We recommend that you set the polling interval below 60 minutes only for testing a few active clients on your network. If you set this value below 60 minutes for a production environment with many active clients, the system’s load increases significantly and may negatively affect performance.
If you set the polling interval to 0, ISE disables communication with the MDM server.
-
Time Interval For Compliance Device ReAuth Query—When the endpoint is authenticated or re-authenticated, ISE uses a cache to get the MDM variables for that endpoint. If the age of cached value is older than the value of Time Interval For Compliance Device ReAuth Query, then ISE makes a device query to the MDM server to get new values. If the compliance status changed, then ISE triggers a CoA.
The valid range is from 1 to 1440 minutes. The default value is 1 minute.
Mobile Device Management - OAuth - Client Credentials
Using OAuth requires configuration of the OAuth server, which is described in Configuring Microsoft Intune as an MDM Server
-
Auto Discovery URL—Enter the value of Microsoft Azure AD Graph API Endpoint from the Microsoft Azure management portal. This URL is the endpoint at which an application can access directory data in your Microsoft Azure AD directory using the Graph API. The URL is of the form:
https://<hostname>/<tenant id>, for example, https://graph.ppe.windows.net/47f09275-5bc0-4807-8aae-f35cb0341329. An expanded version of this URL is also in the property file, which is of the form:https://<Graph_API_Endpoint>/<TenantId_Or_Domain>/servicePrincipalsByAppId/<Microsoft Intune AppId>/serviceEndpoints?api-version=1.6&client-request-id=<Guid.NewGuid()>. -
Client ID—The unique identifier for your application. Use this attribute if your application accesses data in another application, such as the Microsoft Azure AD Graph API, Microsoft Intune API, and so on.
-
Token Issuing URL—Enter the value of the Oauth2.0 Authorization Endpoint from the previous step. This is the endpoint at which your app can obtain an access token using OAuth2.0. After your app is authenticated, Microsoft Azure AD issues your app (ISE) an access token, which allows your app to call the Graph API/ Intune API.
-
Token Audience—The recipient resource that the token is intended for, which is a public, well-known APP ID URL to the Microsoft Intune API.
-
Polling Interval—Enter the polling interval in minutes for Cisco ISE to poll the MDM server for compliance check information. Set this value to match the polling interval on your MDM server. The valid range is from 15 to 1440 minutes. The default value is 240 minutes. We recommend that you set the polling interval below 60 minutes only for testing a few active clients on your network. If you set this value below 60 minutes for a production environment with many active clients, the system’s load increases significantly and may negatively affect performance.
If you set the polling interval to 0, ISE disables communication with the MDM server.
-
Time Interval For Compliance Device ReAuth Query—When the endpoint is authenticated or re-authenticated, ISE uses a cache to get the MDM variables for that endpoint. If the age of cached value is older than the value of Time Interval For Compliance Device ReAuth Query, then ISE makes a device query to the MDM server to get new values. If the compliance status changed, then ISE triggers a CoA.
The valid range is from 1 to 1440 minutes. The default value is 1 minute.
Desktop Device Management
The following settings require you to configure WMI on the SCCM server, so it can communicate with ISE. See Configure the Microsoft SCCM Server for ISE for more information.
-
Host Name / IP Address—Enter the hostname or IP address of the MDM server.
-
Site or Instance Name—Enter the site name, or if the MDM server has several instances, the instance name.
ISE MDM Support for Microsoft Intune and SCCM
-
Microsoft Intune- MDM-ISE supports Microsoft's Intune device management as a partner MDM server managing mobile devices.
You configure ISE as an OAuth 2.0 client application on the Intune server managing mobile devices. ISE gets a token from Azure to establish a session with that ISE Intune application.
See https://msdn.microsoft.com/en-us/library/azure/dn645543.aspx for more information about how Intune communicates with a client application.
-
Desktop Device Manager (Microsoft SCCM) - ISE supports Microsoft's System Center Configuration Manager (SCCM) as a partner MDM server for managing Windows computers. ISE retrieves compliance information from the SCCM server using WMI, and uses that information to grant or deny network access to the user's Windows device.
SCCM Workflow
ISE is able to retrieve information from the SCCM server about whether a device is registered, and if it is registered, is it compliant. The following diagram shows the workflow for devices managed by SCCM.
When a device connects and a SCCM policy is matched, ISE queries the SCCM server specified in the authorization policy to retrieve compliance and last logon (check-in) time. With this information, ISE updates the compliance status and lastCheckinTimeStamp of the device in the Endpoint list.
If the device is not compliant or not registered with SCCM, and a redirect profile is used in the authorization policy, a message is displayed to the user that the device is not compliant or not registered with the SCCM. After the user acknowledges the message, ISE can issue a CoA to the SCCM registration site. Users can be granted access based on the authorization policy and profile.
Microsoft SCCM Server Connection Monitoring
Polling is not configurable for SCCM.
ISE runs an MDM HeartBeat job that verifies connection to the SCCM server, and raises alarms if ISE loses the connection to the SCCM server. The HeartBeat job interval is not configurable.
Configuring Microsoft Intune as an MDM Server
Configuring Microsoft Intune as an MDM server for ISE is slightly differently from configuring other MDM servers. Use the following steps to configure ISE's connection to Azure and Azure's connection to ISE.
-
Get the public certificate from the Intune/Azure Active Directory tenant, and import it into ISE to support SSL handshake.
-
1. Log on to the Intune Admin Console or Azure Admin console, whichever site has your tenant.
-
Use the browser to get the certificate details. For, example, with Internet Explorer:
-
Click on the lock symbol in the browers toolbar, then click View Certficates.
-
In the Certificate window, select the tab Certification Path.
-
Find Baltimore Cyber Trust root, and export the root cert.
-
-
In ISE, choose , and import the root certificate that you just saved. Give the certificate a meaningful name, such as Azure MDM.
-
-
Export the ISE self-signed certificate, and prepare it for InTune/Azure.
-
On the PAN, navigate to , select the Default self-signed server certificate, and click Export.
-
Select Export Certificate Only (default), and select a place to save it.
Run the following PowerShell script on the exported certificate file:
$cer = New-Object System.Security.Cryptography.X509Certificates.X509Certificate2
$cer.Import(“mycer.cer”)
$bin = $cer.GetRawCertData()
$base64Value = [System.Convert]::ToBase64String($bin)

$bin = $cer.GetCertHash()
$base64Thumbprint = [System.Convert]::ToBase64String($bin)

$keyid = [System.Guid]::NewGuid().ToString()
Keep the values for $base64Thumbprint, $base64Value and $keyid, which will be used in the next step.
-
-
Create an ISE application in Intune.
-
Sign in to your customer domain on the Microsoft Azure management portal, navigate to , and choose Add an application my organization is developing.
-
Configure the ISE application in Azure with the following parameters:
-
Application Name— enter ISE.
-
Select WEB APPLICATION AND/OR WEB APP.
-
SIGN-ON URL and APP ID URL—Add any valid URL, these values are not used by ISE.
-
-
-
Get the manifest file from Azure, add the ISE certificate information, and upload the updated manifest into Azure.
-
On the Microsoft Azure management portal ((https://manage.windowsazure.com), open the AAD snap-in, and navigate to the ISE application.
Download the application manifest file from the Manage Manifest menu.
-
-
Update the keyCredentials field in Manifest json file as shown in the following example, replacing Base64 Encoded String of ISE PAN cert with the exported, edited, certificate file from ISE, which is the $base64Value from the PowerShell script:
"keyCredentials": [
                              {
                                “customKeyIdentifier“: “$base64Thumbprint_from_above”,
                                “keyId“: “$keyid_from_above“,
                                "type": "AsymmetricX509Cert",
                                "usage": "Verify",
                                "value": "Base64 Encoded String of ISE PAN cert"
                              }
                           ]
Note
Do not change the name of the manifest file.
The KeyCredentials complex type is documented here: http://msdn.microsoft.com/en-us/library/azure/dn151681.aspx.
-
Upload the updated manifest file to Azure.
-
On the Microsoft Azure management portal, navigate to the list of App Endpoints. You will use the values of following endpoint attributes to configure ISE:
-
MICROSOFT AZURE AD GRAPH API ENDPOINT
-
OAUTH 2.0 TOKEN ENDPOINT
-
-
In ISE, configure the Intune server in ISE. For more information about configuring and external MDM server, see Define Mobile Device Management Servers in ISE. The fields that are important for Intune are described below:
-
Auto Discovery URL—Enter the value of Microsoft Azure AD Graph API Endpoint from the Microsoft Azure management portal. This URL is the endpoint at which an application can access directory data in your Microsoft Azure AD directory using the Graph API. The URL is of the form:
https://<hostname>/<tenant id>, for example, https://graph.ppe.windows.net/47f09275-5bc0-4807-8aae-f35cb0341329. An expanded version of this URL is also in the property file, which is of the form:https://<Graph_API_Endpoint>/<TenantId_Or_Domain>/servicePrincipalsByAppId/<Microsoft Intune AppId>/serviceEndpoints?api-version=1.6&client-request-id=<Guid.NewGuid()>. -
Client ID—The unique identifier for your application. Use this attribute if your application accesses data in another application, such as the Microsoft Azure AD Graph API, Microsoft Intune API, and so on.
-
Token Issuing URL—Enter the value of the Oauth2.0 Authorization Endpoint from the previous step. This is the endpoint at which your app can obtain an access token using OAuth2.0. After your app is authenticated, Microsoft Azure AD issues your app (ISE) an access token, which allows your app to call the Graph API/ Intune API.
-
Token Audience—The recipient resource that the token is intended for, which is a public, well-known APP ID URL to the Microsoft Intune API.
-
For more information about Intune applications, see the following links:
-
https://msdn.microsoft.com/en-us/library/azure/dn645543.aspx
-
https://azure.microsoft.com/en-us/documentation/articles/active-directory-authentication-scenarios
-
https://azure.microsoft.com/en-us/documentation/articles/active-directory-integrating-applications
-
https://azure.microsoft.com/en-us/documentation/articles/active-directory-application-manifest
Policy Set Example for Microsoft SCCM
The following new dictionary entries can be used in policies to support SCCM.
-
MDM.DaysSinceLastCheckin - Number of days since a user last checked in or synched a device with SCCM, from 1 to 365 days.
-
MDM.UserNotified - Values are Y or N. Indicates whether the user was notified that they are not registered. You can then allow limited access and redirect to registration portal, or deny access.
-
MDM.ServerType - Values are MDM for Mobile Device Manager or DM for Desktop Device Manager.
The following example Policy Set shows a set of policies to support SCCM:
|
Policy Name |
If |
Then |
|---|---|---|
|
SCCM_Comp |
Wireless_802.1X AND MDM:MDMServerName EQUALS SccmServer1 AND MDM:DeviceRegisterStatus EQUALS Registered |
PermitAccess |
|
SCCM_NonComp_Notify |
Wireless_802.1X AND MDM:MDMServerName EQUALS SccmServer1 AND MDM:DeviceCompliantStatus EQUALS NonCompliant AND MDM:UserNotified EQUALS 28 |
PermitAccess |
|
SCCM_NonComp_Days |
Wireless_802.1X AND MDM:MDMServerName EQUALS SccmServer1 AND MDM:MDMDeviceCompliantStatus EQUALS Registered AND MDM:DaysSinceLastCheckin EQUALS 28 |
SCCMRedirect |
|
SCCM_NonComp |
Wireless_802.1X AND MDM:MDMServerName EQUALS SccmServer1 AND MDM:DeviceCompliantStatus EQUALS NonCompliant AND MDM:DeviceRegisterStatus EQUALS Registered |
SCCMRedirect |
|
SCCM_UnReg_Notify |
Wireless_802.1X AND MDM:DeviceRegisterStatus EQUALS Registered AND MDM:UserNotified EQUALS Yes |
PermitAccess |
Configure the Microsoft SCCM Server for ISE
ISE communicates with the SCCM server using WMI. WMI must be configured on the Windows server running SCCM.
Note |
The user account that you use for ISE integration must either:
|
Set Permissions When AD User in the Domain Admin Group
For Windows 2008 R2,Windows 2012, and Windows 2012 R2, the Domain Admin group does not have full control on certain registry keys in the Windows operating system by default. The Active Directory admin must give the Active Directory user Full Control permissions on the following registry keys:
-
HKEY_CLASSES_ROOT\CLSID\{76A64158-CB41-11D1-8B02-00600806D9B6}
-
HKLM\Software\Classes\Wow6432Node\CLSID\{76A64158-CB41-11D1-8B02-00600806D9B6}
No registry changes are required for the following Active Directory versions:
-
Windows 2003
-
Windows 2003R2
-
Windows 2008
To grant full control, the Active Directory admin must first take ownership of the key, as shown below.
Procedure
| Step 1 |
Go to the Owner tab by right clicking the key. |
| Step 2 |
Click Permissions. |
| Step 3 |
Click Advanced. |
Required Permissions when AD User not in Domain Admin Group
For Windows 2012 R2, give the Active Directory user Full Control permissions on the following registry keys:
-
HKEY_CLASSES_ROOT\CLSID\{76A64158-CB41-11D1-8B02-00600806D9B6} -
HKLM\Software\Classes\Wow6432Node\CLSID\{76A64158-CB41-11D1-8B02-00600806D9B6}
The following permissions also are required when an Active Directory user is not in the Domain Admin group, but is in the Domain Users group:
-
Add Registry Keys to Allow ISE to Connect to the Domain Controller (see below)
These permissions are only required for the following Active Directory versions:
-
Windows 2003
-
Windows 2003R2
-
Windows 2008
-
Windows 2008 R2
-
Windows 2012
-
Windows 2012 R2
-
Windows 2016
Add Registry Keys to Allow ISE to Connect to the Domain Controller
You must manually add some registry keys to the domain controller to allow ISE to connect as a Domain User, and retrieve login authentication events. An agent is not required on the domain controllers or on any machine in the domain.
The following registry script shows the keys to add. You can copy and paste this into a text file, save the file with a .reg extension, and double click the file to make the registry changes. To add registry keys, the user must be an owner of the root key.
Windows Registry Editor Version 5.00

[HKEY_CLASSES_ROOT\CLSID\{76A64158-CB41-11D1-8B02-00600806D9B6}]
"AppID"="{76A64158-CB41-11D1-8B02-00600806D9B6}"

[HKEY_CLASSES_ROOT\AppID\{76A64158-CB41-11D1-8B02-00600806D9B6}]
"DllSurrogate"="  "

[HKEY_CLASSES_ROOT\Wow6432Node\AppID\{76A64158-CB41-11D1-8B02-00600806D9B6}]
"DllSurrogate"="  "
Make sure that you include two spaces in the value of the key DllSurrogate.
Keep the empty lines as shown in the script above, including an empty line at the end of the file.
Permissions to Use DCOM on the Domain Controller
The Active Directory user used for ISE Passive Identity services must have permissions to use DCOM (remote COM) on the Domain Controller. You can configure permissions with the dcomcnfg command line tool.
Procedure
| Step 1 |
Run the dcomcnfg tool from the command line. |
| Step 2 |
Expand Component Services. |
| Step 3 |
Expand . |
| Step 4 |
Select Action from the menu bar, click properties, and click COM Security. |
| Step 5 |
Make sure that the account that ISE will use for both Access and Launch has Allow permissions. That Active Directory user should be added to all the four options (Edit Limits and Edit Default for both Access Permissions and Launch and Activation Permissions). |
| Step 6 |
Allow all Local and Remote access for both Access Permissions and Launch and Activation Permissions. |
Set Permissions for Access to WMI Root/CIMv2 Name Space
By default, Active Directory users do not have permissions for the Execute Methods and Remote Enable. You can grant access using the wmimgmt.msc MMC console.
Procedure
| Step 1 |
Click Start
> Run and type
|
| Step 2 |
Right-click WMI Control and click Properties. |
| Step 3 |
Under the Security tab, expand Root and choose CIMV2. |
| Step 4 |
Click Security. |
| Step 5 |
Add the Active Directory user, and configure the required permissions as shown below. |
Open Firewall Ports for WMI Access
The firewall software on the Active Directory Domain Controller may block access to WMI. You can either turn the firewall off, or allow access on a specific IP (ISE IP address) to the following ports:
-
TCP 135: General RPC Port. When doing asynchronous RPC calls, the service listening on this port tells the client which port the component servicing this request is using.
-
UDP 138: Netbios Datagram Service
-
TCP 139: Netbios Session Service
-
TCP 445: SMB
Note
Cisco ISE 1.3 and above support SMB 2.0.
Higher ports are assigned dynamically or you can configure them manually. We recommend that you add %SystemRoot%\System32\dllhost.exe as a target. This program manages ports dynamically.
All firewall rules can be assigned to specific IP (ISE IP).
Configure an Authorization Profile for Redirecting Nonregistered Devices
You must configure an authorization profile in Cisco ISE to redirect nonregistered devices for each external MDM server.
Before you begin
- Ensure that you have created an MDM server definition in Cisco ISE. Only after you successfully integrate ISE with the MDM server does the MDM dictionary gets populated and you can create authorization policy using the MDM dictionary attributes.
- Configure ACLs on the Wireless LAN Controller for redirecting unregistered devices.
-
If you are using a proxy for the internet connection and MDM server is part of internal network then you have to put the MDM server name or its IP address in the Proxy-Bypass list. Choose to perform this action.
Procedure
| Step 1 |
Choose . |
| Step 2 |
Create an authorization profile for redirecting nonregistered devices that are not compliant or registered. |
| Step 3 |
Enter a name for the authorization profile that matches the MDM server name. |
| Step 4 |
Choose ACCESS_ACCEPT as the Access Type. |
| Step 5 |
Check the Web Redirection check box and choose MDM Redirect from the drop-down list. |
| Step 6 |
Enter the name of the ACL that you configured on the wireless LAN controller in the ACL field. |
| Step 7 |
Select the MDM portal from the Value drop-down list. |
| Step 8 |
Select the MDM server you want to use from the drop-down list. |
| Step 9 |
Click Submit. |
What to do next
Configure Authorization Policy Rules for the MDM Use Cases
You must configure authorization policy rules in Cisco ISE to complete the MDM configuration.
Before you begin
-
Add the MDM server certificate to the Cisco ISE certificate store.
-
Ensure that you have created the MDM server definition in Cisco ISE. Only after you successfully integrate ISE with the MDM server, the MDM dictionary gets populated and you can create authorization policy using the MDM dictionary attributes.
-
Configure ACLs on the Wireless LAN Controller for redirecting unregistered or noncompliant devices.
Procedure
| Step 1 |
Choose , and expand the policy set to view the authorization policy rules. |
| Step 2 |
Add the following rules:
|
| Step 3 |
Click Save. |
Configuring ACLs on the Wireless LAN Controller for MDM Interoperability
You must configure ACLs on the wireless LAN controller for use in authorization policy to redirect nonregistered devices and certificate provisioning. Your ACLs should be in the following sequence.
Procedure
| Step 1 |
Allow all outbound traffic from server to client. |
| Step 2 |
(Optional) Allow ICMP inbound traffic from client to server for troubleshooting. |
| Step 3 |
Allow access to MDM server for unregistered and noncompliant devices to download the MDM agent and proceed with compliance checks. |
| Step 4 |
Allow all inbound traffic from client to server to ISE for Web Portal and supplicant, and certificate provisioning flows. |
| Step 5 |
Allow inbound DNS traffic from client to server for name resolution. |
| Step 6 |
Allow inbound DHCP traffic from client to server for IP addresses. |
| Step 7 |
Deny all inbound traffic from client to server to corporate resources for redirection to ISE (as per your company policy). |
| Step 8 |
(Optional) Permit the rest of the traffic. |
Example
The following example shows the ACLs for redirecting a nonregistered device to the BYOD flow. In this example, the Cisco ISE ip address is 10.35.50.165, the internal corporate network ip address is 192.168.0.0 and 172.16.0.0 (to redirect), and the MDM server subnet is 204.8.168.0.
Wipe or Lock a Device
Cisco ISE allows you to wipe or turn on pin lock for a device that is lost. You can do this from the Endpoints page.
Procedure
| Step 1 |
Choose . |
| Step 2 |
Check the check box next to the device that you want to wipe or lock. |
| Step 3 |
From the MDM Access drop-down list, choose any one of the following options:
|
| Step 4 |
Click Yes to wipe or lock the device. |
View Mobile Device Manager Reports
Cisco ISE records all additions, updates, and deletions of MDM server definitions. You can view these event in the “Change Configuration Audit” report, which provides all the configuration changes from any system administrator for a selected time period.
Choose , and specify the period of time to display in the resulting report.
View Mobile Device Manager Logs
You can use the Message Catalog page to view Mobile Device Manager log messages. Choose . The default reporting level for MDM log entries is "INFO." You can change the reporting level to "DEBUG" or "TRACE."
 Feedback