Cisco ISE Overview
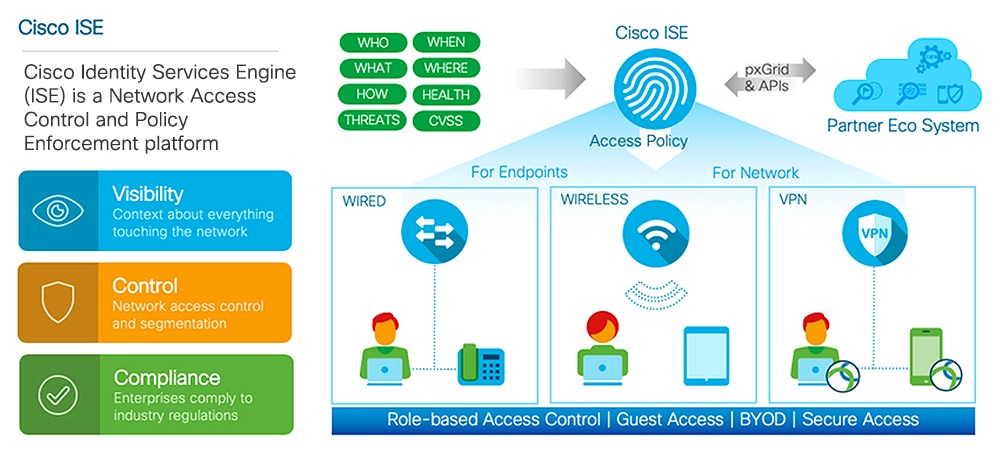
Cisco Identity Services Engine (ISE) is an identity-based network access control and policy enforcement system. It functions as a common policy engine that enables endpoint access control and network device administration for enterprises.
You can leverage Cisco ISE to ensure compliance, enhance infrastructure security, and streamline service operations.
A Cisco ISE administrator can gather real-time contextual data of a network: users and user groups (who?), device type (what?), access time (when?), access location (where?), access type (wired/wireless/VPN) (how?), and network threats and vulnerabilities.
As a Cisco ISE administrator, you will use this information to make network governance decisions. You will tie identity data to various network elements create policies that govern network access and usage.
Cisco ISE Features
Cisco ISE empowers you with the following capabilities:
-
Device Administration: Cisco ISE uses the Terminal Access Controller Access-Control System (TACACS+) security protocol to control and audit the configuration of network devices. It facilitates granular control of who can access which network device and change the associated network settings. Network devices can be configured to query Cisco ISE for authentication and authorization of device administrator actions. These devices also send accounting messages to Cisco ISE to log such actions.
-
Guest and Secure Wireless: Cisco ISE enables you to provide secure network access to visitors, contractors, consultants, and customers. You can use web-based and mobile portals to on-board guests to your company’s network and internal resources. You can define access privileges for different types of guests, and assign sponsors to create and manage guest accounts.
-
Bring Your Own Device (BYOD): Cisco ISE allows your employees and guests to securely use their personal devices on your enterprise network. The end users of the BYOD feature will use configured pathways to add their devices, and be provisioned pre-defined authentication and level of network access.
-
Asset Visibility: Cisco ISE gives you visibility and control over who and what is on your network consistently, across wireless, wired, and VPN connections. Cisco ISE uses probes and device sensors to listen to the way devices connect to the network. Its extensive profile database then classifies the device. This gives you the visibility and context you need to grant just the right level of network access.
-
Secure Wired Access: Cisco ISE uses a wide range of authentication protocols to provide network devices and endpoints a secure wired network access. These include, but are not limited to, 802.1X, RADIUS, MAB, web-based, EasyConnect, and external-agent-enabled authentication methods.
-
Segmentation: Cisco ISE uses contextual data about network devices and endpoints to facilitate network segmentation. Security group tags, access control lists, network access protocols, and policy sets defining authorization, access and authentication, are some ways in which Cisco ISE enables secure network segmentation.
-
Posture / Compliance: Cisco ISE allows you to check the compliance, also known as posture, of endpoints before allowing them to connect to your network. You can ensure that endpoints receive the appropriate posture agents for posturing services.
-
Threat Containment: If Cisco ISE detects threat or vulnerability attributes from an endpoint, adaptive network control policies are sent to the endpoint to dynamically change its access levels. Once the threat or vulnerability is evaluated and addressed, the endpoint is given back its original access policy.
-
Security Ecosystem Integrations: The pxGrid feature allows Cisco ISE to securely share context-sensitive information, policy and configuration data, and more, with connected network devices, third-party vendors, or Cisco partner systems.
Cisco ISE Administrators
Cisco ISE administrators use the admin portal to:
-
Manage deployments , help desk operations, network devices and node monitoring and troubleshooting.
-
Manage Cisco ISE services, policies, administrator accounts, and system configuration and operations.
-
Change administrator and user passwords.
Administrators can access Cisco ISE through the command-line interface (CLI) or the web-based interface. The username and password that you configure during the Cisco ISE setup is intended only for administrative access to the CLI. This role is considered to be the CLI-admin user, also known as CLI administrator. By default, the username for a CLI-admin user is admin, and the password is defined during setup. There is no default password. This CLI-admin user is known as the default admin user, and this user account cannot be deleted. However, it can be edited by other administrators (this includes options to enable, disable, or change password for this account).
You can create an administrator or you can promote an existing user to an administrator role. Administrators can also be demoted to simple network user status by disabling the corresponding administrative privileges.
Administrators can be considered as users who have local privileges to configure and operate the Cisco ISE system.
Administrators are assigned to one or more admin groups. These admin groups are pre-defined in the system for your convenience, as described in the following section.
Privileges of a CLI Administrator Versus a Web-Based Administrator
A CLI administrator can start and stop the Cisco ISE application, apply software patches and upgrades, reload or shut down the Cisco ISE appliance, and view all system and application logs. Because of the special privileges granted to a CLI administrator, we recommend that you protect the CLI administrator credentials and create web-based administrators for configuring and managing Cisco ISE deployments.
Create a New Cisco ISE Administrator
Cisco ISE administrators need accounts with specific roles assigned to it to perform specific administrative tasks. You can create administrator accounts and assign one or more roles to it based on the administrative tasks that an administrator has to perform.
You can use the Admin Users page to view, create, modify, delete, change the status, duplicate, or search for attributes of Cisco ISE administrators.
Procedure
| Step 1 |
Choose |
| Step 2 |
Choose one of the following:
|
| Step 3 |
Enter values for the Administrator fields. Supported characters for the name field are # $ ’ ( ) * + - . / @ _. |
| Step 4 |
Click Submit to create the new administrator in the Cisco ISE internal database. |
Cisco ISE Administrator Groups
Administrator groups, also called as role-based access control (RBAC) groups in Cisco ISE, contain several administrators who belong to the same administrative group. All administrators who belong to the same group share a common identity and have the same privileges. An administrator’s identity as a member of a specific administrative group can be used as a condition in authorization policies. An administrator can belong to more than one administrator group.
An administrator account with any level of access can modify or delete objects for which it has permission, on any page it has access to.
The Cisco ISE security model limits administrators to creating administrative groups that contain the same set of privileges that the administrator has, which is based on the administrative role of the user as defined in the Cisco ISE database. In this way, administrative groups form the basis for defining privileges for accessing the Cisco ISE systems.
The following table lists the admin groups that are predefined in Cisco ISE and the tasks that members from these groups can perform.
|
Admin Group Role |
Access Level |
Permissions |
Restrictions |
||
|---|---|---|---|---|---|
|
Customization Admin |
Manage sponsor, guest, and personal devices portals. |
|
|
||
|
Helpdesk Admin |
Query monitoring and troubleshooting operations |
|
Cannot create, update, or delete reports, troubleshooting flows, live authentications, or alarms. |
||
|
Identity Admin |
|
|
Cannot perform any policy management or system-level configuration tasks in Cisco ISE. |
||
|
MnT Admin |
Perform all monitoring and troubleshooting operations. |
|
Cannot perform any policy management or identity management or system-level configuration tasks in Cisco ISE. |
||
|
Network Device Admin |
Manage Cisco ISE network devices and network device repository. |
|
Cannot perform any policy management or identity management or system-level configuration tasks in Cisco ISE. |
||
|
Policy Admin |
Create and manage policies for all Cisco ISE services across the network that are related to authentication, authorization, posture, profiler, client provisioning, and work centers. |
|
Cannot perform any identity management or system-level configuration tasks in Cisco ISE. Device Administration—Access to the work center does not guarantee access to the subordinate links. |
||
|
RBAC Admin |
All tasks under the Operations menu except for the Endpoint Protection Services Adaptive Network Control, and partial access to some menu items under Administration |
|
Cannot perform any identity management or system-level configuration tasks in Cisco ISE. |
||
|
Read-Only Admin |
Read-only access to the ISE GUI. |
|
|
||
|
Super Admin |
All Cisco ISE administrative functions. The default administrator account belongs to this group. |
Create, read, update, delete, and eXecute (CRUDX) permissions on all Cisco ISE resources.
Device Administration—Access to device administration work centers. Permission for TACACS Policy Conditions and results. Network Device permissions for TACACS proxy and proxy sequences. In addition, permission to enable TACACS global protocol settings. |
|
||
|
System Admin |
All Cisco ISE configuration and maintenance tasks. |
Full access (read and write permissions) to perform all activities under the Operations tab and partial access to some menu items under the Administration tab.
|
Cannot perform any policy management or system-level configuration tasks in Cisco ISE. |
||
|
External RESTful Services (ERS) Admin |
Full access to all ERS API requests such as GET, POST, DELETE, PUT |
|
The role is meant only for ERS authorization supporting Internal Users, Identity Groups, Endpoints, Endpoint Groups, and SGT |
||
|
External RESTful Services (ERS) Operator |
Read-only access to ERS API, only GET |
|
The role is meant only for ERS authorization supporting Internal Users, Identity Groups, Endpoints, Endpoint Groups, and SGT |
||
|
TACACS+ Admin |
Full access |
Access to the:
|
— |
Create Admin Groups
The Admin Groups page allows you to view, create, modify, delete, duplicate, or filter Cisco ISE network admin groups.
Before you begin
To configure an external administrator group type, you must have already specified one or more external identity stores.
Procedure
| Step 1 |
Choose . |
| Step 2 |
Click Add, and enter a name and description. Supported special characters for the Name field are: space, # $ & ‘ ( ) * + - . / @ _ . |
| Step 3 |
Specify the Type of administrator group you are configuring:
|
| Step 4 |
Click Add in the Member Users area to add users to this Admin Group. |
| Step 5 |
Click Submit. |
To delete users from the Admin Group, check the check box corresponding to the user that you want to delete, and click Remove.
 Note |
If an internal user is configured with an external identity store for authentication, while logging in to the ISE Admin portal, the internal user must select the external identity store as the Identity Source. Authentication will fail if Internal Identity Source is selected. |
Administrative Access to Cisco ISE
Cisco ISE administrators can perform various administrative tasks based on the administrative group to which they belong. These administrative tasks are critical. Restrict administrative access to users who are authorized to administer Cisco ISE in your network.
Cisco ISE allows you to control administrative access to its web interface through the following options:
Administrative Access Methods
You can connect to ISE servers in several ways. The PAN runs the Administrators portal, which requires the admin password to log in. Other ISE persona servers are accessible by SSH or the console, where you run the CLI. This section describes the process and password options available for each connection type.
-
Admin password: The ISE Admin user that you created during installation is configured to time out in 45 days by default. You can prevent that by turning off password time on . Chose the Password Policy tab, and uncheck Administrative passwords expire under Password Lifetime.
If you don’t do this, and the password expires, you can reset the Admin password in the CLI. The CLI command is application reset-passwd. You can reset the Admin menu by connecting to the console to access the CLI, or by rebooting the ISE image file to access the boot options menu.
-
CLI password: The CLI password is specified during installation. If you have a problem logging in to the CLI because of an invalid password, you can reset the CLI password. Connect to the console and run the password CLI command to rest the password. See the ISE CLI Reference for more information.
-
SSH access to the CLI: You either enable SSH access during installation, or after, using the CLI command service sshd. You can also force SSH connections to use a key. Note that when you do that, SSH connections to all network devices will also use that key, see the SSH Key Validation section in Cisco ISE Admin Guide: Segmentation . You can force the SSH key to use the Diffie-Hellman Algorithm. ECDSA keys are not supported for SSH keys.
Role-Based Admin Access Control in Cisco ISE
Cisco ISE provides role-based access control (RBAC) policies that ensure security by restricting administrative privileges. RBAC policies are associated with default admin groups to define roles and permissions. A standard set of permissions (for menu as well as data access) is paired with each of the predefined admin groups, and is thereby aligned with the associated role and job function.
Some features in the user interface require certain permissions for their use. If a feature is unavailable, or you are not allowed to perform a specific task, your admin group may not have the necessary permissions to perform the task that utilizes the feature.
Regardless of the level of access, any administrator account can modify or delete objects for which it has permission, on any page that it can access.
Note |
Only the system-defined Admin users with SuperAdmin or ReadOnlyAdmin permissions can see identity-based users who are not part of any user group. Any admins you create with the same with the same permissions cannot see those users. |
Role-Based Permissions
Cisco ISE allows you to configure permissions at the menu and data levels, called the menu access and data access permissions.
The menu access permissions allow you to show or hide the menu and submenu items of the Cisco ISE administrative interface. This feature lets you create permissions so that you can restrict or enable access at the menu level.
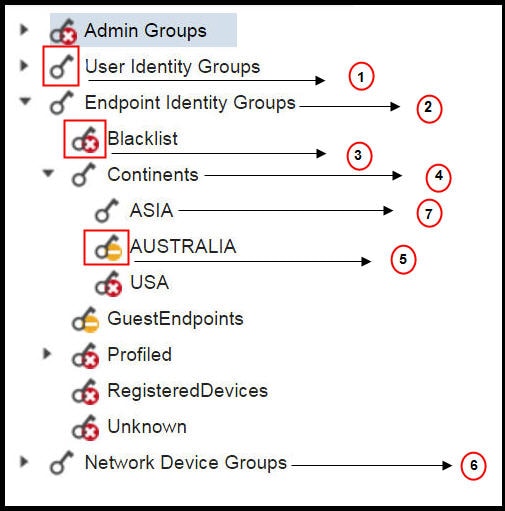
The data access permissions allow you to grant read/write, read only, or no access to the following data in the Cisco ISE interface: Admin Groups, User Identity Groups, Endpoint Identity Groups, Locations, and Device Types.
RBAC Policies
RBAC policies determine if an administrator can be granted a specific type of access to a menu item or other identity group data elements. You can grant or deny access to a menu item or identity group data element to an administrator based on the admin group by using RBAC policies. When administrators log in to the Admin portal, they can access menus and data that are based on the policies and permissions defined for the admin groups with which they are associated.
RBAC policies map admin groups to menu access and data access permissions. For example, you can prevent a network administrator from viewing the Admin Access operations menu and the policy data elements. This can be achieved by creating a custom RBAC policy for the admin group with which the network administrator is associated.
Note |
If you are using customized RBAC policies for admin access, ensure that you provide all relevant menu access for a given data access. For example, to add or delete endpoints with data access of Identity or Policy Admin, you must provide menu access to Work Center > Network Access and Administration > Identity Management. |
Default Menu Access Permissions
Cisco ISE provides an out of the box set of permissions that are associated with a set of predefined admin groups. Having predefined admin group permissions allow you to set permissions so that a member of any admin group can have full or limited access to the menu items within the administrative interface (known as menu access) and to delegate an admin group to use the data access elements of other admin groups (known as data access). These permissions are reusable entities that can be further used to formulate RBAC policies for various admin groups. Cisco ISE provides a set of system defined menu access permissions that are already used in the default RBAC policies. Apart from the predefined menu access permissions, Cisco ISE also allows you to create custom menu access permissions that you can use in RBAC policies. The key icon represents menu access privileges for the menus and submenus and the key with a close icon represents no access for different RBAC groups.
Note |
For Super Admin User, all the menu items are available. For other Admin Users, all the Menu Items in this column are available for Standalone deployment and Primary Node in Distributed Deployment. For Secondary Node in Distributed Deployment, the Menu Items under the Administration tab are not available. |
Configure Menu Access Permissions
Cisco ISE allows you to create custom menu access permissions that you can map to an RBAC policy. Depending on the role of the administrators, you can allow them to access only specific menu options.
Procedure
| Step 1 |
Choose . |
| Step 2 |
Click Add, and enter values for the Name and Description fields.
|
| Step 3 |
Click Submit. |
Prerequisites for Granting Data Access Permissions
When an RBAC admin has Full Access permission to an object (for example, Employee in the User Identity Groups data type), the admin can view, add, update, and delete users who belong to that group. Ensure that the admin has menu access permission granted for the Users page (Administration > Identity Management > Identities > Users). This is applicable for Network Devices and Endpoints objects (based on the permissions granted to the Network Device Groups and Endpoint Identity Groups data types).
You cannot enable or restrict data access for network devices that belong to the default network device group objects—All Device Types and All Locations. All network devices are displayed if Full Access data permission is granted to an object created under these default network device group objects. Therefore, it is recommended that you create a separate hierarchy for the Network Device Groups data type, which is independent of the default network device group objects. You should assign the network device objects to the newly created Network Devices Groups to create restricted access.
Note |
You can enable or restrict data access permissions only for the User Identity Groups, Network Device Groups, and Endpoint Identity Groups. It is not applicable for Admin Groups. |
Default Data Access Permissions
Cisco ISE comes with a set of predefined data access permissions. The data access permissions enable multiple administrators to have the data access permissions within the same user population. You can enable or restrict the use of data access permissions to one or more admin groups. This process allows autonomous delegated control to administrators of one admin group to reuse data access permissions of the chosen admin groups through selective association. Data access permissions range from full access to no access for viewing selected admin groups or the network device groups. RBAC policies are defined based on the administrator (RBAC) group, menu access, and data access permissions. You first create menu access and data access permissions and then create an RBAC policy that associates an admin group with the corresponding menu access and data access permissions. The RBAC policy takes the form:If admin_group=Super Admin then assign SuperAdmin Menu Access permission + SuperAdmin Data Access permission. Apart from the predefined data access permissions, Cisco ISE also allows you to create custom data access permissions that you can associate with an RBAC policy.
There are three data access permissions namely, Full Access, No Access, and Read Only access that can be granted to admin groups.
-
Administration > Admin Access > Administrators > Admin Groups
-
Administration > Groups > User Identity Group
-
Administration > Groups > Endpoint Identity Groups
-
Network Visibility > Endpoints
-
Administration > Network Resources > Network Device Groups
-
Administration > Network Resources > Network Devices
-
Administration > Identity Management > Identities
-
Administration > Identity Management > Groups > User Identity Groups
-
Administration > Identity Management > Groups > Endpoint Identity Groups
If you have Read Only permission on a data type (for example, Endpoint Identity Groups), you will not be able to perform CRUD operations on the data type. If you have Read Only permission on an object (for example, GuestEndpoints), you cannot perform edit/delete operations on the object.
|
Label |
Description |
|---|---|
|
1 |
Denotes full access for the User Identity Groups data type. |
|
2 |
Denotes that Endpoint Identity Groups derives the maximum permission (full access) that is granted to its child (Asia). |
|
3 |
Denotes no access for the object (Blacklist). |
|
4 |
Denotes that the parent (Continents) derives the maximum access permission granted to its child (Asia). |
|
5 |
Denotes Read Only access for the object (Australia). |
|
6 |
Denotes that when Full Access is granted to the parent (Network Device Groups), it results in the children automatically inheriting permissions. |
|
7 |
Denotes that when Full Access is granted to the parent (Asia), it results in the objects inheriting the Full Access permission, unless permissions are explicitly granted to the objects. |
Configure Data Access Permissions
Cisco ISE allows you to create custom data access permissions that you can map to an RBAC policy. Based on the role of the administrator, you can choose to provide them access only to select data.
Procedure
| Step 1 |
Choose . |
| Step 2 |
Choose. |
| Step 3 |
Click Add, and enter values for the Name and Description fields.
|
| Step 4 |
Click Save. |
The Read-Only Admin Policy
The default Read-Only Admin policy is available in the Administration > System > Admin Access > Authorization > Policy page. This policy is available for both new installation and upgraded deployment. The Read-Only Admin policy is applicable to the Read-Only Admin group. By default, Super Admin Menu Access and Read-Only Data Access permissions are granted to Read-Only administrators.
Note |
The default read-only policy is mapped to the Read Only Admin group. You cannot create custom RBAC policy using the Read Only Admin group. |
Customize Menu Access for the Read-Only Administrator
By default, Read-Only Administrators are given Super Admin Menu Access and Read Only Admin Data Access. However, if the Super Admin requires that the Read-Only Administrator view only the Home and Administration tabs, the Super Admin can create a custom menu access or customize the default Permissions to, for example, MnT Admin Menu Access or Policy Admin Menu Access. The Super Admin cannot modify the Read Only Data Access mapped to the Read Only Admin Policy.
Procedure
| Step 1 |
Log in to the Admin Portal as a Super Admin. |
||
| Step 2 |
Navigate to the page. |
||
| Step 3 |
Click Add and enter a Name (for example, MyMenu) and Description. |
||
| Step 4 |
In the Menu Access Privileges section, you can select the Show/Hide option to choose the required options (for example, Home and Administration tabs) that should be displayed for the Read-Only Administrator. |
||
| Step 5 |
Click Submit. The custom menu access permission is displayed in the Permissions drop-down correspoinding to the Read-Only Admin Policy displayed in the Administration > System > Admin Access > Authorization
> Policy page.
|
||
| Step 6 |
Navigate to the Administration > System > Admin Access > Authorization > Policy page. |
||
| Step 7 |
Click the Permissions drop-down corresponding to the Read-Only Admin Policy. |
||
| Step 8 |
Select a default (MnT Admin Menu Access) or custom menu access permission (MyMenu) that you have created in the page. |
||
| Step 9 |
Click Save. You will encounter an error if you choose Data Access permissions for the Read-Only Admin policy.
|
 Feedback