Endpoint Profiling
Profiled Endpoints on the Network
The Profiler service assists in identifying, locating, and determining the capabilities of all endpoints on your network (known as identities in Cisco ISE), regardless of their device types, to ensure and maintain appropriate access to your enterprise network. The Cisco ISE Profiler function uses a number of probes to collect attributes for all endpoints on your network, and pass them to the Profiler analyzer, where the known endpoints are classified according to their associated policies and identity groups.
The Profiler Feed service allows administrators to retrieve new and updated endpoint profiling policies and the updated OUI database as a feed from a designated Cisco feed server through a subscription in to Cisco ISE.
Profiler Condition Settings
The following table describes the fields in the Profiler Condition window. The navigation path for this window is .
|
Field Name |
Usage Guidelines |
|---|---|
|
Name |
Name of the profiler condition. |
|
Description |
Description of the profiler condition. |
|
Type |
Choose any one of the predefined types. |
|
Attribute Name |
Choose an attribute on which to base the profiler condition. |
|
Operator |
Choose an operator. |
|
Attribute Value |
Enter the value for the attribute that you have chosen. For Attribute Names that contain pre-defined Attribute Values, this option displays a drop-down list with the pre-defined values, and you can choose a value. |
|
System Type |
Profiling conditions can be any one of the following types:
|
Cisco ISE Profiling Service
The profiling service in Cisco Identity Services Engine (ISE) identifies the devices that connect to your network and their location. The endpoints are profiled based on the endpoint profiling policies configured in Cisco ISE. Cisco ISE then grants permission to the endpoints to access the resources in your network based on the result of the policy evaluation.
The profiling service:
-
Facilitates an efficient and effective deployment and ongoing management of authentication by using IEEE standard 802.1X port-based authentication access control, MAC Authentication Bypass (MAB) authentication, and Network Admission Control (NAC) for any enterprise network of varying scale and complexity.
-
Identifies, locates, and determines the capabilities of all of the attached network endpoints regardless of endpoint types.
-
Protects against inadvertently denying access to some endpoints.
Profiler Work Center
The Profiler Work Center menu (Work Centers > Profiler) contains all the profiler pages, which acts as a single start point for ISE administrators. The Profiler Work Center menu contains the following options: Overview, Ext ID Stores, Network Devices, Endpoint Classification, Node Config, Feeds, Manual Scans, Policy Elements, Profiling Policies, Authorization Policy, Troubleshoot, Reports, Settings, and Dictionaries.
Profiler Dashboard
The Profiler dashboard (Work Centers > Profiler > Endpoint Classification) is a centralized monitoring tool for the profiles, endpoints, and assets in your network. The dashboard represents data in both graphical and table formats. The Profiles dashlet displays the logical and endpoint profiles that are currently active in the network. The Endpoints dashlet displays the identity group, PSNs, OS types of the endpoints that connect to your network. The Assets dashlet displays flows such as Guest, BYOD, and Corporate. The table displays the various endpoints that are connected and you can also add new endpoints.
Endpoint Inventory Using Profiling Service
You can use the profiling service to discover, locate, and determine the capabilities of all the endpoints connected to your network. You can ensure and maintain appropriate access of endpoints to the enterprise network, regardless of their device types.
The profiling service collects attributes of endpoints from the network devices and the network, classifies endpoints into a specific group according to their profiles, and stores endpoints with their matched profiles in the Cisco ISE database. All the attributes that are handled by the profiling service need to be defined in the profiler dictionaries.
The profiling service identifies each endpoint on your network, and groups those endpoints according to their profiles to an existing endpoint identity group in the system, or to a new group that you can create in the system. By grouping endpoints, and applying endpoint profiling policies to the endpoint identity group, you can determine the mapping of endpoints to the corresponding endpoint profiling policies.
Cisco ISE Profiler Queue Limit Configuration
Cisco ISE profiler collects a significant amount of endpoint data from the network in a short period of time. It causes Java Virtual Machine (JVM) memory utilization to go up due to accumulated backlog when some of the slower Cisco ISE components process the data generated by the profiler, which results in performance degradation and stability issues.
To ensure that the profiler does not increase the JVM memory utilization and prevent JVM to go out of memory and restart, limits are applied to the following internal components of the profiler:
-
Endpoint Cache—Internal cache is limited in size that has to be purged periodically (based on least recently used strategy) when the size exceeds the limit.
-
Forwarder—The main ingress queue of endpoint information collected by the profiler.
-
Event Handler—An internal queue that disconnects a fast component, which feeds data to a slower processing component (typically related to a database query).
Endpoint Cache
-
maxEndPointsInLocalDb = 100000 (endpoint objects in cache)
-
endPointsPurgeIntervalSec = 300 (endpoint cache purge thread interval in seconds)
-
numberOfProfilingThreads = 8 (number of threads)
The limit is applicable to all profiler internal event handlers. A monitoring alarm is triggered when queue size limit is reached.
Cisco ISE Profiler Queue Size Limits
-
forwarderQueueSize = 5000 (endpoint collection events)
-
eventHandlerQueueSize = 10000 (events)
Event Handlers
-
NetworkDeviceEventHandler—For network device events, in addition to filtering duplicate Network Access Device (NAD) IP addresses, which are already cached.
-
ARPCacheEventHandler—For ARP Cache events.
Configure Profiling Service in Cisco ISE Nodes
You can configure the profiling service that provides you a contextual inventory of all the endpoints that are using your network resources in any Cisco ISE-enabled network.
You can configure the profiling service to run on a single Cisco ISE node that assumes all Administration, Monitoring, and Policy Service personas by default.
In a distributed deployment, the profiling service runs only on Cisco ISE nodes that assume the Policy Service persona and does not run on other Cisco ISE nodes that assume the Administration and Monitoring personas.
Procedure
| Step 1 |
Choose . |
| Step 2 |
Choose a Cisco ISE node that assumes the Policy Service persona. |
| Step 3 |
Click Edit in the Deployment Nodes page. |
| Step 4 |
On the General Settings tab, check the Policy Service check box. If the Policy Service check box is unchecked, both the session services and the profiling service check boxes are disabled. |
| Step 5 |
Perform the following tasks:
|
| Step 6 |
Click Save to save the node configuration. |
Network Probes Used by Profiling Service
Network probe is a method used to collect an attribute or a set of attributes from an endpoint on your network. The probe allows you to create or update endpoints with their matched profile in the Cisco ISE database.
Cisco ISE can profile devices using a number of network probes that analyze the behavior of devices on the network and determine the type of the device. Network probes help you to gain more network visibility.
IP Address and MAC Address Binding
NetFlow Probe
Cisco ISE profiler implements Cisco IOS NetFlow Version 9. We recommend using NetFlow Version 9, which has additional functionality needed to enhance the profiler to support the Cisco ISE profiling service.
You can collect NetFlow Version 9 attributes from the NetFlow-enabled network access devices to create an endpoint, or update an existing endpoint in the Cisco ISE database. You can configure NetFlow Version 9 to attach the source and destination MAC addresses of endpoints and update them. You can also create a dictionary of NetFlow attributes to support NetFlow-based profiling.
For more information on the NetFlow Version 9 Record Format, see Table 6, “NetFlow Version 9 Field Type Definitions” of the NetFlow Version 9 Flow-Record Format document.
In addition, Cisco ISE supports NetFlow versions earlier than Version 5. If you use NetFlow Version 5 in your network, then you can use Version 5 only on the primary network access device (NAD) at the access layer because it will not work anywhere else.
Cisco IOS NetFlow Version 5 packets do not contain MAC addresses of endpoints. The attributes that are collected from NetFlow Version 5 cannot be directly added to the Cisco ISE database. You can discover endpoints by using their IP addresses, and append the NetFlow Version 5 attributes to endpoints, which can be done by combining IP addresses of the network access devices and IP addresses obtained from the NetFlow Version 5 attributes. However, these endpoints must have been previously discovered with the RADIUS or SNMP probe.
The MAC address is not a part of IP flows in earlier versions of NetFlow Version 5, which requires you to profile endpoints with their IP addresses by correlating the attributes information collected from the network access devices in the endpoints cache.
For more information on the NetFlow Version 5 Record Format, see Table 2, “Cisco IOS NetFlow Flow Record and Export Format Content Information” of the NetFlow Services Solutions Guide.
DHCP Probe
The Dynamic Host Configuration Protocol probe in your Cisco ISE deployment, when enabled, allows the Cisco ISE profiling service to reprofile endpoints based only on new requests of INIT-REBOOT, and SELECTING message types. Though other DHCP message types such as RENEWING and REBINDING are processed, they are not used for profiling endpoints. Any attribute parsed out of DHCP packets is mapped to endpoint attributes.
DHCPREQUEST Message Generated During INIT-REBOOT State
If the DHCP client checks to verify a previously allocated and cached configuration, then the client must not fill in the Server identifier (server-ip) option. Instead it should fill in the Requested IP address (requested-ip) option with the previously assigned IP address, and fill in the Client IP Address (ciaddr) field with zero in its DHCPREQUEST message. The DHCP server will then send a DHCPNAK message to the client if the Requested IP address is incorrect or the client is located in the wrong network.
DHCPREQUEST Message Generated During SELECTING State
The DHCP client inserts the IP address of the selected DHCP server in the Server identifier (server-ip) option, fills in the Requested IP address (requested-ip) option with the value of the Your IP Address (yiaddr) field from the chosen DHCPOFFER by the client, and fills in the “ciaddr” field with zero.
|
— |
INIT-REBOOT |
SELECTING |
RENEWING |
REBINDING |
|---|---|---|---|---|
|
broadcast/unicast |
broadcast |
broadcast |
unicast |
broadcast |
|
server-ip |
MUST NOT |
MUST |
MUST NOT |
MUST NOT |
|
requested-ip |
MUST |
MUST |
MUST NOT |
MUST NOT |
|
ciaddr |
zero |
zero |
IP address |
IP address |
Wireless LAN Controller Configuration in DHCP Bridging Mode
DHCP SPAN Probe
The DHCP Switched Port Analyzer (SPAN) probe, when initialized in a Cisco ISE node, listens to network traffic, which are coming from network access devices on a specific interface. You need to configure network access devices to forward DHCP SPAN packets to the Cisco ISE profiler from the DHCP servers. The profiler receives these DHCP SPAN packets and parses them to capture the attributes of an endpoint, which can be used for profiling endpoints.
For example,
switch(config)# monitor session 1 source interface Gi1/0/4
switch(config)# monitor session 1 destination interface Gi1/0/2
HTTP Probe
In HTTP probe, the identification string is transmitted in an HTTP request-header field User-Agent, which is an attribute that can be used to create a profiling condition of IP type, and to check the web browser information. The profiler captures the web browser information from the User-Agent attribute along with other HTTP attributes from the request messages, and adds them to the list of endpoint attributes.
Cisco ISE listens to communication from the web browsers on both port 80 and port 8080. Cisco ISE provides many default profiles, which are built in to the system to identify endpoints based on the User-Agent attribute.
HTTP SPAN Probe
The HTTP probe in your Cisco ISE deployment, when enabled with the Switched Port Analyzer (SPAN) probe, allows the profiler to capture HTTP packets from the specified interfaces. You can use the SPAN capability on port 80, where the Cisco ISE server listens to communication from the web browsers.
HTTP SPAN collects HTTP attributes of an HTTP request-header message along with the IP addresses in the IP header (L3 header), which can be associated to an endpoint based on the MAC address of an endpoint in the L2 header. This information is useful for identifying different mobile and portable IP-enabled devices such as Apple devices, and computers with different operating systems. Identifying different mobile and portable IP-enabled devices is made more reliable because the Cisco ISE server redirects captures during a guest login or client provisioning download. This allows the profiler to collect the User-Agent attribute and other HTTP attributes, from the request messages and then identify devices such as Apple devices.
Unable to Collect HTTP Attributes in Cisco ISE Running on VMware
RADIUS Probe
You can configure Cisco ISE for authentication with RADIUS, where you can define a shared secret that you can use in client-server transactions. With the RADIUS request and response messages that are received from the RADIUS servers, the profiler can collect RADIUS attributes, which can be used for profiling endpoints.
Cisco ISE can function as a RADIUS server, and a RADIUS proxy client to other RADIUS servers. When it acts as a proxy client, it uses external RADIUS servers to process RADIUS requests and response messages.
 Note |
When an accounting stop is received, it triggers the Cisco ISE to reprofile the corresponding endpoint if it was originally profiled with an IP address. Therefore if you have custom profiles for endpoints profiled with IP addresses, the only way to meet the total certainty factor for these profiles is to match on the corresponding IP address. |
Network Scan (NMAP) Probe
About the NMAP Probe
Cisco ISE enables you to detect devices in a subnet by using the NMAP security scanner. You enable the NMAP probe on the Policy Service node that is enabled to run the profiling service. You use the results from that probe in an endpoint profiling policy.
Each NMAP manual subnet scan has a unique numeric ID that is used to update an endpoint source information with that scan ID. Upon detection of endpoints, the endpoint source information can also be updated to indicate that it is discovered by the Network Scan probe.
The NMAP manual subnet scan is useful for detecting devices such as printers with a static IP address assigned to them that are connected constantly to the Cisco ISE network, and therefore these devices cannot be discovered by other probes.
NMAP Scan Limitations
Scanning a subnet is highly resource intensive. Scanning a subnet is lengthy process that depends on the size and density of the subnet. Number of active scans is always restricted to one scan, which means that you can scan only a single subnet at a time. You can cancel a subnet scan at any time while the subnet scan is in progress. You can use the Click to see latest scan results link to view the most recent network scan results that are stored in .
Manual NMAP Scan
The following NMAP command scans a subnet and sends the output to nmapSubnet.log:
nmap -O -sU -p U:161,162 -oN /opt/CSCOcpm/logs/nmapSubnet.log
--append-output -oX - <subnet>| -O | Enables OS detection |
| -sU | UDP scan |
| -p <port ranges> | Scans only specified ports. For example, U:161, 162 |
| oN | Normal output |
| oX | XML output |
SNMP Read Only Community Strings for NMAP Manual Subnet Scan
Manual NMAP Scan Results
The most recent network scan results are stored in Work Centers > Profiler > Manual Scans > Manual NMAP Scan Results. The Manaul NMAP Scan Results page displays only the most recent endpoints that are detected, along with their associated endpoint profiles, their MAC addresses, and their static assignment status as the result of a manual network scan you perform on any subnet. This page allows you to edit points that are detected from the endpoint subnet for better classification, if required.
Cisco ISE allows you to perform the manual network scan from the Policy Service nodes that are enabled to run the profiling service. You must choose the Policy Service node from the primary Administration ISE node user interface in your deployment to run the manual network scan from the Policy Service node. During the manual network scan on any subnet, the Network Scan probe detects endpoints on the specified subnet, their operating systems, and check UDP ports 161 and 162 for an SNMP service.
Additional Information
Given below is additional information related to the manual NMAP scan results:
-
To detect unknown endpoints, NMAP should be able to learn the IP/MAC binding via NMAP or a supporting SNMP scan.
-
ISE learns IP/MAC binding of known endpoints via Radius authentication or DHCP profiling.
-
The IP/MAC bindings are not replicated across PSN nodes in a deployment. Therefore, you must trigger the manual scan from the PSN, which has the IP/MAC binding in its local database (for example, the PSN against which a mac address was last authenticated with).
-
The NMAP scan results do not display any information related to an endpoint that NMAP had previously scanned, manually or automatically.
DNS Probe
The Domain Name Service (DNS) probe in your Cisco ISE deployment allows the profiler to lookup an endpoint and get the fully qualified domain name (FQDN). After an endpoint is detected in your Cisco ISE-enabled network, a list of endpoint attributes is collected from the NetFlow, DHCP, DHCP SPAN, HTTP, RADIUS, or SNMP probes.
When you deploy Cisco ISE in a standalone or in a distributed environment for the first time, you are prompted to run the setup utility to configure the Cisco ISE appliance. When you run the setup utility, you will configure the Domain Name System (DNS) domain and the primary nameserver (primary DNS server), where you can configure one or more nameservers during setup. You can also change or add DNS nameservers later after deploying Cisco ISE using the CLI commands.
DNS FQDN Lookup
-
The dhcp-requested-address attribute—An attribute collected by the DHCP and DHCP SPAN probes.
-
The SourceIP attribute—An attribute collected by the HTTP probe
-
The Framed-IP-Address attribute—An attribute collected by the RADIUS probe
-
The cdpCacheAddress attribute—An attribute collected by the SNMP probe
Configure Call Station ID Type in the WLC Web Interface
You can use the WLC web interface to configure Call Station ID Type information. You can go to the Security tab of the WLC web interface to configure the calling station ID in the RADIUS Authentication Servers page. The MAC Delimiter field is set to Colon by default in the WLC user interface.
For more information on how to configure in the WLC web interface, see Chapter 6, “Configuring Security Solutions” in the Cisco Wireless LAN Controller Configuration Guide, Release 7.2.
For more information on how to configure in the WLC CLI using the config radius callStationIdType command, see Chapter 2, “Controller Commands” in the Cisco Wireless LAN Controller Command Reference Guide, Release 7.2.
Procedure
| Step 1 |
Log in to your Wireless LAN Controller user interface. |
| Step 2 |
Click Security. |
| Step 3 |
Expand AAA, and then choose . |
| Step 4 |
Choose System MAC Address from the Call Station ID Type drop-down list. |
| Step 5 |
Check the AES Key Wrap check box when you run Cisco ISE in FIPS mode. |
| Step 6 |
Choose Colon from the MAC Delimeter drop-down list. |
SNMP Query Probe
In addition to configuring the SNMP Query probe in the Edit Node page, you must configure other Simple Management Protocol settings in the following location: .
You can configure SNMP settings in the new network access devices (NADs) in the Network Devices list page. The polling interval that you specify in the SNMP query probe or in the SNMP settings in the network access devices query NADs at regular intervals.
You can turn on and turn off SNMP querying for specific NADs based on the following configurations:
-
SNMP query on Link up and New MAC notification turned on or turned off
-
SNMP query on Link up and New MAC notification turned on or turned off for Cisco Discovery Protocol information
-
SNMP query timer for once an hour for each switch by default
For an iDevice, and other mobile devices that do not support SNMP, the MAC address can be discovered by the ARP table, which can be queried from the network access device by an SNMP Query probe.
Cisco Discovery Protocol Support with SNMP Query
Link Layer Discovery Protocol Support with SNMP Query
| Feature | Feature |
|---|---|
| LLDP global state | Disabled |
| LLDP holdtime (before discarding) | 120 seconds |
| LLDP timer (packet update frequency) | 30 seconds |
| LLDP reinitialization delay | 2 seconds |
| LLDP tlv-select | Enabled to send and receive all TLVs. |
| LLDP interface state | Enabled |
| LLDP receive | Enabled |
| LLDP transmit | Enabled |
| LLDP med-tlv-select | Enabled to send all LLDP-MED TLVs |
CDP and LLDP Capability Codes Displayed in a Single Character
Example 1
lldpCacheCapabilities S
lldpCapabilitiesMapSupported S
Example 2
lldpCacheCapabilities B;T
lldpCapabilitiesMapSupported B;T
Example 3
Switch#show cdp neighbors
Capability Codes:
R - Router, T - Trans Bridge, B - Source Route Bridge, S - Switch, H - Host, I - IGMP,
r - Repeater, P - Phone, D - Remote, C - CVTA, M - Two-port Mac Relay
...
Switch#

Switch#show lldp neighbors
Capability codes:
(R) Router, (B) Bridge, (T) Telephone, (C) DOCSIS Cable Device
(W) WLAN Access Point, (P) Repeater, (S) Station, (O) Other
...
Switch#
SNMP Trap Probe
The SNMP Trap receives information from the specific network access devices that support MAC notification, linkup, linkdown, and informs. The SNMP Trap probe receives information from the specific network access devices when ports come up or go down and endpoints disconnect from or connect to your network, which results in the information received that is not sufficient to create endpoints in Cisco ISE.
For SNMP Trap to be fully functional and create endpoints, you must enable SNMP Query so that the SNMP Query probe triggers a poll event on the particular port of the network access device when a trap is received. To make this feature fully functional you should configure the network access device and SNMP Trap.
Note |
Cisco ISE does not support SNMP Traps that are received from the Wireless LAN Controllers (WLCs) and Access Points (APs). |
Active Directory Probe
The AD probe:
-
Improves the fidelity of OS information for Windows endpoints. Microsoft AD tracks detailed OS information for AD-joined computers including version and service pack levels. The AD probe retrieves this information directly using the AD Runtime connector to provide a highly reliable source of client OS information.
-
Helps distinguish between corporate and non-corporate assets. A basic but important attribute available to the AD probe is whether an endpoint exists in AD. This information can be used to classify an endpoint contained in the AD as a managed device or corporate asset.
You can enable the AD probe under the page. When this probe is enabled, ISE fetches the AD attributes for a new endpoint as soon as it receives a hostname. The hostname is typically learned from the DHCP or DNS probes. Once successfully retrieved, ISE does not attempt to query AD again for the same endpoint until a the rescan timer expires. This is to limit the load on AD for attribute queries. The rescan timer is configurable in the Days Before Rescan field (Administration > System > Deployment > Profiling Configuration > Active Directory). If there is additional profiling activity on the endpoint, the AD is queried again.
-
AD-Host-Exists
-
AD-Join-Point
-
AD-Operating-System
-
AD-OS-Version
-
AD-Service-Pack
Configure Probes per Cisco ISE Node
You can configure one or more probes on the Profiling Configuration tab per Cisco ISE node in your deployment that assumes the Policy Service persona, which could be:
-
A standalone node—If you have deployed Cisco ISE on a single node that assumes all Administration, Monitoring, and Policy Service personas by default.
-
Multiple nodes—If you have registered more than one node in your deployment that assume Policy Service persona.
Before you begin
You can configure the probes per Cisco ISE node only from the Administration node, which is unavailable on the secondary Administration node in a distributed deployment.
Procedure
| Step 1 |
Choose . |
| Step 2 |
Choose a Cisco ISE node that assumes the Policy Service persona. |
| Step 3 |
Click Edit in the Deployment Nodes page. |
| Step 4 |
On the General Settings tab, check the Policy Service check box. If the Policy Service check box is unchecked, both the session services and the profiling service check boxes are disabled. |
| Step 5 |
Check the Enable Profiling Services check box. |
| Step 6 |
Click the Profiling Configuration tab. |
| Step 7 |
Configure the values for each probe. |
| Step 8 |
Click Save to save the probe configuration. |
Setup CoA, SNMP RO Community, and Endpoint Attribute Filter
Cisco ISE allows a global configuration to issue a Change of Authorization (CoA) in the Profiler Configuration page that enables the profiling service with more control over endpoints that are already authenticated.
In addition, you can configure additional SNMP Read Only community strings separated by a comma for the NMAP manual network scan in the Profiler Configuration page. The SNMP RO community strings are used in the same order as they appear in the Current custom SNMP community strings field.
You can also configure endpoint attribute filtering in the Profiler Configuration page.
Procedure
| Step 1 |
Choose . |
||
| Step 2 |
Choose one of the following settings to configure the CoA type:
|
||
| Step 3 |
Enter new SNMP community strings separated by a comma for the NMAP manual network scan in the Change custom SNMP community strings field, and re-enter the strings in the Confirm custom SNMP community strings field for confirmation. |
||
| Step 4 |
Check the Endpoint Attribute Filter check box to enable endpoint attribute filtering. |
||
| Step 5 |
Check the Enable Probe Data Publisher check box if you want Cisco ISE to publish endpoint probe data to pxGrid subscribers that need this data to classify endpoints onboarding on ISE. The pxGrid subscriber can pull the endpoint records from Cisco ISE using bulk download during initial deployment phase. Cisco ISE sends the endpoint records to the pxGrid subscriber whenever they are updated in PAN. This option is disabled by default. When you enable this option, ensure that the pxGrid persona is enabled in your deployment.
|
||
| Step 6 |
Click Save. |
Global Configuration of Change of Authorization for Authenticated Endpoints
You can use the global configuration option to disable change of authorization (CoA) by using the default No CoA option or enable CoA by using port bounce and reauthentication options. If you have configured Port Bounce for CoA in Cisco ISE, the profiling service may still issue other CoAs as described in the “CoA Exemptions” section.
You can use the RADIUS probe or the Monitoring persona REST API to authenticate the endpoints. You can enable the RADIUS probe, which allows faster performance. If you have enabled CoA, then we recommend that you enable the RADIUS probe in conjunction with your CoA configuration in the Cisco ISE application for faster performance. The profiling service can then issue an appropriate CoA for endpoints by using the RADIUS attributes that are collected.
If you have disabled the RADIUS probe in the Cisco ISE application, then you can rely on the Monitoring persona REST API to issue CoAs. This allows the profiling service to support a wider range of endpoints. In a distributed deployment, your network must have at least one Cisco ISE node that assumes the Monitoring persona to rely on the Monitoring persona REST API to issue a CoA.
Cisco ISE arbitrarily will designate either the primary or secondary Monitoring node as the default destination for REST queries in your distributed deployment, because both the primary and secondary Monitoring nodes have identical session directory information.
Use Cases for Issuing Change of Authorization
The profiling service issues the change of authorization in the following cases:
-
Endpoint deleted—When an endpoint is deleted from the Endpoints page and the endpoint is disconnected or removed from the network.
-
An exception action is configured—If you have an exception action configured per profile that leads to an unusual or an unacceptable event from that endpoint. The profiling service moves the endpoint to the corresponding static profile by issuing a CoA.
-
An endpoint is profiled for the first time—When an endpoint is not statically assigned and profiled for the first time; for example, the profile changes from an unknown to a known profile.
-
An endpoint identity group has changed—When an endpoint is added or removed from an endpoint identity group that is used by an authorization policy.
The profiling service issues a CoA when there is any change in an endpoint identity group, and the endpoint identity group is used in the authorization policy for the following:
-
The endpoint identity group changes for endpoints when they are dynamically profiled
-
The endpoint identity group changes when the static assignment flag is set to true for a dynamic endpoint
-
-
-
An endpoint profiling policy has changed and the policy is used in an authorization policy—When an endpoint profiling policy changes, and the policy is included in a logical profile that is used in an authorization policy. The endpoint profiling policy may change due to the profiling policy match or when an endpoint is statically assigned to an endpoint profiling policy, which is associated to a logical profile. In both the cases, the profiling service issues a CoA, only when the endpoint profiling policy is used in an authorization policy.
Exemptions for Issuing a Change of Authorization
The profiling service does not issue a CoA when there is a change in an endpoint identity group and the static assignment is already true.
Cisco ISE does not issue a CoA for the following reasons:
-
An Endpoint disconnected from the network—When an endpoint disconnected from your network is discovered.
-
Authenticated wired (Extensible Authentication Protocol) EAP-capable endpoint—When an authenticated wired EAP-capable endpoint is discovered.
-
Multiple active sessions per port—When you have multiple active sessions on a single port, the profiling service issues a CoA with the Reauth option even though you have configured CoA with the Port Bounce option.
-
Packet-of-Disconnect CoA (Terminate Session) when a wireless endpoint is detected—If an endpoint is discovered as wireless, then a Packet-of-Disconnect CoA (Terminate-Session) is issued instead of the Port Bounce CoA. The benefit of this change is to support the Wireless LAN Controller (WLC) CoA.
-
Profiler CoA is suppressed when the Suppress Profiler CoA for endpoints in Logical Profile option is used for the configured logical profile in the Authorization Profile. Profiler CoA will be triggered for all other endpoints by default.
-
Global No CoA Setting overrides Policy CoA—Global No CoA overrides all configuration settings in endpoint profiling policies as there is no CoA issued in Cisco ISE irrespective of CoA configured per endpoint profiling policy.
Note
No CoA and Reauth CoA configurations are not affected, and the profiler service applies the same CoA configuration for wired and wireless endpoints.
Change of Authorization Issued for Each Type of CoA Configuration
|
Scenarios |
No CoA Configuration |
Port Bounce Configuration |
Reauth Configuration |
Additional Information |
|---|---|---|---|---|
|
Global CoA configuration in Cisco ISE (typical configuration) |
No CoA |
Port Bounce |
Reauthentication |
— |
|
An endpoint is disconnected on your network |
No CoA |
No CoA |
No CoA |
Change of authorization is determined by the RADIUS attribute Acct-Status -Type value Stop. |
|
Wired with multiple active sessions on the same switch port |
No CoA |
Reauthentication |
Reauthentication |
Reauthentication avoids disconnecting other sessions. |
|
Wireless endpoint |
No CoA |
Packet-of-Disconnect CoA (Terminate Session) |
Reauthentication |
Support to Wireless LAN Controller. |
|
Incomplete CoA data |
No CoA |
No CoA |
No CoA |
Due to missing RADIUS attributes. |
Attribute Filters for ISE Database Persistence and Performance
Cisco ISE implements filters for Dynamic Host Configuration Protocol (both DHCP Helper and DHCP SPAN), HTTP, RADIUS, and Simple Network Management Protocol probes except for the NetFlow probe to address performance degradation. Each probe filter contains the list of attributes that are temporal and irrelevant for endpoint profiling and removes those attributes from the attributes collected by the probes.
The isebootstrap log (isebootstrap-yyyymmdd-xxxxxx.log) contains messages that handles the creation of dictionaries and with filtering of attributes from the dictionaries. You can also configure to log a debug message when endpoints go through the filtering phase to indicate that filtering has occurred.
The Cisco ISE profiler invokes the following endpoint attribute filters:
-
A DHCP filter for both the DHCP Helper and DHCP SPAN contains all the attributes that are not necessary and they are removed after parsing DHCP packets. The attributes after filtering are merged with existing attributes in the endpoint cache for an endpoint.
-
An HTTP filter is used for filtering attributes from HTTP packets, where there is no significant change in the set of attributes after filtering.
-
A RADIUS filter is used once the syslog parsing is complete and endpoint attributes are merged into the endpoint cache for profiling.
-
SNMP filter for SNMP Query includes separate CDP and LLDP filters, which are all used for SNMP-Query probe.
Global Setting to Filter Endpoint Attributes with Whitelist
You can reduce the number of persistence events and replication events by reducing the number of endpoint attributes that do not change frequently at the collection point. Enabling the EndPoint Attribute Filter will have the Cisco ISE profiler only to keep significant attributes and discard all other attributes. Significant attributes are those used by the Cisco ISE system or those used specifically in a endpoint profiling policy or rule.
A whitelist is a set of attributes that are used in custom endpoint profiling policies for profiling endpoints, and that are essential for Change of Authorization (CoA), Bring Your Own Device (BYOD), Device Registration WebAuth (DRW), and so on to function in Cisco ISE as expected. The whitelist is always used as a criteria when ownership changes for the endpoint (when attributes are collected by multiple Policy Service nodes) even when disabled.
By default, the whitelist is disabled and the attributes are dropped only when the attribute filter is enabled. The white list is dynamically updated when endpoint profiling policies change including from the feed to include new attributes in the profiling policies. Any attribute that is not present in the whitelist is dropped immediately at the time of collection, and the attribute cannot participate in profiling endpoints. When combined with the buffering, the number of persistence events can be reduced.
You must ensure that the whitelist contains a set of attributes determined from the following two sources:
-
A set of attributes that are used in the default profiles so that you can match endpoints to the profiles.
-
A set of attributes that are essential for Change of Authorization (CoA), Bring Your Own Device (BYOD), Device Registration WebAuth (DRW), and so on to function as expected.
|
AAA-Server |
BYODRegistration |
|
Calling-Station-ID |
Certificate Expiration Date |
|
Certificate Issue Date |
Certificate Issuer Name |
|
Certificate Serial Number |
Description |
|
DestinationIPAddress |
Device Identifier |
|
Device Name |
DeviceRegistrationStatus |
|
EndPointPolicy |
EndPointPolicyID |
|
EndPointProfilerServer |
EndPointSource |
|
FQDN |
FirstCollection |
|
Framed-IP-Address |
IdentityGroup |
|
IdentityGroupID |
IdentityStoreGUID |
|
IdentityStoreName |
L4_DST_PORT |
|
LastNmapScanTime |
MACAddress |
|
MatchedPolicy |
MatchedPolicyID |
|
NADAddress |
NAS-IP-Address |
|
NAS-Port-Id |
NAS-Port-Type |
|
NmapScanCount |
NmapSubnetScanID |
|
OS Version |
OUI |
|
PolicyVersion |
PortalUser |
|
PostureApplicable |
Product |
|
RegistrationTimeStamp |
— |
|
StaticAssignment |
StaticGroupAssignment |
|
TimeToProfile |
Total Certainty Factor |
|
User-Agent |
cdpCacheAddress |
|
cdpCacheCapabilities |
cdpCacheDeviceId |
|
cdpCachePlatform |
cdpCacheVersion |
|
ciaddr |
dhcp-class-identifier |
|
dhcp-requested-address |
host-name |
|
hrDeviceDescr |
ifIndex |
|
ip |
lldpCacheCapabilities |
|
lldpCapabilitiesMapSupported |
lldpSystemDescription |
|
operating-system |
sysDescr |
|
161-udp |
— |
Attributes Collection from IOS Sensor Embedded Switches
An IOS sensor integration allows Cisco ISE run time and the Cisco ISE profiler to collect any or all of the attributes that are sent from the switch. You can collect DHCP, CDP, and LLDP attributes directly from the switch by using the RADIUS protocol. The attributes that are collected for DHCP, CDP, and LLDP are then parsed and mapped to attributes in the profiler dictionaries in the following location: .
For information about the supported Catalyst platforms for Device sensors, see https://communities.cisco.com/docs/DOC-72932.
IOS Sensor Embedded Network Access Devices
Integrating IOS sensor embedded network access devices with Cisco ISE involves the following components:
-
An IOS sensor
-
Data collector that is embedded in the network access device (switch) for gathering DHCP, CDP, and LLDP data
-
Analyzers for processing the data and determining the device-type of endpoints
There are two ways of deploying an analyzer, but they are not expected to be used in conjunction with each other:
-
An analyzer can be deployed in Cisco ISE
-
Analyzers can be embedded in the switch as the sensor
-
Configuration Checklist for IOS Sensor-Enabled Network Access Devices
This section summarizes a list of tasks that you must configure in the IOS sensor-enabled switches and Cisco ISE to collect DHCP, CDP, and LLDP attributes directly from the switch:
-
Ensure that the RADIUS probe is enabled in Cisco ISE.
-
Ensure that network access devices support an IOS sensor for collecting DHCP, CDP, and LLDP information.
-
Ensure that network access devices run the following CDP and LLDP commands to capture CDP and LLDP information from endpoints:
cdp enable lldp run -
Ensure that session accounting is enabled separately by using the standard AAA and RADIUS commands.
For example, use the following commands:
aaa new-model aaa accounting dot1x default start-stop group radius radius-server host <ip> auth-port <port> acct-port <port> key <shared-secret> radius-server vsa send accounting -
Ensure that you run IOS sensor-specific commands.
-
Enabling Accounting Augmentation
You must enable the network access devices to add IOS sensor protocol data to the RADIUS accounting messages and to generate additional accounting events when it detects new sensor protocol data. This means that any RADIUS accounting message should include all CDP, LLDP, and DHCP attributes.
Enter the following global command:
device-sensor accounting
-
Disabling Accounting Augmentation
To disable (accounting) network access devices and add IOS sensor protocol data to the RADIUS accounting messages for sessions that are hosted on a given port (if the accounting feature is globally enabled), enter the following command at the appropriate port:
no device-sensor accounting
-
TLV Change Tracking
By default, for each supported peer protocol, client notifications and accounting events are generated only when an incoming packet includes a type, length, and value (TLV) that has not been received previously in the context of a given session.
You must enable client notifications and accounting events for all TLV changes where there are either new TLVs, or where previously received TLVs have different values. Enter the following command:
device-sensor notify all-changes
-
-
Be sure that you disable the IOS Device Classifier (local analyzer) in the network access devices.
Enter the following command:
no macro auto monitor
Note
This command prevents network access devices from sending two identical RADIUS accounting messages per change.
Support for Cisco IND Controllers by the ISE Profiler
ISE can profile and display the status of devices attached to a Cisco Industrial Network Device (IND). PxGrid connects ISE and the Cisco Industrial Network Director to communicate endpoint (IoT) data. pxGrid on ISE consumes CIND events, and queries CIND to update endpoint type.
The ISE profiler has dictionary attributes for IoT devices. Navigate to , and select IOTASSET from the list of System Dictionaries to see the dictionary attributes.
Guidelines and Recommendations
If you have several ISE nodes configured for profiling, we recommend that you enable pxGrid for IND on one node.
If ISE goes down, then when ISE comes back up, you reconnect to IND in CIND. To reconnect, in CIND, navigate to the pxGrid page, and click Reconnect.
Multiple IND devices can connect to a single ISE.
If the same endpoint is received from two or more publishers (IND), ISE only keeps the last publisher's data for that endpoint.
In pxGrid, ISE gets IND data from the service names com.cisco.endpoint.asset, and /topic/com.cisco.endpoint.asset.
IND Profiling Process Flow
CIND Asset discovery finds an IoT device, and publishes the endpoint data for that device to pxGrid. ISE sees the event on pxGrid, and gets the endpoint data. Profiler policies in ISE assign the device data to attributes in the ISE profiler dictionary, and applies those attributes to the endpoint in ISE.
IoT endpoint data which does not meet the existing attributes in ISE are not saved. But you can create more attributes in ISE, and register them with CIND.
ISE does a bulk download of endpoints when the connection to CIND through pxGrid is first established. If there is a network failure, ISE does another bulk download of accumulated endpoint changes.
Configure ISE and CIND for IND Profiling
Note |
You must install the ISE certificate in CIND, and install the CIND certificate in ISE, before you activate pxGrid in CIND. |
-
In ISE, enable pxGrid—Navigate to . Edit the PSN that you plan to use as pxGrid consumer, and enable pxGrid. This PSN is the one that creates endpoints from pxGrid data published by Cisco IND and profiling.
-
In ISE, create a pxGrid certificate—Navigate to to verify that pxGrid is running. Then click the Certificates tab, and fill in the certificate fields. Click Create to issue the certificate, and opens a window for you to select a download directory. The certificate downloads to that directory in a zipped format.
-
For I want to, select “Generate a single certificate (without a certificate signing request), Common Name, enter a name for the CIND you are connecting with.
-
For Certificate Download Format, choose PKS12 format.
-
For Certificate Password, create a password.
Note
The ISE internal CA must be enabled, and if your browser blocks popups, you won’t be able to download the certificate. Unzip the certificate to make the PEM file available for the next step.
-
-
In CIND, export the CIND certificate—In CIND, navigate to , and Click Download .pem IND certificate. Keep this window open.
-
In ISE, navigate to . When you see the IND pxGrid client, approve it.
-
In CIND, move the slider to enable pxGrid. Another screen opens, where you define the location of the ISE node, the name of the certificate that you entered for this pxGrid server in ISE, and the password you provided. Click Upload Certificate, and locate the ISE pxGrid PEM file.
-
In ISE, import the CIND system certificate—Navigate to , click the Import button, and enter the path to the certificate you got from CIND.
-
In CIND, click Activate.
-
In ISE, navigate to Adminstration->Deployment, select the PSN you are using for the IND connection, select the Profiling page, and enable the pxGrid probe.
-
The pxGrid connection between ISE and CIND is now active. Verify that by displaying the IoT endpoints that CIND has found.
Add an Attribute for IND Profiling
CIND may return attributes that are not in the ISE dictionary. You can add more attributes to ISE, so you can more accurately profile that IoT device. To add a new attribute, you create a custom attribute in ISE, and send that attribute to CIND over pxGrid.
-
Create the attribute in ISE—Navigate to , and select Endpoint Custom Attributes. Create an attribute endpoint attribute.
-
You can now use this attribute in a profiler policy to identify assets with the new attribute. Navigate to , and create a new profiler policy. In the Rules section, create a new rule. When you add an attribute/value, select the CUSTOMATTRIBUTE folder, and the custom attribute you created.
Profiler Conditions
Profiling conditions are policy elements and are similar to other conditions. However unlike authentication, authorization, and guest conditions, the profiling conditions can be based on a limited number of attributes. The Profiler Conditions page lists the attributes that are available in Cisco ISE and their description.
Profiler conditions can be one of the following:
-
Cisco Provided—Cisco ISE includes predefined profiling conditions when deployed and they are identified as Cisco Provided in the Profiler Conditions page. You cannot delete Cisco Provided profiling conditions.
You can also find Cisco Provided conditions in the System profiler dictionaries in the following location: Policy > Policy Elements > Dictionaries > System.
For example, MAC dictionary. For some products, the OUI (Organizationally Unique Identifier) is an unique attribute that you can use it first for identifying the manufacturing organization of devices. It is a component of the device MAC address. The MAC dictionary contains the MACAddress and OUI attributes.
-
Administrator Created—Profiler conditions that you create as an administrator of Cisco ISE or predefined profiling conditions that are duplicated are identified as Administrator Created. You can create a profiler condition of DHCP, MAC, SNMP, IP, RADIUS, NetFlow, CDP, LLDP, and NMAP types using the profiler dictionaries in the Profiler Conditions page.
Although, the recommended upper limit for the number of profiling policies is 1000, you can stretch up to 2000 profiling policies.
Profiling Network Scan Actions
An endpoint scan action is a configurable action that can be referred to in an endpoint profiling policy, and that is triggered when the conditions that are associated with the network scan action are met.
An endpoint scan is used to scan endpoints in order to limit resources usage in the Cisco ISE system. A network scan action scans a single endpoint, unlike resource-intensive network scans. It improves the overall classification of endpoints, and redefines an endpoint profile for an endpoint. Endpoint scans can be processed only one at a time.
You can associate a single network scan action to an endpoint profiling policy. Cisco ISE predefines three scanning types for a network scan action, which can include one or all three scanning types: for instance, an OS-scan, an SNMPPortsAndOS-scan, and a CommonPortsAndOS-scan. You cannot edit or delete OS-scan, SNMPPortsAndOS-scan, and CommonPortsAndOS-scans, which are predefined network scan actions in Cisco ISE. You can also create a new network scan action of your own.
Once an endpoint is appropriately profiled, the configured network scan action cannot be used against that endpoint. For example, scanning an Apple-Device allows you to classify the scanned endpoint to an Apple device. Once an OS-scan determines the operating system that an endpoint is running, it is no longer matched to an Apple-Device profile, but it is matched to an appropriate profile for an Apple device.
Create a New Network Scan Action
A network scan action that is associated with an endpoint profiling policy scans an endpoint for an operating system, Simple Network Management Protocol (SNMP) ports, and common ports. Cisco provides network scan actions for the most common NMAP scans, but you can also create one of your own.
When you create a new network scan, you define the type of information that the NMAP probe will scan for.
Before you begin
The Network Scan (NMAP) probe must be enabled before you can define a rule to trigger a network scan action. The procedure for that is described in Configure Probes per Cisco ISE Node.
Procedure
| Step 1 |
Choose . Alternatively, you can choose . |
||
| Step 2 |
Click Add. |
||
| Step 3 |
Enter a name and description for the network scan action that you want to create. |
||
| Step 4 |
Check one or more check boxes when you want to scan an endpoint for the following:
|
||
| Step 5 |
Click Submit. |
NMAP Operating System Scan
The NMAP tool has limitations on OS-scan which may cause unreliable results. For example, when scanning an operating system of network devices such as switches and routers, the NMAP OS-scan may provide an incorrect operating-system attribute for those devices. Cisco ISE displays the operating-system attribute, even if the accuracy is not 100%.
You should configure endpoint profiling policies that use the NMAP operating-system attribute in their rules to have low certainty value conditions (Certainty Factor values). We recommend that whenever you create an endpoint profiling policy based on the NMAP:operating-system attribute, include an AND condition to help filter out false results from NMAP.
The following NMAP command scans the operating system when you associate Scan OS with an endpoint profiling policy:
nmap -sS -O -F -oN /opt/CSCOcpm/logs/nmap.log -append-output -oX - <IP-address>The following NMAP command scans a subnet and sends the output to nmapSubnet.log:
nmap -O -sU -p U:161,162 -oN /opt/CSCOcpm/logs/nmapSubnet.log
--append-output -oX - <subnet>| -O | Enables OS detection |
| -sU | UDP scan |
| -p <port ranges> | Scans only specified ports. For example, U:161, 162 |
| oN | Normal output |
| oX | XML output |
Operating System Ports
The following table lists the TCP ports that NMAP uses for OS scanning. In addition, NMAP uses ICMP and UDP port 51824.
|
1 |
3 |
4 |
6 |
7 |
9 |
13 |
17 |
19 |
|
20 |
21 |
22 |
23 |
24 |
25 |
26 |
30 |
32 |
|
33 |
37 |
42 |
43 |
49 |
53 |
70 |
79 |
80 |
|
81 |
82 |
83 |
84 |
85 |
88 |
89 |
90 |
99 |
|
100 |
106 |
109 |
110 |
111 |
113 |
119 |
125 |
135 |
|
139 |
143 |
144 |
146 |
161 |
163 |
179 |
199 |
211 |
|
212 |
222 |
254 |
255 |
256 |
259 |
264 |
280 |
301 |
|
306 |
311 |
340 |
366 |
389 |
406 |
407 |
416 |
417 |
|
425 |
427 |
443 |
444 |
445 |
458 |
464 |
465 |
481 |
|
497 |
500 |
512 |
513 |
514 |
515 |
524 |
541 |
543 |
|
544 |
545 |
548 |
554 |
555 |
563 |
587 |
593 |
616 |
|
617 |
625 |
631 |
636 |
646 |
648 |
666 |
667 |
668 |
|
683 |
687 |
691 |
700 |
705 |
711 |
714 |
720 |
722 |
|
726 |
749 |
765 |
777 |
783 |
787 |
800 |
801 |
808 |
|
843 |
873 |
880 |
888 |
898 |
900 |
901 |
902 |
903 |
|
911 |
912 |
981 |
987 |
990 |
992 |
993 |
995 |
999 |
|
1000 |
1001 |
1002 |
1007 |
1009 |
1010 |
1011 |
1021 |
1022 |
|
1023 |
1024 |
1025 |
1026 |
1027 |
1028 |
1029 |
1030 |
1031 |
|
1032 |
1033 |
1034 |
1035 |
1036 |
1037 |
1038 |
1039 |
1040-1100 |
|
1102 |
1104 |
1105 |
1106 |
1107 |
1108 |
1110 |
1111 |
1112 |
|
1113 |
1114 |
1117 |
1119 |
1121 |
1122 |
1123 |
1124 |
1126 |
|
1130 |
1131 |
1132 |
1137 |
1138 |
1141 |
1145 |
1147 |
1148 |
|
1149 |
1151 |
1152 |
1154 |
1163 |
1164 |
1165 |
1166 |
1169 |
|
1174 |
1175 |
1183 |
1185 |
1186 |
1187 |
1192 |
1198 |
1199 |
|
1201 |
1213 |
1216 |
1217 |
1218 |
1233 |
1234 |
1236 |
1244 |
|
1247 |
1248 |
1259 |
1271 |
1272 |
1277 |
1287 |
1296 |
1300 |
|
1301 |
1309 |
1310 |
1311 |
1322 |
1328 |
1334 |
1352 |
1417 |
|
1433 |
1434 |
1443 |
1455 |
1461 |
1494 |
1500 |
1501 |
1503 |
|
1521 |
1524 |
1533 |
1556 |
1580 |
1583 |
1594 |
1600 |
1641 |
|
1658 |
1666 |
1687 |
1688 |
1700 |
1717 |
1718 |
1719 |
1720 |
|
1721 |
1723 |
1755 |
1761 |
1782 |
1783 |
1801 |
1805 |
1812 |
|
1839 |
1840 |
1862 |
1863 |
1864 |
1875 |
1900 |
1914 |
1935 |
|
1947 |
1971 |
1972 |
1974 |
1984 |
1998-2010 |
2013 |
2020 |
2021 |
|
2022 |
2030 |
2033 |
2034 |
2035 |
2038 |
2040-2043 |
2045-2049 |
2065 |
|
2068 |
2099 |
2100 |
2103 |
2105-2107 |
2111 |
2119 |
2121 |
2126 |
|
2135 |
2144 |
2160 |
2161 |
2170 |
2179 |
2190 |
2191 |
2196 |
|
2200 |
2222 |
2251 |
2260 |
2288 |
2301 |
2323 |
2366 |
2381-2383 |
|
2393 |
2394 |
2399 |
2401 |
2492 |
2500 |
2522 |
2525 |
2557 |
|
2601 |
2602 |
2604 |
2605 |
2607 |
2608 |
2638 |
2701 |
2702 |
|
2710 |
2717 |
2718 |
2725 |
2800 |
2809 |
2811 |
2869 |
2875 |
|
2909 |
2910 |
2920 |
2967 |
2968 |
2998 |
3000 |
3001 |
3003 |
|
3005 |
3006 |
3007 |
3011 |
3013 |
3017 |
3030 |
3031 |
3052 |
|
3071 |
3077 |
3128 |
3168 |
3211 |
3221 |
3260 |
3261 |
3268 |
|
3269 |
3283 |
3300 |
3301 |
3306 |
3322 |
3323 |
3324 |
3325 |
|
3333 |
3351 |
3367 |
3369 |
3370 |
3371 |
3372 |
3389 |
3390 |
|
3404 |
3476 |
3493 |
3517 |
3527 |
3546 |
3551 |
3580 |
3659 |
|
3689 |
3690 |
3703 |
3737 |
3766 |
3784 |
3800 |
3801 |
3809 |
|
3814 |
3826 |
3827 |
3828 |
3851 |
3869 |
3871 |
3878 |
3880 |
|
3889 |
3905 |
3914 |
3918 |
3920 |
3945 |
3971 |
3986 |
3995 |
|
3998 |
4000-4006 |
4045 |
4111 |
4125 |
4126 |
4129 |
4224 |
4242 |
|
4279 |
4321 |
4343 |
4443 |
4444 |
4445 |
4446 |
4449 |
4550 |
|
4567 |
4662 |
4848 |
4899 |
4900 |
4998 |
5000-5004 |
5009 |
5030 |
|
5033 |
5050 |
5051 |
5054 |
5060 |
5061 |
5080 |
5087 |
5100 |
|
5101 |
5102 |
5120 |
5190 |
5200 |
5214 |
5221 |
5222 |
5225 |
|
5226 |
5269 |
5280 |
5298 |
5357 |
5405 |
5414 |
5431 |
5432 |
|
5440 |
5500 |
5510 |
5544 |
5550 |
5555 |
5560 |
5566 |
5631 |
|
5633 |
5666 |
5678 |
5679 |
5718 |
5730 |
5800 |
5801 |
5802 |
|
5810 |
5811 |
5815 |
5822 |
5825 |
5850 |
5859 |
5862 |
5877 |
|
5900-5907 |
5910 |
5911 |
5915 |
5922 |
5925 |
5950 |
5952 |
5959 |
|
5960-5963 |
5987-5989 |
5998-6007 |
6009 |
6025 |
6059 |
6100 |
6101 |
6106 |
|
6112 |
6123 |
6129 |
6156 |
6346 |
6389 |
6502 |
6510 |
6543 |
|
6547 |
6565-6567 |
6580 |
6646 |
6666 |
6667 |
6668 |
6669 |
6689 |
|
6692 |
6699 |
6779 |
6788 |
6789 |
6792 |
6839 |
6881 |
6901 |
|
6969 |
7000 |
7001 |
7002 |
7004 |
7007 |
7019 |
7025 |
7070 |
|
7100 |
7103 |
7106 |
7200 |
7201 |
7402 |
7435 |
7443 |
7496 |
|
7512 |
7625 |
7627 |
7676 |
7741 |
7777 |
7778 |
7800 |
7911 |
|
7920 |
7921 |
7937 |
7938 |
7999 |
8000 |
8001 |
8002 |
8007 |
|
8008 |
8009 |
8010 |
8011 |
8021 |
8022 |
8031 |
8042 |
8045 |
|
8080-8090 |
8093 |
8099 |
8100 |
8180 |
8181 |
8192 |
8193 |
8194 |
|
8200 |
8222 |
8254 |
8290 |
8291 |
8292 |
8300 |
8333 |
8383 |
|
8400 |
8402 |
8443 |
8500 |
8600 |
8649 |
8651 |
8652 |
8654 |
|
8701 |
8800 |
8873 |
8888 |
8899 |
8994 |
9000 |
9001 |
9002 |
|
9003 |
9009 |
9010 |
9011 |
9040 |
9050 |
9071 |
9080 |
9081 |
|
9090 |
9091 |
9099 |
9100 |
9101 |
9102 |
9103 |
9110 |
9111 |
|
9200 |
9207 |
9220 |
9290 |
9415 |
9418 |
9485 |
9500 |
9502 |
|
9503 |
9535 |
9575 |
9593 |
9594 |
9595 |
9618 |
9666 |
9876 |
|
9877 |
9878 |
9898 |
9900 |
9917 |
9929 |
9943 |
9944 |
9968 |
|
9998 |
9999 |
10000 |
10001 |
10002 |
10003 |
10004 |
10009 |
10010 |
|
10012 |
10024 |
10025 |
10082 |
10180 |
10215 |
10243 |
10566 |
10616 |
|
10617 |
10621 |
10626 |
10628 |
10629 |
10778 |
11110 |
11111 |
11967 |
|
12000 |
12174 |
12265 |
12345 |
13456 |
13722 |
13782 |
13783 |
14000 |
|
14238 |
14441 |
14442 |
15000 |
15002 |
15003 |
15004 |
15660 |
15742 |
|
16000 |
16001 |
16012 |
16016 |
16018 |
16080 |
16113 |
16992 |
16993 |
|
17877 |
17988 |
18040 |
18101 |
18988 |
19101 |
19283 |
19315 |
19350 |
|
19780 |
19801 |
19842 |
20000 |
20005 |
20031 |
20221 |
20222 |
20828 |
|
21571 |
22939 |
23502 |
24444 |
24800 |
25734 |
25735 |
26214 |
27000 |
|
27352 |
27353 |
27355 |
27356 |
27715 |
28201 |
30000 |
30718 |
30951 |
|
31038 |
31337 |
32768 |
32769 |
32770 |
32771 |
32772 |
32773 |
32774 |
|
32775 |
32776 |
32777 |
32778 |
32779 |
32780 |
32781 |
32782 |
32783 |
|
32784 |
32785 |
33354 |
33899 |
34571 |
34572 |
34573 |
34601 |
35500 |
|
36869 |
38292 |
40193 |
40911 |
41511 |
42510 |
44176 |
44442 |
44443 |
|
44501 |
45100 |
48080 |
49152 |
49153 |
49154 |
49155 |
49156 |
49157 |
|
49158 |
49159 |
49160 |
49161 |
49163 |
49165 |
49167 |
49175 |
49176 |
|
49400 |
49999 |
50000 |
50001 |
50002 |
50003 |
50006 |
50300 |
50389 |
|
50500 |
50636 |
50800 |
51103 |
51493 |
52673 |
52822 |
52848 |
52869 |
|
54045 |
54328 |
55055 |
55056 |
55555 |
55600 |
56737 |
56738 |
57294 |
|
57797 |
58080 |
60020 |
60443 |
61532 |
61900 |
62078 |
63331 |
64623 |
|
64680 |
65000 |
65129 |
65389 |
NMAP SNMP Port Scan
The following NMAP command scans SNMP ports (UDP 161 and 162) when you associate the Scan SNMP Port with an endpoint profiling policy:
nmap -sU -p U:161,162 -oN /opt/CSCOcpm/logs/nmap.log --append-output -oX - <IP-address>| -sU | UDP scan. |
| -p <port-ranges> | Scans only specified ports. For example, scans UDP ports 161 and 16.2 |
| oN | Normal output. |
| oX | XML output. |
| IP-address | IP-address of an endpoint that is scanned. |
NMAP Common Ports Scan
| -sTU | Both TCP connect scan and UDP scan. |
| -p <port ranges> | Scans TCP ports: 21,22,23,25,53,80,110,135,139,143, 443,445,3306,3389,8080 and UDP ports: 53,67,68,123,135,137, 138,139,161,445,500,520,631,1434,1900 |
| oN | Normal output. |
| oX | XML output. |
| IP address | IP address of an endpoint that is scanned. |
Common Ports
| TCP Ports | UDP Ports | ||
|---|---|---|---|
| Ports | Service | Ports | Service |
| 21/tcp | ftp | 53/udp | domain |
| 22/tcp | ssh | 67/udp | dhcps |
| 23/tcp | telnet | 68/udp | dhcpc |
| 25/tcp | smtp | 123/udp | ntp |
| 53/tcp | domain | 135/udp | msrpc |
| 80/tcp | http | 137/udp | netbios-ns |
| 110/tcp | pop3 | 138/udp | netbios-dgm |
| 135/tcp | msrpc | 139/udp | netbios-ssn |
| 139/tcp | netbios-ssn | 161/udp | snmp |
| 143/tcp | imap | 445/udp | microsoft-ds |
| 443/tcp | https | 500/udp | isakmp |
| 445/tcp | microsoft-ds | 520/udp | route |
| 3389/tcp | ms-term-serv | 1434/udp | ms-sql-m |
| 8080/tcp | http-proxy | 1900/udp | upnp |
NMAP Custom Ports Scan
In addition to the common ports, you can use custom ports ( or ) to specify automatic and manual NMAP scan actions. NMAP probes collect the attributes from endpoints via the specified custom ports that are open. These attributes are updated in the endpoint's attribute list in the ISE Identities page (). You can specify up to 10 UDP and 10 TCP ports for each scan action. You cannot use the same port numbers that you have specified as common ports. Refer to the Configure Profiler Policies Using the McAfee ePolicy Orchestrator section for more information.
NMAP Include Service Version Information Scan
The Include Service Version Information NMAP probe automatically scans the endpoints to better classify them, by collecting information about services running on the device. The service version option can be combined with common ports or custom ports.
Example:
CLI Command: nmap -sV -p T:8083 172.21.75.217
|
Port |
State |
Service |
Version |
|---|---|---|---|
|
8083/tcp |
open |
http |
McAfee ePolicy Orchestrator Agent 4.8.0.1500 (ePOServerName: WIN2008EPO, AgentGuid: {1F5ED719-0A22-4F3B-BABA-00FAE756C2FE}) |
NMAP SMB Discovery Scan
NMAP SMB Discovery scan helps differentiate the Windows versions, and results in a better endpoint profiling. You can configure the NMAP scan action to run the SMB discovery script that is provided by NMAP.
The NMAP scan action is incorporated within the windows default policies and when the endpoint matches the policy and the scanning rule, the endpoint is scanned and the result helps to determine the exact windows version. The policy will be then configured on the feed service and new pre-defined NMAP scan is created with the SMB discovery option.
Note |
For SMB discovery, be sure to enable the Windows file sharing option in the endpoint. |
SMB Discovery Attributes
When the SMB discovery script is executed on the endpoint, new SMB discovery attributes, such as SMB.Operating-system, are added to the endpoint. These attributes are considered for updating the Windows endpoint profiling policies on the feed service. When a SMB discovery script is run, the SMB discovery attribute is prefixed with SMB, such as SMB.operating-system, SMB.lanmanager, SMB.server, SMB.fqdn, SMB.domain, SMB.workgroup, and SMB.cpe.
Skip NMAP Host Discovery
Scanning every port of every single IP address is a time-consuming process. Depending on the purpose of the scan, you can skip the NMAP host discovery of active endpoints.
If a NMAP scan is triggered after the classification of an endpoint, the profiler always skips the host discovery of the endpoint. However, if a manual scan action is triggered after enabling the Skip NMAP Host Discovery Scan, then host discovery is skipped.
NMAP Scan Workflow
Steps to be followed to perform a NMAP scan:
Before you begin
In order to run NMAP SMB discovery script, you must enable the file sharing in your system. Refer to the Enable File Sharing to Run NMAP SMB Discovery Script topic for an example.
Procedure
| Step 1 | |
| Step 2 | |
| Step 3 |
Create an SMB Scan Action
Procedure
| Step 1 |
Choose page. |
| Step 2 |
Enter the Action Name and Description. |
| Step 3 |
Check the Run SMB Discovery Script checkbox. |
| Step 4 |
Click Add to create the network access users. |

What to do next
You should configure the profiler policy using the SMB scan action.
Configure the Profiler Policy Using the SMB Scan Action
Before you begin
You must create a new profiler policy to scan an endpoint with the SMB scan action. For example, you can scan a Microsoft Workstation by specifying a rule that if the DHCP class identifier contains the MSFT attribute, then a network action should be taken.
Procedure
| Step 1 |
Choose page. |
| Step 2 |
Enter the Name and Description. |
| Step 3 |
In the drop-down, select the scan action (for example, SMBScanAction) that you had created. Network Scan (NMAP) Action
 |
What to do next
You should add a new condition using the SMB attribute.
Add a New Condition Using the SMB Attribute
Before you begin
You should create a new profiler policy to scan the version of an endpoint. For example, you can scan for Windows 7 under the Microsoft Workstation parent policy.
Procedure
| Step 1 |
Choose page. |
| Step 2 |
Enter the Name (for example, Windows-7Workstation) and Description. |
| Step 3 |
In the Network Scan (NMAP) Action drop-down, select None. |
| Step 4 |
In the Parent Policy drop-down choose the Microsoft-Workstation policy. 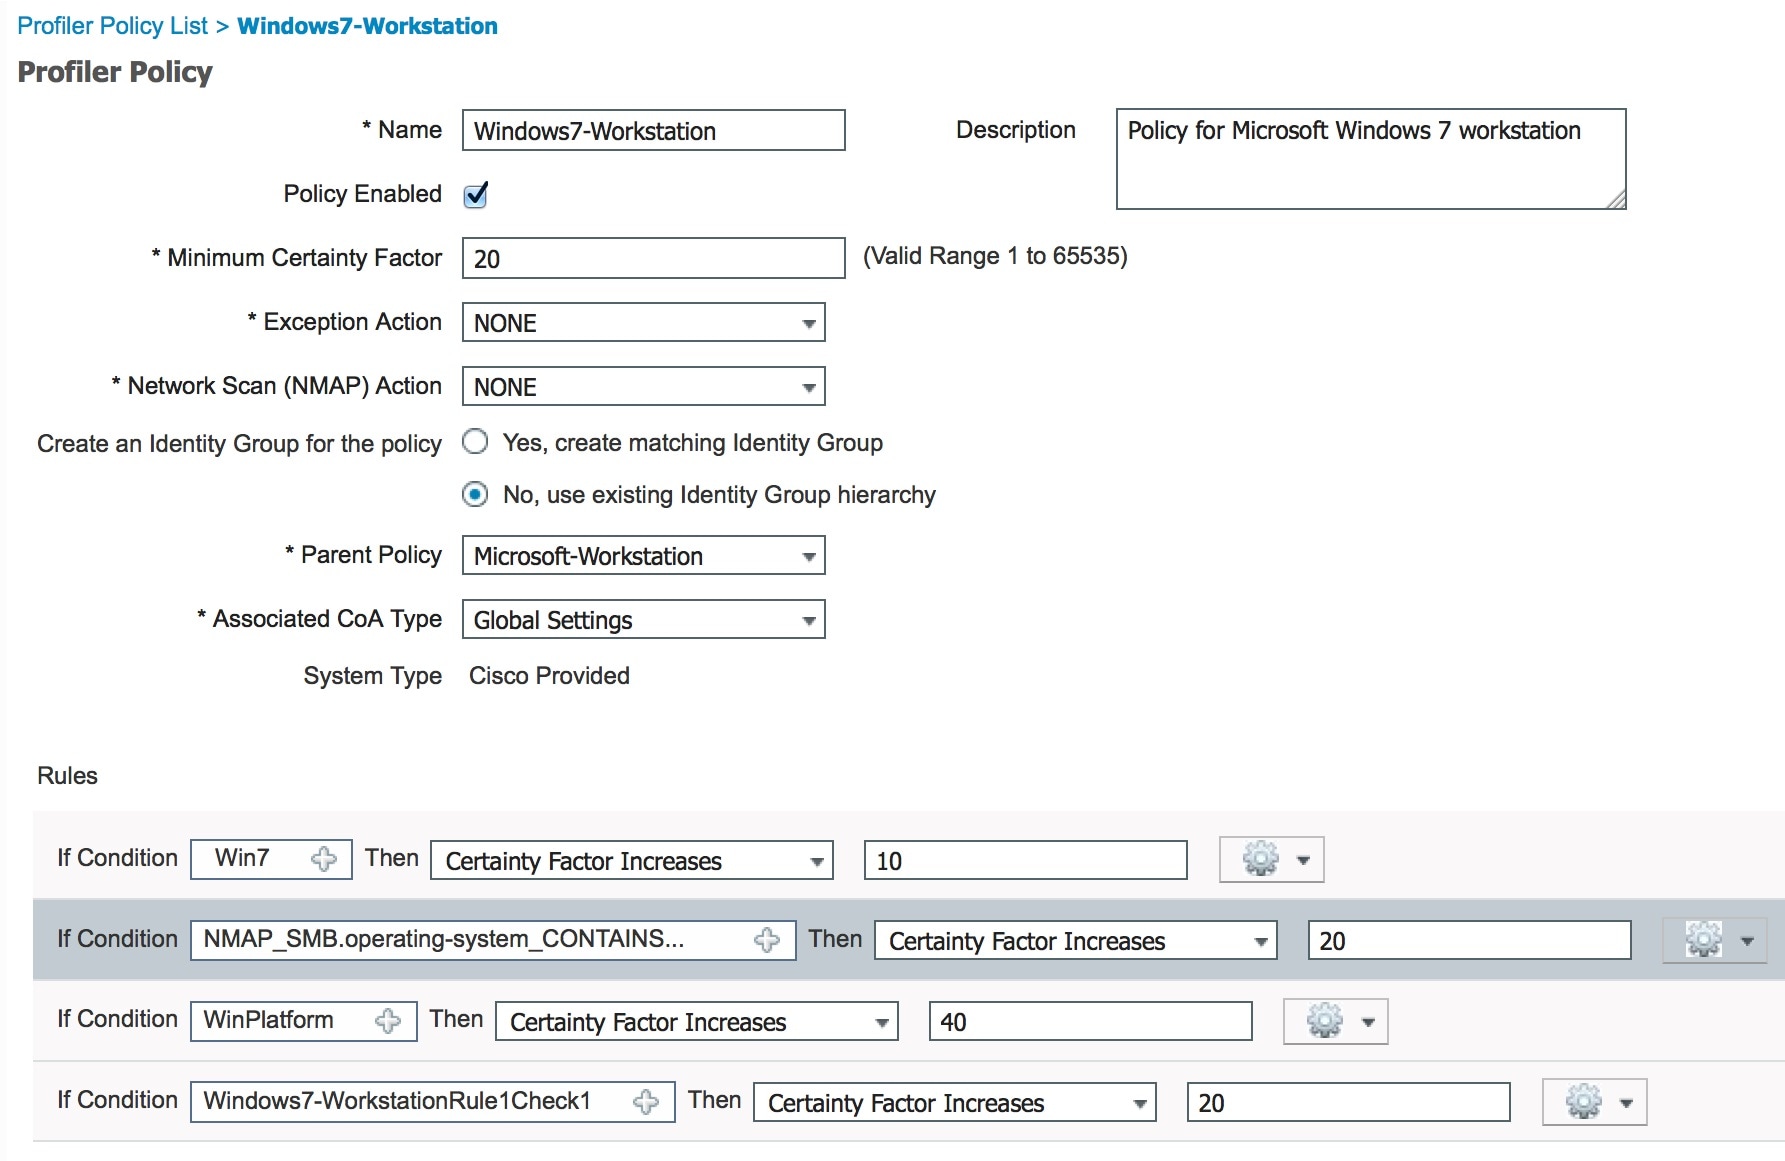 |
Enable File Sharing to Run NMAP SMB Discovery Script
Given below is an example to enable file sharing in Windows OS version 7, to run the NMAP SMB discovery script.
Procedure
| Step 1 |
Choose Control Panel > Network and Internet. |
| Step 2 |
Choose the Network and Sharing Center. |
| Step 3 |
Select Change Advanced Sharing Settings. |
| Step 4 |
Ensure that the Turn on File and Printer Sharing radio button is selected. |
| Step 5 |
Be sure that the Enable File Sharing for Devices That Use 40- or 56-bit Encryption and Turn on Password Protected Sharing radio buttons are selected. |
| Step 6 |
(Optional) Click Save Changes. |
| Step 7 |
Configure the Firewall settings.
|
| Step 8 |
Configure the shared folder.
|
Exclude Subnets from NMAP Scan
You can perform an NMAP scan to identify an endpoint's OS or SNMP port.
When performing the NMAP scan, you can exclude a whole subnet or IP range that should not be scanned by NMAP. You can configure the subnet or IP range in the NMAP Scan Subnet Exclusions page (Work Centers > Profiler > Settings > NMAP Scan Subnet Exclusions). This helps limit the load on your network and saves a considerable amount of time.
For Manual NMAP scan, you can use the Run Manual NMAP Scan page (Work Centers > Profiler > Manual Scans > Manual NMAP Scan > Configure NMAP Scan Subnet Exclusions At) to specify the subnet or IP range.
Manual NMAP Scan Settings
You can perform a manual NMAP scan () using the scan options that are available for automatic NMAP scan. You can choose either the scan options or the predefined ones.
|
Fields |
Usage Guidelines |
|---|---|
|
Node |
Choose the ISE node from which the NMAP scan is run. |
|
Manual Scan Subnet |
Enter the range of subnet IP addresses of endpoints for which you want to run the NMAP scan. |
|
Configure NMAP Scan Subnet Exclusions At |
You will be directed to the page. Specify the IP address and subnet mask that should be excluded. If there is a match, the NMAP scan is not run. |
|
NMAP Scan Subnet |
|
|
Specify Scan Options |
Select the required scan options: OS, SNMP Port, Common Ports, Custom Ports, Include Service Version Information, Run SMB Discovery Script, Skip NMAP Host Discovery. Refer to the Create a New Network Scan Action topic for more information. |
|
Select an Existing NMAP Scan |
Displays the Existing NMAP Scan Actions drop-down that displays the default profiler NMAP scan actions. |
|
Reset to Default Scan Options |
Click the button to restore default settings (all scan options are checked). |
|
Save as NMAP Scan Action |
Enter an action name and a description. |
Run a Manual NMAP Scan
Procedure
| Step 1 |
Choose . |
| Step 2 |
In the Node drop-down, select the ISE node from which you intend to run the NMAP scan. |
| Step 3 |
In the Manual Scan Subnet text box, enter the subnet address whose endpoints you intend to check for open ports. |
| Step 4 |
Select the required Scan Options.
|
| Step 5 |
Click Run Scan. |
Configure Profiler Policies Using the McAfee ePolicy Orchestrator
Cisco ISE profiling services can detect if the McAfee ePolicy Orchestrator (McAfee ePO) client is present on the endpoint. This helps in determining if a given endpoint belongs to your organization.
-
ISE Server
-
McAfee ePO Server
-
McAfee ePO Agent
Cisco ISE provides an in-built NMAP scan action (MCAFeeEPOOrchestratorClientscan) to check if the McAfee agent is running on an endpoint using NMAP McAfee script on the configured port. You can also create new NMAP scan options using the custom ports (for example, 8082). You can configure a new NMAP scan action using the McAfee ePO software by following the steps below:
Procedure
| Step 1 | |
| Step 2 | |
| Step 3 |
Configure profiler policies using the McAfee ePO NMAP scan action. |
Configure the McAfee ePo NMAP Scan Action
Procedure
| Step 1 |
Choose . |
| Step 2 |
Click Add. |
| Step 3 |
Enter the Action Name and Description. |
| Step 4 |
In the Scan Options, check the Custom Ports. |
| Step 5 |
In the Custom Ports dialog box, add the required TCP port. The 8080 TCP port is enabled by default for McAfee ePO. |
| Step 6 |
Check the Include Service Version Information checkbox. |
| Step 7 |
Click Submit. |
What to do next
Configure the McAfee ePO agent.
Configure the McAfee ePO Agent
Procedure
| Step 1 |
In your McAfee ePO server, check the recommended settings to facilitate the communication between the McAfee ePO agent and the ISE server. 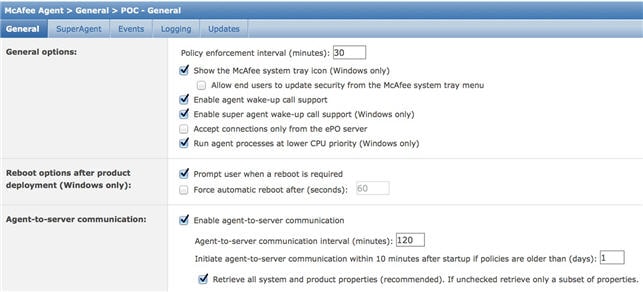 |
| Step 2 |
Verify that the Accept Connections Only From The ePO Server is unchecked. |
What to do next
Configure profiler policies using the McAfee ePO NMAP scan action.
Configure Profiler Policies Using the McAfee ePO NMAP Scan Action
Procedure
| Step 1 |
Choose . |
| Step 2 |
Enter the Name and Description. |
| Step 3 |
In the Network Scan (NMAP) Action drop-down, select the required action (for example, MCAFeeEPOOrchestratorClientscan). |
| Step 4 |
Create the parent profiler policy (for example, Microsoft-Workstation containing a rule to check if the DHCP class identifier contains the MSFT attribute). 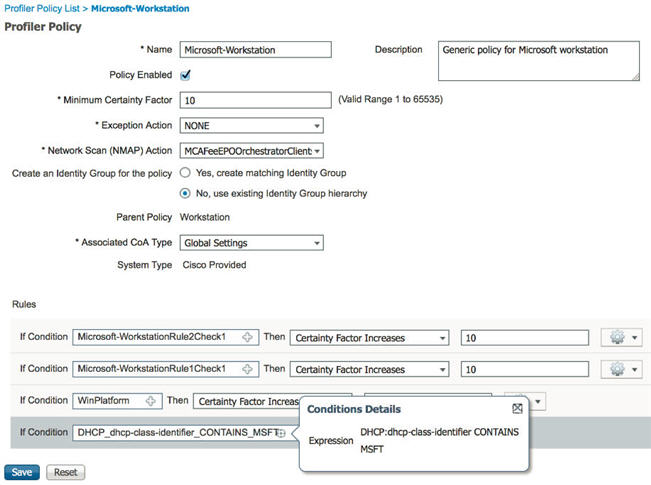 |
| Step 5 |
Create a new policy (for example CorporateDevice) within the parent NMAP McAfee ePO policy (for example, Microsoft-Workstation) to check if the McAfee ePO agent is installed on the endpoint. Endpoints that meet the condition are profiled as corporate devices. You can use the policy to move endpoints profiled with McAfee ePO agent to a new VLAN. 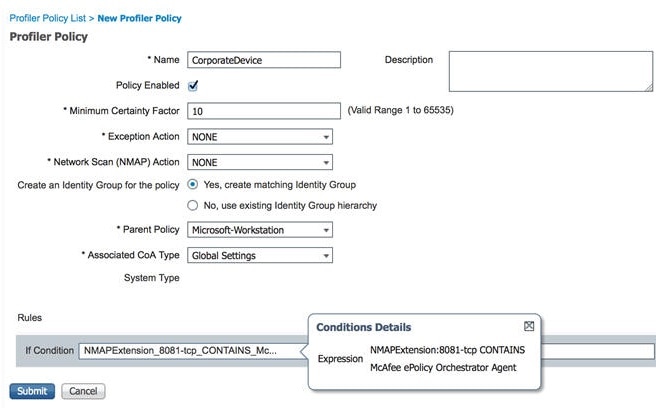 |
Profiler Endpoint Custom Attributes
You can use the Endpoint page to assign attributes to endpoints, besides the attributes that the endpoint gathers from the probe. The endpoint custom attributes can be used in authorization policies to profile endpoints.
You can create a maximum of 100 endpoint custom attributes. The types of endpoint custom attributes supported are: Int, String, Long, Boolean, and Float.
You can add values for the endpoint custom attributes in the page.
Use cases for endpoint custom attributes include, to white list or black list devices based on certain attributes or to assign certain privileges based on the authorization.
Using Endpoint Custom Attributes in Authorization Policy
The endpoint custom attributes section allows you to configure extra attributes. Each definition consists of the attribute and type (String, Int, Boolean, Float, Long). You can profile devices using endpoint custom attributes.
Note |
You must have a plus or higher license to add custom attributes to the endpoints. |
The following steps show how to create an authorization policy using endpoint custom attributes.
Procedure
| Step 1 |
Create the endpoint custom attributes and assign values. |
| Step 2 |
Create an authorization policy using the custom attributes and values.
|
Create a Profiler Condition
Endpoint profiling policies in Cisco ISE allow you to categorize discovered endpoints on your network, and assign them to specific endpoint identity groups. These endpoint profiling policies are made up of profiling conditions that Cisco ISE evaluates to categorize and group endpoints.
Before you begin
To perform the following task, you must be a Super Admin or Policy Admin.
Procedure
| Step 1 |
Choose . |
| Step 2 |
Enter values for the fields as described in the Endpoint Profiling Policies Settings. |
| Step 3 |
Click Submit to save the profiler condition. |
| Step 4 |
Repeat this procedure to create more conditions. |
Endpoint Profiling Policy Rules
You can define a rule that allows you to choose one or more profiling conditions from the library that are previously created and saved in the policy elements library, and to associate an integer value for the certainty factor for each condition, or associate either an exception action or a network scan action for that condition. The exception action or the network scan action is used to trigger the configurable action while Cisco ISE is evaluating the profiling policies with respect to the overall classification of endpoints.
When the rules in a given policy are evaluated separately with an OR operator, the certainty metric for each rule contributes to the overall matching of the endpoint profiles into a specific category of endpoints. If the rules of an endpoint profiling policy match, then the profiling policy and the matched policy are the same for that endpoint when they are dynamically discovered on your network.
Logically Grouped Conditions in Rules
An endpoint profiling policy (profile) contains a single condition or a combination of multiple single conditions that are logically combined using an AND or OR operator, against which you can check, categorize, and group endpoints for a given rule in a policy.
A condition is used to check the collected endpoint attribute value against the value specified in the condition for an endpoint. If you map more than one attribute, you can logically group the conditions, which helps you to categorize endpoints on your network. You can check endpoints against one or more such conditions with a corresponding certainty metric (an integer value that you define) associated with it in a rule or trigger an exception action that is associated to the condition or a network scan action that is associated to the condition.
Certainty Factor
The minimum certainty metric in the profiling policy evaluates the matching profile for an endpoint. Each rule in an endpoint profiling policy has a minimum certainty metric (an integer value) associated to the profiling conditions. The certainty metric is a measure that is added for all the valid rules in an endpoint profiling policy, which measures how each condition in an endpoint profiling policy contributes to improve the overall classification of endpoints.
The certainty metric for each rule contributes to the overall matching of the endpoint profiles into a specific category of endpoints. The certainty metric for all the valid rules are added together to form the matching certainty. It must exceed the minimum certainty factor that is defined in an endpoint profiling policy. By default, the minimum certainty factor for all new profiling policy rules and predefined profiling policies is 10.
Endpoint Profiling Policies Settings
The following table describes the fields in the Endpoint Policies window. The navigation path for this page is: .
|
Field Name |
Usage Guidelines |
|---|---|
|
Name |
Enter the name of the endpoint profiling policy that you want to create. |
|
Description |
Enter the description of the endpoint profiling policy that you want to create. |
|
Policy Enabled |
By default, the Policy Enabled check box is checked to associate a matching profiling policy when you profile an endpoint. When unchecked, the endpoint profiling policy is excluded when you profile an endpoint. |
|
Minimum Certainty Factor |
Enter the minimum value that you want to associate with the profiling policy. The default value is 10. |
|
Exception Action |
Choose an exception action, which you want to associate with the conditions when defining a rule in the profiling policy. The default is NONE. The exception actions are defined in the following location: Policy > Policy Elements > Results > Profiling > Exception Actions. |
|
Network Scan (NMAP) Action |
Choose a network scan action from the list, which you want to associate with the conditions when defining a rule in the profiling policy, if required. The default is NONE. The exception actions are defined in the following location: Policy > Policy Elements > Results > Profiling > Network Scan (NMAP) Actions. |
|
Create an Identity Group for the policy |
Check one of the following options to create an endpoint identity group:
|
|
Yes, create matching Identity Group |
Choose this option to use an existing profiling policy. This option creates a matching identity group for those endpoints and the identity group will be the child of the Profiled endpoint identity group when an endpoint profile matches an existing profiling policy. For example, the Xerox-Device endpoint identity group is created in the Endpoints Identity Groups page when endpoints discovered on your network match the Xerox-Device profile. |
|
No, use existing Identity Group hierarchy |
Check this check box to assign endpoints to the matching parent endpoint identity group using hierarchical construction of profiling policies and identity groups. This option allows you to make use of the endpoint profiling policies hierarchy to assign endpoints to one of the matching parent endpoint identity groups, as well as to the associated endpoint identity groups to the parent identity group. For example, endpoints that match an existing profile are grouped under the appropriate parent endpoint identity group. Here, endpoints that match the Unknown profile are grouped under Unknown, and endpoints that match an existing profile are grouped under the Profiled endpoint identity group. For example,
|
|
Parent Policy |
Choose a parent profiling policy that are defined in the system to which you want to associate the new endpoint profiling policy. You can choose a parent profiling policy from which you can inherit rules and conditions to its child. |
|
Associated CoA Type |
Choose one of the following CoA types that you want to associate with the endpoint profiling policy:
|
|
Rules |
One or more rules that are defined in endpoint profiling policies determine the matching profiling policy for endpoints, which allows you to group endpoints according to their profiles. One or more profiling conditions from the policy elements library are used in rules for validating endpoint attributes and their values for the overall classification. |
|
Conditions |
Click the plus [+] sign to expand the Conditions anchored overlay, and click the minus [-] sign, or click outside the anchored overlay to close it. Click Select Existing Condition from Library or Create New Condition (Advanced Option) . Select Existing Condition from Library---You can define an expression by selecting Cisco predefined conditions from the policy elements library. Create New Condition (Advanced Option)---You can define an expression by selecting attributes from various system or user-defined dictionaries. You can associate one of the following with the profiling conditions:
Choose one of the following predefined settings to associate with the profiling condition:
|
|
Select Existing Condition from Library |
You can do the following:
|
|
Create New Condition (Advance Option) |
You can do the following:
|
Create Endpoint Profiling Policies
You can use the Profiling Policies page to manage endpoint profiling policies that you create as an administrator of Cisco ISE, and also endpoint profiling profiles that are provided by Cisco ISE when deployed.
You can create new profiling policies to profile endpoints by using the following options in the New Profiler Policy page:
-
Policy Enabled
-
Create an Identity Group for the policy to create a matching endpoint identity group or use the endpoint identity group hierarchy
-
Parent Policy
-
Associated CoA Type
Note
When you choose to create an endpoint policy in the Profiling Policies page, do not use the Stop button on your web browsers. This action leads to the following: stops loading the New Profiler Policy page, loads other list pages and the menus within the list pages when you access them, and prevents you from performing operations on all the menus within the list pages except the Filter menus. You might need to log out of Cisco ISE, and then log in again to perform operations on all the menus within the list pages.
You can create a similar characteristic profiling policy by duplicating an endpoint profiling policy through which you can modify an existing profiling policy instead of creating a new profiling policy by redefining all conditions.
Procedure
| Step 1 |
Choose . |
| Step 2 |
Click Add. |
| Step 3 |
Enter a name and description for the new endpoint policy that you want to create. The Policy Enabled check box is checked by default to include the endpoint profiling policy for validation when you profile an endpoint. |
| Step 4 |
Enter a value for the minimum certainty factor within the valid range 1 to 65535. |
| Step 5 |
Click the arrow next to the Exception Action drop-down list to associate an exception action or click the arrow next to the Network Scan (NMAP) Action drop-down list to associate a network scan action. |
| Step 6 |
Choose one of the following options for Create an Identity Group for the policy:
|
| Step 7 |
Click the arrow next to the Parent Policy drop-down list to associate a parent policy to the new endpoint policy. |
| Step 8 |
Choose a CoA type to be associated in the Associated CoA Type drop-down list. |
| Step 9 |
Click in the rule to add conditions and associate an integer value for the certainty factor for each condition or associate either an exception action or a network scan action for that condition for the overall classification of an endpoint. |
| Step 10 |
Click Submit to add an endpoint policy or click the Profiler Policy List link from the New Profiler Policy page to return to the Profiling Policies page. |
Change of Authorization Configuration per Endpoint Profiling Policy
In addition to the global configuration of change of authorization (CoA) types in Cisco ISE, you can also configure to issue a specific type of CoA associated for each endpoint profiling policy.
The global No CoA type configuration overrides each CoA type configured in an endpoint profiling policy. If the global CoA type is set other than the No CoA type, then each endpoint profiling policy is allowed to override the global CoA configuration.
When a CoA is triggered, each endpoint profiling policy can determine the actual CoA type, as follows:
-
General Setting—This is the default setting for all the endpoint profiling policies that issues a CoA per global configuration.
-
No CoA—This setting overrides any global configuration and disables CoA for the profile.
-
Port Bounce—This setting overrides the global Port Bounce and Reauth configuration types, and issues port bounce CoA.
-
Reauth—This setting overrides the global Port Bounce and Reauth configuration types, and issues reauthentication CoA.
Note
If the profiler global CoA configuration is set to Port Bounce (or Reauth), ensure that you configure corresponding endpoint profiling policies with No CoA, the per-policy CoA option so that the BYOD flow does not break for your mobile devices.
See the summary of configuration below combined for all the CoA types and the actual CoA type issued in each case based on the global and endpoint profiling policy settings.
|
Global CoA Type |
Default CoA Type set per Policy |
No coA Type per Policy |
Port Bounce Type per Policy |
Reauth Type per Policy |
|---|---|---|---|---|
|
No CoA |
No CoA |
No CoA |
No CoA |
No CoA |
|
Port Bounce |
Port Bounce |
No CoA |
Port Bounce |
Re-Auth |
|
Reauth |
Reauth |
No CoA |
Port Bounce |
Re-Auth |
Import Endpoint Profiling Policies
You can import endpoint profiling policies from a file in XML by using the same format that you can create in the export function. If you import newly created profiling policies that have parent policies associated, then you must have defined parent policies before you define child policies.
The imported file contains the hierarchy of endpoint profiling policies that contain the parent policy first, then the profile that you imported next along with the rules and checks that are defined in the policy.
Procedure
| Step 1 |
Choose > Profiling Policies. |
| Step 2 |
Click Import. |
| Step 3 |
Click Browse to locate the file that you previously exported and want to import. |
| Step 4 |
Click Submit. |
| Step 5 |
Click the Profiler Policy List link to return to the Profiling Policies page. |
Export Endpoint Profiling Policies
You can export endpoint profiling policies to other Cisco ISE deployments. Or, you can use the XML file as a template for creating your own policies to import. You can also download the file to your system in the default location, which can be used for importing later.
A dialog appears when you want to export endpoint profiling policies, which prompts you to open the profiler_policies.xml with an appropriate application or save it. This is a file in XML format that you can open in a web browser, or in other appropriate applications.
Procedure
| Step 1 |
Choose . |
| Step 2 |
Choose Export, and choose one of the following:
|
| Step 3 |
Click OK to export the endpoint profiling policies in the profiler_policies.xml file. |
Predefined Endpoint Profiling Policies
Cisco ISE includes predefined default profiling policies when Cisco ISE is deployed, and their hierarchical construction allows you to categorize identified endpoints on your network, and assign them to a matching endpoint identity groups. Because endpoint profiling policies are hierarchical, you can find that the Profiling Policies page displays the list of generic (parent) policies for devices and child policies to which their parent policies are associated in the Profiling Policies list page.
The Profiling Policies page displays endpoint profiling policies with their names, type, description and the status, if enabled or not for validation.
The endpoint profiling policy types are classified as follows:
-
Cisco Provided—Endpoint profiling policies that are predefined in Cisco ISE are identified as the Cisco Provided type.
-
Administrator Modified—Endpoint profiling policies are identified as the Administrator Modified type when you modify predefined endpoint profiling policies. Cisco ISE overwrites changes that you have made in the predefined endpoint profiling policies during upgrade.
You can delete administrator-modified policies but Cisco ISE replaces them with up-to-date versions of Cisco-provided policies.
-
-
Administrator Created—Endpoint profiling policies that you create or when you duplicate Cisco-provided endpoint profiling policies are identified as the Administrator Created type.
We recommend that you create a generic policy (a parent) for a set of endpoints from which its children can inherit the rules and conditions. If an endpoint has to be classified, then the endpoint profile has to first match the parent, and then its descendant (child) policies when you are profiling an endpoint.
For example, Cisco-Device is a generic endpoint profiling policy for all Cisco devices, and other policies for Cisco devices are children of Cisco-Device. If an endpoint has to be classified as a Cisco-IP-Phone 7960, then the endpoint profile for this endpoint has to first match the parent Cisco-Device policy, its child Cisco-IP-Phone policy, and then the Cisco-IP-Phone 7960 profiling policy for better classification.
Predefined Endpoint Profiling Policies Overwritten During Upgrade
You can edit existing endpoint profiling policies in the Profiling Policies page. You must also save all your configurations in a copy of the predefined endpoint profiles when you want to modify the predefined endpoint profiling policies.
During an upgrade, Cisco ISE overwrites any configuration that you have saved in the predefined endpoint profiles.
Unable to Delete Endpoint Profiling Policies
You can delete selected or all the endpoint profiling policies in the Profiling Policies page. By default, you can delete all the endpoint profiling policies from the Profiling Policies page. When you select all the endpoint profiling policies and try to delete them in the Profiling Policies page, some of them may not be deleted when the endpoint profiling policies are a parent policy mapped to other endpoint profiling policies or mapped to an authorization policy and a parent policy to other endpoint profiling policies.
For example,
-
You cannot delete Cisco Provided endpoint profiling policies,
-
You cannot delete a parent profile in the Profiling Policies page when an endpoint profile is defined as a parent to other endpoint profiles. For example, Cisco-Device is a parent to other endpoint profiling policies for Cisco devices.
-
You cannot delete an endpoint profile when it is mapped to an authorization policy. For example, Cisco-IP-Phone is mapped to the Profiled Cisco IP Phones authorization policy, and it is a parent to other endpoint profiling policies for Cisco IP Phones.
Predefined Profiling Policies for Draeger Medical Devices
Cisco ISE contains default endpoint profiling policies that include a generic policy for Draeger medical devices, a policy for Draeger-Delta medical device, and a policy for Draeger-M300 medical device. Both the medical devices share ports 2050 and 2150, and therefore you cannot classify the Draeger-Delta and Draeger-M300 medical devices when you are using the default Draeger endpoint profiling policies.
If these Draeger devices share ports 2050 and 2150 in your environment, you must add a rule in addition to checking for the device destination IP address in the default Draeger-Delta and Draeger-M300 endpoint profiling policies so that you can distinquish these medical devices.
Cisco ISE includes the following profiling conditions that are used in the endpoint profiling policies for the Draeger medical devices:
-
Draeger-Delta-PortCheck1 that contains port 2000
-
Draeger-Delta-PortCheck2 that contains port 2050
-
Draeger-Delta-PortCheck3 that contains port 2100
-
Draeger-Delta-PortCheck4 that contains port 2150
-
Draeger-M300PortCheck1 that contains port 1950
-
Draeger-M300PortCheck2 that contains port 2050
-
Draeger-M300PortCheck3 that contains port 2150
Endpoint Profiling Policy for Unknown Endpoints
An endpoint that does not match existing profiles and cannot be profiled in Cisco ISE is an unknown endpoint. An unknown profile is the default system profiling policy that is assigned to an endpoint, where an attribute or a set of attributes collected for that endpoint do not match with existing profiles in Cisco ISE.
An Unknown profile is assigned in the following scenarios:
-
When an endpoint is dynamically discovered in Cisco ISE, and there is no matching endpoint profiling policy for that endpoint, it is assigned to the unknown profile.
-
When an endpoint is statically added in Cisco ISE, and there is no matching endpoint profiling policy for a statically added endpoint, it is assigned to the unknown profile.
If you have statically added an endpoint to your network, the statically added endpoint is not profiled by the profiling service in Cisco ISE. You can change the unknown profile later to an appropriate profile and Cisco ISE will not reassign the profiling policy that you have assigned.
Endpoint Profiling Policy for Statically Added Endpoints
For the endpoint that is statically added to be profiled, the profiling service computes a profile for the endpoint by adding a new MATCHEDPROFILE attribute to the endpoint. The computed profile is the actual profile of an endpoint if that endpoint is dynamically profiled. This allows you to find the mismatch between the computed profile for statically added endpoints and the matching profile for dynamically profiled endpoints.
Endpoint Profiling Policy for Static IP Devices
If you have an endpoint with a statically assigned IP address, you can create a profile for such static IP devices.
You must enable the RADIUS probe or SNMP Query and SNMP Trap probes to profile an endpoint that has a static IP address.
Endpoint Profiling Policy Matching
Cisco ISE always considers a chosen policy for an endpoint that is the matched policy rather than an evaluated policy when the profiling conditions that are defined in one or more rules are met in a profiling policy. Here, the status of static assignment for that endpoint is set to false in the system. But, this can be set to true after it is statically reassigned to an existing profiling policy in the system, by using the static assignment feature during an endpoint editing.
The following apply to the matched policies of endpoints:
-
For statically assigned endpoint, the profiling service computes the MATCHEDPROFILE.
-
For dynamically assigned endpoints, the MATCHEDPROFILEs are identical to the matching endpoint profiles.
You can determine a matching profiling policy for dynamic endpoints using one or more rules that are defined in a profiling policy and assign appropriately an endpoint identity group for categorization.
When an endpoint is mapped to an existing policy, the profiling service searches the hierarchy of profiling policies for the closest parent profile that has a matching group of policies and assigns the endpoint to the appropriate endpoint policy.
Endpoint Profiling Policies Used for Authorization
You can use an endpoint profiling policy in authorization rules, where you can create a new condition to include a check for an endpoint profiling policy as an attribute, and the attribute value assumes the name of the endpoint profiling policy. You can select an endpoint profiling policy from the endpoints dictionary, which includes the following attributes: PostureApplicable, EndPointPolicy, LogicalProfile, and BYODRegistration.
The attribute value for PostureApplicable is auto set based on the operating system. It is set to No for IOS and Android devices since there is no AnyConnect available on those platforms to perform Posture. The value is set as Yes for Mac OSX and Windows devices.
You can define an authorization rule that includes a combination of EndPointPolicy, BYODRegistration, and identity groups.
Endpoint Profiling Policies Grouped into Logical Profiles
A logical profile is a container for a category of profiles or associated profiles, irrespective of Cisco-provided or administrator-created endpoint profiling policies. An endpoint profiling policy can be associated to multiple logical profiles.
You can use the logical profile in an authorization policy condition to help create an overall network access policy for a category of profiles. You can create a simple condition for authorization, which can be included in the authorization rule. The attribute-value pair that you can use in the authorization condition is the logical profile (attribute) and the name of the logical profile (value), which can be found in the EndPoints systems dictionary.
For example, you can create a logical profile for all mobile devices like Android, Apple iPhone, or Blackberry by assigning matching endpoint profiling policies for that category to the logical profile. Cisco ISE contains IP-Phone, a default logical profile for all the IP phones, which includes IP-Phone, Cisco-IP-Phone, Nortel-IP-Phone-2000-Series, and Avaya-IP-Phone profiles.
Create Logical Profiles
You can create a logical profile that you can use to group a category of endpoint profiling policies, which allows you to create an overall category of profiles or associated profiles. You can also remove the endpoint profiling policies from the assigned set moving them back to the available set. For more information about Logical Profiles, see Endpoint Profiling Policies Grouped into Logical Profiles.
Procedure
| Step 1 |
Choose . |
| Step 2 |
Click Add. |
| Step 3 |
Enter a name and description for the new logical profile in the text boxes for Name and Description. |
| Step 4 |
Choose endpoint profiling policies from the Available Policies to assign them in a logical profile. |
| Step 5 |
Click the right arrow to move the selected endpoint profiling policies to the Assigned Policies. |
| Step 6 |
Click Submit. |
Profiling Exception Actions
An exception action is a single configurable action that can be referred to in an endpoint profiling policy, and that is triggered when the exception conditions that are associated with the action are met.
Exception Actions can be any one of the following types:
-
Cisco-provided—You can not delete Cisco-provided exception actions. Cisco ISE triggers the following noneditable profiling exception actions from the system when you want to profile endpoints in Cisco ISE:
-
Authorization Change—The profiling service issues a change of authorization when an endpoint is added or removed from an endpoint identity group that is used by an authorization policy.
-
Endpoint Delete—An exception action is triggered in Cisco ISE and a CoA is issued when an endpoint is deleted from the system in the Endpoints page, or reassigned to the unknown profile from the edit page on a Cisco ISE network.
-
FirstTimeProfiled—An exception action is triggered in Cisco ISE and a CoA is issued when an endpoint is profiled in Cisco ISE for the first time, where the profile of that endpoint changes from an unknown profile to an existing profile but that endpoint is not successfully authenticated on a Cisco ISE network.
-
-
Administrator-created—Cisco ISE triggers profiling exception actions that you create.
Create Exception Actions
You can define and associate one or more exception rules to a single profiling policy. This association triggers an exception action (a single configurable action) when the profiling policy matches and at least one of the exception rules matches in the profiling endpoints in Cisco ISE.
Procedure
| Step 1 |
Choose . |
| Step 2 |
Click Add. |
| Step 3 |
Enter a name and description for the exception action in the text boxes for Name and Description. |
| Step 4 |
Check the CoA Action check box. |
| Step 5 |
Click the Policy Assignment drop-down list to choose an endpoint policy. |
| Step 6 |
Click Submit. |
Create Endpoints with Static Assignments of Policies and Identity Groups
You can create a new endpoint statically by using the MAC address of an endpoint in the Endpoints page. You can also choose an endpoint profiling policy and an identity group in the Endpoints page for static assignment.
The regular and mobile device (MDM) endpoints are displayed in the Endpoints Identities list. In the listing page, columns for attributes like Hostname, Device Type, Device Identifier for MDM endpoints are displayed. Other columns like Static Assignment and Static Group Assignment are not displayed by default.
Note |
You cannot add, edit, delete, import, or export MDM Endpoints using this page. |
Procedure
| Step 1 |
Choose . |
| Step 2 |
Click Add. |
| Step 3 |
Enter the MAC address of an endpoint in hexadecimal format and separated by a colon. |
| Step 4 |
Choose a matching endpoint policy from the Policy Assignment drop-down list to change the static assignment status from dynamic to static. |
| Step 5 |
Check the Static Assignment check box to change the status of static assignment that is assigned to the endpoint from dynamic to static. |
| Step 6 |
Choose an endpoint identity group to which you want to assign the newly created endpoint from the Identity Group Assignment drop-down list. |
| Step 7 |
Check the Static Group Assignment check box to change the dynamic assignment of an endpoint identity group to static. |
| Step 8 |
Click Submit. |
Import Endpoints from CSV Files
Note |
To import endpoint custom attributes, you have to create the same custom attributes as in the CSV file in the page using the correct data types. These attributes have to be prefixed with "CUSTOM." to differentiate them from endpoint attributes. |
There are about 30 attributes that can be imported. The list includes MACAddress, EndPointPolicy, and IdentityGroup. Optional attributes are:
|
Description |
PortalUser |
LastName |
|
PortalUser.GuestType |
PortalUser.FirstName |
EmailAddress |
|
PortalUser.Location |
Device Type |
host-name |
|
PortalUser.GuestStatus |
StaticAssignment |
Location |
|
PortalUser.CreationType |
StaticGroupAssignment |
MDMEnrolled |
|
PortalUser.EmailAddress |
User-Name |
MDMOSVersion |
|
PortalUser.PhoneNumber |
DeviceRegistrationStatus |
MDMServerName |
|
PortalUser.LastName |
AUPAccepted |
MDMServerID |
|
PortalUser.GuestSponsor |
FirstName |
BYODRegistration |
|
CUSTOM.<custom attribute name> |
— |
— |
-
MACAddress
-
MACAddress, EndPointPolicy
-
MACAddress, EndPointPolicy, IdentityGroup
-
MACAddress, EndPointPolicy, IdentityGroup, <List of attributes listed above as optional attributes>
All attribute values, except MAC address, are optional for importing endpoints from a CSV file. If you want to import endpoints without certain values, the values are still separated by the comma.
For example,
-
MAC1, Endpoint Policy1, Endpoint Identity Group1
-
MAC2
-
MAC3, Endpoint Policy3
-
MAC4, , Endpoint Identity Group4
-
MAC5, , Endpoint Identity Group5, MyDescription, MyPortalUser, and so on
Procedure
| Step 1 |
Choose . |
| Step 2 |
Click Import From File. |
| Step 3 |
Click Browse to locate the CSV file that you have already created. |
| Step 4 |
Click Submit. |
Default Import Template Available for Endpoints
You must update the MAC addresses of endpoints, endpoint profiling policies, endpoint identity groups along with any of the optional attribute values you wish to import, and save the file with a new file name. This file can be used to import endpoints. See the header row in the template.csv file that is created when you use the Generate a Template link.
| MAC | EndpointPolicy | IdentityGroup | Other Optional Attributes |
|---|---|---|---|
| 11:11:11:11:11:11 | Android | Profiled | <Empty>/<Value> |
Unknown Endpoints Reprofiled During Import
| MAC Address | Endpoint Profiling Policy Assigned Before Import in Cisco ISE | Endpoint Profiling Policy Assigned After Import in Cisco ISE |
|---|---|---|
| 00:00:00:00:01:02 | Unknown. | Xerox-Device |
| 00:00:00:00:01:03 | Unknown. | Xerox-Device |
| 00:00:00:00:01:04 | Unknown. | Xerox-Device |
| 00:00:00:00:01:05 | If no profile is assigned to an endpoint, then it is assigned to the Unknown profile, and also reprofiled to the matching profile. | Xerox-Device |
Endpoints with Invalid Attributes Not Imported
If any of the endpoints present in the CSV file have invalid attributes, then the endpoints are not imported and an error message is displayed.
For example, if endpoints are assigned to invalid profiles in the file used for import, then they are not imported because there are no matching profiles in Cisco ISE. See below how endpoints are not imported when they are assigned to invalid profiles in the CSV file.
| MAC Address | Endpoint Profiling Policy Assigned Before Import in Cisco ISE | Endpoint Profiling Policy Assigned After Import in Cisco ISE |
|---|---|---|
| 00:00:00:00:01:02 | Unknown. | Xerox-Device |
| 00:00:00:00:01:05 | If an endpoint such as 00:00:00:00:01:05 is assigned to an invalid profile other than the profiles that are available in Cisco ISE, then Cisco ISE displays a warning message that the policy name is invalid and the endpoint will not be imported. | The endpoint is not imported because there is no matching profile in Cisco ISE. |
Import Endpoints from LDAP Server
You can import the MAC addresses, the associated profiles, and the endpoint identity groups of endpoints securely from an LDAP server.
Before you begin
Before you begin to import endpoints, ensure that you have installed the LDAP server.
You have to configure the connection settings and query settings before you can import from an LDAP server. If the connection settings or query settings are configured incorrectly in Cisco ISE, then the “LDAP import failed:” error message appears.
Procedure
| Step 1 |
Choose . |
| Step 2 |
Enter the values for the connection settings. |
| Step 3 |
Enter the values for the query settings. |
| Step 4 |
Click Submit. |
Export Endpoints with Comma-Separated Values File
Note |
To import endpoint custom attributes exported from one deployment to another, you must create the same custom attributes in the page and use the same data type as specified in the original deployment. |
Export All exports all the endpoints in Cisco ISE, whereas Export Selected exports only the endpoints selected by the user. By default, the profiler_endpoints.csv is the CSV file and Microsoft Office Excel is the default application to open the CSV file.
Procedure
| Step 1 |
Choose . |
| Step 2 |
Click Export, and choose one of the following:
|
| Step 3 |
Click OK to save the profiler_endpoints.csv file. |
-
UpdateTime : The last time that the profiler updated the endpoint, due to a change to an endpoint attribute. The value is 0 if there have been no updates since the endpoint session started. It will be blank briefly, during an update.
-
InactivityTime: Time since the endpoint was active.
Identified Endpoints
Cisco ISE displays identified endpoints that connect to your network and use resources on your network in the Endpoints page. An endpoint is typically a network-capable device that connect to your network through wired and wireless network access devices and VPN. Endpoints can be personal computers, laptops, IP phones, smart phones, gaming consoles, printers, fax machines, and so on.
The MAC address of an endpoint, expressed in hexadecimal form, is always the unique representation of an endpoint, but you can also identify an endpoint with a varying set of attributes and the values associated to them, called an attribute-value pair. You can collect a varying set of attributes for endpoints based on the endpoint capability, the capability and configuration of the network access devices and the methods (probes) that you use to collect these attributes.
Dynamically Profiled Endpoints
When endpoints are discovered on your network, they can be profiled dynamically based on the configured profiling endpoint profiling policies, and assigned to the matching endpoint identity groups depending on their profiles.
Statically Profiled Endpoints
An endpoint can be profiled statically when you create an endpoint with its MAC address and associate a profile to it along with an endpoint identity group in Cisco ISE. Cisco ISE does not reassign the profiling policy and the identity group for statically assigned endpoints.
Unknown Endpoints
If you do not have a matching profiling policy for an endpoint, you can assign an unknown profiling policy (Unknown) and the endpoint therefore will be profiled as Unknown. The endpoint profiled to the Unknown endpoint policy requires that you create a profile with an attribute or a set of attributes collected for that endpoint. The endpoint that does not match any profile is grouped within the Unknown endpoint identity group.
Identified Endpoints Locally Stored in Policy Service Nodes Database
Cisco ISE writes identified endpoints locally in the Policy Service node database. After storing endpoints locally in the database, these endpoints are then made available (remote write) in the Administration node database only when significant attributes change in the endpoints, and replicated to the other Policy Service nodes database.
The following are the significant attributes:
-
ip
-
EndPointPolicy
-
MatchedValue
-
StaticAssignment
-
StaticGroupAssignment
-
MatchedPolicyID
-
NmapSubnetScanID
-
PortalUser
-
DeviceRegistrationStatus
-
BYODRegistration
When you change endpoint profile definitions in Cisco ISE, all endpoints have to be reprofiled. A Policy Service node that collects the attributes of endpoints is responsible for reprofiling of those endpoints.
When a Policy Service node starts collecting attributes about an endpoint for which attributes were initially collected by a different Policy Service node, then the endpoint ownership changes to the current Policy Service node. The new Policy Service node will retrieve the latest attributes from the previous Policy Service node and reconcile the collected attributes with those attributes that were already collected.
When a significant attribute changes in the endpoint, attributes of the endpoint are automatically saved in the Administration node database so that you have the latest significant change in the endpoint. If the Policy Service node that owns an endpoint is not available for some reasons, then the Administrator ISE node will reprofile an endpoint that lost the owner and you have to configure a new Policy Service node for such endpoints.
Policy Service Nodes in Cluster
Cisco ISE uses Policy Service node group as a cluster that allows to exchange endpoint attributes when two or more nodes in the cluster collect attributes for the same endpoint. We recommend to create clusters for all Policy Service nodes that reside behind a load balancer.
If a different node other than the current owner receives attributes for the same endpoint, it sends a message across the cluster requesting the latest attributes from the current owner to merge attributes and determine if a change of ownership is needed. If you have not defined a node group in Cisco ISE, it is assumed that all nodes are within one cluster.
There are no changes made to endpoint creation and replication in Cisco ISE. Only the change of ownership for endpoints is decided based on a list of attributes (white list) used for profiling that are built from static attributes and dynamic attributes.
Upon subsequent attributes collection, the endpoint is updated on the Administration node, if anyone of the following attributes changes:
-
ip
-
EndPointPolicy
-
MatchedValue
-
StaticAssignment
-
StaticGroupAssignment
-
MatchedPolicyID
-
NmapSubnetScanID
-
PortalUser
-
DeviceRegistrationStatus
-
BYODRegistration
When an endpoint is edited and saved in the Administration node, the attributes are retrieved from the current owner of the endpoint.
Create Endpoint Identity Groups
Cisco ISE groups endpoints that it discovers in to the corresponding endpoint identity groups. Cisco ISE comes with several system-defined endpoint identity groups. You can also create additional endpoint identity groups from the Endpoint Identity Groups page. You can edit or delete the endpoint identity groups that you have created. You can only edit the description of the system-defined endpoint identity groups; you cannot edit the name of these groups or delete them.
Procedure
| Step 1 |
Choose . |
| Step 2 |
Click Add. |
| Step 3 |
Enter the name for the endpoint identity group that you want to create (do not include spaces in the name of the endpoint identity group). |
| Step 4 |
Enter the description for the endpoint identity group that you want to create. |
| Step 5 |
Click the Parent Group drop-down list to choose an endpoint identity group to which you want to associate the newly created endpoint identity group. |
| Step 6 |
Click Submit. |
Identified Endpoints Grouped in Endpoint Identity Groups
Cisco ISE groups discovered endpoints into their corresponding endpoint identity groups based on the endpoint profiling policies. Profiling policies are hierarchical, and they are applied at the endpoint identify groups level in Cisco ISE. By grouping endpoints to endpoint identity groups, and applying profiling policies to endpoint identity groups, Cisco ISE enables you to determine the mapping of endpoints to the endpoint profiles by checking corresponding endpoint profiling policies.
Cisco ISE creates a set of endpoint identity groups by default, and allows you to create your own identity groups to which endpoints can be assigned dynamically or statically. You can create an endpoint identity group and associate the identity group to one of the system-created identity groups. You can also assign an endpoint that you create statically to any one of the identity groups that exists in the system, and the profiling service cannot reassign the identity group.
Default Endpoint Identity Groups Created for Endpoints
Cisco ISE creates the following five endpoint identity groups by default: Blacklist, GuestEndpoints, Profiled, RegisteredDevices, and Unknown. In addition, it creates two more identity groups, such as Cisco-IP-Phone and Workstation, which are associated to the Profiled (parent) identity group. A parent group is the default identity group that exists in the system.
Cisco ISE creates the following endpoint identity groups:
-
Blacklist—This endpoint identity group includes endpoints that are statically assigned to this group in Cisco ISE and endpoints that are blacklisted in the device registration portal. An authorization profile can be defined in Cisco ISE to permit, or deny network access to endpoints in this group.
-
GuestEndpoints—This endpoint identity group includes endpoints that are used by guest users.
-
Profiled—This endpoint identity group includes endpoints that match endpoint profiling policies except Cisco IP phones and workstations in Cisco ISE.
-
RegisteredDevices—This endpoint identity group includes endpoints, which are registered devices that are added by an employee through the devices registration portal. The profiling service continues to profile these devices normally when they are assigned to this group. Endpoints are statically assigned to this group in Cisco ISE, and the profiling service cannot reassign them to any other identity group. These devices will appear like any other endpoint in the endpoints list. You can edit, delete, and blacklist these devices that you added through the device registration portal from the endpoints list in the Endpoints page in Cisco ISE. Devices that you have blacklisted in the device registration portal are assigned to the Blacklist endpoint identity group, and an authorization profile that exists in Cisco ISE redirects blacklisted devices to an URL, which displays “Unauthorised Network Access”, a default portal page to the blacklisted devices.
-
Unknown—This endpoint identity group includes endpoints that do not match any profile in Cisco ISE.
In addition to the above system created endpoint identity groups, Cisco ISE creates the following endpoint identity groups, which are associated to the Profiled identity group:
-
Cisco-IP-Phone—An identity group that contains all the profiled Cisco IP phones on your network.
-
Workstation—An identity group that contains all the profiled workstations on your network.
Endpoint Identity Groups Created for Matched Endpoint Profiling Policies
If you have an endpoint policy that matches an existing policy, then the profiling service can create a matching endpoint identity group. This identity group becomes the child of the Profiled endpoint identity group. When you create an endpoint policy, you can check the Create Matching Identity Group check box in the Profiling Policies page to create a matching endpoint identity group. You cannot delete the matching identity group unless the mapping of the profile is removed.
Add Static Endpoints in Endpoint Identity Groups
You can add or remove statically added endpoints in any endpoint identity group.
You can add endpoints from the Endpoints widget only to a specific identity group. If you add an endpoint to the specific endpoint identity group, then the endpoint is moved from the endpoint identity group where it was dynamically grouped earlier.
Upon removal from the endpoint identity group where you recently added an endpoint, the endpoint is reprofiled back to the appropriate identity group. You do not delete endpoints from the system but only remove them from the endpoint identity group.
Procedure
| Step 1 |
Choose . |
| Step 2 |
Choose an endpoint identity group, and click Edit. |
| Step 3 |
Click Add. |
| Step 4 |
Choose an endpoint in the Endpoints widget to add the selected endpoint in the endpoint identity group. |
| Step 5 |
Click the Endpoint Group List link to return to the Endpoint Identity Groups page. |
Dynamic Endpoints Reprofiled After Adding or Removing in Identity Groups
If an endpoint identity group assignment is not static, then endpoints are reprofiled after you add or remove them from an endpoint identity group. Endpoints that are identified dynamically by the ISE profiler appear in appropriate endpoint identity groups. If you remove dynamically added endpoints from an endpoint identity group, Cisco ISE displays a message that you have successfully removed endpoints from the identity group but reprofiles them back in the endpoint identity group.
Endpoint Identity Groups Used in Authorization Rules
You can effectively use endpoint identity groups in the authorization policies to provide appropriate network access privileges to the discovered endpoints. For example, an authorization rule for all types of Cisco IP Phones is available by default in Cisco ISE in the following location: .
You must ensure that the endpoint profiling policies are either standalone policies (not a parent to other endpoint profiling policies), or their parent policies of the endpoint profiling policies are not disabled.
Profiler Feed Service
Profiler conditions, exception actions, and NMAP scan actions are classified as Cisco-provided or administrator-created, as shown in the System Type attribute. Endpoint profiling policies are classified as Cisco-provided, administrator-created, or administrator- modified. These classifications are shown in the System Type attribute.
You can perform different operations on the profiler conditions, exception actions, NMAP scan actions, and endpoint profiling policies depending on the System Type attribute. You cannot edit or delete Cisco-provided conditions, exception actions, and nmap scan actions. You can not delete Endpoint policies that are provided by Cisco. When you edit policies, they are called administrator-modified. When the feed service updates policies, the administrator-modified policies are replaced by the up-to-date version of the Cisco-provided policy that it was based on.
You can retrieve new and updated endpoint profiling policies and the updated OUI database from the Cisco feed server. You must have a subscription to Cisco ISE. You can also receive e-mail notifications about applied, success, and failure messages. You can send the anonymous information back to Cisco about feed service actions, which helps Cisco improve the feed service.
The OUI database contains the MAC OUIs assigned to vendors. The OUI list is available here: http://standards.ieee.org/develop/regauth/oui/oui.txt
Cisco ISE downloads policies and OUI database updates every day at 1:00 A.M of the local Cisco ISE server time zone. Cisco ISE automatically applies these downloaded feed server policies, and stores the the changes so that you can revert to the previous state. When you revert to a previous state, the new endpoint profiling policies are removed and updated endpoint profiling policies are reverted to the previous state. In addition, the profiler feed service is automatically disabled.
You can also update the feed services manually in offline mode. You can download the updates manually by using this option if you cannot connect your ISE deployments to Cisco feed service.
Note |
Updates from the Feed Service are not allowed after the license goes Out of Compliance (OOC) for 45 days within a 60-day window period. The license is out of compliance when it has expired, or when the usage exceeds the allowed number of sessions. |
Configure Profiler Feed Service
The Profiler Feed Service retrieves new and updated endpoint profiling policies and MAC OUI database updates from the Cisco Feed server. If the Feed Service is unavailable or other errors have occurred, it is reported in the Operations Audit report.
You can configure Cisco ISE to send anonymous feed service usage report back to Cisco, which sends the following information to Cisco:
-
Hostname - Cisco ISE hostname
-
MaxCount - Total number of endpoints
-
ProfiledCount - Profiled endpoints count
-
UnknownCount - Unknown endpoints count
-
MatchSystemProfilesCount - Cisco Provided profiles count
-
UserCreatedProfiles - User created profiles count
You can change the CoA type in a Cisco-provided profiling policy. When the feed service updates that policy, the CoA type will not be changed, but the rest of that policy's attributes will be still be updated.
Before you begin
The Profiler feed service can only be configured from the Cisco ISE Admin portal in a distributed deployment or in a standalone ISE node.
Set up a Simple Mail Transfer Protocol (SMTP) server if you plan to send e-mail notifications from the Admin portal about feed updates().
To update the Feed Services online:
Procedure
| Step 1 |
Choose , and check if Verisign Class 3 Public Primary Certification Authority and Verisign Class 3 Server CA - G3 are enabled. |
| Step 2 |
Choose . You can also access the option in the
page.
|
| Step 3 |
Click the Online Subscription Update tab. |
| Step 4 |
Click the Test Feed Service Connection button to verify that there is a connection to the Cisco Feed Service, and that the certificate is valid. |
| Step 5 |
Check the Enable Online Subscription Update check box. |
| Step 6 |
Enter time in HH:MM format (local time zone of the Cisco ISE server). By default, Cisco ISE feed service is scheduled at 1.00 AM every day. |
| Step 7 |
Check the Notify administrator when download occurs check box and enter your e-mail address in the Administrator email address text box. Check the Provide Cisco anonymous information to help improve profiling accuracy check box, if you want to allow Cisco ISE to collect non-sensitive information (that will be used to provide better services and additional features in forthcoming releases). |
| Step 8 |
Click Save. |
| Step 9 |
Click Update Now. Instructs Cisco ISE to contact Cisco feed server for new and updated profiles created since the last feed service update. This re-profiles all endpoints in the system, which may cause an increase the load on the system. Due to updated endpoint profiling policies, there may be changes in the authorization policy for some endpoints that are currently connected to Cisco ISE. The Update Now button is disabled when you update new and updated profiles created since the last feed service and enabled only after the download is completed. You must navigate away from the profiler feed service Configuration page and return to this page. |
Configure Profiler Feed Services Offline
You can update the feed services offline when Cisco ISE is not directly connected to the Cisco feed server. You can download the offline update package from the Cisco feed server and upload it to Cisco ISE using the offline feed update. You can also set email notifications about new policies that are added to the feed server.
Configuring the profiler feed services offline involves the following tasks:
-
Download Offline Update Package
-
Apply Offline Feed Updates
Download Offline Update Package
To download offline update package:
Procedure
| Step 1 |
Choose . You can also access the option in the
page.
|
| Step 2 |
Click the Offline Manual Update tab. |
| Step 3 |
Click Download Updated Profile Policies link. You will be redirected to Feed Service Partner Portal. You can
also go to
https://ise.cisco.com/partner/ from your browser, to go to
the feed service partner portal directly.
|
| Step 4 |
If you are a first time user, accept the terms and agreements. An email
will be triggered to Feed Services administrator to approve your request. Upon
approval, you will receive a confirmation email.
|
| Step 5 |
Login to the partner portal using your Cisco.com credentials. |
| Step 6 |
Choose Offline Feed > Download Package . |
| Step 7 |
Click Generate Package . |
| Step 8 |
Click the Click to View the Offline Update Package contents link to view all the profiles and OUIs that are included in the generated package.
|
| Step 9 |
Click Download Package and save the file to your local system. You can
upload the saved file to Cisco ISE server to apply the feed updates in the
downloaded package.
|
Apply Offline Feed Updates
To apply the downloaded offline feed updates:
Before you begin
You must have downloaded the offline update package before applying the feed updates.
Procedure
| Step 1 |
Choose . You can also access the option in the
page.
|
| Step 2 |
Click the Offline Manual Update tab. |
| Step 3 |
Click Browse and choose the downloaded profiler feed package. |
| Step 4 |
Click Apply Update . |
Configure Email Notifications for Profile and OUI Updates
You can configure your email address to receive notifications on profile and OUI updates.
To configure email notifications:
Procedure
| Step 1 |
Perform Step 1 through Step 5 in the Download Offline Update Package section to go to the Feed Service Partner Portal. |
| Step 2 |
Choose Offline Feed > Email Preferences. |
| Step 3 |
Check the Enable Notifications checkbox to receive notifications. |
| Step 4 |
Choose the number of days from the days drop-down list to set the frequency in which you want to receive the notifications on new updates. |
| Step 5 |
Enter the e-mail address/addresses and click Save . |
Undo Feed Updates
You can revert endpoint profiling policies that were updated in the previous update and remove endpoint profiling policies and OUIs that are newly added through the previous update of the profiler feed service .
An endpoint profiling policy, if modified after an update from the feed server is not changed in the system.
Procedure
| Step 1 |
Choose . |
| Step 2 |
Click Go to Update Report Page if you want to view the configuration changes made in the Change Configuration Audit report. |
| Step 3 |
Click Undo Latest. |
Profiler Reports
Cisco ISE provides you with various reports on endpoint profiling, and troubleshooting tools that you can use to manage your network. You can generate reports for historical as well as current data. You may be able to drill down on a part of the report to view more details. For large reports, you can also schedule reports and download them in various formats.
You can run the following reports for endpoints from Operations > Reports > Endpoints and Users:
-
Endpoint Session History
-
Profiled Endpoint Summary
-
Endpoint Profile Changes
-
Top Authorizations by Endpoint
-
Registered Endpoints
Detect Anomalous Behavior of Endpoints
Cisco ISE protects your network from the illegitimate use of a MAC address. ISE detects the endpoints involved in MAC address spoofing and allows you to restrict the permission of the suspicious endpoints.
The following are the two options in the profiler configuration page for Anomalous Behavior:
-
Enable Anomalous Behavior Detection
-
Enable Anomalous Behavior Enforcement
If you enable Anomalous Behavior detection, Cisco ISE probes for data, and checks for any contradiction to the existing data with respect to changes in attributes related to NAS-Port-Type, DHCP Class Identifier, and Endpoint Policy. If so, an attribute called AnomalousBehavior set to true is added to the endpoint which helps you to filter and view the endpoints in the Visibility Context page. Audit logs are also generated for the respective MAC address.
When anomalous behavior detection is enabled, Cisco ISE checks if the following attributes of existing endpoints have changed:
-
Port-Type—Determines if the access method of an endpoint has changed. For example, if the same MAC address that connected via Wired Dot1x has been used for Wireless Dot1x and visa-versa.
-
DHCP Class Identifier—Determines whether the type of client or vendor of an endpoint has changed. This only applies when DHCP Class identifier attribute is populated with a certain value and is then changed to another value. If an endpoint is configured with a static IP, the DHCP Class Identifier attribute is empty in Cisco ISE. Later on, if another device spoofs the MAC address of this endpoint and uses DHCP, the Class Identifier changes from an empty value to a specific string. This will not trigger anomalous behavior detection.
-
Endpoint Policy—Determines if there are significant profile changes. For example, if the profile of an endpoint changes from a “Phone” or “Printer” to a “Workstation”.
If you enable Anomalous Behavior Enforcement, a CoA is issued upon detection of the anomalous Behavior , which can be used to re-authorize the suspicious endpoints, based on the authorization rules configured in the Profiler Configuration page.
To set the authorization policy rules for endpoints with anomalous Behavior, see .
Set Authorization Policy Rules for Endpoints with Anomalous Behavior
You can choose the action to be taken against any endpoint with anomalous Behavior by setting the corresponding rules on the Authorization Policy page.
Procedure
| Step 1 |
Choose Policy > Policy Sets. |
| Step 2 |
Click the arrow icon |
| Step 3 |
From the Actions column on any row, click the cog icon and then from the drop-down list, insert a new authorization rule by selecting any of the insert or duplicate options, as necessary. A new row appears in the Policy Sets table.
|
| Step 4 |
Enter the Rule Name. |
| Step 5 |
From the Conditions column, click the (+) symbol. |
| Step 6 |
Create the required conditions in the Conditions Studio Page. In the Editor section, click the Click To Add an Attribute text box, and select the required Dictionary and Attribute (for example, Endpoints.AnomalousBehaviorEqualsTrue). You can also drag and drop a Library condition to the Click To Add An Attribute text box. |
| Step 7 |
Click Use to set the authorization policy rules for endpoints with anomalous behavior. |
| Step 8 |
Click Done. |
 from the
 View Endpoints with Anomalous Behavior
-
Click Anomalous Behavior from Home > Summary > Metrics. This action opens a new tab with Anomalous Behaviour column in the lower pane of the page.
-
Choose Context Visibility > Endpoints > Endpoint Classification. You can view the Anomalous Behaviour column in the lower pane of the page.
-
You can create a new Anomalous Behavior column in Authentication view or Compromised Endpoints view in the Context Visibility page as explained in the following steps:
Procedure
| Step 1 |
Choose Context Visibility > Endpoints > Authentication or Context Visibility > Endpoints > Compromised Endpoints. |
| Step 2 |
Click the Settings icon in the lower pane of the page and check Anomalous Behavior checkbox.. |
| Step 3 |
Click Go. You can
view the Anomalous Behavior column in the Authentication or Compromised
Endpoints View.
|
Create Endpoints with Static Assignments of Policies and Identity Groups
You can create a new endpoint statically by using the MAC address of an endpoint in the Endpoints page. You can also choose an endpoint profiling policy and an identity group in the Endpoints page for static assignment.
The regular and mobile device (MDM) endpoints are displayed in the Endpoints Identities list. In the listing page, columns for attributes like Hostname, Device Type, Device Identifier for MDM endpoints are displayed. Other columns like Static Assignment and Static Group Assignment are not displayed by default.
Note |
You cannot add, edit, delete, import, or export MDM Endpoints using this page. |
Procedure
| Step 1 |
Choose . |
| Step 2 |
Click Add. |
| Step 3 |
Enter the MAC address of an endpoint in hexadecimal format and separated by a colon. |
| Step 4 |
Choose a matching endpoint policy from the Policy Assignment drop-down list to change the static assignment status from dynamic to static. |
| Step 5 |
Check the Static Assignment check box to change the status of static assignment that is assigned to the endpoint from dynamic to static. |
| Step 6 |
Choose an endpoint identity group to which you want to assign the newly created endpoint from the Identity Group Assignment drop-down list. |
| Step 7 |
Check the Static Group Assignment check box to change the dynamic assignment of an endpoint identity group to static. |
| Step 8 |
Click Submit. |
Import Endpoints from CSV Files
Note |
To import endpoint custom attributes, you have to create the same custom attributes as in the CSV file in the page using the correct data types. These attributes have to be prefixed with "CUSTOM." to differentiate them from endpoint attributes. |
There are about 30 attributes that can be imported. The list includes MACAddress, EndPointPolicy, and IdentityGroup. Optional attributes are:
|
Description |
PortalUser |
LastName |
|
PortalUser.GuestType |
PortalUser.FirstName |
EmailAddress |
|
PortalUser.Location |
Device Type |
host-name |
|
PortalUser.GuestStatus |
StaticAssignment |
Location |
|
PortalUser.CreationType |
StaticGroupAssignment |
MDMEnrolled |
|
PortalUser.EmailAddress |
User-Name |
MDMOSVersion |
|
PortalUser.PhoneNumber |
DeviceRegistrationStatus |
MDMServerName |
|
PortalUser.LastName |
AUPAccepted |
MDMServerID |
|
PortalUser.GuestSponsor |
FirstName |
BYODRegistration |
|
CUSTOM.<custom attribute name> |
— |
— |
-
MACAddress
-
MACAddress, EndPointPolicy
-
MACAddress, EndPointPolicy, IdentityGroup
-
MACAddress, EndPointPolicy, IdentityGroup, <List of attributes listed above as optional attributes>
All attribute values, except MAC address, are optional for importing endpoints from a CSV file. If you want to import endpoints without certain values, the values are still separated by the comma.
For example,
-
MAC1, Endpoint Policy1, Endpoint Identity Group1
-
MAC2
-
MAC3, Endpoint Policy3
-
MAC4, , Endpoint Identity Group4
-
MAC5, , Endpoint Identity Group5, MyDescription, MyPortalUser, and so on
Procedure
| Step 1 |
Choose . |
| Step 2 |
Click Import From File. |
| Step 3 |
Click Browse to locate the CSV file that you have already created. |
| Step 4 |
Click Submit. |
Default Import Template Available for Endpoints
You must update the MAC addresses of endpoints, endpoint profiling policies, endpoint identity groups along with any of the optional attribute values you wish to import, and save the file with a new file name. This file can be used to import endpoints. See the header row in the template.csv file that is created when you use the Generate a Template link.
| MAC | EndpointPolicy | IdentityGroup | Other Optional Attributes |
|---|---|---|---|
| 11:11:11:11:11:11 | Android | Profiled | <Empty>/<Value> |
Unknown Endpoints Reprofiled During Import
| MAC Address | Endpoint Profiling Policy Assigned Before Import in Cisco ISE | Endpoint Profiling Policy Assigned After Import in Cisco ISE |
|---|---|---|
| 00:00:00:00:01:02 | Unknown. | Xerox-Device |
| 00:00:00:00:01:03 | Unknown. | Xerox-Device |
| 00:00:00:00:01:04 | Unknown. | Xerox-Device |
| 00:00:00:00:01:05 | If no profile is assigned to an endpoint, then it is assigned to the Unknown profile, and also reprofiled to the matching profile. | Xerox-Device |
Endpoints with Invalid Attributes Not Imported
If any of the endpoints present in the CSV file have invalid attributes, then the endpoints are not imported and an error message is displayed.
For example, if endpoints are assigned to invalid profiles in the file used for import, then they are not imported because there are no matching profiles in Cisco ISE. See below how endpoints are not imported when they are assigned to invalid profiles in the CSV file.
| MAC Address | Endpoint Profiling Policy Assigned Before Import in Cisco ISE | Endpoint Profiling Policy Assigned After Import in Cisco ISE |
|---|---|---|
| 00:00:00:00:01:02 | Unknown. | Xerox-Device |
| 00:00:00:00:01:05 | If an endpoint such as 00:00:00:00:01:05 is assigned to an invalid profile other than the profiles that are available in Cisco ISE, then Cisco ISE displays a warning message that the policy name is invalid and the endpoint will not be imported. | The endpoint is not imported because there is no matching profile in Cisco ISE. |
Import Endpoints from LDAP Server
You can import the MAC addresses, the associated profiles, and the endpoint identity groups of endpoints securely from an LDAP server.
Before you begin
Before you begin to import endpoints, ensure that you have installed the LDAP server.
You have to configure the connection settings and query settings before you can import from an LDAP server. If the connection settings or query settings are configured incorrectly in Cisco ISE, then the “LDAP import failed:” error message appears.
Procedure
| Step 1 |
Choose . |
| Step 2 |
Enter the values for the connection settings. |
| Step 3 |
Enter the values for the query settings. |
| Step 4 |
Click Submit. |
Export Endpoints with Comma-Separated Values File
Note |
To import endpoint custom attributes exported from one deployment to another, you must create the same custom attributes in the page and use the same data type as specified in the original deployment. |
Export All exports all the endpoints in Cisco ISE, whereas Export Selected exports only the endpoints selected by the user. By default, the profiler_endpoints.csv is the CSV file and Microsoft Office Excel is the default application to open the CSV file.
Procedure
| Step 1 |
Choose . |
| Step 2 |
Click Export, and choose one of the following:
|
| Step 3 |
Click OK to save the profiler_endpoints.csv file. |
-
UpdateTime : The last time that the profiler updated the endpoint, due to a change to an endpoint attribute. The value is 0 if there have been no updates since the endpoint session started. It will be blank briefly, during an update.
-
InactivityTime: Time since the endpoint was active.
Identified Endpoints
Cisco ISE displays identified endpoints that connect to your network and use resources on your network in the Endpoints page. An endpoint is typically a network-capable device that connect to your network through wired and wireless network access devices and VPN. Endpoints can be personal computers, laptops, IP phones, smart phones, gaming consoles, printers, fax machines, and so on.
The MAC address of an endpoint, expressed in hexadecimal form, is always the unique representation of an endpoint, but you can also identify an endpoint with a varying set of attributes and the values associated to them, called an attribute-value pair. You can collect a varying set of attributes for endpoints based on the endpoint capability, the capability and configuration of the network access devices and the methods (probes) that you use to collect these attributes.
Dynamically Profiled Endpoints
When endpoints are discovered on your network, they can be profiled dynamically based on the configured profiling endpoint profiling policies, and assigned to the matching endpoint identity groups depending on their profiles.
Statically Profiled Endpoints
An endpoint can be profiled statically when you create an endpoint with its MAC address and associate a profile to it along with an endpoint identity group in Cisco ISE. Cisco ISE does not reassign the profiling policy and the identity group for statically assigned endpoints.
Unknown Endpoints
If you do not have a matching profiling policy for an endpoint, you can assign an unknown profiling policy (Unknown) and the endpoint therefore will be profiled as Unknown. The endpoint profiled to the Unknown endpoint policy requires that you create a profile with an attribute or a set of attributes collected for that endpoint. The endpoint that does not match any profile is grouped within the Unknown endpoint identity group.
Identified Endpoints Locally Stored in Policy Service Nodes Database
Cisco ISE writes identified endpoints locally in the Policy Service node database. After storing endpoints locally in the database, these endpoints are then made available (remote write) in the Administration node database only when significant attributes change in the endpoints, and replicated to the other Policy Service nodes database.
The following are the significant attributes:
-
ip
-
EndPointPolicy
-
MatchedValue
-
StaticAssignment
-
StaticGroupAssignment
-
MatchedPolicyID
-
NmapSubnetScanID
-
PortalUser
-
DeviceRegistrationStatus
-
BYODRegistration
When you change endpoint profile definitions in Cisco ISE, all endpoints have to be reprofiled. A Policy Service node that collects the attributes of endpoints is responsible for reprofiling of those endpoints.
When a Policy Service node starts collecting attributes about an endpoint for which attributes were initially collected by a different Policy Service node, then the endpoint ownership changes to the current Policy Service node. The new Policy Service node will retrieve the latest attributes from the previous Policy Service node and reconcile the collected attributes with those attributes that were already collected.
When a significant attribute changes in the endpoint, attributes of the endpoint are automatically saved in the Administration node database so that you have the latest significant change in the endpoint. If the Policy Service node that owns an endpoint is not available for some reasons, then the Administrator ISE node will reprofile an endpoint that lost the owner and you have to configure a new Policy Service node for such endpoints.
Policy Service Nodes in Cluster
Cisco ISE uses Policy Service node group as a cluster that allows to exchange endpoint attributes when two or more nodes in the cluster collect attributes for the same endpoint. We recommend to create clusters for all Policy Service nodes that reside behind a load balancer.
If a different node other than the current owner receives attributes for the same endpoint, it sends a message across the cluster requesting the latest attributes from the current owner to merge attributes and determine if a change of ownership is needed. If you have not defined a node group in Cisco ISE, it is assumed that all nodes are within one cluster.
There are no changes made to endpoint creation and replication in Cisco ISE. Only the change of ownership for endpoints is decided based on a list of attributes (white list) used for profiling that are built from static attributes and dynamic attributes.
Upon subsequent attributes collection, the endpoint is updated on the Administration node, if anyone of the following attributes changes:
-
ip
-
EndPointPolicy
-
MatchedValue
-
StaticAssignment
-
StaticGroupAssignment
-
MatchedPolicyID
-
NmapSubnetScanID
-
PortalUser
-
DeviceRegistrationStatus
-
BYODRegistration
When an endpoint is edited and saved in the Administration node, the attributes are retrieved from the current owner of the endpoint.
Create Endpoint Identity Groups
Cisco ISE groups endpoints that it discovers in to the corresponding endpoint identity groups. Cisco ISE comes with several system-defined endpoint identity groups. You can also create additional endpoint identity groups from the Endpoint Identity Groups page. You can edit or delete the endpoint identity groups that you have created. You can only edit the description of the system-defined endpoint identity groups; you cannot edit the name of these groups or delete them.
Procedure
| Step 1 |
Choose . |
| Step 2 |
Click Add. |
| Step 3 |
Enter the name for the endpoint identity group that you want to create (do not include spaces in the name of the endpoint identity group). |
| Step 4 |
Enter the description for the endpoint identity group that you want to create. |
| Step 5 |
Click the Parent Group drop-down list to choose an endpoint identity group to which you want to associate the newly created endpoint identity group. |
| Step 6 |
Click Submit. |
Identified Endpoints Grouped in Endpoint Identity Groups
Cisco ISE groups discovered endpoints into their corresponding endpoint identity groups based on the endpoint profiling policies. Profiling policies are hierarchical, and they are applied at the endpoint identify groups level in Cisco ISE. By grouping endpoints to endpoint identity groups, and applying profiling policies to endpoint identity groups, Cisco ISE enables you to determine the mapping of endpoints to the endpoint profiles by checking corresponding endpoint profiling policies.
Cisco ISE creates a set of endpoint identity groups by default, and allows you to create your own identity groups to which endpoints can be assigned dynamically or statically. You can create an endpoint identity group and associate the identity group to one of the system-created identity groups. You can also assign an endpoint that you create statically to any one of the identity groups that exists in the system, and the profiling service cannot reassign the identity group.
Default Endpoint Identity Groups Created for Endpoints
Cisco ISE creates the following five endpoint identity groups by default: Blacklist, GuestEndpoints, Profiled, RegisteredDevices, and Unknown. In addition, it creates two more identity groups, such as Cisco-IP-Phone and Workstation, which are associated to the Profiled (parent) identity group. A parent group is the default identity group that exists in the system.
Cisco ISE creates the following endpoint identity groups:
-
Blacklist—This endpoint identity group includes endpoints that are statically assigned to this group in Cisco ISE and endpoints that are blacklisted in the device registration portal. An authorization profile can be defined in Cisco ISE to permit, or deny network access to endpoints in this group.
-
GuestEndpoints—This endpoint identity group includes endpoints that are used by guest users.
-
Profiled—This endpoint identity group includes endpoints that match endpoint profiling policies except Cisco IP phones and workstations in Cisco ISE.
-
RegisteredDevices—This endpoint identity group includes endpoints, which are registered devices that are added by an employee through the devices registration portal. The profiling service continues to profile these devices normally when they are assigned to this group. Endpoints are statically assigned to this group in Cisco ISE, and the profiling service cannot reassign them to any other identity group. These devices will appear like any other endpoint in the endpoints list. You can edit, delete, and blacklist these devices that you added through the device registration portal from the endpoints list in the Endpoints page in Cisco ISE. Devices that you have blacklisted in the device registration portal are assigned to the Blacklist endpoint identity group, and an authorization profile that exists in Cisco ISE redirects blacklisted devices to an URL, which displays “Unauthorised Network Access”, a default portal page to the blacklisted devices.
-
Unknown—This endpoint identity group includes endpoints that do not match any profile in Cisco ISE.
In addition to the above system created endpoint identity groups, Cisco ISE creates the following endpoint identity groups, which are associated to the Profiled identity group:
-
Cisco-IP-Phone—An identity group that contains all the profiled Cisco IP phones on your network.
-
Workstation—An identity group that contains all the profiled workstations on your network.
Endpoint Identity Groups Created for Matched Endpoint Profiling Policies
If you have an endpoint policy that matches an existing policy, then the profiling service can create a matching endpoint identity group. This identity group becomes the child of the Profiled endpoint identity group. When you create an endpoint policy, you can check the Create Matching Identity Group check box in the Profiling Policies page to create a matching endpoint identity group. You cannot delete the matching identity group unless the mapping of the profile is removed.
Add Static Endpoints in Endpoint Identity Groups
You can add or remove statically added endpoints in any endpoint identity group.
You can add endpoints from the Endpoints widget only to a specific identity group. If you add an endpoint to the specific endpoint identity group, then the endpoint is moved from the endpoint identity group where it was dynamically grouped earlier.
Upon removal from the endpoint identity group where you recently added an endpoint, the endpoint is reprofiled back to the appropriate identity group. You do not delete endpoints from the system but only remove them from the endpoint identity group.
Procedure
| Step 1 |
Choose . |
| Step 2 |
Choose an endpoint identity group, and click Edit. |
| Step 3 |
Click Add. |
| Step 4 |
Choose an endpoint in the Endpoints widget to add the selected endpoint in the endpoint identity group. |
| Step 5 |
Click the Endpoint Group List link to return to the Endpoint Identity Groups page. |
Dynamic Endpoints Reprofiled After Adding or Removing in Identity Groups
If an endpoint identity group assignment is not static, then endpoints are reprofiled after you add or remove them from an endpoint identity group. Endpoints that are identified dynamically by the ISE profiler appear in appropriate endpoint identity groups. If you remove dynamically added endpoints from an endpoint identity group, Cisco ISE displays a message that you have successfully removed endpoints from the identity group but reprofiles them back in the endpoint identity group.
Endpoint Identity Groups Used in Authorization Rules
You can effectively use endpoint identity groups in the authorization policies to provide appropriate network access privileges to the discovered endpoints. For example, an authorization rule for all types of Cisco IP Phones is available by default in Cisco ISE in the following location: .
You must ensure that the endpoint profiling policies are either standalone policies (not a parent to other endpoint profiling policies), or their parent policies of the endpoint profiling policies are not disabled.
Agent Download Issues on Client Machine
Problem
The client machine browser displays a “no policy matched” error message after user authentication and authorization. This issue applies to user sessions during the client provisioning phase of authentication.
Possible Causes
The client provisioning policy is missing required settings.
Posture Agent Download Issues
Remember that downloading the posture agent installer requires the following:
-
The user must allow the ActiveX installer in the browser session the first time an agent is installed on the client machine. (The client provisioning download page prompts for this.)
-
The client machine must have Internet access.
Resolution
-
Ensure that a client provisioning policy exists in Cisco ISE. If yes, verify the policy identity group, conditions, and type of agent(s) defined in the policy. (Also ensure whether or not there is any agent profile configured under , even a profile with all default values.)
-
Try re-authenticating the client machine by bouncing the port on the access switch.
Endpoints
These pages enable you to configure and manage endpoints that connect to your network.
Endpoint Settings
The following table describes the fields on the Endpoints page, which you can use to create endpoints and assign policies for endpoints. The navigation path for this page is: .
|
Fields |
Usage Guidelines |
|---|---|
|
MAC Address |
Enter the MAC address in hexadecimal format to create an endpoint statically. The MAC address is the device identifier for the interface that is connected to the Cisco ISE enabled network |
|
Static Assignment |
Check this check box when you want to create an endpoint statically in the Endpoints page and the status of static assignment is set to static. You can toggle the status of static assignment of an endpoint from static to dynamic or from dynamic to static. |
|
Policy Assignment |
(Disabled by default unless the Static Assignment is checked) Choose a matching endpoint policy from the Policy Assignment drop-down list. You can do one of the following:
|
|
Static Group Assignment |
(Disabled by default unless the Static group Assignment is checked) Check this check box when you want to assign an endpoint to an identity group statically. In you check this check box, the profiling service does not change the endpoint identity group the next time during evaluation of the endpoint policy for these endpoints, which were previously assigned dynamically to other endpoint identity groups. If you uncheck this check box, then the endpoint identity group is dynamic as assigned by the ISE profiler based on policy configuration. If you do not choose the Static Group Assignment option, then the endpoint is automatically assigned to the matching identity group the next time during evaluation of the endpoint policy. |
|
Identity Group Assignment |
Choose an endpoint identity group to which you want to assign the endpoint. You can assign an endpoint to an identity group when you create an endpoint statically, or when you do not want to use the Create Matching Identity Group option during evaluation of the endpoint policy for an endpoint. Cisco ISE includes the following system created endpoint identity groups:
|
Endpoint Import from LDAP Settings
The following table describes the fields on the Import from LDAP page, which you can use to import endpoints from an LDAP server. The navigation path for this page is: .
|
Fields |
Usage Guidelines |
||
|---|---|---|---|
|
Connection Settings |
|||
|
Host |
Enter the hostname, or the IP address of the LDAP server. |
||
|
Port |
Enter the port number of the LDAP server. You can use the default port 389 to import from an LDAP server, and the default port 636 to import from an LDAP server over SSL.
|
||
|
Enable Secure Connection |
Check the Enable Secure Connection check box to import from an LDAP server over SSL. |
||
|
Root CA Certificate Name |
Click the drop-down arrow to view the trusted CA certificates. The Root CA Certificate Name refers to the trusted CA certificate that is required to connect to an LDAP server. You can add (import), edit, delete, and export trusted CA certificates in Cisco ISE. |
||
|
Anonymous Bind |
Check the Anonymous Bind check box to enable the anonymous bind. You must enable either the Anonymous Bind check box, or enter the LDAP administrator credentials from the slapd.conf configuration file. |
||
|
Admin DN |
Enter the distinguished name (DN) configured for the LDAP administrator in the slapd.conf configuration file. Admin DN format example: cn=Admin, dc=cisco.com, dc=com |
||
|
Password |
Enter the password configured for the LDAP administrator in the slapd.conf configuration file. |
||
|
Base DN |
Enter the distinguished name of the parent entry. Base DN format example: dc=cisco.com, dc=com. |
||
|
Query Settings |
|||
|
MAC Address objectClass |
Enter the query filter, which is used for importing the MAC address. For example, ieee802Device. |
||
|
MAC Address Attribute Name |
Enter the returned attribute name for import. For example, macAddress. |
||
|
Profile Attribute Name |
Enter the name of the LDAP attribute. This attribute holds the policy name for each endpoint entry that is defined in the LDAP server. When you configure the Profile Attribute Name field, consider the following:
|
||
|
Time Out [seconds] |
Enter the time in seconds between 1 and 60 seconds. |
||
Endpoint Profiling Policies Settings
The following table describes the fields in the Endpoint Policies window. The navigation path for this page is: .
|
Field Name |
Usage Guidelines |
|---|---|
|
Name |
Enter the name of the endpoint profiling policy that you want to create. |
|
Description |
Enter the description of the endpoint profiling policy that you want to create. |
|
Policy Enabled |
By default, the Policy Enabled check box is checked to associate a matching profiling policy when you profile an endpoint. When unchecked, the endpoint profiling policy is excluded when you profile an endpoint. |
|
Minimum Certainty Factor |
Enter the minimum value that you want to associate with the profiling policy. The default value is 10. |
|
Exception Action |
Choose an exception action, which you want to associate with the conditions when defining a rule in the profiling policy. The default is NONE. The exception actions are defined in the following location: Policy > Policy Elements > Results > Profiling > Exception Actions. |
|
Network Scan (NMAP) Action |
Choose a network scan action from the list, which you want to associate with the conditions when defining a rule in the profiling policy, if required. The default is NONE. The exception actions are defined in the following location: Policy > Policy Elements > Results > Profiling > Network Scan (NMAP) Actions. |
|
Create an Identity Group for the policy |
Check one of the following options to create an endpoint identity group:
|
|
Yes, create matching Identity Group |
Choose this option to use an existing profiling policy. This option creates a matching identity group for those endpoints and the identity group will be the child of the Profiled endpoint identity group when an endpoint profile matches an existing profiling policy. For example, the Xerox-Device endpoint identity group is created in the Endpoints Identity Groups page when endpoints discovered on your network match the Xerox-Device profile. |
|
No, use existing Identity Group hierarchy |
Check this check box to assign endpoints to the matching parent endpoint identity group using hierarchical construction of profiling policies and identity groups. This option allows you to make use of the endpoint profiling policies hierarchy to assign endpoints to one of the matching parent endpoint identity groups, as well as to the associated endpoint identity groups to the parent identity group. For example, endpoints that match an existing profile are grouped under the appropriate parent endpoint identity group. Here, endpoints that match the Unknown profile are grouped under Unknown, and endpoints that match an existing profile are grouped under the Profiled endpoint identity group. For example,
|
|
Parent Policy |
Choose a parent profiling policy that are defined in the system to which you want to associate the new endpoint profiling policy. You can choose a parent profiling policy from which you can inherit rules and conditions to its child. |
|
Associated CoA Type |
Choose one of the following CoA types that you want to associate with the endpoint profiling policy:
|
|
Rules |
One or more rules that are defined in endpoint profiling policies determine the matching profiling policy for endpoints, which allows you to group endpoints according to their profiles. One or more profiling conditions from the policy elements library are used in rules for validating endpoint attributes and their values for the overall classification. |
|
Conditions |
Click the plus [+] sign to expand the Conditions anchored overlay, and click the minus [-] sign, or click outside the anchored overlay to close it. Click Select Existing Condition from Library or Create New Condition (Advanced Option) . Select Existing Condition from Library---You can define an expression by selecting Cisco predefined conditions from the policy elements library. Create New Condition (Advanced Option)---You can define an expression by selecting attributes from various system or user-defined dictionaries. You can associate one of the following with the profiling conditions:
Choose one of the following predefined settings to associate with the profiling condition:
|
|
Select Existing Condition from Library |
You can do the following:
|
|
Create New Condition (Advance Option) |
You can do the following:
|
Endpoint Context Visibility Using UDID Attribute
The Unique Identifier (UDID) is an endpoint attribute used to identify MAC addresses that belong to an endpoint. An endpoint may contain multiple MAC addresses (for example, one MAC address for the wired interface and another for the wireless interface), and when AnyConnect is installed on an endpoint, the AnyConnect agent generates a UDID for the endpoint. The UDID is saved as an endpoint attribute and an endpoint can be queried using the UDID. The UDID remains constant for an endpoint and does not change with the AnyConnect installation or uninstallation. This facilitates the Context Visibility window (Context Visibility > Endpoints > Compliance) to display one entry instead of multiple entries for endpoints with multiple NICs. You can ensure posture control on a specific endpoint rather than on a Mac address.
IF-MIB
|
Object |
OID |
|---|---|
|
ifIndex |
1.3.6.1.2.1.2.2.1.1 |
|
ifDescr |
1.3.6.1.2.1.2.2.1.2 |
|
ifType |
1.3.6.1.2.1.2.2.1.3 |
|
ifSpeed |
1.3.6.1.2.1.2.2.1.5 |
|
ifPhysAddress |
1.3.6.1.2.1.2.2.1.6 |
|
ifAdminStatus |
1.3.6.1.2.1.2.2.1.7 |
|
ifOperStatus |
1.3.6.1.2.1.2.2.1.8 |
SNMPv2-MIB
|
Object |
OID |
|---|---|
|
system |
1.3.6.1.2.1.1 |
|
sysDescr |
1.3.6.1.2.1.1.1.0 |
|
sysObjectID |
1.3.6.1.2.1.1.2.0 |
|
sysUpTime |
1.3.6.1.2.1.1.3.0 |
|
sysContact |
1.3.6.1.2.1.1.4.0 |
|
sysName |
1.3.6.1.2.1.1.5.0 |
|
sysLocation |
1.3.6.1.2.1.1.6.0 |
|
sysServices |
1.3.6.1.2.1.1.7.0 |
|
sysORLastChange |
1.3.6.1.2.1.1.8.0 |
|
sysORTable |
1.3.6.1.2.1.1.9.0 |
IP-MIB
|
Object |
OID |
|---|---|
|
ipAdEntIfIndex |
1.3.6.1.2.1.4.20.1.2 |
|
ipAdEntNetMask |
1.3.6.1.2.1.4.20.1.3 |
|
ipNetToMediaPhysAddress |
1.3.6.1.2.1.4.22.1.2 |
|
ipNetToPhysicalPhysAddress |
1.3.6.1.2.1.4.35.1.4 |
CISCO-CDP-MIB
|
Object |
OID |
|---|---|
|
cdpCacheEntry |
1.3.6.1.4.1.9.9.23.1.2.1.1 |
|
cdpCacheIfIndex |
1.3.6.1.4.1.9.9.23.1.2.1.1.1 |
|
cdpCacheDeviceIndex |
1.3.6.1.4.1.9.9.23.1.2.1.1.2 |
|
cdpCacheAddressType |
1.3.6.1.4.1.9.9.23.1.2.1.1.3 |
|
cdpCacheAddress |
1.3.6.1.4.1.9.9.23.1.2.1.1.4 |
|
cdpCacheVersion |
1.3.6.1.4.1.9.9.23.1.2.1.1.5 |
|
cdpCacheDeviceId |
1.3.6.1.4.1.9.9.23.1.2.1.1.6 |
|
cdpCacheDevicePort |
1.3.6.1.4.1.9.9.23.1.2.1.1.7 |
|
cdpCachePlatform |
1.3.6.1.4.1.9.9.23.1.2.1.1.8 |
|
cdpCacheCapabilities |
1.3.6.1.4.1.9.9.23.1.2.1.1.9 |
|
cdpCacheVTPMgmtDomain |
1.3.6.1.4.1.9.9.23.1.2.1.1.10 |
|
cdpCacheNativeVLAN |
1.3.6.1.4.1.9.9.23.1.2.1.1.11 |
|
cdpCacheDuplex |
1.3.6.1.4.1.9.9.23.1.2.1.1.12 |
|
cdpCacheApplianceID |
1.3.6.1.4.1.9.9.23.1.2.1.1.13 |
|
cdpCacheVlanID |
1.3.6.1.4.1.9.9.23.1.2.1.1.14 |
|
cdpCachePowerConsumption |
1.3.6.1.4.1.9.9.23.1.2.1.1.15 |
|
cdpCacheMTU |
1.3.6.1.4.1.9.9.23.1.2.1.1.16 |
|
cdpCacheSysName |
1.3.6.1.4.1.9.9.23.1.2.1.1.17 |
|
cdpCacheSysObjectID |
1.3.6.1.4.1.9.9.23.1.2.1.1.18 |
|
cdpCachePrimaryMgmtAddrType |
1.3.6.1.4.1.9.9.23.1.2.1.1.19 |
|
cdpCachePrimaryMgmtAddr |
1.3.6.1.4.1.9.9.23.1.2.1.1.20 |
|
cdpCacheSecondaryMgmtAddrType |
1.3.6.1.4.1.9.9.23.1.2.1.1.21 |
|
cdpCacheSecondaryMgmtAddr |
1.3.6.1.4.1.9.9.23.1.2.1.1.22 |
|
cdpCachePhysLocation |
1.3.6.1.4.1.9.9.23.1.2.1.1.23 |
|
cdpCacheLastChange |
1.3.6.1.4.1.9.9.23.1.2.1.1.24 |
CISCO-VTP-MIB
|
Object |
OID |
|---|---|
|
vtpVlanIfIndex |
1.3.6.1.4.1.9.9.46.1.3.1.1.18.1 |
|
vtpVlanName |
1.3.6.1.4.1.9.9.46.1.3.1.1.4.1 |
|
vtpVlanState |
1.3.6.1.4.1.9.9.46.1.3.1.1.2.1 |
CISCO-STACK-MIB
|
Object |
OID |
|---|---|
|
portIfIndex |
1.3.6.1.4.1.9.5.1.4.1.1.11 |
|
vlanPortVlan |
1.3.6.1.4.1.9.5.1.9.3.1.3.1 |
BRIDGE-MIB
|
Object |
OID |
|---|---|
|
dot1dTpFdbPort |
1.3.6.1.2.1.17.4.3.1.2 |
|
dot1dBasePortIfIndex |
1.3.6.1.2.1.17.1.4.1.2 |
OLD-CISCO-INTERFACE-MIB
|
Object |
OID |
|---|---|
|
locIfReason |
1.3.6.1.4.1.9.2.2.1.1.20 |
CISCO-LWAPP-AP-MIB
|
Object |
OID |
|---|---|
|
cLApEntry |
1.3.6.1.4.1.9.9.513.1.1.1 |
|
cLApSysMacAddress |
1.3.6.1.4.1.9.9.513.1.1.1.1.1 |
|
cLApIfMacAddress |
1.3.6.1.4.1.9.9.513.1.1.1.1.2 |
|
cLApMaxNumberOfDot11Slots |
1.3.6.1.4.1.9.9.513.1.1.1.1.3 |
|
cLApEntPhysicalIndex |
1.3.6.1.4.1.9.9.513.1.1.1.1.4 |
|
cLApName |
1.3.6.1.4.1.9.9.513.1.1.1.1.5 |
|
cLApUpTime |
1.3.6.1.4.1.9.9.513.1.1.1.1.6 |
|
cLLwappUpTime |
1.3.6.1.4.1.9.9.513.1.1.1.1.7 |
|
cLLwappJoinTakenTime |
1.3.6.1.4.1.9.9.513.1.1.1.1.8 |
|
cLApMaxNumberOfEthernetSlots |
1.3.6.1.4.1.9.9.513.1.1.1.1.9 |
|
cLApPrimaryControllerAddressType |
1.3.6.1.4.1.9.9.513.1.1.1.1.10 |
|
cLApPrimaryControllerAddress |
1.3.6.1.4.1.9.9.513.1.1.1.1.11 |
|
cLApSecondaryControllerAddressType |
1.3.6.1.4.1.9.9.513.1.1.1.1.12 |
|
cLApSecondaryControllerAddress |
1.3.6.1.4.1.9.9.513.1.1.1.1.13 |
|
cLApTertiaryControllerAddressType |
1.3.6.1.4.1.9.9.513.1.1.1.1.14 |
|
cLApTertiaryControllerAddress |
1.3.6.1.4.1.9.9.513.1.1.1.1.15 |
|
cLApLastRebootReason |
1.3.6.1.4.1.9.9.513.1.1.1.1.16 |
|
cLApEncryptionEnable |
1.3.6.1.4.1.9.9.513.1.1.1.1.17 |
|
cLApFailoverPriority |
1.3.6.1.4.1.9.9.513.1.1.1.1.18 |
|
cLApPowerStatus |
1.3.6.1.4.1.9.9.513.1.1.1.1.19 |
|
cLApTelnetEnable |
1.3.6.1.4.1.9.9.513.1.1.1.1.20 |
|
cLApSshEnable |
1.3.6.1.4.1.9.9.513.1.1.1.1.21 |
|
cLApPreStdStateEnabled |
1.3.6.1.4.1.9.9.513.1.1.1.1.22 |
|
cLApPwrInjectorStateEnabled |
1.3.6.1.4.1.9.9.513.1.1.1.1.23 |
|
cLApPwrInjectorSelection |
1.3.6.1.4.1.9.9.513.1.1.1.1.24 |
|
cLApPwrInjectorSwMacAddr |
1.3.6.1.4.1.9.9.513.1.1.1.1.25 |
|
cLApWipsEnable |
1.3.6.1.4.1.9.9.513.1.1.1.1.26 |
|
cLApMonitorModeOptimization |
1.3.6.1.4.1.9.9.513.1.1.1.1.27 |
|
cLApDomainName |
1.3.6.1.4.1.9.9.513.1.1.1.1.28 |
|
cLApNameServerAddressType |
1.3.6.1.4.1.9.9.513.1.1.1.1.29 |
|
cLApNameServerAddress |
1.3.6.1.4.1.9.9.513.1.1.1.1.30 |
|
cLApAMSDUEnable |
1.3.6.1.4.1.9.9.513.1.1.1.1.31 |
|
cLApEncryptionSupported |
1.3.6.1.4.1.9.9.513.1.1.1.1.32 |
|
cLApRogueDetectionEnabled |
1.3.6.1.4.1.9.9.513.1.1.1.1.33 |
CISCO-LWAPP-DOT11-CLIENT-MIB
|
Object |
OID |
|---|---|
|
cldcClientEntry |
1.3.6.1.4.1.9.9.599.1.3.1.1 |
|
cldcClientMacAddress |
1.3.6.1.4.1.9.9.599.1.3.1.1.1 |
|
cldcClientStatus |
1.3.6.1.4.1.9.9.599.1.3.1.1.2 |
|
cldcClientWlanProfileName |
1.3.6.1.4.1.9.9.599.1.3.1.1.3 |
|
cldcClientWgbStatus |
1.3.6.1.4.1.9.9.599.1.3.1.1.4 |
|
cldcClientWgbMacAddress |
1.3.6.1.4.1.9.9.599.1.3.1.1.5 |
|
cldcClientProtocol |
1.3.6.1.4.1.9.9.599.1.3.1.1.6 |
|
cldcAssociationMode |
1.3.6.1.4.1.9.9.599.1.3.1.1.7 |
|
cldcApMacAddress |
1.3.6.1.4.1.9.9.599.1.3.1.1.8 |
|
cldcIfType |
1.3.6.1.4.1.9.9.599.1.3.1.1.9 |
|
cldcClientIPAddress |
1.3.6.1.4.1.9.9.599.1.3.1.1.10 |
|
cldcClientNacState |
1.3.6.1.4.1.9.9.599.1.3.1.1.11 |
|
cldcClientQuarantineVLAN |
1.3.6.1.4.1.9.9.599.1.3.1.1.12 |
|
cldcClientAccessVLAN |
1.3.6.1.4.1.9.9.599.1.3.1.1.13 |
|
cldcClientLoginTime |
1.3.6.1.4.1.9.9.599.1.3.1.1.14 |
|
cldcClientUpTime |
1.3.6.1.4.1.9.9.599.1.3.1.1.15 |
|
cldcClientPowerSaveMode |
1.3.6.1.4.1.9.9.599.1.3.1.1.16 |
|
cldcClientCurrentTxRateSet |
1.3.6.1.4.1.9.9.599.1.3.1.1.17 |
|
cldcClientDataRateSet |
1.3.6.1.4.1.9.9.599.1.3.1.1.18 |
CISCO-AUTH-FRAMEWORK-MIB
|
Object |
OID |
|---|---|
|
cafPortConfigEntry |
1.3.6.1.4.1.9.9.656.1.2.1.1 |
|
cafSessionClientMacAddress |
1.3.6.1.4.1.9.9.656.1.4.1.1.2 |
|
cafSessionStatus |
1.3.6.1.4.1.9.9.656.1.4.1.1.5 |
|
cafSessionDomain |
1.3.6.1.4.1.9.9.656.1.4.1.1.6 |
|
cafSessionAuthUserName |
1.3.6.1.4.1.9.9.656.1.4.1.1.10 |
|
cafSessionAuthorizedBy |
1.3.6.1.4.1.9.9.656.1.4.1.1.12 |
|
cafSessionAuthVlan |
1.3.6.1.4.1.9.9.656.1.4.1.1.14 |
EEE8021-PAE-MIB: RFC IEEE 802.1X
|
Object |
OID |
|---|---|
|
dot1xAuthAuthControlledPortStatus |
1.0.8802.1.1.1.1.2.1.1.5 |
|
dot1xAuthAuthControlledPortControl |
1.0.8802.1.1.1.1.2.1.1.6 |
|
dot1xAuthSessionUserName |
1.0.8802.1.1.1.1.2.4.1.9 |
HOST-RESOURCES-MIB
|
Object |
OID |
|---|---|
|
hrDeviceDescr |
1.3.6.1.2.1.25.3.2.1.3 |
|
hrDeviceStatus |
1.3.6.1.2.1.25.3.2.1.5 |
LLDP-MIB
|
Object |
OID |
|---|---|
|
lldpEntry |
1.0.8802.1.1.2.1.4.1.1 |
|
lldpTimeMark |
1.0.8802.1.1.2.1.4.1.1.1 |
|
lldpLocalPortNum |
1.0.8802.1.1.2.1.4.1.1.2 |
|
lldpIndex |
1.0.8802.1.1.2.1.4.1.1.3 |
|
lldpChassisIdSubtype |
1.0.8802.1.1.2.1.4.1.1.4 |
|
lldpChassisId |
1.0.8802.1.1.2.1.4.1.1.5 |
|
lldpPortIdSubtype |
1.0.8802.1.1.2.1.4.1.1.6 |
|
lldpPortId |
1.0.8802.1.1.2.1.4.1.1.7 |
|
lldpPortDescription |
1.0.8802.1.1.2.1.4.1.1.8 |
|
lldpSystemName |
1.0.8802.1.1.2.1.4.1.1.9 |
|
lldpSystemDescription |
1.0.8802.1.1.2.1.4.1.1.10 |
|
ldpCapabilitiesMapSupported |
1.0.8802.1.1.2.1.4.1.1.11 |
|
lldpCacheCapabilities |
1.0.8802.1.1.2.1.4.1.1.12 |
Session Trace for an Endpoint
You can use the global search box available at the top of the Cisco ISE home page to get session information for a particular endpoint. When you search with a criteria, you get a list of endpoints. Click on any of these endpoints to see the session trace information for that endpoint. The following figure shows an example of the session trace information displayed for an endpoint.
Note |
The dataset used for search is based on Endpoint ID as indexes. Therefore, when authentication occurs, it is mandatory to have Endpoint IDs for the endpoints for those authentications to include them in the search result set. |
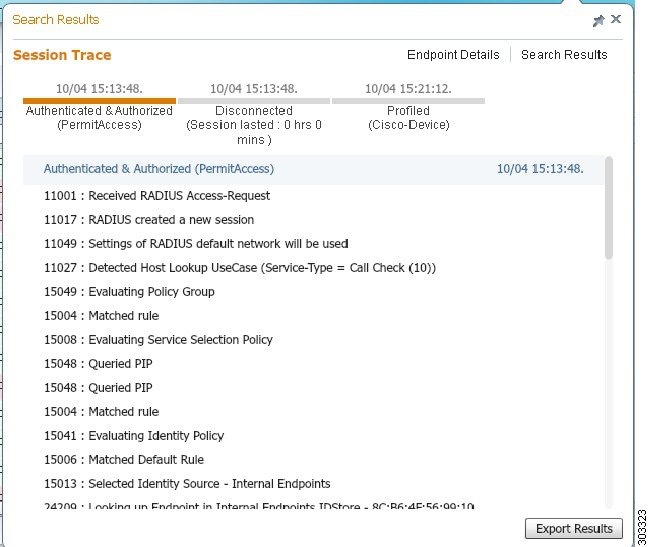
You can use the clickable timeline at the top to see major authorization transitions. You can also export the results in .csv format by clicking the Export Results button. The report gets downloaded to your browser.
You can click on the Endpoint Details link to see more authentication, accounting, and profiler information for a particular endpoint. The following figure shows an example of endpoint details information displayed for an endpoint.
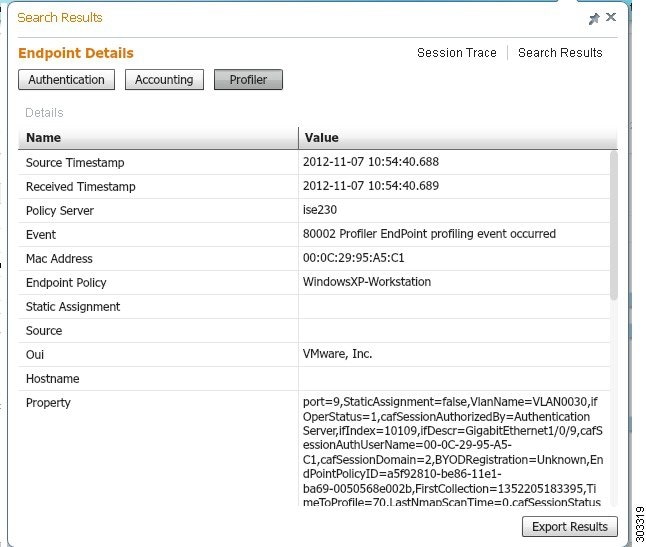
Session Removal from the Directory
Sessions are cleaned from the session directory on the Monitoring and Troubleshooting node as follows:
-
Terminated sessions are cleaned 15 minutes after termination.
-
If there is authentication but no accounting, then such sessions are cleared after one hour.
-
All inactive sessions are cleared after five days.
Global Search for Endpoints
You can use the global search box available at the top of the Cisco ISE home page to search for endpoints. You can use any of the following criteria to search for an endpoint:
-
User name
-
MAC Address
-
IP Address
-
Authorization Profile
-
Endpoint Profile
-
Failure Reason
-
Identity Group
-
Identity Store
-
Network Device name
-
Network Device Type
-
Operating System
-
Posture Status
-
Location
-
Security Group
-
User Type
You should enter at least three characters for any of the search criteria in the Search field to display data.
Note |
If an endpoint has been authenticated by Cisco ISE, or its accounting update has been received, it can be found through the global search. Endpoints that have been manually added and are not authenticated by or accounted for in Cisco ISE will not show up in the search results. |
The search result provides a detailed and at-a-glance information about the current status of the endpoint, which you can use for troubleshooting. Search results display only the top 25 entries. It is recommended to use filters to narrow down the results.
The following figure shows an example of the search result.
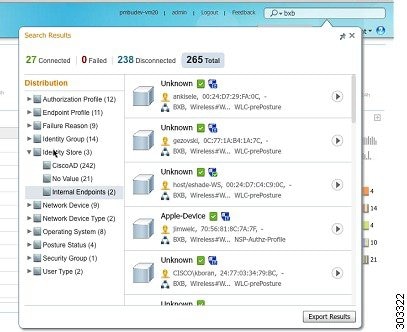
You can use any of the properties in the left panel to filter the results. You can also click on any endpoint to see more detailed information about the endpoint, such as:
-
Session trace
-
Authentication details
-
Accounting details
-
Posture details
-
Profiler details
-
Client Provisioning details
-
Guest accounting and activity
 Feedback