Viewing and Adding Devices

This chapter contains the following sections:

Viewing and Adding Devices

On the Devices screen, the following tabs are displayed:

  • Nodes Learned

  • Device Connections

  • Device Groups

  • SPAN Management

  • Subnet Gateway Configuration

On the Nodes Learned tab, the following details are displayed for each node:

  • The name of the node

  • The ID of the node

  • IP Address of the node

  • The number of ports on the node

When you click the node name under the tab Node Name, the Update Node Information window is displayed. Update the following fields in the window:

  • Node ID: Enter the node ID.

  • Node Name: The name of the node.

  • Tier: Select the tier of the node from the following options in the drop-down list: Unknown, Access, Distribution, and Core.

  • Operation Mode: Choose how the traffic is handled based on the flows. This can be one of the following:

    Allow reactive forwarding—No default flows are programmed. How traffic that does not match a flow is treated depends upon the switch implementation.

    Proactive forwarding only—The following default flows are programmed on the switch:

    • Punt Link Layer Discovery Protocol (LLDP) packets.

    • Drop all other traffic.

On the Device Connections tab, click Add Device to add a device, click Remove Devices to remove a device, or click Rediscover Devices to rediscover a device. When you click Rediscover Devices tab, the Rediscover Device window is displayed. Click Rediscover Device so that the device gets deleted and rediscovered again.

In each device window, click View, Edit, or Delete to add a device, edit an existing device, or delete a device. The following details are displayed for each device in each device window:

  • The name of the device and its IP address

  • The username on the device

  • The type of the mode, for example, NX-API

  • The uptime on the device, for example, date and time

  • The hardware on the node

On the Device Groups tab, click + Group to add a group of devices. In each group window, click View, Edit, or Delete to add a group of devices, edit an existing group of devices, or delete a group of devices respectively. The following details are displayed in each group window:

  • The name of the node group, for example, Node Group Name One

  • The names of the nodes in the group, for example, nx-tap-agg-sw1 and nx-tap-agg-sw2

On the SPAN Management tab, click + Add Device to add an APIC device or the production switch to the network. Click Remove Devices to delete the devices or click Rediscover Devices to rediscover the devices. The production switch should be a Cisco Nexus 9000 Series switch or Cisco Nexus 3000 Series switch in NXOS mode. The feature NXAPI has to be enabled on these production switches.


Note


If a device is unreachable and disconnects from NDB, NDB tries to locate and connect to the device after every 30 seconds.


The following columns are displayed on the SPAN Management tab to display the information about the devices:

  • IP Address

  • Username

  • Type: The APIC device is listed as AC and the production switch will belated here is listed as PS.

  • Active IP

  • Secondary IP Address

  • Tertiary IP Address

  • Action

You must add an APIC controller before you can set up SPAN session and SPAN destination.

Starting with Cisco NDB release 3.6, Global deny ACLs are automatically added to all non-configured (Edge SPAN/TAP & Monitor) interfaces on a device. The Global deny ACL feature is equivalent to Block Rx feature. By default, Global Deny ACL feature is enabled for a device. To disable the Global Deny ACL feature, you need to add the configure.global.acls parameter and set it to false in the config.ini file. After setting the configure.global.acls parameter, you need to restart the system to disable Global Deny ACLs on the newly added devices.


Note


To disable Global Deny ACL during CLI upgrade, run the CLI upgrade command and then configure the configure.global.acls parameter to false in the config.ini file before restarting the NDB. For example:
/xnc upgrade --perform --target-home {xnc_directory_to_be_upgraded} [--verbose] [--backupfile {xnc_backup_location_and_zip_filename}]
// In the config.ini file//
configure.global.acls=false 

To disable Global Deny ACL features during configuration upload, set the configure.global.acls parameter to false in the config.ini file before restarting the NDB.


Starting with Cisco NDB release 3.6, when a new switch is discovered on NDB, the following connections are installed on the ISL interfaces:

  • Default-Deny-ISL connection with Default-Deny-All, Default-Deny-MPLS, and Default-Deny-ARP filters. This connection is supported on all the types of switches in NXAPI mode.

  • Default-Deny-ISL-ICMP connection with Default-Deny-ICMP and Default-Deny-ICMP-All filters. This connection is supported on 9200, 9300EX, 9300FX, 9500EX, and 9500FX switches in NXAPI mode.

All the ACLs related to the default filters are installed on the ISL interfaces of the new switch. By default, this feature is enabled for all the new ISL interfaces.


Note


You can manage this feature using the mm.addDefaultISLDenyRules parameter in config.ini file. By default, themm.addDefaultISLDenyRules parameter is not be present in config.in file. To disable this feature, you need to add the mm.addDefaultISLDenyRules parameter to config.ini file ans set it to false and restart the device. For example:
mm.addDefaultISLDenyRules = false


Note


To disable Default-Deny-ISL Default-Deny-ISL-ICMP features during CLI upgrade, run the CLI upgrade command and then configure the mm.addDefaultISLDenyRules parameter to false in the config.ini file before restarting the NDB. For example:
./xnc upgrade --perform --target-home {xnc_directory_to_be_upgraded} [--verbose] [--backupfile {xnc_backup_location_and_zip_filename}] 
// In the config.ini file//
mm.addDefaultISLDenyRules=false 

To disable Default-Deny-ISL Default-Deny-ISL-ICMP features during configuration upload, set the mm.addDefaultISLDenyRules parameter to false in the config.ini file before restarting the NDB.


Managing a Device in NDB

You can add, remove, or edit a device using NDB.

  • Adding a Device

  • Removing a Device

  • Rediscovering a Device

  • Managing Profile for a Device

Adding a Device

Complete these steps to add a device.


Note


This procedure is applicable for releases prior to Cisco NDB Release 3.9.2. For the latest procedure (Release 3.9.2 and after), see the subsequent Adding a Device procedure.


Procedure


Step 1

Navigate to ADMINISTRATION > Device Connections tab.

Step 2

Click Add Device, the Add Device dialog box opens.

Step 3

In the Add Device dialog box, enter the following details:

Table 1. New Device Details

Field

Description

IP address/Hostname

The name or IP address of the device. To add multiple devices in non-hybrid mode, add the hostnames or IP Addresses separated with the comma. For example, ndb1.cisco.com, ndb2.cisco.com, ndb3.cisco.com.

Username/Password

Select this option to add a device using username and password credentials.

Profile

Select this option to add a device using a profile. For more information about adding a device using profiles, see Profile Management

Username

Username for authenitcating the device.

Password

Password for authenticating the device.

Connection Type

Type of connection supported. Currently, NXAPI is supported.

Port

The device communication port. For example, use port 80 for NX-API over HTTP and 443 for HTTPS.

Set Auxiliary Node

Indicates whether this NX-API connection is Auxillary for the OpenFlow device.

Device Prerequisites

To set the device to default configuration required for NX-API type of connection. This option is available for NXAPI connection type only without Auxiliary mode. To know more about the Device Prerequisites, see Device Prerequisites section.

Step 4

Click Add Device to create and add the new device to NDB. The new device is listed on the DEVICE CONNECTION tab.

Global deny ACLs are automatically added to all non-configured interfaces (Edge SPAN/TAP, Packet Truncation, Remote Source, and Local and Remote Monitor) on a device. By default, Global Deny ACL feature is enabled on all the devices. You can disable the Global Deny ACL feature by setting the configure.global.acls parameter to false in the config.ini file. Ensure that you restart NDB after making changes in the configuration file.

By default, deny ACL is enabled on all the Inter Switch Links (ISL) interfaces causig all the traffic in the ISL interfaces to be droped if there is no connection installed. The following connections are installed on the ISL interfaces:

  • Default-Deny-ISL connection with Default-Deny-All, Default-Deny-MPLS, and Default-Deny-ARP filters. This connection is supported on all the types of switches in NXAPI mode.

  • Default-Deny-ISL-ICMP connection with Default-Deny-ICMP and Default-Deny-ICMP-All filters. This connection is supported on Nexus 9200, 9300EX, 9300FX, 9500EX, and 9500FX switches in NXAPI mode.

You can disable deny ACL on all the ISL interfaces by setting the configure.global.acls parameter to false in the config.ini file. Ensure that you restart NDB after making changes in the configuration file.

You can disable Global deny ACL or ISL deny ACL during the CLI upgrade or configuration upload by using the CLI upgrade command and setting the configure.global.acls parameter to false in the config.ini file. For example:
xnc upgrade --perform --target-home {xnc_directory_to_be_upgraded} [--verbose] [--backupfile {xnc_backup_location_and_zip_filename}]

Path:<NDBhome>/configuration/configure.global.acls=false 

Note


You can also disable Global deny ACL or ISL deny ACL by uploading the configuration in a Web browser.


Adding a Device

Use this procedure to add a device (NDB switch). This procedure is applicable for Cisco NDB Release 3.9.2, and after.

Beginning with Release 3.9.2, the Device Prerequisites check-box is not optional. The system and interface configurations are by default configured by the NDB controller. The ACLs for the switch are part of the device onboarding.

Procedure


Step 1

Navigate to Administration > Device Connections tab.

Step 2

Click the Add Device button.

The Add Device window is displayed on the right.

Step 3

Enter the following details in the Add Device window.

Table 2. Add Device (NXAPI)

Field

Description

IP address/Hostname

The name or IP address of the device. To add multiple devices in non-hybrid mode, add the hostnames or IP Addresses separated with the comma. For example, ndb1.cisco.com, ndb2.cisco.com, ndb3.cisco.com.

Username/Password

Select this option to add a device using username and password credentials. If you select this option, the following fields are displayed:

  • Username—Enter a username for logging in to the device.

  • Password—Enter the password for authenticating the device.

Profile

Select this option to add a device using a profile. For more information about adding a device using profiles, see Profile Management

Port

The device communication port. For example, use port 80 for NX-API over HTTP and 443 for HTTPS.

Set Auxiliary Node

Check the check-box to indicate whether this NX-API connection is Auxillary for the OpenFlow device.

TCAM Carving

Check the TCAM Carvingcheck-box.

Select Scale or Default option.

If the TCAM option is selected, NDB will carve the selected TCAM region and Reload the switch by default. If TCAM option is not selected, NDB checks for the TCAM region in the switch. If the TCAM region is already carved, NDB continues with the device onboarding process. If no TCAM region is carved, NDB aborts the device onboarding process. An error message indicating that the TCAM regions are not carved is displayed.

Step 4

Click Add Device.

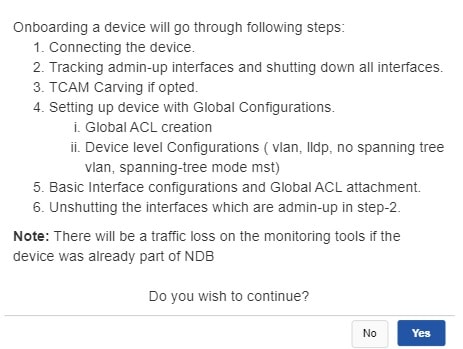
A pop-window is displayed which gives details of the internal tasks involved before the device is onboarded on to the NDB network. Click Yes to continue with the device addition. The list of actions performed by the NDB controller for onboarding a device is displayed in the pop-up window (as displayed below):

The new device is listed under the Device Connections tab and the device name is indicated in green (Ready). If you have selected the TCAM Carving option earlier (see Step 3), the device is indicated in yellow (Not Ready). The device goes in for a reboot and turns green after a few minutes.

Note


Do not connect the freshly added NDB device to the ACI fabric or the NX-OS fabric, until it is indicated asReady.

Global deny ACLs are automatically added to all non-configured interfaces (Edge SPAN/TAP, Packet Truncation, Remote Source, and Local and Remote Monitor) on a device. By default, Global Deny ACL feature is enabled on all the devices. You can disable the Global Deny ACL feature by setting the configure.global.acls parameter to false in the config.ini file. Ensure that you restart NDB after making changes in the configuration file.

By default, deny ACL is enabled on all the Inter Switch Links (ISL) interfaces causig all the traffic in the ISL interfaces to be droped if there is no connection installed. The following connections are installed on the ISL interfaces:

  • Default-Deny-ISL connection with Default-Deny-All, Default-Deny-MPLS, and Default-Deny-ARP filters. This connection is supported on all the types of switches in NXAPI mode.

  • Default-Deny-ISL-ICMP connection with Default-Deny-ICMP and Default-Deny-ICMP-All filters. This connection is supported on Nexus 9200, 9300EX, 9300FX, 9500EX, and 9500FX switches in NXAPI mode.

You can disable deny ACL on all the ISL interfaces by setting the configure.global.acls parameter to false in the config.ini file. Ensure that you restart NDB after making changes in the configuration file.

You can disable Global deny ACL or ISL deny ACL during the CLI upgrade or configuration upload by using the CLI upgrade command and setting the configure.global.acls parameter to false in the config.ini file. For example:
xnc upgrade --perform --target-home {xnc_directory_to_be_upgraded} [--verbose] [--backupfile {xnc_backup_location_and_zip_filename}]

Path:<NDBhome>/configuration/configure.global.acls=false 

Note


You can also disable Global deny ACL or ISL deny ACL by uploading the configuration in a Web browser.


Removing a Device

To remove a device from NDB, complete these steps

Procedure


Step 1

Navigate to Device Connections tab.

Step 2

Select the device to remove from the table.

Step 3

Click Remove Devices. The Remove Devices dialog box opens.

Step 4

Verify the selected device(s) in the Remove Devices dialog box and click either of the two options:

  • Remove Device: Use this option to remove the device connection from NDB while retaining the device configuration.

  • Purge & Remove Device: Uset this option to remove the device connection from NDB along with the device configuration.


Rediscovering a Device

To rediscover a device from NDB, complete these steps:

Procedure


Step 1

Navigate to Device Connections tab.

Step 2

Select the device(s) to rediscover from the table under the Device Connections tab.

Step 3

Click Rediscover Devices, the Redicover Devices window appears.

Step 4

Verify the selected devices in the Redicover Devices window.

Step 5

Click Rediscover Devices to rediscover the device(s).

A pop-window is displayed indicating an impact on the traffic. Click Yes to continue.


Managing Profile for a Device

You can attach a profile to an exisitng device or change the profile attached to a device using NDB. Complete these steps to add or change a profile to a device:


Note


This feature is currently supported in NXAPI mode only.


Procedure


Step 1

Navigate to Device Connections tab.

Step 2

Click Add/Change Profile to Device, the Add/Change Profile to Device window appears.

Step 3

Verify the selected devices in the Add/Change Profile to Device window. You can edit the following details in the Add/Change Profile to Device window:

  • Profile: Select a profile to attach. For more information about the profiles, see Profile Management section.

  • Connection Type: Specify the supported connection type. Currently, NXAPI is supported.

  • Port: The device communication port. For example, use port 80 for NX-API over HTTP and 443 for HTTPS.


Device in Maintenance Mode

Beginning with Release 3.9.2, when the NDB controller is not able to connect to a device, the controller tries to refresh the device connection and on failure, moves the device to maintenance mode. NDB controller continues to make periodic attempts to connect to the device. On successful connection, the device is moved out of the maintenance mode.

You can move an NDB device to maintenance mode while performing device maintenance activities, such as, NX-OS upgrade of the device, switch reload, etc. The NDB controller cannot modify any of the device configurations while the device is in maintenance mode. When the device is moved out of this mode, the NDB controller can make changes to the the device configurations, as required.


Note


An NDB device is automatically moved to maintenance mode if it is disconnected from the NDB controller.

To put a device in/out of maintenance mode, navigate to Administration > Device Connections. Select the required device. The available options for maintenance mode are:

  • Maintenance on—adds an NDB device manually to maintenance mode.

  • Maintenance off—removes an NDB device manually from maintenance mode.

  • Remove maintenance—disconnects the device that is currently in maintenance mode. The NDB controller can not make further attempts to connect to the device.

When a device is in maintenance mode, the same is indicated in the Device Connections tab. The Device Status column indicates Maintenance. When the device moves out of maintenance mode, the Device Status column indicates Ready. You can also check the status of the device in the Topology tab. An M in red indicates that the device is in maintenance mode.

Device Prerequisites

Starting with Cisco NDB release 3.8, NDB pushes basic configuration to a newly added switch into NDB. Manual configuration of the NX-API devices to make it ready for NDB is not required. As a part of the adding a new device, the prerequisites are configured by NDB on the devices.

You need to ensure that NX-API is enabled on the new device for NDB to push prerequisite configuration successfully.

Following configurations are pushed into the new switch by NDB.

  • TCAM configurations based on the device platform

  • MST mode is enabled on the Spanning Tree

  • Basic VLAN Configuration

  • LLDP feature is enabled (only for the centralized mode of NDB)


Note


Device is rebooted after all the configurations are successfully pushed by NDB. The device reboot is required because of the TCAM configurations. The reboot is supported from NX-OS is 9.2(3) and above


The Device Prerequisites can be configured when you add or edit a device, or when you add or change profile to device.

Profile Management

Starting with Cisco NDB release 3.8, you can add, edit, or delete a profile through NDB. A profile allow you to manage multiple switches attached to a NDB. You can attach multiple switches to a profile. The profile configuration is applied to all the member switches.

Adding a Profile

Complete these steps to add a profile:

Procedure


Step 1

Navigate to ADMINSTRATION > User Management.

Step 2

On the User Management page, click Profile tab.

Step 3

Click Add Profile to open the Add Profile dialog-box.

Step 4

Enter name of the profile in the Profile Name text-field.

Step 5

Enter the user name to be configured for the member switches in the User Name text-field.

Step 6

Enter the password to be configured for the member switches in the Password text-field.

Step 7

Click Create to create a new profile.


Editing a Profile

To edit a profile using NDB, complete these steps:

Procedure


Step 1

Navigate to ADMINSTRATION > User Management > Profile tab.

Step 2

Click Edit to edit a profile. The Edit Profile dialog box opens.

Step 3

Enter new name of the profile in the Profile Name text-field.

Step 4

Enter the new user name to be configured for the member switches in the User Name text-field.

Step 5

Enter the new password to be configured for the member switches in the Password text-field.

Step 6

Click Submit. All the devices that are part of the profile are rediscovered with the updated credentials.


Deleting a Profile

Complete these steps to delete a profile:

Procedure


Step 1

Navigate to ADMINSTRATION > User Management > PROFILE.

Step 2

On the Profile page, click Delete for the profile to delete it.The deleted profile is removed from the Profile page.