Cisco Prime Provisioning Administration Guide, 7.0
Bias-Free Language
The documentation set for this product strives to use bias-free language. For the purposes of this documentation set, bias-free is defined as language that does not imply discrimination based on age, disability, gender, racial identity, ethnic identity, sexual orientation, socioeconomic status, and intersectionality. Exceptions may be present in the documentation due to language that is hardcoded in the user interfaces of the product software, language used based on RFP documentation, or language that is used by a referenced third-party product. Learn more about how Cisco is using Inclusive Language.
- Updated:
- December 1, 2014
Chapter: Manage Security
Manage Security
This chapter describes how you can create, edit, and delete users, user groups, user roles, and object groups and how privileges are assigned to these entities.
The security features are only accessible to the user admin or users with the following roles:
- SysAdminRole—Gives access to all the Prime Provisioning tools. This is similar to “root” in a UNIX system.
- UserAdminRole—Gives access to only the user management tools.
Choose Administration > Security to access the user management tools.
This chapter contains the following sections:
- Users—To manage users.
- User Groups—To manage user groups.
- User Roles—To manage user roles.
- Object Groups—To manage object groups.
- User Roles Design Example—Shows example of how to use the Users, User Groups, User Roles, and Object Groups
Details
When you click the Details button, located at the bottom of the Users window, you receive the following columns of information: User ID ; User Group that a user belongs to; Role that a user occupies; Resource Privilege permissions that a user has for each role occupied; Object Group that a user role is associated with; Customer View that a user’s role is limited to; Provider View that a user’s role is limited to.
Create
When you click the Create button, located at the bottom of the Users window, a user with the required privileges can create a new user. To create a new user, follow these steps:
Step 1 Choose Administration > Security > Users.
Step 2 Click the Create button and the window shown in Figure 3-1, appears.
Figure 3-1 Create/Copy/Edit Users Window
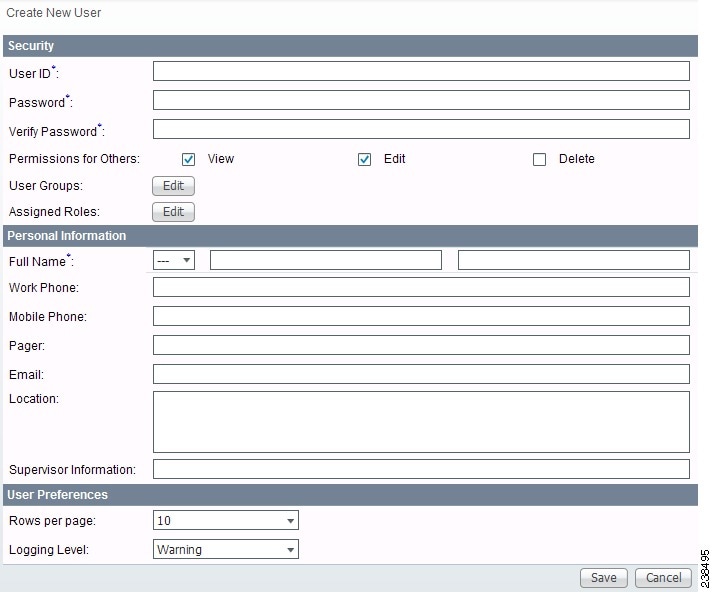
Step 3 Enter information in the Security section, as follows:
– Prime Provisioning requires a non-blank password.
– Prime Provisioning passwords must be a minimum of five characters and no practical maximum length.
– Prime Provisioning does not employ any password restrictions or complexity rules; use good judgment in determining passwords.
– Prime Provisioning passwords are encrypted when stored in the repository.
– Prime Provisioning passwords do not expire.
– Prime Provisioning monitors inactivity and auto-logoff per the settings defined in the Dynamic Component Properties Library (DCPL) properties for repository/rbac.
- Verify Password (required)—Confirm by re-entering the selected password.
- Permission for Others—Check each of the associated check boxes for the permission that the user (to be created) wants to give to other users. The user who creates the object is the owner of the objects. The creator can allow or disallow other users to View, Edit, and/or Delete the objects owned by the creator by defining permissions. This is the last line of defense. For UserA to delete an object X that UserB created, UserA must first have Delete permission for object X, then UserB’s settings for permissions for others is checked, to finally decide whether UserA can delete object X. Permission for others can be enabled or disabled by setting the property: repository.rbac.checkCreatorPermissionEnabled . After you make a change, you must restart the WatchDog by entering stopwd followed by startwd .
- User Groups—Click Edit and you receive a list of the groups. Add this user to a user group(s). The user inherits all the roles assigned to the group(s). You can filter this list. From the selected groups, check the check box next to each group to which you want to add this user. Then click OK . You can repeat this procedure if you want to change your selection.
A user’s group membership can also be changed in the group editor (see the “Edit” section).
The user inherits all the privileges from the groups in which it participates and from the roles assigned to it. That is, the permissions received by the user is an OR result of the permissions in each role.
Step 4 Enter information in the Personal Information section, as follows:
- Full Name (required)—Click the drop-down list and select a title; enter the first name; and then enter the last name.
- Work Phone (optional)—Enter the work phone number.
- Mobile Phone (optional)—Enter the user’s cell phone or mobile phone number.
- Pager (optional)—Enter the user’s pager number.
- Email (optional)—Enter the user’s e-mail address.
- Location (optional)—Enter the user’s location.
- Supervisor Information (optional)—Enter information about the supervisor.
Step 5 Enter information in the User Preferences section, as follows:
- Language (optional)—Click the drop-down list to select a language (at this time only English is supported).
- Rows per page (optional)—This defines the number of rows per page for object listing. The default is 10 . The choices are: 5 , 10 , 20 , 30 , 40 , 50 , 100 , 500 , 1000 , and 2500 .
- Logging Level (optional)—The default is Warning . The choices are: Off , Severe , Warning , Config , Info , Fine , Finer , Finest , and All (see all levels of logs). This defines the logging level for viewing logging events. The list progresses from the least number of messages to the most number of messages.
- Initial Screen (optional)—The default is Home . The choices are: Home , Service Inventory , Service Design , Monitoring , Administration , Site Index , and Diagnostics . This is a way to specify the first window you will see after logging in.
The Users window reappears with the new user listed.
Copy
The Copy button, located at the bottom of the Users window, provides a convenient way to create a new User by copying the information for an existing User including User Groups, Assigned Roles, and User Preferences. Follow these steps:
Step 1 Choose Administration > Security > Users.
Step 2 Check one check box for the existing User you want to copy and edit to create a new User.
Step 3 Click the Copy button and the window shown in Figure 3-1, appears.
Required entries are a User ID , Password , Verify Password, and Full Name .
Step 4 Make all the other changes you want by following the instructions in the “Create” section.
Step 5 Click Save and you will return to the Users window.
The newly created User is added to the list and a Status Succeeded message appears in green.
Edit
The Edit button, located at the bottom of the Users window, allows a user with the required privileges to edit user-specific information. Follow these steps:
Step 1 Choose Administration > Security > Users.
Step 2 Check the check box for the row of the user you want to edit.
Step 3 Click the Edit button and a window as shown in Figure 3-1, appears.

Note To change your password without the SysAdmin or UserAdmin privileges, click the Account tab on the top of the Home page. This allows the user to edit the user profile, including changing the password.
Step 4 Enter the desired information for the user profile, as specified in the “$paratext>” section .
The Users window reappears with the edited user listed.
Delete
The Delete button, located at the bottom of the Users window, allows a user with the required privileges to delete user-specific information. Follow these steps:
Step 1 Choose Administration > Security > Users.
Step 2 Check the check box(es) for the row(s) of the user(s) you want to delete.
Step 3 Click the Delete button and a confirmation window appears.
Step 4 Click Delete to continue with the process of deleting information for the specified user(s). Otherwise click Cancel .
The Users window reappears. If this was successful, the newly updated information appears and a Status box appears in the lower left corner of the window with a green check mark for Succeeded .
User Groups
A user group is a logical grouping of users with common privileges. The User Groups feature is used to create, edit, or delete user groups.
To access the User Groups window, choose Administration > Security > User Groups. The User Groups window appears.
The explanations of the remainder of the buttons is given as follows:
Create
The Create button, located at the bottom of the User Groups window, allows a user with the required privileges to create a user group. Follow these steps:
Step 1 Choose Administration > Security > User Groups.
Step 2 Click the Create button and the window shown in Figure 3-2, appears.
Figure 3-2 Create/Edit User Groups Window
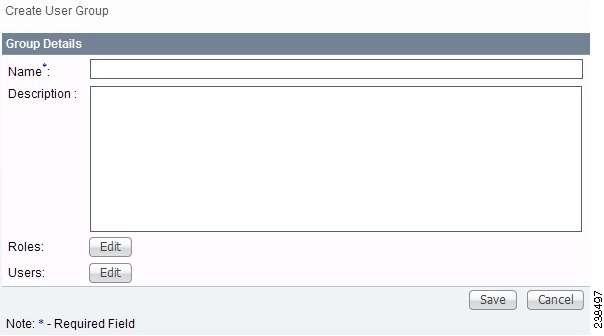
Step 3 Enter information for the user group profile, as follows:
- Name (required)—Enter a name for the new user group.
- Description (optional)—Enter a description of this new user group.
- Roles — This allows you to assign roles to this user group. Click Edit and you receive a list of the roles. You can filter this list. From the selected roles, check the check box next to each role you want to attach to this user group. Then click OK . You can repeat this procedure if you want to change your selection.
- Users —This allows you to add users to this user group. Click Edit and you receive a list of the users. You can filter this list. From the selected users, check the check box next to each user you want to attach to this user group. Then click OK . You can repeat this procedure if you want to change your selection.
Step 4 Click Save. The User Groups window reappears with the new user group listed.
Edit
The Edit button, located at the bottom of the User Groups window, allows a user with the required privileges to edit user group-specific information. Follow these steps:
Step 1 Choose Administration > Security > User Groups.
Step 2 Check the check box for the row of the user group you want to edit.
Step 3 Click the Edit button and a window as shown in Figure 3-2, appears.
Step 4 Enter the desired information for the user group profile, as specified in Step 3 of the “Create” section .
The User Groups window reappears with the edited user group list.
Delete
The Delete button, located at the bottom of the User Groups window, allows a user with the required privileges to delete user group-specific information. Follow these steps:
Step 1 Choose Administration > Security > User Groups.
Step 2 Check the check box(es) for the row(s) of the user group(s) you want to delete.
Step 3 Click the Delete button and a confirmation window appears.
Step 4 Click Delete to continue the process of deleting information for the specified user group(s). Otherwise click Cancel .
The User Groups window reappears. If this was successful, the newly updated information appears and a Status box appears in the lower left corner of the window with a green check mark for Succeeded .
User Roles
A user role is a predefined or a user-specified role defining a set of permissions. The User Roles feature is used to create, edit, or delete user roles.
To better understand the way roles are managed, certain specific characteristics of roles are defined as follows:
- Parent Role —All permission of the parent roles are inherited by the role that is being created or edited (child role). A child role always has the same or more privileges than its parent role.
- Customer —If a role is associated with a customer, a user of this role does not have access to the objects associated with other customers. Object types that are constrained by customer view are: Persistent Task, Customer Site, VPN, CPE, SR, Policy, Service Order, and resource pools that are associated with a Customer, Customer Site, or VPN.
- Provider —If a role is associated with a provider, a user of this role does not have access to the objects associated with other providers. Object types that are constrained by provider view are: Persistent Task, Access Domain, Region, PE, Policy, and some resource pools that are associated with a provider, Access Domain, Region, or PE.
Customer view and provider view within a role have no affect on those objects that do not belong to either a customer or a provider. Those object types are: task, probe, workflow, device, Prime Provisioning host, and template.
Permission operation types in a Role editor, namely View, Create, Edit, and Delete mean View, Create, Modify, and Delete a database object. For example, SR modification (or subsumption) is viewed as Role Based Access Control (RBAC) Creation. SR purge is viewed as RBAC Delete.
A Role can be enabled to be associated with Object Group(s). When Object Group association is enabled, a Role can no longer be associated with a Customer or a Provider, and it cannot have a Parent Role. Resources are limited to PE, CPE, and Named Physical Circuit only. PE and CPE permission implies Device Permission.
Note A global policy, the one that is not associated with any customer or provider, is accessible by both customer-view roles and provider-view roles.
Separate provider-view from customer-view roles when defining a role. When a role is associated with a provider, choose only the resources for which an access scope can be constrained by a provider view. Do the same for a customer-view role.
To access the User Roles window, choose Administration > Security > Roles . The User Roles Administration window appears.
The predefined roles are provided with associated permissions that cannot be edited or deleted. They are intended to cover most of the needed use cases to facilitate a rapid assignment of roles to users and groups with minimum manual configuration. They can also be used as examples to create new roles.
Create
The Create button, located at the bottom of the User Roles Administration window, allows a user with the required privileges to create a new user role. Follow these steps:
Step 1 Choose Administration > Security > Roles.
Step 2 Click the Create button and a window comprised of Figure 3-3 and Figure 3-4, appears.
Figure 3-3 Create/Copy/Edit User Roles Window (Top)
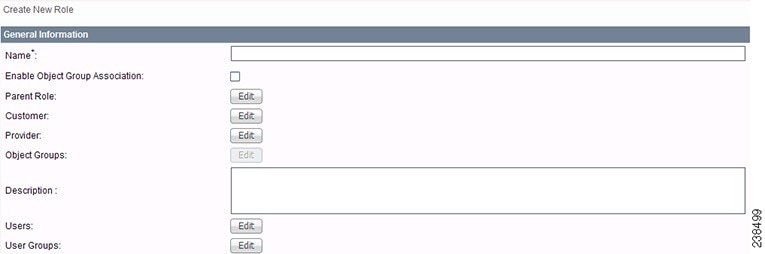
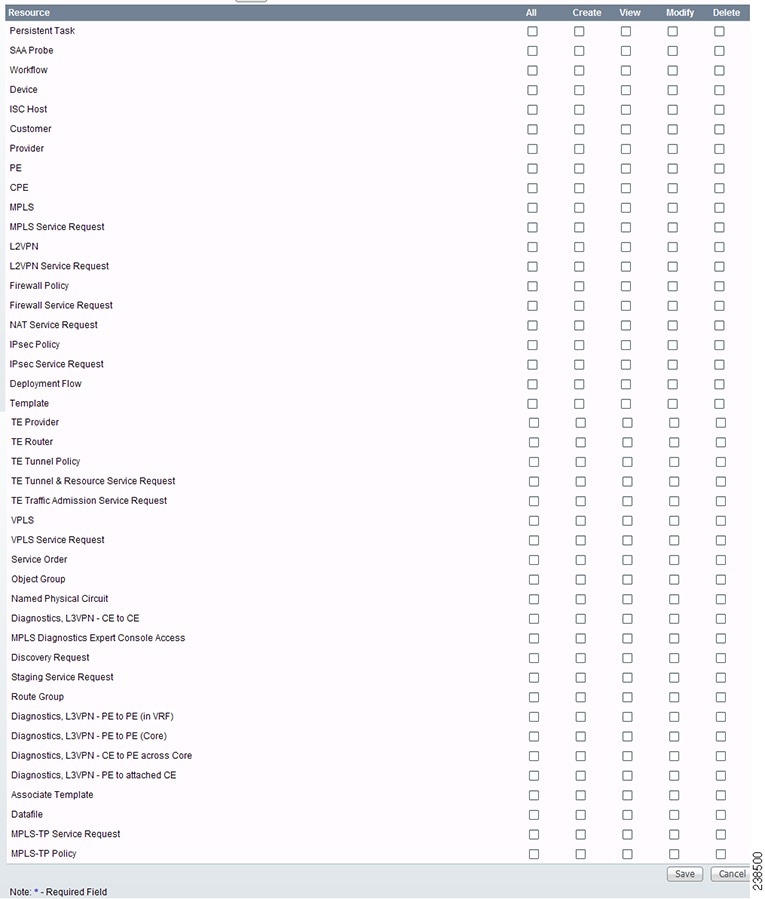
Figure 3-4 Create/Copy/Edit User Roles Window (Bottom)
Step 3 Enter the following information in Figure 3-3:
- Name (required)—Enter the name of this new user role.
- Enable Object Group Association —The default is that this check box is unchecked. In this case, Parent Role , Customer , and Provider are enabled and Object Groups is not enabled. A complete list of resources appears, as shown in the example in the User Roles Administration window. If you check this check box, Parent Role , Customer , and Provider are not enabled and Object Groups is enabled. A window, as shown in Figure 3-4, is reduced to just PE , CPE , and Named Physical Circuit .
- Parent Role (optional)—Click Edit and a list of the existing roles appears, similar to the User Roles Administration window, from which you can click the radio button for the parent role you choose. Then click Select . You can repeat this procedure if you want to change your selection. Click the Clear button if you want no parent selection.
- Customer (optional)—Click Edit and a list of the existing customers appears. You can filter this list. From the selected customers, click the radio button for the customer you want to select to own this role. Then click Select . You can repeat this procedure if you want to change your selection. Click the Clear button if you want no customer selection.
Note A customer can only be associated with a logical device, such as CPE and PE. This is not possible with a physical device, such as device.
- Provider (optional)—Click Edit and a list of the existing providers appears. You can filter this list. From the selected providers, click the radio button for the provider you want to select to own this role. Then click Select . You can repeat this procedure if you want to change your selection. Click the Clear button if you want no provider selection.
- Object Groups (optional)—Click Edit and a list of the existing object groups appears. You can filter this list. From the selected object groups, check the check box(es) for the object group(s) you want to associate with this User Role. Then click OK . You can repeat this procedure if you want to change your selection. Deselect the Enable Object Group Association button if you want no object group selection.
- Description (optional)—Enter the descriptive information about permissions in this field, as shown in the Description column of the User Roles Administration window.
- Users (optional)—Click Edit and a list of the existing users appears. You can filter this list. From the selected users, check the check box(es) for the user(s) you want assigned to this role. Then click OK . You can repeat this procedure if you want to change your selection.
Note A user who is associated with a specific role cannot see objects associated with other customers or with other providers.
- User Groups (optional)—Click Edit and a list of the existing user groups appears. You can filter this list. From the selected user groups, check the check box(es) for the user group(s) you want assigned to this role. Then click OK . You can repeat this procedure if you want to change your selection.
Step 4 In Figure 3-4, click any combination of the following permissions: Create ; View ; Modify ; Delete . If you want all the permissions, click All .
Note Prime Provisioning Host refers to Administration > Control Center > Hosts. Here, you can view host details, perform configuration tasks, start and stop servers, activate a watchdog, and so on.
Note The Workflow object is currently not used.
Note Template controls the template manager functions and Associate Template controls the ability to associate templates with service requests. If you choose Create permission in Template, you also automatically receive Modify permission. If you choose any or all permissions in Associate Template, you automatically turn on the View permission in Template.
Note Datafile permission allows you to manage datafiles and list all Service Requests associating the datafile. If you choose any or all permissions in Datafile, you automatically turn on the View permission in Template.
The User Roles Administration window reappears with the new user role listed.
Copy
The Copy button, located at the bottom of the User Roles Administration window, provides a convenient way to copy the information from an existing User Role and edit it to create a new User Role. Follow these steps:
Note All fields in the existing role are copied to the new role, even including Users and User Groups. You should edit the new role carefully to reflect your intention.
Step 1 Choose Administration > Security > Roles.
Step 2 Check one check box for the existing User Role you want to copy and edit to create a new User Role.
Step 3 Click the Copy button and the window comprised of Figure 3-3 and Figure 3-4 appears.
Step 4 The required entry is a Name . A default name is given, Copy of and the name of the original User Role. You cannot duplicate a Name .
Step 5 Make all the other changes you want by following the instructions in the “Create” section.
Step 6 Click Save and you will return to the User Roles Administration window.
The newly created User is added to the list and a Status Succeeded message appears in green.
Edit
The Edit button, located at the bottom of the User Roles Administration window, allows a user with the required privileges to edit user role-specific information. Follow these steps:
Step 1 Choose Administration > Security > Roles.
Step 2 Check the check box for the row of the user role you want to edit.
Step 3 Click the Edit button and a window appears combining Figure 3-3 and Figure 3-4 for this user role.
Step 4 Enter the desired information for the user role profile, as specified in Step 3 and Step 4 of the “Create” section.
The User Roles Administration window reappears with the edited user roles listed.
Delete
The Delete button, located at the bottom of the User Roles Administration window, allows a user with the required privileges to delete user role-specific information. Follow these steps:
Step 1 Choose Administration > Security > Roles.
Step 2 Check the check box(es) for the row(s) of the user role(s) you want to delete.
Step 3 Click the Delete button and a confirmation window appears.
Step 4 Click Delete to continue with the process of deleting information for the specified user role(s).
The User Roles Administration window reappears. If this was successful, the newly updated information appears and a Status box appears in the lower left corner of the window with a green check mark for Succeeded .
Object Groups
An Object Group is a named aggregate entity comprised of a set of objects. The object types can be PE, CE, Named Physical Circuit (NPC), and interfaces of PEs or CEs. An Object Group provides instance level of access granularity for users.
An Object Group can be associated with different roles. A role can be associated with an Object Group or it can be associated with a grouping of Customer and Provider, but it cannot be associated with both of these. The association with a grouping of Customer and Provider is either with Customer(s), with Provider(s), or with Customer(s) and Provider(s). When a role is associated with Object Group(s), you can only define permissions for PE, CE, and NPC. Permissions on interfaces is implied PEs or CEs, that is, PE Create or CE Create implies Interface Create. PE or CE Edit implies Interface Create, Edit, or Delete. CE or PE Delete implies Interface Delete.
When instance level of access is desired for PE, CE, NPC, or interface of PEs and CEs, you can usually define a role associated with Object Group(s) that contains a collection of PEs and CEs you are limited to operate. Then define other roles to include permissions on other types of objects. See the “User Roles Design Example” section.
If an Object Group contains PEs (or CEs) only, with no explicit interface as a group member, you can access all interfaces of grouped PEs or CEs. If an Object Group contains any explicit interface as group members, every single interface that you want to access you must manually choose to include as group members.
Note Permissions are the union of all roles that you occupy. If your intention is to limit access to a scope of devices or Named Physical Circuits (NPCs), define a role to be associated with Object Group(s), Device, CE, PE, and NPC.
To access the Object Groups window, choose Administration > Security > Object Groups . The Object Groups window appears.
Create
The Create button, located at the bottom of the Object Groups window, allows a user with the required privileges to create a new object group. Follow these steps:
Step 1 Choose Administration > Security > Object Groups.
Step 2 Click the Create button and the Create Object Group window appears.
Step 3 Enter the following information:
- Name (required)—Enter the name of this new object group.
- Description (optional)—Enter a description of this new object group.
- PE Group Members (optional)—Click Edit and a list of the existing PEs appears. You can filter this list. From the selected PEs, check the check box(es) for the PE(s) you want to include in this group. Then click OK . You can repeat this procedure if you want to change your selection(s). The Interface Members column will be empty. All existing interfaces for each of the PE Groups in the Name column will default to be members of the group unless you select only a subset. To limit the interfaces and select a subset of interfaces, click a PE Group in the Name column.You receive a list of all the interfaces for that PE from which you can individually select only the interfaces you want to associate with that PE Group. Then click OK . When you return to Create Object Group window, the Name and selected Interface Members for each PE Group Member appear. If no entries exist in the Interface Members column for both PE Group Members and CE Group Members , the default is all existing interfaces for both (if any exist).
- CE Group Members (optional)—Click Edit and a list of the existing CEs appears. You can filter this list. From the selected CEs, check the check box(es) for the CE(s) you want to include in this group. Then click OK . You can repeat this procedure if you want to change your selection(s). The Interface Members column is empty. All existing interfaces for each of the CE Groups in the Name column default to be members of the group unless you select only a subset. To limit the interfaces and select a subset of interfaces, click a CE Group in the Name column.You receive a list of all the interfaces for that CE from which you can individually select only the interfaces you want to associate with that CE Group. Then click OK . You return to Create Object Group window and the Name , and selected Interface Members for each CE Group Member appear. If no entries exist in the Interface Members column for both CE Group Members and PE Group Members , the default is all existing interfaces for both (if any exist).
- NPC Group Members (optional)—Click Edit and a list of the existing NPCs appears. You can filter this list. From the selected NPCs, check the check box(es) for the NPC(s) you want to select to own this role. Then click OK . You can repeat this procedure if you want to change your selection(s). You return to Create Object Group window and the Name for each NPC Group Member appears.
Create Object Group window reappears with the new object group listed.
Edit
The Edit button, located at the bottom of Create Object Group window, allows a user with the required privileges to edit object group-specific information. Follow these steps:
Step 1 Choose Administration > Security > Object Groups.
Step 2 Check the check box for the row of the object group you want to edit.
Step 3 Click the Edit button and a window appears as shown in the Object Groups window, with the object group chosen specified in the Name field.
Step 4 Enter the desired information for the object group, as specified in Step 3 of the “Create” section.
The Object Groups window reappears with the edited object groups listed.
Delete
The Delete button, located at the bottom of the Object Groups window, allows a user with the required privileges to delete object group-specific information. Follow these steps:
Step 1 Choose Administration > Security > Object Groups.
Step 2 Check the check box(es) for the row(s) of the object group(s) you want to delete.
Step 3 Click the Delete button and a confirmation appears.
Step 4 Click Delete to continue with the process of deleting information for the specified object group(s).
The Object Groups window reappears. If this was successful, the newly updated information appears and a Status box appears in the lower left corner of the window with a green check mark for Succeeded .
User Roles Design Example
This section gives an example situation, an illustration that shows this setup, and steps on how to set up this design:
Example
This section explains an example data center for which the following sections, “Illustration of Setup” section and “Steps to Set Up Example” section give an illustration setup and steps, respectively.
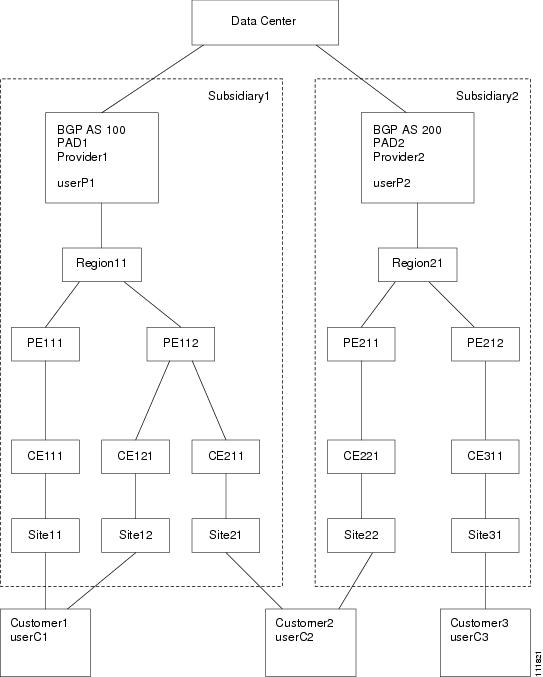
Finance Customer XYZ built an MPLS network to connect its branch offices to its data center. Subsidiaries of XYZ are running different parts of the MPLS network. Each subsidiary uses a different BGP AS domain, which results in different Provider Administrative Domains (PADs) inside Prime Provisioning.
Each subsidiary acts as a Provider and owns therefore its own Devices, like PE and CE devices, and should also own logical attributes inside Prime Provisioning, like Regions, Sites, Customers, and VPNs. Therefore, the view of the devices for each subsidiary must be separated into PAD views. Thus, Provider A cannot manipulate or view the configuration files for devices of Provider B. Devices are not shared between PADs.
Inside a PAD, there are Customers with sites and VPNs with only local significance. Also, the IP addressing should be defined per PAD.
But there are also Customers that have sites in different PADs. This means that there is a need for Inter-AS VPNs. The Provider who owns the Customer should also have the right to share this Customer with other Providers. In this case, the VPNs and Route Targets should be shared between the providers.
Illustration of Setup
Figure 3-5 shows the set up described in the “Example” section.
Figure 3-5 Contents in Example
Steps to Set Up Example
This section explains the steps to create the example explained in the “Example” section and shown in the “Illustration of Setup” section.
Step 1 Create the following Object Groups (see the “Create” section, which is for the section Object Groups):
- P1PEGroup that has members PE111 and PE112
- P2PEGroup that has members PE211 and PE212
- C1CEGroup that has members CE111 and CE121
- C2CEGroup that has members CE211 and CE221
- C3CEGroup that has the member CE311
- C2DeviceGroup that has members PE112, CE211, PE211, and CE221
- C3DeviceGroup that has members PE212 and CE311.
Step 2 Create the following User Roles that are associated with one or more groups created in Step 1 (see the “Create” section, which is for the section User Roles).
- P1DeviceGroupRole, associated with groups P1PEGroup, C1CEGroup, and C2CEGroup, and have the Modify and Delete permissions on for PE and Cpe.
- P2DeviceGroupRole, associated with groups P2PEGroup, C2CEGroup, and C3CEGroup, and have the Modify and Delete permissions on for PE and Cpe.
- C1DeviceGroupRole, associated with groups P1PEGroup, C1CEGroup, and have the Modify permission on for PE and the Modify and Delete permissions on for Cpe.
- C2DeviceGroupRole, associated with group C2DeviceGroup, and have the Modify permission on for PE and the Modify and Delete permissions on for Cpe.
- C3DeviceGroupRole, associated with group C3DeviceGroup, and have the Modify permission on for PE and the Modify and Delete permissions on for Cpe.
Step 3 Create the following User Roles that have Customer View or Provider View, as explained in the “User Roles” section.
- P1MplsRole, associated with Provider P1, and have permissions on Provider, Task, Prime Provisioning Host, Mpls SR, Mpls Policy, NPC, and Probe. (Add Service, Template, and ServiceOrder if needed.)
- P2MplsRole, associated with Provider P2, and have permissions on Provider, Task, Prime Provisioning Host, Mpls SR, Mpls Policy, NPC, and Probe. (Add Service, Template, and ServiceOrder if needed.)
- C1MplsRole, associated with Customer C1, and have permissions on Customer, Task, Prime Provisioning Host, Mpls SR, Mpls Policy, NPC, and Probe. (Add Service, Template, and ServiceOrder if needed.)
- C2MplsRole, associated with Customer C2, and have permissions on Customer, Task, Prime Provisioning Host, Mpls SR, Mpls Policy, NPC, and Probe. (Add Service, Template, and ServiceOrder if needed.)
- C3MplsRole, associated with Customer C3, and have permissions on Customer, Task, Prime Provisioning Host, Mpls SR, Mpls Policy, NPC, and Probe. (Add Service, Template, and ServiceOrder if needed.)
Step 4 Assign the User Roles defined in Step 2 and Step 3 to Users, as explained in the “Users” section.
- User P1 has User Roles: P1DeviceGroupRole, P1MplsRole, C1MplsRole, and C2MplsRole.
- User P2 has User Roles: P2DeviceGroupRole, P2MplsRole, C2MplsRole, and C3MplsRole.
- User C1 has User Roles: C1DeviceGroupRole and C1MplsRole.
- User C2 has User Roles: C2DeviceGroupRole and C2MplsRole.
- User C3 has User Roles: C3DeviceGroupRole and C3MplsRole.
 Feedback