Cisco Prime Provisioning Administration Guide, 7.0
Bias-Free Language
The documentation set for this product strives to use bias-free language. For the purposes of this documentation set, bias-free is defined as language that does not imply discrimination based on age, disability, gender, racial identity, ethnic identity, sexual orientation, socioeconomic status, and intersectionality. Exceptions may be present in the documentation due to language that is hardcoded in the user interfaces of the product software, language used based on RFP documentation, or language that is used by a referenced third-party product. Learn more about how Cisco is using Inclusive Language.
- Updated:
- December 1, 2014
Chapter: Backup and Restore of Prime Provisioning Repository
- Data Items Included in Backup and Recovery
- Guidelines
- Sybase Backup and Restore Process Overview
- Sybase Database Backup and Restore
- Installing the Sybase Backup and Restore Tool
- Sample Install Prompts and User Responses
- Post Install Status
- Adding PATH Statement
- Configuring the Sybase Backup and Restore Tool
- Post Configuration Status
- How to Use the Backup Script
- Behavior of the Backup Process
- How to Restore the Database from the Backup
- Oracle Database Backup and Restore
Backup and Restore of Prime Provisioning Repository
This chapter explains how to back up and restore your Sybase and Oracle databases. When upgrading from a earlier release of Prime Provisioning, the existing backup script will no longer work. From Prime Provisioning 6.8, you can install the new backup script that is available along with the downloaded version of the product. You can download the latest version of the product from the Software Download page.
This chapter contains the following sections:
- Data Items Included in Backup and Recovery
- Guidelines
- Sybase Backup and Restore Process Overview
- Sybase Database Backup and Restore
- Oracle Database Backup and Restore
Data Items Included in Backup and Recovery
Most of the Prime Provisioning-related data items are stored in a repository held on a relational database and the rest are stored in an operating system level file system. For Prime Provisioning to function flawlessly on restart, following a crash, it is necessary that the proposed backup and recovery feature include various Prime Provisioning-related data items as a whole. The underlying tasks involved in backup and recovery procedures differ depending on the nature of persistence of these data items. However, these procedures shall work commonly for all the data items in a seamless and transparent manner.
The following data elements are included in Prime Provisioning’s backup and recovery plan:
1. Main repository: This repository consists of data items such as Customers/Organizations, VPNs, Policies, Devices, and Interfaces. This data is held on an RDBMS, either the embedded Sybase ASA database or the customer’s Oracle database.
2. SLA repository: This repository consists of data items pertaining to Service Level Agreements (SLA) and Probes. This repository is held on a Sybase ASA database.
3. Others: There are a few data items that are stored in the OS level file system under various Prime Provisioning install directories, which would be part of the proposed backup and recovery plan.
Guidelines
This section explains how to use the supported backup methods in Prime Provisioning.
For the backup and recovery plan to function efficiently, customers are requested to follow these guidelines:
Step 1 Support exists for the following types of supported backups:
a. Full backup is a complete backup of the Prime Provisioning repository, Prime Provisioning repository transaction logs, and other Prime Provisioning data files held in the file system. It is recommended to have a full backup on a default weekly basis, which could be reconfigured as desired by the customer.
b. Incremental backup is a backup of all the data from the time of the last full or incremental backup until this incremental backup. It is recommended that the full backup be interspersed with several incremental backups, by default, daily.
c. Archive backup is a complete backup of all Prime Provisioning data in respective archive files, typically on a tape drive. Use this backup if you are backing up directly to a tape.
d. Live backup creates redundant copies of transaction logs to restore the Prime Provisioning repositories held on a Relational Database Management System (RDBMS) and creates redundant copies of other Prime Provisioning data held on the file system on the Main server machine. These redundant copies are typically set up on a secondary machine to restart Prime Provisioning if the primary server machine becomes unusable.
Step 2 The plan default schedule requires Weekly FULL ONLINE (while system is running) backups interspersed with DAILY ONLINE incremental backups of all Prime Provisioning data items. An ARCHIVE full backup, preferably on a tape, is recommended on a MONTHLY basis. This archive tape backup should be stored in different premises to prevent any loss of backups in case of acts of physical disasters at the main server location.
Step 3 It is important to keep more than one full backup to prevent accidental loss of backup copies.
Step 4 Create archive backup copies on a tape device.
Step 5 External factors such as available hardware, the size of database files, recovery medium, disk space, and unexpected errors can affect customers’ recovery time. When implementing the plan, the customer shall allow additional recovery time for miscellaneous tasks that must be performed, such as entering recovery commands or retrieving, loading, and organizing tapes.
Sybase Backup and Restore Process Overview
This section describes how to back up and restore Sybase ASA for an Prime Provisioning installation. This section contains the following sections:
Overview of the Backup and Restore Process
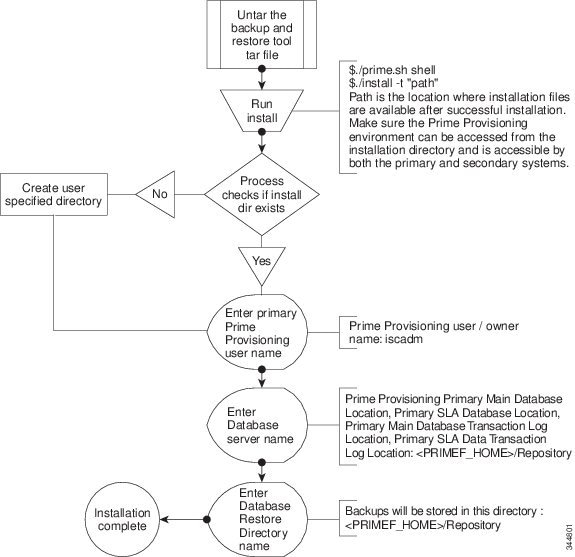
Figure 4-1 shows an overview of the Sybase ASA backup and restore process.
Figure 4-1 Overview - Sybase ASA Backup and Restore

Planning your Backup and Restore Process
Before backing up and restoring your Sybase installation, you must first prepare a plan. To prepare your plan, follow these steps:
Step 1 Determine the frequency for full backups.
Step 2 Determine the frequency for incremental backups.
Step 3 Determine the location for storing the backups.

Note The file system must be accessible by the primary Prime Provisioning production machine and the secondary system (if you want to run the restore process from the secondary system or you want to perform a live backup).
Step 4 Document the information for Step 1 to Step 3.
Step 5 Set up the proper bookkeeping for your backup and restore procedure.
Configuring Sybase Credentials
In Prime Provisioning, changeDBPassword.sh script has been introduced to update Sybase database password. This script is available in <PRIMEF_HOME>/bin. It allows only the installation owner to execute it with the initial credentials. It also validates if the database is running properly.
Adhere to the rules below, while updating the Sybase password:
- You should not enter a simple password or any of your old passwords.
- Password must contain at least: one uppercase letter, one lowercase letter, and one number.
- Password length should be in the range of 8 to 30 characters.
- Special characters and ASCII character set are not allowed.
Once the password is updated, you need to validate the backup and restore process, and upgrade Paths.
Use the following steps to execute the script:
Step 1 Navigate to the directory where the latest version of Prime Provisioning software is installed.
Step 2 In <PRIMEF_HOME>/bin, execute the following script:
Step 3 Enter the valid username and password.
Step 4 After the validation, you will be prompted with the following message “Enter database new password:”.
Step 5 Enter a valid new password that adhere to the guidelines mentioned above.
Prime Provisioning gets restarted automatically once the new password is updated in the database and the properties file.
As a part of this feature, few scripts related to Backup and Restore tool installation has been modified.
Note You will be no longer prompted with the Sybase credentials during the installation of the Backup and restore tool.
Installing the Backup and Restore Tool
Figure 4-2 shows the process flow for installing the backup and restore tool.
Figure 4-2 Installing the Backup and Restore Tool
Configuring the Backup and Restore Process
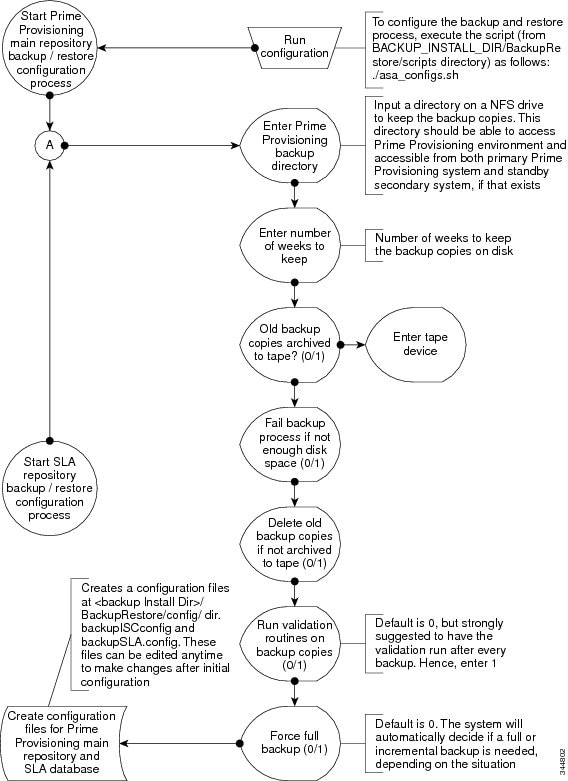
Figure 4-3 shows the one-time configuration process for the backup and restore.
Figure 4-3 One-Time Configuration Process Flow
Preconditions
Before backing up your Sybase installation, you must observe the following preconditions:
1. The backup task must be carried out while the Prime Provisioning database server is running.
2. The backup directory path that you specify during the configuration must be on a Network File System (NFS) drive.
3. The backup and restore tool must be installed and accessible by both the primary and secondary systems.
4. The backup and restore tasks must be carried out from the Prime Provisioning primary machine. However, the live backup and restore is done from the secondary system.
5. You must not modify, rename, or move the backup directory structure after you configure it.
Functions
1. The backup follows a weekly scheme.
2. The backup week begins every Sunday.
3. A full backup occurs automatically the first time a backup is run for the backup week.
4. After the full backup, only incremental backups occur for the remainder of the week.
5. You can force a full backup during the week by changing the configuration setting to fullBackup=1 before running the backup script.
6. A new subdirectory is created for every backup week under the backup directory specified during the configuration. The name has the format mm-dd-yyyy, where the date is Sunday of the current backup week.
7. A new subdirectory is created for each full backup created during the backup week. All the associated incremental backup copies are also kept under this directory. If a full backup is forced during the same backup week, a new subdirectory is created for the full backup and after associated incremental backups.
Note Do not modify, rename, delete, or move the directory structure created by the backup tool.
8. Both the database and the transaction log are backed up in a full backup.
9. Only the transaction log is backed up in an incremental backup.
10. The transaction log is truncated after each backup, either full or incremental. In other words, the transaction log is started fresh after each backup.
11. The name of the log file after backup will be of the form yymmddnn.log, where yy is the year, mm is the month, and dd is the day on which the backup is taken and nn is the serial number of this backup on a given day.
Incremental Backup Scheme
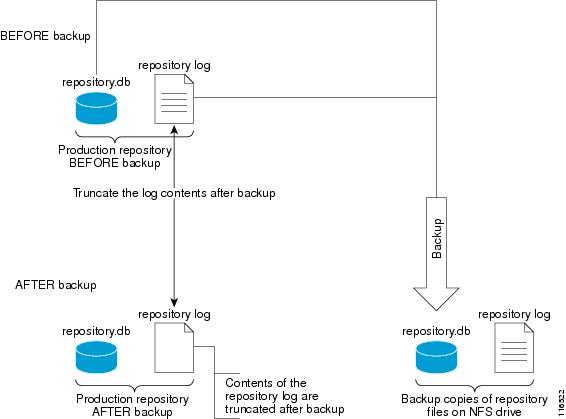
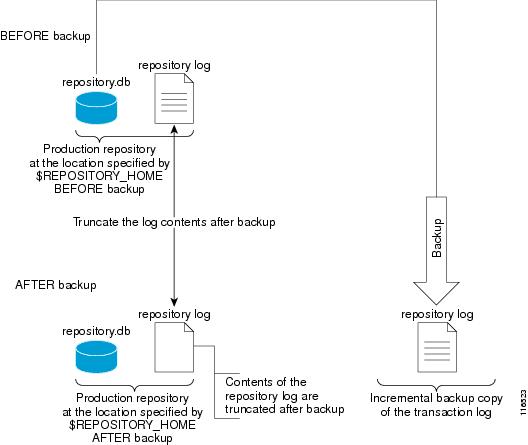
Figure 4-5 shows an incremental backup scheme.
Figure 4-5 Incremental Backup Scheme
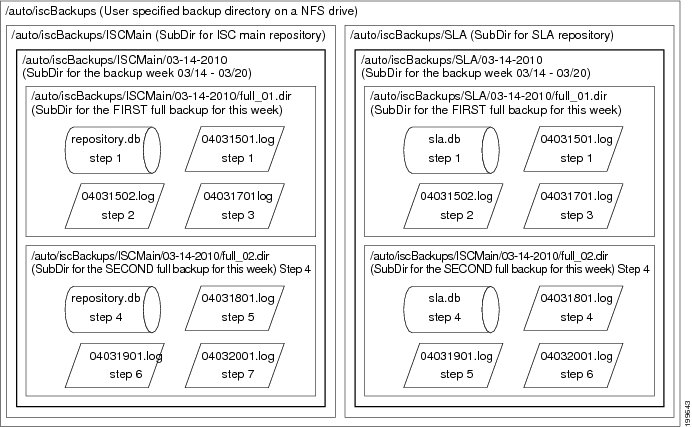
Typical Backup Directory Structure
To create a backup directory structure on an NFS drive, you can use the following procedure.
Assume the Backup Week is 03/14/2010 through 03/20/2010 and the Backup Dir as specified during configuration is /auto/Prime Provisioning Backups (NFS drive). The system creates two subdirectories under user specified backup dir, ISCMain and SLA.
1. First backup run on 03/15/2010 Monday, default full backup. Creates a sub dir /03-14-2010/full_01.dir under ISCMain and SLA directories.
2. Second backup run on the same date 03/15/2010, default incremental backup.
3. Third backup run on 03/17/2010, default incremental backup.
4. Fourth backup, Forced FULL backup (after changing configuration file setting, fullBackup to 1) on 03/18/2010. Creates a new sub dir /03-14-2010/full_02.dir under ISCMain and SLA directories.
Note Configuration setting, full backup reset to 0.
5. Fifth backup, run on 03/19/2010, default incremental backup.
6. Sixth backup, run on 03/20/2010, default incremental backup.
Note Backup Week ended on 03/20/2010.
Figure 4-6 shows a typical backup directory structure on an NFS drive.
Figure 4-6 Typical Backup Directory Structure
Preconditions
Before restoring your Sybase installation, you must observe the following preconditions:
1. The Prime Provisioning database server should be stopped while running the Restore task.
2. The backup directory path that you specify during the configuration must be on a Network File System (NFS) drive.
3. The backup and restore tool must be installed and accessible by both the primary and secondary systems.
4. The backup and restore tasks must be carried out from the Prime Provisioning primary machine. However, the live backup and restore is done from the secondary system.
5. The user running the restore script needs write permissions on the $REPOSITORY_HOME directory.
6. The repository files shall have write permission for the user running the restore.
7. Do not modify, rename, or move the backup directory structure after configured.
8. Do not rename, move, or delete the backup copies of the repository files.
9. Do not move, rename, or delete the production repository files under $REPOSITORY_HOME.
Functions
1. Restores the repository from existing full and incremental backup copies.
2. At least one full backup copy should be available to restore the repository.
3. The repository can be restored to a desired point in time using the available backup copies.
4. The restore process can recover the repository if there is a media failure on the database file, repository.db and/or sla.db.
5. The restore process cannot recover the repository if there is a media failure on the transaction log file. In this case, one of the following should be done to recover the database until the most recent checkpoint (partial recovery only):
a. Using the available backup copies, the repository can be restored to a desired point in time. Use the Prime Provisioning restore script to do this.
b. Make an extra backup copy of the database file immediately. When the transaction log is gone, the only record of the changes between the last backup and the most recent checkpoint is in the database file. Delete or rename the transaction log file. Restart the database with the -f switch.
For example, $SYBASE_HOME/bin/dbsrv8 $REPOSITORY_HOME/repository.db -f
Note Please see Sybase ASA documentation for more information.
Note This option should be done by an authorized database administrator only.
Restore from Media Failure
Figure 4-7 shows the process flow for how to restore from a media failure on the database file (.db).
Figure 4-7 Restore from Media Failure on the Database File (.db)
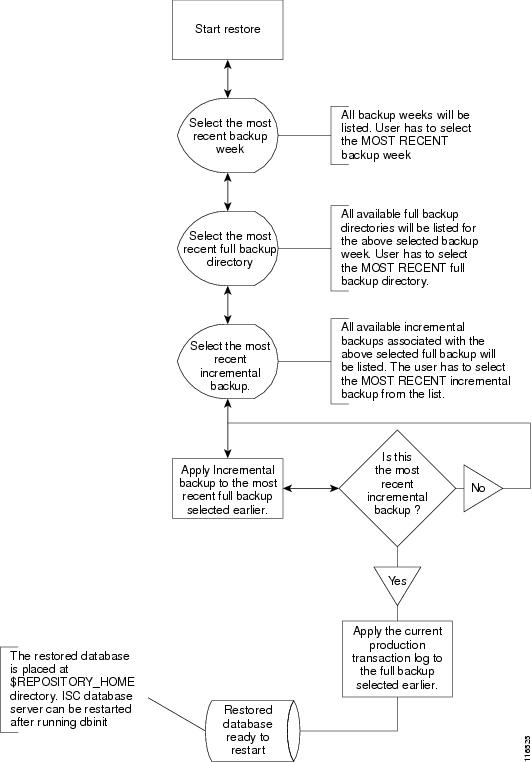
Restore to a Desired Point-in-Time
Figure 4-8 shows the process flow for how to restore from a desired point-in-time.
Figure 4-8 Restore the Database to a Desired Point-in-Time
Sybase Database Backup and Restore
It is important to protect all Prime Provisioning-related data by a well-defined backup and recovery plan. Data loss could occur due to the following reasons. The objective of Prime Provisioning’s backup and recovery plan is to greatly minimize the risk of data loss due to any of these reasons:
– The disk drive holding database files and other data files becomes unusable.
– The database files and other data files become corrupted due to hardware or software problems.
– A computer or operating system goes down while there are partially completed transactions.
The Sybase Backup and Restore tool provides a suite of scripts with several options to back up and restore your embedded Sybase database.
The backup script automatically detects whether a full backup is needed for this current backup week. If a full backup already exists for this current backup week, this script automatically takes an incremental backup. However, the user can force a full backup overriding this default behavior by changing the configuration setting.
Installing the Sybase Backup and Restore Tool
Step 1 In Prime Provisioning 6.8, Sybase backup and restore tool for Linux is available as iscBRToolASA.tar file in the new Prime Provisioning installation directory.
Note In Prime Provisioning 6.8.1, Sybase backup and restore tool (iscBRToolASA.tar) location has changed due to Sybase 16 upgrade and it needs to be copied from Prime Provisioning 6.8.1 image location. Earlier the location was Prime Provisioning installation directory.
Prime Provisioning 6.8.1 image location is available at:
https://software.cisco.com/download/release.html?i=!y&mdfid=286308515&softwareid=284525453&release=6.8.1&os=
Step 2 Untar this file as follows:
mkdir -p $PRIMEP_HOME/backup/Sybase
gzip -d < iscBRToolASA.tar | tar xf -
Run install from where the tar file is unzipped. The install script takes command line arguments. Because install is also a system command, to differentiate between the system command and this installation script, run the script as follows:
where:
"path" is the location the installation files will be available after successful installation.
<
BACKUP_INSTALL_DIR
> must be NFS accessible by both the primary and secondary systems.
For help in the install script, use -h(elp) as a command line argument.
Sample Install Prompts and User Responses
The following is a sample install session:
/opt/prime-provisioning-6_7/backup/Sybase/PP67Database_Backup not exists do you want to create it and continue? [y/n] [y]Post Install Status
The installation creates an env.sh script under the < BACKUP_INSTALL_DIR > /BackupRestore/config directory.
Editing the env.sh script is NOT RECOMMENDED. This env.sh script sets the necessary environment variables needed to run Prime Provisioning backup and restore scripts.
Adding PATH Statement
After installing the Prime Provisioning Backup and Restore tool and before configuring it, the PATH statement:
PATH=$PATH:/BackupRestore/scripts:/BackupRestore/config:/BackupRestore/bin export PATH
should be added to the login .profile file of the user iscadm.
Without this permanent addition, later runs of the backup and restore may fail.
Configuring the Sybase Backup and Restore Tool
A one-time configuration is needed before the first backup is carried out.
Step 1 Invoke the asa_configs.sh script to configure the backup and restore process. Execute this script from the directory < BACKUP_INSTALL_DIR> /BackupRestore/scripts as follows:
# ./asa_configs.sh
A sample configuration session is as follows, with the configuration prompt on the LHS and sample user response on the RHS of the prompt.
-----------------------------------------------------------------------
-----------------------------------------------------------------------
[/opt/prime-provisioning-6_7/backup/Sybase/PP661Database_Backup/BackupRestore/Backups] [?]
Post Configuration Status
How to Use the Backup Script
The backup script is used as follows:
Step 1 Run the < BACKUP_INSTALL_DIR> /BackupRestore/script/asa_backup.sh script to initiate the backup task.
a. The backup should be made while the Prime Provisioning database server is running. There is no need to stop Prime Provisioning to back up the database.
b. The backup directory path specified during the configuration process must be on an NFS device.
It is important to keep the backup copies on an external storage device to protect the backup copies if the main Prime Provisioning system crashes.
c. Install the Backup and Restore tool and implement the periodic backup tasks from the primary Prime Provisioning host machine. However, the backup task can be carried out from a secondary system, provided the following conditions are met:
– The main Prime Provisioning and SLA repository files should be placed on an NFS device accessible from the primary Prime Provisioning host system and the secondary Prime Provisioning host system.
– The hardware and software configuration of the secondary system should be the same as the Prime Provisioning primary host system.
– The same version of Prime Provisioning should be installed on both the primary and secondary systems.
– The Backup and Restore tool should be installed on the secondary Prime Provisioning system.
Step 2 Rerun the config script to make changes to the initial configuration settings, if needed.
Behavior of the Backup Process
Step 1 The backup scripts follow a weekly backup scheme; the backup week begins on Sunday.
Step 2 A full backup (both .db and .log files) is taken the first time the backup script is run during the backup week. Only incremental (only .log file) backups are taken for the remainder of the current backup week.
Step 3 You can force a full backup instead of an automatic incremental backup by setting the fullBackup property to 1 in the backupISC.config and backupSLA.config file, before running the asa_backup.sh script.
Step 4 A new subdirectory (under the user-specified backup directory) is created for each backup week. This directory is named as MM-DD-YYYY, where MM is the month and DD is the date of the Sunday of this backup week and YYYY is the year.
Step 5 A subdirectory is created for each full backup and all the associated incremental backups under the above weekly directory. Each time a forced full backup is made for the current backup week, there is a new subdirectory created to contain this full backup and its associated incremental backups.The full backup directory for the current backup week is named full_0 n .dir, where n is 1,2...9.
How to Restore the Database from the Backup
The asa_restore.sh script supports the following types of database restore:
1. A restore of a previous Full or incremental backup.
2. A recovery from a media failure on the database file.
Note The main Prime Provisioning repository consists of repository.db and repository.log files and the SLA consists of sla.db and sla.log files. Prime Provisioning does not support placing the .db and.log files in different locations. Thus, if there is a media failure on the .db file, then the associated .log file also becomes unusable and thus this option might not be useful.
Step 1 Run < BACKUP_INSTALL_DIR> /BackupRestore/script/asa_restore.sh script to initiate the restore task after being sure to follow these pre-conditions:
a. The database server of Prime Provisioning should not be running. Failing to stop the database server results in an inconsistent database after the restore.
b. Follow the instructions and prompts carefully while running the scripts.
c. Do not copy, move, or delete the repository files under $REPOSITORY_HOME .
A sample configuration session is as follows, with the configuration prompt on the LHS and sample user response on the RHS of the prompt.
Oracle Database Backup and Restore
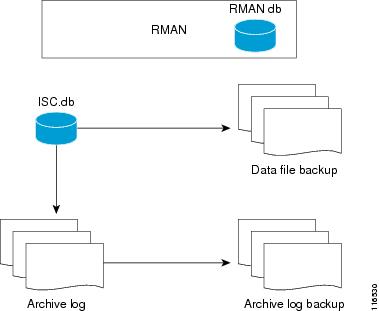
Oracle databases have a backup and restore Recovery Manager (RMAN) tool. To use this tool for online backup, the Oracle database must be in ARCHIVELOG mode, as explained in the “Create RMAN Catalog Database” section. RMAN maintains the bookkeeping intelligence of backup and recovery files and backs up at the block level. Therefore, RMAN can significantly speed up backups and reduce the server load by using incremental backups.
Figure 4-9 shows an Oracle Database Backup Diagram.
Figure 4-9 Oracle Database Backup
RMAN for Oracle 10g is explained in the quick start guide and reference manual, which are available from Oracle’s website.
RMAN is convenient to use. However, it only provides a command line interface. And it still demands database analyst knowledge when recovery is needed.
Be sure that the backup data and RMAN catalog are located on a different disk from where the Oracle database (data files, redo logs, and control files) are located. Both can reside on the same Prime Provisioning database server.
Oracle Enterprise manager (GUI) can be used to set up RMAN.
Alternatively, RMAN configuration is explained in the following areas that should be implemented sequentially:
Step 1 Create RMAN Catalog Database.
Step 2 Create RMAN User.
Step 3 Create RMAN Catalog.
Step 4 Register the Prime Provisioning Database with the RMAN Catalog.
Step 5 Add PATH Statement
Step 6 Modify Prime Provisioning Database Initial Parameter File.
Step 7 Back up Database.
Step 8 Recover Database.
Create RMAN Catalog Database
The catalog database holds the recovery catalogs. This database typically is set up on a different server from any database being registered in it. It also works if this database is set up on the same database server as the Prime Provisioning database.
Use the Oracle utility dbassist to create a catalog database. (This is the same as Prime Provisioning database creation, except you should name the RMAN global name rcat , and you should name the SID rcat .)
Create RMAN User
Creating an RMAN user is the same as creating an Prime Provisioning user on an rcat database. Name the RMAN user ID rmanuser and name the password rmanpassword . Make sure rmanuser has proper privileges. For example:
SQL> grant connect, resource, recovery_catalog_owner to rmanuser;
Create RMAN Catalog
Create a catalog from the RMAN command prompt:
Register the Prime Provisioning Database with the RMAN Catalog
Set the ORACLE_SID environment variable = prime.
RMAN > connect catalog rmanuser/rmanpassword@rcat
RMAN > connect target sys/ change_on_install
RMAN> configure controlfile autobackup on;
The default password for an Oracle sys account after Oracle installation is change_on_install . Replace this sys account password with the correct sys account password for the Prime Provisioning database.
Add PATH Statement
After installing the Prime Provisioning Backup and Restore tool and before configuring it, the PATH statement:
PATH=$PATH:/BackupRestore/scripts:/BackupRestore/config:/BackupRestore/bin export PATH
should be added to the login .profile file of the user iscadm.
Without this permanent addition, later runs of the backup and restore may fail.
Modify Prime Provisioning Database Initial Parameter File
To modify the Prime Provisioning database initial parameter file, do the following:
Step 1 To ensure the database is in archive log mode, enter the following:
SQL> alter system set log_archive_dest_1 = ‘location= </var/tmp/oradata/arch> ’ SCOPE=BOTH;
SQL> alter system archive log start;
where </var/tmp/oradata/arch> is the location of the archive destination.
Step 2 Restart the Prime Provisioning database server with the ARCHIVELOG mode turned on, as follows:
Step 3 Check the archive log mode, as follows:
Back up Database
To back up the database, do the following:
Step 1 Download the software for backup and restore from:
http://software.cisco.com/download/navigator.html?mdfid=284127465&flowid=37682
Step 2 Before you run the backup scripts, make sure you update the file $PRIMEP_HOME/backup/Oracle/backupenv.properties
Use a text editor to open this file and read the directions on how to update each property.
Note The file $PRIMEP_HOME/backup/Oracle/backupenv.properties contains BACKUP_DEST, which must point to a directory that is writable by the owner of the Oracle database. To do this, specify chmod atw <file_defined_by_BACKUP_DEST>
Step 3 To perform a full database backup, execute the following:
$PRIMEP_HOME/backup/Oracle/oracle_backup.sh -f
Step 4 You can perform incremental backups after a minimum of one full backup. To perform an incremental backup, execute the following:
$PRIMEP_HOME/backup/Oracle/oracle_backup.sh -i
Note These backup scripts can be run as cron jobs and cannot be scheduled by the Prime Provisioning task manager.
Back up Non-database Files
On the Prime Provisioning server machine, to backup non-database related files, such as task logs or Prime Provisioning system properties, execute the script: non_db_backup.sh .
Recover Database
To recover a database, do the following:
Step 1 Stop the Prime Provisioning watchdog before recovering a database, as follows:
Step 2 To recover a database, you can execute the following from the location $PRIMEP_HOME/backup/Oracle/oracle_recover.sh
% oracle_recover.sh [ “ <date_time> ” ]
The “ <date_time> ” is optional. The format is “ mmm dd yyyy hh : mm : ss ” , where the first mmm is the month and must be alphabetic characters with an initial capitalization, for example:
If you do not specify <date_time> , the script does a full database recovery.
Note Do not stop the Oracle Listener during restore.
Standby System for Prime Provisioning (Secondary System)
This section explains how to set up Sybase and Oracle standby systems for Prime Provisioning.
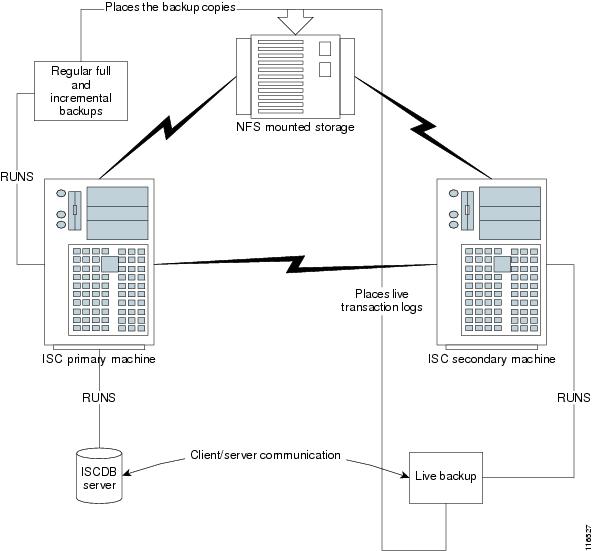
Sybase Standby System Process Overview
Figure 4-10 shows a live backup scheme.
Figure 4-10 Live Backup Scheme
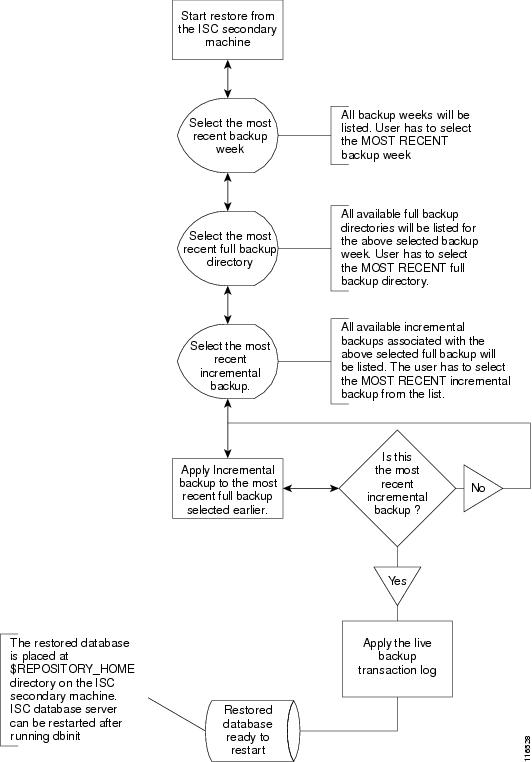
Restore from Live Backup
Figure 4-11 shows the process flow for how to restore from a live backup.
Figure 4-11 Restore from Live Backup
Sybase Standby System Set Up
The explanation of setting up a Sybase standby system is explained as follows:
Running Live Backup of Prime Provisioning Databases
Run < BACKUP_INSTALL_DIR> /BackupRestore/scripts/asa_liveBackup.sh from the Prime Provisioning secondary system to start the live backup after being sure to follow these preconditions:
Step 1 Set up a standby Prime Provisioning system.
Step 2 The standby system should be similar to the primary Prime Provisioning host system in hardware and software configurations.
Step 3 The Prime Provisioning primary and standby systems should be on the same LAN.
Step 4 Prime Provisioning software should be installed on the secondary system and the version of Prime Provisioning on the primary and standby systems should be the same.
Step 5 The backup and restore tool should be installed on the primary and the secondary systems.
Step 6 The live backup should be started from the secondary system only, you should not run the live backup from Prime Provisioning primary system.
Step 7 The storage device where the regular backup copies are placed should be accessible from the standby system.
Step 8 You must run < BACKUP_INSTALL_DIR > /BackupRestore/scripts/asa_liveBackupConfig.sh to configure the live backup on the standby system before starting the live backup for the first time.
Step 9 The Prime Provisioning database server must be running on the primary Prime Provisioning host before starting the live backup on the standby system.
Step 10 The live backup stops when the Prime Provisioning database server is stopped and should be restarted after restarting Prime Provisioning.
Step 11 At least one full backup must be taken before starting the live backup.
Step 12 Regular periodic full/incremental backups should be taken even if the live backup is running on the secondary system.
Step 13 There should not be more than one live backup running simultaneously.
Note When backup is taken using standby server in a different subnet, the host parameter (host=$ISCHOST) need to be added after tcpip in dbping command which exists in the backup script. For example: RES=`$SYBASE_HOME/bin/dbping -c "uid=$DBUSER;pwd=$DBPASSWD;dbn=$dbName;eng=$dbEng;links=tcpip(host=$ISCHOST)"
How to Restore the Database from the Live Backup
When the primary Prime Provisioning host fails, the standby system restores the database from the latest available full backup, the latest incremental backup, and the live backup.
Run the <BACKUP_INSTALL_DIR> /BackupRestore/script/asa_restoreFromLiveBackup.sh script on the standby system to restore the database after being sure to follow these preconditions:
Step 1 At least one full backup copy should be available to restore the database.
Step 2 If more than one backup copy is available, use only the latest full backup and the latest associated incremental backup.
Step 3 Run the restore from the standby machine.
Oracle Standby System Set Up
Prime Provisioning 6.0 supports both physical standby and logical standby in Oracle 10g Data Guard. For information about the Oracle 10g standby concept and configuration, see the Oracle Data Guard Concept and Administration 10g Release 1 (10.1) Part No. B10823-01. The document can be found at Oracles’ website.
When the standby database is activated, use the following commands to point Prime Provisioning to the new database server:
update $PRIMEP_HOME/etc/install.cfg and replace <old_db_server> with <new_db_server> .
<old_db_server> is the name of the old database server
 Feedback