This document contains the following sections:
Introduction
The Cisco Prime Network Registrar Jumpstart product is a complete solution for using the Cisco Prime Network Registrar application to manage DHCP, DNS, and Caching DNS servers. It includes the following components:
-
Cisco Prime Network Registrar 11.1 application software
-
AlmaLinux 8.6 Operating System
-
VMware ESXi 7.0.3 Hypervisor
-
Cisco UCS C220 M6 Hardware
These components are integrated together into a single flexible and easy to use appliance (see the following figure).
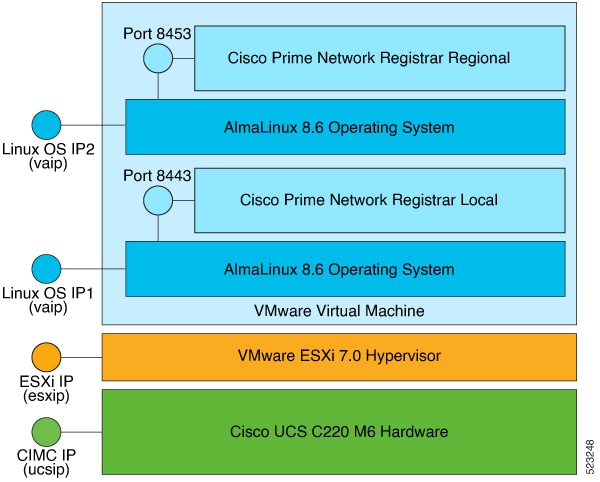
Above figure shows the three primary layers in the Cisco Prime Network Registrar Jumpstart appliance. Each of these layers has its own capabilities. Each of these layers can be controlled independently as well as remotely, and each requires its own independent connection to the network. Thus, three unique IP addresses are required.
You may only need to connect to the Cisco Prime Network Registrar Web UI to perform IP address management tasks, but you may also need to connect to one of the other layers to perform system management or troubleshooting tasks related to the appliance.
You can connect to each layer as described below:
-
Connecting to Virtual Appliance (Open Virtual Appliance) Layer—You can connect to the Cisco Prime Network Registrar application layer using the web browser. Use https://vaip:8443 for local and https://vaip:8453 for regional, where vaip is the virtual appliance IP address (which is also the IP address of the Linux Operating System).
To access the Cisco Prime Network Registrar Command Line Interface (CLI), you can use an SSH connection to the virtual appliance IP address using ssh -l root vaip.
You can manage the Linux OS by connecting to it using ssh -l root vaip. There is no Windows system installed on the Cisco Prime Network Registrar virtual appliance, but the standard Linux commands necessary to manage a networking application are all present on the Linux OS.
-
Connecting to ESXi Hypervisor Layer—Connect to the ESXi hypervisor, identified by the IP address esxip (or its DNS name), using the web browser. esxip is the IP address designated to the ESXi hypervisor.
-
Connecting to Cisco Integrated Management Controller (CIMC) UCS Management Console—This allows you to configure and manage the ESXi layer. You can connect to the CIMC by using a browser using https://ucsip/. ucsip is the IP address assigned to the Jumpstart. After you log in to CIMC, you can start the vKVM console to get access to the ESXi configuration screen and manage hardware (power, temperature, fan RPM).
Prerequisites
The items concerning the networking environment are as follows. These are not unique to the virtual appliance, but are instead values that are determined by the environment in which you will deploy the virtual appliance.
-
The IP address or DNS name of the ESXi installation on which you intend to deploy the virtual appliance.
-
The IP address or DNS name of any vCenter server associated with the ESXi installation, above.
-
Netmask associated with the IP address for the virtual appliance.
-
Gateway address appropriate to the IP address and netmask.
-
IP addresses of up to two DNS servers for the virtual appliance to use.
-
Any proxy values necessary for the virtual appliance to access the Internet.
 Note |
Ensure that you have the Cisco Prime Network Registrar licenses from Cisco.com before you get started. For details, see the "License Files" section of Cisco Prime Network Registrar 11.1 Installation Guide. |
Cisco Prime Network Registrar Jumpstart
Be ready with the following information when configuring the Cisco Prime Network Registrar Jumpstart:
-
IP address for the CIMC port on the Cisco Prime Network Registrar Jumpstart.
Note
This IP address must be unique for this appliance.
-
Netmask (subnetmask) for the CIMC port address.
-
Gateway for the CIMC port address.
Network information for ESXi
By default, DHCP is enabled in the ESXi configuration. If IP address needs to be manually set, be ready with the following information when configuring network information for ESXi:
-
IP address for the ESXi installation on the Cisco Prime Network Registrar Jumpstart.
Note
This IP address must be unique for this appliance.
-
Netmask for the IP address for the ESXi installation.
-
Gateway address for the ESXi installation on the Cisco Prime Network Registrar Jumpstart.
-
VLAN (if any) for the ESXi installation on the Cisco Prime Network Registrar Jumpstart.
Cisco Prime Network Registrar Virtual Appliance
Be ready with the following information before you deploy the virtual appliance. These items are unique to the installation of this particular virtual appliance.
-
A virtual machine name for the deployed virtual appliance.
-
A root password for the operating system on the virtual appliance. You will be prompted to enter and configure the root password during your first boot.
-
IP address for the Cisco Prime Network Registrar virtual appliance.
-
DNS name (hostname) for the virtual appliance. It should be placed into DNS using the IP address you selected for the virtual appliance.
-
Username and password for the administrator of the Cisco Prime Network Registrar installation.
Configuring the Cisco Prime Network Registrar Jumpstart
Configuring Cisco Prime Network Registrar Jumpstart requires you to do the following configuration steps to connect it to the network:
Configuring Cisco Prime Network Registrar Jumpstart
To configure the Cisco Prime Network Registrar Jumpstart, configure the UCS CIMC Network Connection. To configure this, follow the steps in the Connecting and Powering On the Server (Standalone Mode) chapter of the enclosed Cisco UCS C220 Server Installation and Service Guide or you can see the document available online at:
https://www.cisco.com/c/en/us/td/docs/unified_computing/ucs/c/hw/C220/install/C220.html.
You have to configure NIC Redundancy Mode as None in the Connecting and Powering On the server (Standalone Mode) procedure.
The CIMC gives you insight into the hardware as well as support for a virtual KVM console allowing remote management of the ESXi layer. For details on CIMC, see the Cisco UCS C-Series Integrated Management Controller GUI Configuration Guide available online at:
Configuring Network Information for ESXi
After configuring the network information for the UCS CIMC console, use the virtual KVM console that the CIMC console provides to configure the network information for the ESXi hypervisor.
-
Use a browser to connect to the IP address of the CIMC console.
-
Log in to the CIMC console.
Note
The default username is admin and default password is password, but you will be prompted to change the password at your earliest convenience.
-
On the Chassis Summary page, click Launch vKVM.
The initial screen on the KVM console displays VMware ESXi 7.0.3.
-
Press F2 to customize the system.
Note
The virtual KVM console needs to capture the mouse to accept input. It may be necessary on some systems to use the mouse to select the Single Cursor option from the Tools menu of the KVM Console window. If nothing happens when you press F2, select the Session Options from the Tools menu and click OK. Usually this causes the mouse to be captured, and then the functions keys will make it through to the console. If you want the mouse back, you can press F12.
-
Press F2 again to view the login window.
-
Log in to the host. The default username is root and the password is c!SCo123.
Select the Configure Password option and reconfigure the root password after you log in.
-
Using the arrow keys, select the Configure Management Network option and press Enter.
-
Configuring IP
For IP configuration:
-
Use the arrow keys to select IPv4 Configuration and press Enter.
-
Use the arrow keys to select Set Static IP address and Network Configuration.
-
Use the space bar to enable this selection.
-
Use the arrow keys to select IPv4 Address and enter the IP address.
-
Use the arrow keys to select Subnet Mask and enter the subnet mask.
-
Use the arrow keys to select Default Gateway and enter the gateway address.
-
Press Enter to accept the IP Configuration updates.
Note
If you want to use IPv6 with Cisco Prime Network Registrar, use the arrow keys to select IPv6 Configuration and enter the information requested on that screen.
-
-
Configuring DNS Servers
To configure the DNS Servers:
-
Use the arrow keys to select DNS Configuration and press Enter.
-
Use the arrow keys to select Primary DNS Server and enter the IP address of the primary DNS server.
-
Use the arrow keys to select Alternate DNS Server and enter the IP address of the alternate DNS server.
-
Use the arrow keys to select Hostname and enter the hostname.
Note
Ensure that you enter the entire hostname, including the domain name.
-
Press Enter to accept the DNS Configuration updates.
-
-
If you have a VLAN configured on the switch to which the ESXi is connected, use the arrow keys to select VLAN (optional) and press Enter.
Enter the VLAN for this network connection and press Enter to accept the change.
Press Esc to exit the Configure Management Network window which you are in now.
-
Use the arrow keys to select Test Management Network and press Enter.
You can see the addresses to be pinged and the hostname to be resolved. Use the arrow keys and select the address to be pinged and press Enter. The test pings your default gateway and DNS servers and tests the connectivity. Press Enter when the test is complete.
At this point, ESXi listens on the IP address that you configured.
-
Use a browser to connect to the IP address configured for ESXi.
Enter username and password to login. Review the VMware Customer Experience Improvement Program (CEIP) page and choose whether you want to join the program. You are now logged in to the ESXi host.
Note
If a warning message about an untrusted SSL certificate appears, select the appropriate action based on your security policy.
Configuring Cisco Prime Network Registrar Virtual Appliance
The Cisco Prime Network Registrar Virtual Appliance is delivered as a virtual machine installed on the ESXi hypervisor. The virtual machine names as shipped from Cisco are “Cisco Prime Network Registrar Local” and “Cisco Prime Network Registrar Regional”.
Note |
You may change the virtual machine name as per your choice, however, the underlying disk storage will remain under the name originally used to deploy the OVA (for example, Cisco Prime Network Registrar Local). |
To manage the virtual machine containing Cisco Prime Network Registrar, as well as manage any other virtual machines which you may deploy on the Jumpstart, use the VMware web client to connect to http://esxip, where esxip is the IP address designated to the ESXi hypervisor.
To configure the Cisco Prime Network Registrar Virtual Appliance:
-
After deploying the OVA files, click the virtual machine name and click the Console link.
Note
To deploy the OVA files, see the “Deploying the Regional Cluster OVA or Local Cluster OVA” subsection of Cisco Prime Network Registrar 11.1 Installation Guide.
-
You will be prompted to enter a root (system) password, which is not the Cisco Prime Network Registrar password.
Note
This is the root password for the underlying Linux operating system on which the Cisco Prime Network Registrar 11.1 application is installed. You will be asked to enter this password twice. You will need root access to the underlying Linux operating system later on, so make sure that you remember this password.
-
Read the end user license agreement and if you agree with the terms stated, accept the agreement by entering y (Yes).
-
Log in to the server as the root user.
-
To configure the network for the Virtual Appliance, see Configuring Network Access on RHEL/AlmaLinux 8.x Using nmcli.
Configuring Network Access on RHEL/AlmaLinux 8.x Using nmcli
The NetworkManager command-line tool (nmcli) provides a command line way to configure networking by controlling NetworkManager. This section provides only an overview with some examples to help you learn how to use nmcli to configure network access on the virtual appliance.
In a departure from previous approaches to network interface configuration, NetworkManager deals with both connections and interfaces (also known as devices). Connections are configured with IP addresses, gateways, DNS servers, and then applied to interfaces (devices). This is a critical change from the past way of configuring network access on AlmaLinux.
First, there are two nmcli commands that are of general usefulness:
-
The nmcli d command lists all available network interfaces (devices).
-
The nmcli c command lists all available configurations.
Use the above two commands frequently as you are learning to use nmcli.
Follow the steps below to configure an IP address for an interface on your virtual appliance. Typically these commands are typed directly into the console of the virtual appliance. If you are already connected through the network (for example, by ssh), then making changes to the network interface configuration can be problematic, as you may also lose network connectivity (and thereby your ability to issue nmcli commands) at any point in the process.
-
Make sure that the interface does not block nmcli. The nmcli d command lists the existing interfaces. If the interface you want to configure is listed as unmanaged, then NetworkManager has been explicitly blocked from configuring this interface. Until you remove this blockage, no nmcli command will have any effect on this interface. Note that you may not need to perform this procedure unless the interface is listed as unmanaged. Follow the steps below to allow it to be managed by NetworkManager:
-
Remove the line NM_CONTROLLED-no from the file /etc/sysconfig/network-scripts/ifcfg-interface, where interface is the interface name listed in the nmcli d command. If there is no file with this name, then you do not need to perform this procedure.
-
NetworkManager must be told to read the configuration files again. To do this, give the following command:
nmcli connection reload
Note
Manual changes to any ifcfg file will not be noticed by NetworkManager until the nmcli connection reload command is issued.
-
-
Make sure that there is no current configuration for the interface that you want to configure. If you want the configuration that you create to be the default for the interface and there are multiple configurations associated with an interface, it may lead to confusion when the system reboots. The nmcli c command lists the existing configurations. If you see any existing configurations, examine them to see if they apply to the interface you want to configure. An easy way to do this is to use the following command:
nmcli con show config | grep interfaceIf you see any output, you should remove the configuration config with the command:
nmcli con delete configNote
There is often a configuration called "Wired connection 1" which needs to be deleted.
-
Create the configuration and associate it with the interface (device) in one command. This command only creates the configuration and associates it with the interface, it does not apply it to the interface.
where config is the name of the configuration, which can be anything (including the name of the interface), interface is the name of the interface (device), ip is the IPv4 address, netmaskwidth is the network mask width, and gateway is the IPv4 gateway address.nmcli con add type ethernet con-name config ifname interface ip4 ip/netmaskwidth gw4 gatewayFor example (type all in one line):nmcli con add type ethernet con-name my-office ifname ens160 ip4 10.10.24.25/24 gw4 10.10.20.174 -
Add the DNS server to the configuration for the interface (device):
nmcli con mod config ipv4.dns dnsipwhere dnsip is the IPv4 address of the DNS server and config is the name of the configuration.
For example:nmcli con mod my-office ipv4.dns 72.63.128.140You can add two DNS addresses as given below:nmcli con mod my-office ipv4.dns "72.63.128.140 72.63.111.120"Note
This will replace any previously set DNS servers. To add to an previously set DNS entry, use the + before ipv4.dns as shown below:nmcli con mod test-lab +ipv4.dns "72.63.128.140 72.63.111.120"
-
Apply the configuration to the interface, which will bring up the interface if it was not already running:
nmcli con up configwhere config is the name of the configuration.
-
Use the following command to examine information about a connection:
nmcli -p con show configThis will typically scroll off of the console screen, leaving the beginning unreadable. To allow you to move back and forth and examine the output easily, use this command:nmcli -p con show config | lessFrom this, you can see the entire configuration. You can modify things in the configuration using the following command:nmcli con mod config something.other new-valueFor example:nmcli con mod my-office wifi-min.key-cntl wpa-psk -
Use the set-hostname command to set the hostname for the system:
hostnamectl set-hostname hostname.domainNote
This must be done before registering the local to the regional, otherwise an error will result about "localhost" already existing.
where hostname is the hostname you want to use and domain is the domain name, ending with .com, .org, and so on. It is important to include the domain name (along with the .com, .org, or whatever ending is appropriate), since this is used as the default for DNS lookups.
For example:
hostnamectl set-hostname my-server.gooddomain.com -
After you configure the networking you must restart Cisco Prime Network Registrar in order for the interfaces to be properly discovered by Cisco Prime Network Registrar. Use the following commands to restart:
-
Local RHEL/AlmaLinux 8.x—systemctl restart nwreglocal
-
Regional RHEL/AlmaLinux 8.x—systemctl restart nwregregional
If you fail to restart, it will result in a misconfigured registration at the regional.
-
To develop a complete understanding of the usage of nmcli, search the internet for online resources on nmcli and AlmaLinux 8.6.
Configuring Cisco Prime Network Registrar to Automatically Power Up
There are several layers of processing involved in running the Cisco Prime Network Registrar application. Each layer has choices it can make about what to do when it is first powered up after power failures.
You can configure the Cisco Prime Network Registrar to start automatically when power is restored to the Jumpstart.
The two places where you have to change the configurations to make this possible are:
-
UCS Hardware—The UCS hardware has to be configured to power up the ESXi hypervisor when power is restored.
-
ESXi Hypervisor—The ESXi hypervisor has to be configured to power up the Cisco Prime Network Registrar virtual appliance when power is restored to the ESXi hypervisor layer.
To configure the UCS Hardware to automatically power up the ESXi hypervisor:
-
Connect to the CIMC UCS Management Console at http://cimcip using a browser and log in. cimcip is the address of the CIMC port.
-
Click the Navigation toggle button on the upper left.
-
In the Compute tab on the left pane, click the Power Policies tab.
-
Select Power On from the Power Restore Policy drop-down list in the Power Restore Policy area.
If you want, you can enter a delay value in the Power Delay Value field.
-
Click Save Changes to save the updates.
To configure the ESXi hypervisor to automatically power up the Cisco Prime Network Registrar virtual appliance when power is restored to the ESXi hypervisor layer, see the “Configuring the Virtual Appliance to Automatically Power Up” section of Cisco Prime Network Registrar 11.1 Installation Guide.
Licensing the ESXi Host
The VMWare ESXi host will run on a 60-day Evaluation Mode license once it is powered up. The host license that you receive when purchasing a Jumpstart must be applied to license the server. It will be in the following format:
NX61M-43JE6-78J4W-0VB7H-9XHJ4
To license the ESXi host:
-
Connect to the ESXi host using the VMware web client.
-
In the navigation pane on the left, choose Manage under Host, and then click the Licensing tab.
-
Click the Assign license button and enter the License key in the pop-up dialog.
How to Recover Cisco Prime Network Registrar Jumpstart
This section describes how to recover Cisco Prime Network Registrar Jumpstart 11.1. It includes the following sections:
Prerequisites
To start the recovery process, make sure that you have:
-
Internet connectivity—Internet connectivity is required to download the recovery images and to request Cisco Prime Network Registrar replacement licenses from Cisco.com. Ensure that you have the licenses with you before you start the recovery process.
-
Recovery kit—The Recovery kit is comprised of three files which must be downloaded from www.cisco.com to your local client. For more information, see Downloading the Recovery Kit.
-
Connection to CIMC UCS Management Console—Ensure that the CIMC port is configured on the Cisco Prime Network Registrar Jumpstart appliance. This allows you to configure and manage the ESXi layer. For more information, see Configuring the Cisco Prime Network Registrar Jumpstart.
Downloading the Recovery Kit
To download the Cisco Prime Network Registrar Jumpstart recovery kit:
-
From the appropriate server host or client workstation, do the following:
To download
Go to the following URL
Cisco Prime Network Registrar 11.1 Jumpstart Appliance Recovery—approximately 405.21 MB (VMware-ESXi-7.0.3d-19482537- Custom-Cisco-4.2.2-a.iso)
https://customerconnect.vmware.com/downloads/details?downloadGroup=OEM-ESXI70U3-CISCO&productId=974
Cisco Prime Network Registrar 11.1.0.2 Local Virtual Appliance for VMWare—approximately 1513.32 MB (cpnr_11_1_0_2_local.ova)
https://software.cisco.com/download/home/286330862/type/284240043/release/11.1.0.2
Cisco Prime Network Registrar 11.1.0.2 Regional Virtual Appliance for VMWare—approximately 1581.64 MB (cpnr_11_1_0_2_regional.ova)
-
To download the recovery kit, click the Download button.
-
Sign in with your Cisco.com user ID and password.
-
Read the Cisco End User License Agreement and accept the conditions by clicking Accept License Agreement.
-
Download the .iso and .ova files to a location that can be browsed from the host that will be used to recover the Cisco Prime Network Registrar Jumpstart.
Recovery Procedures
This section explains the following recovery procedures:
Recovering Cisco Prime Network Registrar Jumpstart
To recover the Cisco Prime Network Registrar Jumpstart:
-
Use a browser to connect to the IP address of the CIMC console and log in to the console.
-
On the Chassis Summary page, click Launch vKVM. Choose Java or HTML. You will be asked to approve the running of the application, as this operation downloads code to run on your system. After some delay, the KVM Console window is displayed.
-
Click the Virtual Media tab.
-
Click vKVM-Mapped vDVD.
-
Browse to the downloaded VMware-ESXi-7.0.3d-19482537-Custom-Cisco-4.2.2-a.iso image and select it.
-
Click the Map Drive button.
Ensure that the ISO file is attached and the same status is displayed in the Virtual Media tab.
-
Click the Host Power link and then choose Power Cycle. Monitor the process via the KVM.
-
Follow the on-screen instructions in the KVM Console window to install ESXi 7.0.3. Press F6 for Boot Menu. Navigate down to select UEFI: Cisco KVM -Mapped vDVD2.00 and enter. This step could take several to many minutes depending on the network connection from the client where the install is being run to the server.
-
You will get a “Welcome to VMware ESXi 7.0.3 Installation” screen. Press Enter to continue. Accept the End User License Agreement.
-
When prompted, select the local disk and continue. You may be presented with a choice to upgrade or re-install and re-partition, depending on the situation. Choose the option appropriate for your situation.
-
When prompted, enter and confirm a root password. Make note of this password since this will now be required to login to ESXi.
-
Confirm to start the installation. Once installation is completed, reboot when prompted.
-
After the startup completes, make sure the Virtual Media drive is now unmapped in the Virtual Media tab.
-
ESXi is always installed in the evaluation mode which will run for 60 days. If you do not have the ESXi 7.0 license key, call the Cisco Technical Assistance Center (TAC) and ask for the Licensing Team. For your local Cisco TAC phone number, see the Cisco Worldwide Contacts page at:
http://www.cisco.com/c/en/us/support/web/tsd-cisco-worldwide-contacts.html
-
After the server reboots, configure ESXi 7.0 via the KVM Console window. For more information on how to configure the ESXi layer, see Configuring Network Information for ESXi.
-
Using VMware web client, connect to the IP address or hostname of the UCS (ESXi) host.
-
In the navigation pane on the left, click Virtual Machines.
-
Click the Create / Register VM link.
-
Choose Deploy a virtual machine from an OVF or OVA file.
-
Click Next.
-
Enter a name for the virtual machine.
-
Click the blue box and navigate to the .ova file.
-
Click Next and follow the on-screen instructions.
-
On the Deployment Options page, select the Thick Disk Provisioning radio button.
See the “Deploying the Regional Cluster OVA or Local Cluster OVA on VMware” subsection of Cisco Prime Network Registrar 11.1 Installation Guide for details.
Note
You might want to resize the data disk before starting the virtual machine since the Recovery DVD has the standard OVAs. For details regarding increasing the disk size, see the “Increasing the Size of Disk on VMware” procedure in the “Introduction to Cisco Prime Network Registrar Virtual Appliance” chapter of Cisco Prime Network Registrar 11.1 Administration Guide.
-
Click the name of the virtual machine and click the Console link. For more information, see Configuring Cisco Prime Network Registrar Virtual Appliance.
-
Connect to Cisco Prime Network Registrar using https://. It prompts you to create an admin user and password for Cisco Prime Network Registrar.
Recovering the Licenses
You can now restore your original license or request a replacement license at http://www.cisco.com/go/license.
Troubleshooting
If you encounter any issue for which you are not able to find a solution, contact the Cisco Technical Assistance Center (TAC) for help.
For assistance in troubleshooting, the appliance comes with a secure FTP server and a TAC tool.
Ensure that you send the data gathered by the TAC tool to the TAC team in case of issues. For more details regarding the TAC tool, see Cisco Prime Network Registrar 11.1 Administration Guide.
You can use the FTP server (vsftpd) to transfer files to and from the virtual appliance. You have to create a user to log in to the vsftpd because the 'root' user cannot be used for logging in. The vsftpd will not be up and running when you power on the appliance, so you have to manually start it.
You can start the vsftpd using the command:
/etc/init.d/vsftpd startYou can stop the vsftpd using the command:
/etc/init.d/vsftpd stopRelated Documentation
Note |
We sometimes update the documentation after original publication. Therefore, you should also review the documentation on Cisco.com for any updates. |
The following is a list of documentation that you can refer to:
Hardware Documents
Go to the following page to see the documentation for UCS server hardware:
https://www.cisco.com/c/en/us/support/servers-unified-computing/ucs-c220-m5-rack-server/model.html
Platform-Specific Documents
The following is a list of sites with platform-specific documentation:
-
For VMware ESXi specific documentation, go the VMware website.
-
For CentOS specific documentation, go to the CentOS website.
Software Documents
The following document gives the list of documents available for Cisco Prime Network Registrar 11.1:
Obtaining Documentation and Submitting a Service Request
For information on obtaining documentation, using the Cisco Bug Search Tool (BST), submitting a service request, and gathering additional information, see What’s New in Cisco Product Documentation at: http://www.cisco.com/c/en/us/td/docs/general/whatsnew/whatsnew.html.
Subscribe to What’s New in Cisco Product Documentation, which lists all new and revised Cisco technical documentation as an RSS feed and delivers content directly to your desktop using a reader application. The RSS feeds are a free service.
The documentation set for this product strives to use bias-free language. For purposes of this documentation set, bias-free is defined as language that does not imply discrimination based on age, disability, gender, racial identity, ethnic identity, sexual orientation, socioeconomic status, and intersectionality. Exceptions may be present in the documentation due to language that is hardcoded in the user interfaces of the product software, language used based on standards documentation, or language that is used by a referenced third-party product.
Cisco and the Cisco logo are trademarks or registered trademarks of Cisco and/or its affiliates in the U.S. and other countries. To view a list of Cisco trademarks, go to this URL: https://www.cisco.com/c/en/us/about/legal/trademarks.html. Third-party trademarks mentioned are the property of their respective owners. The use of the word partner does not imply a partnership relationship between Cisco and any other company. (1721R)
© 2023 Cisco Systems, Inc. All rights reserved.
 Feedback