![]()
Network Element Driver Package
 Note |
Download the NED package only when you onboard a new device type into Cisco MSX Managed Device service pack. |
The Cisco Network Services Orchestrator (NSO) uses Network Element Drivers (NEDs) to orchestrate a multivendor network for different devices types and services. You can add a new NED after the Cisco MSX is installed and deployed into production.
The NED management functionality in Cisco MSX allows you to add, replace, and delete NED for device management.
The Cisco MSX service packs have a predefined set of NED package that is uploaded into NSO. The Managed Device service pack consists of Cisco IOS NED. Thus allows you to onboard any IOS-XE device. Similarly, for onboarding ASR9000, you need a new Cisco IOS-XR NED added into the Managed Device NSO using the NED management functionality.
This service pack also extends its support for devices such as Cisco IOS-XR, Cisco CAT, Cisco NX-OS, Cisco ASA, Juniper SRX, and FORTINET.
Uploading a NED Package
Before you begin
-
Download the NED. Use the following URL.
-
Use Cisco credentials to log in.
README.signature
cisco_x509_verify_release.py
ncs-4.7.6-juniper-junos-4.5.13.signed.bin
ncs-4.7.6-juniper-junos-4.5.13.tar.gz
ncs-4.7.6-juniper-junos-4.5.13.tar.gz.signature
tailf.cer
|
Downloaded NED Package Files |
Name of Each NED Tar Files |
|---|---|
|
ncs-4.7.6-juniper-junos-4.5.13.tar.gz |
Main NED file |
|
ncs-4.7.6-juniper-junos-4.5.13.tar.gz.signature |
Signature File |
|
tailf.cer |
Certificate File |
Procedure
| Step 1 |
Log in to the Cisco MSX Portal. |
||
| Step 2 |
In the main menu, go to Settings > NED Management. Displays the list of NEDs that are currently installed in the system. |
||
| Step 3 |
Click Add NED. The Upload NED File dialog box appears. |
||
| Step 4 |
Upload the downloaded NED package files in their respective fields: 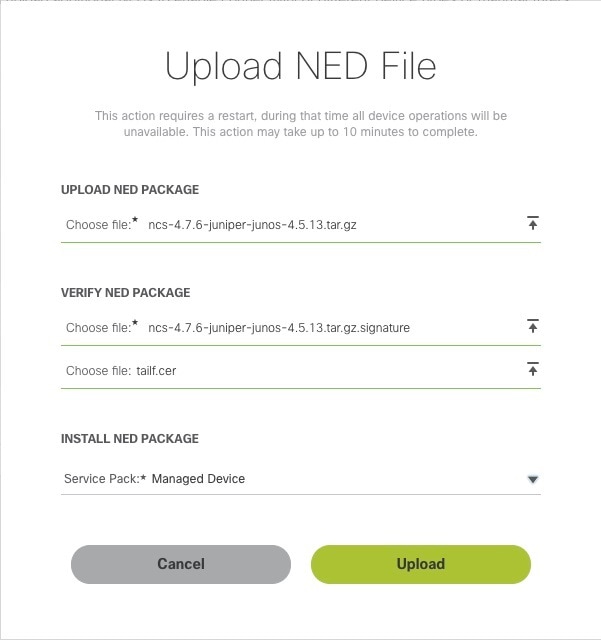
|
||
| Step 5 |
Click Upload. The Upload NED dialog box appears for you to confirm the upload. |
||
| Step 6 |
Click Upload again.
The Validating and Installing NED file dialog box appears. The installation process takes a few minutes to complete. Displays the validation message after installing the NED file. |
||
| Step 7 |
Click Close. The NED Management home page displays the list of NEDs that are installed in the system.
|
Deleting a NED Package
To delete a NED package using the Cisco MSX Portal:
Before you begin
-
Ensure that you delete all the sites that are using the NED.
-
On deleting NED, the device models that use the NED namespace cannot be used in Managed Device anymore.
Procedure
| Step 1 |
Log in to the Cisco MSX Portal. |
||
| Step 2 |
In the main menu, go to Settings > NED Management. Displays the list of NEDs that are currently installed in the system. 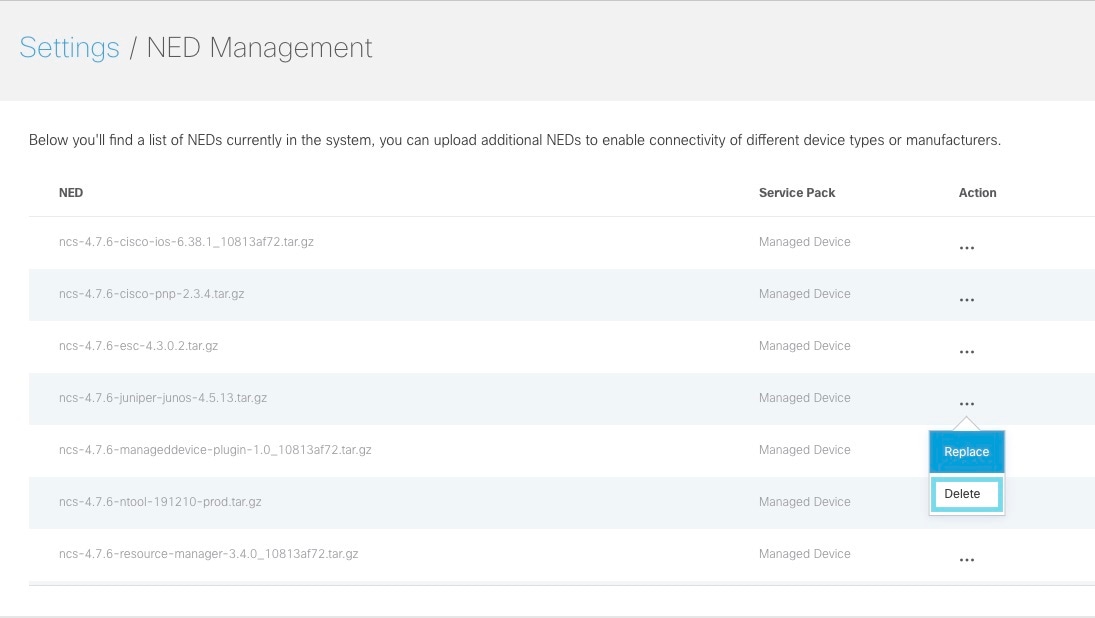
|
||
| Step 3 |
Select the NED, and click the ellipsis (…) and choose Delete. The Delete NED confirmation dialog box appears for you to confirm the delete. |
||
| Step 4 |
Click Delete.
The Deleting and Uninstalling NED file dialog box appears. The deletion process takes a few minutes. Displays the validation message after deleting the NED file. |
||
| Step 5 |
Click Close. |
Replacing a NED Package
Replace option is used to upgrade or change an existing version of the NED package.
To replace a NED package using the Cisco MSX Portal:
Procedure
| Step 1 |
Log in to the Cisco MSX Portal. |
||
| Step 2 |
In the main menu, go to Settings > NED Management. Displays the list of NEDs that are currently installed in the different service packs. |
||
| Step 3 |
Select the NED and click Replace. The Replace NED File dialog box appears. 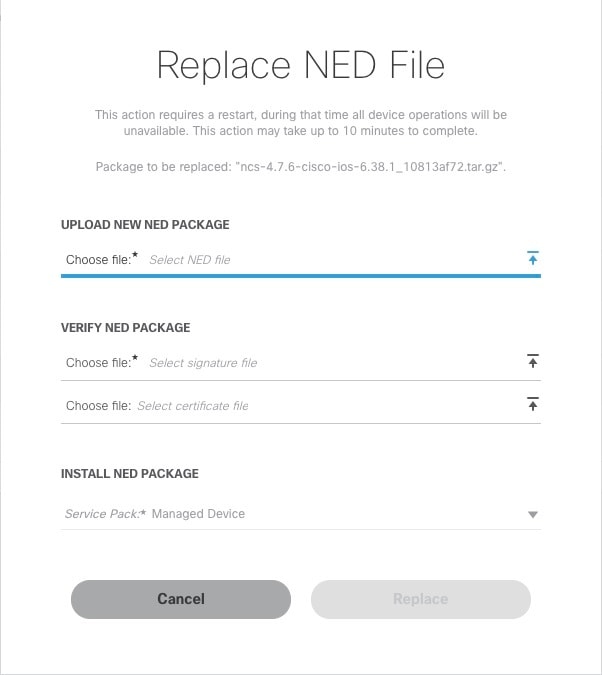
|
||
| Step 4 |
Upload the downloaded NED package files in their respective fields:
|
||
| Step 5 |
Click Replace. The Replace NED dialog box appears for you to confirm the replacement. |
||
| Step 6 |
Click Replace again.
The Validating and Replacing NED File dialog box appears. Displays the validation message after replacing the NED file. |
||
| Step 7 |
Click Close. |
Preparing Device Model
Cisco MSX Managed Device service pack supports out-of-the-box device models. To facilitate the SNMP metric collection for new device type, use the device model construct with several fields that capture all the necessary metrics data.
Sample device model fields:
"deviceModelName": "", ---> Unique Name
"platformDeviceType": "",  --> This is a global field and a big category where this particular device belongs. For example "CPE".
"platformDeviceSubType": "", --> This is sub category. For example, Sub category of a Juniper Device can be "SRX", "EX" etc..
"interfaces": [], ---> List of interfaces for the device model.
"lan": [], ---> Interfaces that can be categorized as LAN.
"wan": [], ---> Interfaces that can be categorized as WAN.
"nedId": "", --> NSO NED ID for this device
"deviceType": "",  --> NSO Device-Type for this device
"directTemplate":"" --> This field allows you to apply configurations to a device while it is onboarded to MSX. In this case, use this for applying SNMP configuration. Create a new file and name it. Save the NSO XML template in this file.
 Note:  Ensure that you keep a note of the file name used for the XML template. You can reuse this later during device model preparation.
"deviceMetricConfigurations": [{
        "snmpDetails": {  ----> This is needed to connect to the device. This step is for preparing the CLI configuration for the SNMP support. Enter your choices for authentication protocol, privacy protocol, user used, and so on. Ensure to make a note of it.
            "snmpAuthProto": "",
            "snmpVersion": "",
            "snmpPrivProto": "",
            "snmpUserName": ""
        },
        "platformDeviceType": "",  ---> This must be similar to the device model section.
        "platformDeviceSubType": "", ---> This must be similar to the device model section.
        "snmpOidList":[], -----> The set of OIDs that is required to retrieve the data
        "snmpCpuMemoryUptimeQueryTemplate": { ---> This is a query template that explores the data collected from SNMPBEAT and provides a representation on the UI based on device OIDs and MIBs that are specific to this new device type.
        }
    }]
}
The two important fields in the data model construct are given in the table below:
Note |
This table contains the list of default OIDs that work only for specific Cisco devices. These OIDs may vary for the new device type. Therefore, the list of extra OIDs that helps to fetch the necessary data has to be imported into Cisco MSX. |
|
Data Model Field |
List of Default OID/Query Template |
Metrics Data |
|---|---|---|
|
snmpOidList |
"oid":".1.3.6.1.2.1.1.3" |
System / System Uptime |
|
"oid":".1.3.6.1.6.3.10.2.1.3” |
snmpEngineBoots |
|
|
"oid":".1.3.6.1.4.1.9.9.109.1.1.1.1.6" |
CPU / MEM |
|
|
"oid":".1.3.6.1.4.1.9.9.109.1.1.1.1.7" |
CPU / MEM 1 min |
|
|
"oid":".1.3.6.1.4.1.9.9.109.1.1.1.1.8" |
CPU / MEM 5 min |
|
|
"oid":".1.3.6.1.4.1.9.9.48.1.1.1” |
CiscoMemoryPool |
|
|
"oid":".1.3.6.1.2.1.2.2.1” |
InterfaceTable |
|
|
snmpCpuMemoryUptimeQueryTemplate |
"enterprises.2636.3.1.13.1.11.9.1.0.0" |
Memory consumption value in terms of percentage (%) |
SNMP OID List: In the Managed Device service pack, SNMP metrics are collected using the OIDs of the device type. OIDs are ISO specific, but the OIDs for CPU and memory are enterprise-specific.
The collected SNMP metric data are as follows:
-
Interface traffic
-
Interface BW utilization
-
CPU
-
Memory
-
System Uptime
For examples:
|
Name of the Vendor |
OID for CPU |
Description |
|---|---|---|
|
CISCO |
1.3.6.1.4.1.9.9.109.1.1.1 |
(1.3.6.1.4.1) – This prefix is the standard OID and must not be changed. (9.9.109.1.1.1)-This is Cisco enterprise-specific code. |
|
JUNIPER |
1.3.6.1.4.1.2636.3.1.13.1.21 |
(1.3.6.1.4.1.) - This prefix is the standard OID and must not be changed. (2636.3.1.13.1.21) - This is Juniper enterprise-specific code. |
SNMP QUERY Template: The Managed Device service pack can process the data that is collected as a part of SNMP polling using the Query Template. The metrics data is represented differently for each vendor. Query template is defined based on these returned metric values.
For example: The table below lists some of the sample query templates.
|
Name of Vendor |
OID for Memory Usage Metrics |
Description |
|---|---|---|
|
JUNIPER SRX |
"enterprises.2636.3.1.13.1.11.9.1.0.0" |
Represents the memory usage value in terms of percentage (%). |
|
Cisco ASA |
".1.3.6.1.4.1.9.9.48.1.1.1" |
|
Preparing Device Model Information for New Device Type
To facilitate the SNMP metric collection for the new device type, you can utilize the device model construct to collect metrics details.
For more details on how to build each SNMP field in the device model construct, see 'Sample device model field with description' in the Preparing Device Model.
Sample device model construct of Juniper:
{
    "deviceModels": [{
        "deviceModelName": "Juniper SRX",
        "platformDeviceType": "",
        "platformDeviceSubType": "",
        "interfaces": [],
        "lan": [],
        "wan": [],
        "nedId": "",
        "deviceType": "",
        "directTemplate":""


    }],
    "deviceMetricConfigurations": [{
        "snmpDetails": {
            "snmpAuthProto": "",
            "snmpVersion": "",
            "snmpPrivProto": "",
            "snmpUserName": ""
        },
        "platformDeviceType": "",
        "platformDeviceSubType": "",
        "snmpOidList":[],
        "snmpCpuMemoryUptimeQueryTemplate": {
        }
    }]
}
Next step:
After preparing the device model information (JSON file) for the new device type, upload this JSON file into Cisco MSX. For more information, see Importing Device Model.
Importing Device Model
Note |
For onboarding new device type, prepare the device model information and then import the JSON file into the Cisco MSX. For more information, see Preparing Device Model Information for New Device Type. Ensure that you update the device model as per the latest Cisco MSX version. |
To import a device model:
Procedure
| Step 1 |
Log in to the Cisco MSX portal. |
||
| Step 2 |
From the left pane, choose Settings. The Settings window appears. |
||
| Step 3 |
Click Device Model Management. |
||
| Step 4 |
Click Managed Device. The Managed Device Models window is displayed. 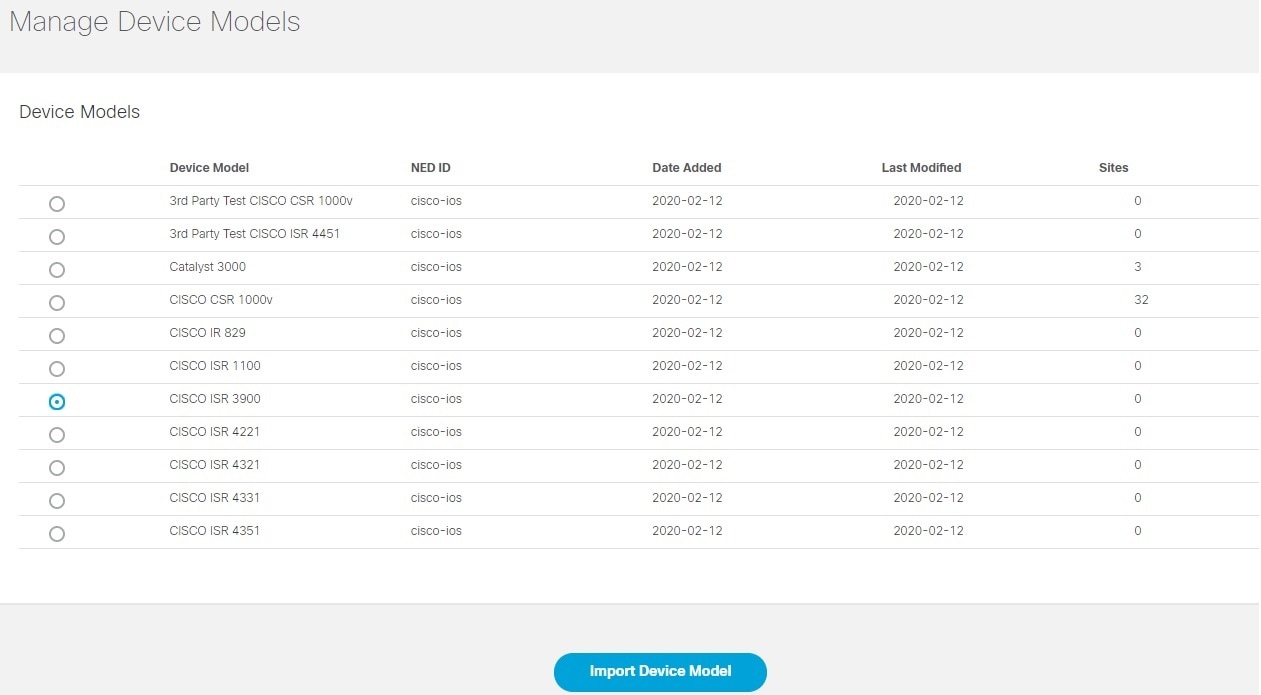
The list of device model appears. These device models can be deleted or added again according to your requirement. Existing device models can be overwritten depending on the requirements of the interfaces used. |
||
| Step 5 |
Click Import Device Model. The Import Device Model is displayed. 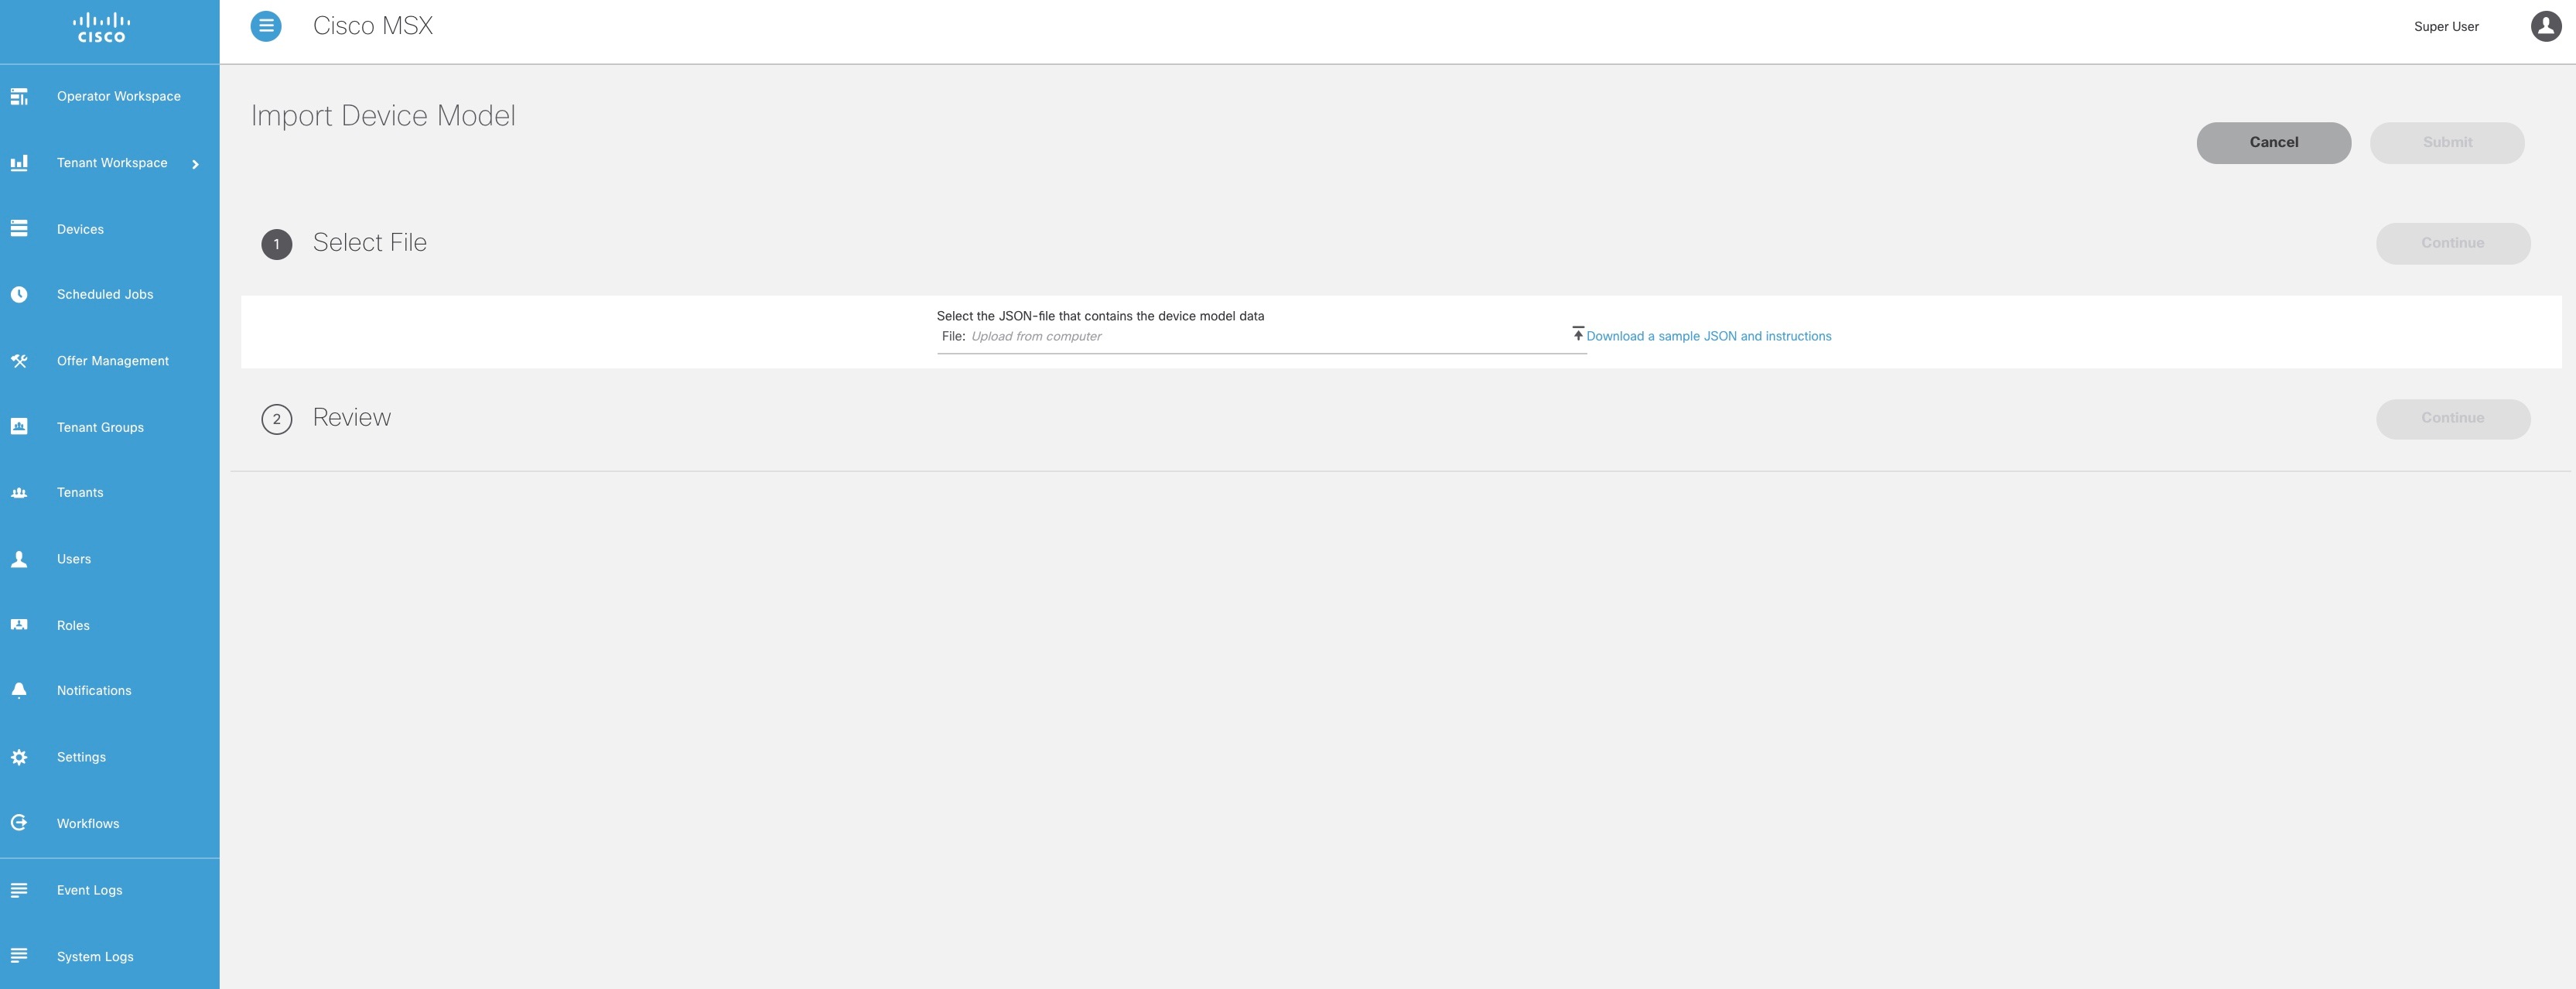
|
||
| Step 6 |
Upload the JSON file from your local file storage. This JSON file contains device model data. The Managed Device service pack supports out-of-the box device models.
To import device model for new device type, see Sample JSON File for Importing a Device Model on the New Device Type. For more information on the sample JSON file of the third-party device, see 'Sample JSON File for Importing a Device Model on the New Device Type'. |
||
| Step 7 |
Click Review to view the Device Model status. You can see the details about the interfaces and the capabilities of the WAN and LAN. |
||
| Step 8 |
Click Submit . Now the newly imported device model appears on the list of Device Model table. Next Steps
|
![]()
 Feedback