Setting Up Meraki SD-WAN-Specific Configurations in MSX
Use this section to configure initial settings in the MSX Portal after installing the Meraki SD-WAN.
Generating API Access Key for Meraki
After you get access to Meraki, use the following procedure to get API access key for Meraki.
Before you begin
-
Enable Meraki Service: Meraki service is not available in Cisco MSX by default. To enable Meraki in Cisco MSX, contact your Cisco account representative.
-
Obtain the Meraki Organization ID: When the Meraki organization is setup for the Tenant, the ID for organization is shared.
Procedure
| Step 1 |
Log in to Meraki Dashboard with your user name and password . |
||
| Step 2 |
Choose User > My Profile. |
||
| Step 3 |
Click Generate New API Access Key button to generate a new key.

|
Adding MSX IP Address to the Meraki Allowed List
To ensure seamless connectivity between Meraki and MSX, ensure MSX IP address are added to the allowed list in Meraki. Do the following
Procedure
| Step 1 |
Log in to the Cisco Meraki Dashboard. |
| Step 2 |
Go to the Organization Settings. |
| Step 3 |
In the Login IP ranges section:
|
Managing Meraki Traffic Class Access for Tenants
Use this procedure to assign Meraki application relevancy templates to tenant users. While defining traffic policies for Meraki SD-WAN, the tenant users will see only the templates that they were given access to.
Procedure
| Step 1 |
Log in to the Cisco MSX Portal using your credentials. |
| Step 2 |
From the left hand pane, choose Settings > Template Management. |
| Step 3 |
Select the SD-WAN tile to see the list of available templates on the Template Management screen. The SD-WAN Template Management screen lists templates that are currently available in the MSX library. 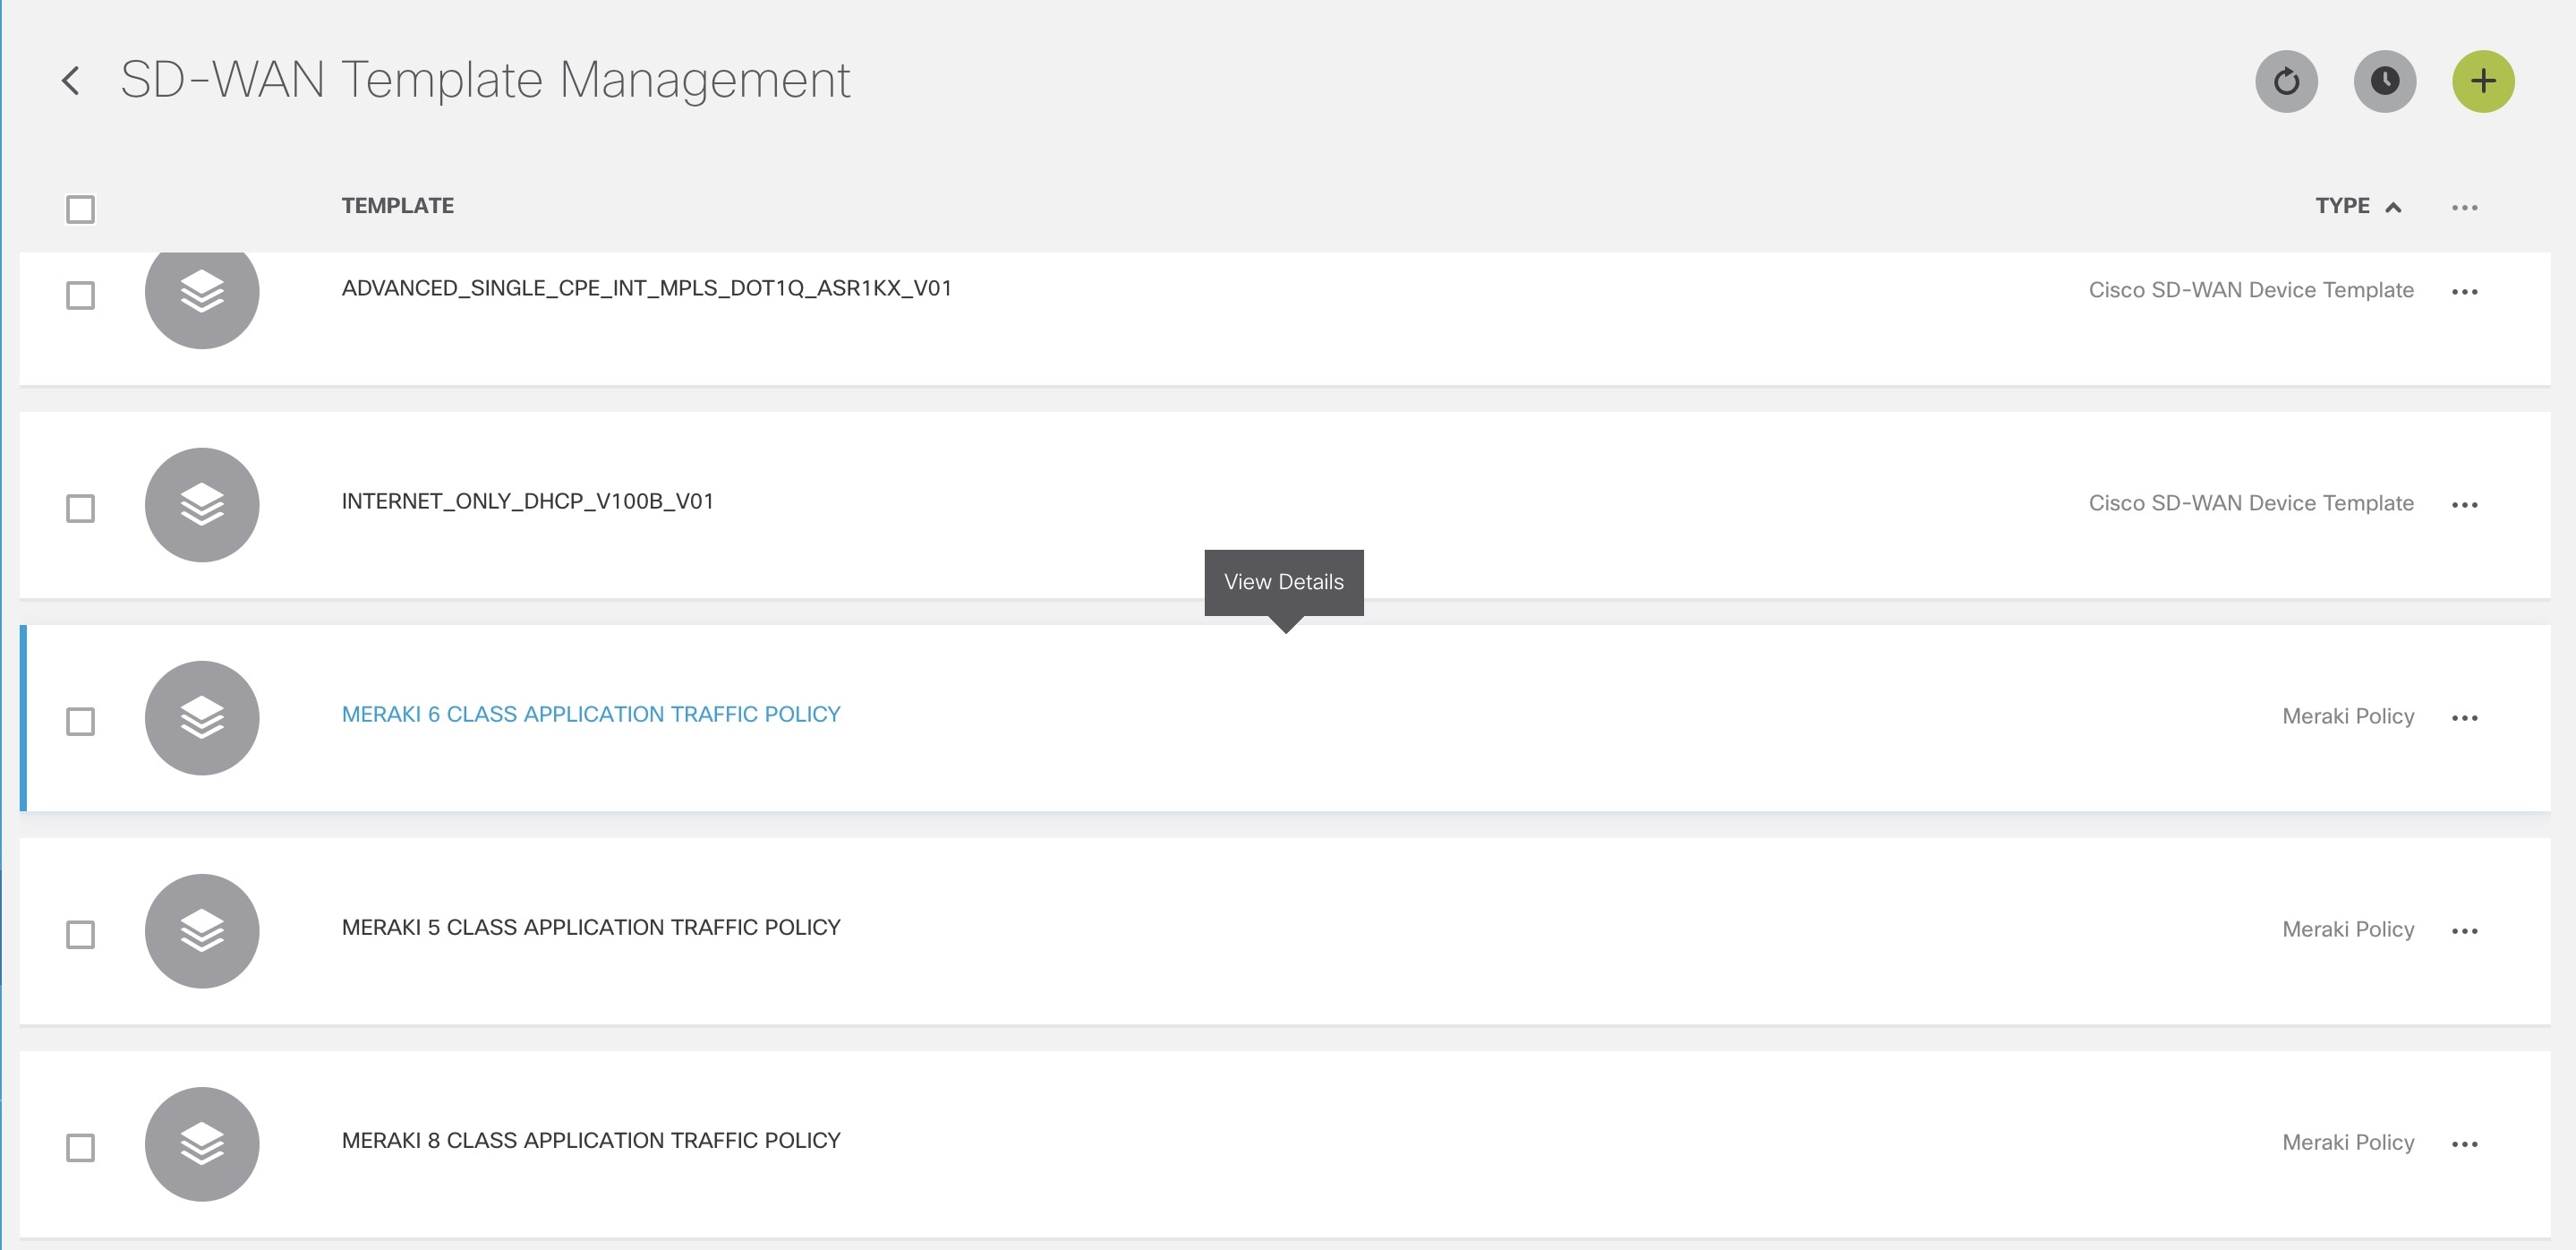
|
| Step 4 |
Select one or more Meraki Policy based template type and click (…) > Assign Tenants option to display the wizard. You can also expand the template, and click Assign Tenants option to display the wizard. 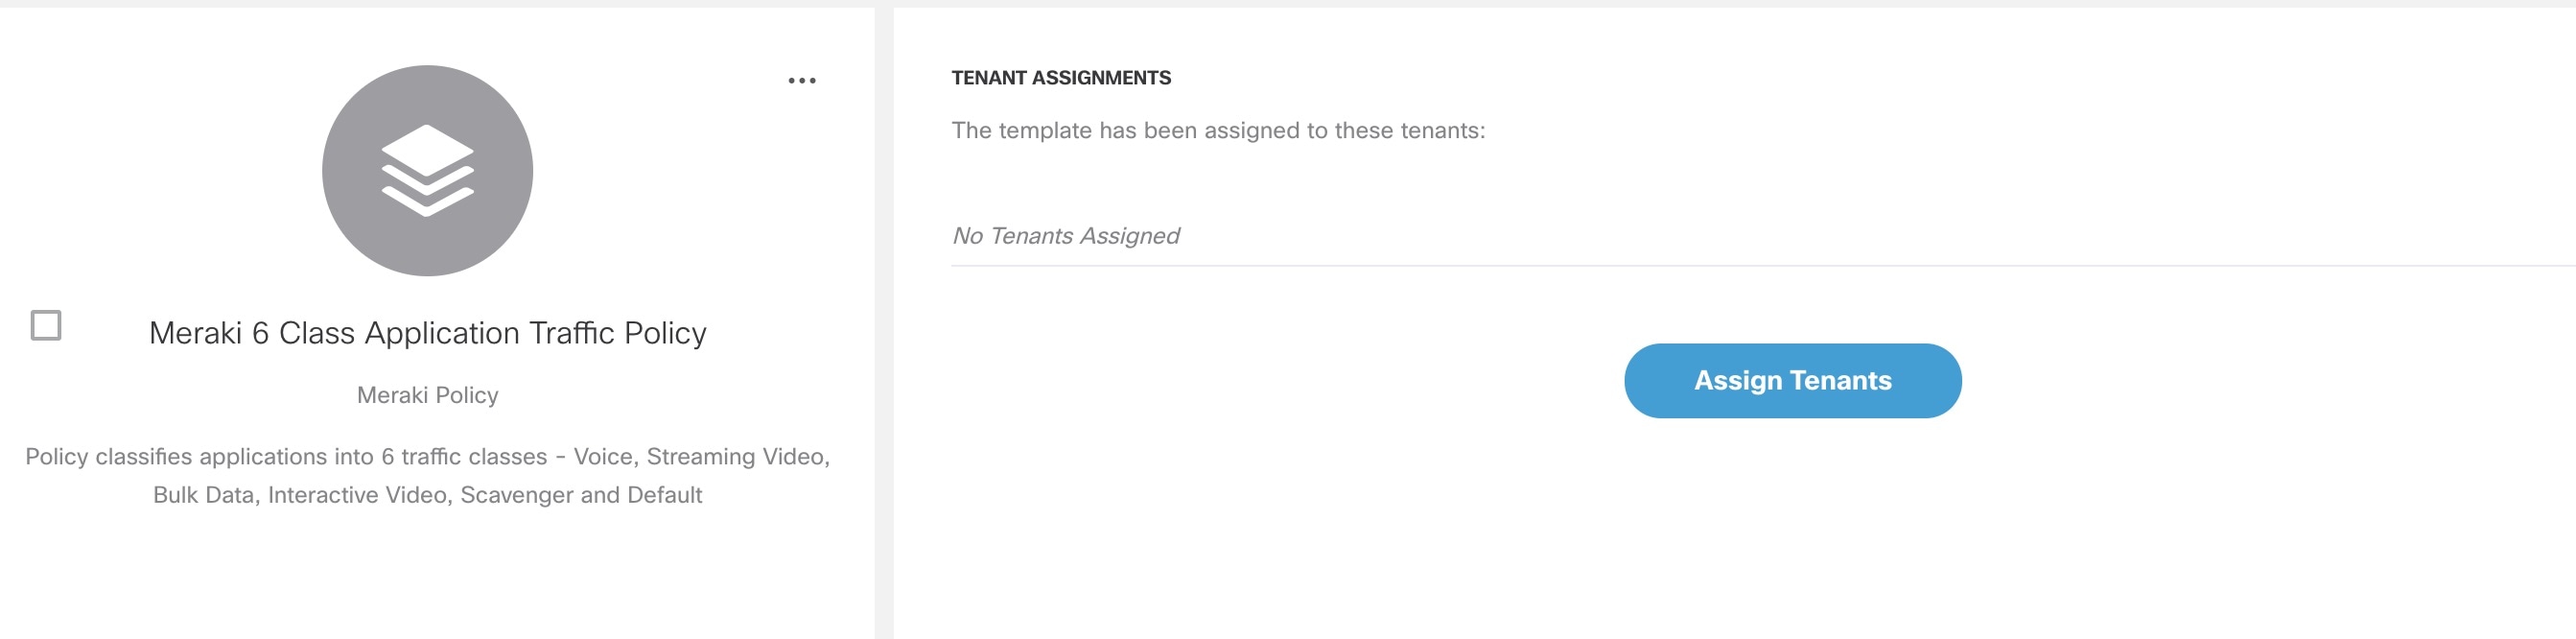
|
| Step 5 |
Choose one or more tenants from the drop-down list and click > to start the export process. |
| Step 6 |
Click Confirm Assignment to save and apply the changes. |
| Step 7 |
Click View Template Activity option to track the progress in the Template Activity screen. |
Setting Up SD-WAN Control and Management Plane for Meraki
To create the Meraki SD-WAN control plane service:
Before you begin
Configure Meraki-specific initial settings in MSX. For more information, see Setting Up Meraki SD-WAN-Specific Configurations in MSX.
Procedure
| Step 1 |
Log in to the Cisco MSX Portal. |
| Step 2 |
In the main menu, click Service Catalog. |
| Step 3 |
Click SD-WAN. |
| Step 4 |
Select the tenant from the drop-down. |
| Step 5 |
Click Get Started. |
| Step 6 |
From the SD-WAN Service screen, click Add Control Plane to add a control plane for the customer. |
| Step 7 |
Select Attach Control Plane, if you want to use an existing control plane. |
| Step 8 |
In the Select Control Plane Type section, select Meraki to attach a Meraki SD-WAN control plane. The selected controller will appear in blue. |
| Step 9 |
Click Continue. |
| Step 10 |
Enter the API Access Key. |
| Step 11 |
Enter the Organization ID. The organization ID helps to uniquely identify tenant's Meraki SD-WAN control plane. |
| Step 12 |
Click Submit. The Meraki SD-WAN Control plane is attached. 
|
Adding a New Site or Device for Meraki
Before You Begin
Set up the Meraki control plane for the tenant and ensure that the status is active. For more information, see Setting Up SD-WAN Control and Management Plane for Meraki.
To create a new site:
Procedure
| Step 1 |
Log in to the Cisco MSX portal using your credentials. |
||
| Step 2 |
From the left hand pane, click Service Catalog > SD-WAN > Continue to Offers. |
||
| Step 3 |
Select the tenant from the drop-down and click Continue. The SD-WAN home page appears and displays the Site Summary window for the selected tenant. |
||
| Step 4 |
Click Add Site button to add a new Meraki site/device.
|
||
| Step 5 |
Select Control Plane Type. Select Meraki as the control plane type and click Continue. If the tenant has only Meraki control plane deployed, only the Meraki controller type is enabled. If the tenant has both Cisco SD-WAN and Meraki control planes, you can choose to add site on either Meraki or Cisco SD-WAN control planes. For more information, see Deploying a Site or Device for Cisco SD-WAN. |
||
| Step 6 |
Enter the site information such as Site Name, Location, Latitude, Longitude, and so on, and click Continue. |
||
| Step 7 |
Select a Site Type. Choose from one of the following device types you want to set up on your Meraki site:
|
||
| Step 8 |
Set up Meraki site. Choose from one of the following options to create a site:
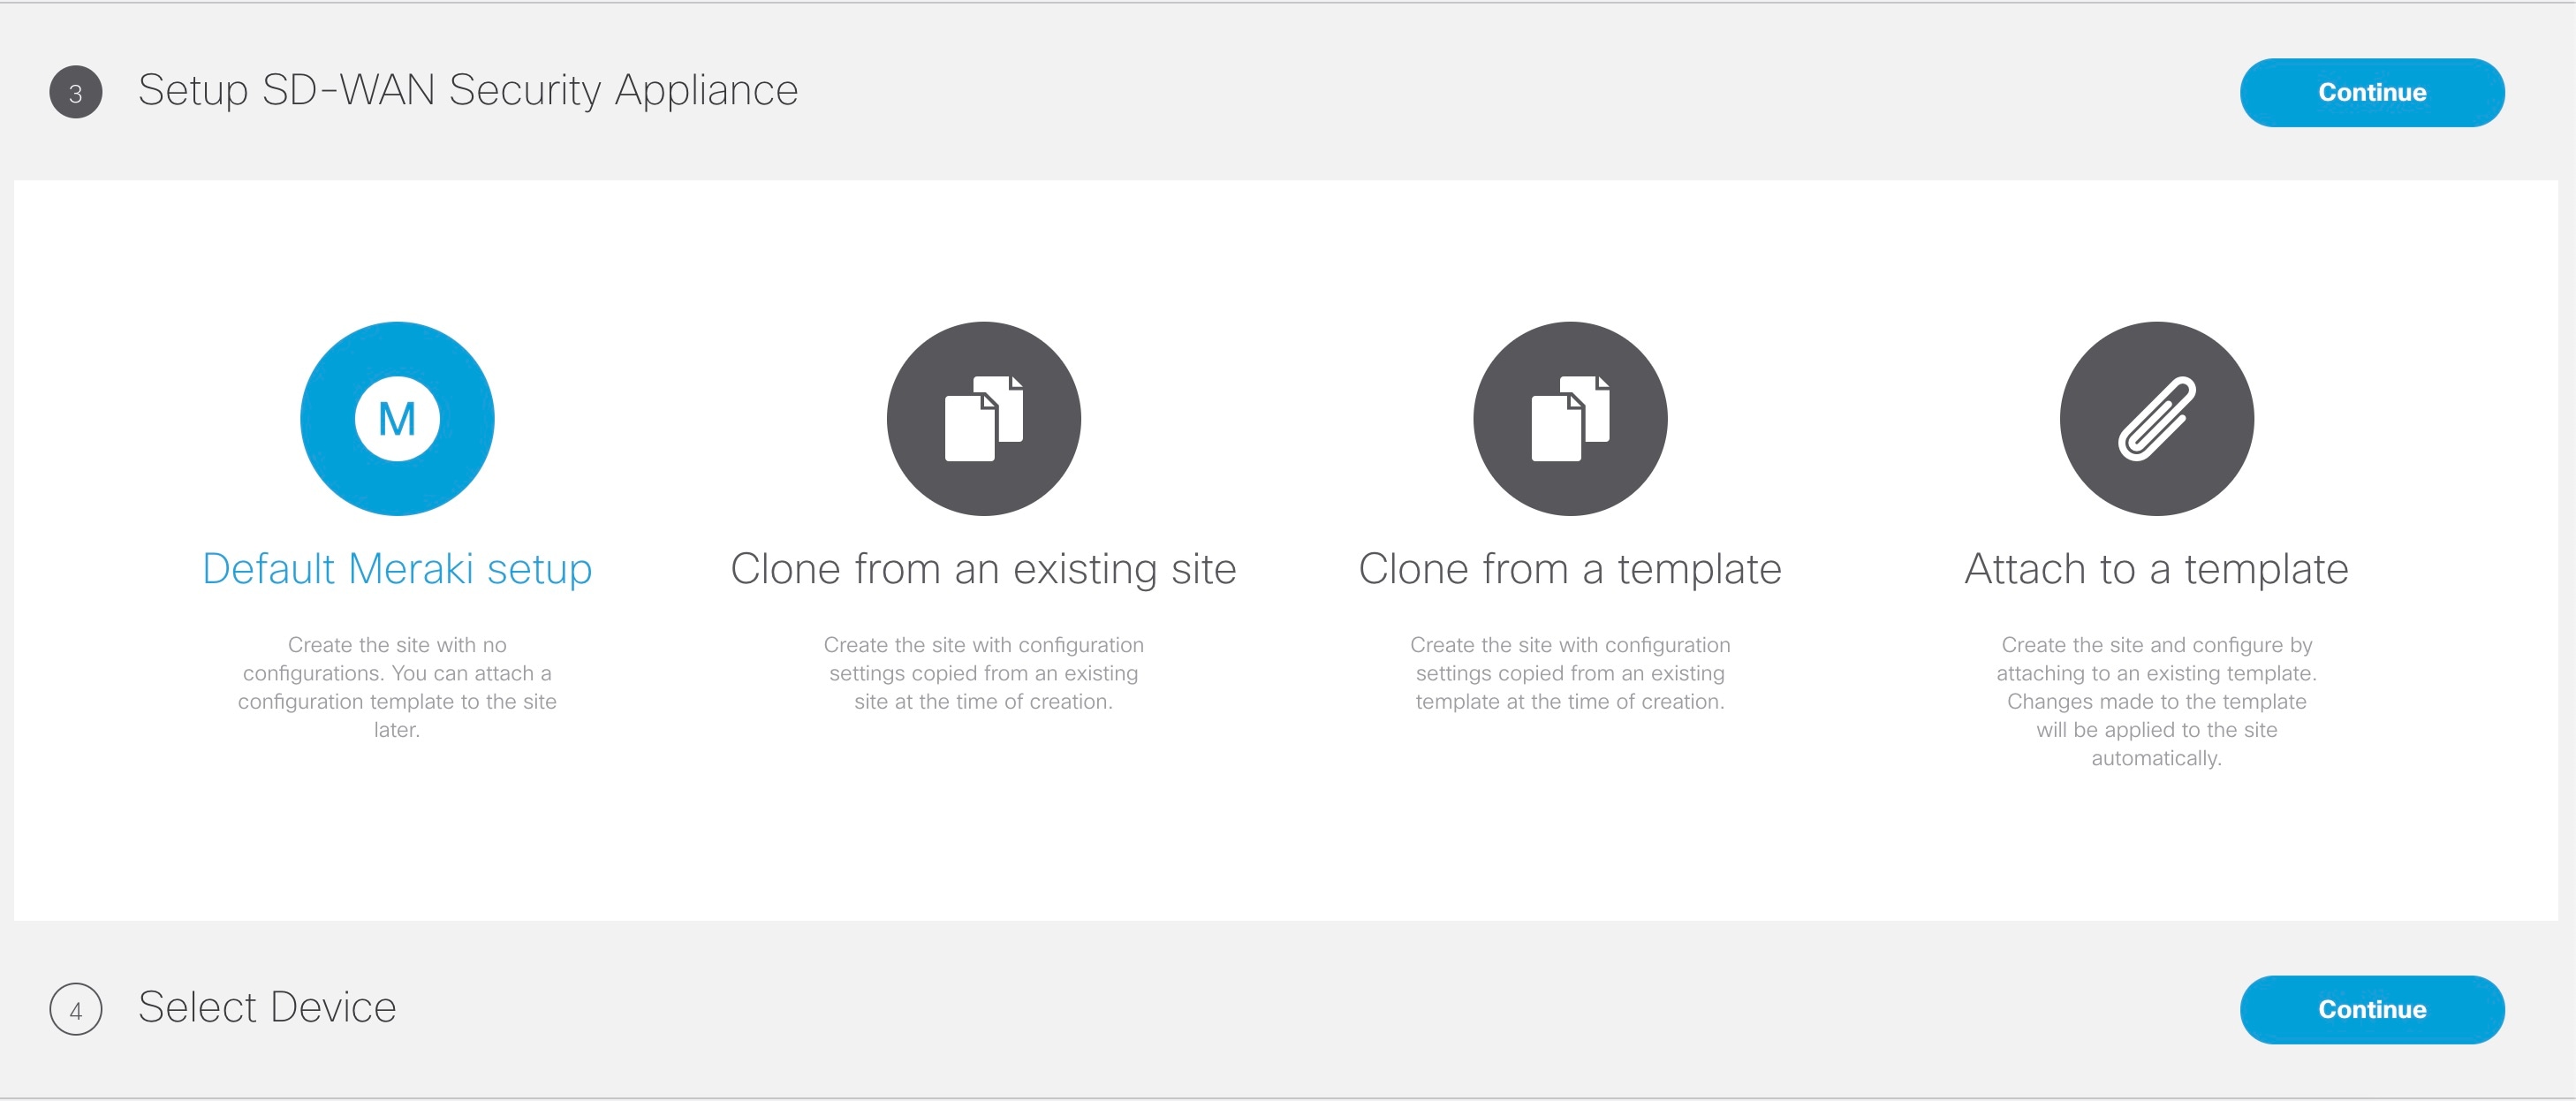
|
||
| Step 9 |
Select a Device for your site. From the Select a Device to Add to Site drop-down list, choose the device from the device inventory, and add the device to the site. The options shown in this drop-down depends on the site or the network type you chose in Step 7. After creating a site, from the Site Summary page, you can use the option 'Add Additional Devices' to add more devices. |
||
| Step 10 |
Click Submit. The site summary page appears. |
Configuring Application Relevance Settings for Meraki SD-WAN
Use application relevance settings in MSX to give a particular application higher priority, among others, and apply these settings across MSX-managed Meraki SD-WAN sites.
 Note |
The application relevance setting is supported only for following Meraki sites/network type:
|
Use this procedure to configure application relevance settings in MSX to assign a particular application higher priority among others.
Before you begin
-
Make sure one or more Meraki application class model template are assigned and available to the tenants. For more information, see Managing Meraki Traffic Class Access for Tenants.
-
Create or attach Control Plane, see Setting Up SD-WAN Control and Management Plane for Meraki.
-
Ensure you have the following permissions to configure traffic policies:
-
SD-WAN Traffic Policy: Users with manage permission can add and modify Application Relevance policy or Path Preference policy to the SD-WAN fabric.
-
Service Configuration Application: Users with manage permission can configure application relevance for Meraki applications. You can find this permission under Services, Configurations, and Devices category of permissions.
-
Procedure
| Step 1 |
Log in to the Cisco MSX portal using your credentials. |
||
| Step 2 |
From the left hand pane, click Dashboard. |
||
| Step 3 |
In the Subscription dashlet, click SD-WAN and click SD-WAN Home. |
||
| Step 4 |
Select the tenant from the drop-down and click Traffic Policy in the main menu. |
||
| Step 5 |
Select Meraki SD-WAN Traffic Policy.
|
||
| Step 6 |
In the Application Relevance tab, select a policy class model that suits your requirements. A policy class model is based on the number of traffic classes it includes. Depending on the selected class, the list of applications for the chosen class model appears on the same page. For information on the out-of-box applications available with Meraki SD-WAN in MSX, see Applications Available with Cisco MSX SD-WAN. 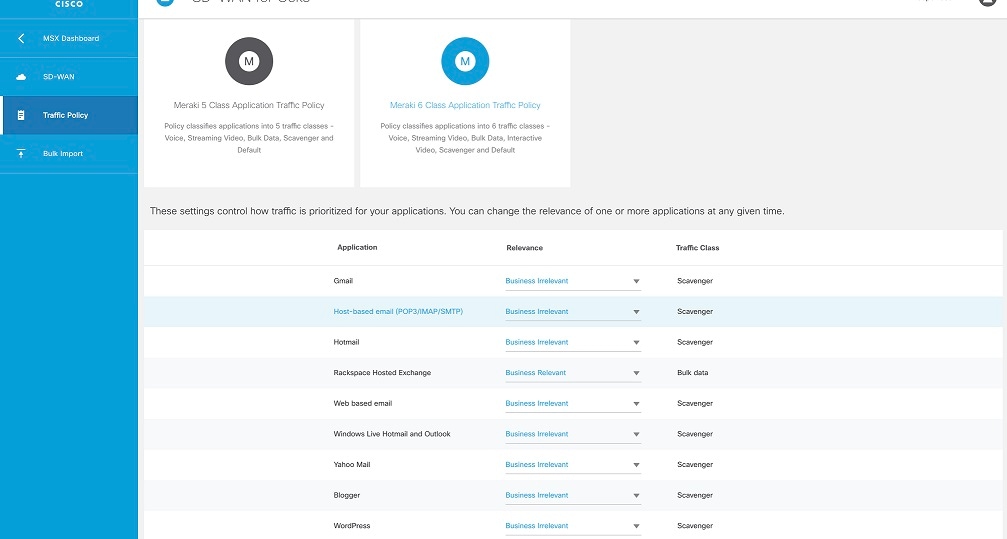
|
||
| Step 7 |
Edit the application relevance for the applications. To edit, select an application, and choose one of the following business relevance settings from the relevance drop-down list.
|
||
| Step 8 |
Review or modify the Application relevance settings and click Apply to Meraki Sites to apply these changes across all Meraki sites for the selected tenant. |
||
| Step 9 |
Click Apply on the Confirm Policy Apply dialog box to proceed with applying the changes across Meraki sites.
After applying the policy, you can view the status under Meraki Traffic Policy Status section on the Site Summary page. 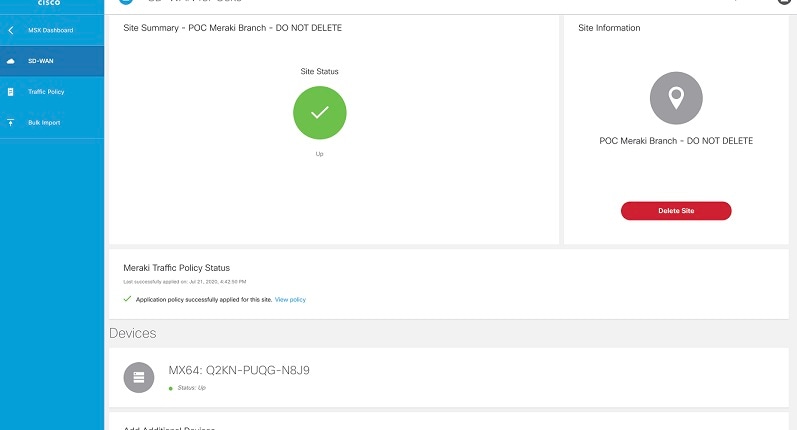
|
Deploying an Additional Controller Type
Cisco MSX allows you to create new or attach a Cisco SD-WAN control plane to a tenant that already has a Meraki control plane deployed. Thus, allowing you to manage both Cisco SD-WAN and Meraki control plane and site information at the same time.
For deploying a Cisco SD-WAN control plane to the tenant, see Setting Up Control Plane for Cisco SD-WAN.
After both the control planes are deployed, you can select sites based on controller type filter option in List and Map view.
Maintaining Cisco Meraki SD-WAN Deployments
This section covers the maintenance tasks for Cisco Meraki SD-WAN deployments.
Deleting the Meraki Site
To delete the Meraki site:
Procedure
| Step 1 |
Log in to the Cisco MSX portal using your credentials. |
| Step 2 |
From the left hand pane, click Dashboard. |
| Step 3 |
Click SD-WAN. The SD-WAN window is displayed. |
| Step 4 |
Select the tenant from the drop-down. The SD-WAN Home screen refreshes and displays site status and control plane status for the selected tenant. |
| Step 5 |
In the List view, select the Meraki controller type. Cisco MSX displays all the sites with Meraki control plane. |
| Step 6 |
Select the Site for which you want to view the summary. The site summary screen appears. |
| Step 7 |
Click Delete Site. This action permanently deletes all information about the site and device from the Cisco MSX. |
Detaching the Control Plane for Meraki
To detach the control plane for Merkai:
Procedure
| Step 1 |
Log in to the Cisco MSX Portal. |
| Step 2 |
In the main menu of the Cisco MSX Portal, click Dashboard. |
| Step 3 |
Click SD-WAN. The SD-WAN screen appears. |
| Step 4 |
Select the tenant from the drop-down. The SD-WAN Home screen refreshes and displays site status and control plane status for the selected tenant. |
| Step 5 |
In the List view, select the Meraki as the controller type. All the sites of Meraki control plane are displayed. |
| Step 6 |
Select the Site. The site summary screen appears. The Meraki control plane dashboard is shown. |
| Step 7 |
To detach control plane, click the Detach Control Plane button. |
 Feedback