Installation Guide for Cisco Evolved Programmable Network Manager 2.1 and Maintenance Packs (2.1.x)
Bias-Free Language
The documentation set for this product strives to use bias-free language. For the purposes of this documentation set, bias-free is defined as language that does not imply discrimination based on age, disability, gender, racial identity, ethnic identity, sexual orientation, socioeconomic status, and intersectionality. Exceptions may be present in the documentation due to language that is hardcoded in the user interfaces of the product software, language used based on RFP documentation, or language that is used by a referenced third-party product. Learn more about how Cisco is using Inclusive Language.
- Updated:
- August 17, 2017
Chapter: Supplementary Installation-Related Information and Procedures
Log In and Out as the Linux CLI Users
The Linux CLI has two shell users: One with administrative access (Linux CLI admin user), and another with root access (Linux CLI root user). The following diagram illustrates the flow for logging in and out as the various CLI users.
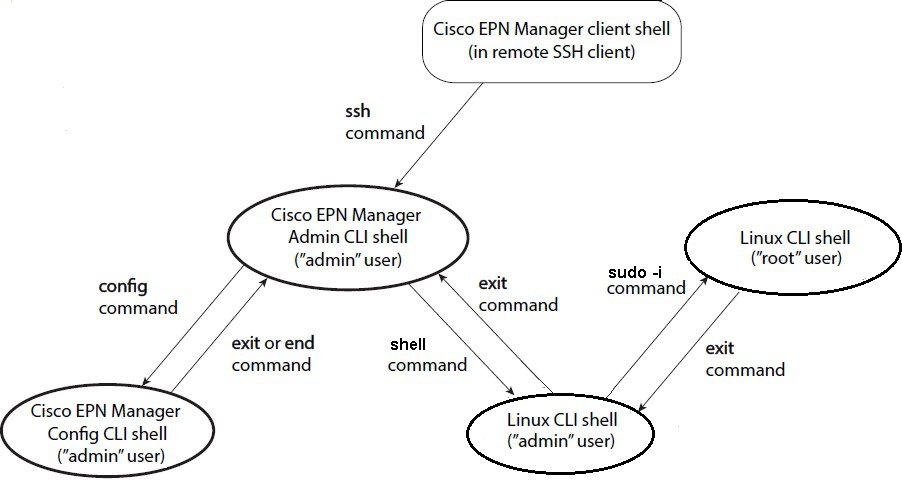
To log in as the Linux CLI root user, you will have to transition from being the Cisco EPN Manager CLI admin user to the Linux CLI admin user to the Linux CLI root user . The following procedure gives you the exact steps you must follow to log in as these users. For more information on these users, refer to the Cisco Evolved Programmable Network Manager User and Administrator Guide .
If the Linux CLI user is disabled, re-enable it. Refer to the user management procedures in the Cisco Evolved Programmable Network Manager User and Administrator Guide .
Step 1 To log in as the Linux CLI root user:
a. Start an SSH session with the Cisco EPN Manager server and log in as the Cisco EPN Manager CLI admin user.
b. As the Cisco EPN Manager CLI admin user, log in as the Linux CLI admin user:
c. Log in as the Linux CLI root user:
By default, the Linux CLI shell prompt is the same for the Linux CLI admin and root user. You can use the whoami command to check the current user.
a. Log out as the Linux CLI root user.
You are now logged in as the Linux CLI admin user.
b. Log out as the Linux CLI admin user:
You are now logged in as the Cisco EPN Manager CLI admin user.
For security purposes, disable the Linux CLI users. Refer to the user management procedures in the Cisco Evolved Programmable Network Manager User and Administrator Guide .
Copy Files From a Client Machine to the Cisco EPN Manager Server
- You can use SCP, FTP, or SFTP protocols to retrieve files from the client machine. Make sure the required protocol is enabled on your client machine and the required ports are open (see Ports Used by Cisco EPN Manager).
This procedure explains how to copy files from your client machine to the Cisco EPN Manager server.
Step 1 Start an SSH session with the Cisco EPN Manager server and log in as the Cisco EPN Manager CLI admin user.
Step 2 Log in as the Linux CLI admin user (see Log In and Out as the Linux CLI Users).
Step 3 From the Cisco EPN Manager server, retrieve the file from the client machine. You can use SCP, FTP, or SFTP. This example uses the scp command, which has the following syntax:
- clientUsername is your username on the client machine
- clientIP is the IP address of the client machine
- fullpath-to-file-on-client is the full path to the file on the client machine that you want to copy to the server
- server-directory is the path to the directory on the server to which you want to copy the file
In the following example, a file named myfile located in the /temp directory on the client machine is being copied to the /localdisk/defaultRepo on the Cisco EPN Manager server.
Step 4 Log out as the Linux CLI admin user as described in Log In and Out as the Linux CLI Users.
Synchronize the Hardware and NTP Clock
This procedure synchronizes the hardware clock with the NTP clock using the hwclock command.
Step 1 Log in as the Linux CLI root user as described in Log In and Out as the Linux CLI Users.
Step 2 Check the NTP service status and ensure that NTP has obtained a stable time reference using the following commands. The following includes examples of the output you should see.
a. Ensure that ntpd is running.
b. If ntpd (pid 3290) is not running, start it using the following command:
(Repeat Step a to ensure it is running.)
c. Ensure that NTP is receiving time from an NTP server.
synchronised to NTP server (10.116.133.175) at stratum 3
    time correct to within 62 ms
    polling server every 1024 s
If you do not see output similar to this, then NTP synchronization has not yet occurred. Wait a few minutes and run ntpstat again. If synchronization does not happen within 10 minutes, contact your system administrator or Cisco support.
Step 3 Synchronize the hardware clock with NTP using the following command:
You should see output similar to the following:
hwclock from util-linux-ng 2.17.2
Using /dev interface to clock.
Last drift adjustment done at 1470117750 seconds after 1969
Last calibration done at 1470117750 seconds after 1969
Hardware clock is on local time
Assuming hardware clock is kept in local time.
Waiting for clock tick...
...got clock tick
Time read from Hardware Clock: 2016/08/02 16:03:30
Hw clock time : 2016/08/02 16:03:30 = 1470117810 seconds since 1969
1470117810.500000 is close enough to 1470117810.500000 (0.000000 < 0.001000)
Set RTC to 1470117810 (1470117810 + 0; refsystime = 1470117810.000000)
Setting Hardware Clock to 16:03:30 = 1470117810 seconds since 1969
ioctl(RTC_SET_TIME) was successful.
Not adjusting drift factor because it has been less than a day since the last calibration.
Step 4 Verify that the hardware clock is synchronized with NTP.
Check the output and ensure that the two clocks are synchronized (to at least within a few seconds of each other):
Hwclock is: Tue 26 Jul 2016  06:11:40  PM AEST   -0.391028 seconds
linux clock is: Tue Jul 26  18:11:40  AEST 2016
Step 5 As the Linux CLI admin user, restart the Cisco EPN Manager services.
a. If you are logged in as the Linux CLI root user, switch to the Linux CLI admin user.
b. Switch to the Cisco EPN Manager CLI admin user.
c. Stop and restart the Cisco EPN Manager services.
Log Into the Cisco EPN Manager Web GUI
Follow these steps to log into the Cisco EPN Manager web GUI:
Step 1 On a client machine, launch one of the supported browsers (see Web Client Requirements).
Step 2 In the browser’s address line, enter https:// serverIP , where serverIP is the IP address of the server on which you installed Cisco EPN Manager. The login window is displayed.
When a client accesses the Cisco EPN Manager web GUI for the first time, the browser may display a warning that the site is untrusted. When this happens, follow the prompts to add a security exception and download the self-signed certificate from the Cisco EPN Manager server. After you complete this procedure, the browser will accept the Cisco EPN Manager server as a trusted site in all future login attempts.
Step 3 Enter the web GUI root username and password, as specified during the installation.
If any licensing problems occur, a message appears in an alert box. If you have an evaluation license, the number of days until the license expires is shown. You are also alerted about any expired licenses. (You have the option to go directly to the Administration > Licenses and Software Updates > Licenses page to address these problems.) For more information about licenses, refer to the Cisco Evolved Programmable Network Manager User and Administrator Guide .
Step 4 Click Login to log in to the Cisco EPN Manager web GUI. The home page appears and you can now use the web GUI. For information about the dashboards and dashlets, refer to the Cisco Evolved Programmable Network Manager User and Administrator Guide .
Step 5 For increased security, perform these steps:
- Change the password for the web GUI root user by choosing Administration > Users > Roles & AAA > Change Password .
- Create at least one Cisco EPN Manager web GUI user that has Admin or Super User privileges, then disable the web GUI root user. For information on disabling this user, refer to the user management topics in the Cisco Evolved Programmable Network Manager User and Administrator Guide .
- If you have not done so already, disable the Linux CLI users. Refer to the Cisco Evolved Programmable Network Manager User and Administrator Guide .
Perform setup tasks for server, user, fault, and web GUI management. For a detailed list of tasks, see the beginning of the administration section of the Cisco Evolved Programmable Network Manager User and Administrator Guide .
For information on Cisco EPN Manager user interfaces and user types, see the Cisco Evolved Programmable Network Manager User and Administrator Guide .
 Feedback