Cisco Evolved Programmable Network Manager 2.0.3 Installation Guide
Available Languages
Table of Contents
Cisco Evolved Programmable Network Manager 2.0.3 Installation Guide
Installation Paths for Cisco EPN Manager 2.0.3
Log In and Out as the Linux CLI Users
Workflow for Installing Cisco EPN Manager2.0.3 in a Standard Environment (No HA)
Perform the Cisco EPN Manager2.0.3 Prerequisite Tasks
Download Cisco EPN Manager2.0.3 (No HA)
Install Cisco EPN Manager2.0.3 (No HA)
Synchronize the Hardware and NTP Clock
Synchronize the Inventory of Optical Devices with the Database (Existing Deployments Only)
Workflow for Installing Cisco EPN Manager 2.0.3 in an HA Deployment
Perform the Cisco EPN Manager2.0.3 Prerequisite Tasks
Download Cisco EPN Manager2.0.3 (HA Deployment)
Install Cisco EPN Manager2.0.3 on Primary and Secondary Servers (HA Deployment)
Workflow for Installing Geo Map Resources for Offline Use
Download and Copy the Geo Maps Resources to the Cisco EPN Manager Server
Install the Geo Maps Resources on the Cisco EPN Manager Server
Configure the Cisco EPN Manager Server to Use the Installed Map Resources
Cisco Evolved Programmable Network Manager 2.0.3 Installation Guide
First Published: November 8, 2016
Install Cisco EPN Manager 2.0.3 in a Standard Environment (No HA)
Install Cisco EPN Manager 2.0.3 in an HA Environment
Install GeoMap Resources for Offline Use
Obtaining Documentation and Submitting a Service Request
SUPPLEMENTAL LICENSE AGREEMENT FOR CISCO SYSTEMS NETWORK MANAGEMENT SOFTWARE: CISCO EVOLVED PROGRAMMABLE NETWORK MANAGER
IMPORTANT-READ CAREFULLY : This Supplemental License Agreement (“SLA”) contains additional limitations on the license to the Software provided to Customer under the End User License Agreement between Customer and Cisco. Capitalized terms used in this SLA and not otherwise defined herein shall have the meanings assigned to them in the End User License Agreement. To the extent that there is a conflict among any of these terms and conditions applicable to the Software, the terms and conditions in this SLA shall take precedence.
By installing, downloading, accessing or otherwise using the Software, Customer agrees to be bound by the terms of this SLA. If Customer does not agree to the terms of this SLA, Customer may not install, download or otherwise use the Software.
ADDITIONAL LICENSE RESTRICTIONS:
- Installation and Use. The Software components are provided to Customer solely to install, update, supplement, or replace existing functionality of the applicable Network Management Software product. Customer may install and use the following Software components:
–![]() Cisco Evolved Programmable Network Manager: May be installed on a server in Customer's network management environment.
Cisco Evolved Programmable Network Manager: May be installed on a server in Customer's network management environment.
For each Software license granted, customers may install and run the Software on a single server to manage the number of network devices and codecs specified in the license file provided with the Software, or as specified in the Software License Claim Certificate. Customers whose requirements exceed the network device and codec limits must purchase upgrade licenses or additional copies of the Software. The network device and codec limits are enforced by license registration.
DESCRIPTION OF OTHER RIGHTS AND LIMITATIONS.
Refer to the Cisco Systems, Inc. End User License Agreement.
Cisco and the Cisco Logo are trademarks of Cisco Systems, Inc. and/or its affiliates in the U.S. and other countries. A listing of Cisco's trademarks can be found at www.cisco.com/go/trademarks. Third party trademarks mentioned are the property of their respective owners. The use of the word partner does not imply a partnership relationship between Cisco and any other company. (1110R)
Any Internet Protocol (IP) addresses used in this document are not intended to be actual addresses. Any examples, command display output, and figures included in the document are shown for illustrative purposes only. Any use of actual IP addresses in illustrative content is unintentional and coincidental.
Installation Overview
Installation Paths for Cisco EPN Manager 2.0.3
The following table lists the mandatory installation paths for Cisco EPN Manager 2.0.3.
- PP = Point Patch
- Cisco EPN Manager 2.0.1 = Cisco EPN Manager 2.0 Maintenance Pack 1
- Cisco EPN Manager 2.0.2 = Cisco EPN Manager 2.0 Maintenance Pack 2
- Cisco EPN Manager 2.0.3 = Cisco EPN Manager 2.0 Maintenance Pack 3
1. 2. |
|
1. 2. |
|
1. 2. |
Log In and Out as the Linux CLI Users
The Linux CLI has two shell users: One with administrative access (Linux CLI admin user), and another with root access (Linux CLI root user). The following diagram illustrates the flow for logging in as the various CLI users.
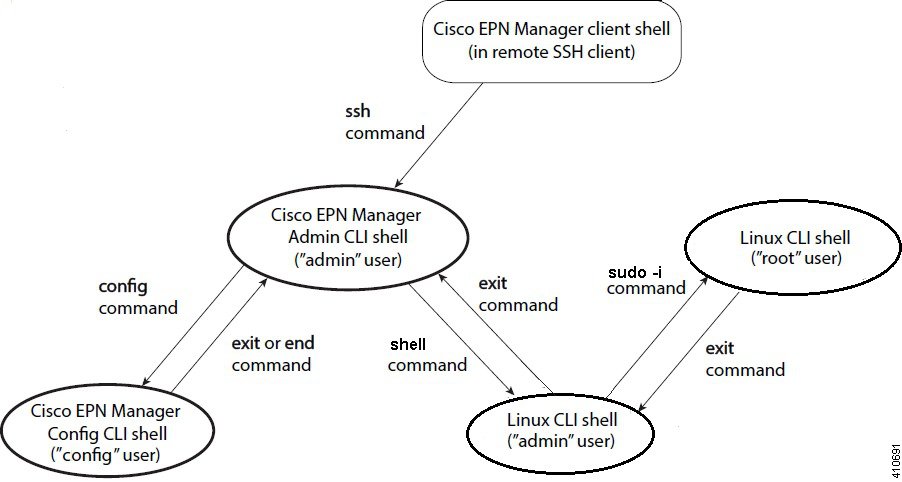
To log in as the Linux CLI root user, you will have to transition from being the Cisco EPN Manager CLI admin user to the Linux CLI admin user to the Linux CLI root user. The following procedure gives you the exact steps you must follow to log in as these users. For more information on these users, refer to the Cisco Evolved Programmable Network Manager User and Administrator Guide.
If the Linux CLI user is disabled, re-enable it. Refer to the user management procedures in the Cisco Evolved Programmable Network Manager User and Administrator Guide.
Step 1![]() To log in as the Linux CLI root user:
To log in as the Linux CLI root user:
a.![]() Start an SSH session with the Cisco EPN Manager server and log in as the Cisco EPN Manager CLI admin user.
Start an SSH session with the Cisco EPN Manager server and log in as the Cisco EPN Manager CLI admin user.
b.![]() As the Cisco EPN Manager CLI admin user, log in as the Linux CLI admin user:
As the Cisco EPN Manager CLI admin user, log in as the Linux CLI admin user:
shell
Enter shell access password: password
c.![]() Log in as the Linux CLI root user:
Log in as the Linux CLI root user:
By default, the Linux CLI shell prompt is the same for the Linux CLI admin and root user. You can use the whomai command to check the current user.
a.![]() Log out as the Linux CLI root user.
Log out as the Linux CLI root user.
You are now logged in as the Linux CLI admin user.
b.![]() Log out as the Linux CLI admin user:
Log out as the Linux CLI admin user:
You are now logged in as the Cisco EPN Manager CLI admin user.
For security purposes, disable the Linux CLI users. Refer to the user management procedures in the Cisco Evolved Programmable Network Manager User and Administrator Guide.
Install Cisco EPN Manager 2.0.3 in a Standard Environment (No HA)
Workflow for Installing Cisco EPN Manager 2.0.3 in a Standard Environment (No HA)
1.![]() Perform the Cisco EPN Manager 2.0.3 Prerequisite Tasks.
Perform the Cisco EPN Manager 2.0.3 Prerequisite Tasks.
2.![]() Download Cisco EPN Manager 2.0.3 (No HA).
Download Cisco EPN Manager 2.0.3 (No HA).
3.![]() Install Cisco EPN Manager 2.0.3 (No HA).
Install Cisco EPN Manager 2.0.3 (No HA).
4.![]() Synchronize the Hardware and NTP Clock.
Synchronize the Hardware and NTP Clock.
5.![]() Synchronize the Inventory of Optical Devices with the Database (Existing Deployments Only).
Synchronize the Inventory of Optical Devices with the Database (Existing Deployments Only).
Perform the Cisco EPN Manager 2.0.3 Prerequisite Tasks
The following tasks are mandatory for Cisco EPN Manager 2.0.3 installations.
Step 1![]() If you have an existing deployment (this is not a fresh installation), perform these tasks:
If you have an existing deployment (this is not a fresh installation), perform these tasks:
a.![]() Back up your data. Refer to the backup topics in the Cisco Evolved Programmable Network Manager User and Administrator Guide.
Back up your data. Refer to the backup topics in the Cisco Evolved Programmable Network Manager User and Administrator Guide.
b.![]() If you have used the menu customization feature to adjust what is displayed in the web GUI, move the following file to ensure a smooth Cisco EPN Manager 2.0.3 installation.
If you have used the menu customization feature to adjust what is displayed in the web GUI, move the following file to ensure a smooth Cisco EPN Manager 2.0.3 installation.

Note![]() You do not need to restart Cisco EPN Manager after performing this procedure.
You do not need to restart Cisco EPN Manager after performing this procedure.
–![]() Start an SSH session and log into the Cisco EPN Manager server as the Linux CLI root user (as described in Log In and Out as the Linux CLI Users).
Start an SSH session and log into the Cisco EPN Manager server as the Linux CLI root user (as described in Log In and Out as the Linux CLI Users).
–![]() Run the following command (this command is one line):
Run the following command (this command is one line):
cp /opt/CSCOlumos/compliance_enable/disable/navigation_Converged.json.previous /opt/CSCOlumos/compliance_enable/disable/navigation_Converged.json
If you receive a “No file found” response, do not be concerned.
Note![]() If you did have customized menus, you will need to re-customize them after the Cisco EPN Manager 2.0.3 installation.
If you did have customized menus, you will need to re-customize them after the Cisco EPN Manager 2.0.3 installation.
Step 2![]() Make sure that Cisco EPN Manager has a valid license. Refer to the topics in the Cisco Evolved Programmable Network Manager User and Administrator Guide.
Make sure that Cisco EPN Manager has a valid license. Refer to the topics in the Cisco Evolved Programmable Network Manager User and Administrator Guide.
Go to Download Cisco EPN Manager 2.0.3 (No HA).
Note![]() Although this section is directed at standard deployments, this procedure also applies when preparing the primary and secondary servers for installation in an HA environment. For the next step in HA deployments, go to Remove the HA Configuration.
Although this section is directed at standard deployments, this procedure also applies when preparing the primary and secondary servers for installation in an HA environment. For the next step in HA deployments, go to Remove the HA Configuration.
Download Cisco EPN Manager 2.0.3 (No HA)
This procedure explains how to download the required ubf file. (Although this section is directed at standard deployments, this procedure is also used to download the ubf file onto the primary server in a high availability deployment.)
(Existing deployments) Back up your data.
Step 1![]() Make sure you have performed the tasks in Perform the Cisco EPN Manager 2.0.3 Prerequisite Tasks.
Make sure you have performed the tasks in Perform the Cisco EPN Manager 2.0.3 Prerequisite Tasks.
Step 2![]() Log into the Cisco EPN Manager web GUI as a user with Administrator privileges.
Log into the Cisco EPN Manager web GUI as a user with Administrator privileges.
Step 3![]() From the left sidebar, choose Administration > Licenses and Software Update > Software Update.
From the left sidebar, choose Administration > Licenses and Software Update > Software Update.
Step 4![]() Get the ubf file, either by downloading it directly from the Software Download site on Cisco.com or by uploading it to the Cisco EPN Manager server from a saved location. The file will have a name similar to cepnm2.0-mp3-build xxxx .ubf (be sure to check the file description).
Get the ubf file, either by downloading it directly from the Software Download site on Cisco.com or by uploading it to the Cisco EPN Manager server from a saved location. The file will have a name similar to cepnm2.0-mp3-build xxxx .ubf (be sure to check the file description).
–![]() Click the blue Download link at the top of the page and log into Cisco.com. Cisco EPN Manager will check for available software updates.
Click the blue Download link at the top of the page and log into Cisco.com. Cisco EPN Manager will check for available software updates.
–![]() Select the Cisco EPN Manager 2.0.3 file and click OK to start the download from Cisco.com to the Cisco EPN Manager server.
Select the Cisco EPN Manager 2.0.3 file and click OK to start the download from Cisco.com to the Cisco EPN Manager server.
–![]() Copy the Cisco EPN Manager 2.0.3 installation file to your client machine.
Copy the Cisco EPN Manager 2.0.3 installation file to your client machine.
–![]() Click the blue Upload link at the top of the page, browse to the ubf file on your client machine, and click OK.
Click the blue Upload link at the top of the page, browse to the ubf file on your client machine, and click OK.
After the successful download or upload of Cisco EPN Manager 2.0.3, the software will appear under the Files tab.
Go to Install Cisco EPN Manager 2.0.3 (No HA).
Note![]() Although this section is directed at standard deployments, this procedure also applies when downloading the software to the primary server in an HA deployment. For the next step in HA deployments, go to Download Cisco EPN Manager 2.0.3 (HA Deployment).
Although this section is directed at standard deployments, this procedure also applies when downloading the software to the primary server in an HA deployment. For the next step in HA deployments, go to Download Cisco EPN Manager 2.0.3 (HA Deployment).
Install Cisco EPN Manager 2.0.3 (No HA)
Step 1![]() Verify that Cisco EPN Manager 2.0 Point Patch 2 is installed on the server.
Verify that Cisco EPN Manager 2.0 Point Patch 2 is installed on the server.
a.![]() Click the gear at the top right of the web GUI window (next to name of the current domain) and click About Cisco EPN Manager .
Click the gear at the top right of the web GUI window (next to name of the current domain) and click About Cisco EPN Manager .
b.![]() In the pop-up window, click View Installed Updates.
In the pop-up window, click View Installed Updates.
c.![]() Verify that EPN Manager Point Patch 2.0.0 is listed.
Verify that EPN Manager Point Patch 2.0.0 is listed.
If the point patch is not listed, you must install it as described in the Cisco EPN Manager 2.0 Release Notes. It is a requirement for Cisco EPN Manager 2.0.3.
Step 2![]() From the left sidebar, choose Administration > Licenses and Software Update > Software Update.
From the left sidebar, choose Administration > Licenses and Software Update > Software Update.
Step 3![]() Click the Install button associated with EPN Manager Maintenance Pack 2.0.3 on the Software Update page.
Click the Install button associated with EPN Manager Maintenance Pack 2.0.3 on the Software Update page.
Step 4![]() Click Yes in the confirmation message pop-up window to proceed with the installation. After successful installation, the status will change to Installed.
Click Yes in the confirmation message pop-up window to proceed with the installation. After successful installation, the status will change to Installed.
Cisco EPN Manager will auto-restart and the Cisco EPN Manager web GUI will not be accessible for some time.
Step 5![]() Check the status of the Cisco EPN Manager services.
Check the status of the Cisco EPN Manager services.
a.![]() Start an SSH session with the Cisco EPN Manager server and log in as the Cisco EPN Manager CLI admin user.
Start an SSH session with the Cisco EPN Manager server and log in as the Cisco EPN Manager CLI admin user.
b.![]() Run the ncs status command to ensure that all services are up and running:
Run the ncs status command to ensure that all services are up and running:
Step 6![]() Once the Cisco EPN Manager web GUI is accessible, log in and check the version on the Software Update page.
Once the Cisco EPN Manager web GUI is accessible, log in and check the version on the Software Update page.
a.![]() From the left sidebar, choose Administration > Licenses and Software Update > Software Update.
From the left sidebar, choose Administration > Licenses and Software Update > Software Update.
b.![]() Verify that EPN Manager Maintenance Pack 3.0.1 is listed as Installed under the Updates tab.
Verify that EPN Manager Maintenance Pack 3.0.1 is listed as Installed under the Updates tab.
Go to Synchronize the Hardware and NTP Clock.
Note![]() Although this section is directed at standard deployments, this procedure also applies when installing the software to the primary server in an HA deployment. For the next step in HA deployments, go to Step 3 in Install Cisco EPN Manager 2.0.3 on Primary and Secondary Servers (HA Deployment).
Although this section is directed at standard deployments, this procedure also applies when installing the software to the primary server in an HA deployment. For the next step in HA deployments, go to Step 3 in Install Cisco EPN Manager 2.0.3 on Primary and Secondary Servers (HA Deployment).
Synchronize the Hardware and NTP Clock
This procedure synchronizes the hardware clock with the NTP clock using the hwclock command. (Although this section is directed at standard deployments, it is also used to synchronize the clocks on primary and secondary servers in an HA deployment.)
Step 1![]() Log in as the Linux CLI root user as described in Log In and Out as the Linux CLI Users.
Log in as the Linux CLI root user as described in Log In and Out as the Linux CLI Users.
Step 2![]() Check the NTP service status and ensure that NTP has obtained a stable time reference using the following commands. The following includes examples of the output you should see.
Check the NTP service status and ensure that NTP has obtained a stable time reference using the following commands. The following includes examples of the output you should see.
a.![]() Ensure that ntpd is running.
Ensure that ntpd is running.
service ntpd status
ntpd (pid 3290) is running...
b.![]() If ntpd (pid 3290) is not running, start it using the following command:
If ntpd (pid 3290) is not running, start it using the following command:
(Repeat Step a to ensure it is running.)
c.![]() Ensure that NTP is receiving time from an NTP server.
Ensure that NTP is receiving time from an NTP server.
ntpstat
 synchronised to NTP server (10.116.133.175) at stratum 3
 time correct to within 62 ms
 polling server every 1024 s
If you do not see output similar to this, then NTP synchronization has not yet occurred. Wait a few minutes and run ntpstat again. If synchronization does not happen within 10 minutes, contact your system administrator or Cisco support.
Step 3![]() Synchronize the hardware clock with NTP using the following command:
Synchronize the hardware clock with NTP using the following command:
You should see output similar to the following:
 hwclock from util-linux-ng 2.17.2
 Using /dev interface to clock.
 Last drift adjustment done at 1470117750 seconds after 1969
 Last calibration done at 1470117750 seconds after 1969
 Hardware clock is on local time
 Assuming hardware clock is kept in local time.
 Waiting for clock tick...
...got clock tick
 Time read from Hardware Clock: 2016/08/02 16:03:30
 Hw clock time : 2016/08/02 16:03:30 = 1470117810 seconds since 1969
 1470117810.500000 is close enough to 1470117810.500000 (0.000000 < 0.001000)
 Set RTC to 1470117810 (1470117810 + 0; refsystime = 1470117810.000000)
 Setting Hardware Clock to 16:03:30 = 1470117810 seconds since 1969
 ioctl(RTC_SET_TIME) was successful.
 Not adjusting drift factor because it has been less than a day since the last calibration.
Step 4![]() Verify that the hardware clock is synchronized with NTP.
Verify that the hardware clock is synchronized with NTP.
echo "hwclock is: $(hwclock --show)" ; echo "linux clock is: $(date)";
Check the output and ensure that the two clocks are synchronized (to at least within a few seconds of each other):
 Hwclock is: Tue 26 Jul 2016 06:11:40 PM AEST -0.391028 seconds
 linux clock is: Tue Jul 26 18:11:40 AEST 2016
Step 5![]() (High availability deployments) Do the following:
(High availability deployments) Do the following:
a.![]() Perform the previous steps on both servers.
Perform the previous steps on both servers.
b.![]() Check the clocks on each server and ensure they are synchronized with each other.
Check the clocks on each server and ensure they are synchronized with each other.
c.![]() Go to Step 7 in Install Cisco EPN Manager 2.0.3 on Primary and Secondary Servers (HA Deployment) to re-enable high availability.
Go to Step 7 in Install Cisco EPN Manager 2.0.3 on Primary and Secondary Servers (HA Deployment) to re-enable high availability.
Step 6![]() As the Linux CLI admin user, restart the Cisco EPN Manager services.
As the Linux CLI admin user, restart the Cisco EPN Manager services.
a.![]() If you are logged in as the Linux CLI root user, switch to the Linux CLI admin user.
If you are logged in as the Linux CLI root user, switch to the Linux CLI admin user.
b.![]() Switch to the Cisco EPN Manager CLI admin user.
Switch to the Cisco EPN Manager CLI admin user.
c.![]() Stop and restart the Cisco EPN Manager services.
Stop and restart the Cisco EPN Manager services.
If you installed Cisco EPN Manager 2.0.3 on an existing deployment that has optical devices, perform an inventory collection for those devices. See Synchronize the Inventory of Optical Devices with the Database (Existing Deployments Only).
Synchronize the Inventory of Optical Devices with the Database (Existing Deployments Only)
If you are installing Cisco EPN Manager 2.0.3 on top of an existing deployment (in other words, this is not a fresh installation of Cisco EPN Manager) and your deployment includes optical devices, you need to perform a Sync operation on the optical devices. The Sync operation instructs Cisco EPN Manager to collect device physical and logical inventory and save the information to the database.
Step 1![]() Choose Monitor > Network Devices.
Choose Monitor > Network Devices.
Step 2![]() Select all of the optical devices, then click Sync.
Select all of the optical devices, then click Sync.
Install Cisco EPN Manager 2.0.3 in an HA Environment
Workflow for Installing Cisco EPN Manager 2.0.3 in an HA Deployment
1.![]() Perform the Cisco EPN Manager 2.0.3 Prerequisite Tasks.
Perform the Cisco EPN Manager 2.0.3 Prerequisite Tasks.
2.![]() Remove the HA Configuration.
Remove the HA Configuration.
3.![]() Download Cisco EPN Manager 2.0.3 (HA Deployment).
Download Cisco EPN Manager 2.0.3 (HA Deployment).
4.![]() Install Cisco EPN Manager 2.0.3 on Primary and Secondary Servers (HA Deployment).
Install Cisco EPN Manager 2.0.3 on Primary and Secondary Servers (HA Deployment).
5.![]() Synchronize the Hardware and NTP Clock.
Synchronize the Hardware and NTP Clock.
6.![]() Synchronize the Inventory of Optical Devices with the Database (Existing Deployments Only).
Synchronize the Inventory of Optical Devices with the Database (Existing Deployments Only).
Perform the Cisco EPN Manager 2.0.3 Prerequisite Tasks
Perform the steps in Perform the Cisco EPN Manager 2.0.3 Prerequisite Tasks. You should perform these tasks on both servers.
Remove the HA Configuration
- Make sure you have the password (authentication key) that was created when HA was enabled. You will need it to install the patch on the secondary server.
- (Existing deployments) Back up your data.
Step 1![]() Make sure you have performed the tasks in Perform the Cisco EPN Manager 2.0.3 Prerequisite Tasks.
Make sure you have performed the tasks in Perform the Cisco EPN Manager 2.0.3 Prerequisite Tasks.
Step 2![]() Log into the Cisco EPN Manager web GUI as a user with Administrator privileges.
Log into the Cisco EPN Manager web GUI as a user with Administrator privileges.
Step 3![]() From the left sidebar, choose Administration > Settings > High Availability.
From the left sidebar, choose Administration > Settings > High Availability.
Step 4![]() Click HA Configuration on the left.
Click HA Configuration on the left.
Step 6![]() When the remove operation completes, confirm that the Configuration Mode field displays HA Not Configured.
When the remove operation completes, confirm that the Configuration Mode field displays HA Not Configured.
Download Cisco EPN Manager 2.0.3 as described in Download Cisco EPN Manager 2.0.3 (HA Deployment).
Download Cisco EPN Manager 2.0.3 (HA Deployment)
- Make sure you have the password (authentication key) that was created when HA was enabled. You will need it to install the patch on the secondary server.
Step 1![]() Make sure you have removed the HA configuration as described in Remove the HA Configuration.
Make sure you have removed the HA configuration as described in Remove the HA Configuration.
Step 2![]() On the primary server, upload/download the Cisco EPN Manager 2.0.3 ubf file. Follow the procedure in Download Cisco EPN Manager 2.0.3 (No HA).
On the primary server, upload/download the Cisco EPN Manager 2.0.3 ubf file. Follow the procedure in Download Cisco EPN Manager 2.0.3 (No HA).
Step 3![]() Upload the Cisco EPN Manager 2.0.3 ubf file to the secondary server:
Upload the Cisco EPN Manager 2.0.3 ubf file to the secondary server:
a.![]() Log into the secondary server’s HM web page by entering the following URL in your browser:
Log into the secondary server’s HM web page by entering the following URL in your browser:
Where serverIP is the IP address or host name of the secondary server.
b.![]() Enter the authentication key and click Login.
Enter the authentication key and click Login.
c.![]() Click Software Update at the top right of the Health Monitor window to open the Secondary Server Software Update window.
Click Software Update at the top right of the Health Monitor window to open the Secondary Server Software Update window.
d.![]() Enter the authentication key and click Login.
Enter the authentication key and click Login.
e.![]() Click the Upload link under the window title, browse to the ubf file, and click OK.
Click the Upload link under the window title, browse to the ubf file, and click OK.
After the successful download or upload of Cisco EPN Manager 2.0.3, the software will appear under the Files tab.
Install Cisco EPN Manager 2.0.3 as described in Install Cisco EPN Manager 2.0.3 on Primary and Secondary Servers (HA Deployment).
Install Cisco EPN Manager 2.0.3 on Primary and Secondary Servers (HA Deployment)
- Make sure you have the password (authentication key) that was created when HA was enabled. You will need to install the maintenance pack on the secondary server.
- Make sure no backups are in progress.
Step 1![]() Verify that Cisco EPN Manager 2.0 Point Patch 2 is installed on the primary server.
Verify that Cisco EPN Manager 2.0 Point Patch 2 is installed on the primary server.
a.![]() Click the gear at the top right of the web GUI window (next to name of the current domain) and click About Cisco EPN Manager .
Click the gear at the top right of the web GUI window (next to name of the current domain) and click About Cisco EPN Manager .
b.![]() In the pop-up window, click View Installed Updates.
In the pop-up window, click View Installed Updates.
c.![]() Verify that EPN Manager Point Patch 2.0.0 is listed.
Verify that EPN Manager Point Patch 2.0.0 is listed.
If it is not listed, you must install it as described in the Cisco EPN Manager 2.0 Release Notes. It is a requirement for Cisco EPN Manager 2.0.3.
Step 2![]() Install Cisco EPN Manager 2.0.3 on the primary server as described in Install Cisco EPN Manager 2.0.3 (No HA). That section includes the steps for verifying the installation. After the installation, the primary server automatically restarts and the web GUI will not be accessible for some time.
Install Cisco EPN Manager 2.0.3 on the primary server as described in Install Cisco EPN Manager 2.0.3 (No HA). That section includes the steps for verifying the installation. After the installation, the primary server automatically restarts and the web GUI will not be accessible for some time.
Step 3![]() Verify that Cisco EPN Manager 2.0 Point Patch 2 is installed on the secondary server.
Verify that Cisco EPN Manager 2.0 Point Patch 2 is installed on the secondary server.
a.![]() Click the gear at the top right of the web GUI window (next to name of the current domain) and click About Cisco EPN Manager .
Click the gear at the top right of the web GUI window (next to name of the current domain) and click About Cisco EPN Manager .
b.![]() In the pop-up window, click View Installed Updates.
In the pop-up window, click View Installed Updates.
c.![]() Verify that EPN Manager Point Patch 2.0.0 is listed.
Verify that EPN Manager Point Patch 2.0.0 is listed.
If it is not listed, you must install it as described in the Cisco EPN Manager 2.0 Release Notes. It is a requirement for Cisco EPN Manager 2.0.3.
Step 4![]() Install Cisco EPN Manager 2.0.3 on the secondary server.
Install Cisco EPN Manager 2.0.3 on the secondary server.
a.![]() Log into the secondary server’s HM web page by entering the following URL in your browser:
Log into the secondary server’s HM web page by entering the following URL in your browser:
Where serverIP is the IP address or host name of the secondary server.
b.![]() Enter the authentication key and click Login.
Enter the authentication key and click Login.
c.![]() Click Software Update at the top right of the Health Monitor window to open the Secondary Server Software Update window.
Click Software Update at the top right of the Health Monitor window to open the Secondary Server Software Update window.
d.![]() Enter the authentication key and click Login.
Enter the authentication key and click Login.
e.![]() Click the Install button associated with EPN Manager Maintenance Pack 2.0.3 on the Software Update page.
Click the Install button associated with EPN Manager Maintenance Pack 2.0.3 on the Software Update page.
f.![]() Click Yes in the confirmation message pop-up window to proceed with the installation. On successful installation, the status will change to Installed and the primary server will restart automatically.
Click Yes in the confirmation message pop-up window to proceed with the installation. On successful installation, the status will change to Installed and the primary server will restart automatically.
Step 5![]() After the secondary server has restarted, verify the installation on the secondary server.
After the secondary server has restarted, verify the installation on the secondary server.
a.![]() Start an SSH session with the secondary server and log in as the Cisco EPN Manager CLI admin user.
Start an SSH session with the secondary server and log in as the Cisco EPN Manager CLI admin user.
b.![]() Run the ncs status command to ensure that all services are up and running.
Run the ncs status command to ensure that all services are up and running.
c.![]() Once the web GUI is accessible, verify the installation and version in the secondary server’s HM web page. Enter the following URL in your browser:
Once the web GUI is accessible, verify the installation and version in the secondary server’s HM web page. Enter the following URL in your browser:
Where serverIP is the IP address or host name of the secondary server.
–![]() Enter the authentication key and click Login.
Enter the authentication key and click Login.
–![]() Click Software Update at the top right of the Health Monitor window to open the Secondary Server Software Update window.
Click Software Update at the top right of the Health Monitor window to open the Secondary Server Software Update window.
–![]() Enter the authentication key and click Login.
Enter the authentication key and click Login.
–![]() Verify that EPN Manager Maintenance Pack 3.0.1 is listed.
Verify that EPN Manager Maintenance Pack 3.0.1 is listed.
Step 6![]() Synchronize the hardware and NTP clocks on both the primary and secondary servers as described in Synchronize the Hardware and NTP Clock.
Synchronize the hardware and NTP clocks on both the primary and secondary servers as described in Synchronize the Hardware and NTP Clock.
Step 7![]() On the primary server, enable high availability and verify that the primary server’s HA status is Primary Active.
On the primary server, enable high availability and verify that the primary server’s HA status is Primary Active.
–![]() Log into the Cisco EPN Manager web GUI as a user with Administrator privileges.
Log into the Cisco EPN Manager web GUI as a user with Administrator privileges.
–![]() From the left sidebar menu, choose Administration > Settings > High Availability.
From the left sidebar menu, choose Administration > Settings > High Availability.
–![]() Click HA Configuration on the left, then enter the secondary server’s IP address, the secondary server’s authentication key, and an email address to which Cisco EPN Manager should send HA state change notifications.
Click HA Configuration on the left, then enter the secondary server’s IP address, the secondary server’s authentication key, and an email address to which Cisco EPN Manager should send HA state change notifications.
–![]() Click Save, then wait until the servers are synchronized.
Click Save, then wait until the servers are synchronized.
–![]() Verify that the Configuration Mode is HA Enabled.
Verify that the Configuration Mode is HA Enabled.
b.![]() Verify the primary server’s HA status.
Verify the primary server’s HA status.
–![]() Click HA Status on the left.
Click HA Status on the left.
–![]() Check that the Current State Mode displays Primary Active.
Check that the Current State Mode displays Primary Active.
Step 8![]() Verify that the secondary server’s HA status is Secondary Syncing.
Verify that the secondary server’s HA status is Secondary Syncing.
a.![]() Log into the secondary server’s HM web page by entering the following URL in your browser:
Log into the secondary server’s HM web page by entering the following URL in your browser:
Where serverIP is the IP address or host name of the secondary server.
b.![]() Enter the authentication key and click Login.
Enter the authentication key and click Login.
c.![]() Verify that the Current State Mode is Secondary Syncing (with a green check mark).
Verify that the Current State Mode is Secondary Syncing (with a green check mark).
Install GeoMap Resources for Offline Use
Use the Geo Maps feature to position your network devices on a world map and monitor them within their geographical context. There are two ways to import map images:
- Online mode (internet connectivity)—Import maps from the map provider's web site
- Offline mode (no internet connectivity)—Use locally-installed map resources
These topics explain how to download and install Geo Maps for offline use.
Note![]() Geo Map compressed files are very large. We recommend you save the files to a remote repository.
Geo Map compressed files are very large. We recommend you save the files to a remote repository.
Workflow for Installing Geo Map Resources for Offline Use
1.![]() Download and Copy the Geo Maps Resources to the Cisco EPN Manager Server.
Download and Copy the Geo Maps Resources to the Cisco EPN Manager Server.
2.![]() Install the Geo Maps Resources on the Cisco EPN Manager Server.
Install the Geo Maps Resources on the Cisco EPN Manager Server.
3.![]() Configure the Cisco EPN Manager Server to Use the Installed Map Resources.
Configure the Cisco EPN Manager Server to Use the Installed Map Resources.
Download and Copy the Geo Maps Resources to the Cisco EPN Manager Server
- If you plan to use a remote repository (because Geo Map files are very large), make sure a remote repository has been configured. For more information, refer to the topics on using remote FTP backup repositories in the Cisco Evolved Programmable Network Manager User and Administrator Guide.
- Make sure SCP is enabled on your client machine and the required ports are open (refer to the Cisco EPN Manager 2.0 Installation Guide).
This procedure shows you how to download and copy the GeoMaps resources to the default local repository on the Cisco EPN Manager server.
Step 1![]() Download the Geo Maps compressed files to a client machine.
Download the Geo Maps compressed files to a client machine.
a.![]() Go to the Software Download site on Cisco.com.
Go to the Software Download site on Cisco.com.
b.![]() Navigate to the files by choosing All Releases > 2.0 >2.0.1.
Navigate to the files by choosing All Releases > 2.0 >2.0.1.
c.![]() Identify the Geo Map you want to download and click Download.
Identify the Geo Map you want to download and click Download.
d.![]() Follow the instructions to save the file to the client machine.
Follow the instructions to save the file to the client machine.
Step 2![]() Copy the Geo Maps compressed files from the local machine to the Cisco EPN Manager server’s default local repository (/localdisk/defaultRepo).
Copy the Geo Maps compressed files from the local machine to the Cisco EPN Manager server’s default local repository (/localdisk/defaultRepo).
a.![]() Start an SSH session with the secondary server and log in as the Cisco EPN Manager CLI admin user.
Start an SSH session with the secondary server and log in as the Cisco EPN Manager CLI admin user.
b.![]() Log in as the Linux CLI admin user (as described in Log In and Out as the Linux CLI Users).
Log in as the Linux CLI admin user (as described in Log In and Out as the Linux CLI Users).
c.![]() From the Cisco EPN Manager server, retrieve each file from the client machine and copy it to the server. (As the Linux CLI admin user, you can optionally use FTP or SFTP.) The scp command uses the following syntax:
From the Cisco EPN Manager server, retrieve each file from the client machine and copy it to the server. (As the Linux CLI admin user, you can optionally use FTP or SFTP.) The scp command uses the following syntax:
scp clientUsername @ clientIP :/ fullpath-to-tarfile /localdisk/defaultRepo
–![]() clientUsername is your username on the client machine
clientUsername is your username on the client machine
–![]() clientIP is the IP address of the client machine to which you downloaded the files in Step 1
clientIP is the IP address of the client machine to which you downloaded the files in Step 1
–![]() fullpath-to-tarfile is the full pathname of the Geo Maps compressed file on the client machine
fullpath-to-tarfile is the full pathname of the Geo Maps compressed file on the client machine
scp joesmith@123.456.789.101:/temp/Russia_GeoMap_CEPNM_2_0_1-bundle.tar.gz /localdisk/defaultRepo
Install the Geo Maps as described in Install the Geo Maps Resources on the Cisco EPN Manager Server.
Install the Geo Maps Resources on the Cisco EPN Manager Server
The installation process will extract the Geo Maps files and install them in /opt/CSCOlumos/resources/offline_geo. To avoid storage constraints, consider mounting additional storage on the directory (by editing /etc/fstab). If you have high availability and need to mount additional storage, be sure to edit the /etc/fstab file on both the primary and secondary servers.
Step 1![]() Start an SSH session with the Cisco EPN Manager server and log in as the Cisco EPN Manager CLI admin user.
Start an SSH session with the Cisco EPN Manager server and log in as the Cisco EPN Manager CLI admin user.
Step 2![]() Install the GeoMaps resource file that is located in /localdisk/defaultRepo.
Install the GeoMaps resource file that is located in /localdisk/defaultRepo.
application install filename defaultRepo
Where filename is the GeoMaps resource file located in /localdisk/defaultRepo (this is the file you copied in Download and Copy the Geo Maps Resources to the Cisco EPN Manager Server). For example:
application install Russia_GeoMap_CEPNM_2_0_1-bundle.tar.gz defaultRepo
Save the current ADE-OS running configuration? (yes/no) [yes] ? yes
 Please ensure you have a backup of the system before proceeding.
 Proceed with the application install ? (yes/no) [yes] ? yes
The installation takes a few minutes to complete depending on the size of the map resources.
Step 3![]() Verify that the maps were installed successfully by confirming that a directory named geoMaps was created under /opt/CSCOlumos/resources/offline_geo:
Verify that the maps were installed successfully by confirming that a directory named geoMaps was created under /opt/CSCOlumos/resources/offline_geo:
ls /opt/CSCOlumos/resources/offline_geo
geoMaps
Step 4![]() Restart Cisco EPN Manager.
Restart Cisco EPN Manager.
Step 5![]() Instruct your users to clear their browser caches.
Instruct your users to clear their browser caches.
Step 6![]() (High availability deployments) Repeat this procedure on the other server.
(High availability deployments) Repeat this procedure on the other server.
Configure Cisco EPN Manager to use the new Geo Maps as described in Configure the Cisco EPN Manager Server to Use the Installed Map Resources.
Configure the Cisco EPN Manager Server to Use the Installed Map Resources
Step 1![]() Choose Administration > Settings > System Settings, then choose Maps > Network Topology.
Choose Administration > Settings > System Settings, then choose Maps > Network Topology.
Step 3![]() Choose Installed Map Resources from the Map Provider drop-down list.
Choose Installed Map Resources from the Map Provider drop-down list.
You do not have to restart the Cisco EPN Manager server to apply your changes.
Related Documentation
Refer to the Cisco Evolved Programmable Network Manager 2.0 Documentation Overview for information about and links to all of the documentation that is provided with Cisco EPN Manager 2.0 and its maintenance packs.
Note![]() We sometimes update the documentation after original publication. Therefore, you should also review the documentation on Cisco.com for any updates.
We sometimes update the documentation after original publication. Therefore, you should also review the documentation on Cisco.com for any updates.
Obtaining Documentation and Submitting a Service Request
For information on obtaining documentation, submitting a service request, and gathering additional information, see the monthly What’s New in Cisco Product Documentation, which also lists all new and revised Cisco technical documentation, at:
http://www.cisco.com/en/US/docs/general/whatsnew/whatsnew.html
Subscribe to What’s New in Cisco Product Documentation, which lists all new and revised Cisco technical documentation, as an RSS feed and deliver content directly to your desktop using a reader application. The RSS feeds are a free service.
This document is to be used in conjunction with the documents listed in the “Related Documentation” section.
Cisco and the Cisco logo are trademarks or registered trademarks of Cisco and/or its affiliates in the U.S. and other countries. To view a list of Cisco trademarks, go to this URL: www.cisco.com/go/trademarks. Third-party trademarks mentioned are the property of their respective owners. The use of the word partner does not imply a partnership relationship between Cisco and any other company. (1110R)
Any Internet Protocol (IP) addresses and phone numbers used in this document are not intended to be actual addresses and phone numbers. Any examples, command display output, network topology diagrams, and other figures included in the document are shown for illustrative purposes only. Any use of actual IP addresses or phone numbers in illustrative content is unintentional and coincidental.
 Feedback
Contact Cisco
- Open a Support Case

- (Requires a Cisco Service Contract)