- Preface
- Introducing Cisco Network Services Manager
- Understanding Network Services Manager Concepts
- Using the Network Services Manager Northbound API
- Working with Tenants and Network Containers Using the Northbound API
- Using the Network Services Manager UI
- Monitoring Network Status
- Troubleshooting
- Northbound API Parameters
- Glossary
- Index
Cisco Network Services Manager User Guide, 5.0
Bias-Free Language
The documentation set for this product strives to use bias-free language. For the purposes of this documentation set, bias-free is defined as language that does not imply discrimination based on age, disability, gender, racial identity, ethnic identity, sexual orientation, socioeconomic status, and intersectionality. Exceptions may be present in the documentation due to language that is hardcoded in the user interfaces of the product software, language used based on RFP documentation, or language that is used by a referenced third-party product. Learn more about how Cisco is using Inclusive Language.
- Updated:
- November 13, 2012
Chapter: Working with Tenants and Network Containers Using the Northbound API
Working with Tenants Using the NB API
This chapter describes how to manage tenants and network containers using the Network Services Manager NB API:
•![]() Getting Started with a REST Client
Getting Started with a REST Client
•![]() Creating Tenant Network Containers
Creating Tenant Network Containers
•![]() Creating Network Containers for Zones, VLANs, and Remote Access
Creating Network Containers for Zones, VLANs, and Remote Access
•![]() Updating Tenants and Network Containers
Updating Tenants and Network Containers
•![]() Identifying Service Offerings
Identifying Service Offerings
NB API Resources
Table 4-1 identifies the REST resources that are available via the NB API, along with a brief description, restrictions, and the supported REST operations.
Each resource has a name, description, and various configuration settings (parameters). For information on the parameters that can be used when working with metamodels, see Northbound API Parameters.
Getting Started with a REST Client

Note ![]() The procedures in this guide use Firefox Mozilla with the RESTClient tool.
The procedures in this guide use Firefox Mozilla with the RESTClient tool.
To get started with a REST client:
Step 1 ![]() In your browser, choose Tools > REST Client.
In your browser, choose Tools > REST Client.
Step 2 ![]() From the Method drop-down list, choose GET.
From the Method drop-down list, choose GET.
Step 3 ![]() In the location field, enter:
In the location field, enter:
https://hostname:8443/NetworkServicesManagerAPI/v1/
where hostname is the name of the Network Services Manager engine.
Step 4 ![]() Click Add Request Header and add the following headers:
Click Add Request Header and add the following headers:
|
|
|
|---|---|
accept |
application/xml |
content-type |
application/xml |
Step 5 ![]() Click Send.
Click Send.
Step 6 ![]() When you receive a response, click the Formatted XML tab.
When you receive a response, click the Formatted XML tab.
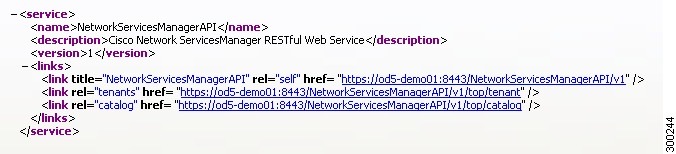
The available links for working with the NB API via a REST client are listed, as shown in Figure 4-1.
After you log in and set the request headers, you are ready to continue with the other procedures in this chapter.
XML Example
Figure 4-1 shows an example of top-level links using a REST client.
Figure 4-1 Top-Level Links
Creating Tenants
As described in Tenants and Network Containers, a tenant is a domain that contains business model objects that set up and manipulate one or more logical network containers.
You can create tenants and network containers using a REST client with a browser and then import these new items into Network Services Manager using the NB API. Any tenants and network containers that you create using the NB API are automatically displayed in the Administration UI.
This procedure requires you to specify one public address pool and one private address pool.
To create a tenant using a REST client:
Step 1 ![]() In your browser, choose Tools > REST Client.
In your browser, choose Tools > REST Client.
Step 2 ![]() In the REST client:
In the REST client:
a. ![]() From the Method drop-down list, choose GET.
From the Method drop-down list, choose GET.
b. ![]() Enter the following location:
Enter the following location:
https://hostname:8443/NetworkServicesManagerAPI/v1/top/catalog
where hostname is the name of the Network Services Manager engine.
c. ![]() Click Send.
Click Send.
Step 3 ![]() In the response pane, click Formatted XML to view the available tenant service offerings and their UIDs. (See Figure 4-2.)
In the response pane, click Formatted XML to view the available tenant service offerings and their UIDs. (See Figure 4-2.)
Step 4 ![]() Note the UID of the required tenant service offering (two are highlighted in Figure 4-2). You need this information to create the tenant.
Note the UID of the required tenant service offering (two are highlighted in Figure 4-2). You need this information to create the tenant.

Tip ![]() You can copy and paste the UID from the Response Body tab when needed.
You can copy and paste the UID from the Response Body tab when needed.
Step 5 ![]() In the Formatted XML tab, locate the type of tenant you want to create and its create hyperlink.
In the Formatted XML tab, locate the type of tenant you want to create and its create hyperlink.
Step 6 ![]() Click the create hyperlink (see Figure 4-3) to enter it in the REST request field.
Click the create hyperlink (see Figure 4-3) to enter it in the REST request field.
Step 7 ![]() Make sure that the content-type and application request headers exist, each with the value application/xml.
Make sure that the content-type and application request headers exist, each with the value application/xml.
Step 8 ![]() In the Method field, choose POST.
In the Method field, choose POST.
Step 9 ![]() In the Request Body field, enter the following information:
In the Request Body field, enter the following information:
<serviceOffering xmlns:xsi="http://www.w3.org/2001/XMLSchema-instance"
xmlns="http://www.cisco.com/NetworkServicesManager">
<uid>service-uid</uid>
<name>service-name</name>
<description>service-description</description>
<parameters>
<parameter>
<name>public.address.subnet</name>
<type>subnet</type>
<subnet>
<ipv4>ipv4-address</ipv4>
<mask>pool-mask</mask>
</subnet>
</parameter>
<parameter>
<name>private.address.subnet</name>
<type>subnet</type>
<subnet>
<ipv4>ipv4-address</ipv4>
<mask>pool-mask</mask>
</subnet>
</parameter>
</parameters>
</serviceOffering>
where:
•![]() service-uid is the UID of the tenant service offering. (See Step 4.)
service-uid is the UID of the tenant service offering. (See Step 4.)
•![]() service-name is the name you want to give the new tenant.
service-name is the name you want to give the new tenant.
We recommend that you name the tenant something that is meaningful and quickly decipherable, such as Boston or Boston State Street Branch.
•![]() service-description is a comment about the new tenant. Descriptions are limited to 250 characters.
service-description is a comment about the new tenant. Descriptions are limited to 250 characters.
•![]() ipv4-address is an IPv4 address in dotted decimal format, such as 192.0.2.1.
ipv4-address is an IPv4 address in dotted decimal format, such as 192.0.2.1.
•![]() pool-mask is the mask applied to the IPv4 address to indicate the size of the address pool, such as 24.
pool-mask is the mask applied to the IPv4 address to indicate the size of the address pool, such as 24.
Step 10 ![]() Click Send.
Click Send.
The response pane displays the request with a hyperlink to the create task itself, and the task status: pending, failure, in progress, or success. (See Figure 4-4.)
Step 11 ![]() If the request is in pending state, view an updated status by clicking the self hyperlink, changing the method to GET, and clicking Send.
If the request is in pending state, view an updated status by clicking the self hyperlink, changing the method to GET, and clicking Send.
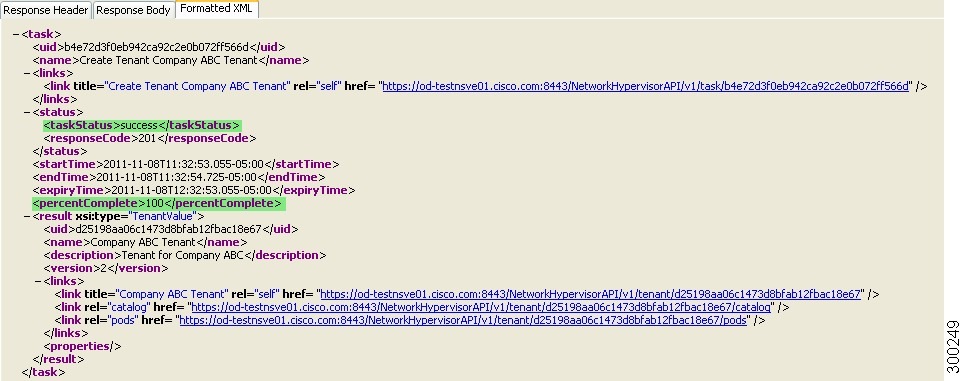
If the creation task is successful, information similar to that in Figure 4-5 is displayed.
If the request reports a failure status, additional information is provided in the response pane so that you can address the failure.
For more information on task status, see Status Codes and Error Handling.
Step 12 ![]() After you receive a success status, you can confirm that the tenant is created by either of the following methods:
After you receive a success status, you can confirm that the tenant is created by either of the following methods:
•![]() In the REST client:
In the REST client:
a. Change the method to GET.
b. Enter the following in the request field:
https://hostname:8443/NetworkServicesManagerAPI/v1/top/tenant
where hostname is the name of the Network Services Manager engine.
c. Click Send. The response includes the newly created tenant.
•![]() Log into the Network Services Manager Administration UI and view the tenants. The Domain Navigator includes the newly created tenant.
Log into the Network Services Manager Administration UI and view the tenants. The Domain Navigator includes the newly created tenant.
XML Examples
The following figures show examples of XML responses and selections when using a REST client to create a tenant.
Figure 4-2 Tenant Service Offerings and UIDs
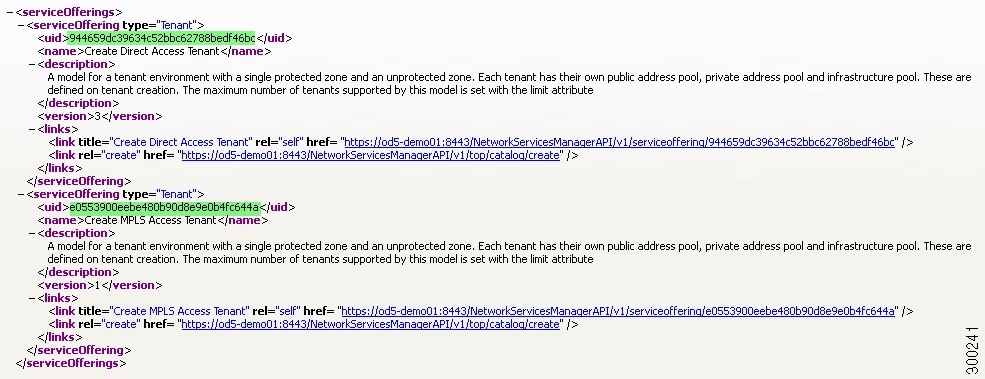
Figure 4-3 Tenant Create Hyperlink

Figure 4-4 Example Task Status
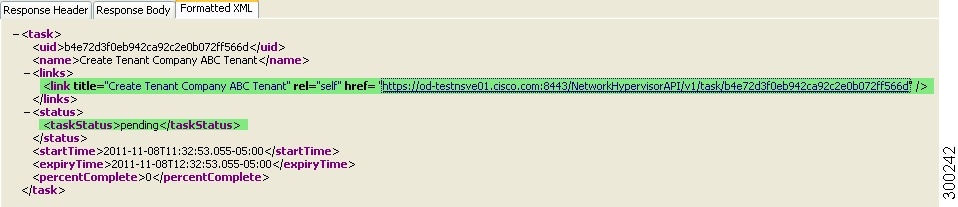
Figure 4-5 Example Successful Task
Creating Tenant Network Containers
After you create a tenant, you need to create a tenant network container to identify the device stack and IP address pools for the tenant to use.
This procedure requires UIDs for the following (all of which are available by using a REST client as described in this procedure):
•![]() Tenant
Tenant
•![]() Tenant network container
Tenant network container
•![]() Device stack to be used by the tenant network container
Device stack to be used by the tenant network container
To create a tenant network container using a REST client:
Step 1 ![]() Obtain the tenant UID:
Obtain the tenant UID:
a. ![]() From the Method drop-down list, choose GET.
From the Method drop-down list, choose GET.
b. ![]() Enter the following location in the request field:
Enter the following location in the request field:
https://hostname:8443/NetworkServicesManagerAPI/v1/top/tenant
where hostname is the name of the Network Services Manager engine.
c. ![]() Click Send.
Click Send.
d. ![]() In the response, locate the required tenant, and note the UID.
In the response, locate the required tenant, and note the UID.
Step 2 ![]() Obtain the device stack UID:
Obtain the device stack UID:
a. ![]() From the Method drop-down list, choose GET.
From the Method drop-down list, choose GET.
b. ![]() Enter the following location:
Enter the following location:
https://hostname:8443/NetworkServicesManagerAPI/v1/tenant/tenant-uid/pods
where:
–![]() hostname is the name of the Network Services Manager engine.
hostname is the name of the Network Services Manager engine.
–![]() tenant-uid is the tenant UID from Step 1.
tenant-uid is the tenant UID from Step 1.
c. ![]() Click Send.
Click Send.
d. ![]() In the response, locate the required device stack (pod), and note the UID.
In the response, locate the required device stack (pod), and note the UID.
Step 3 ![]() Obtain the tenant network container UID:
Obtain the tenant network container UID:
a. ![]() From the Method field, choose GET.
From the Method field, choose GET.
b. ![]() Enter the following location:
Enter the following location:
https://hostname:8443/NetworkServicesManagerAPI/v1/tenant/tenant-uid/catalog
where:
–![]() hostname is the name of the Network Services Manager engine.
hostname is the name of the Network Services Manager engine.
–![]() tenant-uid is the tenant UID.
tenant-uid is the tenant UID.
c. ![]() Click Send.
Click Send.
d. ![]() In the response, locate the required tenant network container and note the UID.
In the response, locate the required tenant network container and note the UID.
Step 4 ![]() Click the create link for the required tenant network container and choose POST from the Method drop-down list.
Click the create link for the required tenant network container and choose POST from the Method drop-down list.
Step 5 ![]() In the Request Body field, enter the following information:
In the Request Body field, enter the following information:
<serviceOffering xmlns:xsi="http://www.w3.org/2001/XMLSchema-instance"
xmlns="http://www.cisco.com/NetworkServicesManager">
<uid>tnc-uid</uid>
<name>tnc-name</name>
<description>tnc-description</description>
<parameters>
<parameter>
<name>tnc.pod</name>
<type>uid</type>
<uid>pod-uid</uid>
</parameter>
</parameters>
</serviceOffering>
where:
•![]() tnc-uid is the UID of the tenant network container, available in Step 3.
tnc-uid is the UID of the tenant network container, available in Step 3.
•![]() tnc-name is the name of the tenant network container.
tnc-name is the name of the tenant network container.
•![]() tnc-description is a description of the tenant network container. Descriptions can contain up to 250 characters.
tnc-description is a description of the tenant network container. Descriptions can contain up to 250 characters.
•![]() pod-uid is the UID of the device stack, available from Step 2.
pod-uid is the UID of the device stack, available from Step 2.
Step 6 ![]() Click Send.
Click Send.
Step 7 ![]() If the response displays the status "pending," click the self link, change the method to GET, and click Send.
If the response displays the status "pending," click the self link, change the method to GET, and click Send.
A successful response indicates that the tenant network container was created and contains links to the following:
•![]() Newly created tenant network container.
Newly created tenant network container.
•![]() Service offerings for the tenant network container.
Service offerings for the tenant network container.
•![]() Parent of the tenant network container. In this example, the parent is the tenant.
Parent of the tenant network container. In this example, the parent is the tenant.
XML Example
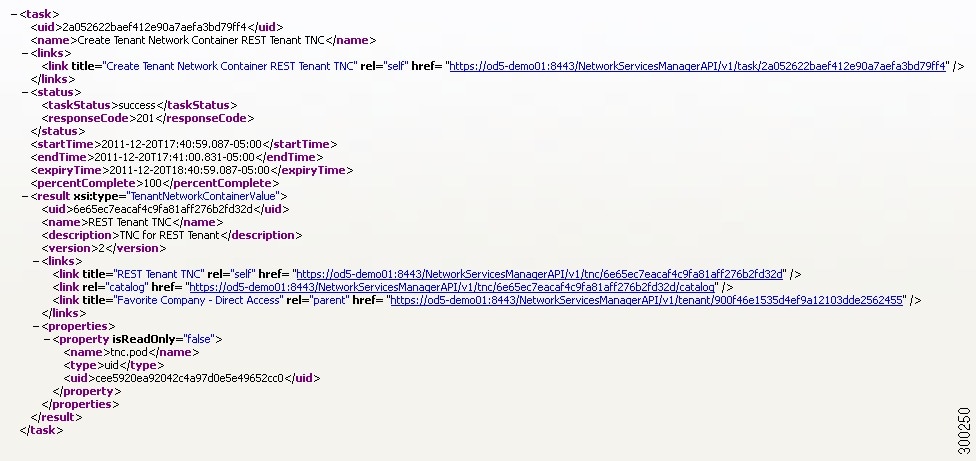
Figure 4-6 shows an example of a successfully created tenant network container.
Figure 4-6 Successfully Created Tenant Network Container
Creating Network Containers for Zones, VLANs, and Remote Access
Network containers are created inside tenant network containers, and can contain zones, VLANs, and ENCs.
Note ![]() Before you create a container that is subordinate to a tenant, confirm that the controller has a configured device stack and functioning connections to the engine and all devices in the stack.
Before you create a container that is subordinate to a tenant, confirm that the controller has a configured device stack and functioning connections to the engine and all devices in the stack.
The following topics describe how to create zone network containers, and other network containers within them:
•![]() Creating Zone Network Containers
Creating Zone Network Containers
•![]() Creating VLAN Network Containers
Creating VLAN Network Containers
•![]() Creating ENC Network Containers
Creating ENC Network Containers
Creating Zone Network Containers
Zone network containers enable you to share or limit access to a tenant and its resources. For example, you might want to create a private and protected zone network container to limit access to sensitive information, and an unprotected zone network container to allow access to the internet. A single tenant network container can contain multiple zone network containers, enabling you to provide the levels of security that you need for your environment.
Zone security options include:
To create a zone network container in an existing tenant network container:
Step 1 ![]() From the Method drop-down list, choose GET.
From the Method drop-down list, choose GET.
Step 2 ![]() Enter the following location:
Enter the following location:
https://hostname:8443/NetworkServicesManagerAPI/v1/tnc/tnc-uid/catalog
where:
•![]() hostname is the name of the Network Services Manager engine.
hostname is the name of the Network Services Manager engine.
•![]() tnc-uid is the UID of the tenant network container.
tnc-uid is the UID of the tenant network container.
Step 3 ![]() Click Send. The response lists the available types of zone network containers.
Click Send. The response lists the available types of zone network containers.
Step 4 ![]() In the response, click the create link for the required zone network container.
In the response, click the create link for the required zone network container.
Step 5 ![]() In the request body field, enter the following information:
In the request body field, enter the following information:
<serviceOffering xmlns:xsi="http://www.w3.org/2001/XMLSchema-instance"
xmlns="http://www.cisco.com/NetworkServicesManager">
<uid>zone-nc-uid</uid>
<name>zone-nc-name</name>
<description>zone-nc-description</description>
<parameters/>
</serviceOffering>
where:
•![]() zone-nc-uid is the UID of the required network container.
zone-nc-uid is the UID of the required network container.
•![]() zone-nc-name is the name to assign to the network container.
zone-nc-name is the name to assign to the network container.
•![]() zone-nc-description is a description of the network container. Descriptions can contain up to 250 characters.
zone-nc-description is a description of the network container. Descriptions can contain up to 250 characters.
Step 6 ![]() From the Method drop-down list, choose POST.
From the Method drop-down list, choose POST.
Step 7 ![]() Click Send.
Click Send.
Step 8 ![]() If the response displays a pending status, click the self link, change the request method to GET, and click Send.
If the response displays a pending status, click the self link, change the request method to GET, and click Send.
A successful response indicates that the tenant network container was created and contains links to the following:
•![]() Newly created network container.
Newly created network container.
•![]() Service offerings for the network container.
Service offerings for the network container.
•![]() Parent of the network container. In this case, the parent is the tenant network container.
Parent of the network container. In this case, the parent is the tenant network container.
Creating VLAN Network Containers
After you create a zone network container, you are ready to create one or more VLAN network containers so that users and machines can access resources as specified in the network access policies.
Network Services Manager offers the following types of VLAN network containers:
A zone network container often contains only one VLAN.
To create a VLAN network container:
Step 1 ![]() From the Method drop-down list, choose GET.
From the Method drop-down list, choose GET.
Step 2 ![]() Enter the following location:
Enter the following location:
https://hostname.cisco.com:8443/NetworkServicesManagerAPI/v1/nc/zone-nc-uid/catalog
where:
•![]() hostname is the name of the Network Services Manager engine.
hostname is the name of the Network Services Manager engine.
•![]() zone-nc-uid is the UID of the zone network container.
zone-nc-uid is the UID of the zone network container.
Step 3 ![]() Click Send.
Click Send.
The response lists the available service offerings for the specified zone network container.
Step 4 ![]() In the response, click the create link for the required VLAN network container.
In the response, click the create link for the required VLAN network container.
Step 5 ![]() In the request body field, enter the required information for the VLAN:
In the request body field, enter the required information for the VLAN:
•![]() For a Layer 3 public or private routed VLAN, enter the mask.
For a Layer 3 public or private routed VLAN, enter the mask.
•![]() For a Layer 2 unrouted VLAN, you do not need to provide any information.
For a Layer 2 unrouted VLAN, you do not need to provide any information.
The following example is for a Layer 3 routed VLAN:
<serviceOffering xmlns:xsi="http://www.w3.org/2001/XMLSchema-instance"
xmlns="http://www.cisco.com/NetworkServicesManager">
<uid>vlan-uid</uid>
<name>vlan-name</name>
<description>vlan-description</description>
<parameters>
<parameter>
<name>l3.vlan.size</name>
<type>integer</type>
<integer>mask</integer>
</parameter>
</parameters>
</serviceOffering>
where:
•![]() vlan-uid is the UID of the type of VLAN that you are creating.
vlan-uid is the UID of the type of VLAN that you are creating.
•![]() vlan-name is the VLAN name.
vlan-name is the VLAN name.
•![]() vlan-description is a brief description of the VLAN. Descriptions can contain up to 250 characters.
vlan-description is a brief description of the VLAN. Descriptions can contain up to 250 characters.
•![]() mask is the VLAN size, such as 24.
mask is the VLAN size, such as 24.
Step 6 ![]() From the Method drop-down list, choose POST.
From the Method drop-down list, choose POST.
Step 7 ![]() Click Send.
Click Send.
Step 8 ![]() If the response displays a pending status, click the self link, change the request method to GET, and click Send.
If the response displays a pending status, click the self link, change the request method to GET, and click Send.
A successful response indicates that the VLAN network container was created and contains links to the following:
•![]() Newly created VLAN network container.
Newly created VLAN network container.
•![]() Service offerings for the VLAN network container.
Service offerings for the VLAN network container.
•![]() Parent of the network container. In this case, the parent is the zone network container.
Parent of the network container. In this case, the parent is the zone network container.
Creating ENC Network Containers
If you need to allow remote access to a zone, you can do so by creating an ENC network container in the zone network container. An ENC network container allows remote access to the zone via either MPLS or a direct connection. ENCs are available for private or public unprotected zones; that is, zones that do not have a firewall.
Because a tenant needs only one ENC network container to allow remote access, you can create only one.
To create an ENC network container:
Step 1 ![]() From the Method drop-down list, choose GET.
From the Method drop-down list, choose GET.
Step 2 ![]() Enter the following location:
Enter the following location:
https://hostname.cisco.com:8443/NetworkServicesManagerAPI/v1/nc/zone-nc-uid/catalog
where:
•![]() hostname is the name of the Network Services Manager engine.
hostname is the name of the Network Services Manager engine.
•![]() zone-nc-uid is the UID of the zone network container.
zone-nc-uid is the UID of the zone network container.
Step 3 ![]() Click Send.
Click Send.
The response lists the available service offerings for the specified zone network container.
Step 4 ![]() In the response, click the create link for an ENC network container.
In the response, click the create link for an ENC network container.
Step 5 ![]() In the request body field, enter the following information:
In the request body field, enter the following information:
<serviceOffering xmlns:xsi="http://www.w3.org/2001/XMLSchema-instance"
xmlns="http://www.cisco.com/NetworkServicesManager">
<uid>enc-uid</uid>
<name>enc-name</name>
<description>enc-description</description>
<parameters/>
</serviceOffering>
where:
•![]() enc-uid is the UID of the required ENC.
enc-uid is the UID of the required ENC.
•![]() enc-name is the name of the ENC.
enc-name is the name of the ENC.
•![]() enc-description is a description of the ENC. Descriptions can contain up to 250 characters.
enc-description is a description of the ENC. Descriptions can contain up to 250 characters.
Step 6 ![]() From the Method drop-down list, choose POST.
From the Method drop-down list, choose POST.
Step 7 ![]() Click Send.
Click Send.
Step 8 ![]() If the response displays a pending status, click the self link, change the request method to GET, and click Send.
If the response displays a pending status, click the self link, change the request method to GET, and click Send.
A successful response indicates that the ENC was created and contains links to the following:
•![]() Newly created ENC.
Newly created ENC.
•![]() Service offerings for the ENC.
Service offerings for the ENC.
•![]() Parent of the network container. In this case, the parent is the zone network container.
Parent of the network container. In this case, the parent is the zone network container.
Updating Tenants and Network Containers
You can update or modify an existing tenant or network container via the NB API by using the REST PUT method. The procedure is the same, regardless of the object you update.
The Request Body content uses the following structure:
<service-offering xmlns:xsi="http://www.w3.org/2001/XMLSchema-instance"
xmlns="http://www.cisco.com/NetworkServicesManager">
<uid>uid</uid>
<name>name</name>
<description>description</description>
<version>version</version>
<parameters>
<parameter>
<name>parameter-name</name>
<type>datatype</type>
<subnet>
<ipv4>value</ipv4>
<mask>value</mask>
</subnet>
</parameter>
<parameter>
<name>parameter-name</name>
<type>datatype</type>
<subnet>
<ipv4>value</ipv4>
<mask>value</mask>
</subnet>
</parameter>
</parameters>
</service-offering>
where:
•![]() service-offering is the type of service you are updating. Service names include:
service-offering is the type of service you are updating. Service names include:
–![]() tenant
tenant
–![]() tenantNetworkContainer
tenantNetworkContainer
–![]() networkContainer
networkContainer
–![]() externalNetworkConnection
externalNetworkConnection
•![]() uid is the UID of the object you are updating.
uid is the UID of the object you are updating.
•![]() name is the name assigned to this instance.
name is the name assigned to this instance.
•![]() description is the description for this instance. Descriptions can contain up to 250 characters.
description is the description for this instance. Descriptions can contain up to 250 characters.
•![]() version is the current version of this object. You can obtain the current version number by clicking the self link for the object you are updating.
version is the current version of this object. You can obtain the current version number by clicking the self link for the object you are updating.
•![]() parameter-name is the name of the parameter, such as public.address.subnet.
parameter-name is the name of the parameter, such as public.address.subnet.
•![]() datatype is the datatype for this parameter, such as subnet or integer.
datatype is the datatype for this parameter, such as subnet or integer.
•![]() value is the value assigned to this parameter.
value is the value assigned to this parameter.
For information on the specific parameters required, see:
•![]() Creating Tenant Network Containers
Creating Tenant Network Containers
•![]() Creating Network Containers for Zones, VLANs, and Remote Access
Creating Network Containers for Zones, VLANs, and Remote Access
To update an item via the NB API using a REST client:
Step 1 ![]() In the REST client, navigate to the required object. For example:
In the REST client, navigate to the required object. For example:
a. ![]() Set the request method to GET.
Set the request method to GET.
b. ![]() In the location field, enter the required location, such as:
In the location field, enter the required location, such as:
https://hostname:8443/NetworkServicesManagerAPI/v1/top/tenant
where hostname is the name of the Network Services Manager engine.
c. ![]() Click the appropriate child link and click Send.
Click the appropriate child link and click Send.
d. ![]() Continue navigating through the child links until the object you want is listed.
Continue navigating through the child links until the object you want is listed.
Step 2 ![]() Click the self link of the required object (see Figure 4-7).
Click the self link of the required object (see Figure 4-7).
Step 3 ![]() In the Request Body field, enter the updated information for the selected object.
In the Request Body field, enter the updated information for the selected object.
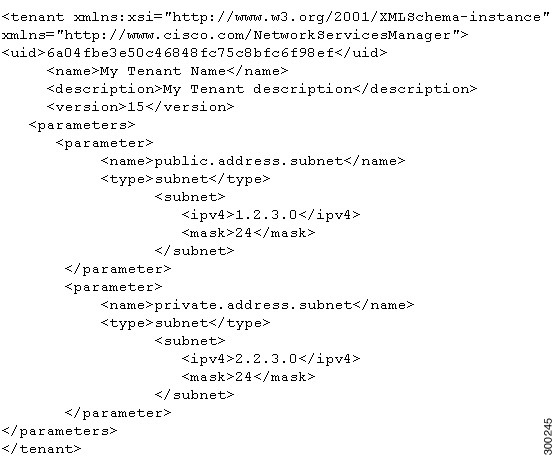
Figure 4-8 shows an example for updating a tenant.
Step 4 ![]() Change the request method to PUT.
Change the request method to PUT.
Step 5 ![]() Click Send.
Click Send.
Step 6 ![]() If the response displays a pending status, click the self link, choose the GET method, and click Send.
If the response displays a pending status, click the self link, choose the GET method, and click Send.
A successful response indicates that the item was updated as requested, and the version number is incremented.
XML Examples
The following figures show examples of updating a tenant using a REST client.
Figure 4-7 Object Self Link

Figure 4-8 Request Body Example for Updating a Tenant
Identifying Created Objects
At times, you might find it useful to identify created objects. For example, you might want to view a list of all created tenants, or view the details of a specific tenant.
To identify created objects using a REST client, choose the GET request method, enter the appropriate URL (see Table 4-2), and click Send.
Identifying Service Offerings
When creating new objects, you might find it useful to identify the available service offerings. For example, you might want to view the available types of tenants or network containers.
To view available service offerings using a REST client, choose the GET request method and the appropriate URL (see Table 4-3), and click Send.
|
|
|
|---|---|
Service offering details |
https://hostname:8443/NetworkServicesManagerAPI/v1/serviceoffering/offering-uid1 |
Top level offerings |
https://hostname:8443/NetworkServicesManagerAPI/v1/ |
Tenant types |
https://hostname:8443/NetworkServicesManagerAPI/ |
Tenants |
https://hostname:8443/NetworkServicesManagerAPI/v1/tenant/tenant-uid/ |
Tenant network containers |
https://hostname:8443/NetworkServicesManagerAPI/v1/tnc/tnc-uid/ |
Network containers |
https://hostname:8443/NetworkServicesManagerAPI/v1/nc/nc-uid/ |
ENCs |
https://hostname:8443/NetworkServicesManagerAPI/v1/enc/enc-uid/ |
Pods |
https://hostname:8443/NetworkServicesManagerAPI/v1/tenant/tenant-uid/ |
1 This URL is also the "self" link for the service offering. |
Deleting Created Objects
If you no longer need an object, you can delete it. Deleting an object that contains other objects, such as a tenant or tenant network container, also deletes all child objects.
To delete created objects using a REST client, choose the DELETE request method, enter the appropriate URL (see Table 4-4), and click Send.
 Feedback