- Preface
- Supplemental License Agreement
- Installing the Product Software
- Running the Setup Program
- Configuring Cisco IOS CNS Agents
- Setting Up a Multizone System
- Setting Up a Multihomed System
- Scalability Among Event Gateway Ports
- Cisco CNS Configuration Engine SSL Security
- Installing the VMware
- Index
Cisco Configuration Engine Installation and Configuration Guide 3.5.4
Bias-Free Language
The documentation set for this product strives to use bias-free language. For the purposes of this documentation set, bias-free is defined as language that does not imply discrimination based on age, disability, gender, racial identity, ethnic identity, sexual orientation, socioeconomic status, and intersectionality. Exceptions may be present in the documentation due to language that is hardcoded in the user interfaces of the product software, language used based on RFP documentation, or language that is used by a referenced third-party product. Learn more about how Cisco is using Inclusive Language.
- Updated:
- April 10, 2014
Chapter: Cisco CNS Configuration Engine SSL Security
- CNS Agent and Configuration Engine Security
- CNS ID, Password Authorization, SSL Encryption
- SSL Host Communication Basics
- Four Steps to CNS SSL Communication
- Running SSL Encrypted Communication
- Cisco IOS v12.3(4)T Certificate Server
- Setting up the Cisco IOS Certificate Server
- Viewing the IOS Certificate Server Self-Signed (root) Certificate
- Sample Commands and Output
- OpenSSL Certificate Formats
- Troubleshooting CNS SSL Communications
- IOS SSL Device Troubleshooting
- CNS ID Syntax
- CNS ID Network Interface Value Lookups
- CNS ID Hardware Serial Number
- Viewing the Motherboard Hardware Serial Number
- View the CNS Image ID to Hardware-Serial
- CNS Configuration ID to Hardware-Serial
- Additional Information Sources
Cisco CNS Configuration Engine SSL Security
This chapter discusses the setup and configuration of 128-Bit Secure Sockets Layer (SSL) Encrypted Communications between CNS Agent Enabled Cisco IOS Devices and the Cisco CNS Configuration Engine.
This chapter contains the following sections:
- CNS Agent and Configuration Engine Security
- SSL Host Communication Basics
- Four Steps to CNS SSL Communication
- Running SSL Encrypted Communication
- Cisco IOS v12.3(4)T Certificate Server
- Setting up the Cisco IOS Certificate Server
- Viewing the IOS Certificate Server Self-Signed (root) Certificate
- Sample Commands and Output
- Troubleshooting CNS SSL Communications
- IOS SSL Device Troubleshooting
- CNS ID Syntax
CNS Agent and Configuration Engine Security
Security in communication between the Cisco Configuration Engine server and the enabled CNS agent devices (routers) involves three basic functions:
- Identification—Unique CNS agent ID. At a minimum, the CNS agent IDs are required for a device to communicate with the Cisco Configuration Engine server.
- Authentication—Unique CNS password. The Authentication feature consists of a CNS password that the CNS agents present to the Cisco Configuration Engine server as part of any communication handshake.
- Encryption—128-Bit SSL / Shared PKI SSL Trust point Certificates. Secure Sockets Layer (SSL) protocol. The Encryption feature consists of the industry standard Secure Sockets Layer (SSL) protocol, which protects communications between the CNS agent devices and the Cisco Configuration Engine server.
While device identification is mandatory, authorization and encryption are optional features. Of the two optional features, you can enable either or both of them at any time. Encryption does not require authentication, and authentication does not require encryption.
Each security feature is configured and handled separately by both the Cisco Configuration Engine server and the CNS agent devices.
CNS ID, Password Authorization, SSL Encryption
The CNS Configuration Engine has settings for CPE Device Identification, Authorization, and Encryption. Each of these features is configured and handled separately by both the CNS Configuration Engine and the CNS CPE Devices communicating with the CNS Configuration Engine.
The CPE Device CNS Agent IDs are required for a CNS Agent enabled CPE device to communicate with the CNS Configuration Engine server. The Authorization feature consists of a CNS Password that the CNS Agent enabled devices present to the CNS Server. If you choose Encryption, CNS Agent to CNS Configuration Engine communication negotiations takes place as the first of the communication sequence. Only when the SSL Encryption is successful, the CNS Identification and CNS Authentication protocols are passed. When you enable all the options on the CNS Configuration Engine Server, the options should be successfully passed by the CNS Agent CPE Devices or the device is not allowed to connect to the server for any purpose and will be rejected.
Identification
This is a mandatory setting. Each CNS Enabled CPE device (router) must have a unique ID assigned to it before it can start communication with the CNS Configuration Engine. You can configure several CNS agents on a single router. Each agent must have a unique ID assigned to it.
To configure CNS agent IDs on a CNS agent device, enter the following command, beginning in global configuration mode:
cns id string < unique string>
cns id string <unique string for event agent> event
cns id string <unique string for image agent> image
On the Cisco Configuration Engine server, when setting up a new device object through the user interface, the administrator must specify these CNS agent IDs. The Cisco Configuration Engine server will not accept any agent connection unless the CNS agent device and the IDs are already configured on the server.
Authentication
The Authentication feature consists of a CNS password that the CNS agent device presents to the Cisco Configuration Engine server as part of any communication handshake. The CNS password is used in two ways:
- It is assigned at the CNS Configuration Engine Server as a global one-time-use password which is known to the CNS Configuration Engine administrator.
- This one-time-use password is then also placed in the CNS Agent Enabled device’s configuration by the device administrator before the device attempts to connect to the CNS Configuration Engine Server.
On the CNS Configuration Engine web User Interface, the radio button under the Devices menu labeled Resync Device allows the administrator to reset any CPE Devices unique password as a global one-time-use password. Then, before the CNS agent device attempts to connect to the Cisco Configuration Engine server, the administrator must enter this one-time-use password in the CNS agent device configuration. If a device is out of sync with the server, it can be reset and the server will re-assign a new random value upon successful connection.
The following prompt in the CNS Configuration Engine Setup program sets the server to expect CNS Passwords from the CPE Devices:
Cisco IOS Devices are normally authenticated before being allowed to connect to the Event Gateway/Config Server. Disabling authentication will increase security risk.
During setup of the Cisco Configuration Engine server, the administrator must assign this CNS password as a global one-time-use password. Then, before the CNS agent device attempts to connect to the Cisco Configuration Engine server, the administrator must enter this one-time-use password in the CNS agent device configuration.
In the Cisco Configuration Engine server Setup program, authentication is enabled when you answer y at the “Enable authentication” prompt (see Authentication Settings). This configures the Cisco Configuration Engine server to expect the password from the CNS agent device. After authentication is enabled, the administrator must use the Cisco Configuration Engine user interface to reconfigure the actual password. You can set the password by using the CNS Configuration Engine web UI under the menu Tools > Security Mgr > BootStrap.
This password can be used for the initial CPE Device connections to the CNS Configuration Engine Server. After each CPE device has been identified and authenticated, the CNS Configuration Engine server generates the password and automatically assigns a random password for the CPE device.

Note The random cns password command has been intentionally hidden for additional security. You can use the cns password command to set or reset the initial password, but you cannot view the password value after it has been set.
To configure the CNS password on the CPE device, enter the following command, beginning in global configuration mode:
Encryption
The CNS communications between CNS Agent-enabled devices and the CNS Configuration Engine can be encrypted with 128-Bit SSL Protocol strong encryption. This brings all the benefits of the industry
standard Secure Sockets Layer Encryption Protocol to the communications between CNS Agent enabled
devices and the CNS Configuration Engine.
The CNS Configuration Engine Setup program prompts related to the SSL Encryption features are Shown below
SSL Host Communication Basics
To take part in SSL based communications, the hosts system should have the following:
- A common PKI Certificate Server (CS) / Certificate Authority (CA) that is trusted to sign and issue Digital Certificates to use with SSL (Trustpoint).
- Hostname
- DNS Server IP Address (Name Resolution)
- DNS Domain Name(Name Resolution)
- Date and Time zone Settings
- NTP Date and Time Updates
- SSL Trust Point Signed SSL Certificates.
Every host that takes part in SSL Communications needs to have an accurate date and time, along with some fundamental Host Name Resolution capabilities. They should have a strong encryption based Operating Systems to enable 128-Bit SSL Export Grade Encrypted communications.
Four Steps to CNS SSL Communication
Using the CNS Agent and CNS Configuration Engine, you can establish a trusted and encrypted communication channel between Cisco IOS devices and the CNS Configuration Engine by using the CNS Agent SSL Encryption feature. You can encrypt the transmission of all IOS Syslog Messages including Firewall and IDS Sensor traffic, Configuration Updates, Statistics Gathering, and Device Inventory over a single 128-Bit SSL Connection.
There are four basic steps to set up the SSL Communications between the CNS Agents and CNS Configuration Engine:
Step 1![]() Obtain the Server Self-Signed (root) Certificate. In the first part of the deployment the Certificate Authority (CA) must be setup and you should have a Self-Signed Certificate.
Obtain the Server Self-Signed (root) Certificate. In the first part of the deployment the Certificate Authority (CA) must be setup and you should have a Self-Signed Certificate.
Step 2![]() CNS Configuration Engine SSL Enrollment.
CNS Configuration Engine SSL Enrollment.
The CNS Configuration Engine needs to enroll and acquire its own unique SSL Certificate from the Cisco IOS CA Server. The CPE device checks the CNS Configuration Engine's SSL Certificate and the Root CA Signature against its own SSL Certificate in order to setup the SSL Connectivity. This enrollment is done over a File Copy or Terminal/Console cut and paste method.
Note In versions 1.3.2 and 1.4 of the CNS Configuration Engine there is no SCEP protocol enrollment client.
Step 3![]() Set the Cisco IOS Trustpoint.
Set the Cisco IOS Trustpoint.
Cisco CNS Agent CPE Devices only need a copy of the Root CA's Certificate self-signed certificate. This is simply known as Setting the Cisco IOS Trustpoint as they are not required to enroll for their own individual certificate. You can use the same Root CA's Self-Signed certificate for CNS Configuration Engine Server Certificate validation. This is similar to how PC web browsers work today.
Cisco CPE Devices are designed to primarily utilize the Cisco SCEP Enrollment Protocol to set the SSL Trustpoints or enroll a CPE Device for its own Certificate. The use of the SSL Protocol in Cisco Devices was introduced into Cisco IOS in 1999-2000 and the SCEP Protocol for Certificate Enrollment and related functions was developed in a joint venture by Cisco Systems Inc. and Verisign Inc.
On the CNS Configuration Engine re-run the Setup program to enable Encryption on the Server end. The CNS Agents in the CPE device(s) need to reconfigure the command to use the encrypt keyword.
Figure 7-1 CNS 128-Bit SSL Client & Server HandShake
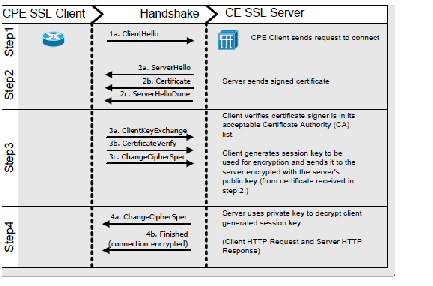
Running SSL Encrypted Communication
After setting up the encryption on the server end, the Cisco IOS Device and the CNS Configuration Engine are prepared to begin the SSL Encrypted Communications. Any CNS Agent inbound service connection which attempts to initiate the connection with the keyword encrypt in its IOS command will be encrypted over SSL.
Cisco IOS v12.3(4)T Certificate Server
Before you configure the CNS Configuration Engine or an SSL Cisco IOS Device getting any certificates or setting the device SSL trustpoints, you should setup the SSL Certificate Server (Trustpoint).
The Cisco IOS Certificate Server supports Simple Certificate Enrollment Protocol (SCEP) over HTTP as its primary Certificate enrollment protocol.
Today, Cisco IOS SSL Client Devices use the SCEP as their primary Certificate Server enrollment protocol to set their SSL Cisco IOS Trustpoints. The CNS Configuration Engine uses a manual enrollment (terminal write) to enroll and obtain its SSL Certificate from the Certificate Server as it does not support the SCEP protocol or other automated enrollment protocols.
Engine Certificate Enrollment IOS Command
For the CNS Configuration Engine Certificate Request, the following syntax on the Cisco IOS CS is required to have it accept the certificate request from a Terminal or Screen dump:
Cisco IOS Certificate Enrollment IOS Command
For the Cisco IOS CPE Device Certificate request by means of SCEP, use the following command:
crypto pki server {cs-label} request pkcs10 url {url}
The URL is the path that the Cisco IOS CPE Device uses to set its Trustpoint by means of SCEP.
Setting up the Cisco IOS Certificate Server
These are short version of IOS CS setup and configuration that you need to substitute with your own server name and issuer-name values. Further documentation covering the setup of the IOS Certificate Server in detail is available at Cisco.com.
Viewing the IOS Certificate Server Self-Signed (root) Certificate
To view the Certificate Authorities own (self-signed) SSL Certificate on your IOS Certificate Server, use the command below. This is the Certificate that will be digitally signed and authenticate all of the SSL Certificates issued by this Certificate Authority.
Show Crypto CA Certificate
The following example shows how the crypto ca certificate command is used at the router prompt.
Show Crypto PKI Server
The following example shows how the crypto pki server command is used at the router prompt.
IOS Certificate Server Enrollment
This section describes the IOS certificate server enrollment procedure.
Certificate Enrollment using SCEP Protocol
SCEP is the recommended method of Certificate Enrollment for all Cisco IOS Devices. An example of IOS client configuration for SCEP enrollment is shown below:
Certificate Enrollment using Terminal Copy and Paste
The command line enrollment requires access to the IOS command. The certificate request and reply both will be issued on the console session screen and not saved to any file. The issued results can simply be copied to file as text and saved for use in the CNS Configuration Engine. To obtain a certificate, use the following command:
The following example shows how to use a certificate request for a CNS Configuration Engine:
Note Your certificate request can have PEM headers and footers.
Note if a PEM formated certificate is expected manually add the following PEM headers:
Crypto Key and SSL Certificate Request Creation
The following steps will describe you the basics of RSA Key generation and SSL Certificate Request Generation on the CNS CE. The generated certificate is referred to as the Certificate Signing Request and is used to apply for a valid signed SSL Certificate from your Certificate Authority in return.
Logon to the Console or Terminal of your CNS Configuration Engine and enter the commands in the order they are presented here.
Note You have to substitute the sample filenames with your own actual filenames as required. The output listed here is actual OpenSSL output created in a test environment and your actual output data can vary slightly. In the following text, both the command input and any output generated is listed as captured on the screen. Make sure that the CNS Configuration Engine is installed and setup with the network TCP/IP connectivity.
Generating RSA Keys
Log into CNS Configuration Engine Console or Terminal, enter the following commands in order to generate an RSA Keypair and a Certificate Signing Request:
Changing the File Ownership rights of the RSA keys
To change the files ownership rights of the RSA keys, use the following command.
Generating an SSL Certificate Signing Request
To generate an SSL Certificate Signing request, use the following command.
After you complete the above steps, create a v2.0 Privacy Enhanced Mail (PEM) formatted SSL Certificate Signing Request on the local CNS Configuration Engine file system. The SSL Certificate should be signed by your Certificate Server/Authority. The server.csr file can now be transferred to the certificate authority for signing.
The following example shows the unformatted file.
“-----BEGIN CERTIFICATE REQUEST-----” and “-----END
CERTIFICATE REQUEST-----” header and footer text on a line each by themselves.
Certificate Request Digitally Signed and Issued
Copy the SSL Certificate Request server.csr file to your Certificate Server and submit it for signing by the CS/CA. The CS/CA Administrator will verify the CNS Configuration Engine Certificate Request with the CS/CA’s Root Certificate according to their policy and return the signed/valid SSL Certificate to you as a ‘server.cer’ file in a Privacy Enhanced Mail (PEM) format. After you receive the certificate, copy or place the signed Certificate in you preferred directory location on the CNS Configuration Engine or on an external FTP Server that has IP FTP Client connectivity access.
Viewing the CNS Configuration Engine Certificate Contents
To view the CNS Configuration Engine Certificate contents, run the following command on the CNS Configuration Engine console (as root). In the output, you should look at the serial: number:
Preview the Issued SSL Certificate
After you copy the CNS Configuration Engine Certificate onto the CNS Configuration Engine, to preview the signed contents of the CNS Configuration Engine Certificate, use the following OpenSSL command on the Certificate server.cer file.
root@opus root]# openssl x509 -noout -text -in /root/server.cer
CNS Configuration Engine Certificate Request
This is an example of keys and a certificate request on a test CNS Configuration Engine. You can create a certificate request on your CNS Configuration Engine (*.csr) and the CA signs the certificate and sends you back a valid certificate (*.cer).
Enabling SSL in the Configuration Engine
Log into the CNS Configuration Engine Console or Terminal as root, run the CNS Configuration Engine Setup program a nd entering the command Setup. This allows you to make changes to the CNS Configuration Engine Setup encryption settings, and only apply those changes you have made. In this case you will be enabling SSL on that host and identifying the key and certificate locations.
Sample CNS Configuration Engine Setup for SSL
The following example shows the screen from my SSL enabled CNS Configuration Engine Setup:
Setting the Cisco IOS SSL Trustpoint
In Cisco IOS you can set the trustpoint over a network by using the SCEP, or you can screen dump it by using the 'terminal' option. To paste it over a terminal, it needs to be in a specific format (encoded). It should be in Base-64 encoded format for the terminal entry method.
CPE SSL Trustpoint Using SCEP
The following example shows how to obtain the Trustpoint by using the SCEP Protocol method.
CPE SSL Trustpoint Using Terminal Copy/Paste
The following example shows how to set the trustpoint over the console by using a terminal session.
Show Crypto CA Trustpoint IOS Command
The following example shows how to get the following output, and the key field in this example is the Serial Number.
PEM
This is the default format used by OpenSSL and the only format usable by CNS Configuration Engine v1.4 and earlier. This format can contain all the private keys (RSA and DSA), public keys (RSA and DSA) and (x509) certificates. PEM stores the data in Base64 encoded DER format, surrounded by ascii headers, so this format is suitable for text mode transfers between systems.
DER
DER format can contain all the private keys, public keys and certificates. DER stores according to the ASN1 DER format. It is the default format for most browsers.
PKCS#12
PKCS#12 is also known as PFX files. They can contain all the private keys, public keys and certificates.It stores the data in a binary format.
For more information see http://www.drh-consultancy.demon.co.uk/pkcs12faq.html/.
Converting Certificate Formats with OpenSSL
This section describes the procedure to convert the certificate formats with the OpenSSL tools. For more information refer the OpenSSL documentation.
OpenSSL From PEM/DER to DER/PEM
The following example shows how to convert OpenSSL from PEM/DER to DER/PEMPKCS#12.
Troubleshooting CNS SSL Communications
To view the issued CNS Config Engine certificate contents n the CNS Configuration Engine, run the following OpenSSL command. This sample is taken from a real certificate issued by a IOS CS/CA in our lab. The key value to note here is the “Serial Number:” hex string, which denotes the serial number of the issued certificate.
Debug Dump of SSL Transactions
To view the debug output of the SSL Transactions, use the following commands. The SSL Dump program is part of OpenSSL toolkit and can help in the process of SSL trustpoint setting and sharing.
IOS SSL Device Troubleshooting
The following debug and show commands are available on most of the IOS CPE’s that support the SSL Security Layer. These commands can provided the operator all the information they may need to help debug a SSL Client trustpoint setup in the CPE device.
Show Crypto Key Pubkey-Chain RSA Command
The following example shows the output of what a Trustpoint certificate public key looks like in the IOS Device:
Show Crytpo CA Trustpoint
The following example shows the output of a IOS SSL Trustpoint certificate contents and signature looks like in the IOS Device:
Show Crypto CA Certificate
The following example shows the output of the IOS “show crypto ca cert” contents look like in the IOS Device:
CNS ID Network Interface Value Lookups
The following example shows the output of the CNS ID network interface value:
CNS ID Hardware Serial Number
The following example shows the output of the CNS ID hardware serial number:
Viewing the Motherboard Hardware Serial Number
The following example shows the output of the motherboard hardware serial number:
This product contains cryptographic features and is subject to United States and local country laws governing import, export, transfer and use. Delivery of Cisco cryptographic products does not imply third-party authority to import, export, distribute or use encryption. Importers, exporters, distributors and users are responsible for compliance with U.S. and local country laws. By using this product you agree to comply with applicable laws and regulations. If you are unable to comply with U.S. and local laws, return this product immediately.
A summary of U.S. laws governing Cisco cryptographic products may be found at: http://www.cisco.com/wwl/export/crypto/tool/stqrg.html
View the CNS Image ID to Hardware-Serial
The following example shows the output of the CNS Image to hardware-serial:
CNS Configuration ID to Hardware-Serial
The following example shows the output of the CNS configuration id to hardware-serial:
Note The hardware-serial ID is what is listed in the 'show version' command and is retrieved internally by the CNS Agents from the device’s motherboard. This may or may not be the same alpha-numeric string as the serial-number printed on the chassis of your particular Cisco IOS Device.
Cisco IOS Certificate Server
For more information on Cisco IOS certificate server, see the document at:
http://www.cisco.com/en/US/products/sw/iosswrel/ps5207/products_feature_guide09186a00801d1cb0.html.
Certificate Server Data Sheet
For more information on certificate server data sheet, see the technical document at:
http://www.cisco.com/en/US/tech/tk583/tk372/tech_brief09186a00801e05dc.html.
Cisco IOS Software Releases 12.3 T / Security Commands
For more information on Cisco IOS software releases and security commands, see the command reference document at:
http://www.cisco.com/en/US/products/sw/iosswrel/ps5207/products_command_reference_chapter09186a00801a7f81.html.
SSL Public Key Infrastructure
For more information on SSL public key infrastructure, see the white paper at:
http://www.cisco.com/en/US/tech/tk583/tk618/technologies_white_paper09186a0080179739.shtml.
Certificate Security Attribute-Based Access Control
For more information on certificate security attribute-based access control, see the document at:
http://www.cisco.com/en/US/products/sw/iosswrel/ps1839/products_feature_guide09186a00801541ce.html.
Cisco IOS Certificate Server Data Sheet
For more information on Cisco IOS certificate server data sheet, see the document at
http://www.cisco.com/en/US/tech/tk583/tk372/tech_brief09186a00801e05dc.html.
http://www.cisco.com/warp/public/cc/pd/iosw/prodlit/certs_ds.pdf.
Cisco IOS Certificate Server and Software Releases 12.3 T
For more information on Cisco IOS server and software releases 12.4, see the document at
http://www.cisco.com/en/US/products/sw/iosswrel/ps5207/products_feature_guide09186a00801d1cb0.html.
Trusted Root Certification Authority
For more information on trusted rooted certificate authority, see the document at:
http://www.cisco.com/en/US/products/sw/iosswrel/ps1834/products_feature_guide09186a008007fecf.html.
Online Certificate Status Protocol
For more information on online certificate status protocol, see the document at:
http://www.cisco.com/en/US/products/sw/iosswrel/ps5207/products_feature_guide09186a00801a755b.html.
Cisco's SCEP Home Page
For more information on SCEP home page, refer the document at:
http://www.cisco.com/warp/public/cc/pd/sqsw/tech/scep_wp.html.
CISCO IOS Software Releases 12.3 T
For more information on Cisco IOS software releases 12.3 T and RSA Key pair, see the document at:
http://www.cisco.com/en/US/products/sw/iosswrel/ps5207/products_feature_guide09186a00801d1cb4.html.
Trustpoint Command
For more information on trustpoint commands, see the document at:
http://www.cisco.com/univercd/cc/td/doc/product/software/ios122/122newft/122t/122t8/fttrust.htm.
Certificate Enrollment Enhancements
For more information on certificate enrollment enhancements, see the document at:
http://www.cisco.com/univercd/cc/td/doc/product/software/ios122/122newft/122t/122t8/ftenrol2.htm.
Configuring Crypto Maps
For more information on configuring crypto maps for DN-based access control, see the document at:
Multiple RSA Key Pair Support
For more information on multiple RSA key pair support, see the document at:
http://www.cisco.com/univercd/cc/td/doc/product/software/ios122/122newft/122t/122t8/ftmltkey.htm -42193.
Simple Certificate Enrollment Protocol:
For more information on simple certificate enrollment protocol, see the document at:
http://www.cisco.com/warp/public/cc/pd/sqsw/tech/scep_wp.htm.
Public Domain OpenSSL
For more information on OpenSSL, see http://www.openssl.org.
 Feedback